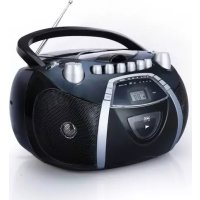
MS 1031 - Hi-fi system SEG - Free user manual and instructions
Find the device manual for free MS 1031 SEG in PDF.
| Product type | Hi-Fi system |
| Brand | SEG |
| Model | MS 1031 |
| Power supply | AC 230 V, 50 Hz |
| Output power | 2 × 4.5 W |
| Radio frequency range | FM 87.5 – 108 MHz |
| CD player | CD, CD-R, CD-RW, MP3, WMA |
| USB memory / SD card | USB 1.1/2.0, SD/MMC/SDHC up to 32 GB |
| Remote control battery | CR2032, 3 V |
| Headphone jack | Stereo 3.5 mm, 8 – 32 Ω |
| Auxiliary input | LINE IN (3.5 mm jack) |
| Antenna | Unwindable FM wire |
| Main functions | FM radio, CD/MP3/WMA player, USB/SD, AUX, clock, timer, sleep, programming, repeat, random, equalizer, ID3 |
| Safety | Double insulation, laser class 1, mains plug circuit breaker |
| Cleaning | Soft, slightly damp cloth, without solvent |
| Dimensions (approx.) | 260 × 150 × 200 mm |
Frequently Asked Questions - MS 1031 SEG
User questions about MS 1031 SEG
0 question about this device. Answer the ones you know or ask your own.
Ask a new question about this device
Download the instructions for your Hi-fi system in PDF format for free! Find your manual MS 1031 - SEG and take your electronic device back in hand. On this page are published all the documents necessary for the use of your device. MS 1031 by SEG.
USER MANUAL MS 1031 SEG
This product is designed to operate from a 230 Volt, 50Hz AC mains supply. Other power sources may damage it. check that the rating label of the product states 230V AC before you plug it in for the first time.
SYMBOLS

This apparatus is double insulted and an earth connection is not required.

Dangerous voltage constituting a risk of electric shock is present inside this apparatus

This mark is applied to show the apparatus conforms to European safety and electromagnetic compatibility standards

There are important operating and maintenance instruction is the literature accompanying the apparatus.
Safety Instructions and Important Information About Intended Use
Please read the following instructions and safety notes thoroughly before starting to use your product!
Intended Use: this micro system has been designed for playing back audio files and reception of Radio broadcast. If the product is not used according to the instructions, the user's and other persons' safety is not guaranteed and the warranty will be void.
User manual: please read this User Manual thoroughly and keep it for any future reference in a safe place. For your own safety and in order to familiarize yourself with the different functions of the product, please follow the instructions in this manual carefully.
When passing this product to other persons, please also hand over this User Manual.
Please also read the user manuals of all devices that you are going to connect to this device.
- Connecting to the Power Supply: do not use the device if the device or its cables present visible damage.
Connect the device only to the voltage indicated on the corresponding label on
the product or AC adapter, resp. Never connect the device to a different voltage.
Connect the device to grounded power outlets that comply with the
corresponding safety standards only. Do not bend or squeeze the cables.
WARNING: Inside the device there is dangerous voltage. Never open the
housing of the device: there is risk of personal injury by electric shock.
In order to completely disconnect the device from the mains, the power plug must be pulled out from the wall outlet. Always pull the power cord from the plug and never from the cable itself. Electric storms may damage any electric equipment; therefore disconnect the power plug from the wall outlet during a thunderstorm. It is also recommended to disconnect the device from the mains and to remove any batteries when you are intending not to use the device for a longer time.
Objects inside the device: make sure that no foreign objects or liquids enter the device via the ventilation holes or other openings. There is risk of electric shock, damage to the device and short-circuit. In case of any emergency, immediately pull the power plug and contact a qualified service technician.
Laser product: CD-products employ a laser system (Class 1 Laser). To ensure proper use of this product please read this owner's manual carefully and retain for future reference. There is laser radiation inside the device. Laser radiation can damage your eyes permanently. To prevent direct exposure to the laser beam, do not try to open the enclosure. Never attempt to repair the device.
Hazardous laser radiation when open and interlock failed or defeated.
DANGER: do not expose yourself to the laser beam!
Installation: place the device onto a flat and even surface. Never cover the ventilation holes of the device and make sure that the air can easily flow around the device (keep at least 10cm / 4 inch space on the back and sides).
The device has anti-skid rubber feet. Over the long-term, these feet can dissolve due to chemical substances. It is recommended that you place the device on an anti-skid surface.
WARNING: do not use this device outdoors!
Condensation: when bringing this device from a cold to a warm environment
(e.g. after transportation) moisture can condensate inside the device. In order to protect the device from damage and failure wait at least 2 hours prior to using the device.
Health injury: extremely high audio volumes can damage your hearing
permanently. Therefore carefully adjust the volume.
Connect the headphones or earphones (If this option is available on your model)
to the device prior to powering it on, as connecting it when already powered on can produce high sound levels causing damage to your hearing.
Children: Do not allow children to play with electrical devices. Children may not be able to comprehend the presence of potential risks.
Batteries: Keep batteries away from children.
Always replace all the batteries at the same time (never mix old and new batteries). Do not short-circuit any batteries. There is risk of explosion when misusing the batteries.
- Do not place any objects on the device and never apply any pressure onto the housing or the display. Do not place any recipients containing liquids (beverages, vases, etc.) onto or next to the device. Do not place any fire sources (such as candles) onto the device. This could damage the product.
Environmental effects: Keep the device away from any heat sources (heating equipment, ovens, cooking places, candlelight, etc.), direct sun radiation, dirt, dust, vibrations, strong magnetic fields, moisture and rain. - Cleaning: Disconnect from the mains supply. Clean the device with a soft, slightly moistened cloth. Do not use any chemicals, alcohol or solvents for cleaning. The finish of the device can be damaged by using these substances. Always make sure that no moisture enters the device.
Servicing: when using the device according to the operating instructions, no special service or maintenance is required. In case of any loss of performance or other malfunction, contact a qualified service technician.
Repairs: never open the device! Any repairs must be performed by authorized technicians or service personnel. Any unauthorised opening or modification will void the warranty and also the safety of the product may be altered. WARNING: Inside the device there is dangerous voltage. Never open the housing of the device: there is risk of personal injury by electric shock.
Environment
Old batteries do not belong in with the domestic waste!

Consumers are obliged by law to return any old batteries and rechargeable batteries to the corresponding local and/or public collection centres or to return them to the retail shops. This ensures that batteries will be disposed of respecting the environment.
Make sure to return any batteries and rechargeable batteries discharged.
Disposal of old electric and electronic devices:

The icon of a dashed-out waste bin means that a separate disposal of electric/electronic equipment is necessary.
According to the Legislation of the European Union, any electric and electronic devices may not be disposed of with domestic trash but must be returned to a special collection center enabled for the recycling of these devices. The local waste companies should have set up specific collecting centres for this purpose, allowing private consumers to return any old devices for free. Please contact your local authorities or the local waste company for the available disposal possibilities.
Please support us actively by protecting the environment and recycle this product accordingly by returning it to a specific collection centre. This will protect the environment, other people and yourself. Thank you very much!
Disposal of Packaging and Packaging Materials:
Packaging and any packaging materials do not belong in with the domestic waste! Your system consists of materials which can be recycled and reused if disassembled by a specialized company. Please observe the local regulations regarding the disposal of packaging materials.
Handling compact discs
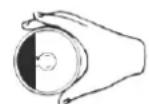
The unit has been designed to play compact discs bearing the identification logo shown at the left. No other discs can be played.
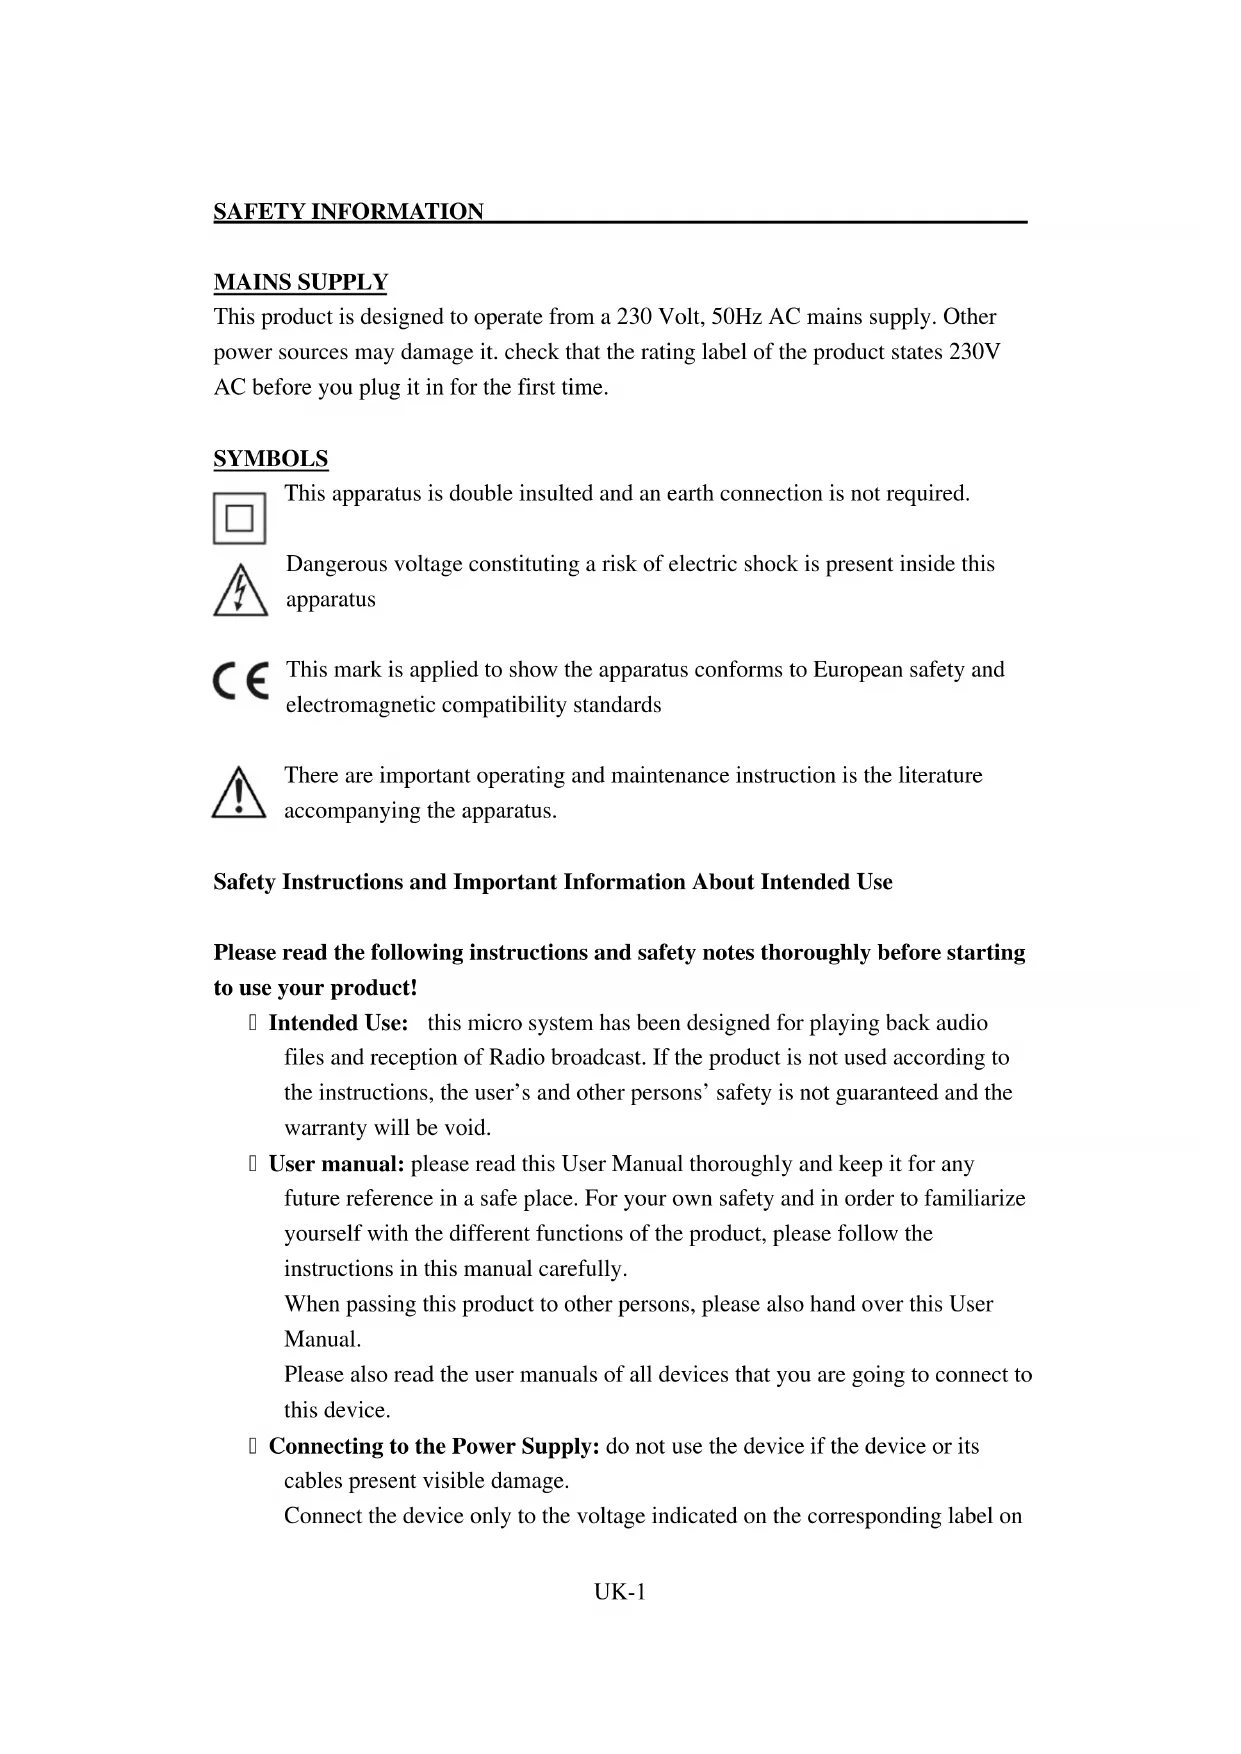
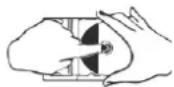
- Open a disc case by holding the bottom left and right side with the right hand, and then lifting the top cover with the left hand.
- Press down on the center of the case and lift the disc out carefully.
- Hold by the edges without touching the recoding surface.

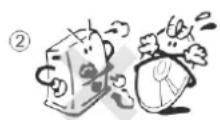
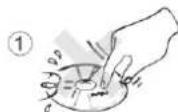
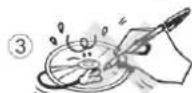
- Foreign objects, dust and finger prints should be carefully wiped off in a straight motion from the inside to the out side of the recorded side of the disc with a soft cloth before use.
- Do not expose disc to direct sunlight, heating implements and high temperatures.
- Do not bend the disc.
①

2
3
Serious scratches should cause the laser pickup to skip.
-
Do not attempt to widen the center hole in the disc. It will result in damage to the disc.
-
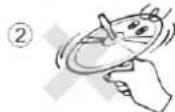
Do not writ anything with a ballpoint pen pencil on the disc surface.

-
Never use chemical such as record sprays, antistatic sprays or fluid, benzine or thinner to clean compact discs. Such chemicals would irreparably damage the disc's plastic surface.
-
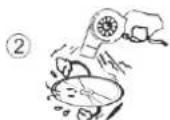
If a disc is suddenly removed from a cold to hot area. It will not play due to moisture on the disc surface. So wipe off with a soft cloth. Do not ue a hair drye to dry moisture on discs
-
Remove the CD from the Disc tray of your unit, if it is not going to be used for a long period.
-
Keep the disc in a disc case when storing.
Do not store the where it may be exposed to: -
Direct sunlight for a long time.
- High temperatures from heating elements
- high humidity

MS 1031
INSTRUCTIONMANUAL
Please this instruction manual carefully and familiarize yourself you're your new HiFi System before using it for the first time. Please retain this manual for future reference.
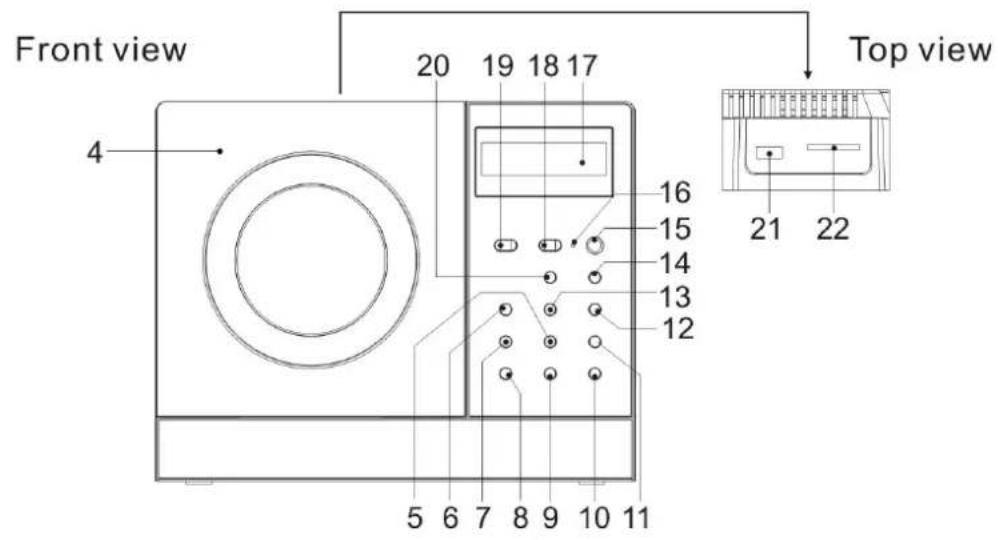
LOCATION OF CONTROLS
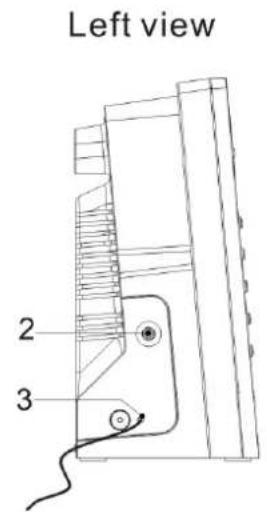
- SPEAKER
- LINE IN JACK
- FM ANTENNA
4.CD DOOR - PRESET/FOLDER DOWN BUTTON
- FUNCTION BUTTON
- MEM/C-ADJ.BUTION
- TIMER BUTTON
- VOLUME "+" BUTTON
- VOLUME " -" BUTTON
- PRESET/FOLDER UP BUTTON
- SKIP/TUNE SEARCH UP BUTTON
- SKIP/TUNE SEARCH DOWN BUTTON
- PLAY/PAUSE BUTTON
15.IR SENSOR
16.STANDBY LED INDICATOR
17.LCD DISPLAY
18.STANDBY/ON BUTTON - OPEN/CLOSE BUTTON
20.STOP BUTTON
21.USB DEVICE IN PORT
22.SD/MMC MEMORY CARD IN SLOT
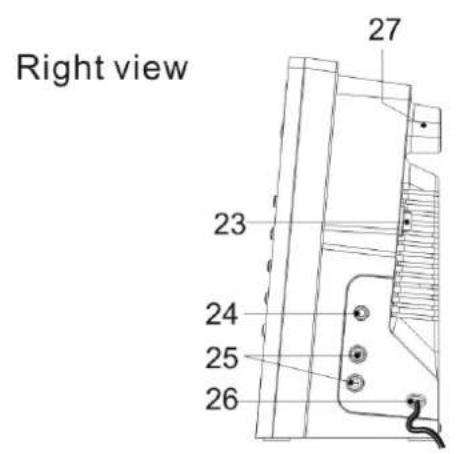
23.AC POWER MAIN SWITCH
24.HEADPHONES JACK
25.SPEAKER OUT (L & R) JACK
26.AC CORD
27.HITCHING HOLE
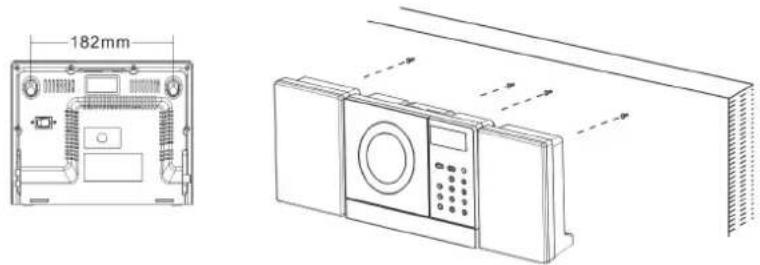
Fix the two nails (Size:3.5*25BA) into the wall and they should parallel each other. (The distance between the two nails should be 182mm )
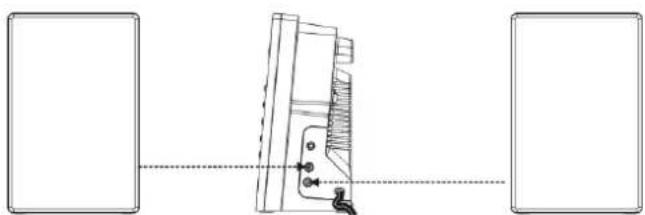
SPEAKERS CONNECTION
Max connection distance is 2 metres
CONNECTING TO THE POWER
Before switching on make sure that the voltage of your electricity supply is the same as that indicated on the rating plate.
For your own safety read the following instruction carefully before attempting to connect this unit to the mains.
This unit is designed to operate on AC 230V 50Hz current only. Connecting it to other power source may damage the unit.
Caution
To prevent electric shock disconnect from the mains before removing cover, no user serviceable parts inside. Refer servicing to qualified service personnel.
Safety Precaution
Do not allow this unit to be exposed to rain or moisture.
Mains supply: AC 230V / 50Hz - AC only.

This symbol means that this unit is double insulated. An earth connection is not required.
POWER SUPPLY
Remove the stereo carefully from the box, retaining the packaging for future use.
Read these instruction carefully before use.
Connections
Connect the speaker to the speaker out (L&R) JACK on the right of the unit (25).
Connect the right speaker to the right terminal and the left speaker to the left terminal.
Connect the main lead to an AC outlet. Check that your main supply is 230V 50Hz
Extend the FM antenna on the rear of the unit (3).
AC power operation - Main switch
Select ON with the main power switch (23) to power the unit.
Select OFF with the main power switch (23) to switch off power.
Disconnect the power cord from the mains if the unit is not going to be used for sometime.
REMOTE COTROL
- STANDBY/ON BUTTON
- ID3/MO./ST.BUTION
- OPEN/CLOSE BUTTON
- TIMER BUTTON
- FUNCTION BUTTON
- MEM/C-ADJ. BUTTON
- SLEEP BUTTON
- SKIP/TUNE SEARCH DOWN BUTTON
- INTRO BUTTON
10.EQ BUTTON
11.REPEAT BUTTON
12.MUTE BUTTON
13.VOLUME“-”BUTTON
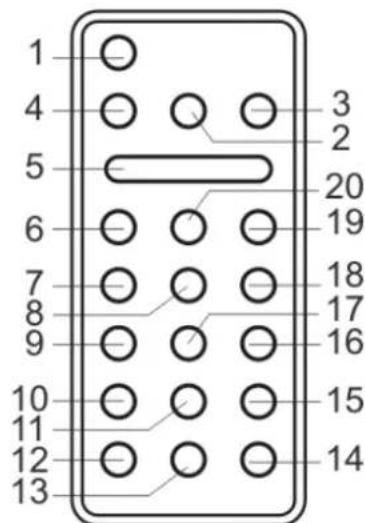
14.VOLUME“+”BUTTON
15.RANDOM BUTTON
16.PRESET/FOLDER UP BUTTON
17.PRESET/FOLDERDOWNBUTTON
18.SKIP/TUNE SEARCH UP BUTTON
19.PLAY/PAUSE BUTTON
20.STOP BUTTON
Remote control
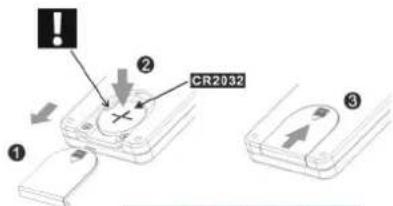
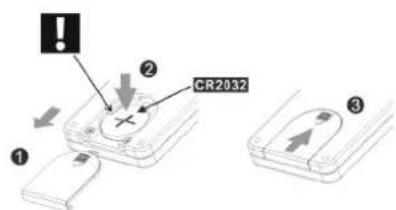
- Remove the plastic tab from the battery compartment at the rear of the remote
control. Pull it gently
Replace a used battery.
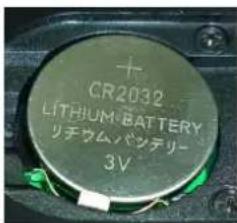
- Open the battery compartment and insert one battery of the type CR 2032 (Fig.1).
- Pay attention to the positive (+) is facing up and the battery must be placed under the tab.
- Close the battery compartment. Make sure that the cover is locked in place.
BATTERY REPLACEMENT
When the battery become too weak, the operating distance of the remote controller is greatly reduced and you will need to replace the battery
Notes: To maintain the accuracy and long life of the transmitter, do not press two or more buttons simultaneously
If the remote control is not to be used for a long time, remove the batteries to prevent possible damage through leaking batteries.
USING THE REMOTE CONTROLLER CORRECTLY
Point the remote controller at the remote sensor (15)
The functions of the button on the remote control are the same as the corresponding controls on the main unit.
When there is a strong ambient light source, the performance of the infrared remote sensor may be degraded, causing unreliable operation.
The maximum effective distance of remote control operation is about 5 metres (16.5 feet).
In the STANDBY mode:
- Press and hold the MEM/C-ADJ. button (7) until the time display changes to 12-hour (or 24-hour) digit and will flash.
- Press the SKIP/TUNE SEARCH (UP or DOWN) button (12, 13) to adjust 12-hour or 24-hour digit.
- Press the MEM/C-ADJ. button (7) again, the HOUR digit will flash on the display, press the SKIP/TUNE SEARCH (UP or DOWN) button to adjust HOUR digit.
- Press the MEM/C-ADJ. button once more, the MINUTE digit will flash on the display, press the SKIP/TUNE SEARCH (UP or DOWN) button to adjust MINUTE digit.
- Press the MEM/C-ADJ. button again to confirm the time.
- Each state as shown above will be cleared if the key is not pushed in 10 seconds
TIMER SETTING
During in the STANDBY OFF/ON mode.
- After adjusting clock, press the TIMER button on the unit (8) or the remote control (3) for a few seconds, "ON" and "00:00" appears on the display and the HOUR digit flashes.(F1)
- Press the SKIP/TUNE SEARCH (UP or DOWN) button (12,13) to adjust it.
- Press the TIMER button again, the MINUTE digit will start flashing, adjust it by pressing the SKIP/TUNE SEARCH (UP or DOWN) button.
- Press the TIMER button once more to confirm and order TIMER ON time.
- After adjusting "TIMER ON", "OFF" appears on the display and the HOUR digit flashes.(F2)
- Repeat the above steps 2 to 3, and then press the TIMER button once more to confirm and order TIMER OFF time.
- Now the "TUNER" appears on the display with flashing, adjust "TUNER, CD, USB or SD CARD" by pressing the SKIP/TUNER SEARCH (UP or DOWN) button.
- Press the TIMER button again, the timer "VOL" indicator appears on the display and flashes, adjust the timer volume high or low by pressing the SKIP/TUNE SEARCH(UP or DOWN) button.
-
Each enable state as shown above will be cleared if the button is not pushed in 10seconds.
-
After adjusting "TIMER ON" and "TIMER OFF", press the TIMER button, "③" appears on the display.
- The unit will be switched on automatically at "TIMER ON" order and start playing, the unit will be switched off automatically at "TIMER OFF" order.
Note: If the display shows "ERROR" while you set the "TIMER ON" it means both "TIMER ON" and "TIMER OFF" to set the off time first.

EO CONTROL
EQ shows the present sound tone. When you press the EQ button, the sound tone changes as below:

SLEEP FUNCTION (BY REMOTE CONTROL)
- If you want to fall asleep to music, press the SLEEP button.
- You may select the TUNER, CD/MP3, USB, SD/MMC, or AUX mode in sleep function to play from 90, 80, 70 up to 10 minutes of music before shutting itself off automatically

FUNCTION SELECT
Press the FUNCTION button (6) on the unit or on the remote control(5) to select the desired. Display changes as below:

Operation
- Select ON with the Main Power Switch (23) on the rear of the unit.
- Press the STANDBY/ON Button on the unit (18) or the remote control (1) to turn the unit on.
- Select the TUNER function with the FUNCTION Button on the unit (6) or on the remote control (5).
- There are a number of ways that you can tune to radio stations.
- Follow the instructions in the sections below.
- Adjust the VOLUME to the desired level using the VOLUME-/+Button(9,10) or the VOLUME-/+Buttons(13,14) on the remote control.
- To turn off the radio, press the STANDBY Button again
Manual Tuning
Manual Tuning Manual tuning is useful when you already know the frequency of the desired transmitter. Select the desired frequency band using the Band button.
To change the frequency, repeatedly press the TUNING up or down buttons until the precise frequency is reached.
Automatic Tuning
Press and hold the TUNING up or down Buttons for about a second.
The radio will start automatically scanning for strong radio signals. The TUNER Display shows the frequency in MHz for FM,
The tuner will stop scanning when it finds a strong signal.
Repeat this process until the desired station is found.
Notes: As automatic tuning depends on the signal strength of the transmitters, weak transmitters are sometimes skipped. In such a case, tuner manually to find the weaker transmitters. On the other hand, with a very strong signal, the tuner may stop before it reaches the optimum setting. Tune manually for the best reception.
Storing Stations
This unit allows you to store the frequencies of up to 30 radio stations (30xFM) in the memory; First tune into the station you want to store using one of the methods above. Then press the MEM/C-ADJ. button(7) on the unit or on the remote control(6).
Press PRESET/FOLDER-UP or PRESET/FOLDER-DN Buttons on the unit (5,11) or on the remote control (16,17) to select the desired channel memory and press the MEM/C-ADJ. button within 5 seconds to store it.
To reprogram a preset station repeat the procedure above.
Selecting a preset station
To select a preset station, press the PRESET/FOLDER-UP or PRESET/FOLDER-DN Buttons on the unit(5,11) or on the remote control(16,17) until the desired preset program is displayed.
FM Stereo Reception
When an FM signal is tuned in, the (((ST.))) indicator will appear in the display. In case of noisy reception, if you push the ID3/FMMONO-STEREO button on the remote control (2) to FM MONO position, the FM STEREO indicator will turn off & switch to MONO FM status
Antenna
For FM reception there is a wire antenna (3) at the rear of the unit. Extend it for best reception.
Select ON with the Main Power Switch (23) on the rear of the unit.
Press the STANDBY/ON Button on the unit (18) or the remote control (1) to turn the unit on.
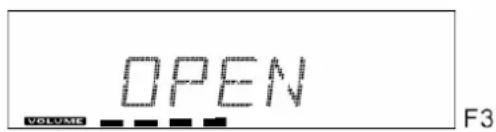
Select the CD function with the FUNCTION Button on the unit (6) or on the remote control (5). Press the CD door open/close button (19) to open the CD compartment.
When the disc compartment has opened, remove a disc from its case and place it carefully in the compartment with the label side facing up. Locate smaller, 3" discs, on the central spindle in the compartment
Close the disc compartment by pressing CD door open/close button (19).
When the compartment is fully closed, the disc will start turning automatically. The total number of tracks and the total playing time of the CD will appear on the display (17).
The disc compartment may be opened at any time by pressing the CD door open/close button (19). Remove the CD only after the compartment has fully opened.
Caution
Do not put any thing except a compact disc into the compartment. Foreign objects can damage the mechanism. Keep the disc compartment closed when not in use to prevent
dirt and dust from entering the mechanism.
Never place more than one disc into the disc compartment at any time.
If the disc is correctly loaded, the following information will be displayed:
Total number of tracks on the disc Total playing time
Notes: After the disc compartment is fully closed, the disc information may not appear on the display. This means that the disc is improperly loaded (most likely it is upside down). To check, open the disc compartment again and reload the disc.
DISC PLAY
Press the CD door button (4) to open the disc compartment, and insert a CD.
Close the disc compartment by pressing the CD Cover.
Press the PLAY/PAUSE button (14) on the unit or (19) on the remote control. Disc play will begin from the start of the first track of the disc.
Notes: If the disc is deeply scratched, or too dirty, disc play may not start. If an improperly centred disc is played, noise can be heard in the mechanism. The use of such discs should be avoided.
Disc Errors
This compact disc player has built-in error compensation circuits to correct for minor defects in a disc.
There are limits, however, to the amount of corrections possible.
In some cases, the CD player may skip some tracks, or parts of tracks, on a disc during disc play. This problem may be caused by defects (such as scratches) in the disc being played, which are too large for the error compensation circuits to handle. If you encounter this problem, check the CD player's operation as follows, before having the unit serviced:
Play a new disc. If the CD player operates normally, the skipping problem is probably due to a defective disc.
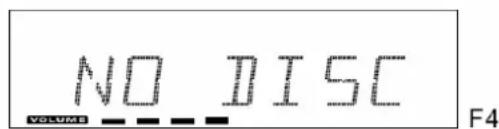
A) In the CD mode
- This unit can play CD,CD-R,CD-RW and MP3 discs.
- If no disc or can't read TOC, NO DISC will be displayed (F4)
Playing the entire CD/MP3
- Insert the CD disc into the CD compartment, the main unit will automatically
read the total number of the folders and tracks at the same time.
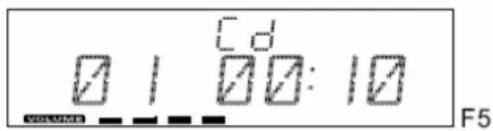
- Press the PLAY/PAUSE button, the unit will play the first track of the CD disc automatically.(F5)
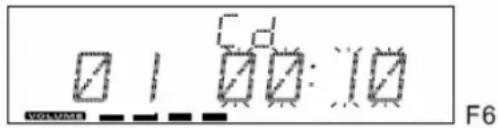
- Press the PLAY/PAUSE button once again, the time elapsed indicator will flash.(F6)
- Press SKIP/TUNERSEARCH (UP or DOWN) button once to change Track NO., press and hold the SKIP/TUNERSEARCH(UP or DOWN) button once to skip fast forward or backward of each song.
- To resume playback, press the PLAY/PAUSE button once more again.
- To stop playback, press the STOP button once on the unit (or remote control).
B) MP3/WMA
1.Insert the MP3/WMA disc into the CD compartment, the main unit will automatically read the total number of the folders and tracks at the same time.
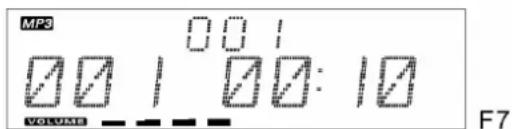
2. Press the PLAY/PAUSE button, the unit will play the first track of the CD disc automatically.(F7)
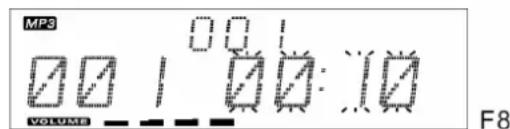
3. Press the PLAY/PAUSE button once again, the time elapsed indicator will flash.(F8)
4. To change Track NO., Press SKIP/TUNE SEARCH(UP or DOWN) button once. Press and hold the SKIP/TUNE SEARCH(UP or DOWN) button once to skip fast forward or backward each song.
5. To resume playback, press the PLAY/PAUSE button once more again.
6. To change the ALBUM NO., press the PRESET/FOLDER UP or PRESET/FOLDER DN once.
7. To stop playback, press the STOP button once on the unit (or remote control)
Note: If the main unit is not working properly, disconnect the power source and then reconnect it again
ID3 Operation
- Press the ID3 button once to open the ID3 function.
- If the mp3 file is write in "ID3" it will automatically to search the information of
"TITLE NAME" "ARTIST NAME" and "ALBUM NAME" to show in the display.
- Press the ID3 button on the remote again. Then resume to normally play.

During in the STANDBY mode
- Insert the USB DEVICE or SD/MMC CARD, and then press the STANDBY/ON button on the main unit (or remote control) to power "ON" the unit.
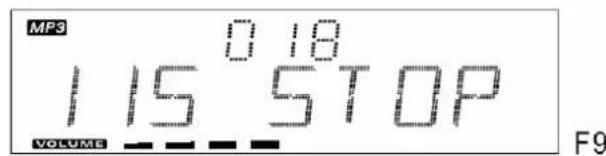
- Press the FUNCTION button on the main unit (or remote control) to select the USB or SD/MMC mode. The main unit will automatically read the total number of the folders and tracks at the same time.(F9)
- If the USB memory device more than one folder.
a. Press the PRESET/FOLDER (UP or DOWN) button to select each folder.
b. Press the SKIP/TUNER SEARCH (UP or DOWN) button to select current track in desired folder. - If the MP3 and WMA are written in "ID3".
a. During the unit in the MP3 or WMA playing, press the ID3/MONO/STEREO button once. The display will show a "ID3 ON", and then it will automatically search more than 64 letters for "TITLE NAME", "ARTIST NAME" or "ALBUM NAME" which move from the right corner to the left corner on the display continuously.
b. Press the ID3/MONO/STEREO button once again. The display will show a "ID3 OFF", and then the main unit will play normally.
Note:
- The main unit can play MP3 and WMA only in this mode.
- This unit can support most of USB devices and SD/MMC/ SDHC cards. The memory capacity up to 32GB. It can not access (or access a longer time) the memory capacity over 32GB (We cannot guarantee the compatibility to any available USB- or SD/(MMC) memory media).
- It can support USB version 1.1 and 2.0.
- The main unit does not support the WMA file which is protected "DRM FILE".
Playing the Entire flash disc
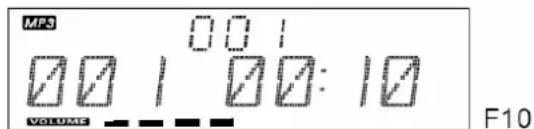
- Playback will start by pressing the PLAY/PAUSE button. Playback starts with the first track. The display shows the current track number and its elapsed time.(F10)
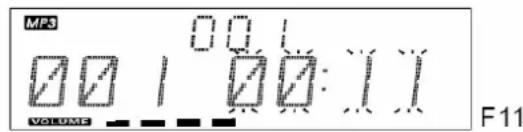
- To interrupt playback, press the PLAY/PAUSE button. The time elapsed indicator will flash.(F11)
- To resume playback, press the PLAY/PAUSE button again.
- To stop playback, press the STOP button
Note: In any time, the USB DEVICE or SD CARD must be fixed well under in the STANDBY mode to avoid the main unit and USB DEVICE or SD CARD were damaged.
TRACKSKIP
Starting disc play from the beginning of a particular track of a file
Press the SKIP/TUNER SEARCH (UP or DOWN) (12,13) on the unit or (18,8) on the remote control to select the desired track. The number of the selected track will be shown on the display. Press the Play/Pause button to start play.
To skip to the next track
To skip ahead to the beginning of the next track.
Press the SKIP/TUNER SEARCH UP (12) on the unit or (18) on the remote control once. Play will resume at the beginning of the next track.
The player will skip ahead to the next track each time the SKIP/TUNER SEARCH (UP) button is pressed. Repeatedly pressing the Forward Skip Track button makes the player skip ahead through the disc track by track. Once the beginning of the last track is reached the player will return to track 1.
To skip back to the previous track on a file
To skip back to the beginning of the previous track. Press the SKIP/TUNER SEARCH DOWN (13) on the unit or (8) on the remote control twice.
Play will resume at the beginning of the previous track.
The player will skip back one track each time the SKIP/TUNER SEARCH DOWN button is pressed. If this button is pressed in the middle of a track, the player will skip back to the beginning of that track. To make it skip back to the previous track press the SKIP/TUNER SEARCH DOWN button twice.
Repeatedly pressing the SKIP/TUNER SEARCH DOWN button makes the player
skip back through the disc track by track. Once the beginning of the first track is reached, the player will go back to the last track.
Manual Search
During playback, by pressing and holding the SKIP/TUNER SEARCH (UP or DOWN) buttons will cause the player to scan through the current track. At the end of a track the player will skip to the next track and continue scanning. At the beginning of a track the player will skip to the previous track and continue scanning.
When the player reaches the end of the final track, or the beginning of the first track, it will stop scanning.
REPEAT FUNCTION (CD/MP3/USB/CARD)
CD
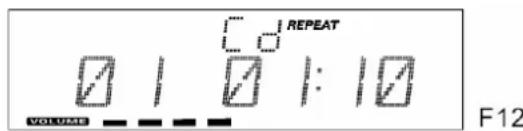
Use the REPEAT button on the remote control(11) to listen to an entire disc or one track.
- Press the REPEAT button once on the remote, REPEAT is displayed. The unit will play the current track repeatedly. (F12)
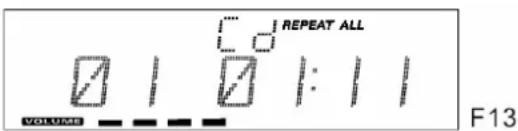
- Press the REPEAT button twice, REPEAT ALL is displayed. The unit will play all tracks repeatedly. (F13)
- Press the REPEAT button thrice, the REPEAT function will be off.
MP3/WMA
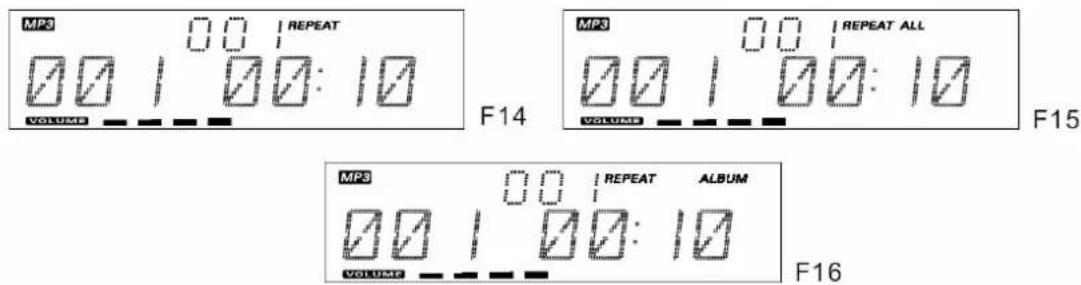
- Press the REPEAT button once on the remote, REPEAT is displayed. The unit will play the current track repeatedly. (F14)
- Press the REPEAT button twice, REPEAT ALL is displayed. The unit will play all tracks repeatedly. (F15)
- Press the REPEAT button thrice, then REPEAT ALBUM is displayed. It will play repeatedly the current album. (F16)
- Press the REPEAT button four times, the REPEAT function will be off.
RANDOM PLAY
- Press the RANDOM Button(15) on the remote control. "RANDOM" will appear in the display before the track playing .(F17)
- The CD player will select a track at random and begin to play. At the end of that track another randomly selected track will be played.
- When all the tracks have been played in this way, the CD player will stop.
- Press the RANDOM Button (15) to return to normal Play status.
INTRO PLAY
- Press the INTRO on the remote control (9), then INTRO is displayed. INTRO will play the first 10 seconds of each track. (F18)
- Press the INTRO button twice, then resume to normally play

PROGRAMMED DISPLAY
User can make the program up to 32 tracks in CD mode or 64 tracks in MP3/WMA/USB/SDCARD mode in any desired order.
Program mode is activated while in stop mode. Press the STOP button (20) on the unit or (19) on the remote control first, then follow the instructions below.
CD
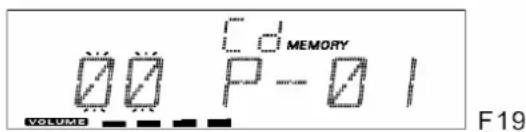
- Press the MEM/C-ADJ. button (7) on the unit or on the remote control(6) to shift to PROGRAM mode. (F19)
- Press the SKIP/TUNER SEARCH (UP or DOWN) button, the track number will be changed.
-
Press the MEM/C-ADJ. button to confirm the track number.
-
Repeat the above steps to program other tracks a maximum number of 32 tracks in CD mode or 64 tracks in MP3/WMA/USB/SD CARD be programmed.
MP3/WMA/USB/SD CARD
- Press the MEM/C-ADJ. button to shift to PROGRAM mode. The album number is flashing. (F20)
- Press the PRESET/FOLDER(UP or DOWN) button, the album number will be changed.
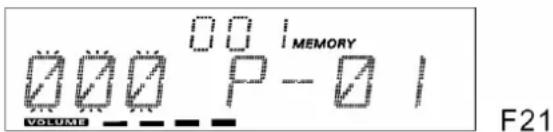
- Press the MEMORY/CLOCK-ADJ button, the track number is flashing. (F21)
- Press the SKIP/TUNER SEARCH (UP or DOWN), the track number will be changed.
- Press the MEMORY/CLOCK-ADJ button to confirm the track number.

1.PROGRAM PLAY
Press the PLAY/PAUSE button on the unit (or remote control), it will play starting with the first track of the program. When all tracks have been played, the unit display will show the number of tracks and the playing time of the CD/MP3/WMA tracks.
2. CANCEL PROGRAM
- Press the STOP button once, or open the CD tray door and close it again then the memory will be erased.
- Set a new program, the existing one will be cleared.
Note: During the program mode.
- Press the "REPEAT" button once, the "REPEAT" indicator will light on the display. Then the main unit will repeat the current track.
- Press the "REPEAT" button twice, the "REPEAT ALL" will light on the display. Then the main unit will repeat all the total number of tracks.
- Press the "REPEAT" button once more again. The main unit will return to play the program in normally.
AUX IN PLAY
The AUX input is located at the rear of the unit (2). Use a 3.5mm stereo jack cable to connect audio equipment through the LINE IN jack.
- To select the AUX input function, repeatedly press the FUNCTION button on the unit (or remote control) until AUX is indicated on the display.
- Press the VOLUME (UP or DOWN) button to adjust the sound output level.
Note: LINE in cable not included.
MUTE SETTING (ON THE REMOTE CONTROL)
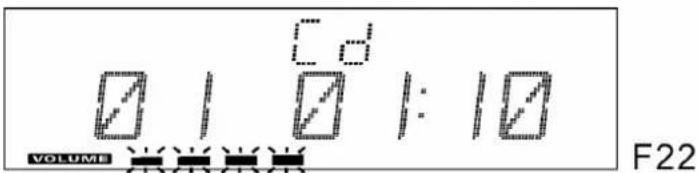
- When you press the MUTE button (4) once on the remote control, the volume level will flash and the audio output will be temporarily terminated. (F22)
- Press the MUTE button again, the volume level and the audio output will return to normal.
HEADPHONES JACK
Headphones should have a 3.5mm diameter stereo plug and an impedance of 8-32 ohms. When head phones are connected (24), the speakers are automatically disconnected.
LCD DISPLAY WINDOW
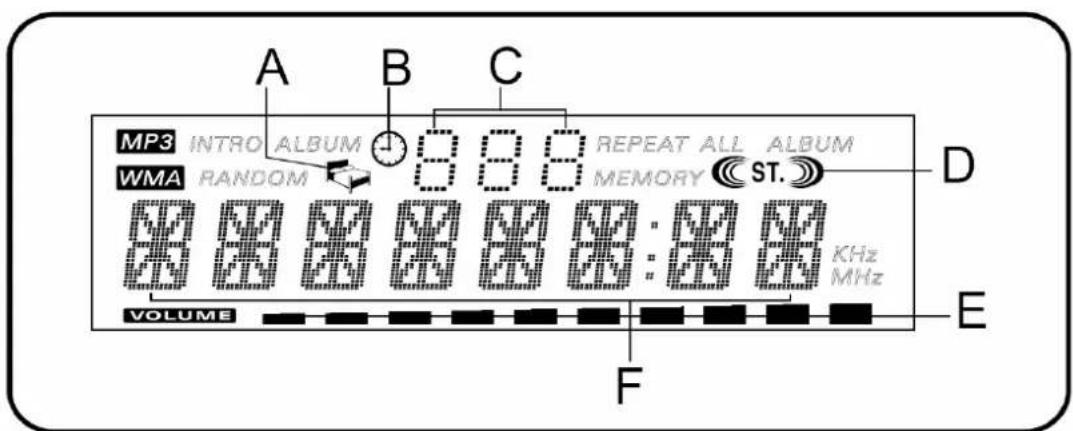
A. SLEEP INDICATOR
B. TIMER INDICATOR
C. ALBUM / RADIO MEMORY NUMBER INDICATOR
D.STEREO INDICATOR
SPECIFICATIONS
Power Supply
AC: 230V 50Hz
Battery: 1 x CR203, 3V for remote control
Radio Frequency Coverage
FM: 87.5-108MHz
CD Player
Pick Up: 3-Beam, Semi conductor Laser
D/A Converter: 16-Bit Linear 2x Oversampling
Other features
Earphone output: 3.5mm jack, Stereo, 150mV
AUX R/L: Audio
USB port: support 1.1, 2.0
Memory card reader: SD/MMC/SDHC card
Max. capacity UP to 32GB (We cannot guarantee the compatibility to any available USB- or SD(/MMC)-memory media.)
General
Headphones: 3.5 mm stereo jack plug, 8-32Ohm
Output Power: 2x4.5 Watts
Design and specifications are subject to change without notice
PRISE SECTEUR
Enlevez IRemove the plastic tab from the battery compartment at the rear of the
remote control. Pull it gently
Replace a used battery.
- Open the battery compartment and insert one battery of the type CR 2032 (Fig.1).
Pay attention to the correct polarity (+ / - ) in accordance with the markings.
- Close the battery compartment. Make sure that the cover is locked in place.
REEMPLACEMENT DESPILES
service@schmid-electronics.de
service@schmid-electronics.de