
RR 1103 - Hi-fi system SEG - Free user manual and instructions
Find the device manual for free RR 1103 SEG in PDF.
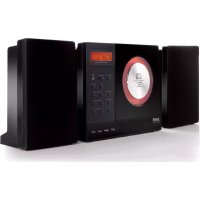
| Product type | Portable hi-fi system |
| Brand | SEG |
| Model | RR 1103 |
| Dimensions (W x D x H) | 260 x 225 x 124 mm |
| Weight | 2.088 kg |
| Mains power | 230 V ~ 50 Hz |
| Battery power | 6 UM-2 (R14) batteries – 1.5 V each |
| Power consumption | ≤ 12 W |
| Radio frequency ranges | FM: 87.5 – 108 MHz / AM: 540 – 1600 kHz |
| CD player | CD, CD-R, CD-RW – 3-beam laser, 1-bit 8x oversampling D/A converter |
| Cassette player | Normal type (IEC I), speed 4.75 cm/s, frequency response 125 Hz – 8 kHz |
| Headphone jack | 3.5 mm stereo jack, impedance 32 Ω, output 150 mV |
| Output power | 2 x 1.0 W RMS |
| Signal-to-noise ratio (CD) | 55 dB typical |
| Main functions | CD playback, AM/FM radio, cassette, recording from radio or CD, track programming (20 max), repeat, fast forward/rewind, pause |
| Maintenance and cleaning | Clean the device with a soft, slightly damp cloth. Clean the cassette deck heads with a cotton swab soaked in alcohol after 50 hours of use. Use a soft cloth for CDs (from center to edge). |
| Safety | Double insulation (class II), do not open the housing, dangerous voltage inside, avoid humidity and heat sources, disconnect during storms, do not use outdoors, reasonable volume to protect hearing |
| Spare parts and repairability | Repairs only by qualified technician. 2-year warranty (Switzerland). Used batteries must be recycled. |
| General information | Operating temperature: 0–35 °C. For household use only. Compliant with EU standards (EN 60065, EN 55013, etc.). |
Frequently Asked Questions - RR 1103 SEG
User questions about RR 1103 SEG
0 question about this device. Answer the ones you know or ask your own.
Ask a new question about this device
Download the instructions for your Hi-fi system in PDF format for free! Find your manual RR 1103 - SEG and take your electronic device back in hand. On this page are published all the documents necessary for the use of your device. RR 1103 by SEG.
USER MANUAL RR 1103 SEG
O bere Seite
Rückseite
OBER- UNDFRONTSEITE
natural_image
Three-step diagram showing hand positioning: press, disc, and ring (no text or symbols)- Lagerung
natural_image
3D rendering of a screwdriver inserted into a mechanical component (no text or symbols visible)AUFNAHME VOM RADIO
3.5mm jack, stereo, ←150mV 32ohm. ( test conditions: CD @1K, -10DB; FM @22.5K,98 MHz,60 DB )
2 x 1.0 W
≤ 12 W
55dB typical ( CD audio)
Safety Instructions and Important Information About Intended Use
Please read the following instructions and safety notes thoroughly before starting to use your product!!
Intended use: Intended dbex has been designed for playing back CD discs and reception of Radio broadcast. If the product is not used according to the instructions, the user's and other persons' safety is not guaranteed and the warranty will be void.
Uses manual: please read this User Manual thoroughly and keep it for any future reference in a safe place. For your own safety and in order to familiarize yourself with the different functions of the product, please follow the instructions in this manual carefully.
When passing this product to other persons, please also hand over this User Manual.
Please also read the user manuals of all devices that you are going to connect to this device.
CoConnecting to the Power Supply: Connecting that the Power Supply or its cables present visible damage.
Connect the device only to the voltage indicated on the corresponding label on the product. Never connect the device to a different voltage. Connect the device to grounded power outlets that comply with the corresponding safety standards only. Do not bend or squeeze the cables.
WARNING: Inside the device there is dangerous voltage. Never open the housing of the device: there is risk of personal injury by electric shock.
In order to completely disconnect the device from the mains, the power plug must be pulled out from the wall outlet. Make sure that you can remove the power plug at any time. Always pull the power cord from the plug and never from the cable itself. Electric storms may damage any electric equipment; therefore disconnect the power plug from the wall outlet during a thunderstorm. It is also recommended to disconnect the device from the mains and to remove any batteries when you are intending not to use the device for a longer time.
Objects inside the device: make sure the foreign objects or liquids enter the device via the ventilation holes or other openings. There is risk of electric shock, damage to the device and short-circuit. In case of any emergency, immediately pull the power plug and contact a qualified service technician.
Lasas or product: 20 Rep product is employ a laser system (Class 1 Laser). To ensure proper use of this product please read this owner's manual carefully and retain for future reference. There is laser radiation inside the device. Laser radiation can damage your eyes permanently. To prevent direct exposure to the laser beam, do not try to open the enclosure. Never attempt to repair the device. Hazardous laser radiation when open and interlock failed or defeated. DANGER: do not expose yourself to the laser beam!
In installation: psteel the device onto a flat and even surface. Never cover the ventilation holes of the device and make sure that the air can easily flow around the device (keep at least 10 cm / 4 inch space on the back and sides). The device has anti-skid rubber feet. Over the long-term, these feet can dissolve due to chemical substances. It is recommended that you place the device on an anti-skid surface.
WARNING: do not use this device outdoors!
Co-Indication: Otherebsartiging this device from a cold to a warm environment (e.g. after transportation) moisture can condensate inside the device. In order to protect the device from damage and failure wait at least 2 hours prior to using the device.
He'deal in injury: he'demirely high audio volumes can damage your hearing permanently. Therefore carefully adjust the volume, specially if you enjoy sound via headphones or earphones (option).
Connect the headphones or earphones to the device (if available - option) prior to powering it on, as connecting it when already powered on can produce high sound levels causing damage to your hearing.
Children: Children allow children to play with electrical devices. Children may not be able to comprehend the presence of potential risks.
BaBatteries: Batepberries away from children.
Always replace all the batteries at the same time (never mix old and new batteries). Do not short-circuit any batteries. Keep batteries away from any heat sources (direct sun radiation, fire etc.). There is risk of explosion when misusing the batteries.
Do not put a canary objects in both the device. Do not play a property, or the device housing or the display. Do not place any recipients containing liquids (beverages, vases, etc.) onto or next to the device. Do not place any fire sources (such as candles) onto the device. This could damage the product.
Environnemental effects: Keep the device away from any heat sources (heating equipment, ovens, cooking places, candlelight, etc.), direct sun radiation, dirt, dust, vibrations, strong magnetic fields, moisture and rain.
Cleaming: Disconnect from the mains supply. Clean the device with a soft, slightly moistened cloth. Do not use any chemicals, alcohol or solvents for cleaning. The finish of the device can be damaged by using these substances. Always make sure that no moisture enters the device.
SeServicing: when using the device according to the operating instructions, no special service or maintenance is required. In case of any loss of performance or other malfunction, contact a qualified service technician.
Re repairs: never open the device! Any repairs must be performed by authorized technicians or service personnel. Any unauthorised opening or modification will void the warranty and also the safety of the product may be altered. WARNING: Inside the device there is dangerous voltage. Never open the housing of the device: there is risk of personal injury by electric shock.
EnvironmentEnvironment
Old batteries do not belong in with the domestic waste! Old batteries do not belong in with the domestic waste!
Consumers are obliged by law to return any old batteries and rechargeable batteries to the corresponding local and/or public collection centres or to return them to the retail shops. This ensures that batteries will be disposed of respecting the environment.
Make sure to return any batteries and rechargeable batteries discharged.
Disposal of old electric and electronic devices: Disposal of old electric and electronic devices:
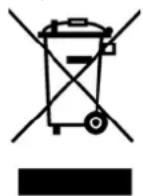
The icon of a dashed-out waste bin means that a separate disposal of electric/electronic equipment is necessary.
According to the Legislation of the European Union, any electric and electronic devices may not be disposed of with domestic trash but must be returned to a special collection center enabled for the recycling of these devices. The local waste companies should have set up specific
collecting centres for this purpose, allowing private consumers to return any old devices for free. Please contact your local authorities or the local waste company for the available disposal possibilities.
Please support us actively by protecting the environment and recycle this product accordingly by returning it to a specific collection centre. This will protect the environment, other people and yourself. Thank you very much!
Disposal of Packaging and Packaging Materials: Disposal of Packaging and Packaging Materials:
Packaging and any packaging materials do not belong in with the domestic waste! Your system consists of materials which can be recycled and reused if disassembled by a specialized company. Please observe the local regulations regarding the disposal of packaging materials.
Safety information
Mains supply
This equipment is designed to operate from a 230 Volt, 50Hz AC mains supply. Other power sources may damage it. Check that the rating label of the equipment says 230V A C before you plug it in for the first time.
Mains plug
We have fitted this equipment with a standard mains plug.
- If the mains lead gets damaged it must be replaced by a qualified service agent with an approval lead the same type.
- If you cut off the mains plug, for example to fit a different type, please destroy the old plug as it would be dangerous if inserted into a live power outlet. Carefully follow the wiring instructions supplied with the new plug.
- If a fuse is fitted to the plug, remove the fuse before throwing the plug away.
- Carefully follow the wiring instructions supplied with a new mains plug.
- Inever use a fused mains plug without the fuse cover.
Symbols

This equipment is double insulated and an earth connection is not required.
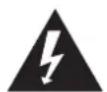
Dangerous voltage constituting a risk of e lectric shock is present inside this equipment.

This mark is applied to show the equipment conforms to European safety and electro-magnetic compatibility standards.

There are important operating and maintenance instructions in the literature a corresponding this equipment.
Safe use and care of your audio equipment
We have designed and made this product to meet European safety standards, but as with any electrical equipment you must take care to get the longest working life from it and stay safe. Here are a few tips to help you do this.
Read these instructions carefully before you try to use the equipment.
Pro tect the mains lead. You must ensure the mains lead cannot be walked on, crushed, chafed, cut, and so on.
Avoid harsh conditions such as wet or damp places, high humidity, strong vibration, extremely high or low temperatures, strong sunlight and places that are very dusty.
Never let anyone, push objects into holes and ventilation slots.
Safety information
To save power switch off mains power or pull out the mains power plug when you are not using the equipment, unless the function of the equipment requires a continuous power supply.
Do n't continue to use this equipment if you have spilt liquids in it, if it is damaged in any way or if it does not work normally. Immediately unplug the equipment and get expert advice.
Pull the mains plug out of the wall socket during thunderstorms.
This product is designed for domestic use only. Any other use may involve alidate the guarantee and might be dangerous.
Ventilation
Place the equipment on a hard flat surface away from direct sunlight and heat sources. If it is in a cabinet, allow at least a 10cm gap all around. Don't obstruct the ventilation slots, including those underneath, with soft furnishings. Overheating will shorten the life of the equipment and increase the risk of fire.
Cleaning
Disconnect the mains supply and use only a lightly dampened soft cloth. Do not use chemical solvents or strong detergents as these may damage the cosmetic finish.
Batteries
Remove batteries when the equipment is not to be used for a long time. Batteries left in equipment may cause damage through deterioration and corrosive leakage, invalidating the guarantee. To protect the environment please use local recycling facilities for battery disposal.
Disposal
Waste electric and electronic products must not be disposed of with household waste. Please refer to the retailer from whom you purchased this item for disposal instructions.
B atteries and packaging materials can be recycled using your local collection facilities.
Important Safety warnings
To prevent electric shock, do not remove any cover.
If anything goes wrong, don't try and fix it yourself, get a qualified service agent to look at it.
Do not expose this equipment to dripping or splashing or place any objects filled with liquids, such as vases, on the equipment.
Never put a naked flame source on or near the equipment.
Small parts. Do not let young children play with the equipment.
Never operate the equipment and try to view video while driving a vehicle.
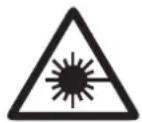
Class 1 laser product
This product contains a low power laser device. Invisible laser radiation when open and interlocks defeated.
Avoid exposure to beam.
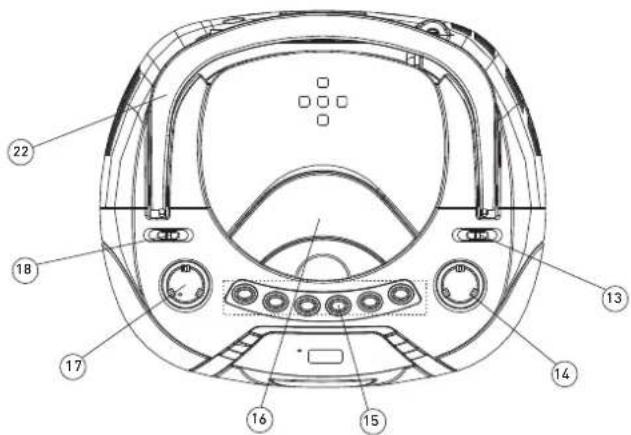
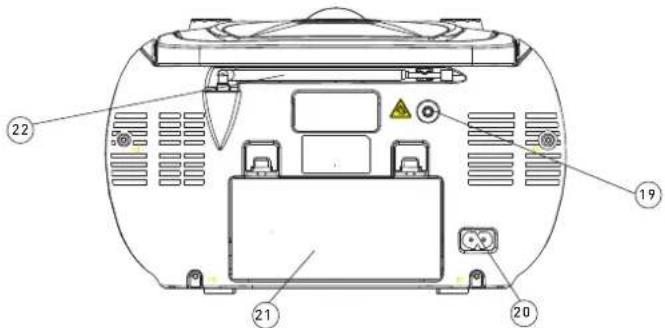
Identifying P arts
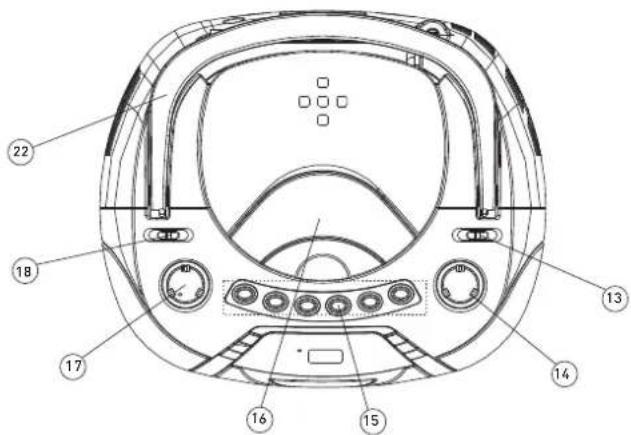
Front panel
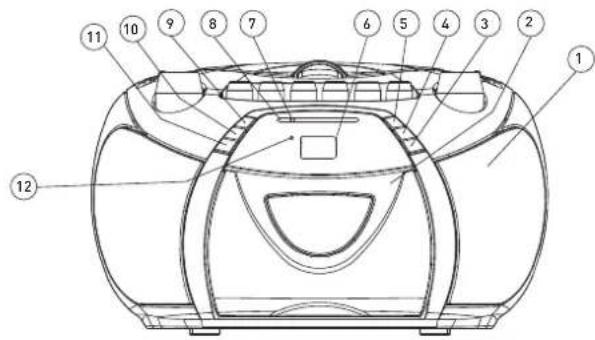
Top panel

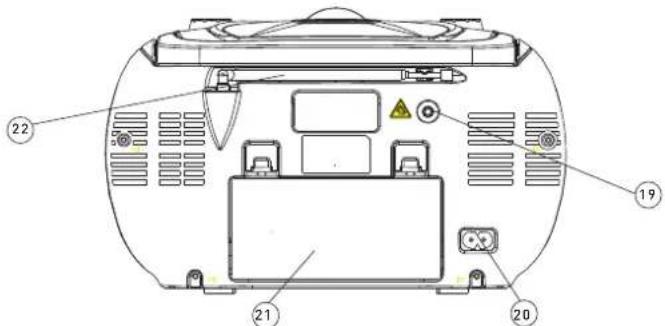
Rear panel

FRONT AND TOP PANEL
-
SPEAKER
-
CAS SETTE C O MPA R TMENT
-
PROGRAM
CD: programming and control of programmed track number.
- NEXT
C D: skips tracks forward.
- STOP
C D: stops C D playback or delete a program.
- DIS PLAY
- d isplay of CD functions.
- DIAL POINTER WINDOW
- 5 hows AM/FM frequency.
-
RADIODAILSCALE
-
PLAY/PA US E
C D: start or pauses C D playback.
- BACK
C D: skips tracks backward.
- REPEAT
CD : repeat a track/CD/program.
- FM S TE REO INDICATOR
- d lisplay of FM stereo indications.
- BANDSELECTOR (AM•FM•FMST.)
- frequency b and selection: AM, FM or FM 5 T.
- TUNING K NO B
- AM/FM/FM S T. stations selector.
- CASSETTERECORDERKEYS
PAUSE-interrupts recording or playback.
S TO P/EJE CT - stops the tape; opens the c assette compartment.
FWD /RE W - forwards/rewinds the tape.
PLAY - starts playback
R E C O R D - start recording.
- CDDOOR
- CD compartment door open/close mark [OPEN/CLOSE].
- VOLUME CONTROL
- sound level control.
- FUNCTION SELECTOR
- source selection C D, R AD 10 or TAPE and power off.
- HANDLE
REAR PANEL
- STEREOHEADPHONE JACK
- c connect for the 3.5mm stereo headphone.

• Health injury: extremely high audio volumes can damage your hearing
permanently. Therefore carefully adjust the volume, specially if you enjoy sound via headphones or earphones. Constant high volume use can lead to permanent hearing loss.
Connect the headphones or earphones to the device (if available - option) prior to powering it on, as connecting it when already powered on can produce high sound levels causing damage to your hearing.
- ACPOWERSUPPLY
- power supply cord connection.
- BATTETRYCOMPARTMENT
- o pening of the battery compartment.
- TELESCOPIC ANTENNA
- improvement of FM reception.
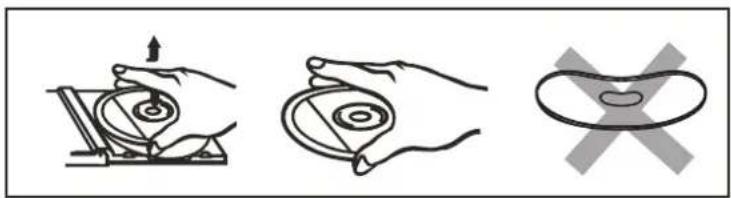
Compact Disc
COMPACT DISC
- Always use a compact discs bearing the mark as shown:

- Noted on handling discs
R removing the disc from its storage case and loading it.
* Do not touch the reflective recorded surface.
* Do not stick paper or write a nything on the surface.
* Do not bend the disc.
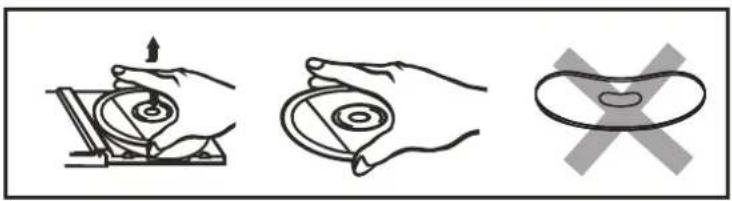
natural_image
Three-step diagram showing hand positioning: press, disc, and pad (no text or symbols)- Storage
* S tore the disc in its case.
* Do not expose discs to direct sunlight or high temperatures, high humidity or dusty places.
- C leaning a d isc
* S hould the disc become soiled, wipe off dust, dirt and fingerprints with a soft cloth.
* The disc should be cleaned from the centre to the edge.
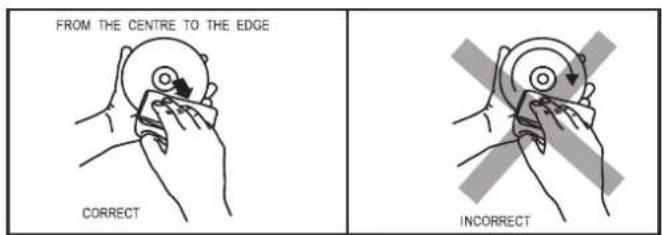
* N ever use benzene, thinners, record cleaner fluid or anti static spray.
* B e sure to close the C D d oor so the lens is not contaminated by dust.
* Do not touch the lens.
Power Supply
Using the D C power supply
The mains power supply can be used to save the batteries. Make sure that the unit is NO T plugged into the wall outlet before inserting the batteries.
Batteries (not included)
Open the battery compartment and insert 6 R14 batteries carefully observing the "+" and "-" polarity marking inside the compartment.
Important:
When replacing the batteries, make sure you dispose of the old batteries in accordance with regulations in your area. They should be disposed of in a location specifically designated for that purpose so they can be recycled safely and without posing a ny risk for the environment. Do not burn batteries.
NOTE:
Incorrect use of the batteries may result in electrolyte leakage having a corrosive effect in the compartment.
Do not mix different types of batteries: do not use a lkaline batteries with saline batteries, for example.
Do not mix old batteries with new ones. U se batteries of the same type recommended by the manufacturer.
If the unit is not to be used for an extended period of time, remove the batteries a s damage may o ccur due to battery leakage.
- Batteries: Keep batteries away from children.
Always replace all the batteries at the same time (never mix old and new batteries), use batteries of the same type. Never use different types of batteries together. Do not short-circuit any batteries. Keep batteries away from any heat sources (direct sun radiation, fire etc.). There is risk of explosion when misusing the batteries.
- To use the appliance with batteries, disconnect the AC power cord from it.
Using the A C s upply
Make sure that the voltage indicated on the manufacturer's nameplate in the battery compartment corresponds to the voltage supply in your home. If this is not the case, DO NO T use this appliance. Seek qualified advice.
Connect the electrical power cable to the unit, then plug it into the wall outlet. The wall outlet must be located near the product and be easily a cccessible.
To turn power to the apparatus off, unplug the power supply cable from the wall outlet.
To protect the unit during thunderstorms, unplug the power supply cable from the wall outlet.
Connecting to the Power Supply: do not use the device if the device or its cables present visible damage.
Connect the device only to the voltage indicated on the corresponding rating label on the product. Never connect the device to a different voltage. Connecting to other power source may damage the unit. Connect the device to grounded power outlets that comply with the corresponding safety standards only. Do not bend or squeeze the cables.
WARNING: Inside the device there is dangerous voltage. Never open the housing of the device: there is risk of personal injury by electric shock.
In order to completely disconnect the device from the mains, the power plug must be pulled out from the wall outlet. Make sure that you can remove the power plug at any time. Always pull the power cord from the plug and never from the cable itself. Electric storms may damage any electric equipment; therefore disconnect the power plug from the wall outlet during a thunderstorm. It is also recommended to disconnect the device from the mains and to remove any batteries when you are intending not to use the device for a longer time.
General Operation
General operation
Select the source b y setting the FUNC TIO N S ELEC TO R to C D, TA PE(O FF)or RA DIO .
Set the desired volume level using the V O LUME K NO B.
To turn off the unit, set the FUNC TIO N S ELECTO R to O FF.
Radio
To listen to the FM radio, extend the telescopic antenna and adjust it for optimum reception. Reduce the length of the antenna if the signal is too strong (if you are very near the transmitter, for example).
As the unit is equipped with a built-in antenna, the telescopic antenna is not needed to listen to AM stations.
Move the entire unit to adjust the built-in antenna for optimum reception.
Radio rec eptio n
Set the FUNC TIO N S ELECTO R on RA DIO.
Position the BA ND S ELECTO R on the desired band: AM, FM or FM S T.
Turn the TUNING K NO B to search for the desired station.
NOTE:
The FM stereo indicator comes on if the BAND SELECTOR is set on FM ST. and you have tuned the radio to an FM stereo station.
When you have finished listening to the radio, position the FUNC TIO N S ELEC TO R to O FF.
Playing a cassette
Set the FUNC TIO N S ELECTO R on TA PE.
Press STO P/EJEC T to open the cassette door.
Insert a recorded cassette and close the c assette door.
Press PLAY to start playback.
To interrupt playback, press PA USE. To resume, press the key a gain.
By pressing the FW D or REW button, fast winding of the tape is possible in both directions.
To stop the tape, press S TO P/EJE C T button.
Stereo h eadphones jack
C onnect headphones with the volume set low and increase it if required. Prolonged listening through some headphones at high volume settings can result in hearing damage.
Reduce the V O LUME to a low level before putting on the headphones. You can then adjust the V O LUME progressively to a comfortable level.
RECORDING
GENERAL INFORMATION ON RECORDING
- Recording is permissible in so far as copyright of other rights of third parties are infringed.
- This deck is not suitable for recording on C HR O ME (IEC II) or METAL (IEC IV) type cassettes. For recording, use NO RMAL type cassettes (IEC I) on which the tabs have not been broken.
- The best recording level is set automatically. Altering the V O LUME c onrol will not affect the recording in progress.
- At the very beginning and end of the tape, no recording will take place during 7 seconds, when the leader tape passes the recorder heads.
- To protect a tape from accidental erasure, have the tape in front of you and break out the left tab.
- Recording on this side is no longer possible. To record over this side again, cover the tabs with a piece of adhesive tape.
natural_image
3D rendering of a screwdriver inserted into a metal bracket with two holes (no text or symbols visible)- Tune to the desired radio station.
- Press STO P/E JEC T to open the c assette door.
- Insert a suitable cassette into the cassette deck and close the cassette door.
- Press RE C O R D to start recording.
- For brief interruptions, press PA US E. To resume recording, press PA USE again.
- To stop recording, press S TO P/PA US E.
- S lide the F UNC TIO N selector to C D.
- Insert the C D y ou want to record.
- Insert a suitable cassette into the cassette deck and close the cassette door.
- Press RECORD to start recording. The PLAY and RECORD buttons are depressed together.
- Press C D PLAY /PA USE button. The recording level is set automatically.
- To stop recording, press the cassette S TO P/PA USE.
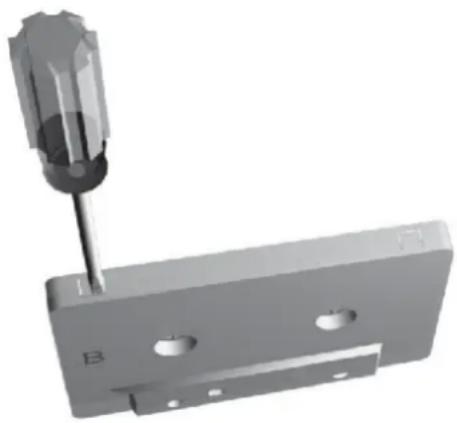
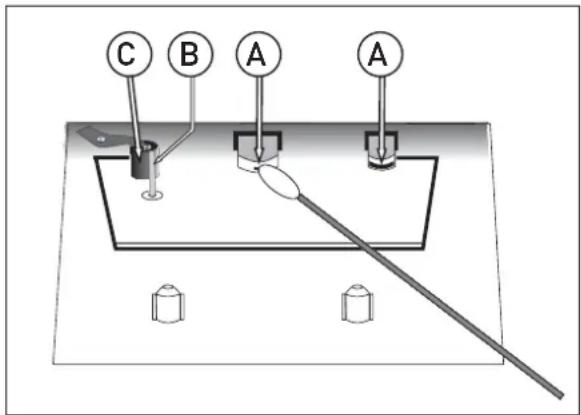
MAINTENANCE
Tape deck maintenance.
To ensure quality recording and playback of the tape deck, clean part A, B and C shown in the diagram below after approx. 50 hours of operation, or on average once a month. Use a cotton bud slightly moistened with alcohol or a special head cleaning fluid to c lean the deck.
- O pen the cassette door by pressing S TO P/E JEC T.
- Press PLAY and clean the rubber pressure rollers C.
- Press PA US E and clean the magnetic heads A and a lso the C apstan B.
- After cleaning, press STO P/EJEC T.
Note: C leaning of the heads can also be done by p laying a c leaning cassette through once.
CD
The C D player supports audio discs, C D-R, C D-RW. Do not attempt to read C D-R O M, C Di, V C D's, DV Ds or DATA CDs.
Note:
Even if this portable radio-CD player is able to read C D-R and C D-RW discs, it is not possible to offer a 100% guarantee that all CD-R / RW discs can be read; playback depends on the quality and condition of the blank discs that you use, among other things. A playback failure does not necessarily indicate that the unit is malfunctioning.
Position the FUNC TIO N S E LE CTO R on CD (the display unit briefly displays “- - -”).
To open the C D door, raise it by pressing the corner marked OPEN/CLOSE.
Insert a CD, CD-R or CD-RW disc, printed surface facing upwards and gently close the CD player door.
Start playback by pressing PLAY / PA US E.
Press PLAY / PA US E to PAUSE and P LAY. To stop C D p layback, press S TO P.
NOTE:
C D playback stops automatically when the C D compartment is opened, the radio function is selected or the C D M P3 has finished.
Selecting a different track
During playback, press NEX T or BAC K on the unit to select a track.
If you have selected a track number in S top or Pause mode, press PLAY / PA US E to resume playback.
Briefly press NEX T to pass to the next track or press NEX T several times until the desired track number appears in the d isplay.
Briefly press BA C K to return to the start of the c current track.
Press BA C K several times to find a p previous track.
Searching for a passage on a track
Press and hold BA C K or NEX T to read the track in fast forward mode with the volume muted.
Release the BAC K or NE X T button periodically until you have found the desired passage (normal playback resumes a automatically).
Repeat
Whilst in play mode, press the R EP button once to playback the current track repeatedly.
Whilst in play mode, press the R EP button twice to playback the entire C D repeatedly.
Pro gramming of track numbers
Up to 20 tracks can be programmed in any order. If desired, a given track can be programmed more than once.
In S TO P mode, press B A C K or N E X T to s elect a track.
When the desired track number appears, press the PRO G button once to record the track (the unit displays "prog", briefly followed by the track number selected).
Repeat steps 1 and 2 to select and program the desired tracks.
To start playback of your programmed tracks, press PLAY / PA US E.
The display will show "FUL" if you attempt to program more than 20 tracks.
Program check
In S TO P mode, press the PRO G button. (the unit displays the track numbers in the order they are programmed).
Deleting a program
Perform any of the following operations to delete the memory:
- Open the C D door;
- S elect the R ADIO source;
- Press S TO P twice.
- Objects inside the device: make sure that no foreign objects or liquids enter the device via the ventilation holes or other openings. Do not put anything except a compact disc into the compartment. Keep the compartment closed when not in use to prevent dirt and dust from entering the mechanism. Foreign objects can damage the mechanism. Furthermore, there is risk of electric shock, damage to the device and short-circuit. In case of any emergency, immediately pull the power plug and contact a qualified service technician.
Specifications
Specification
Power supply
AC: 230 V\~50Hz
DC : Battery: 6 X UM-2.
Radio Frequency Tuning Range FM,AM
FM: 87.5-108 MHz AM: 540-1600KHz
CD Player
3 Beam Laser Pick Up
Pick Up:
1 Bit, 8 Times Over Sampling
D/A Converter:
DA Converter
Cassette player
Tape speed
: 4.75 C M/Sec.
125Hz-8KHz
Frequency response
3.5mm jack, stereo, ←150mV 32ohm. ( test conditions: CD @1K, -10DB; FM @ 22.5K,98 MHz,60 DB )
Earphone terminal:
2 x 1.0 W
Output power
≤ 12 W
Power consumption
Temp. 0-35°C, operation status: Horizontal
Operating conditions
260*225*124 mm ( L*W*H)
Dimensions of main unit
2.088kg.
Weight of main unit (kg)
55dB typical ( CD audio)
Signal/ Noise ratio (audio)
This product fulfils the following EU regulations
EN 60065: 2002 + A1: 2006 + A11: 2008
EN 55013: 2001 + A1: 2003 + A2: 2006
EN 55020: 2007
EN 61000-3-2: 2006
EN 61000-3-3: 2008
Trouble s hooter
| Unit deadNo functions | C heck unit is plugged into mains outlet.Fuse blown.Batteries exhausted. | Plug a appliance into mains supply.C heck supply with another appliance.Replace plug fuse.Replace batteries. |
| No sound | Wrong sound settings selected. | C heck the band selector is on the correct setting.Is the C D dirty or are there fingerprints on it. |
| Sound wobbling or distorted.Interference on radio | Batteries interference.Excessive vibration. | Replace batteries.Place unit on a flat, stable surface.C heck the aerial. |
| Popping or crackling noise over the sound. | External inference.Weak signal. | Move receiver to a new location.Try fine tuning the receiver. |
| Weak reception. | Aerial adjustment required or weak signal area. | Adjust aerial or move receiver to a different location near a window if using a indoor aerial. |
Panneau supérieur
Panneau arrière

PANNEAUXAVANTETSUPÉRIEUR
-
HAUT-PARLEUR
-
COMPARTIMENT CASSETTE
-
PROGRAMME
- C O M P A R T I M E N T D E S P I L E S
* N e pliez p as le disque.
natural_image
Three-step diagram showing hand positioning: press, disc, and padlock (no text or symbols)- Rangement
* N e touchez p as la lentille.
Alimentation
Alimentation DC
Piles ( non fo urnies)
natural_image
3D mechanical assembly diagram showing a screwdriver inserted into a housing with labeled parts (no readable text or symbols)ENREGISTREMENT À PARTIR D'UNE É MISSION DERADIO
Pannello superiore

Pannello posteriore
PANNEL L O SUPERIORE E ANTERIORE
-
CASSA
-
VANO CASSETTA
-
PROGRAMMA
- INDICATO RE FM STEREO
natural_image
Three-step diagram showing hand positioning: press, circular object, and cross symbol (no text or labels)- Conservazione
natural_image
3D rendering of a screwdriver inserted into a metal bracket with mounting holes (no text or symbols visible)REGISTRARE DALLA RADIO
- 5mm jack, stereo, ←150mV 32ohm. ( test conditions: CD @1K,
-10DB; FM @22.5K,98 MHz,60 DB)
55dB typical ( CD audio)
service@schmid-electronics.de
service@schmid-electronics.de


- O bere Seite
- Rückseite
- OBER- UNDFRONTSEITE
- AUFNAHME VOM RADIO
- Safety Instructions and Important Information About Intended Use
- Please read the following instructions and safety notes thoroughly before starting to use your product!!
- EnvironmentEnvironment
- Safety information
- Mains supply
- Mains plug
- Symbols
- Safe use and care of your audio equipment
- Ventilation
- Cleaning
- Batteries
- Disposal
- Important Safety warnings
- Identifying P arts
- Front panel
- Top panel
- Rear panel
- FRONT AND TOP PANEL
- Compact Disc
- Power Supply
- Using the D C power supply
- Batteries (not included)
- Important:
- NOTE:
- Using the A C s upply
- General Operation
- Radio
- Radio rec eptio n
- Playing a cassette
- Stereo h eadphones jack
- RECORDING
- GENERAL INFORMATION ON RECORDING
- MAINTENANCE
- CD
- Repeat
- Program check
- Deleting a program
- Specifications
- Panneau supérieur
- Panneau arrière
- PANNEAUXAVANTETSUPÉRIEUR
- Alimentation
- Alimentation DC
- Piles ( non fo urnies)
- ENREGISTREMENT À PARTIR D'UNE É MISSION DERADIO
- PANNEL L O SUPERIORE E ANTERIORE
- REGISTRARE DALLA RADIO
Brand : SEG
Model : RR 1103
Category : Hi-fi system