
DigiFrame 88 - Digital photo frame BRAUN - Free user manual and instructions
Find the device manual for free DigiFrame 88 BRAUN in PDF.
User questions about DigiFrame 88 BRAUN
0 question about this device. Answer the ones you know or ask your own.
Ask a new question about this device
Download the instructions for your Digital photo frame in PDF format for free! Find your manual DigiFrame 88 - BRAUN and take your electronic device back in hand. On this page are published all the documents necessary for the use of your device. DigiFrame 88 by BRAUN.
USER MANUAL DigiFrame 88 BRAUN
natural_image
Black-framed display frame showing a skier in action against a snowy mountain backdrop (no text or symbols visible)Dlaschau 3, 5, 15, 30 sec
Important Safety Precautions....9
Cleaning the LCD screen 9
Cleaning the Digital Picture Frame....9
Introduction....10
Box Content....10
Setting up the Digital Picture Frame ....11
Control Buttons and Remote Control ....11
Using the control buttons....11
Using the remote control....12
Card selection screen....12
Thumbnail screen ....12
Displaying a single photo full screen ....13
Changing the displayed photo manually....13
Rotating a photo 13
Enlarging a photo....13
Copying displayed photo to built-in memory.....13
Deleting the displayed photo 13
Adjusting the LCD color ....13
Setting date and time
(only model with this function)....14
Setting Viewing Options....14
Connecting a USB Flash Drive ....15
Frequently Asked Questions ....15
Technical Specifications....16
Important Safety Precautions
Always follow these basic safety precautions when using your Digital Picture Frame. This will reduce the risk of fire, electric shock, and injury.
Warning: To reduce the risk of fire or shock hazard, do not expose this product to rain or moisture.
Warning: To prevent the risk of electric shock, do not remove the cover. There are no user-service-able parts inside. Refer all servicing to qualified personnel.
• The Digital Picture Frame is for indoor use only.
- Unplug the Digital Picture Frame before performing care and maintenance.
- Do not block the ventilation holes on the back of the Digital Picture Frame.
- Keep your Digital Picture Frame out of direct sunlight and heat sources.
- Protect the power cord. Route power cords so that they are not likely to be walked on or pinched by items placed on or against them. Pay particular attention to the point where the cord is plugged into the Digital Picture Frame.
- Only use the AC adapter included with the Digital Picture Frame. Using any other power adapter will void your warranty.
- Unplug the power cord from the outlet when the Digital Picture Frame is not in use.
Cleaning the LCD screen
Treat the screen gently. The screen is made of glass and can be scratched or broken.
To clean fingerprints or dust from the LCD screen, we recommend using a soft, non-abrasive cloth such as a camera lens cloth.
If you use a commercial LCD cleaning kit, do not apply the cleaning liquid directly to the LCD screen, but moisten a soft cloth with the liquid.
Cleaning the Digital Picture Frame
Clean the outer surface of the Digital Picture Frame (excluding the screen) with a soft cloth moistened with water.
ENGLISH10
Introduction
Welcome to the Digital Picture Frame!
Now you can display your digital photos directly from your memory card without needing a computer. Simply insert a memory card into the Digital Picture Frame, turn it on, and you will be treated to a slideshow of your photos.
It's as easy as that.
You can also display individual photos.
To learn more about your new Digital Picture Frame's features and take full advantage of them, please take a few minutes to read this User Guide.
Important!
Please note that this DigiFrame is available in different versions with or without video, MP3 or date/time function. The detailed features of each Digital Picture Frame are specified on the package.
natural_image
Black-framed display frame showing a climber ascending snowy mountains under a blue sky (no text or symbols visible)The Digital Picture Frame offers the following key features:
- Displaying digital photos (JPEG) without a computer.
- Simply insert a compatible memory card (memory card not included) into the Digital Picture Frame to show photos, play music or supported video files (only model with video and MP3 functions).
- Compatible memory cards include Secure Digital™, MultiMedia Card™, Memory Stick™.
- Clock and calendar function (only for model with this function).
- Main functions are controlled via the buttons on the frame or the included infrared remote control.
- Bright TFT LCD screen.
- USB 2.0
• Built-in memory.
Box Content
- Digital Picture Frame
• AC power adapter (5 V, 1 A) - User Guide
- Remote control
ENGLISH 11
Setting up the Digital Picture Frame
The Digital Picture Frame is easy to set up. Just follow these steps:
- Connect the AC power adapter to the Digital Picture Frame and a wall outlet.
- Insert a memory card into the appropriate slot.
Slot 1: Secure Digital™, MultiMedia Card™, Memory Stick™
Slot 2: USB Flashdrive
Note: The card will only fit in one direction. Do not force it. The card should fit snugly when properly inserted. The Digital Picture Frame will automatically start a slideshow of the photos on the card.
- To display photos individually, press the EXIT button to open the thumbnail screen. Use the four arrow buttons to choose a photo. Press the POWER/ENTER button on the Digital Picture Frame or the ENTER button on the remote control.
Note: Pull the plastic tab sticking out of the remote control. It protects the battery, and the remote control will not work unless it is removed.
- To restart the slideshow, press the POWER/ENTER button on the Digital Picture Frame again, or press the SLIDESHOW button on the remote control.
Control Buttons and Remote Control
You can access all of the Digital Picture Frame features either with the buttons on the frame or via the remote control.
Using the control buttons
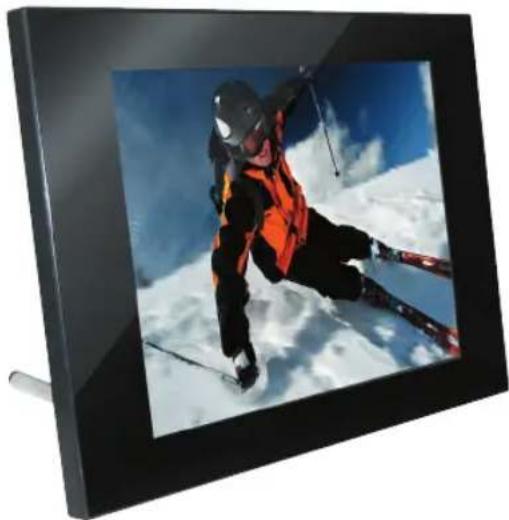
The control buttons are located on top of the Digital Picture Frame.
Button Action
① UP Move highlighting up select previous file
② DOWN Move highlighting down select next file
③ LEFT Move highlighting left
Display previous photo
④ RIGHT Move highlighting right
Display next photo
⑤ EXIT Exit current screen
Go back a screen
⑥ SETUP Open function menu
⑦ Power/ Select highlighted option
Enter Start slideshow
Pause
Play
Frame on/off
① Up
② Down
③ Left
④ Right
⑤ Stop/Exit
⑥ Menu
⑦ Power/Enter
⑧ / ⑫ Stand
⑨ DC Power Input (DC IN: 5V/1A)
⑩ Card slot (SD/MMC/MS)
⑪ USB
⑬ Holes for wallmount
⑭ Speakers
ENGLISH12
Using the remote control
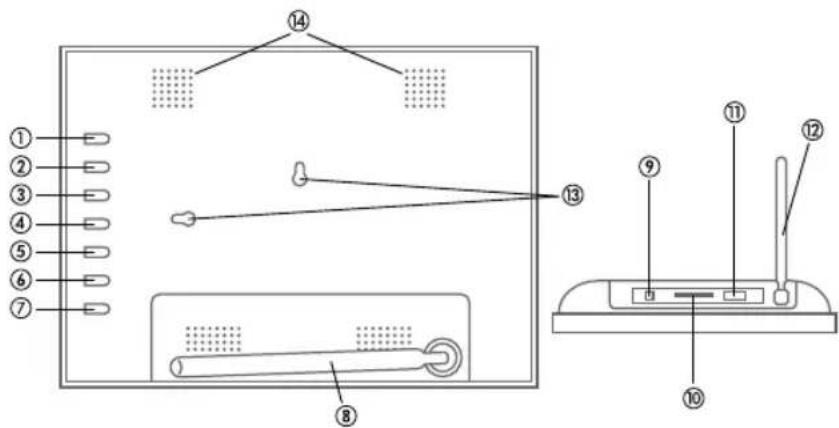
The remote control included with your Digital Picture Frame may look slightly different from the one shown here, but it offers the same buttons and functions.
POWER Press POWER to turn on and off the frame
SETUP Press for setup
Left
▶ Right
▲ Up
▼ Down
ENTER Confirm your operation PAUSE/PLAY
EXIT Exit to the previous menu
ROTATE Rotate Pictures at 90/180/270°
ZOOM Zoom in the photo
SLIDESHOW Slideshow your digital pictures at the desired transition effect
Replacing the remote control battery
- Hold the remote control with the control buttons facing downward.
- While pressing the ridged lug of the battery cover to the inside, pull the tray out.
- Place a CR2025 lithium battery on the tray with the positive "+" end facing toward you.
- Close the tray.
Card selection screen
Use the Select Card menu to choose between memory cards and the built-in memory.: Memory, SD/MMC, USB
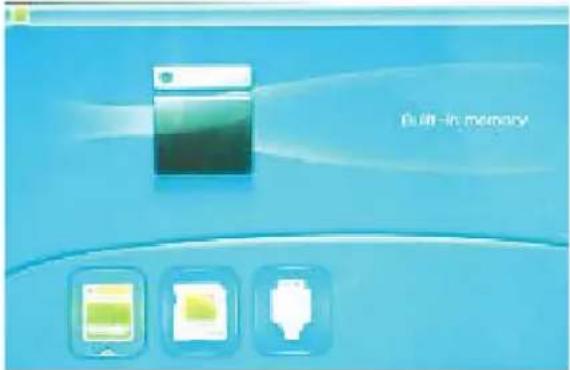
- To open the Select Card menu, press the EXIT button repeatedly to return to the menu screen.
- Press the left and right arrow buttons to select the desired memory card or the built-in memory.
- Press the ENTER button to confirm your selection.
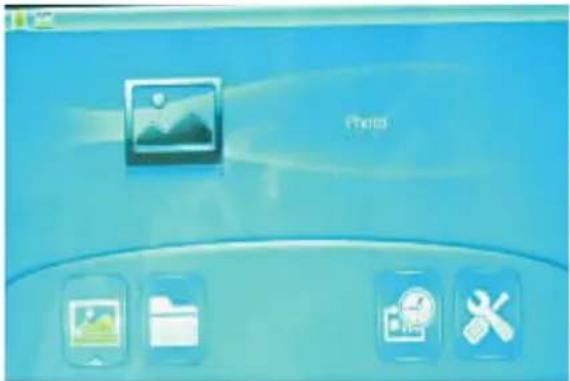
Menu selection screen
Use the menu selection screen to choose the appropriate menu (left/right arrow button/Enter).
A) Photo Display Thumbnail screen
B) File Display file list
C) Calendar Display calendar and time
(only for model with this function)
D) Setup Setting the fram options
A) Photo
Thumbnail screen
This screen shows thumbnail versions of all photos on the selected memory source. Up to 6 photos are displayed at a time. Use this screen to select a single photo to be displayed, copied or deleted, or to start a slideshow of all photos.
- Press the arrow buttons on the remote control or Digital Picture Frame until the desired photo is highlighted. The photo file name will be displayed at the screen.
- Press the SLIDESHOW button to start the slideshow with the selected photo.
- To stop the slideshow and return to the thumbnail screen, press the EXIT button.
Copying selected photo to built-in memory
Use the remote control to copy the selected photo from the memory card to the built-in memory.
- Press the SETUP button to open the menu.
- Press the up or down arrow button to select Copy Photo.
- Press ENTER. A confirmation message will be displayed.
Deleting a selected photo
When selecting a photo, you can delete it with the remote control.
- Press the SETUP button to open the menu.
- Press the up or down arrow button to select Delete Photo.
- Press ENTER. A confirmation message is displayed.
Displaying a single photo full screen
You can choose a single photo to be displayed without a slideshow.
- With the thumbnail screen or file list displayed, select a photo and press ENTER to display the selected photo on the full screen.
- Press the left arrow button to go to the previous photo.
- Press the right arrow button to display the next photo.
- To stop the full screen display and return to the thumbnail screen, press the EXIT button.
Changing the displayed photo manually
During a slideshow, each photo replaces the previous one at the interval set for the slideshow speed in the Setup menu.
You can also change the displayed photo at any time during a slideshow, press the ENTER (PLAY/PAUSE) button.
- Press the left arrow button to go to the previous photo.
- Press the right arrow button to display the next photo.
Rotating a photo
You can rotate a photo displayed in full screen mode using the remote control.
Press the ROTATE button to rotate the photo 90° clockwise.
Enlarging a photo
To magnify a photo displayed in full screen mode, press the ZOOM button.
B) File
File mode
- In the mode selection screen, use the arrow buttons to select File and press ENTER. A list with all files and folders will be displayed.
- Use the arrow buttons [▲]/[▼] to choose the desired file.
Copying files
- When the file is marked, press SETUP, select COPY and confirm with ENTER.
Deleting files
- When the file is marked, press SETUP, select DELETE and confirm with ENTER.
C) Calendar
Setting date and time (only for model with this function)
Open the menue selection display and use the left/right arrow button to select the icon for SETUP.
Press ENTER to open the setting options.
Use the UP/DOWN arrow buttons to choose the option set time/date.
ENGLISH 14
D) Setup
Setting the Frame Options
In the menu selection screen, use the arrow buttons to select Setup and press ENTER. A list with the available options will be displayed. The settings and parameters are selected as follows:
[▲]/[▼] Shift items or choose parameter [◀]/[▶]: Change parameter value ENTER: Confirm the defined setting EXIT: Return to list of settings or menue selecting screen
The following table lists the viewing options in the Setup menu as well as the available settings and their effects.
Menu list
Language
Slidemode Single window, four/triple windows
Slice speed 3, 5, 15, 30 sec 1, 5, 15, 30 min, 1 Std.
Photo effect Color, mono, sepia Photo mode Display image size Autofit, full, Panscan Display Contrast, Brightness, Saturation, Tint
Set time/date
Set time format 12 / 24 h
Set date format
Format built-In Memory
Reset setting
Connecting a USB Flash Drive
Your Digital Picture Frame will see a USB Flash Drive the same way it sees memory cards.
ENGLISH 15
Frequently Asked Questions
Q: How do I set up my Digital Picture Frame?
A: It is very simple to get your Digital Picture Frame out of the box and running in just a few minutes. Just plug the power adapter into the Digital Picture Frame and into a standard wall socket. Insert a memory card into the appropriate card slot on the side of the Digital Picture Frame, and turn it on. Your first slideshow will automatically start to play.
Q: What memory cards can the Digital Picture Frame read?
A: Compatible memory cards include Secure Digital™, MultiMedia Card™, Memory Stick™, Memory Stick Pro™, Memory Stick Duo™, and Memory Stick Pro Duo™.
Q: I set up the Digital Picture Frame. Why won't it turn on?
A: The adapter is not securely connected to the Digital Picture Frame
Q: I have a memory card in the Digital Picture Frame. Why can't I view my photos?
A: First, make sure that the memory card is one of the formats listed above and that the files on the card are JPEG image files. Second, turn the Digital Picture Frame off and make sure that the memory card is inserted all the way into the card slot and is facing in the correct direction. Third, turn the frame on. After a couple of seconds, you should see your first photo. Press EXIT to open the Select Card screen and select the card. Then select PHOTO. You should see the thumbnail screen listing all photos on the card. If you don't, you may want to try another card.
Note: Some digital cameras save images in other formats. Please refer to your camera's manual if your photos are not JPEG files.
Q: Why is the picture display slower with some pictures and faster with others?
A: Higher resolution pictures load more slowly. Try using lower resolution pictures or down sampling your images. See your camera's operating manual for details on down sampling photos.
Q: Can I insert multiple memory cards?
A: Yes. Turn on the Digital Picture Frame before inserting any card. The Select Card screen lets you choose between all available memory cards.
Q: Does the Digital Picture Frame have a built-in memory?
A: Yes. The volume depends on your model.
Q: Does the Digital Picture Frame support all JPEG files?
A: No, it supports JPEG files taken from a digital camera. The Digital Picture Frame may not read all image files downloaded from the internet or from other software graphics applications.
ENGLISH 16
Technical Specifications
Product: 8.0" LCD screen
Digital Picture Frame (20 cm)
Resolution: 800 x 600 pixel (4:3)
Internal memory: See package specifications
Memory card Secure Digital™, MultiMedia
formats: Card™, Memory Stick™,
USB Flash Drives
File formats: Standard JPEG
Features: Slideshow mode
Multiple transitional styles for
slideshow
Variable speed for slideshow
Stand for optimum viewing angle
USB Ports: USB 2.0
Power input: 100 V - 240 V AC, 50 Hz
Output: 5 V DC, 1 A
Dimensions: approx. 223 x 162 x 28 mm
Weight: approx. 515 g
Certification: CE/RoHS
Design and specifications are subject to change without notice.

This symbol on the product or in the instructions means that your electrical and electronic equipment should be disposed at the end of its life separately from your household waste. There are separate collection systems for recycling in the EU. For more information, please contact the local authority or your retailer where you purchased the product.
FRANÇAIS
Sommaire
Agrandir la photo....21
natural_image
Black-framed display screen showing a skier in mid-air against a blue sky with clouds (no text or symbols visible)Vitesse 3, 5, 15, 30 sec
de separation 1, 5, 15, 30 min, 1 h
Certificates : CE/RoHS
natural_image
Black-framed display frame showing a skier in action against a snowy mountain backdrop (no text or symbols visible)① UP
② Down
③ Left
④ Right
⑤ Stop/Exit
⑥ Menú
⑦ Power/Enter
⑧ / ⑫ Suspensión
⑨ Toma de corriente (DC IN: 5V/1A)
⑩ Ranura trajetasde memoria (SD/MMC/MS)
⑪ Puerto USB
⑬ Ranura para colgar
⑭ Altoparlantes
ESPAÑOL28
natural_image
Black-framed display frame showing a climber in mid-air against a snowy mountain backdrop (no text or symbols visible)① Up
② Down
③ Left
④ Right
⑤ Stop/Exit
⑥ Menu
⑦ Power/Enter
⑧ / ⑫ Piede
⑨ Allaciamento corrente (DC IN: 5V/1A)
natural_image
Blue desktop computer interface with icons for image, folder, clock, and wrench (no readable text or symbols)ITALIANO 37
A) Foto
Anteprima immagini
natural_image
Black-framed display frame showing a climber in mid-air against a snowy mountain backdrop (no text or symbols visible)natural_image
Blue desktop computer interface with icons for image, folder, photo, and tools (no readable text or symbols)NEDERLAND 45
A) Foto
Foto-overzicht
Dia sneheld 3, 5, 15, 30 sec
1, 5, 15, 30 min, 1 uur
Foto effect Kleur, mono, sepia
Foto modus past de grootte von de

- Important Safety Precautions
- Cleaning the LCD screen
- Cleaning the Digital Picture Frame
- ENGLISH10
- Introduction
- Important!
- The Digital Picture Frame offers the following key features:
- Box Content
- ENGLISH 11
- Setting up the Digital Picture Frame
- Control Buttons and Remote Control
- Using the control buttons
- ENGLISH12
- Using the remote control
- Replacing the remote control battery
- Card selection screen
- Menu selection screen
- A) Photo
- Thumbnail screen
- Copying selected photo to built-in memory
- Deleting a selected photo
- Displaying a single photo full screen
- Changing the displayed photo manually
- Rotating a photo
- Enlarging a photo
- B) File
- File mode
- Copying files
- Deleting files
- C) Calendar
- Setting date and time (only for model with this function)
- ENGLISH 14
- D) Setup
- Setting the Frame Options
- Menu list
- Language
- Set time/date
- Set date format
- Format built-In Memory
- Reset setting
- Connecting a USB Flash Drive
- ENGLISH 15
- Frequently Asked Questions
- ENGLISH 16
- Technical Specifications
- FRANÇAIS
- Sommaire
- ESPAÑOL28
- ITALIANO 37
- A) Foto
- Anteprima immagini
- NEDERLAND 45
- Foto-overzicht
Brand : BRAUN
Model : DigiFrame 88
Category : Digital photo frame