
C300RU V3 - Network card / adapter CONCEPTRONIC - Free user manual and instructions
Find the device manual for free C300RU V3 CONCEPTRONIC in PDF.

| Product Type | 300N Wireless USB Adapter |
| Brand | Conceptronic |
| Model | C300RU V3 |
| Maximum Speed | 300 Mbps (802.11n standard) |
| Frequency Bands | 2.4 GHz |
| Wireless Security | WEP, WPA, WPA2 (encryption up to 128-bit) |
| WPS Function | Yes - physical and virtual button (PBC), PIN code |
| Interface | USB 2.0 (compatible with USB 1.1) |
| LED Indicators | Network activity LED (blinking during operation) |
| Buttons | 1 × WPS button |
| Package Contents | Adapter, USB extension cable, CD-ROM with drivers and manual, quick start guide, warranty card |
| Supported Operating Systems | Windows XP, Vista, 7 |
| Power Supply | Via USB port (5 V, 500 mA) |
| Dimensions (approx.) | 8.5 × 2.2 × 1.2 cm (without cable) |
| Weight (approx.) | 30 g |
| Operating Temperature | 0 °C to 40 °C |
| Operating Humidity | 10 % to 85 % (non-condensing) |
| Certifications | CE, FCC, RoHS |
| Maintenance and Cleaning | Disconnect the device before cleaning. Use a soft, dry cloth. Do not use abrasive products or solvents. |
| Safety Instructions | Do not expose to water or excessive humidity. Do not open the casing. Keep out of reach of children. |
Frequently Asked Questions - C300RU V3 CONCEPTRONIC
User questions about C300RU V3 CONCEPTRONIC
0 question about this device. Answer the ones you know or ask your own.
Ask a new question about this device
Download the instructions for your Network card / adapter in PDF format for free! Find your manual C300RU V3 - CONCEPTRONIC and take your electronic device back in hand. On this page are published all the documents necessary for the use of your device. C300RU V3 by CONCEPTRONIC.
USER MANUAL C300RU V3 CONCEPTRONIC
Conceptronic C300RU Versie 3.0
Gebruiksaanwijzing
http://support.microsoft.com/kb/928429
http://www.microsoft.com/windowsxp/using/networking/setup/wireless.mspx#4
Conceptronic C300RU Version 3.0
User Manual
Congratulations on the purchase of your Conceptronic 300N Wireless USB Adapter
This user manual gives you a step-by-step explanation of how to install and use the Conceptronic 300N Wireless USB Adapter on your computer.
If you need more information or support for your product, we advise you to visit our Service & Support website at www.conceptronic.net/support and select one of the following options:
- FAQ : Frequently Asked Questions database
- Downloads : Manuals, Drivers, Firmware and more downloads
- Contact : Contact Conceptronic Support
For general information about Conceptronic products visit the Conceptronic website at www.conceptronic.net
The information in this manual is based on Windows 7 and Vista, but can differ from your computer when you are using a different operating system.
Some functions described in this manual will require manual operation or configuration of your wireless router or access point. Refer to the documentation of your wireless router or access point for more information regarding these functions.
1. Package contents
The following items are present in the package of the Conceptronic 300N Wireless USB Adapter:
- Conceptronic 300N Wireless USB Adapter (C300RU v3.0)
USB Extension Cable
Product CD-ROM - This multi language user manual
Warranty card & CE declaration booklet
2. The 300N Wireless USB Adapter explained
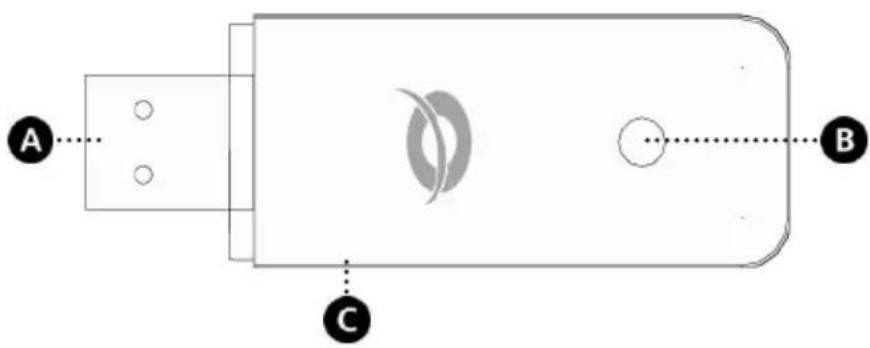
Nr Description Status Explanation
A. USB connector - Connect the C300RU to your computer.
B. Activity LED Off The adapter is not connected to a network. Flashing randomly The adapter is connected to a network and sending or receiving data.
C. WPS button - Press to start the WPS function.
3. Hardware installation
Before you can install the drivers & software, you need to connect the 300N Wireless USB Adapter to your computer.
- Turn on your computer.
Plug the 300N Wireless USB Adapter into a free USB port on your computer.
The computer will recognize new hardware and shows the 'New Hardware Wizard'.
- Ignore this wizard or click on "Cancel" to close this wizard.
You can now proceed with the driver & software installation, described in chapter 4.
Note: When using Windows 7, you may skip chapter 4, since windows 7 will automatically install the needed native drivers. However, when using these native drivers, the WPS functionality and the Conceptronic Wireless Network Config Utility are not available. When you choose to skip chapter 4, you can also skip chapter 5.1 ~ 5.4 and continue to chapter 5.5.
4. Driver & software installation
When the 300N Wireless USB Adapter is connected to your computer, you can proceed with installing the Conceptronic drivers & software.
A. Insert the CD-ROM in the optical drive of your computer. The AutoPlay option will be shown automatically. Click on "Run Autorun.exe" to start the autorun menu.
Note: If the AutoPlay option is not shown, you can start the autorun menu by browsing to "Computer" and double clicking on your optical drive.
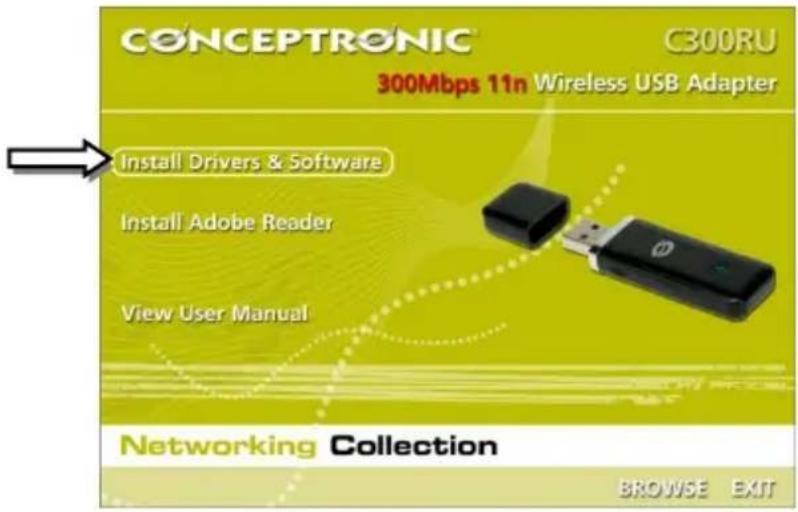
B. Select the option "Install Drivers & Software" from the autorun menu. The installation wizard will appear.
Note: You might get a "User Account Control" warning message, which you will need to accept by clicking on "Yes".
C. Accept the License Agreement by selecting "I Agree..." and click on "Next" to proceed.
D. Select "Install driver and Conceptronic Wireless Network Configuration Utility" if you want to use the Conceptronic software, or select "Install drivers only" if you want to use the standard Windows Wireless Configuration utility. Click on "Next" to proceed.
Note: If you are using Windows XP and selected to install both drivers and utility, you will be asked which Configuration Tool you want to use. Select "Conceptronic Configuration Tool" and click on "Next" to proceed.
E. Click on "Install" to install the driver and software.
The drivers & software (if selected) will be installed on your computer.
F. When the installation is finished, click on "Finish" to close the installation wizard.
G. The Conceptronic Wireless Network Configuration Utility will be shown if you have selected to install the drivers and the software.
Note: It is recommended to restart your computer when the new hardware installation has been completed.
You can now proceed to chapter 5 to connect to a wireless network.
5. Connect to a wireless network
This chapter will explain how you can connect to your wireless network by using the 300N Wireless USB Adapter and the Conceptronic Wireless Network Config Utility.
Note: If you have chosen to use the native drivers of Windows 7, or you have chosen "Install drivers only" during the installation of the drivers & software in the previous chapter, the WPS functionality and the Conceptronic Wireless Network Config Utility will not be available. Therefore, chapter 5.1 ~ 5.4 will not apply for you. Continue to chapter 5.5 for information how you can connect to your wireless network.
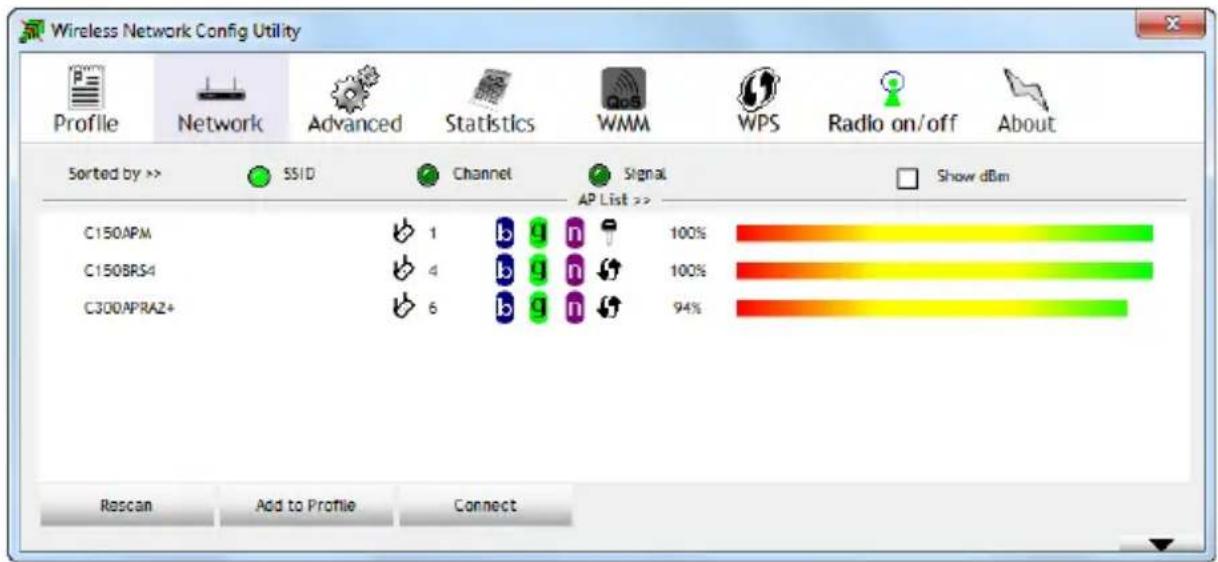
5.1 The Conceptronic Wireless Network Config Utility
When the installation of the drivers & software is completed, the Conceptronic Wireless Network Config Utility will be shown on your screen, displaying the wireless networks in your area:
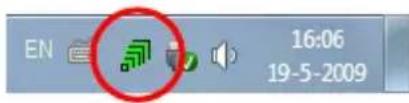
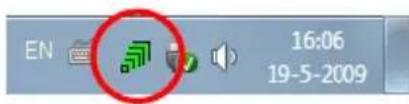
If the wireless utility is not shown, double click on the system tray icon of the wireless utility:

Connecting to your wireless network can be done in two different ways: automatically using the Wi-Fi Protected Setup (WPS) option or manually using the wireless utility.
ENGLISH
5.2 Connect automatically using the WPS (Virtual) Push Button
The Conceptronic 300N Wireless USB Adapter supports WPS (Wi-Fi Protected Setup). WPS is a standard to easily secure your wireless network. With WPS you can protect your wireless network with just a few easy steps without knowledge of different encryption methods.
Note: To use the WPS option of the 300N Wireless USB Adapter your router or access point also needs to support WPS.
- Select the page "WPS" in the wireless utility.
- Start WPS configuration on your router or access point by either pressing the WPS button on the device or the soft button in the web interface of the device.
- Press the WPS button on the 300N Wireless USB Adapter (refer to chapter 2 to see where the WPS button is located) or use the virtual WPS Push Button (named “PBC”) in the wireless utility.

The wireless utility will be triggered by the (virtual) WPS button and will try to connect to your wireless network. If the wireless utility main window is shown on your screen, you can see the WPS activity at the bottom of the window:

When the WPS Push Button authentication is completed successfully, the message "Get WPS profile successfully" will be shown shortly.
- Select the newly created WPS profile from the 'WPS Profile List' and click on "Connect" to establish the wireless connection.
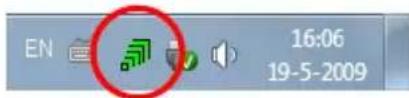
You are now connected to your wireless network. The wireless utility will indicate the signal strength in your system tray:
5.3 Connect automatically using the WPS PIN Code function
When your router or access point is WPS capable, but does not have a (virtual) push button, you can create a WPS connection using the PIN Code function.
Note: Your wireless router or access point needs to have the WPS PIN Code function in its web interface in order to use this function.
The wireless utility can work in "Enrollee" or "Registrar" mode:
- When "Enrollee" is selected, the wireless utility will generate a PIN Code which must be entered in the WPS configuration of your router or access point.
- When "Registrar" mode is selected, you can enter a PIN Code in the wireless utility. This mode is needed when your router or access point provides a PIN Code which must be used for the wireless connection.
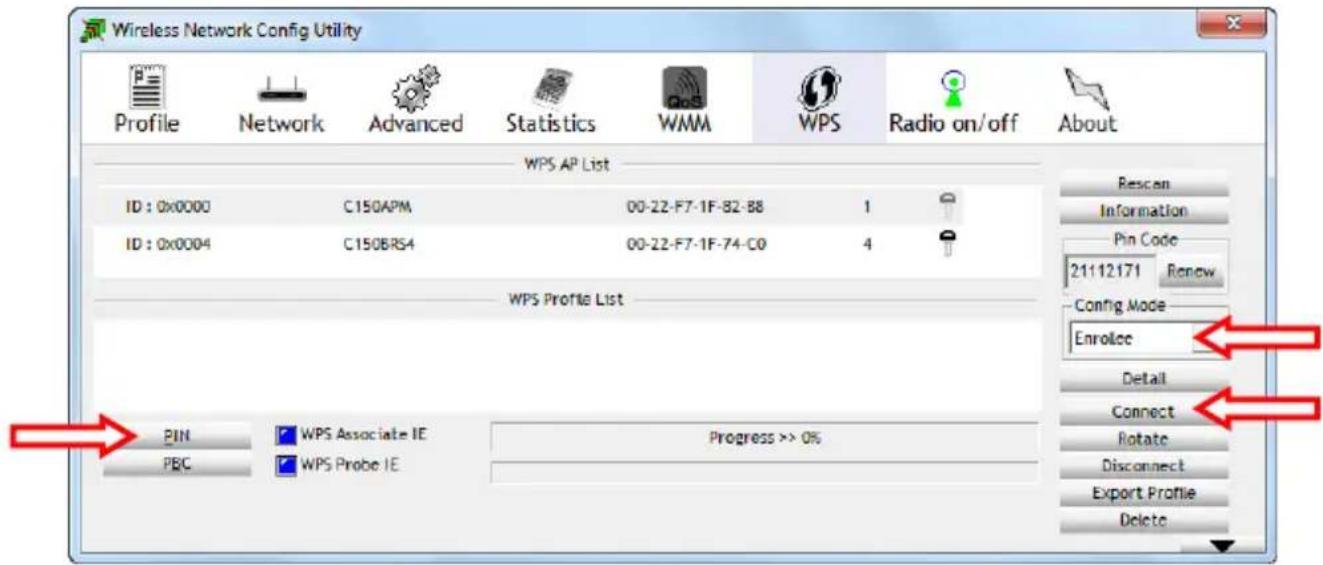
- Activate the WPS PIN Code function on your router or access point.
- Select the correct "Config Mode" in the wireless utility, according to the information above.
- Click on the "PIN" button in the wireless utility.
You can see the WPS activity at the bottom of the window:

When the WPS PIN Code authentication is completed successfully, the message "PIN - Get WPS profile successfully" will be shown shortly.
- Select the newly created WPS profile from the 'WPS Profile List' and click on "Connect" to establish the wireless connection.
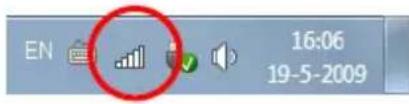
You are now connected to your wireless network. The wireless utility will indicate the signal strength in your system tray:
5.4 Connect manually to your wireless network
The wireless utility will automatically show all available wireless networks within the range of your 300N Wireless USB Adapter. If your wireless network is not shown, click on the "Rescan" button to scan for available wireless networks.
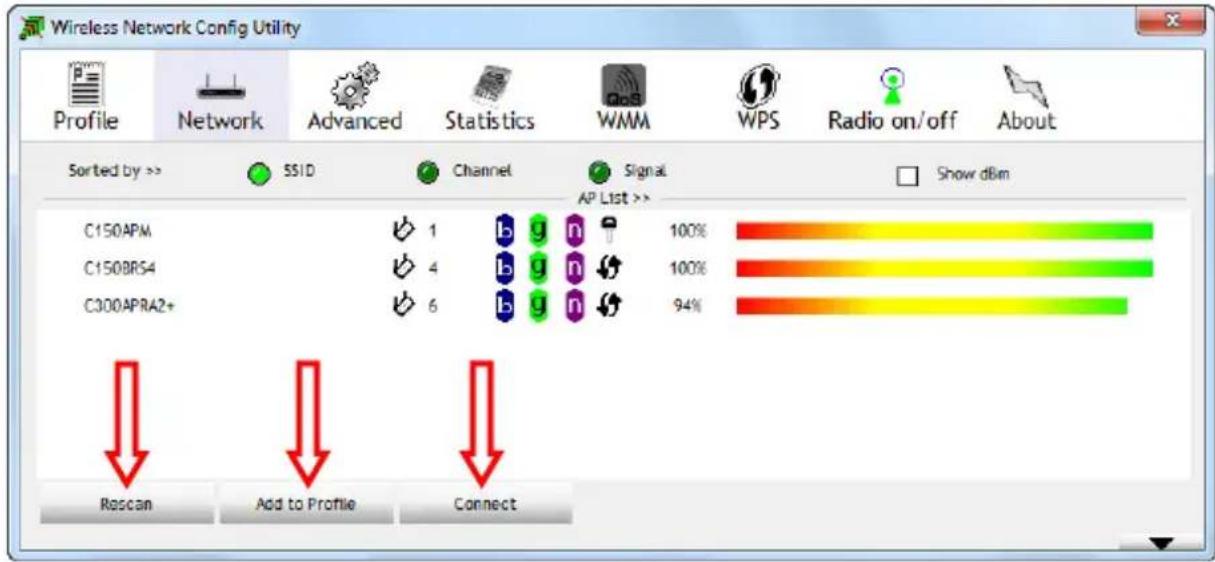
- Select the network you want to connect to from the list of available wireless networks.
- Click on "Add to Profile".
The wireless utility will collapses and shows the "Add to Profile" options.
Note: If you want to connect to a temporary wireless network (for example: a hotspot), you can also use the "Connect" button. When using the "Connect" button instead of the "Add to Profile" button, the connection information will be deleted when you restart your computer.
Non-password protected network (unsecured):
Enter a name for your profile, verify that the correct SSID (wireless network) is selected and click the "OK" button to add the profile your profile list.
The Wireless Utility will automatically open the 'Profile' window. Select the new created profile and click the "Activate" button to connect to the wireless network.
The wireless utility will connect to the wireless network directly. When you are connected, the wireless utility will indicate the signal strength in your system tray:

Note: If you are connecting to your own network and it is unsecured (not protected by a password), we advise you to enable security on your network to prevent unauthorized access to your network.
Password protected network (secured):
Enter a name for your profile, verify that the correct SSID (wireless network) is selected click on the "Auth.Encry." Button.
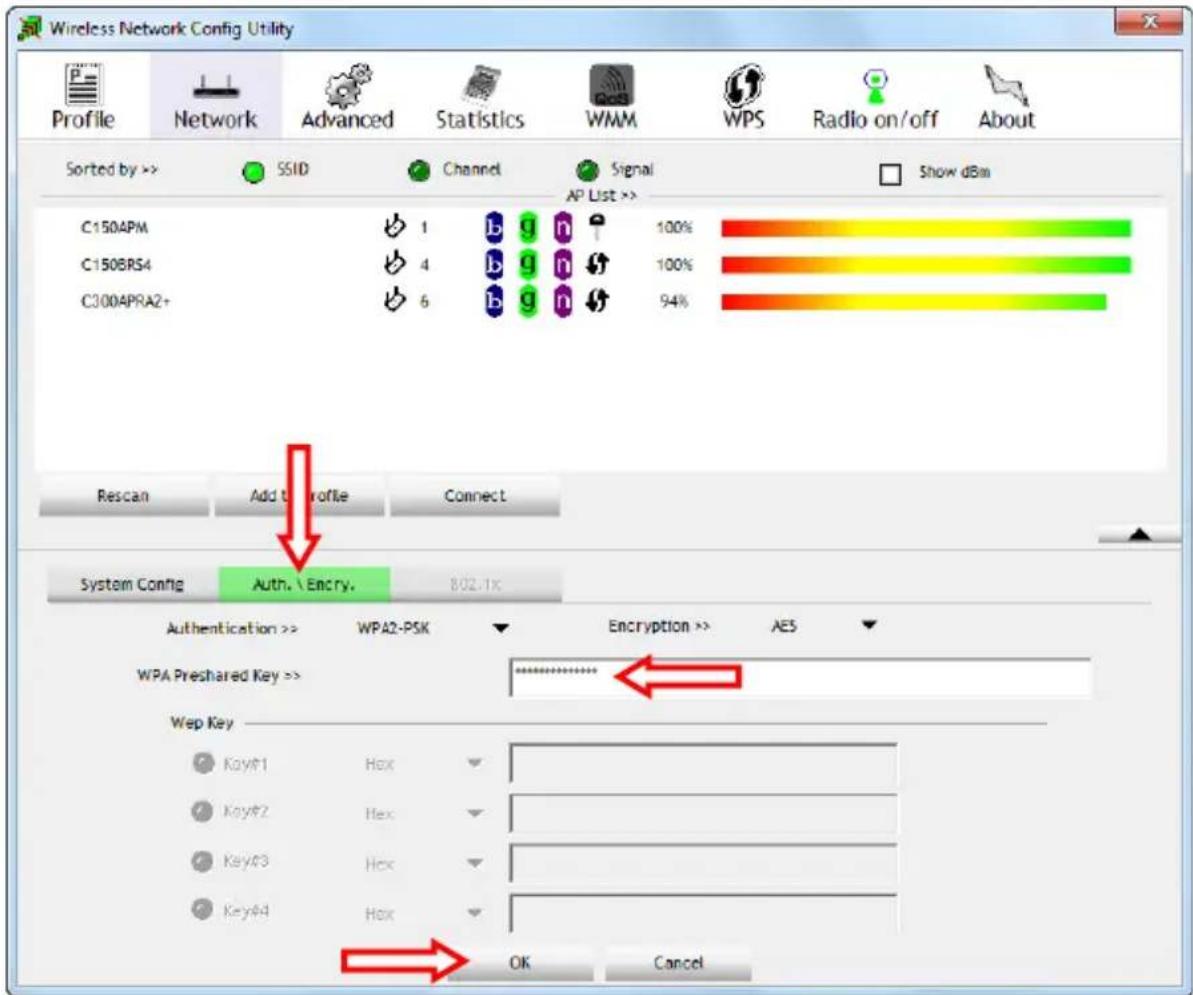
Verify if the automatically selected security matches the settings of your wireless networks and enter the encryption key or passphrase of your wireless network into the "WPA Preshared Key" field.
Note: On some routers or access points, the default encryption key or passphrase is mentioned on a sticker on the bottom of the device.
Click the "OK" button to add the profile your profile list. The wireless utility will automatically open the 'Profile' window.
Select the new created profile and click the "Activate" button to connect to the wireless network.
The wireless utility will connect to the wireless network directly. When you are connected, the wireless utility will indicate the signal strength in your system tray:
ENGLISH
5.5 Driver only or Windows 7 native driver installation
When you have chosen not to install the Conceptronic drivers & software for Windows 7, or you have only installed the Conceptronic drivers without the software, you need to use the standard Windows wireless network connection wizard to connect to a wireless network:
You can find connection information for these wireless network connection wizards on the following links:
http://support.microsoft.com/kb/928429
http://www.microsoft.com/windowsxp/using/networking/setup/wireless.mspx#4
Note: Without the Conceptronic drivers & software, you cannot use the WPS functionality. If you want to use the WPS functionality, (re)install the drivers & software as described in chapter 4.
Enjoy the use of the Conceptronic 300N Wireless USB Adapter!
C300RU Version 3.0 de Conceptronic
Manual de usuario
http://support.microsoft.com/kb/928429
http://www.microsoft.com/windowsxp/using/networking/setup/wireless.mspx#4
Conceptronic C300RU Version 3.0
Bedienungsanleitung
http://support.microsoft.com/kb/928429
- http://www.microsoft.com/windowsxp/using/networking/setup/wireless.mspx#4
http://support.microsoft.com/kb/928429
http://www.microsoft.com/windowsxp/using/networking/setup/wireless.mspx#4
http://support.microsoft.com/kb/928429
http://www.microsoft.com/windowsxp/using/networking/setup/wireless.mspx#4
http://support.microsoft.com/kb/928429
http://www.microsoft.com/windowsxp/using/networking/setup/wireless.mspx#4