ZDE 320 X - Cooker ZANUSSI - Free user manual and instructions
Find the device manual for free ZDE 320 X ZANUSSI in PDF.
| Product type | Cooker (hob) |
| Brand | Zanussi |
| Model | ZDE 320 X |
| Number of cooking zones | 2 electric plates |
| Diameter of plates | 180 mm (normal) and 145 mm (normal) |
| Power of 145 mm plate | 1.0 kW |
| Power supply | 230 V single-phase |
| Table width | 270 mm |
| Table depth | 490 mm |
| Approximate weight | 5 kg |
| Control type | Rotary knobs with 7 positions (0-6) |
| Main functions | Cooking by electric plates, adjustable heating positions, operation indicator lamp |
| Maintenance and cleaning | Unplug before cleaning; clean plates with soapy water, avoid abrasive products; steel surround with water and vinegar |
| Safety | Knobs in Stop position when not in use, disconnect before servicing, installation by professional |
| Spare parts and repairability | Use exclusively original parts, repair by authorized after-sales service |
| General information | Warranty 24 months in Belgium, manufacturer Electrolux Home Products Italy, compliant with EEC directives |
Frequently Asked Questions - ZDE 320 X ZANUSSI
User questions about ZDE 320 X ZANUSSI
0 question about this device. Answer the ones you know or ask your own.
Ask a new question about this device
Download the instructions for your Cooker in PDF format for free! Find your manual ZDE 320 X - ZANUSSI and take your electronic device back in hand. On this page are published all the documents necessary for the use of your device. ZDE 320 X by ZANUSSI.
USER MANUAL ZDE 320 X ZANUSSI
Plaque normale 145 1000 W
Plaque normale 180 1500 W
Puissance totale 2500 W
Tension d'alimentation 230 V 50 Hz
et modifications successives.
These warnings are provided in the interest of safety. You must read them carefully before installing or using the appliance.
It is most important that this instruction book should be retained with the appliance for future reference. Should the appliance be sold or transferred, always ensure that the book is left with the appliance in order that the new owner can get to know the functions of the appliance and the relevant warnings.
During Operation
- This appliance has been designed to be operated by adults and children under supervision. Young children MUST NOT be allowed to tamper with the controls or play near or with the oven.
- This appliance has been designed for cooking edible foodstuff and to be used for domestic non-professional purposes only. It must not be used for any other purpose.
It is dangerous to alter the specification in any way. - For hygiene and safety reasons, this appliance should be kept clean at all times. A build-up of fats or other foodstuff could result in a fire.
- Accessible parts of this appliance may become hot when it is in use. Children should be KEPT AWAY until it has cooled.
- Under no circumstances should you attempt to repair the appliance yourself. Repairs carried out by unexperienced persons may cause injury or serious malfunctioning. Refer to your local Zanussi Service Centre. Always insist on genuine Zanussi spare parts.
- Ensure that all control knobs are in the OFF position when not in use.
- Should you connect any electrical tool to a plug near this cooking appliance, ensure that electric cables are not in contact with it and keep them far enough from the heated parts of this appliance.
- If the appliance is out of order, disconnect it from the electric supply.
About Installation, Cleaning and Maintenance
- It is mandatory that all operations required for the installation are carried out by a qualified or competent person, in accordance with existing rules and regulations.
-
Disconnect the appliance from the electrical supply, before carrying out any cleaning or maintenance work.
-
Once you removed all packaging from the appliance, ensure that it is not damaged and the electric cable is in perfect conditions. Otherwise, contact your dealer before proceeding with the installation.
- The manufacturer disclaims any responsibility should all the safety measures not be carried out.

The symbol on the product or on its packaging indicates that this product may not be treated as household waste. Instead it shall be handed over to the applicable collection point for the recycling of electrical and electronic equipment. By ensuring this product is disposed of correctly, you will help prevent potential negative consequences for the environment and human health, which could otherwise be caused by inappropriate waste handling of this product. For more detailed information about recycling of this product, please contact your local city office, your household waste disposal service or the shop where you purchased the product.
Guide to Use the instructions
The following symbols will be found in the text to guide you throughout the Instructions:

Safety Instructions

Step by step instructions for an operation

Hints and Tips

Environmental information
These instructions are only for the countries stated by the symbol printed on the front cover of this instruction book.
Contents
For the User
For Your Safety 18
Description of the appliance 19
Before the first use 19
Operation 20
Hints and tips 20
Maintenance and cleaning 21
For the Installer
Technical Data 21
Instruction for the Installer 22
Electrical connection 22
Building In 23
Possibilities for insertion 24
Guarantee conditions
25
Description of the appliance

1.Hob top
2. Normal hot plate - 180 mm Ø
3. Normal hot plate - 145 mm Ø
4. Control knobs
5. Pilot light
Before the first use
Before using the hob for the first time, switch the plates on for about 10 minutes at the maximum position. It is important to note that the plate may smoke a little and produce a slightly unpleasant odour when used for the first time. This is quite normal and will disappear after a few minutes.
Operation
Electric Hotplates
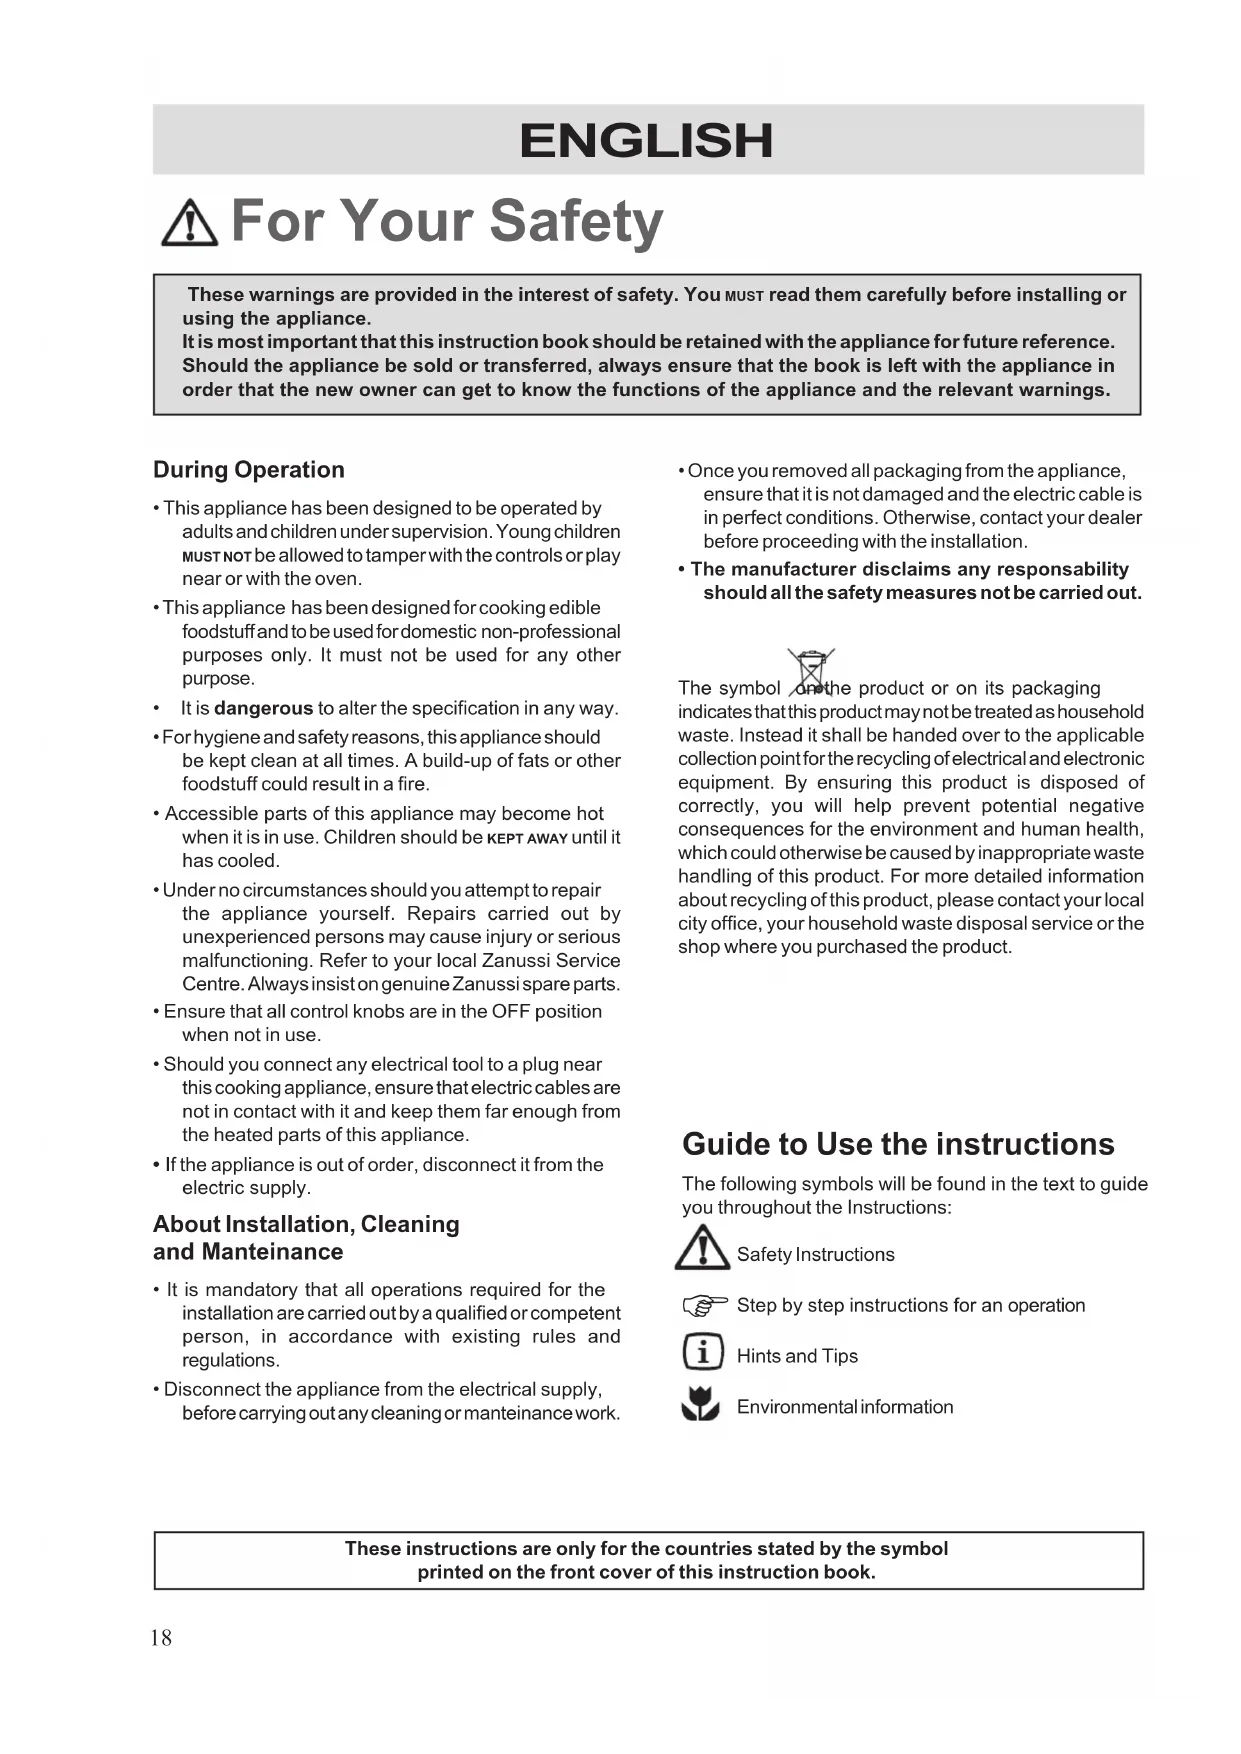
To switch on a hotplate, turn the relevant control knob anticlockwise to the required heat setting.
The control knob is numbered 1 - 6
0-OFF
1 - Minimum
6 - Maximum.
We recommend the plates are switched to maximum (6) for a short while to boost the plate, and then adjusted to the required setting.

Take care when frying food in hot oil or fat, as the overheated splashes could easily ignite.
Pilot Light
The Pilot Light will come on each time a cooking zone is switched on.
You can switch off the plate a short while before you finish cooking, and the final stage will be completed on the accumulated heat. Similarly, stews etc. cooked in well covered saucepans cook at lower temperature which is more economical.

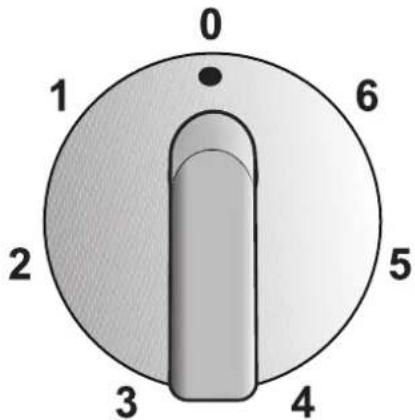
Ensure pans are large enough to avoid liquids being split onto the plates.
Never leave the plates on without a pan on them or with an empty pan on them.
Suggestions for the correct setting of the plates are given in the following table.
| OFF 0 | ||
| Very Gentle 1 | To | keep food warm To melt butter and chocolate |
| Gentle 2 To | prepare cream-sauces, stews and milk puddings or to fry eggs | |
| Slow 3 Dried vegetables,frozen food,fruit,boiling water or milk | ||
| Medium 4 Boiled potatoes,fresh vegetables,pâtés,soups, broths, pancakes or fish | ||
| High 5 Larger | stews,meat roll,fish, omelettes,steaks | |
| Fast 6 Steaks | escalopes and frying. | |
Hints and Tips
Saucepans for use on solid plates should have several characteristics:
They should be fairly heavy duty
They should fit the heat area exactly, or be slightly larger for efficient use, NEVER smaller.
They should have a flat base to ensure good contact with the plate.
This is particularly important when using pans for high temperature frying or pressure cooking.
As soon as liquid starts boiling, turn down the plate control knob so that it will barely keep the liquid simmering.
Maintenance and Cleaning

Before any maintenance or cleaning can be carried out, you must DISCONNECT the hob from the electricity supply.
Never use steam or a steam cleaning machine to clean the appliance.
The hob is best cleaned whilst it is still warm, as spillage can be removed more easily than if it is left to cool.
The Hob Top
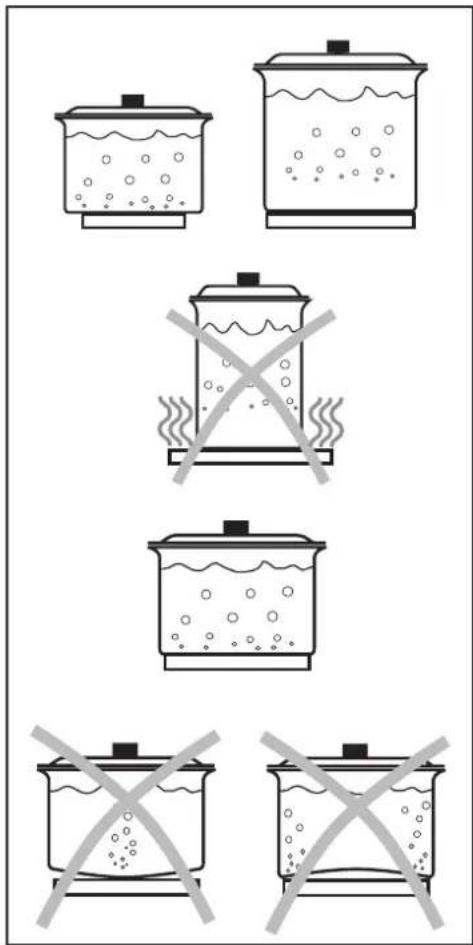
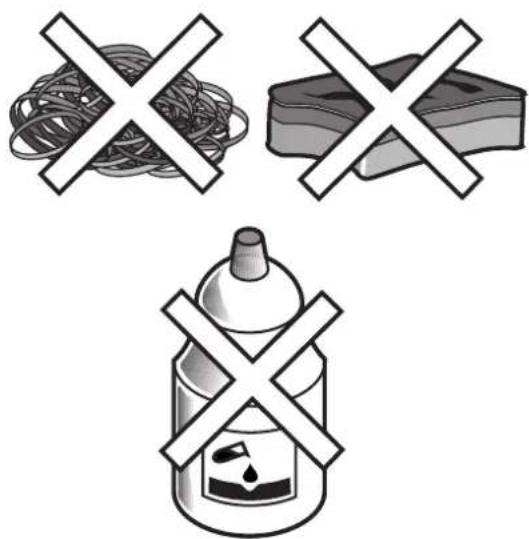
Regularly wipe over the hob top using a soft cloth well wrung out in warm water to which a little washing up liquid has been added. Avoid the use of the following:
-household detergent and bleaches;
- impregnated pads unsuitable for non-stick saucepans;
- steel wool pads;
-bath/sink stain removers.
Should the hob top become heavily soiled, the following products are recommended:
- For stainless steal hobs use a proprietary stainless steel cleaner.
- For other hobs use warm water and soft detergent.
The control knobs may be removed by carefully pulling them upward for easier cleaning.
The Hotplates
Spills onto the actual plate should be removed using warm water and a soft brush, nylon or plastic scourer. To keep the plates looking as new, hotplate conditioner can be purchased from most hardware stores.
Alternatively, wipe the plates with a drop of olive oil on a kitchen towel to avoid rust. It is important to note that the plate will smoke a little and produce a slightly unpleasant odour when next used.
Stainless steel parts: the stainless steel spill rings may become straw coloured with use. Use a proprietary stainless steel cleaner to remove this straw discolouration. This also applies to the area around the hotplates on stainless steel hobs.

Failure to clean and condition hotplates may lead to rust and corrosion forming on the surface.
Technical Data
Hotplate Rating
Rear Normal Hotplate 0180mm 1,5 kW
Front Normal Hotplate 0 145mm 1,0 kW
Total Rating 2,5 kW
Electric Supply 230 V 50 Hz
Hob recess dimensions
Length 270mm
Width 490 mm.

This appliance complies with the following E.E.C.Directives:
- 73/23 - 90/683 (Low Voltage Directive);
-89/336 (Electromagnetical Compatibility Directive);
-93/68 (General Directives)
and subsequent modifications.
MANUFACTURER:
ELECTROLUX HOME PRODUCTS ITALY S.p.A.
Viale Bologna, 298 I-47100 FORLI (Italy)
Instruction for the Installer

The following instructions about installation and maintenance must be carried out by qualified personnel in compliance with the regulation in force.
The appliance must be electrically disconnected before all interventions. If any electric supply to the appliance is required to carry out the work, ensure all the necessary precautions are followed.

The side walls of the unit in which the hob is going to be installed, must not exceed the height of the working top.
Avoid installing the appliance in the proximity of inflammable materials (e.g. curtains, tea towels etc.).
Electrical Connection
The appliance is designed to be connected to 230 V monophase electricity supply.
The connection must be carried out in compliance with the laws and regulations in force.
Before the appliance is connected:
- check that the main fuse and the domestic installation can support the load (see the rating label);
- check that the power supply is properly earthed in compliance with the current rules;
- check the socket or the double pole switch used for the electrical connection can be easily reached with the appliance built in the forniture unit.
The appliance is supplied with a connection cable. This has to be provided with a proper plug, able to support the load marked on the identification plate. To connect the plug to the cable, follow the recommendation given in Fig.3. The plug has to be fitted in a proper socket.
If connecting the appliance directly to the electric system, it is necessary that you install a double pole switch between the appliance and the electricity supply, with a minimum gap of 3mm between the switch contacts and of a type suitable for the required load in compliance with the current rules.
The connection cable has to be placed in order that, in each part, it cannot reach a temperature 90^ higher than the room temperature.
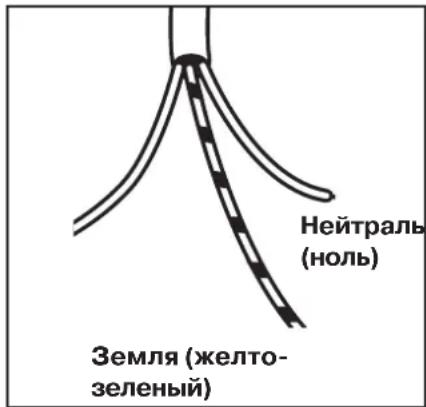
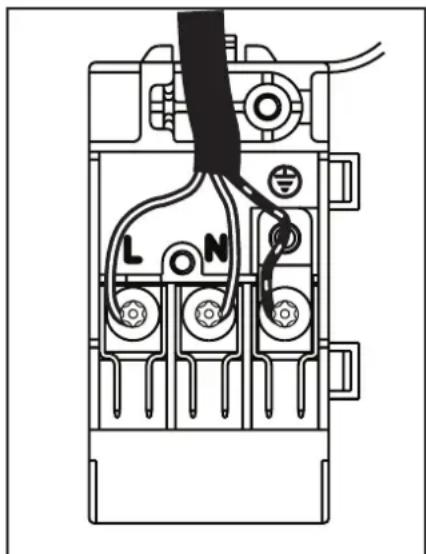
The brown coloured phase cable (fitted in the terminal block contact marked with "L") must always be connected to the network phase.
Replacement of the connection cable
The connection of the connection cable to the appliance's terminal block is of type "Y". This means that its replacement requires the specific equipment of a technician.
In this case, only cable type H05V2V2-F T90 must be used. The cable section must be suitable to the voltage and the working temperature.
The yellow/green earth wire must be approximately 2cm longer than the phase wires (Fig. 1).
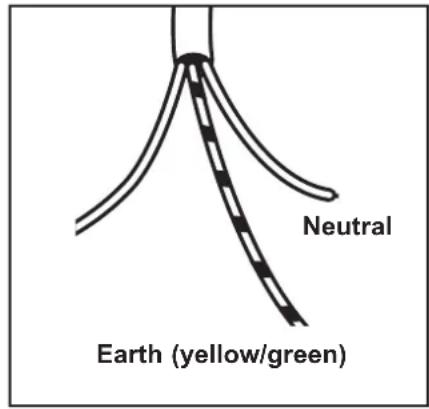
Fig. 1

Fig. 2
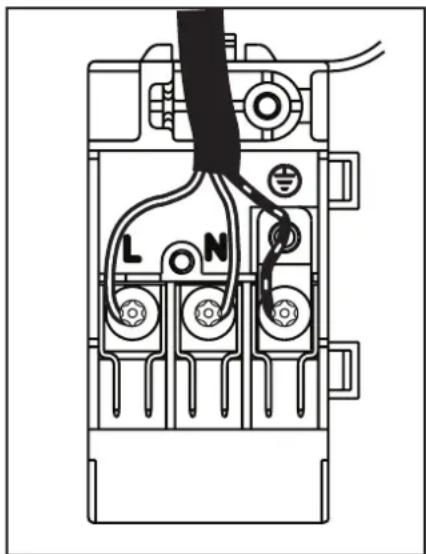
Fig. 3
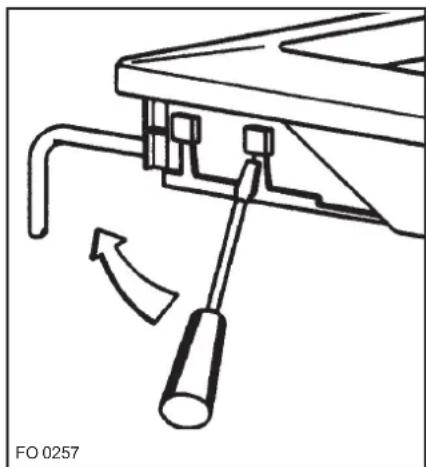
To open the terminal block and reach the terminals, proceed as follows:
- insert the point of a screwdriver into the visible protruding part of the terminal block;
2.exert a light pressure and lift (Fig. 2)
Building In
Dimensions are given in millimetres
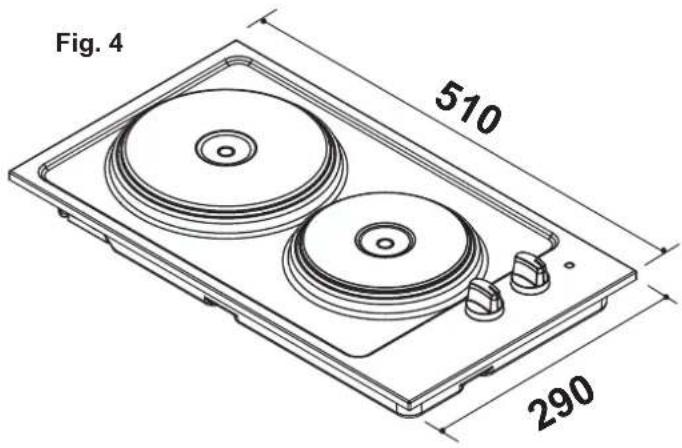
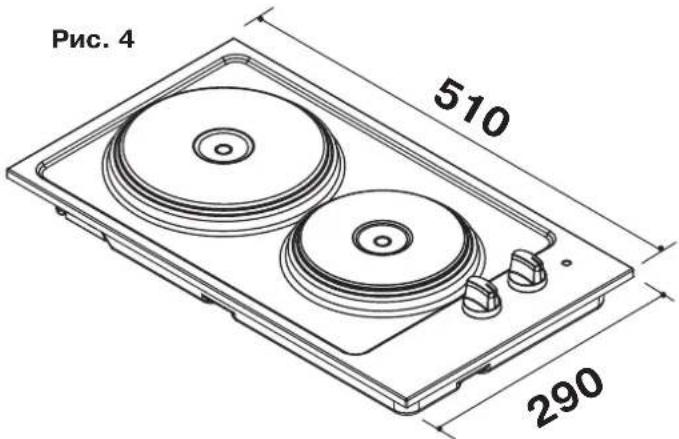
These hobs can be inserted in a built-in kitchen unit whose depth is between 550 and 600~mm . The hobs dimensions are shown in Fig. 4.
Installation and assembly
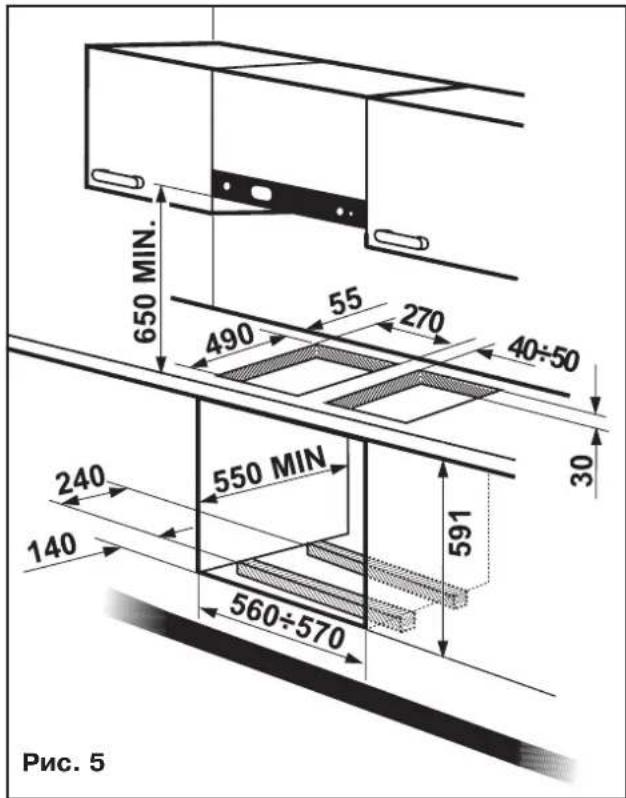
These hobs can be installed in a kitchen unit with an opening for insertion whose dimensions are shown in Fig. 5.
The edge of the cut out must have a minimum distance from the rear wall of 55mm
If there are side walls, or sides of the furniture unit near the hob, the cut out edges must have a minimum distance of 100mm .
Hanging furniture units or hoods must be placed at 650 mm minimum from the hob.

Carry out the building in of the hob as follows:
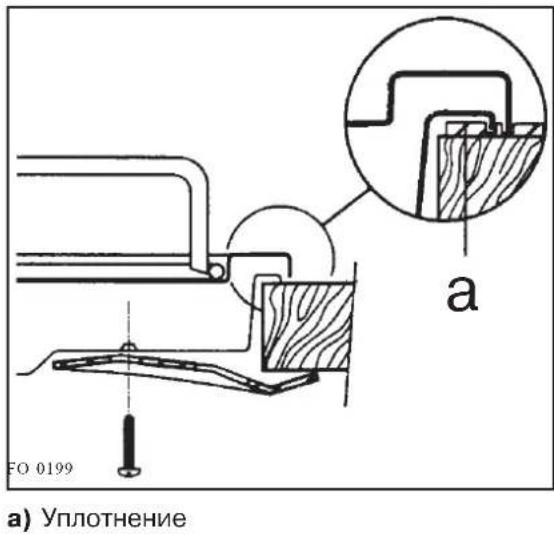
- Put the relevant sealings, supplied with the hob, on the edges of the cut out, taking care that the sealings meet without overlapping;
- place the hob in the cut out, taking care of its centring;
- fix the hob with the relevant screws (Fig. 6). The traction of the screws is able to trace the sealing, any excess of which can then be easily removed.

If several 30cm hob are to be installed side by side into the same cut out, an assembly kit including a support side bracket and supplementary sealings is available at our After Sales Centres. The relevant installation instructions are supplied within the kit package.
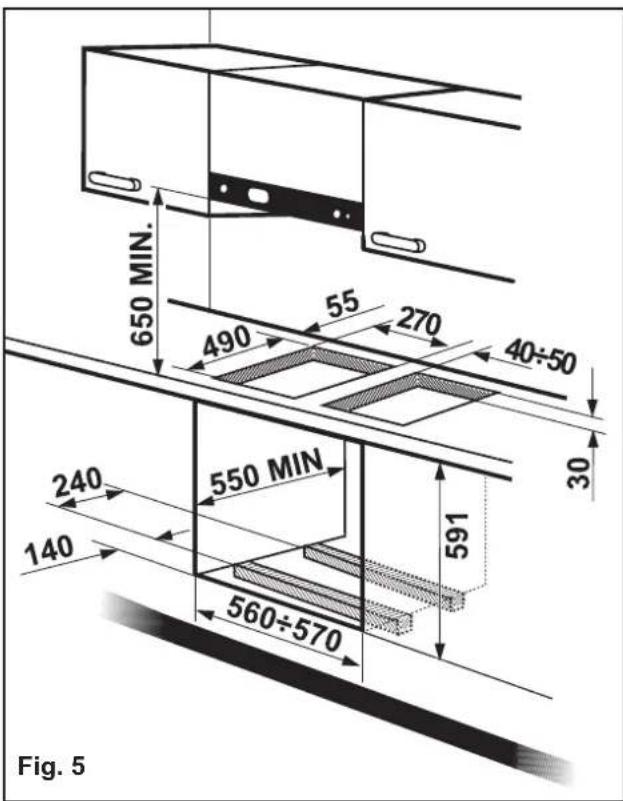
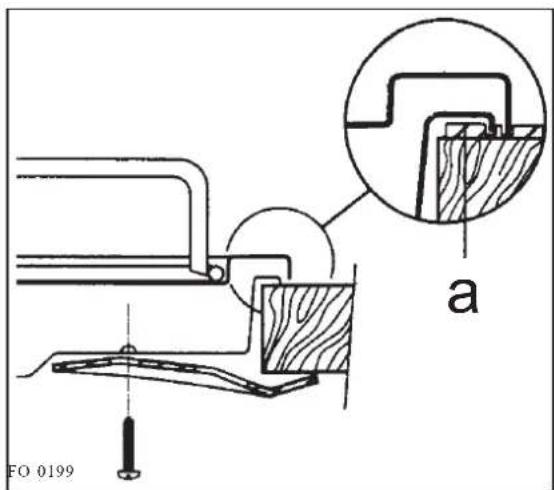
Fig. 6
a) Seal
Possibilities for insertion
Building over a kitchen unit with door
Proper arrangements must be taken in designing the furniture unit, in order to avoid any contact with the bottom of the hob which can be hot when in operation. The recommended solution is shown in diagram 7.
The panel fitted under the hob ("a") should be easily removable to allow easy access if technical assistance is needed. The space behind the kitchen unit ("b") can be used for connections.
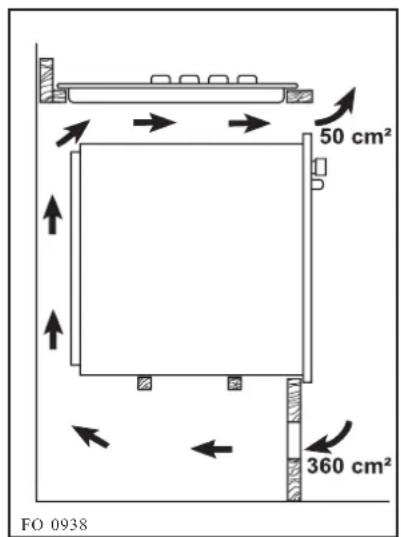
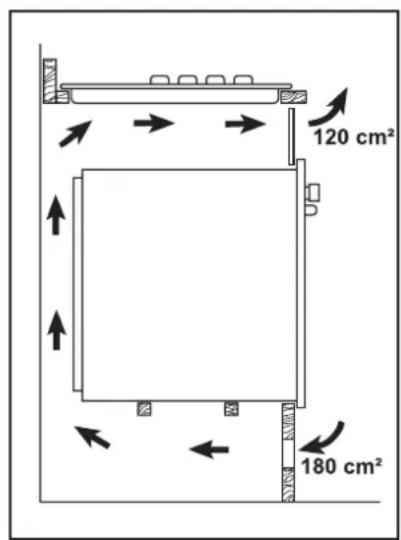
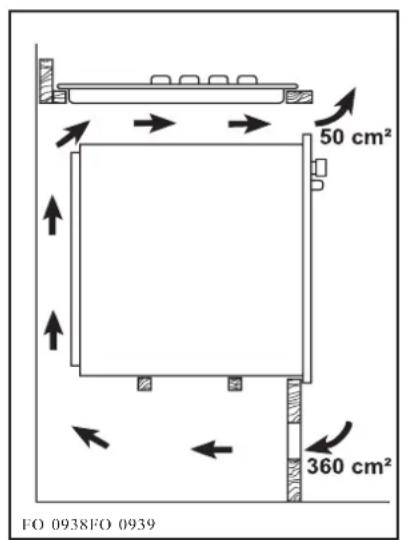
Kitchen unit with oven
The hob recess dimensions must comply the indication given in Fig. 5 and the kitchen unit must be provided with proper openings to allow a continuous supply of air. Suggestions to ensure a proper ventilation are shown in Figs. 8 e 9.
The electrical connection for the hob must be separate from the electrical connection for the oven, to ensure safety and to allow an easy removal of the oven from the unit, if necessary.
a) Removable panel
b) Space for connections
DECLARATION OF GUARANTEE TERMS (BELGIUM)
Our appliances are produced with the greatest of care. However, a defect may still occur. Our consumer services department will repair this upon request, either during or after the guarantee period. The service life of the appliance will not, however, be reduced as a result.
This declaration of guarantee terms is based on European Union Directive 99/44/EC and the provisions of the Civil Code. The statutory rights that the consumer has under this legislation are not affected by this declaration of guarantee terms.
This declaration does not affect the vendor's statutory warranty to the end user. The appliance is guaranteed within the context of and in adherence with the following terms:
- In accordance with provisions laid down in paragraphs 2 to 15, we will remedy free of charge any defect that occurs within 24 months from the date the appliance is delivered to the first end user. These guarantee terms do not apply in the event of use for professional or equivalent purposes.
- Performing the guarantee means that the appliance is returned to the condition it was in before the defect occurred. Defective parts are replaced or repaired. Parts replaced free of charge become our property.
- So as to avoid more severe damage, the defect must be brought to our attention immediately.
- Applying the guarantee is subject to the consumer providing proof of purchase showing the purchase and/or delivery date.
- The guarantee will not apply if damage caused to delicate parts, such as glass (vitreous ceramic), synthetic materials and rubber, is the result of inappropriate use.
- The guarantee cannot be called on for minor faults that do not affect the value or the overall reliability of the appliance.
-
The statutory warranty does not apply when defects are caused by:
-
a chemical or electrochemical reaction caused by water,
- abnormal environmental conditions in general,
-
unsuitable operating conditions,
contact with harsh substances. -
The guarantee does not apply to defects due to transport which have occurred outside of our responsibility. Nor will the guarantee cover those caused by inadequate installation or assembly, lack of maintenance or failure to respect the assembly instructions or directions for use.
- Defects that result from repairs or measures carried out by people who are not qualified or expert or defects that result from the addition of nonoriginal accessories or spare parts are not covered
by the guarantee.
- Appliances that are easy to transport may be delivered or sent to the consumer services department. Home repairs are only anticipated for bulky appliances or built-in appliances.
- If the appliances are built-in, built-under, fixed or suspended in such a way that removing and replacing them in the place where they are fitted takes more than half an hour, the costs that result therefrom will be charged for. Connected damage caused by these removal and replacement operations will be the responsibility of the user.
- If, during the guarantee period, repairing the same defect repeatedly is not conclusive, or if the repair costs are considered disproportionate, in agreement with the consumer, the defective appliance may be replaced with another appliance of the same value.
In this event, we reserve the right to ask for a financial contribution calculated according to the length of time it has been used.
- A repair under guarantee does not mean that the normal guarantee period will be extended nor that a new guarantee period begins.
- We give a twelve month guarantee for repairs, limited to the same defect.
- Except in the event where liability is legally imposed, this declaration of guarantee terms excludes any compensation for damage outside the appliance for which the consumer wishes to assert his rights. In the event of legally admitted liability, compensation will not exceed the purchase price paid for the appliance.
These guarantee terms are only valid for appliances purchased and used in Belgium. For exported appliances, the user must first make sure that they satisfy the technical conditions (e.g.: voltage, frequency, installation instructions, type of gas, etc.) for the country concerned and that they can withstand the local climatic and environmental conditions. For appliances purchased abroad, the user must first ensure that they meet the qualifications required in Belgium. Non-essential or requested adjustments are not covered by the guarantee and are not possible in all cases.
Our consumer services department is always at your disposal, even after the guarantee period has expired.
Address for our consumer services department: ELECTROLUX HOMEPRODUCTS BELGIUM
Bergensesteenweg, 719-1502 LEMBEEK
Tel. 02.3630444
DEUTSCH

Zu Ihrer Sicherheit
Stark 5 Omeletts, Steaks, Crèpes.
Eunpockavovukεotia,0145mm 1,0 kW
Σuovaiik katavawon 2,5 kW
Yka3aHnI NO NcNoJIb3OBaHnIO NaCTOJUero pyKOBoDCTBa
Bb BCTpeTne B TeKCTe HAcToaero pyKOBoDCTBa CNeIyUoIue CNMBOJI, KOtOpbl NOMOryT Bam OpneHTnpoBAtbcR B HEM:

YkaazHnno 6eONaCHOCTN

PoiarobbIe yka3aHnno 0KcnJyatauM

Cobetbipekomehdaunn

HOpMaIIO oxpaHe OkpyKaIOUe Cpebl
Данная ИНСТPyкУДейСТВИЕЛБHA TOЛБКО ДЛЯ СТРА, 06O3HaueHHbIX CUMBOJOM, HaneyaTahHbIM Ha nepeDHeN O6LoKKe HAcToIeero 6yKJIeTa.
CockepaHne
Yka3aHnI yCTaHOBUnKa
Texnueckne xapaKtepncn 68
Yka3aHnIyIyCTaHOBUnka 69
3JIeKtpnueckoe nOdkHoueHne 69
BcTpaBbHne 70
BapnaHtbyIyctahOBKn 71
Описане пибopa

1.ПоверхонсьВарочи naHeJI
2.KoHΦopka-Диam.180 MM
3. KoΦopka -Диam. 145 MM
4. Puykn ynpableny KOHΦopkamn
5.Индикаторналамночka
IpeedepBbIM npiroTOBHeHem nHnHa BapOCHo HnHeN BkIOHTe o6e KOHOpKn Ha MaKcImaJIbHyIO MOuHOCTb npimepHo Ha 10 MNHyT.
CneNyET OTMeTtB, YTO npn nepbOM BKNIOueHIN KOHΦopOK BO3MOXHO 6pa3OBAHne He6oJbUoro KOJIuYeCTBa DbIMa N HEPpNTHORO 3aIaxa. 3To COBepWeHNO HopMaJIbHOe ABLeHne, KOTOpoe npeKpatNTcA Upe3 HECKoJIbKO MInHyT.
PONHARMOUHOCTb2,5KBT
3JNeKtpOnItaHne 230 B 50 T
Pa3mepbl BbIeMKn NOB BapOCHyIO naHeJIb
Динha 270 MM.
UnpHa 490 MM.

HaHHe N3eJIne COOTBETCTBye TcJeDyIOUIMIpeKtIbAM EbPoneNCKoro CoO3a:
-73/23 -90/683 (ДиректuaNo Hn3KOMy
HappxeHHIO);
-89/336 (ДиректNBa no эл ektpomarHHTHOI COBMECTNMOCTN);
-93/68(DnpeKTHBbIOOeeroXapaKTepa)CnoCJeNyIOUIMN N3MeHeHnMn.
N3ROTOBNTeJIb:
ELECTROLUX HOME PRODUCTS ITALY S.p.A.
Viale Bologna, 298 I-47100 FORLI (Italy)
Yka3aHnJa IJyUCTaHOBUnKa

Cneyuounye yka3aHnno yctahOBke n Texo6cnykuaBHNO OTHOCrK ONepaunm, KOTOpbIe DOJXhB1 BblIOJNHTbCR TOJIbKO KBaHnOuNpOBAHHbIMn CneuaJNCTAmN B COOTBETCTBNN C DeNCTBYUOMH HopMaMn.
Ipeed BbINOJIHeHnEM IIO6bIX pa60t c np6Opom erO CNeyEt OTcoeHNHTb OT CETn 3JeKtpoNTaHHa. Ecnn dJra BbINOJIHeHnTo nn HHOJ onepaunn Heo6xOIMo HAnuHne 3JeKtpoNTaHHa, ydoCTOBeBpTEcb B TOM, 4TO npHrTbI BCE Heo6xOIMbIe Ha 3OT CnyaHm Mepbl npedocTopoXHOCTN.
Злес耗费скoe подочене
Pn6op paccuHa nOdkHoueHne K OndHoFa3HOI CETn 3JIeKTPoPiTuHa HAnpJxKeHem 230 B.
IOnKIOUeHHe IONXHO BbIOnHrTbcR B COOTBeCTBUN C DeIcTByIOuIMN HOpMaMn IN paBUNaMn.
IpeepnokknoeHne npnbopa:
1.yoCTOBepbTecb,TO npEdoxpaHnteIb cTeN n 3JeKTPnuecka Cetb B BaWei KbapTpe BblepkNAIOT COOTBeTCTBYIOUHO Harpy3Ky (CM. naCnpTHyIO TaBnUky);
2.yIOCTOBepbTecb,HTO 3JIeKtpnueckar CeTb IMeET OJXHOE 3a3emJIeHHe, COOTBETCTBYIOUee DeIcTBYIOUIM HOpMaM;
3.yoctOBepbTecb,TO npu yCTaHOBHeHHo Ha MeCTO BapouHOI nAHeJI OBeCneUHbAEcra IeKm IOCTyn Kpo3ETKe CTeN u BNJIke CETeBOrO UHypa.
Pn60p NOCTabJIeTcC CTeBbIM Whypom.Ero CneJyET O6OpUdOBaTB BNKO, COOTBeTCTByIOuIeH Hargy3Ke,yka3aHHoHa NaCnOpTHo T6NIuKe.PnYCTaHOBKe BUNIK Ha CTeBOI uHyp PnpEepXNBaITecb peKOMeHNaIIN, pNBeDEHbIXHa Pnc.3.BnIKy CNeJyET BCTABJIaTB BCOTBeTCTBYIOUYIOPO3eTKy.
Ipn Hepa3bemHom nodknkyehnn npnbopa K cetn Heo6xOIMO yCTaHOBNt b Mekdy HmN DByXIOJIOCbH Pa3MbKATEJB C paCCTOHNEM MEXy pa3OMKHytBMN KOHTaTAMn HE MeHee 3 MM, TIN KOTOPOR COOTBETCTBYET Tpe6yEmOHarpy3KE B COOTBETCTBnC DeIcTBYIOUIMM HOpMaMn I npabuJAmn.
CetBoI npoBOI DoJIxKeH 6bITb pa3MeUeH TaKIM O6pa3OM,HTO6bI HnKaJaEro YAcTb He MOrJHa HarPeTbcr DO TEMNepaTpby, Ha 90^ npeBbIaIOuEi KOMHaTHyIO TEMNepaTpy.
KopnueBbI npoBD (noDKIOUeHHbIK KOHTaKTy KJIeMMHOKOLOIKN, NOMEeEHHomy 6yKB0B "L") BcERda DOJKeH CoEDINHrTBCr C a3OIN CETn.
3aMeHa ceTeBOro wHypa
IopKIOUeHne cTeBOrO shHpya K KJIeMMHOJ KOJODKe np6bopa OTHOCITcK TINy "Y". 3To 03NaHaet, YTO Ira ero 3aMeHbI Heo6xOIMo CneuaNbHoe o6OpydoBaHne.
B 3TOM cnyuae DoJxKeH nCNoJb3ObaTcR ToJbKO CneuaJIbHbI CeTeBOI shyp. CeYeHne npoBOIOB DOJXHO COOTBeTCTBOBaTb HAnpJxKeHIO I pa6Oey TEMnepaType.
XeJITo-3eJIeHbI npOBoI 3a3eMJIeHn JOJIxE H 6bITb npIMepHO Ha 2 cm dINHHee fo3OBbIX npOBoIOB (Pnc.1).

BbICOTA 6OKOBbIX CTeHOK KxOHHO Me6eHN, Ha KOTOPO yCTaHaBnBaETCaBapOuHa naHeIb, He DOJXHa npeBbIwAtb BbICOTy pa6oeryo cTOna.
He yctaHaBnBaIte BapOHyIO naHEnb B6n3N OT IerKOBocnIaMeHЯIoUxxCmaTePnaNoB (HanpImep, 3aHaBeCOK, noIOTeHeuT.D.).
Pnc.1
Pnc.2
Pnc.3
YTO6bI OTKpbITb KJIeMMHyIO KOPO6Ky I NOJyHTb DOCTyN K KJIeMMaM, DeiCTByIte CJIeDyUoIIM 06pa3OM:
- BCTaBbTe KOHcK OTBepTKB BUNMyIO BBICTyauOuYU qactb KJIeMMHOJ Kopo6Kn;
- cIeRka Hauabnte n noHMMTe (Pnc. 2)
Встpanваиме
Pa3MepbI yKa3aHbI B MM.
JaHHaBapOuHnPaHeJIbMOKeT6bITbBCTpOeHa B KyxOHHyMe6eIb C rny6uHOnOT 550do600MM. Pa3MepblBapOuHnPaHeJIn NOKa3aHbHaPnc.4.
YctahOBka n c6Opka
Dahna Bapouha NaheJIb MOxET 6bITb BCTpoEHa B KyxOHHyO Me6eJIb C BBiEMKoI, pa3Mepbl KOTOpO npBedeHb Ha PnC.5.
KpaBbEMKn DOJIKeH paCIOJaRaTbcr OTO3aDHei CTeHbHa PaCCTOARHn He MeHee 55 MM.
B clyuae, ecn BapouhnaHeIb yctaHaBnBaETcR
pAOM CO CTeHAM KxHn NIN 6OKOBIMC TcEHkAMN
KxOHHO Me6JI, Kpa BBIEMKN DOJXHbI
pacnoJaTaBCr OT HIX Ha pacCTOHN He MeHee
100 MM.
PacctoHne OT NOBecbIX UkaΦOB NIN BbITaKKn Do BapouHoi NaHeJN DOJIxHO COCTaBnTb He MeHee 650 MM.

BbIOJIHnTe BCTpaINBaHne BapOuHOI naHeJI nCJeDyUoMm O6pa3OM:
- PpOJoxHte yNlOTHeHHa, NoCTabIeMbIe BMeCTe C BApOuHOH NaHeJIbIO, NO KpaM BbIeMKn TaK, 4TO6bI B MecTe CTbIka OHn He HAKlaDbIbAInCb dpyr Ha dpyra;
- YcTaHOBnTe BapOCHyIO NaHeJIb BBbEMKY TOHNO ueHTpy;
- 3aKpEnNTe naHeIb COOTBeTCTByIOUIMN BnHTAmn (Pnc.6). Pnp 3atrBaNHH BnHTOB n36bITKNyILOTHEHm MOYr BBICTyINrHApxMy; NX MOXHO JERKO ydaNtB.

B cnyae, ecnn HeckoIbKO 30-cm BapOHybIX naHeJe yCTaHabINBaIOTcB Ody n Ty Je BbIeMky OHa K dpyro, Bbl MoKTe npNo6peTn CneuaJIbHbIK KomNKeKT dJa c6OpKn, BkIOUyAa BOKOBOn KoHHTeHN I DonOJIHNTeJIbHBe yNIIOTHeHry, B HaUnx cepBnCHbIX ueHTpax. COOTBetCTByIOuNe HnCTpyKcUN NoCTaBnaIOTcB MecTe C kOMNKeKToM dJa c6OpKn.
BapnaHTbI yCTaHOBKn
YcTaHOBKa B KyxOHbIi ShKaΦ C DBepuεη
山kaФДOLKHeH NMeTb CneuaNbHyIO KOHCTpyKcIIO, OBeCneuBaIOUyO OTCyTCTBNE KaKOro-JIb6O KOHTaTa C DHom BapOuHOI NaHEIN, KOTOpoe MoKET HArpeBaTbcr npn ee nCNoJIb3OBaHN. PekomeHdyemoe peweHne NOKa3aHO Ha pncYHke 7. NaHEIn, yCTaHaBnBaEmar NOB BapOuHOI NaHEbIO ("a"), DOJXHa 6bITb CbeMHOJ IO BoecneYeHn JERKOro DOCTyna Ha CnyaB BblONHeHnpeMOHTbIX paBOT. PrcOCTpaHCTBO C3aDi KxOHHO Me6eHN ("b") MOKET nCNOJB3OBaTbcr dJIra BblONHeHn NOkKnUoyehn.
Kyxohna Mebeb c DuyOBblm shkaΦom
Pa3MepbI BbIeMKn IODBapOuyHyIO naHEnb DOJXHbI COOTBeTCTBOBaTb npUBeDeHHbIM Ha Pnc.5;B Wkafty DOJXHbI IMETbcr OTBepCTnA DnA ObecneueHn HnpepbIBHO rnpToKa BO3dyxA.PekOMeHDoBaHHbIE BapnaHTbl ObecneueHn Heo6xOaIMoB BeHTnJIaun NOKa3ahbHa Pnc.8 n9.
3NeKtpnueckne NOkHoueHnaDyXOBORo 1kaΦa N BapOCHN NaHEn DOJXHBb6bTB BbINOJIHeHb NO OTdJIbHOCTn DnI OBeCneueHn 6e3OnaCHOCTn IN PPOCTOTb BiHIMAHn DyXOBORo 1kaΦa B CJIyae HEOxMOCTn.

Pnc.7 Pnc.8 Pnc.9
a) Cbemna naheIb
b) PiooctpaHCTBO DnB BbINOHeHnnoDkNIOueHn

From the Electrolux Group. The world's No.1 choice.
The Electrolux Group is the world's largest producer of powered appliances for kitchen, cleaning and outdoor use. More than 55 million Electrolux Group products (such as refrigerators, cookers, washing machines, vacuum cleaners, chain saws and lawn mowers) are sold each year to a value of approx. USD 14 billion in more than 150 countries around the world.