
OKR 110 - Radio OK - Free user manual and instructions
Find the device manual for free OKR 110 OK in PDF.
Download the instructions for your Radio in PDF format for free! Find your manual OKR 110 - OK and take your electronic device back in hand. On this page are published all the documents necessary for the use of your device. OKR 110 by OK.
USER MANUAL OKR 110 OK
DAHNEETXPHHTO
ENUSERMANUAL10
F5MANUAL DE INSTRUCTIONES 14
1 MANUALLE DELLETTENTE 26
NGBRIUKSAANWUZNG
INSTRUMENTORSHUE
P1MANUAL DE UTILZACAO 35
70

091110461325(12,rdb 1
61273 804-95
0011040132513,785-921160119

HERZLICHEN GLUCKWUNSCH
Thanks for your purchase of this ok. product.
IMPORTANT SAFETY INSTRUCTIONS. READ CAREFULLY AND KEEP FOR FUTURE REFERENCE.
- Observe all safety instructions to avoid damage through improper use! Follow all safety warnings on the appliance and in this instruction manual.
- Keep this instruction manual for future use. Should this appliance be passed on to a third party, then this instruction manual must be included.
- No liability will be accepted for damage resulting from improper use or non-compliance with these instructions.
- Only use this appliance for its intended use. The appliance is not suitable for commercial use. This appliance is only suitable for indoor and household use.
- Do not attempt to repair the appliance yourself. In case of malfunction, repairs are to be conducted by qualified personnel only.
- Regularly check the power plug and power cord for damage. If the supply cord is damaged, it must be replaced by the manufacturer, its service agent or similarly qualified persons in order to avoid a danger or injury.
- Warning! During cleaning or operation do not immerse the electrical parts of the appliance in water or other liquids. Never hold the appliance under running water.
- Do not open the appliance casing under any circumstances. Do not insert any foreign objects into the inside of the casing.
- Never use accessories which are not recommended by the manufacturer. They could pose a safety risk to the user and might damage the appliance. Only use original parts and accessories.
- Keep the appliance away from any hot surfaces and open flames. Protect the appliance against heat, cold, and direct sunlight.
-
Warning: The appliance (including power cord and wire antenna) must not be installed at the following locations:
-
Above hot plates, stoves, heaters or other devices that emit heat or steam.
Within the heated area of a luminary. -
Do not place heavy objects on top of the appliance. Do not place objects with open flames, e.g. candles, on top of or beside the appliance. Do not place objects filled with water, e.g. vases, on or near the appliance.
- Connect the power plug to an easily reachable electrical outlet so that in case of an emergency the appliance can be unplugged immediately. Pull the power plug out of the electrical outlet to completely switch off the appliance. Use the power plug as the disconnection device which shall remain accessible at all times.
- To avoid damaging to the power cord, do not squeeze, bend or rub it on sharp edges. Keep it away from hot surfaces and open flames as well.
- Place the cord in such a way that no unintentional pulling or tripping over it is possible.
- Always insert batteries correctly with regard to the polarities (+ and -) marked on the battery and the battery compartment.
- Replace batteries only with the same or equivalent type.
- Do not allow children to replace batteries without adult supervision.
- Remove the batteries if you will not be using the appliance for an extended period of time.
- Exhausted batteries should be immediately removed from equipment and properly disposed of.
- Please refer to the safety instructions provided by the battery manufacturer.
INTENDED USE
The product has been designed for a fixed installation underneath cupboards, shelves and other furniture.
Every other type of use can lead to damage to the product or injury.
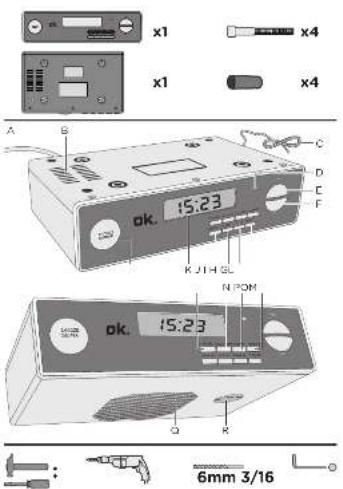
COMPONENTS
Fold out front and rear page for product illustrations.
A. Power cord and plug
B. Ventilation slots
C. Wire antenna
D. STANDBY indicator light
E. VOL+ key
F. VOL- key
G. TUN-UP key
H. TUN-DN key
I. SLEEP key
J. MEMORY key
K. LCD display
L. SNOOZE/DIMMER key
M. STANDBY key
N. CLOCK SET key
O. ALARM 1 key
P. ALARM 2 key
Q. Loudspeaker
R. Battery compartment
Accessories:
- Screws (x4)
- Spacers (x4)
- Template (x1)
The product may be available in different colours.
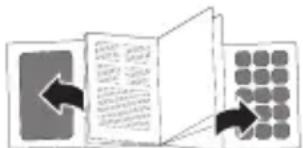
INSTALLATION
Choosing the suitable location:
- Within sufficient reach for the power plug to a wall outlet (powr cord length: 180 cm). Wall outlet must remain easily accessible after complete installation.
Mounting underneath a sturdy shelf (thickness: 16 to 20mm
2 Tape the template underneath the shelf on which the product is to be mounted. Use a pen to mark the drill holes.
Remove the template. Drill 4 holes (6 mm drill bit).
Insert the 4 spacers into the product.
Fix the product with the 4 screws on the surface (Allen key, size 3/16).
Warning: Do not mount the product on the surface without the use of the spacers in order not to obstruct proper ventilation.
Lay out the wire antenna.
OPERATION
Note: The letters A, B and C inside the illustrations are indicating the sequence on how to perform the respective operation task.
3 Connecting to power: Connect the power plug with a suitable wall outlet (display: CC:CC). The STANDBY indicator lights up red. The product is in standby mode now.
Switching product on: Press STANDBY. The STANDBY indicator goes off. Switching product off: Press STANDBY to set the product on standby mode. The STANDBY indicator lights up red.
5 Radio station search (automatic): Press and hold TUN-DN or TUN-UP for approx. 2 seconds. The station search stops automatically when a station's signal is received by the product.
EN
12
Radio station search (manual): Press TUN-DN or TUN-UP to reduce/increase the frequency by 0.1 MHz.
RDS:
When the product is tuned to a RDS station, the name of the station and RDS are shown in the display.
The product's clock time is automatically synchronised if the station is transmitting a time signal.
Setting the volume: Set the volume using the VOL + / - keys.
7 Saving radio station (manually): Tune in the desired station. Press MEMORY (Display: P- and MEMORY are flashing).
Selecting memory number (P01 to P30): Press ALARM 1 or ALARM 2. Confirm with MEMORY.
Recalling saved radio stations: Press ALARM 1 or ALARM 2.
8 Saving radio station (automatically):
Press and hold MEMORY for approx. 3 seconds. All stations within range (max. 30) will be saved automatically.
Recalling saved radio stations: Press ALARM 1 or ALARM 2 during radio operation.
Setting the time: In standby mode, press and hold CLOCK SET for approx. 2 seconds (display:
Use TUN-UP or TUN-DN to choose 12 or 24 hour time display.
Confirm with CLOCK SET. The hours are flashing.
Set the hours with TUN-UP or TUN-DN. Confirm with CLOCK SET. The minutes are flashing.
Set the minutes with TUN-UP or TUN-DN. Confirm with CLOCK SET.
Setting the alarm: In standby mode, press and hold ALARM 1 for approx. 2 seconds (display: right up. AL1 flashes).
Use TUN-UP or TUN-DN to choose the alarm signal:
- Radio radio
BELQUZZER
Confirm with ALARM 1. The hours are flashing.
Set the hours with TUN-UP or TUN-DN. Confirm with ALARM 1. The minutes are flashing.
Set the minutes with TUN-UP or TUN-DN. Confirm with ALARM 1 (display: current time and AL1). The alarm has been set and activated successfully.
If desired, follow the steps above to set a seconds alarm time. To do so, use the ALARM 2 key.
11Activating/Deactivating alarm: In standby mode, press ALARM 1/2.
AL1/2 lights up = alarm function activated
- AL1/2 goes off = alarm function deactivated
12 Snooze: When the alarm sounds, press SNOOZE. The alarm will sounds again 5 minutes afterwards.
Switching off the alarm: When the alarm sounds, press ALARM 1/2.
14 Adjusting display brightness: Use DIMMER to select one of the 4 brightness levels.
Automatic switch-off: In radio mode, press SLEEP (display: SLP 120 SLEEP is flashing).
When 120 minutes have elapsed, the product will switch to standby mode.
Press SLEEP repeatedly to reduce the time to automatic switch-off from 110 to as low as 10 minutes (in increments of 10 minutes).
Display: Schematic switch-off.
Back-up battery: Open the battery compartment underneath the product.
Insert a button cell battery (CR2025 type, not included). The + polarity must be positioned towards outside.
Close the battery compartment.
Note: The back-up battery preserves the clock time in case of a temporary power blackout.
CLEANING AND CARE
- Never immerse the appliance in water or other liquids.
- Clean the appliance with a soft, slightly damp cloth. Make sure that no moisture is entering the appliance during cleaning.
- Never use corrosive detergents, wire brushes, abrasive scourers, metal or sharp implements to clean your appliance.
- Dry the appliance thoroughly after cleaning.
Storage
- Store the appliance in a cool, dry location, away from children and pets.
- Remove the batteries from the battery compartment if the appliance will not be used for a longer time.
TECHNICAL DATA
Power supply: 230V ,50Hz,3W
Back-up battery: 1 × 3V button cell, CR2025 type (not included)
Frequency range: FM: 87.5 - 108 MHz
Protection class: Class II
DISPOSAL

The crossed-out wheeled bin logo requires the separate collection of waste electric and electronic equipment (WEEE). Electric and electronic equipment may contain dangerous and hazardous substances. Do not dispose of this appliance as unsorted municipal waste. Return it to a designated collection point for the recycling of WEEE. By doing so, you will help to conserve resources and protect the environment.
Contact your retailer or local authorities for more information.
FELICIDADES
- Skruvar (x4)
Distanser (x4) - Mall (x1)