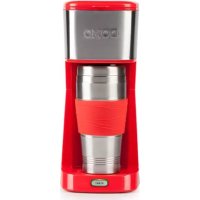
DO438K - Coffee machine DOMO - Free user manual and instructions
Find the device manual for free DO438K DOMO in PDF.



User questions about DO438K DOMO
0 question about this device. Answer the ones you know or ask your own.
Ask a new question about this device
Download the instructions for your Coffee machine in PDF format for free! Find your manual DO438K - DOMO and take your electronic device back in hand. On this page are published all the documents necessary for the use of your device. DO438K by DOMO.
USER MANUAL DO438K DOMO
natural_image
Red and silver Domo water heater device with 'Start' button (no visible text or symbols on body)DO437K - DO440K
PRODUCT OF LINEA 2000
GARANTIEVOORWAARDEN
CONDITIONS DE GARANTIE
This appliance has a two year warranty period. During this period the manufacturer is responsible for any failures that are the direct result of construction failure. When these failures occur the appliance will be repaired or replaced if necessary. The warranty will not be valid when the damage to the appliance is caused by wrong use, not following the instructions or repairs executed by a third party. The guarantee is issued with the original till receipt. All parts, which are subject to wear, are excluded from the warranty.
If your device breaks down within the 2-year warranty period, you can return the device together with your receipt to the shop where you purchased it.
CONDICIONES DE GARANTÍA
RECYCLAGE-INFORMATIE
natural_image
Symbol of a trash bin crossed with diagonal lines, no text or numbers presentRECYCLING INFORMATIONEN
natural_image
Recycling symbol icon with three chasing arrows forming a triangle (no text or labels)RECYCLING INFORMATION
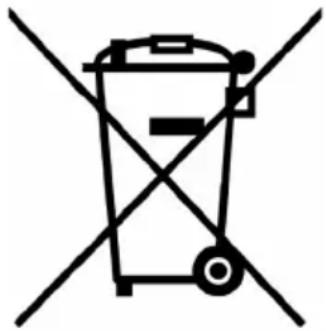
This symbol on the product or on its packaging indicates that this product may not be treated as household waste. Instead it must be brought to the applicable collection point for recycling of electrical and electronic equipment. By ensuring this product is disposed of correctly, you will help prevent potential negative consequences for the environment and human health, which could otherwise be caused by inappropriate waste handling of this product. For more detailed information about recycling of this product, please contact your local city office, your household waste disposal service or the shop where you purchased the product.
The packaging is recyclable. Please treat package ecologically.
natural_image
Symbol of a trash bin crossed out by two diagonal lines (no text or labels)
natural_image
Recycling symbol composed of three chasing arrows forming a triangle (no text or labels)natural_image
Simple black line drawing of a plug with a curved wire (no text or symbols)If the supply cord is damaged, it must be replaced by the manufacturer, its service agent or a similarly qualified person in order to avoid a hazard.
natural_image
Warning symbol depicting steam rising inside a triangle (no text or numbers)text_image
Labeled diagram of a blender with numbered parts including buckets and a water drop containerEERSTE GEBRUIK
natural_image
Line drawing of a mechanical device with a cylindrical top and base, no text or symbols present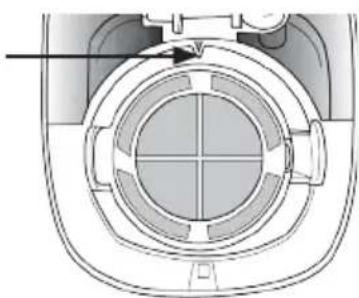
natural_image
Cross-sectional diagram of a mechanical component with concentric circles and internal channels (no text or symbols)KOFFIE ZETTEN MET KOFFIEPADS
natural_image
Warning symbol depicting steam rising inside a triangle (no text or numbers)text_image
Labeled diagram of a Kerosen brand blender with numbered parts including buckets and a water dispensernatural_image
Line drawing of a mechanical device with a lid and base, no text or symbols present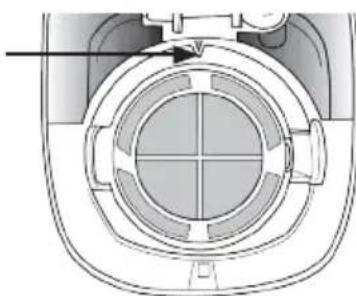
natural_image
Technical diagram of a mechanical component with concentric circular features and a central cross-section (no text or symbols)natural_image
Warning symbol depicting steam rising inside a triangle (no text or numbers)text_image
Labeled diagram of a Kevada blender with numbered parts including buckets and a lidERSTE BENUTZUNG
natural_image
Line drawing of a mechanical device with a cylindrical component mounted on a base (no text or symbols)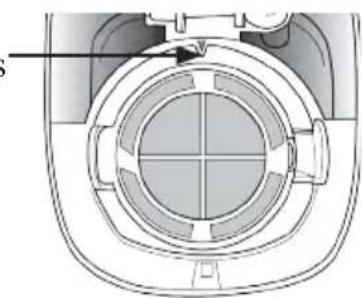
natural_image
Cross-sectional diagram of a mechanical component with concentric circles and internal channels (no text or symbols)This appliance may be used by children from the age of 8 and up, and also by persons with a physical or sensory limitation, as well as mentally limited persons or persons with a lack of experience and knowledge. But only on the condition that these persons have received the necessary instructions on how to use this appliance in a safe way and know the dangers that can occur by using this appliance.
Children cannot be allowed to play with the appliance. Maintenance and cleaning of the appliance may not be done by children, unless they are older than 8 years old and are under supervision. Keep the appliance out of reach of children younger than 8 years old.
This appliance is suitable to be used in a household environment and in similar surroundings such as:
- Kitchen for personnel of shops, offices or other similar professional surroundings
- Farms
- Hotel or motel rooms and other surroundings with a residential character
- Guest rooms or similar
Attention: This appliance cannot be used with an external timer or a separate remote control.

text_image
Warning sign depicting steam rising inside a triangle, indicating heat hazardThe appliance can become hot during use. Keep the power cord away from hot parts and don't cover the appliance.
- Read all instructions before use.
- Before use check if the voltage indicated on the appliance corresponds with the voltage of your power net.
- Do not let the cord hang on a hot surface or over the edge of a table or counter top.
- Never use the appliance when the cord or plug is damaged, after malfunction or when the appliance is damaged. In that case, take the appliance to the nearest qualified service center for check-up and repair.
- Close supervision is necessary when the appliance is used by or near children.
- The use of accessories that are not recommended or sold by the manufacturer can cause fire, electrical shock or injuries.
- Unplug the appliance and let it cool down when the appliance is not in use, before assembling or disassembling any parts and before cleaning. Pull the plug itself when removing the plug from the socket. Never pull the cord to unplug.
- Never leave an operating appliance unattended.
- Never place this appliance on or near a gas stove or
electrical stove, in a hot oven or on a spot where it may come into contact with a warm appliance.
- Do not use the appliance outdoors.
- Only use the appliance for the purpose for which it was designed.
• Always use the appliance on a firm, dry, level surface. - Do not touch any hot surfaces.
- Never immerse the appliance, the cord or the plug in water or other liquids to avoid fire, electrical shock or injuries.
- Be extra careful when moving an appliance that contains hot liquids.
- The appliance switches off automatically when the brewing process is finished. Unplug after use.
- Never clean the appliance with a metal scouring pad.
- This appliance is equipped with a safety screw, so that the housing can not be removed. Never try to remove the housing to avoid the risk of fire or electrical shock. Never try to repair the appliance yourself. Take the appliance to a qualified service center for check-up and repair.
SAVE THESE INSTRUCTIONS
PARTS
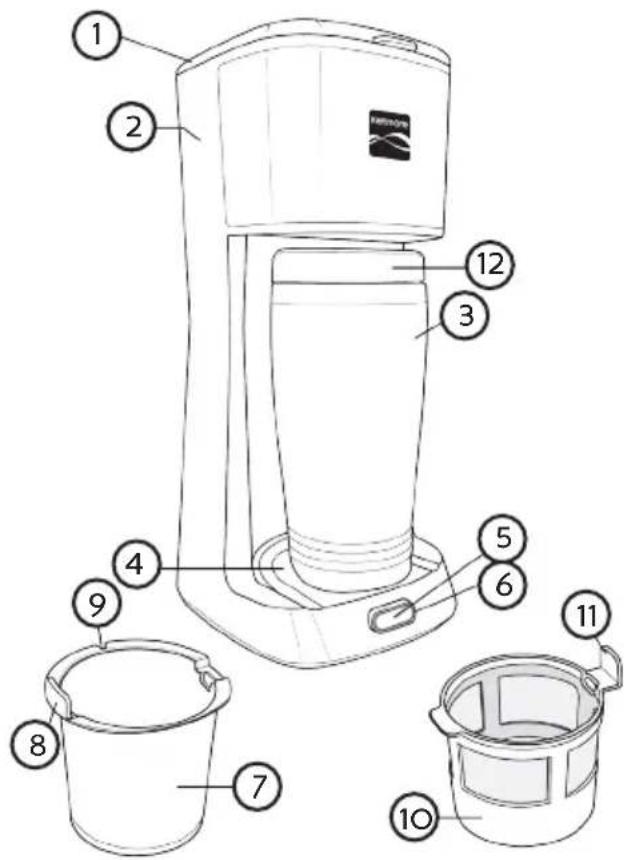
- Lid
- Water tank
- Portable cup
- Platform for cup
- Start button
-
Indicator light
-
Removable filter basket
-
Handle
-
Gap for placement
-
Removable permanent filter
-
Handle
-
Cup lid with closeable drinking spout
text_image
Labeled diagram of a portable blender with numbered parts including buckets and a water dispenserFIRST USE
- Clean the removable parts according to the instructions in the section ‘Cleaning and maintenance’.
- Before brewing coffee for the first time, let the My Coffee run with only water:
- Pour fresh cold water in the water tank up to the maximum indication.
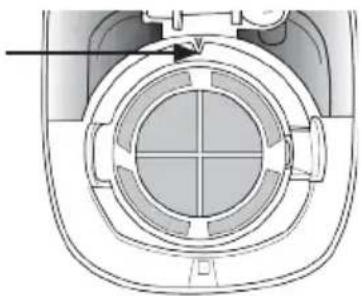
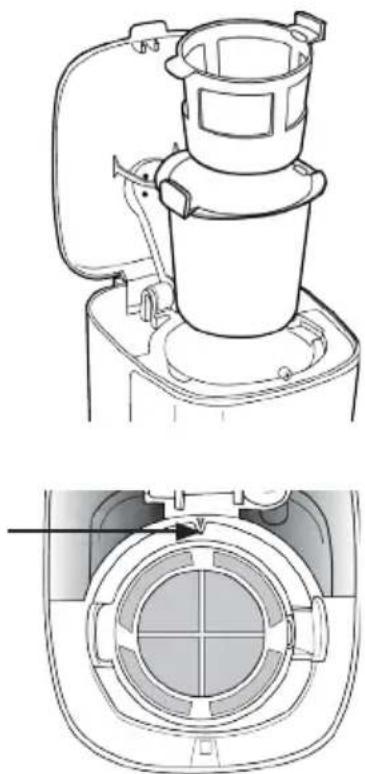
- Place the removable filter basket into the filter holder, so that the handle is resting in the gap at the left side of the filter holder. The small gap in the filter basket will now nicely surround the triangle at the top of the filter holder.
- Place the permanent filter into the basket, so that the handle is resting in the gap at the right side of the basket.
Caution: If the filter basket and the filter are not placed correctly, the appliance will not operate properly.
natural_image
Technical line drawing of a portable blender with top and side views (no text or symbols)- Close the lid.
- Place the cup on the platform below the filter holder.
- Plug in the My Coffee.
- Press the start button and let the water run through. Pour the water out of the cup after the process.
Tip: Once you have pressed the start button, you can not turn off the appliance, nor interrupt the process. The appliance needs to complete the entire brewing process before you can start a new process. At the end of the brewing process the indicator light will go off.
MAKING COFFEE WITH GRINDED COFFEE
- Open the lid.
- Pour fresh cold water into the water tank up to the maximum indication.
- Place the removable filter basket into the filter holder, so that the handle is resting in the gap at the left side of the filter holder. The small gap in the filter basket will now nicely surround the triangle at the top of the filter holder.
- Place the permanent filter into the basket, so that the handle is resting in the gap at the right side of the basket. Or: instead of the permanent filter you can also use a regular coffee filter. You can place the filter directly into the filter basket.
Caution: If the filter basket and the filter are not placed correctly, the appliance will not operate properly.
- Add grinded coffee into the (permanent) filter. Take into account that the cup has a content of 400 ml.
- Close the lid.
- Place the cup on the platform below the filter holder.
- Plug in the appliance.
Caution: Make sure that the indicator light is off after you have plugged in the My Coffee. If the light is on, wait until it goes off and let the appliance cool down for 5 minutes. Only then press the start button.
- Press the start button. The indicator light will light up and the coffee will start running. When the brewing process is finished, the indicator light will go off and the appliance will switch off automatically. Let the coffee drip before removing the cup from the platform.
Tip: You can also use the My Coffee to generate hot water for other hot beverages, like tea, instant hot chocolate or instant soup. To avoid the coffee taste in the water, remove the permanent filter and the filter basket before you start the brewing process.
Caution: Be careful when opening the lid after brewing coffee. The appliance can be hot here and hot steam may escape. Always open the lid with the small handle at the front.
MAKING COFFEE WITH COFFEE PADS
- Open the lid.
- Pour fresh cold water into the water tank up to the maximum indication.
- Place the coffee pad(s) in the permanent filter. We recommend to use 2 coffee pads for a full cup.
- Place the removable filter basket into the filter holder, so that the handle is resting in the gap at the left side of the filter holder. The small gap in the filter basket will now nicely surround the triangle at the top of the filter holder.
- Place the permanent filter with the coffee pads in the basket, so that the handle is resting in the gap at the right side of the basket.
Caution: If the filter basket and the filter are not installed correctly, the appliance will not function properly.
-
Close the lid.
-
Place the cup on the platform below the filter holder.
-
Plug in the appliance.
-
Press the start button. The indicator light will light up and the coffee will start running through. When the brewing process is finished, the indicator light will go off and the appliance will switch off automatically. Let the coffee drip before removing the cup from the platform.
CLEANING AND MAINTENANCE
- Make sure that the My Coffee has switched off automatically and remove the plug from the socket.
- Let the appliance cool down.
- Open the lid and remove the permanent filter and the filter basket.
- Dispose of the coffee remains in these parts.
- The filter basket, the permanent filter, the cup and the lid of the cup are dishwasher safe. You can also wash them in warm water with some washing-up liquid.
- Clean the outside of the My Coffee and the inside of the lid with a soft, damp cloth.
Important: Never use abrasive, scouring cleaning products or scouring pads. Never immerse the appliance itself in water.
Cleaning with vinegar
To remove and avoid scale, clean the My Coffee with vinegar once a month. Excessive steam development or a longer brewing process may indicate that the appliance needs to be cleaned.
- Fill the cup for about 1/3 with white vinegar and add 2/3 cold water until the cup is full. Pour the solution into the water tank.
- Place the cup on the platform below the filter holder.
- Press the start button and let the vinegar solution run through until the appliance switches off automatically. The light will go off.
- Repeat this process with a new vinegar solution. Never reuse the first vinegar solution that has already run through. Pour away the vinegar solutions after they have run through.
- After this, fill the cup with cold water and pour the water into the water tank. Press the start button and let the water run through. Repeat this process until the vinegar taste has disappeared completely.
- Wash and dry the permanent filter, the filter basket, the lid and the cup as described above.
PRECAUCIONES IMPORTANTES
natural_image
Warning symbol depicting steam rising inside a triangle (no text or numbers)text_image
Labeled diagram of a blender with numbered parts including buckets and a water dispenserPRIMER USO
natural_image
Line drawing of a mechanical device with a lid and base, no text or symbols present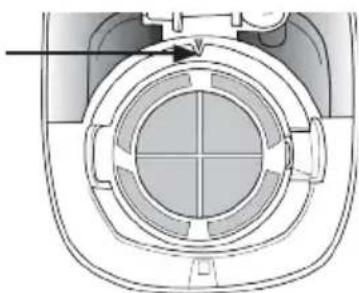
natural_image
Cross-sectional diagram of a mechanical component with concentric circular features and a central hub (no text or symbols)text_image
Warning sign depicting steam rising inside a triangle, indicating heat hazardtext_image
Labeled diagram of a portable blender with numbered parts including buckets and a water drop containerPRVNÍ POUŽITÍ
natural_image
Line drawing of a blender with open lid and base (no text or symbols)