Giga T Pro II - Remote control Hähnel - Free user manual and instructions
Find the device manual for free Giga T Pro II Hähnel in PDF.
Document temporarily unavailable
The manual is currently being transferred to our new server. It will be accessible again in a few hours. Thank you for your patience.
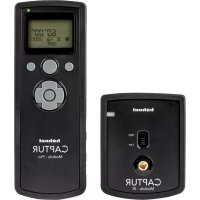
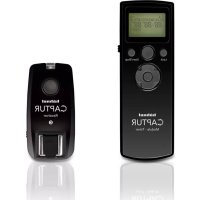
| Product type | Wireless remote control for camera |
| Brand | Hähnel |
| Model | Giga T Pro II |
| Compatibility | Cameras with remote control jack and flash hot shoe |
| Range | Up to 100 meters (estimated) |
| Number of channels | 16 selectable channels |
| Display | Backlit LCD screen on transmitter and receiver |
| Main functions | Single shot, burst, bulb mode, timer, programmable intervalometer |
| Basic timer mode | Adjustable delay and number of shots |
| Intervalometer | Programmable with delay, exposure time, interval 1, N1, interval 2, N2 |
| Transmitter power | 2 AAA batteries (not included) |
| Receiver power | 2 AAA batteries (not included) |
| Included cable | Connection cable for remote control jack |
| Mounting | Hot shoe for receiver |
| Maintenance | Keep dry, do not modify, avoid extreme temperatures |
| Safety | Respect polarity, keep out of reach of children |
| General information | Compliant with environmental regulations |
Frequently Asked Questions - Giga T Pro II Hähnel
User questions about Giga T Pro II Hähnel
0 question about this device. Answer the ones you know or ask your own.
Ask a new question about this device
Download the instructions for your Remote control in PDF format for free! Find your manual Giga T Pro II - Hähnel and take your electronic device back in hand. On this page are published all the documents necessary for the use of your device. Giga T Pro II by Hähnel.