
Blender Compact - Blender PRINCESS - Free user manual and instructions
Find the device manual for free Blender Compact PRINCESS in PDF.
| Product type | Compact blender |
| Brand | Princess |
| Model | Compact Blender 217000 / 217400 |
| Jar capacity | 800 ml |
| Bottle capacity (217400 only) | 500 ml |
| Power | 300 W (estimated) |
| Power supply | 220-240 V ~ 50/60 Hz |
| Main material | Plastic and stainless steel (blade) |
| Speeds | Slow (I), Fast (II), Pulse (P) |
| Intended use | Blend fruits and vegetables, smoothies, milkshakes, juices, cold soups, cold and hot sauces |
| Maximum ingredient temperature | 55 °C |
| Continuous operation time | 2 minutes maximum, then 3 minutes cooling |
| Safety | Not for use by children, very sharp blade, do not immerse the appliance, stop and unplug before cleaning |
| Cleaning the appliance | Soft damp cloth, do not put in dishwasher |
| Cleaning accessories | Blade, sealing ring, jar, lid, bottle: soapy water or dishwasher |
| Spare parts | Blade, sealing ring, jar, lid, insert, bottle (model 217400) |
Frequently Asked Questions - Blender Compact PRINCESS
User questions about Blender Compact PRINCESS
0 question about this device. Answer the ones you know or ask your own.
Ask a new question about this device
Download the instructions for your Blender in PDF format for free! Find your manual Blender Compact - PRINCESS and take your electronic device back in hand. On this page are published all the documents necessary for the use of your device. Blender Compact by PRINCESS.
USER MANUAL Blender Compact PRINCESS
217000 Princess Blender Compact White
217400 Princess Blender2Go
B1
B2
B3

PRINCESS
Gefeliciteerd!
Citroen-knoflook dressing
You have purchased a Princess product. Our aim is to provide quality products with a tasteful design and at an affordable price. We hope that you will enjoy this product for many years.
Safety instructions
General safety
The appliance shall not be used by children. Keep the appliance and the mains cable out of the reach of children. Children shall not play with the appliance.
The appliance can be used by persons with reduced physical, sensory or mental capabilities or with lack of experience and knowledge if they are supervised or instructed on how to use the appliance in a safe way and understand the hazards involved.
Read the manual carefully before use. Keep the manual for future reference.
Only use the appliance and the accessories for their intended purposes. Do not use the appliance and the accessories for other purposes than described in the manual.
Do not use the appliance if any part or any accessory is damaged or defective.
If a part or an accessory is damaged or defective, it must be replaced by the manufacturer or an authorised repair agent.
Do not use the appliance near bathtubs, showers, basins or other vessels containing water.
Do not immerse the appliance in water or other liquids. If the appliance is immersed in water or other liquids, do not remove the appliance with your hands. Immediately remove the mains plug from the wall socket. If the appliance is immersed in water or other liquids, do not use the appliance again.
Clean the appliance and the accessories. Refer to the section "Cleaning and maintenance".
Electrical safety
Before use, always check that the mains voltage is the same as the voltage on the rating plate of the appliance.
The appliance is not intended to be operated by means of an external timer or separate remote-control system.
Connect the appliance to an earthed wall socket. If necessary, use an earthed extension cable of a suitable diameter (at least 3 × 1 ~mm^2 ). For additional protection, install a residual current device (RCD) with a rated residual operating current that does not exceed 30 ~mA .
Make sure that water cannot enter the contact plugs of the mains cable and the extension cable.
Always fully unwind the mains cable and the extension cable.
Make sure that the mains cable does not hang over the edge of a worktop and cannot be caught accidentally or tripped over. Keep the mains cable away from heat, oil and sharp edges.
Do not use the appliance if the mains cable or the mains plug is damaged or defective.
- If the mains cable or the mains plug is damaged or defective, it must be replaced by the manufacturer or an authorised repair agent.
Do not pull the mains cable to disconnect the mains plug from the mains.
Disconnect the mains plug from the mains when the appliance is not in use, before assembly or disassembly and before cleaning and maintenance.
Safety instructions for blenders
The appliance is suitable for domestic use only.
Do not use the appliance - outdoors.
Place the appliance on a stable and flat surface.
Keep the appliance away . from heat sources. Do not place the appliance on hot surfaces or near open flames.
Do not use the appliance for. - pressing fruits or vegetables.
Do not use the appliance for beating eggs.
Do not use the appliance for - kneading dough.
Do not use the appliance for grinding meat.
Do not use the appliance with an empty jar or bottle.
When using the jar, always - mount the jar lid and the jar lid insert before switching on the appliance.
Do not leave the appliance switched on continuously for more than two minutes.
Make sure that your hands are dry before touching the appliance.
Beware of sharp parts. Keep your hands away from the moving parts during use and during cleaning and maintenance. The appliance uses a sharp blade.
Beware of hot parts. Wait until the appliance has cooled down before touching the housing and the parts of the appliance. The appliance becomes hot during use.
Be extra careful during cleaning and maintenance.
Be extra careful when emptying the jar or the bottle. Be extra careful when handling the sharp blade.
- Do not leave the appliance - unattended during use.
Cleaning and maintenance
The appliance must be cleaned after each use.
Before you proceed, we need you to pay attention to the following notes:
- Before cleaning or maintenance, switch off the appliance, remove the mains plug from the wall socket and wait until the appliance has cooled down.
- Do not immerse the appliance in water or other liquids.
- Always be careful when cleaning the blade. The blade is very sharp. Risk of personal injury.
Before you proceed, we would like you to focus your attention on the following notes:
- Do not use aggressive or abrasive cleaning agents to clean the appliance.
- Do not use sharp objects to clean the appliance.
- Do not clean the appliance in the dishwasher.
Regularly check the appliance for possible damage.
Clean the outside of the appliance with a soft, damp cloth. Thoroughly dry the outside of the appliance with a clean, dry cloth.
Clean the accessories:
- Clean the blade and the seal ring in soapy water or in the dishwasher.
- Clean the jar, the jar lid and the jar lid insert in soapy water or in the dishwasher.
- Clean the bottle and the bottle lid in soapy water or in the dishwasher.
- Rinse the accessories under running water.
- Thoroughly dry the accessories.
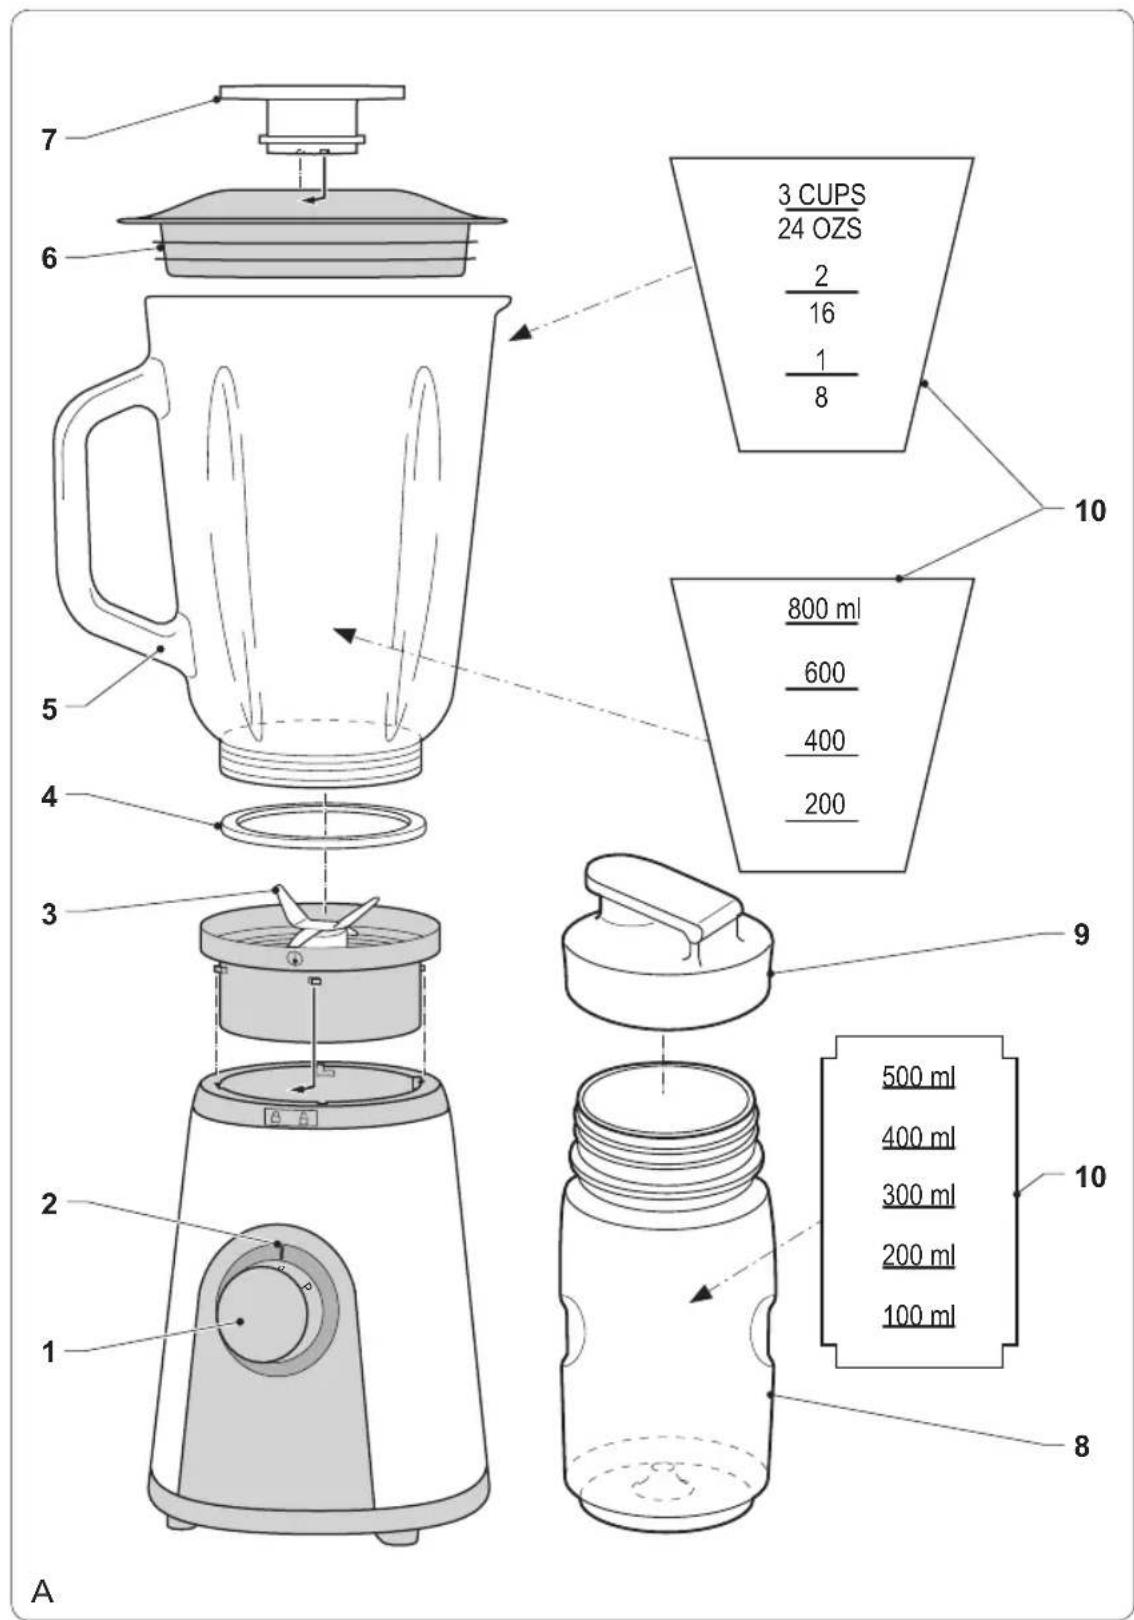
Description (fig. A)
Your 217000/217400 Princess blender has been designed for the following applications: mashing fruits and vegetables; preparing smoothies, shakes and juices; preparing cold soups; preparing dressings, dips and sauces. The maximum capacity of the jar is 800ml . The maximum capacity of the bottle is 500ml . The appliance is suitable for indoor use only. The appliance is suitable for domestic use only.
Before you proceed, we need you to pay attention to the following notes:
-
The appliance has been designed for mixing cold and lukewarm ingredients (max. 55^ ). It is recommended not to use the appliance for mixing hot liquids and solids. Hot liquids and solids can easily cause the jar to break and the jar lid to abruptly come off the appliance due to steam pressure. Keep the jar lid pressed with your hand when mixing lukewarm liquids to prevent leakage.
-
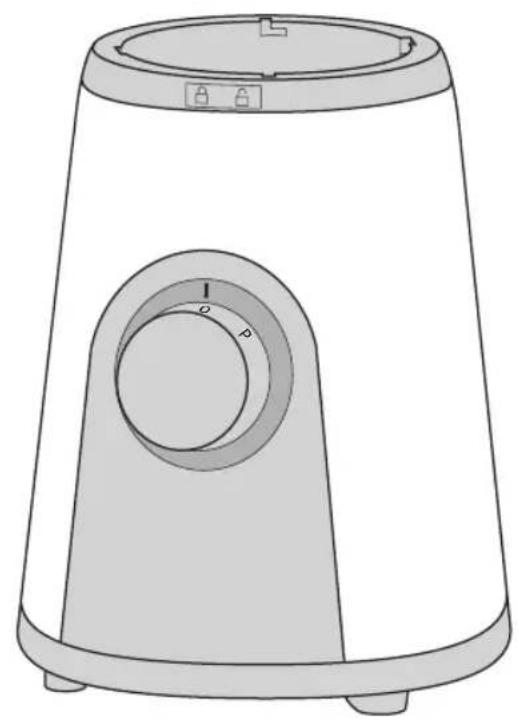
On/off button
- Power indicator
- Blade
- Seal ring
- Jar
- Jar lid
- Jar lid insert
- Bottle (217400 only)
- Bottle lid (217400 only)
- Juice level indicator
Assembly (fig. A & B)
Before you proceed, we need you to pay attention to the following notes:
- Before assembly or disassembly, switch off the appliance, remove the mains plug from the wall socket and wait until the appliance has cooled down.
217000 / 217400: Mounting the jar (fig. A)
Place the seal ring (4) onto the blade (3). Mount the blade (3) to the bottom of the jar (5). Lock the blade (5) by turning it clockwise.
Mount the jar (5) onto the appliance. Lock the jar (5) by turning it clockwise.
Mount the jar lid (6) onto the jar (5).
Mount the jar lid insert (7) into the jar lid (6). Lock the jar lid insert (7) by turning it clockwise.
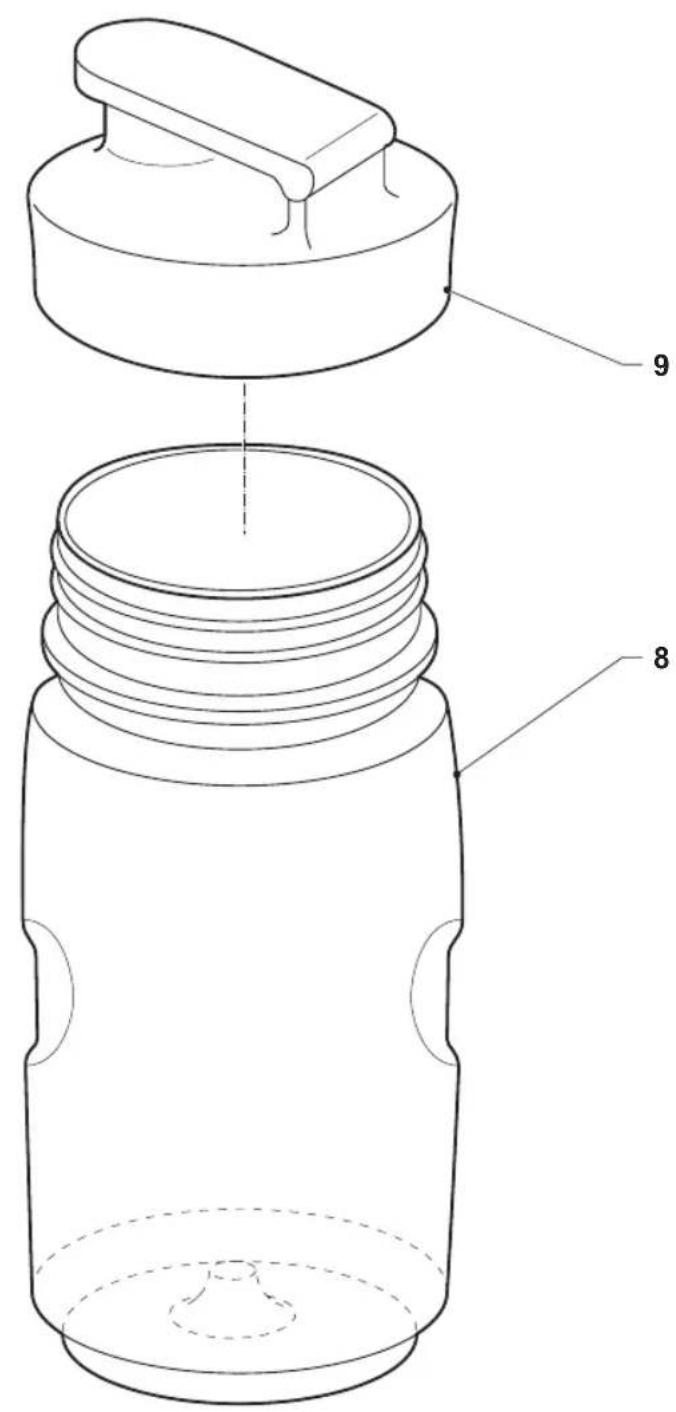
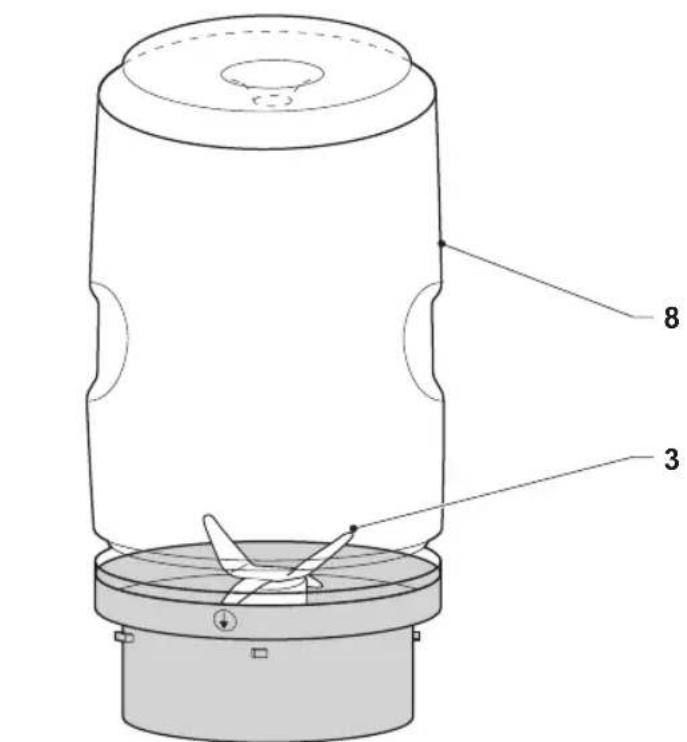
217400: Mounting the bottle (fig. B)
Fig. B1: Loosen the lid (9) from the bottle (8).
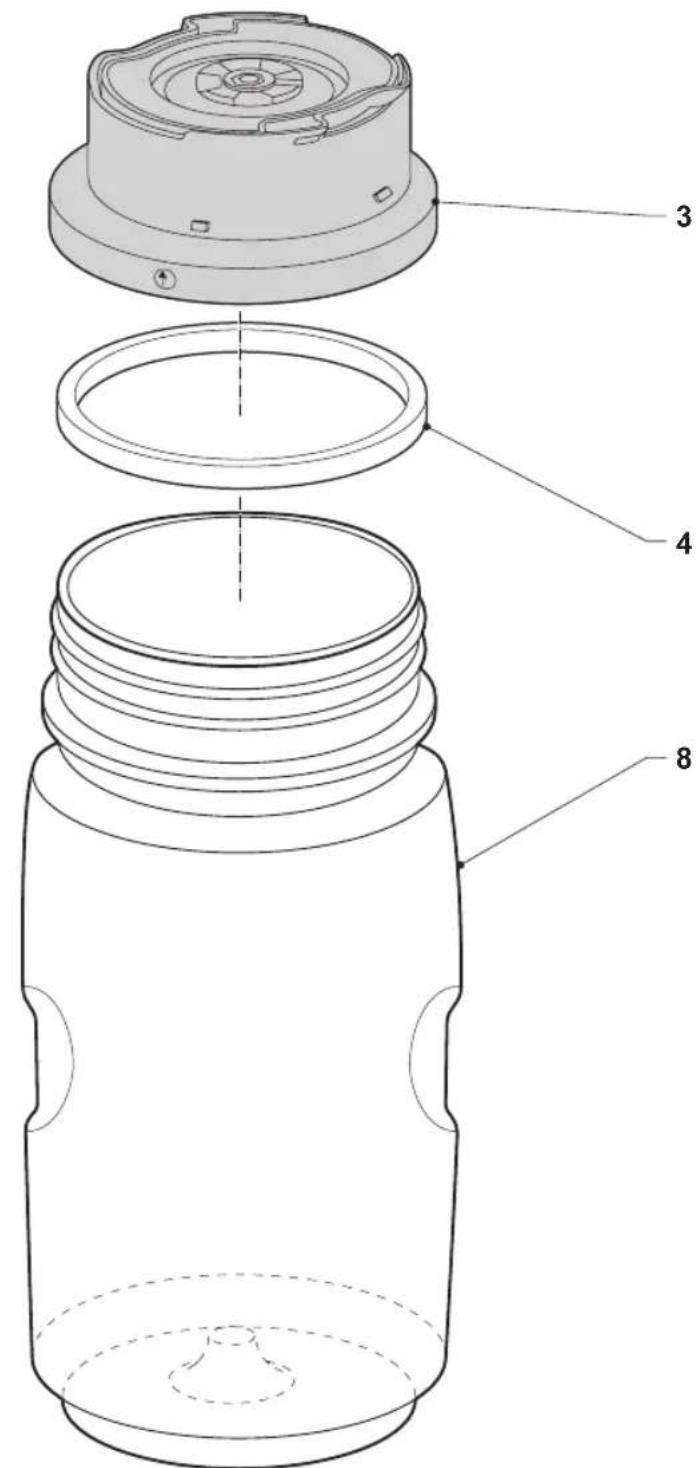
Fig. B2: Place the seal ring (4) onto the blade (3). Tighten the blade (3) onto the bottle (8).
Fig. B3: Turn the bottle (8) upside down. Place the bottle (8) onto the appliance.
Lock the bottle (8) by turning it clockwise until it clicks into place.
Use
Switching on and off (fig. A)
Before you proceed, we need you to pay attention to the following notes:
- Do not switch on the appliance when the jar or the bottle is empty.
- Do not leave the appliance switched on continuously for more than two minutes.
After two minutes, switch off the appliance and allow it to cool down for three minutes before switching it on again.
To switch on the appliance with continuous low speed, set the on/off switch (1) to the "l" position.
To switch on the appliance with continuous high speed, set the on/off switch (1) to the "II" position.
To switch on the appliance in pulse mode, set the on/off switch (1) to the "P" position.
To switch off the appliance, set the on/off switch (1) to the "O" position.
Hints for use
Before you proceed, we need you to pay attention to the following notes:
- Do not exceed the maximum mark on the juice level indicator.
- Do not overload the appliance. Do not put too many ingredients into the jar or the bottle at one time. If the motor stops, immediately switch off the appliance, remove the mains plug from the wall socket and allow the appliance to cool down for at least 10 minutes.
Cut the fruit and/or vegetables into pieces.
Make sure that the pieces of fruit and/or vegetables fit in the jar or the bottle.
Put the pieces of fruit and/or vegetables into the jar or the bottle.
Assemble the appliance. Refer to the section "Assembly".
Insert the mains plug into the wall socket. The power indicator comes on.
Switch on the appliance. The appliance blends the ingredients in a few seconds.
The longer the appliance is switched on, the finer the ingredients will be blended.
If necessary, add more pieces of fruit and/or vegetables:
Jar
- Switch off the appliance.
- Turn the jar lid insert counterclockwise to remove it from the jar lid.
- Cut the fruit and/or vegetables into pieces. Make sure that the pieces of fruit and/or vegetables fit in the jar.
- Put the pieces of fruit and/or vegetables into the jar.
- If the pieces are too large for the filling opening of the jar lid, remove the jar lid and add the pieces of fruit and/or vegetables.
- Mount the jar lid onto the jar.
- Mount the jar lid insert into the jar lid.
- Switch on the appliance. The appliance blends the ingredients in a few seconds. The longer the appliance is switched on, the finer the ingredients will be blended.
Bottle
- Switch off the appliance.
-
Unlock the bottle by turning it counterclockwise. Remove the bottle from the appliance. Turn the bottle straight up again.
-
Loosen the blade from the bottle.
- Cut the fruit and/or vegetables into pieces. Make sure that the pieces of fruit and/or vegetables fit in the bottle.
- Put the pieces of fruit and/or vegetables into the bottle.
- Tighten the blade onto the bottle.
- Turn the bottle upside down. Place the bottle onto the appliance. Lock the bottle by turning it clockwise until it clicks into place.
- Switch on the appliance. The appliance blends the ingredients in a few seconds. The longer the appliance is switched on, the finer the ingredients will be blended.
After use, switch off the appliance. Remove the mains plug from the wall socket. The power indicator goes off. Allow the appliance to cool down completely. - Put the ingredients in the blender.
- Blend the ingredients until they are blended to a smooth, mixed substance.
- Cover the substance and leave it in the refrigerator for 1-2 hours to cool down.
Recipes
Apricot pineapple smoothie
| Ingredients Quantity | |
| Apricot (fresh, diced) 1 | |
| Pineapple (crushed) 1/4 cup | |
| Strawberry | 6 |
| Banana | 1/2 |
| Water | 1/2 cup |
| Skim milk powder | 1 tbsp. |
| Flax seed powder | 1 tsp. (option) |
| Protein powder | 1 tbsp. (option) |
Tropical shake
| Ingredients Quantity | |
| Strawberry (frozen) 4 | |
| Banana (frozen) | 1/2 |
| Mango | 1/2 |
| Water | 1 cup |
| Piña colada | 2 tbsp. |
| Flax seed powder | 1 tsp. (option) |
| Protein powder | 1 tbsp. (option) |
| Ice cube | 6 |
Put the ingredients in the blender. Blend the ingredients until they are blended to a smooth, mixed substance. Cover the substance and leave it in the refrigerator for 1-2 hours to cool down.
Gazpacho
Ingredients Quantity
Tomato (quartered) 4
Cucumber (sliced) 1/2
Green pepper (with seeds) 1/2
Onion (sliced) 1
Garlic 2 cloves
Parsley 4 sprigs
Olive oil 2 tbsp.
Wine vinegar 2 tbsp.
Ice water 1/2 cup
Red wine 1/2 cup
Worcestershire sauce 1 tsp.
Tabasco sauce 1/4 tsp.
Salt / Pepper according to taste
Put the ingredients in the blender. Blend the ingredients until they are blended to a smooth, mixed substance. Cover the substance and leave it in the refrigerator for 1-2 hours to cool down.
Lemon garlic dressing
Ingredients Quantity
| Tomato | 1 |
| Lemon (no seeds) 1 | |
| Garlic 2 cloves | |
| Flax seed powder | 2 tbsp. |
| Celery seed | 1/2 tsp. |
| Cider vinegar 1/4 cup | |
| Water | 1/2 cup |
| Salt / Pepper | according to taste |
Put the ingredients in the blender. Blend the ingredients until they are blended to a smooth, mixed substance. Cover the substance and leave it in the refrigerator for 1-2 hours to cool down.
Hot Mexican salsa
| Ingredients Quantity | |
| Tomato | 4 |
| Onion | 1/2 |
| Garlic 1 clove | |
| Flax seed powder | 2 tsp. |
| Ground cayenne pepper | 1/8 tsp. |
| Chopped fresh coriander | 3-4 tbsp. |
| Cider vinegar 1 tbsp. | |
| Tabasco sauce 1/4 tsp. | |
Put the ingredients in the blender. Blend the ingredients until they are blended to a smooth, mixed substance. Cover the substance and leave it in the refrigerator for 1-2 hours to cool down.
Storage
- Put the appliance and the accessories in the original packaging.
- Store the appliance with the accessories in a dry and frost-free place, out of the reach of children.
U.K. Wiring instructions
The wires in the mains lead are coloured in accordance with the following code:
BLUE NEUTRAL
BROWN LIVE
As the colours of the wire in the mains lead of this appliance may not correspond with the colour markings identifying the terminals on your plug, proceed as follows:
The wire which is coloured BLUE must be connected to the terminal which is marked with the letter N or coloured black.
The wire which is coloured BROWN must be connected to the terminal which is marked with the letter L or coloured red.
Should the fuse in the BS1363 plug require replacement, a 3Amp BS1362 fuse must be fitted.
This is a double-insulated appliance and does not need an earth connection.
Warning! On no account should either the live or neutral wires be connected to the earth terminal.
Disclaimer
Subject to change; specifications can be changed without further notice.
Felicitations!
Worcestershire-Sauce 1 TL
Tabasco-Sauce 1/4 TL
Tabasco-Sauce 1/4 TL
Salt / Peber after smag
Put ingredientserne i blenderen.
Salt / Peber after smag
Put ingredientserne i blenderen.
cglggl gglgglgglgglgglgglgglgglgglgglgglgglgglgglgglgglgglgglgglgglgglgglgglgglgglgglgglgglgglgglgglgglgglgglgglgglgglgglgglgglgglgglgglgglgglgglgglgglgglgglggl
e 15 e 15 e 15 e 15 e 15 e 15 e 15 e 15 e 15 e 15 e 15 e 15 e 15 e 15 e 15 e 15 e 15 e 15 e 15 e 15 e 15 e 15 e 15 e 15 e 15 e 15
i jll
Jg j 100000000000000000000000000000000000000000000
a jll jc s jll slj p - 1 1 g / g a51 gill g baiy p - 1 1 g / g a51 gill g bai jn 12 51 1
g 1 g a 1 g a 1 g a b
a kaly a jll g s jy jy jy - jg jlc a jll g z g a jll jil - jla c al j g la yj y jal jgl i g la jrl g
cllgallbljglal jglal Jz. 10 10 10 10 10 10 10 10 10 10 10 10 10 10
Jglal Jl 12
Jilg w g Jg j 2 .
jglg jg jg j.
jz jz jz jz jz jz jz jz jz jz jz jz jz jz jz jz jz jz jz jz jz jz jz jz jz jz jz jz jz jz jz jz jz jz jz jz jz jz jz jz jz jz jz jz jz jz jz jz jz jz
1 1
ii yS11 a0xu
Jn Jn Jn Jn Jn Jn Jn Jn Jn Jn Jn Jn Jn Jn Jn Jn Jn Jn Jn Jn Jn Jn Jn Jn Jn Jn Jn Jn Jn Jn Jn Jn Jn Jn Jn Jn Jn Jn Jn Jn Jn Jn Jn Jn Jn Jn Jn Jn Jn Jn Jn
1
Princess Ciljia.
a
aaleil aalwll
Jg jgljgljgljgljgljgljgljgljgljgljgljgljgljgljgljgljgljgljgljgljgljgljgljgljgljgljgljgljgljgljgljgljgljgljgljgljgljgljgljgljgljgljgljgljgljgljgljgljgljgljgl
1
yI 1alalgljgai y 8. Iaiaai (laiaay) 5 4 9 aai g jagai piaui 4 aagaae
aaiia 1


- Gefeliciteerd!
- Citroen-knoflook dressing
- Safety instructions
- General safety
- Electrical safety
- Safety instructions for blenders
- Cleaning and maintenance
- Description (fig. A)
- Assembly (fig. A & B)
- / 217400: Mounting the jar (fig. A)
- 217400: Mounting the bottle (fig. B)
- Use
- Switching on and off (fig. A)
- Hints for use
- Jar
- Bottle
- Recipes
- Gazpacho
- Ingredients Quantity
- Lemon garlic dressing
- Hot Mexican salsa
- Storage
- U.K. Wiring instructions
- Disclaimer
- Felicitations!
- i jll
Brand : PRINCESS
Model : Blender Compact
Category : Blender