
BWT 6312 E - Washing machine BRANDT - Free user manual and instructions
Find the device manual for free BWT 6312 E BRANDT in PDF.
| Product type | Top-loading washing machine |
| Brand | Brandt |
| Model | BWT 6312 E |
| Maximum load capacity | 6 kg (dry laundry) |
| Wash programs | Cotton (20°C-90°C), Synthetic (cold-60°C), Wool/Delicate (cold-30°C), Opti A45 min (40°C), Flash 30 min (30°C), Rinse, Spin, Prewash, Delayed start up to 19h |
| Maximum spin speed | Not specified in the manual, max spin for cotton |
| Options | Extra rinse, Easy iron, Drain (100 rpm), Stop with water in drum |
| Power supply | 220-240 V, 50 Hz (check rating plate) |
| Required water pressure | 0.1 to 1 MPa (1 to 10 bars) |
| Energy consumption (cotton cycle 60°C full load) | 0.82 kWh (class A+++) |
| Water consumption (cotton cycle 60°C full load) | 49 L |
| Cotton program duration 60°C full load | 188 min |
| Power consumption in off mode | < 0.50 W |
| Power consumption in standby mode | < 2.50 W |
| Noise level | Not specified |
| Dimensions (H x W x D) | Not specified |
| Net weight | Not specified |
| Maintenance and cleaning | Removable and cleanable dispenser drawer; accessible pump filter for cleaning; body: liquid soap and soft cloth |
| Safety | Overflow protection; child safety (supervision required); automatic stop in case of anomaly; lid lock during cycle |
| Spare parts and repairability | Use only original spare parts; intervention by a qualified professional |
| General information | Compliant with EU regulations 1015/2010 and 1061/2010; recyclable; spin efficiency class A according to residual moisture |
Frequently Asked Questions - BWT 6312 E BRANDT
User questions about BWT 6312 E BRANDT
0 question about this device. Answer the ones you know or ask your own.
Ask a new question about this device
Download the instructions for your Washing machine in PDF format for free! Find your manual BWT 6312 E - BRANDT and take your electronic device back in hand. On this page are published all the documents necessary for the use of your device. BWT 6312 E by BRANDT.
USER MANUAL BWT 6312 E BRANDT
OPTION PRÉLAVAGE (U)
This appliance has been designed exclusively for domestic use for washing linen. Very important : Read de before installing and using this appliance.
RECOMMENLED LOADS :
- The maximum capacity of the appliance is 6 kg.
SAFETY


The following instructions must be respected :
INSTALLATION :
- The pressure of the water supply must be between 0.1 and 1 MPa (1 and 10 bars).
- Do not use an extension, adapter, multi-socket or a timer plug.
- The electrical installation must be capable of withstanding the maximum power rating stated in the manufacturer's data plate and the plug must be duly earthed and accessible.
- Only use the hose and the new seals Gupplied with the appliance.
- If the power cord is damaged, have it changed by the After Sales Service or a qualified professional to avoid any risks.
- We recommend that the appliance is not placed onto a mat or carpet to avoid hampering the circulation of air at its base.
- If a problem occurs that you cannot solve (see page 15), do not tamper with the appliance and call the technical department of your dealer or the manufacturer.
USE :
- This appliance may be used by children of 8 years or older and by persons with limited physical, sensorial or mental capacities or without experience or knowledge of it, provided that they are correctly supervised or if they are given instructions on the use of the appliance in complete safety if the risks incurred are understood. Children should be supervised to ensure that they do not play with the appliance and prevent children of less than 3 years old from playing with it, unless they are constantly supervised. Do not allow children to clean the appliance unless supervised.
- Do not load linen that has been treated with stain removers, solvents or inflammable products – straight after they have been treated (risk of explosion).
EN
USE (continued) :
- This washing machine is fitted with a safety device to prevent any spillage of water.
- At the end of the cycle, ensure the water tap is switched off and the appliance unplugged.
ENVIRONMENT

This washing machine has been designed to respect the environment.
PROTECTING THE ENVIRONMENT
Modify the dose of washing powder to suit the state and amount of the linen washed, taking care not to exceed the dose recommended by the washing powder manufacturer.
This appliance's packaging material is recyclable. Help protect the environment by placing the packaging into the municipal containers provided for this purpose.
Your washing machine also contains many recyclable materials, it features this logo to remind you that used appliances must not be mixed with other waste.
The appliance must therefore be recycled in compliance with the European directive 2002/96/CE on used electrical and electronic equipment.
Contact your town hall or your retailer for the used appliance collection points closest to your home.
ENERGY SAVING
Only programme a prewash when it is absolutely necessary. For linen that is not very or normally dirty, a low temperature programme is sufficient.
1 - INSTALLATION

1.1 - UNPACKING (Diagram 1.1.2 to 1.1.4)

The following instructions must be respected :
- Remove the chocks from the lid and flaps of the drum and open and close the drum carefully.
- Lift the washing machine and remove the motor B chock and base A (Diagram 1.1.2).
- Remove the strip C and place the stoppers in the holes D (Diagram 1.1.3).
- Remove the 3 hose support clips, E and place the stoppers in the 3 holes (very important) F (Diagram 1.1.4).
1.2 - CONNECTION TO THE WATER SUPPLY
(Diagram 1.2)
Connect the supply hose to the connector at the back of the washing machine and your tap fitted with a threaded connector ∅ 20x27.
1.3 - DRAINING (Diagram 1.3)
Position the drain hose, fitted with the curved part, H ensuring that the instructions shown on the diagram are respected and especially that the connection is not air-tight: air must pass freely between the drain hose and the drain to avoid used water from flowing back up the hose into the machine and bad smells being caused.
1.4 - LEVELLING THE MACHINE (Diagram 1.4)
The appliance must be installed on a horizontal floor. If required, and if it is equipped with adjustable feet at the front of the appliance, stabilise your washing machine so that it is level. If it is fitted with retractable castors, it may be moved by pulling the lever underneath the appliance completely to the left.
1.5 - ELECTRICAL CONNECTION (Diagram 1.1.1)
Ensure that the indications on the data plate of the Appliance are respected.
1.6 - CLEANING BEFORE USE
Once installed, your washing machine must be cleaned by programming a cotton cycle at 90^ C with nothing inside and with half a dose of washing powder.

RECOMMENDATIONS :
- Before inserting the linen, sort it by colour, how dirty it is and the type of textile. Empty all pockets, close zips, removes hooks from curtains, place Small items of underwear in a mesh bag.
- Remove any loose buttons, pins and clips.
- Knot belts, and ties for aprons, etc.
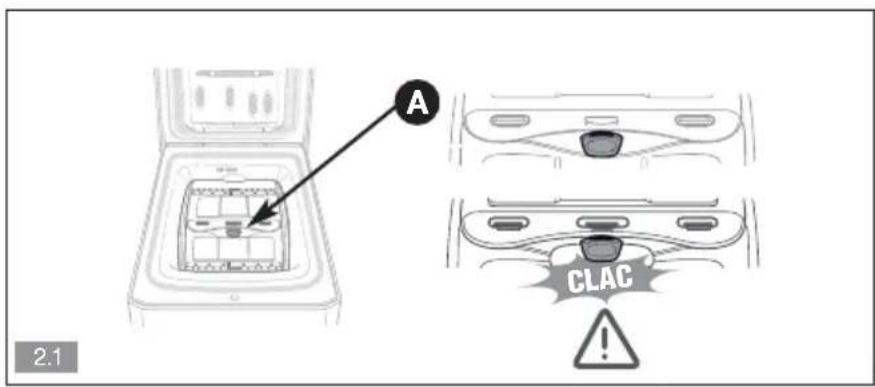
2.1 - LOADING YOUR WASHING (Diagram 2.1)
Operate the handle of the lid and open the drum by pushing the button.

Once the linen has been put in, ensure that the drum has been closed properly. Ensure the edge of the button is visible.
2.2 - WASHING PRODUCTS AND ADDITIVES
(Diagram 2.2)
The product drawer has 4 compartments :
① pre-wash (powder), wash (powder or liquid),
softener, bleach.
- Use detergents that are certified for domestic washing machines.
- Do not use liquid detergents with the pre-wash cycle and/or delayed start.
- Concentrated bleach must be diluted.
- Do not exceed the MAX level.
3 - PROGRAMMING

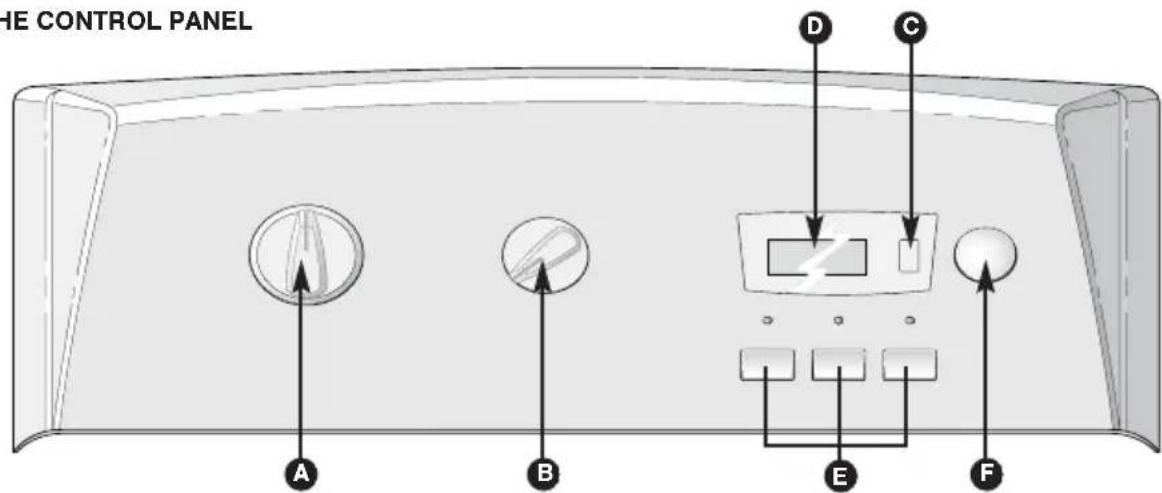
3.1 - THE CONTROL PANEL
text_image
HE CONTROL PANEL A B D C E F
Programme selector

Delayed start setting

Options

Spin dry speed selector

Display

Start/Pause
3.2 - PROGRAMMING A WASH CYCLE
STARTING THE APPLIANCE
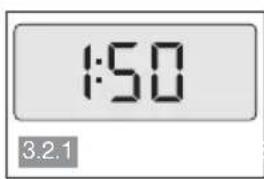
- Select your programme and temperature (see programme chart) by turning the Programme selector A. The estimated duration of the programme is displayed D (Diagram 3.2.1). Once the cycle has started and after a few minutes, the duration of the programme will be updated according to the quantity and type of linen being washed.
- Select your spin dry speed to suit the textile by turning the selector Butomatically limited for certain programmes).
-Select the options if desired using the Etttons then press the «Start/Pause» button F.
DELAYED START OF A PROGRAMME
- Select your programme using the programme selector A.
- Press the «Delayed start» button Ⓐdelay the start of your programme, in steps of one hour until the required delay is obtained (maximum 19h00).
- Confirm by pressing the «Start/Pause» button. F The display shows the time remaining before the start of the programme, four segments successively light up in rotation (Diagram 3.2.2 to 3.2.5). The last hour is counted down in minutes.
Once the delayed start phase is over, the programme will actually start. The display shows the time left and this becomes increasingly accurate as the cycle progresses.
ADDING OR REMOVING AN ITEM DURING THE CYCLE (impossible during spin)
- Press the «Start/Pause» button F interrupt the the washing cycle. On the display Die time flashes (Diagram 3.2.6).
- Insert or remove the linen.

The time that the lid remains locked depends on the temperature inside the machine and safety reasons, may not be released for several es if a cycle of over 40^ C is interrupted.
- Press the «Start/Pause» button F e-start washing. On the display D he two dots flash (Diagram 3.2.7).
NB : If you have selected a delayed start, you can access the drum instantly at any time in the period before the washing cycle starts without having to interrupt and restart the cycle.
MODIFICATION OF THE PROGRAMME IN PROGRESS
During the washing cycle or during the delayed start period, you can make certain modifications :
- Select another programme, another spin dry speed or modify the options. Depending on how far the programme has advanced, not everything may be possible.
CANCELLING A PROGRAMME IN MID-CYCLE OR WHEN PAUSED
- Turn the programme selector A the stop position «☐». The lights and the display D I be switched off.
This operation may be made at any time, during the cycle or when programming or even when paused.
NB : In all cases, cancelling a programme means that you have to re-programme everything from the start again.
END OF THE WASHING CYCLE
The display Dows the washing cycle is completed at the end of the programme (Diagram 3.2.8).
- Place the programme selector A the stop position «☐».
- Open the lid and remove the linen.
Certain models automatically position the drum with the opening at the top to make it easier to take the linen out. This operation only lasts 3 minutes at most.
PROGRAMME OPTI A45 min
Programme at 40°C for washing 3 kg or cotton or mixed fabrics in 45 minutes, ensuring perfect results.
PROGRAMME FLASH 30 min
This programme allows you to wash a 2.5 kg load of not very dirty COTTON, WHITE, COLOURS or RESISTANT SYNTHETIC linen. The cycle time is restricted to around 30 minutes. In this programme, the washing temperature is automatically programmed at 30°C.

Important : For this programme, the doses of detergent should be reduced by half.
OPTION PREWASH ( Ⓤ )
To remove earth, sand, blood, ... it allows the washing to be continued in clean water.

The detergent is to be put into the pre-wash compartment ⓘ the product drawer
(Diagram 2.2).
OPTION RINSE PLUS ( 🤒 )
Add an extra rinse. Recommended for sensitive skins.
OPTION EASY IRONING ( )
Wash and spin dry speeds adapted to avoid crumpling of the linen.
FONCTION DRIP DRY (100 tr/min)
This function, for very delicate linen, enables you to remove spinning and to pass directly to the draining of the washing machine.
FONCTION FULL DRUM STOP ( ☐)
This function enables you to remove the washing from your machine before the spin phase or to delay this phase with you washing remaining in water to prevent creasing.
When the machine is stopped with the drum full, the display 🟢 shows alternately Diagram 3.2.9 to 3.2.10.
You can then just empty it (position «100») or with a spin dry cycle. The programme will stop automatically.
| Programmes table | U | ∅ | ∅ | 100 | ∅ | |||
| Type of textile | Temperature (°C) | Maximum weight of dry clothes | Prewash | Rinse plus | Easy ironing | Drip-dry | Full drum stop | |
 | COTTON 20° - 90° 6,0 kg | ● | ● | ● | ● | ● | ||
 | SYNTHETICS cold - 60° 2,5 kg | ● | ● | ● | ● | ● | ||
 | WOOL / DELICATES cold - 30° | 1,5 kg | ● | ● | ● | |||
| Special programmes | ||||||||
| Opti A45 min 40° 3,0 kg | ● | ● | ● | |||||
| Flash 30 min 30° 2,5 kg | ● | ● | ||||||
| Special programmes | ||||||||
 | Rinsing -- | ● | ● | |||||
 | Spinning -- | ● | ||||||
TEST PROGRAMMES ACCORDING TO DELEGATED REGULATION (UE) N°1061/2010
- Standard cotton programme at 60^ C : Cotton - 60^ C - no option - max spin.
- Standard cotton programme at 40^ C : Cotton - 40^ C - no option - max spin.
4 - REGULAR CARE

4.1 - AVOIDING BAD SMELLS
Respect the installation instructions for the drain hose described in paragraph 1.3, leave the lid open after the cycle has finished. Once a month run a cycle at 60^ C or 90^ C.
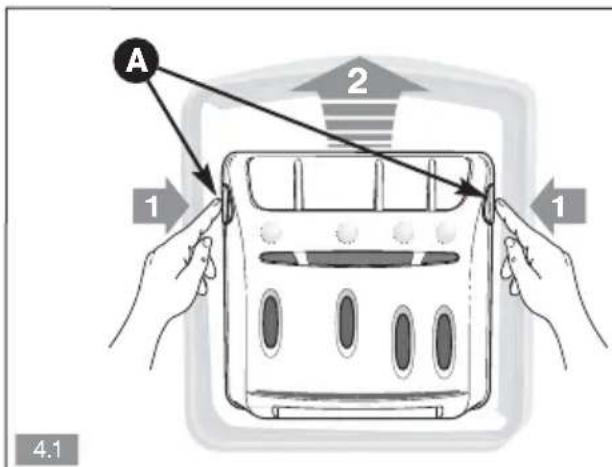
4.2 - PRODUCT DRAWER (Diagram 4.1)
- Release the drawer by pressing the Bumps A puyll it towards you. Remove the siphons B separate the drawer C from the trim D
– Rinse everything under the tap.
- Refit all of the parts of the drawer, then fit it back under the lid of the machine.
4.3 - PUMP FILTER (Diagram 4.2)
- Release the part A the bottom of the drum by pushing a pen into the hole B d push it to the right.
– Turn the drum towards the front. - Remove the pump filter, Remove any objects that may be inside and rinse everything under the tap.
- Refit both parts Cd. A
- Push the part A the left until it clicks into place.
4.4 - OUTSIDE PANELS
Use liquid soap. Do not use abrasive products or scourers. Dry with a soft cloth.
Incidents may arise when using your washing machine :
If the display shows the following message :
| d01 the tap is turned off.5.1 | d07 - the lid is not closed correctly.5.2 - the drump is blocked. | d02 The pump filter is clogged ; clean the filter (paragraph 4.3).5.3 |
Here are a few points to check :
| Problems : Causes / Remedies : | |
| The washing machine will not start : | - The appliance is not plugged in or there is a power cut.- You haven't pressed the «Start/Pause» buttonF.- You have programmed a delayed start.- See problems 5.1 and 5.2. |
| The linen is not or not sufficiently spun : | - You have selected a programme without spin drying or with limited spin drying.- The spin safety system has detected poor distribution of the washing in the drum : unfold the linen and programme another spin cycle.- Check the height of the curved drain partH (Diagram 1.3). |
| A puddle of water forms on the floor : | First remove the plug from the socket and turn off the water supply.- Check that the sealsAC fitted and the connectors are tightened (Diagram 1.2).- Check the curved part is positioned correctlyH (Diagram 1.3). |
| Strong vibrations when spin drying : | - The washing machine has not been released correctly (Diagram 1.1.3).- The floor is not level (paragraph 1.4). |
| The machine does not drain : - You have programmed «Full drum stop».- The drain hose is bent or squashed (Diagram 1.3).- See problem 5.3. | |
| The lid does not open : - The programme has not yet finished.-Wait until the temperature inside the machine drops. | |
| The drum is blocked : | - If you have access, check that a small item of linen is not trapped between the drum and the tank, by removing partAfrom the bottom of the drum (Diagram 4.2).- See problem 5.2. |
| The drum doors open very slowly (on machines fitted with gently opening doors) : | - Your machine has not operated for a long time.- It is located in too cold a position.- Detergent residue (powder) is blocking the hinges.- in all cases, everything returns to normal after the doors have opened initially. |
Note on operation - this is not an incident :
| The programme time decreases or increases during the wash | This is not a fault. The length of time displayed at the start of the programme is updated according to the load in the machine (automatic weighing). This guarantees perfect washing results and water and energy consumption appropriate to the load. This is normal. The spin safety and anti-foam systems may extend the initial programme time displayed. |
6 - INFORMATION CONCERNING THE EU REGULATIONS 1015/2010
In accordance with EU regulation 1015/2010, below you will find additional product information. The purpose of this information is to provide details on the energy-saving directives to which all appliances sold in the EU must conform.
PRODUCT INFORMATION
Residual moisture of the laundry
To find the spin-drying efficiency of your appliance, consult its energy label and refer to the table below :
| Spin drying efficiency class | Residual moisture D in % |
| A (very efficient) | D < 45 |
| B | 45 ≤D < 54 |
| C | 54 ≤D < 63 |
| D | 63 ≤D < 72 |
| E | 72 ≤D < 81 |
Programmes for tests defined by (EU) delegated regulation 1061/2010
These programmes are suitable for cleaning averagely soiled cotton cloth and are more efficient in terms of both energy and water consumption.
| Maximum load of dry laundry (6 kg) | ||
| Programme (*) | Class/kWh/l | min ⏻ |
| Cotton 60°C full load | A+++ /0.82/49 | 188 |
| Cotton 60°C half load | A+++ /0.59/32 | 118 |
| Cotton 40°C half load | A+++ /0.425/32 | 117 |
(*) Programme without options, max. spin.
For energy-saving purposes, the actual washing temperature can vary from the temperature of the selected programme.
Electricity consumption in on and 'left-on' modes
| Off-mode : | < 0,50 W | 'Left-on' mode : | < 2,50 W |
WASHING YOUR CLOTHES CORRECTLY
Care labels on items of clothing specify appropriate detergents, temperatures and settings.
| Type of cloth Programme Detergent | ||
White cotton  laundry laundry | Cotton Temp. ≤ 90°C | Detergent with a bleaching product |
Coloured linen or  cotton laundry cotton laundry | Cotton Temp. ≤ 60°C | Detergent for coloured laundry without a bleaching product |
Synthetic items  | Synthetic items Temp. ≤ 60°C | Colour/delicate detergent |
| Delicate fabrics [S283] — | Delicate/Silk Temp. ≤ 40°C | Detergent for delicate laundry |
Wool  | Wool Temp. ≤ 30°C | Detergent for woollen items |
WORK TO BE CARRIED OUT

Any work required to your appliance must be needs to be carried out by a qualified professional that represents the brand. When you contact the professional, provide them with the complete reference of your appliance (type) and the serial number (nr). This information is to be found on the data plate on the back of your appliance (Diagram 1.1.1).
ORIGINAL SPARE PARTS
When work is carried out, ask that only genuine certified spare parts are used.


PROFESSIONAL EXPERTISE FOR THE GENERAL PUBLIC
To keep your appliance in good working order, we recommend that you use Clearit household products; discover a range of professional equipment and accessories to care for and improve the performance of your appliances every day.
NOTES

IT


PROGRAMMA OPTI A45 min
PROGRAMA OPTI A45 min
EMPFOHLENE FÜLLMENGE:
OPTION VORWÄSCHE (U)
PRODUKTINFORMATIONEN
PROGRAMMA OPTI A45 min
OPTIE VOORWASSEN (U)
text_image
A B C D E F Gnatural_image
Diagram showing two mechanical components with directional arrows indicating motion, no text or symbols present2

text_image
A CLAC 2.1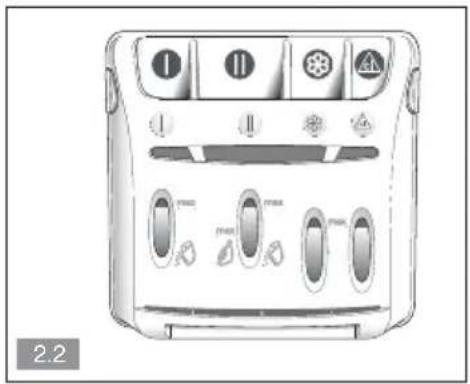
natural_image
Front view of a portable air conditioner unit with control panel and indicator lights (no text or symbols visible)3

text_image
1:50 3.2.1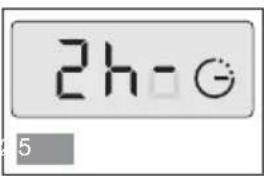
text_image
2h-
text_image
2h10
text_image
2h
text_image
2h10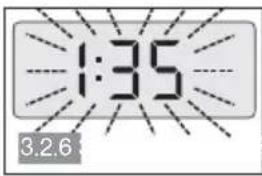
text_image
1:35 3.2.6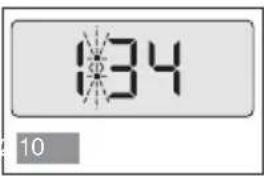
text_image
134 10
text_image
-0-
text_image
8
text_image
u4
text_image
A 2 1 1 4.1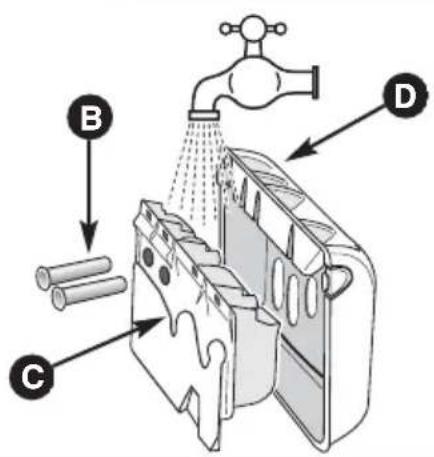
text_image
Diagram illustrating a water spray system with labeled components A, B, C, and D, showing flow from pipe to drain.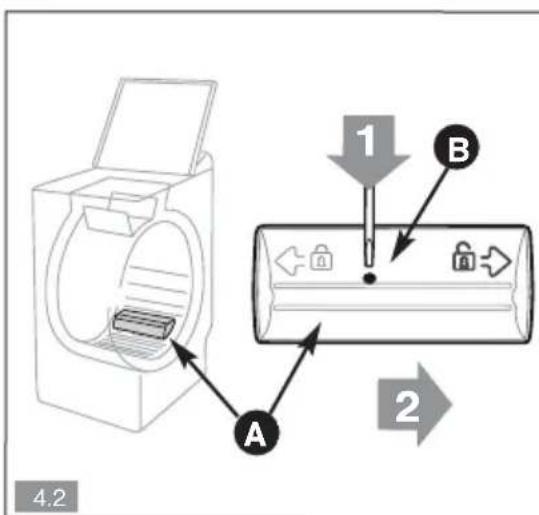
text_image
1 B A 2 4.2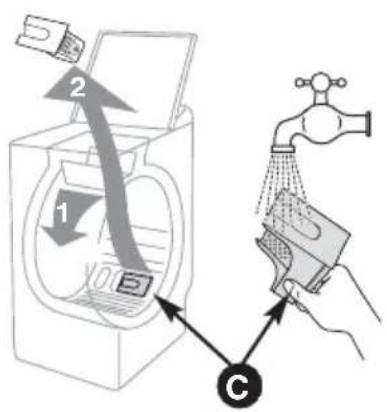
text_image
Diagram illustrating a washing machine operation with labeled parts and a hand cleaning a water tap, showing steps 1 and 2.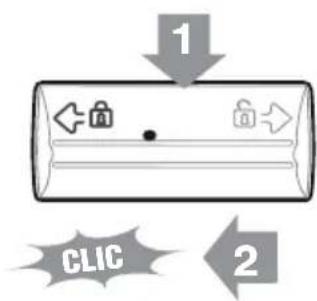
flowchart
graph TD
    A["Step 1"] --> B["Step 2"]
    B --> C["CLIC"]