Easy Snap HD Aqua - Camcorder Best Buy - Free user manual and instructions
Find the device manual for free Easy Snap HD Aqua Best Buy in PDF.
User questions about Easy Snap HD Aqua Best Buy
0 question about this device. Answer the ones you know or ask your own.
Ask a new question about this device
Download the instructions for your Camcorder in PDF format for free! Find your manual Easy Snap HD Aqua - Best Buy and take your electronic device back in hand. On this page are published all the documents necessary for the use of your device. Easy Snap HD Aqua by Best Buy.
USER MANUAL Easy Snap HD Aqua Best Buy
EMC Directive 2004/108/EC
CE Marking Directive 95/68/EEC
Fecha y lugar
09/04/2014
EN 55022: 2010/ AC: 2011
EN 55024: 2010
EN 61000-3-2: 2006+A1: 2009+A2: 2009
EN 61000-3-3:2008
IEC 60529:1989+A1:1999
EN 60529:1991+A1:2000
Best Buy Asia Limited
906, 9/F, Two Grand Tower, 625 Nathan Rd.,
Mongkok, Kowloon, Hong Kong

Firmado: Patty Zheng, Lab Inspector
User Manual
Attention
Thank you for purchasing this Best Buy camera. Please read the operating instructions carefully in order to use the unit properly and correctly. Keep this pamphlet in a safe place after reading should you need to refer to it later on.
- Before using this unit, please read and understand the safety precautions described below. Always ensure that the camcorder is being operated correctly.
- Do not point this unit directly into the sun or any other intense light sources which could damage your eyesight.
- Do not try to open the case of this unit or attempt to modify this unit in any way. Maintenance and repairs should be carried out only by authorized service providers.
- Keep this unit and its accessories out of the reach of children and animals to prevent accidents or damage to the unit.
- If you notice smoke or a strange odor coming from the unit, turn the power off immediately. Take the unit to the nearest authorized service center for repair. Do not attempt to repair the unit on your own.
- Use only recommended power accessories. Use of power sources not expressly recommended for this unit may lead to overheating, distortion of the equipment, fire, electrical shock or other hazards.
DISCLAIMER
We assume no responsibility for damages suffered by the end user or any third party as a result of inappropriate handling of the product or its accessories, or by their operational failure and by their use. We reserve the right to make changes to this product and its accessories without prior notice at any time. The photos included in this user manual are for reference only.
WARNING: The battery has a specific number of charging and discharging cycles. When these cycles have been exceeded, the battery may need to be changed. A battery that has completed its life cycle is not covered by the guarantee.
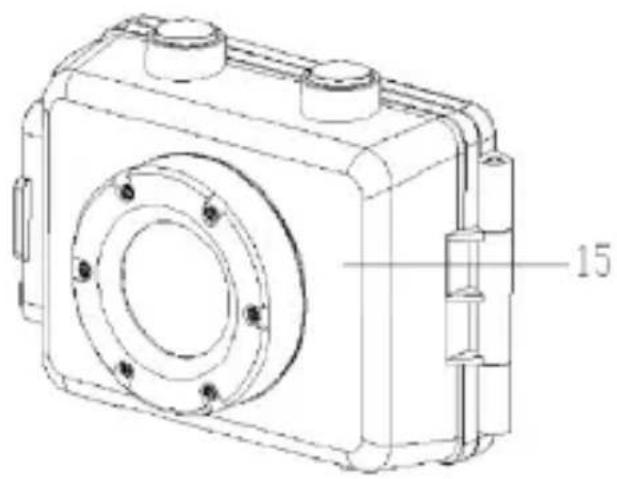
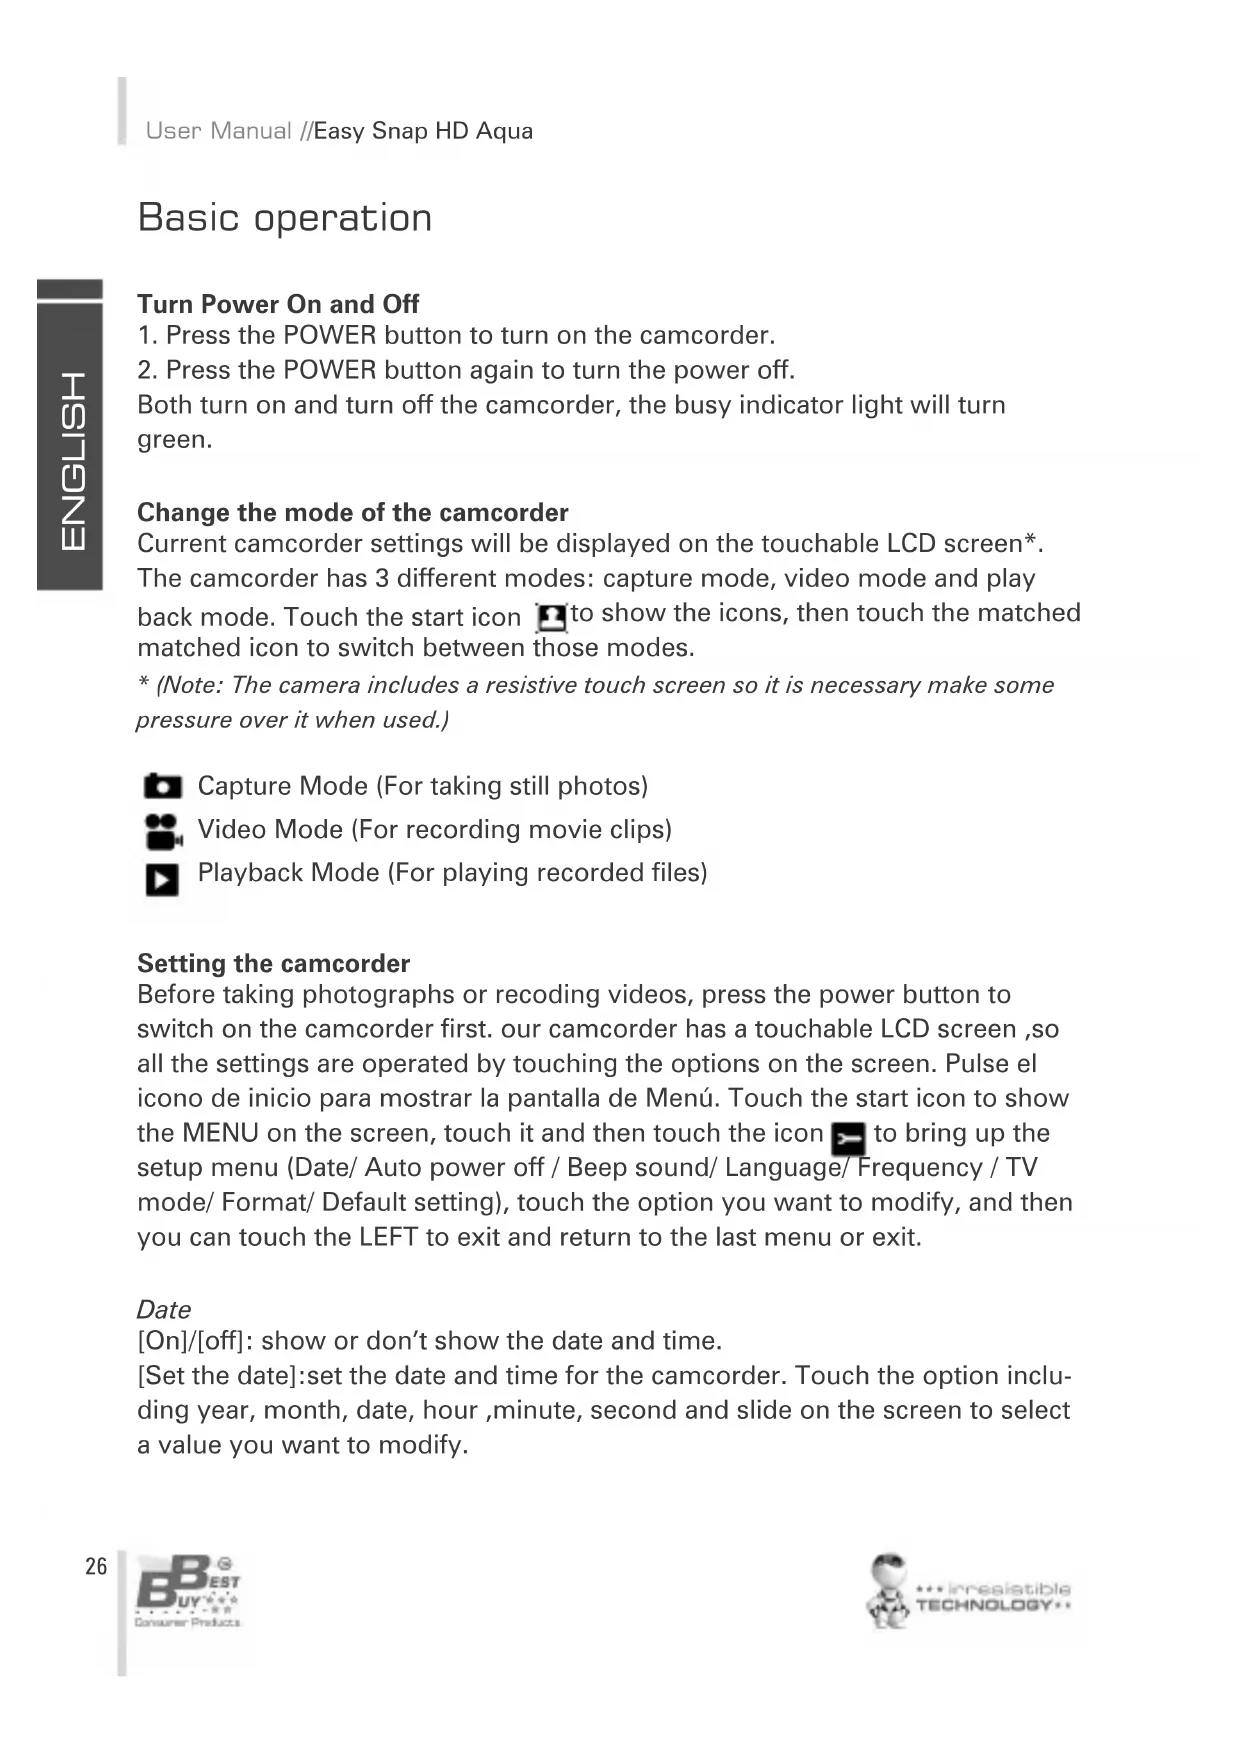
Parts of the camcorder
- USB jack
- Micro SD card slot
- LCD screen
4.Shutter button - Speaker
- Charging indicator light
- Busy indicator light
- Power button
- Reset
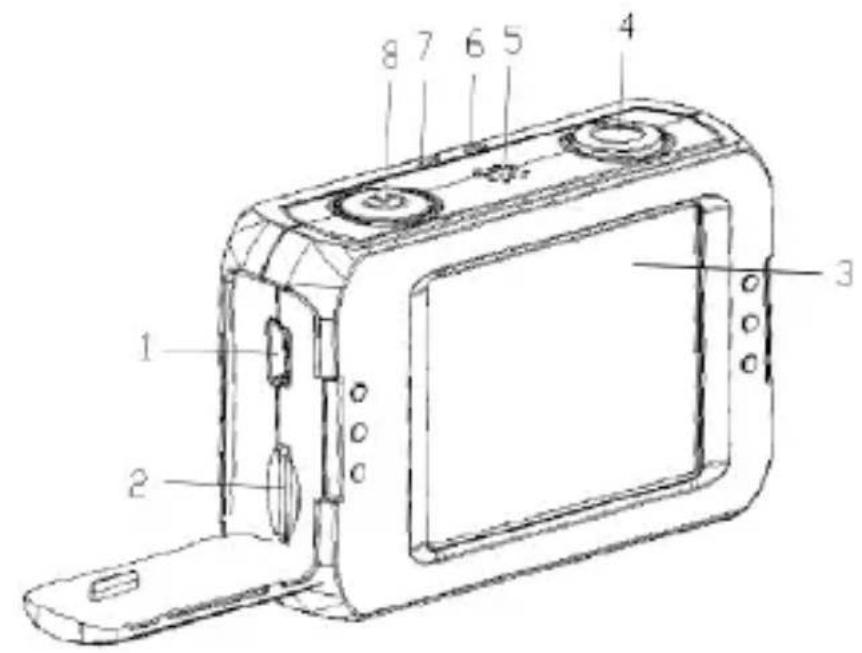
- AV out jack
11.HDMI jack - Tripod slot
- Microphone
- Lens
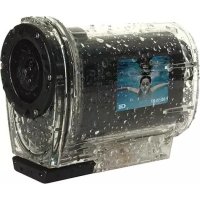
- Water proof case
Charging the battery
The camcorder has an internal lithium battery, Please charge the battery correctly before use.
- Turns off the camcorder.
- Connect the USB cable to the camcorder and the computer for battery charging.
- when charging, the power indicator light will turn red.
- Once fully charged the charging indictor will disappear. Then Unplug the USB cable. The camcorder body may be warm after extended use. This is normal.
Inserting the Memory Card
This camcorder does not equipped with internal memory. An micro SD card (at least class 4) must be inserted for this sportive camcorder to operate. If a card has not been inserted, this sportive camcorder can not record.
- Turns off the camcorder.
- Open the rubber cover at the side of camcorder .Find the micro SD card slot, and then insert the card .
- If the memory card has successfully been inserted, you can hear a clear buzzer.
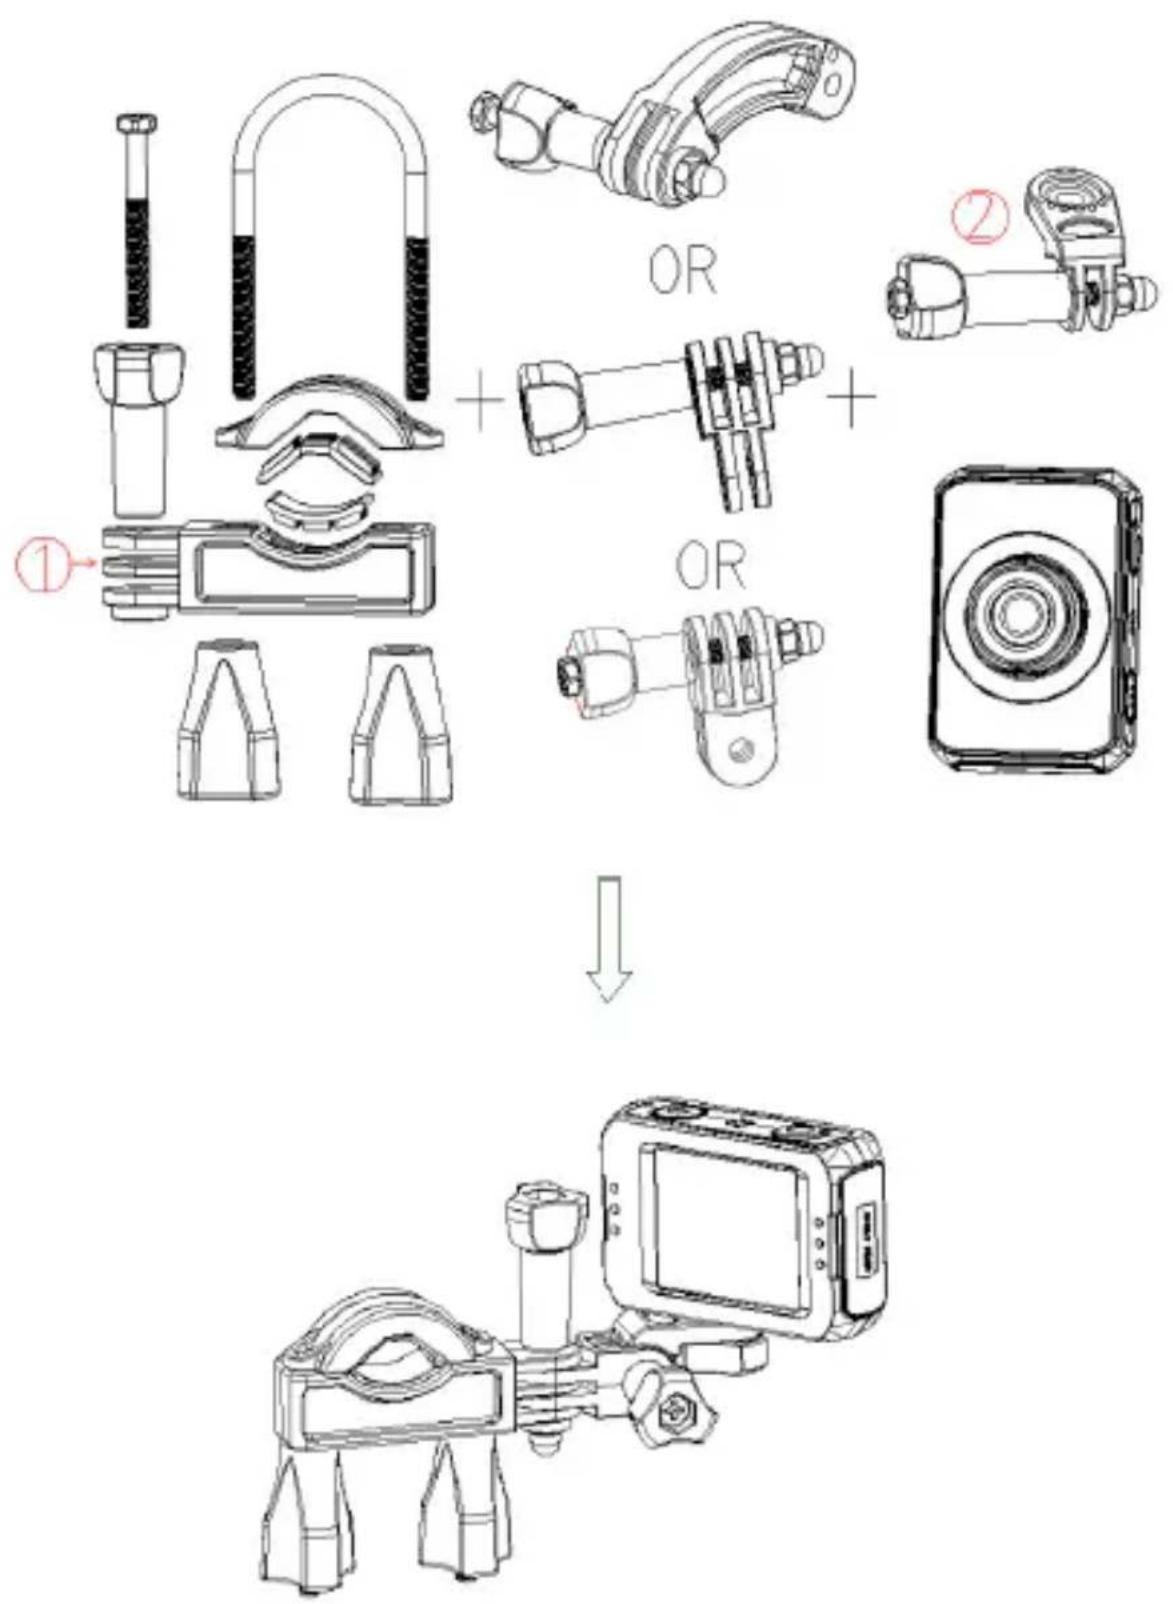
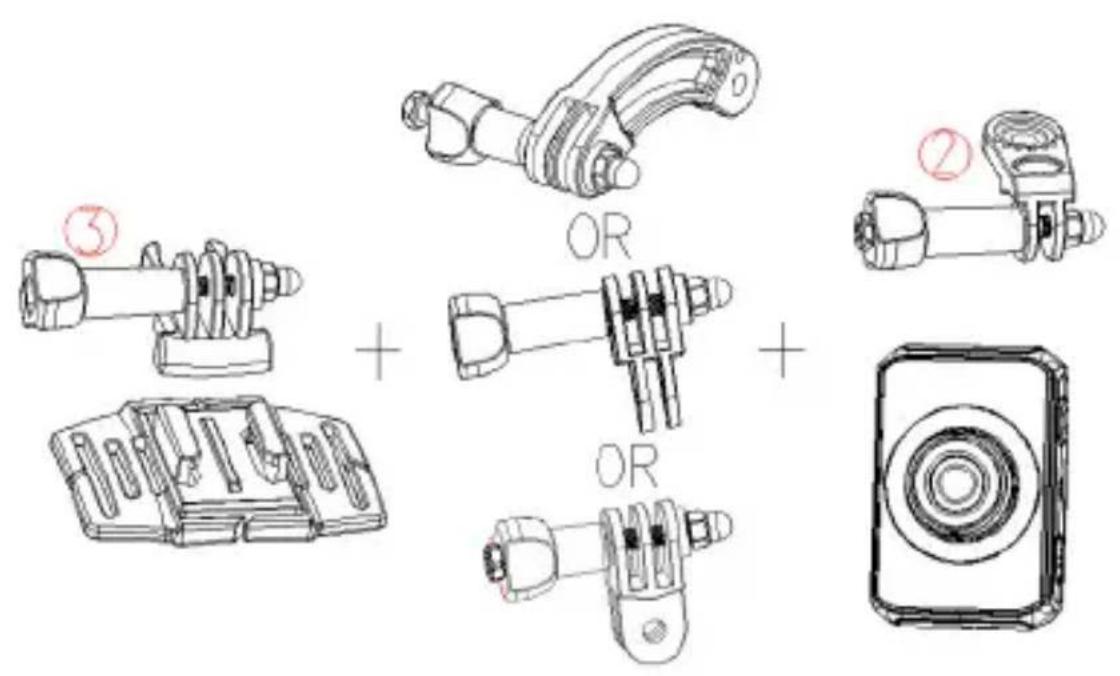
Mounts
In order to use the camcorder more convenient in outdoor sports or in under water situations, We have provided two kinds of main mounts packaged in this camcorder. Mount a is used in fixing to a bike, and mount b is used in fixing to a helmet.
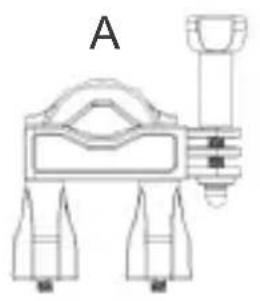
The operating steps as follow:
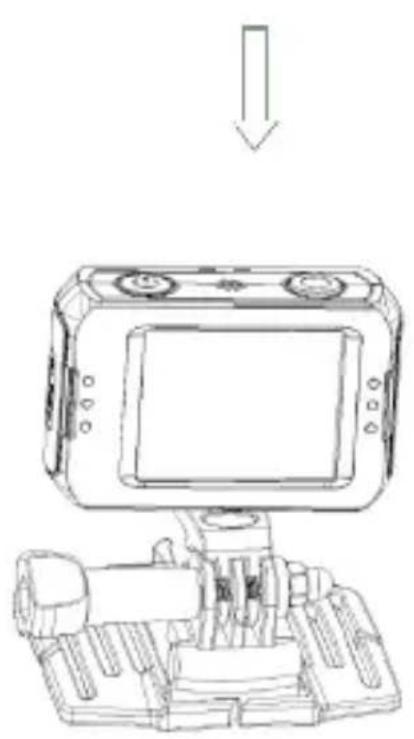
Fix the sportive camcorder to a bike
- Choose to put the camcorder into the water resistant case or the bracket, then lock it .
- Find the mount a, fix it to the handlebar of a bike by placing the rubber pad, and rotating screws.
- Choosing connectors from the three given below, and then fix them to the part 1 of the main mount a.
- Fix the connector 2 that have a metal screw on it to the last connector.
- Fix the tripod slot of the camcorder to the metal screw of the mount 2 respectively.
- Adjust those screws to make the camcorder more steady and convenient.
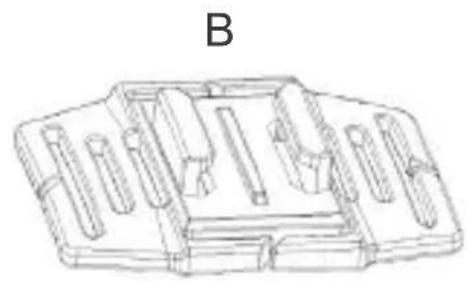
Fix the sportive camcorder to a helmet
- Choose to put the camcorder into the water resistant case or the bracket, then lock it.
- Fix the connector 3 to the main mount b as given below.
- Choosing (one, more, none) connector from the three given above, and then fix them to the connector 3.
- Fix the connector 2 that have a metal screw on it to the last connector.
- Fix the tripod slot of the camcorder to the metal screw of the mount 2 respectively.
- Adjust those screws to make the camcorder more steady and convenient.
- After fixing the camcorder to the mount correctly, using a strap to fix them to the helmet.
Insert a strap into the two ends of the main mount b, adjust length according to the helmet's size, and then tie the strap up to your helmet.
Note: You can also follow the same steps to the point 6 and then install the accessory for motorcycle helmets and flat surfaces. Once installed just stick the camera with the attachment to the helmet or on the surface you want to place the camera.
NOTES
- No sound is recorded when using the underwater housing.
- Some small leaks might occur in the waterproof housing. It is completely normal.
- When the camera records just after being submerged, image can be blurred.
Basic operation
Turn Power On and Off
- Press the POWER button to turn on the camcorder.
- Press the POWER button again to turn the power off.
Both turn on and turn off the camcorder, the busy indicator light will turn green.
Change the mode of the camcorder
Current camcorder settings will be displayed on the touchable LCD screen*. The camcorder has 3 different modes: capture mode, video mode and play back mode. Touch the start icon to show the icons, then touch the matched matched icon to switch between those modes.
- (Note: The camera includes a resistive touch screen so it is necessary make some pressure over it when used.)

Capture Mode (For taking still photos)

Video Mode (For recording movie clips)

Playback Mode (For playing recorded files)
Setting the camcorder
Before taking photographs or recoding videos, press the power button to switch on the camcorder first. our camcorder has a touchable LCD screen, so all the settings are operated by touching the options on the screen. Pulse el icono de inicio para estar la pantalla de Menu. Touch the start icon to show the MENU on the screen, touch it and then touch the icon to bring up the setup menu (Date/ Auto power off / Beep sound/ Language/ Frequency / TV mode/ Format/ Default setting), touch the option you want to modify, and then you can touch the LEFT to exit and return to the last menu or exit.
Date
[On]/[off]: show or don't show the date and time.
[Set the date]:set the date and time for the camcorder. Touch the option including year, month, date, hour ,minute, second and slide on the screen to select a value you want to modify.
Auto Power Off
To save power, the video camera is turned off automatically after a period of time. After you select the "off" that means the power save function is switched off. [1min]/[3min]/[5min]/[off]
Language
Set the on-screen language.[English] /[French] /[Spanish]/[Portuguese]/ [German]/[Dutch]/[Italian]
Format
Format your micro SD card including protected files, removing the micro SD card during formatting may damage the card.[OK]/ [Cancel]
Recording movie clips
- Turn on the camcorder and touch the icon "VIDEO" to set the camera to video mode.
- Start recording.
Use the LCD screen to view your subject, and touch the
to zoom in or zoom out on your subject.
Press the shutter button to start recording.
The LCD monitor will displays how long it has been recording for. If using a slow card, it will change the size to 720P automatically.
3. Finish recording.
Press the Shutter button again to stop recording.
The camcorder will stop recording automatically when the memory capacity is full.
4. Touch the icon "MENU" to set the option in video mode. (Size/ Exposure/ White balance/ Color/ Loop recording/ Motion detection/ Record audio/ Date stamp)
Size
Changing the video resolution for the recording. Select small movie size to record longer time.[1080P]/ [720P]/ [VGA]
Exposure
Set the exposure value manually to compensate for unusual lighting conditions. The value varies from -2 to +2.
White balance
Adjust white balance to suit different light sources. There five items for option: [Auto]//[Daylight]//[Cloudy]//[Fluorescent]//[Incandescent]
Loop recording
Sets the time of the video before recording, when the time is up, it will start another video. When the memory card is full, it will delete the primary files.[off]/[1minutes]/[3minutes]/[5minutes]
Motion detection
Using this function means that the camcorder will stop recording automatically when it detect no motion for 10 seconds, and when it detect active scene, it will recover recording by itself. [On]/[Off]
Record audio
Record voice when recording movie clips [On]/[Off]
Taking still images
- Turn on the camcorder and touch the "CAPTURE" button to set the camera to capture mode.
- Take a still image.
Use the LCD screen to view your subject, and touch the icon to zoom in or zoom out on your subject.
Press the shutter button to take a still image.
After the image has been taken the LCD will display the image for a brief second.
The memory capacity in the top right of screen will decrease as each image is taken.
- Touch the icon"MENU" to set the option in capture mode.(Capture mode/ Resolution/ Quality/ Sharpness/ Exposure/ White balance/ Color/ ISO/ Scene mode/ Anti-shake/ Continue shot)
Capture mode
Use this function to set a delay from the time the shutter button is pressed to the time the image is shot.[Single]/[2s timer]/ [5s timer]/[10s timer]
Resolution
12M/8M/5M/3M
Continue shot
Use this function to take 6 pictures continuously.[On]/[Off]
Playback and delete
- Turn on the camcorder and touch the icon "PLAYBACK" to set the camera to playback mode.
- Touch the screen right and left to view the photos and video files.
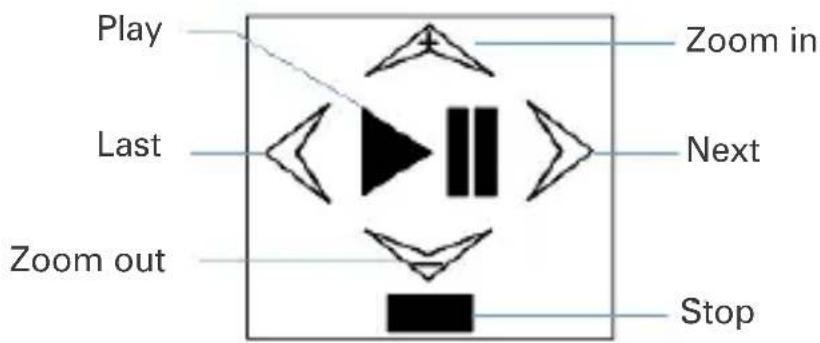
- Press the shutter button or touch the icon to start playing the video file, then it will appear another icon, touch it or press the shutter button can have a pause. Repeating this move can play or pause it again. At last, you can touch the icon to stop playing the video file.
- When viewing the images, you can touch the icon zoom in or zoom out it. In the situation of zooming in the image, you can touch and move on the screen to see details of the image .but you cannot use the menu any more, unless zoom out it to the original size.
- Touch the icon "MENU" to set the option in playback mode. (Delete/ Rotate/ Protect/ Pictbridge)
Delete
Use this function to delete a single file or all files.[Delete Current Image]/[Delete All Images]/[Cancel]
Making connections
Connecting the Camcorder to a TV/HDTV
- Connect the camcorder to a TV/HDTV via the AV/HDMI cable.
- Turn on the TV/HDMI and set to "AV"/HDMI mode.
- Turn on the camcorder. And it will enter the playback mode automatically.
- The screen of TV/HDTV shows the recorded files. And screen of the camcorder is showed as below, playback files by touching these icons.
Connecting the Camcorder to a PC
There are two ways to download files from the camcorder's internal memory or memory card to a computer:
- By inserting the memory card into a card reader
- By connecting the camera to a computer using the supplied USB cable.
Using a Card Reader
- Eject the memory card from the camcorder and insert it into a card reader that is connected to a computer.
- Open [My Computer] or [Windows Explorer] and double-click the removable disk icon that
represents the memory card.
- Copy images from the card into a directory of your choice on the computer's hard disk.
Connecting the Camcorder to a PC with the USB Cable
- Connect the supplied USB cable to the computer's USB port and turn the camcorder on.
- When connect to the computer, it will appears "Mass storage" on the screen
- Open [My Computer] or [Windows Explorer]. A"Removable Disk" appears in the drive list. Double-click the "Removable Disk" icon to view its contents. Files stored on the camera are located in the folder named "DCIM".
- Copy the photos or files to your computer.
How to use the PC Camera function
- Turn off the camcorder.
- Connect the USB cable to a computer.
- Press and hold the Shutter button, connect camcorder to the USB cable until "PC Camera" appeared on the screen.
- In cases of Window XP, Open [My Computer], double click "USB video tool". The camcorder will works as PC Camera function.
- In cases of Window Vista, 7 and 8, the PC Camera function can only be used under communicate software (Skype, etc.)
Specification
Sensor: 5 Mega Pixels CMOS
LCD display: 2.0" TFT touch screen
Lens: F/3.2, f=7.5mm
Shutter: Electronic Shutter: 1/2 1/800 sec
Angle of lens: 120^
Resolution:
Still Image: 12M/8M/5M/3M
Video: 1080P/ 720P/VGA
White balance: Auto/Daylight/Cloudy/Incandescent/Fluoresce
Exposure: -2.0 +2.0EV
Continue shot: 6 frames/shot
ISO: Auto/100/200/400
Sharpness: Sharp/Normal/Soft
Storage: External memory: micro SD (Up to 32GB)
HDMI OUT: HDMI
Power source: Li-ion battery (2*350mAh)
Ambient temperature:
Operating: 0^ C to 40^ C
Storage: -20 to 60^ C
Microphone: Built-in
Speaker: Built-in
Dimension: 71.8 × 46.6 × 31(mm)
Weight: About 75 g
Warranty
BEST BUY PRODUCT GUARANTEE CONDITIONS
- HARDWARE UNITS: Best Buy offers a 2 year guarantee (24 months) in materials and workmanship from the date of purchase. It is therefore necessary to present a document proving the date of delivery or purchase, whether the invoice, receipt or delivery note. Documents that have been manipulated will not be accepted.
- SOFTWARE ACCESSORIES: (only if included in the product) Product software accessories will be sent via a download link or email within 30 days of the date of purchase.
- REQUEST FOR TECHNICAL ASSISTANCE: Connect online to the Best Buy website (www :/ / bestbuy-int.com) and see if you can find the solution to the problem. If not, contact the Best Buy technical service (specified below) to request repair of the product.
- REPLACEMENT: Within the first 15 days from the date of purchase, if it cannot be easily repaired, the product will be replaced by another (only the defective item will be replaced and not the other elements that go with it).
- REPAIR: Repair of a product is free (both labour and materials) within the two years of the guarantee provided that there is no reason for the cancellation of the guarantee. For repair of the product you must previously contact the technical service and obtain a repair number (RMA); otherwise the product will be returned to sender and shipping costs will be charged.
- CANCELLATION OF GUARANTEE: The guarantee will be automatically cancelled in the following cases:
- Deficiencies of product use in countries other than the country of sale.
- Handling of the product or its identification elements (serial numbers) by anyone other than the official technical service staff.
- Deficiencies caused by improper installation of the product.
- Problems arising from use of unofficial product accessories.
- Breakage caused by manipulation of the components of the unit.
- Damage caused fortuitously by accidents, falls or natural disasters.
- The guarantee does not include consumables and parts used and worn by normal use (remote control keys, batteries, bulbs, connectors scratched by multiple connections and disconnections, etc.).y desconexiones, etc.).
-
ADDITIONAL NOTES: Batteries that have reached the end of their useful life will not be covered by the guarantee. Replacement of damaged equipment or any part thereof shall not involve extension of the guarantee.
-
USER COMPENSATION: The liability and SOLE compensation will be to change or repair the defective product (or defective part thereof), provided they fall within the aforementioned cases.
- GENERAL: Best Buy International or its representatives shall in no case be liable for any damages, including those resulting from lost profits or any other pecuniary loss, arising as a result of the use or inability to use the product in question, even assuming that Best Buy International has reported that they may arise.
How to benefit from being a registered user.
Register on our website http://www.bestbuy-int.com
How to request technical assistance.
Once registered, you can request technical assistance at any time as follows:
BEST BUY INTERNATIONAL

sat@bestbuy-int.com

www.bestbuyas.com.hk
DECLARATION OF CONFORMITY
CCGTSE 13040056601V
Best Buy Asia Limited declares that this product, Easy Snap HD Aqua, by the brand Best Buy Consumer Products, with a CE certificate for the year 2013, is a device that complies with:
EMC Directive 2004/108/EC
CE Marking Directive 95/68/EEC
Date and place
09/04/2014
EN 55022: 2010/ AC: 2011
EN 55024: 2010
EN 61000-3-2: 2006+A1: 2009+A2: 2009
EN 61000-3-3:2008
Best Buy Asia Limited
IEC 60529:1989+A1:1999
EN 60529:1991+A1:2000
906, 9/F, Two Grand Tower, 625 Nathan Rd.,
Mongkok, Kowloon, Hong Kong

Signed: Patty Zheng, Lab Inspector
Alimentation: Battery Li-ion (2*350 mAh)
CONDITIONS DE GARANTIE DES PRODUITS BEST BUY
EMC Directive 2004/108/EC
CE Marking Directive 95/68/EEC
Date et lieu
09/04/2014
EN 55022: 2010/ AC: 2011
EN 55024: 2010
EN 61000-3-2: 2006+A1: 2009+A2: 2009
EN 61000-3-3:2008
IEC 60529:1989+A1:1999
EN 60529:1991+A1:2000
Best Buy Asia Limited
906, 9/F, Two Grand Tower, 625 Nathan Rd., Mongkok, Kowloon, Hong Kong

Signature: Patty Zheng, Lab Inspector
Storage: -20 to 60^ C
EMC Directive 2004/108/EC
CE Marking Directive 95/68/EEC
EN 55022: 2010/ AC: 2011
EN 55024: 2010
EN 61000-3-2: 2006+A1: 2009+A2: 2009
EN 61000-3-3:2008
IEC 60529:1989+A1:1999
EN 60529:1991+A1:2000
Data e luogo
09/04/2014
Best Buy Asia Limited
906, 9/F, Two Grand Tower, 625 Nathan Rd.,
Mongkok, Kowloon, Hong Kong

Firmato: Patty Zheng, Lab Inspector
Manual do Utilizador
Precauções
Siga把这些 passos para as utiliser:
Montar a camarara numa bicycliceta
EMC Directive 2004/108/EC
CE Marking Directive 95/68/EEC
EN 55022: 2010/ AC: 2011
EN 55024: 2010
EN 61000-3-2: 2006+A1: 2009+A2: 2009
EN 61000-3-3:2008
IEC 60529:1989+A1:1999
EN 60529:1991+A1:2000
Data e lugar
09/04/2014
Best Buy Asia Limited
906, 9/F, Two Grand Tower, 625 Nathan Rd.,
Mongkok, Kowloon, Hong Kong

Assinado: Patty Zheng, Lab Inspector
EMC Directive 2004/108/EC
CE Marking Directive 95/68/EEC
Datum und Ort
09/04/2014
EN 55022: 2010/ AC: 2011
EN 55024: 2010
EN 61000-3-2: 2006+A1: 2009+A2: 2009
EN 61000-3-3:2008
Best Buy Asia Limited
IEC 60529:1989+A1:1999
EN 60529:1991+A1:2000
906, 9/F, Two Grand Tower, 625 Nathan Rd.,
Mongkok, Kowloon, Hong Kong

Patty Zheng, Lab Inspector
Instrukcja Obstugi
Ostrzeżenie
Press the Shutter button again to stop recording.
The camcorder will stop recording automatically when the memory capacity is full.
WARUNKI GWARANCJI PRODUKTów BEST BUY
EMC Directive 2004/108/EC
CE Marking Directive 95/68/EEC
EN 55022: 2010/ AC: 2011
EN 55024: 2010
EN 61000-3-2: 2006+A1: 2009+A2: 2009
EN 61000-3-3:2008
IEC 60529:1989+A1:1999
EN 60529:1991+A1:2000
Data i.),
09/04/2014
Best Buy Asia Limited
906, 9/F, Two Grand Tower, 625 Nathan Rd.,
Mongkok, Kowloon, Hong Kong

Podpis: Patty Zheng, Lab Inspector
YcTaHOBKa KapTbI NaMaTn
B 3Toi KaMepe He npeducMOteHa BHyTpEHnra NaMaTb.ДЯ nCNoJIb3OBaHnry UcTPOIcTBa Heo6xOdImo yCTaHOBVt b KapTu NaMAtu Micro SD (Klacca 4 nnn Bblwe) B COOTBeTCTByIOUssn Cnot. PpN OTCyTCTBnN KApTbI NaMAtu 3aNNCb JIO6Oro TIna N306paJKeHHa HeBO3MOxHa.
- BbIKIIOUHTe KaMepy.
- OTKpoIe pe3HOByIO KpbIshky OTceKa Ha 6OKOBoI CTOpOHe.BCTaBbTe KapTy namrtn B cnot Micro SD.
- Ecni KapTa NaMaTn BCTaBHeHa npaBnIbHo, OHa 0HKcnpyETc B CLOTe C XapakTepHbIM 0eJIYKOM.
YctaHOBka
Дононтульные поспособлия можны установлары Кк He nocpeдтbehno Ha KaMEpy,Тak И сincnoь3OBaHem NOBODHORO 6OKca(B ATOM clyuae
Heo6xOdmo npocTo OTKpbITb 3aMOK, pIoJXHTb KaMepy B np03paHbI 6OKc n CHOBa 3aKpbITb repMeTnUHbI 3aMOK).Ppi NcNoJIb3OBaHmN POnBOJHO 6OKca HET BO3MOxHOctn 3aPiNCbIBaTb 3ByK, HO 3aTO OH P03BOJare T NorpyKaTbcra C KaMepo IPOD BODy Ha rIy6nHy do 10 MeTpOB.
(Pa3Mep/3Kcno3nua/ BaIahc 6eIoro/ LBeT/ LnkInuecka 3aIncb/
TeKtOBAHnE DnHexeHn/ 3aNNcB 3ByKa/ NeuTa bDaTbI)
Pa3Mep
I3MeHHe pa3peWeHnBnDeOkaDpa. Bb6op MaJIeHbKOro pa3Mepa n3o6paXeHn I03BOJAEr YBeJIuHTb DoCTyUHoe BpEma 3aIncn. [1080P]/ [720P]/ [VGA]
3Kcno3nua
PyuHoe n3MeHeHne 3HaueHnE 3KcNo3nIe IJ KOppeKUIn B Clyuae HeOCTaTKa nn n36bItka OCBeSeHnE. 3HaueHne ot -2 do +2.
BalaHc benoTo uBeTa
Koppekua 6aHaHca 6eIoro CBeTa B 3aBnCmOCTn OT XapaKTepa NCToHnKa OcBeueHna. MoXHo BbIpaTb OndHO n3 PAn Tn 3NaYeHn: [ABTO]/[DeHb]/ [PacMypHo]/[ФлуорсeHThbl CBET]/[JaAMNbHaKaJIbBaHn]
Luknuecka 3annc6
Hacrpoika dInTeBHOCTN BnDeoOpaRMHeTa. Nocle nCTeueHna3aHaHoro npomexyTKa BpeMeHN Haunhaetc 3aIncb cJeDyUoJero BnDeoknna. Pnp 3aOpJHnKapTbI NaMRTn CTnAOTc camble nepBbIe BnDeoOpaRMHebl. Bo3MOxHbIe 3NaueHnra: [OTKnIOUeHo]/ [1 MNHyTa]/ [3 MNHyTbI]/ [5 MNHyT]
OnpeeneHne BnKHeHHa
3TaФункци NO3BOJareT aBTOMaTHueCKn PpeKpaTHTb CbeMKy,ecIn B KaIpe He Na6IIOJaETcH Nkakoro DnIXeHnHa npotXeHn 10 cekyn. EcnB KaIpe ONaTb NOABJIaETcR dBNXeHne, 3aINCb BIDeo BO3O6HOBJIaETcA aBTOMaTHueCKn. [BkIIOUeHo]/ [OTKIIIOUeHo]
3aNNcB 3ByKa
I03B0JareT Bb6paTb, npOn3BOaNTcra Ln BO BpeM CbeMKn BInDeo TaKKe 3aNNCb 3Byka. [BkIIOueHo]/ [OTKIIIOueHo]
ΦOTOCHMKN
- BkIIOUHTe BnDeOKaMEpy n HaxMITE Ha KHOJky "PexIM CbeMKn" dJa BXOda BpeKIM CbeMKn.
- CbeMka foToIpaΦn.
C nOMOUIIO XnIDKOKPNCtAJIHueCKOrO 3KpaHa BbI6epNTe HxKhBip paKypc CbeMKN, 3aTeM HaxMMTE KHOKN DnI npi6NIJKeHnI yJaJIeHnI OBeKTA CbeMKN. DnI BbINOLHeHnI FOToCbEMKn HaxMMTE KHOKNy "3aTBOp". NocIe BbINOLHeHnI CbeMKN Ha 3KpaHe B TeUeHnE HeKOtopoR OBeMeHn OTo6paxKaETcR OTCHTbI KaAp. B npaBOM BepXHem YrIy 3KpaHa OTo6paxKaETcR ObbEm DoCTynHOI NaMRTN, KOToPbI yMeHbShaetcR B npoUceCE CbeMKN.
- Haxmte nKtorpammy "MeHIO" dIa hAcTroynpeXnMa cBemKn. DocTynhblcJeDyUoIe onu: (Pexm CbemKn/ Pa3peSeHne/ KaueCTBO/ Pe3KocTb/
Зкноця/Балансбелогоцьета/Цвет/ISO/PexиM cцehы /Антувибраця/ HenpepbHna CBemka)
Pekm CbeMK
3Ta ΦyHKZnHacTpanBaet TaMep, 3aDaIOUnn IpOMeKyTOK BpeMeHN MeKdY HaxKaTNEm KHOPIKn 3aTBOPa N MOMENTOM CbeMKN φOTOKaIpa. DocTyIhBie or [HeT]/[2c.]/[5c.]/[10c.]
Pa3peWeHne
12M/8M/5M/3M
HenpepbBHa cbeMa
3Ta 0yHKUaI NO3BOJAE T CdeNaTb 6 OTOCHIMKOB B HenpepbIBHOM pEXIME.
[BkIIOUeHa]/[BbIKIOUeHa]
Bocnpon3BeDeHne n ydaJIeHne
- Величente Камери нахшITE на полтогаму "Реким Воспождени" to set the camera to playback mode.
- Touch the screen right and left to view the photos and video files.
- Дя начana Bocnpon3BedeHЯ Bindeoknna Haxmnte KhoNky "3aTbOp"
IINI pNIOKCHNTecb K NIKTORpAMMe . Nocle 3TOTO NOBIAeTcA
NIKTORpMaBn npNOCTaHOBKn BOCnpON3BeDeHn npNKoCHNTecb K
Hn HxMnte Ha KhoNky "3aTBOp". NocneobateIbHoe NOBTOpeHne Haxatna
BbI3bIBAeT npIOCTaHOBky I BO306HOBJIeHne BOCpON3BeDeHn.ДЯ OKOHuaHn
BOcnpOn3BedeHn BnDeOKnna HaXMnTe Ha NkTOrpaYy
4.BoBpeMa npocMoTpa n3o6paXeHn MOxHO yBeJIuHTb INN yMeHbUHTb,
HaxmHa NIKTOrpaMMoCne yBelenueHn306paxeHnHa 3KpaHe
MOXHO paCCMOTpeTb OTdeIbHbIe ero DeTaII, npIKOCHyBwncb K 3KpaHy I
IepemectNB HxKbI yAcTOK n3o6paXeHnA DBNXeHnEM paNbca. Ondako
Функци MeHIO npn npocmoTpe yBelenueHHoro n306paXeHnna HeaKTHBbl -ДЯ
NcNoJIb3OBAHnHyKHO BepHyTbcK NcXoHOMy pa3Mepy CHIMKa.
5:Дянachtpoикpeхиma Bocnpo3BedeHnaXmTe NIKTORpaMMy "MeHIO".
Дocунные onци: (YdaneHne/ PoTaцnia/ 3aunTa/ Pictbridge)
ydaenne
Hactpoika yHKnIy Ira ydaIeHna Ondoro nn cpa3y Bcex faiIOB. [YdaIITb Tekyuiee n3O6paxKeHne]/[YdaIITb BCE n3O6paxKeHna]/[OTmeHa]
CoeHHeHnC BHeHnMn yCTpoIcTBamn
IcnoB30BaHne cHTbIBaIOoero yCTpO'CTBa KapT nAmrTu
1.ИЗВЛЕКЛТЕ KapTu NaMЯТи ИЗ ВьIKЛIOчEHнй KaМеры N BCTaBbTe ee B CLOT CHITbIBAJOUSeRo yCTpoJCTBa, NOДКЛIOчEHнО K KOMMbIOTepy.
2. OTKpoIe nanky [Moi KOMnbIOTe] nII [Windows Explorer] n igeKNHnte Dba pa3aMbIbIO Ha NIKTORpaMMy BHeuHero yCTpO'CTBa, COOTBETCTBYUOuyo KapTe nAMrTI.
3.Скогири Te n3o6paXeHnЯ C KapTbI NaMaTn B Bbl6paHHbI KaTaIor Ha JxecTKO DnCKe KOMNbIOTepa.
CoeHHeHne KaMepb C KOMNbIOTepom npN NOMOu BXODaJcero B KOMnJIeKT Ka6eJr USB
- Побсединту Кабел USBиЗ KOMплкта постбки К пор tam USB KOMьЮТера И Камерbl, 3aTeM ВКЛЮЧИТЕ Камepy.
- После установлией COeINHeHЯ Ha KOMlbITope NOBJIeTcRdoNoJHnTeIbHoe yCTpOJCTBO namrTu.
- OTKpoIte nanky [MoK komnbIOTep] nII [Windows Explorer]. B cnNcKe yCTPOICTB NOABIIeTcHOBbI "CbeMHbI BHeUHNI DnCK", COOTBeTCTBYIOUIN Kamepe.ДЯ npocMOTpa coDEpXIMOrO yCTPOICTBa ⅢeIKHnTe IBa pa3a Na NKToIrpamme.ДaHHbIe, 3aNNcaHHbIe B naMaTn KamepbI, HaxoJrTcB NanKe DCIM.
- Ckopnyte Ha KOMbIOpTe Tpe6yEmble faJIbI n fOToCHIMKn.
IcnoJb3OBAHne yHKuN Be6KaMepbl
- BbIKJIIOUHTe KaMepy
2.ПодсоeДинITE K KMпьОТеру Ka6eIb USB. - Ydepxnbay hkaToi KhoNky "3aTbOp", NOKJIouHte KaMepy Ka6eIem USB n DOxINTEcB NOBHeHn Ha 3KpaHe NIKTORpaMMbl Be6-Kamepbbl.
- Ecni KOMnbIOTep pa6oTaET noi ynpabLeHnem Windows XP, oTKpoIe nanky "MoKmNbIOTep" i KInkHnTe Dba pa3a Ha 3NaUOK " BndeOyCTpoIcTBO USB". KaMepa B 3Tom clyuae 6yJeT fynKcNoHnPoBaTb kaK Be6-Kamepa.
- Ecni KOMnbIOTep pa6oTaET noi ynpabLeHnem Windows Vista, 7 n 8, NOdkJIIOUeHHoe yCTpO'CTBO 6yJeT cyHKcNoHnPoBaTb kaK Be6-KaMepa npN HCPOJb3OBaHn INpOrpaMM KOMMyHnKauNN (Skpe n np.)
TexHnueckne npaMeTpbl
UCIOBNA DEICTBNA IAPAHTN N3DEJN BEST BUY
OBOPUIOBAHNE: Best Buy npedocablaet rapaHTIO cpoKOM 2 rOda (24 Meca)Ha n3dJIne mATEpnaIbI co DnA NOKyPkN npoDykTa. Po 3Toi npuHne npn BO3HKnHOBeHN npeTeH3n Heo6xOIMo npedocabITb DOkyMeHTaIbHbIe CBnDETeJIbCTBa, NOdTBePxxJaOUsne DaTy NOKyPkN I3dJIIN - Cuet-phiKTypy, TOBAPbIy cheK IIn HaKlaDHy IO pniEKMn. He npinHmAJOTc DOkyMeHTbl, B KOTOpblc YMbIShLeHHO BHeCEHbI N3MeHENH.
KOMNOHEHTbI IPOPAMMHO OBCNEEHNr (ToIbKO B cIyue, ecn n3deJne BKIOuayetnx):
Ipecesblka KOMnoHEnTa IporpaMMHOrO oBecneueHn OCyueCTBJIaETcnyTe m npedocTabHeN
CsbIKn dIe 3arpy3Kn IIN NO 3JeKTPoHHo NOte B TeueHn 30 dNe C daTbI NOKyPkN n3dEIny.
3APOC TEXHNUECKOI NOIDEPKKN: Npeeynte Ha Be6-ctpaHnuy Best Buy (www.bestbuy-int.com) npoBepbTe, ec7b JIN ONICAHNE HENCnpaBHOCTN B CnNCKe rOTOBbIX peweHn. B cnyae oTcYCTBnRA roTOBORo peuENTa o6paNTecb B cnyk6y TexHNUeCKO IODepRt Best Buy (aDPEC yka3an Hnke) n 3aBNTe O Heo6XoDMOCTn peMOHTa N3dEInna.
3AMEHA:Ha npotjxehnn nepBbix 15 dHe c daTbI npOaJn,ecn HncnpaBHOCTbJeKo He NOdaetcyaYCTpaHEnIO, n3dJIne 3aMeHReTcRa Ha dpyroe (3aMeHe noJnxKaToTobko DeEeKTHbIe y3NbI, 3aMeHa OCTaIbHbIX qAcTei n3dJIInr He npOn3BOuNTc).
PEMOHT: BeCnIaTHbI peMOHT n3dJIyra (pa60a I MaTePnaJIbI) BblIOJIHЯETcB TeueHIN DByXleTHeRo rapaHTnHOrO cPoka npn YcIobNn OTCytCTBn OBCToRrTeJIbCTB, aHHyIInpyUOx INrpaHTnHbIe o63aTeJIbCTBa.ДЯ BblIOJIHEnHry peMOHTa chauana Heo6xOJMo 6paTITbc8 B CnI TexHnuecko NODepKKn N NOlyuHTb KOD pnoceDypbl rapaHTnpOBaHHoro 6cLnyKbAHnra (RMA), npOTNBHom cLyuae n3dJIyne 6ydt Bo3BpaUeHo OTnpaBnteJIHO C BO3MeJeHEm 3a erO cHT paCXoDOb no nepeCbIJIke.
AHHUYIPOBAHNE TAPAHNTINHBIXOB3ATEJIbCTB: TapaHTnABTomaTneCKn aHHyIpyeTc npn BO3HNKHOBEHm CNeDyUOxN 06CToRTeJbCTB:
- HencnpabHocTN fYHKUHOHPoBaHnI, NOBUBWHeC B CtpaHax, OTNIuHbIX O T CtpaHbI npOdaXn.
-Операци obcnyжваня n3delen nIIN Oпераци c erO ndeHTnФИКaцIOHbIMN 3JIeMeHTaM (серинбIM HomepOM), npOBeDEHHbIe IuCaAM, He OTHOcAUNMCsK OФицaIbHOMy nepcoHaIy TexHuecko NOdepxkN.
- HenCnpaBHOCTN, Bbl3BaHHbIe HenpabINbHOY yCTaHOKo N3dEJIy.
- HenolanaKn, BbiteKaIOuIe N3 IcNoIb3OBAHn I3dEINr He nO Ha3HaueHIO.
-ФИЗИЕСКОЕ NOВPEЖDEHNE OДНО ГИЙ NOПЕСКОЛБКИХ Y3ЛOB yCTpoICTBa, Bbl3BaHHOe erO INСПОЛьЗОВАнEHМ.
- Yüep6, cIyuaHNO HaHeceHHbI B pe3yIbTaTe abapn, naeHnay, yda pa IIN BCJeCTBne CTNXNHO 6eDCTBnY.
-ГараHTиHbIe 63aTeIbCTBa He paCnpocTpaHЯOTcHa paCXoHbIe MaTePnAbli N DeTaII, IcNoJIb3yEmbIe N n3HaWNBaembIe B npOceCE HopMaJIbHOro FOYHKUHOHPOBaHnra (KJIaBNI pJIbT dNCTaUHOHOrO ynpabLeHnRA, 6aTapeN, BeHTINLAuOHHbIe KaHAlbI, pa3beMbI, n3HaWNBaembIe MHOROKpArThbIM NOkJIIOUeHNEm N OTKlIOUeHNEm N T.D.)
- ПРИМЕЧАЙ: Гаразно He paСпространяETсЯ 6БаТApEN I aKKуMЛЯТОрьI, ДОCTИше KoHua cBoero cpoKa 3KcПлуatauIN. 3aMeHa yCtPoIcTBA Ил KaKOrO-ln6o erO y3laВ cIyuae pONOMKn He
BLeueT 3a co6oI npOJIeHnI Cpoka rapaHTNI.
·KOMPENHCALIJI NOJIb3OBATEJIIO: MaTePnaJIbHЯ OTBeTCTBHeHHOCTb I o6a3aTeJIbCTBa nO KOMpeHcaIIN NOKyNaTeJIIO CO CTOpOHbI KOMnAHm COCToT NCKJIIOUHTeJIbHO B O6a3aTeJIbCTBax 3aMeHbI IIn pEmOnTa HeNCnPabHOrO n3dJIy (IIn HEnCnPaBHorO y3Ja B n3dJIyN) PpN YcNOBn COOTBeTCTBn Tpe6OBaHnM, n3LOXeHHbIM BblSe.
OBUHE 3AMEAHN: KomnaHnBest Buy Internacionai nn ee npedctabteHn npi KaNX
ObCToTeIbCTBax He YBJIaOTc OTBeTCTBHeHbIMn 3a BO3MOxHbI yuep6,B TOM uNCLe
3aKJIuOaUcNcB V notepe DoXoDa IIN dpynx MaTePnaJIbHbIX y6bITkax, BbITEKaIOUx N3
ICNoJIb3OBAHn IIN HeBO3MOxHOCTN IcNoJIb3OBAHn DaHHOr O3JeINy, BKIIouaY Bo3MOxHbIE
IocNeIcTBnA,O KOTOpBX INHΦopMnPoBaJa KOMNaHnBest Buy International.
Kak cTaTb 3apernctpnpoBaHHbIM NOJb30BaTeJeM?
3apernctpnpyTecb Ha Hauwe Be6-CTpnaHnce no aDpecy http://www.bestbuy-int.com
Kak o6paTntb8 3a TexHHuecko nOndepKKo?
3apernctpnpobAHbI NOlb3OBaTeIb B IIO6oe BpeM MoKet 06paTntbcra 3a TexHnuecko IopdeppkO C NOMOsbIO CLeyIOUe CTaHdapTHoN FOpmbl:
BEST BUY INTERNATIONAL

sat@bestbuy-int.com

www.bestbuyas.com.hk
DEKJIAPAUÇN A COOTBETCTBNA
C
GTSE 13040056601V
Best Buy Asia Limited 3aBnE, TTO HactoNn npOyKT Easy Snap HD Aqua ToproBm MapKn Best Buy Consumer Products, cepTnФnKAT EC 3a 2013 roD, YBnEeTcYCTpOINCTBOM, OTBeuHUsM CJIeDyHUsM Tpe6OBaHnM:
EMC Directive 2004/108/EC
CE Marking Directive 95/68/EEC
Data mecTo
09/04/2014
EN 55022: 2010/ AC: 2011
EN 55024: 2010
EN 61000-3-2: 2006+A1: 2009+A2: 2009
EN 61000-3-3:2008
IEC 60529:1989+A1:1999
EN 60529:1991+A1:2000
Best Buy Asia Limited
906, 9/F, Two Grand Tower, 625 Nathan Rd., Mongkok, Kowloon, Hong Kong

Подпсь: Patty Zheng, Lab Inspector

be eco-friendly!
Environment protection first!
Your appliance contains valuable materials which can be recovered or recycled. Leave it at a local civic waste collection point.