
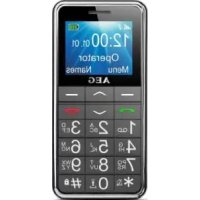
Voxtel M320 - Smartphone AEG - Free user manual and instructions
Find the device manual for free Voxtel M320 AEG in PDF.
| Product Type | Smartphone |
| Brand | AEG |
| Model | Voxtel M320 |
| Network | GSM 900 / DCS 1800 |
| Standby Time | 400 hours (full battery) |
| Talk Time | 4 hours |
| Battery Capacity | 800 mAh, 3.7 V DC |
| Charging Time | Less than 5 hours |
| Operating Temperature | 0 °C to 40 °C |
| Contact Memory | Up to 300 on phone, 250 on SIM card |
| Main Functions | SOS, flashlight, Bluetooth, FM radio, alarms, calendar, calculator, games |
| Package Contents | Handset, charging cradle, power adapter, back cover, user guide, USB cable |
| Power Supply | Power adapter: input 100-240 V AC, 50/60 Hz, 0.15 A max; output 5.0 V DC, 550 mA |
| Display | Color screen (not specified) |
| Weight | Not specified (estimated ~100 g) |
| Dimensions | Not specified (estimated ~120 x 50 x 15 mm) |
| Security | Keypad lock, SIM PIN code, phone code (default 1122), phone lock |
| Compliance | CE (R&TTE Directive 1999/5/EC) |
| Warranty | 24 months from date of purchase |
Frequently Asked Questions - Voxtel M320 AEG
User questions about Voxtel M320 AEG
0 question about this device. Answer the ones you know or ask your own.
Ask a new question about this device
Download the instructions for your Smartphone in PDF format for free! Find your manual Voxtel M320 - AEG and take your electronic device back in hand. On this page are published all the documents necessary for the use of your device. Voxtel M320 by AEG.
USER MANUAL Voxtel M320 AEG
MOBILE TELEPHONE VoxtelM320
CoNTENTS
1 BOX CONTENT 3
2 GETTING TO KNOW YOUR PHONE. 4
3 MENU OPERATION 8
4 INSTALLATION AND SETUP 9
5 MAKING AND ANSWERING CALLS 12
6 USING THE PHONEBOOK. 13
7CALL HISTORY 16
8 MESSAGING. 17
9 SETTINGS 21
10 SOS SETTING 25
11 TOOLS 26
12 GAMES 28
13 SAFETY AND PRECAUTIONS 29
14 GUARANTEE AND SERVICE 35
15 TECHNICAL DETAILS 36
16 CE DECLARATION 37
17 DISPOSAL OF THE DEVICE (ENVIRONMENT) .38
18 TROUBLESHOOTING 39
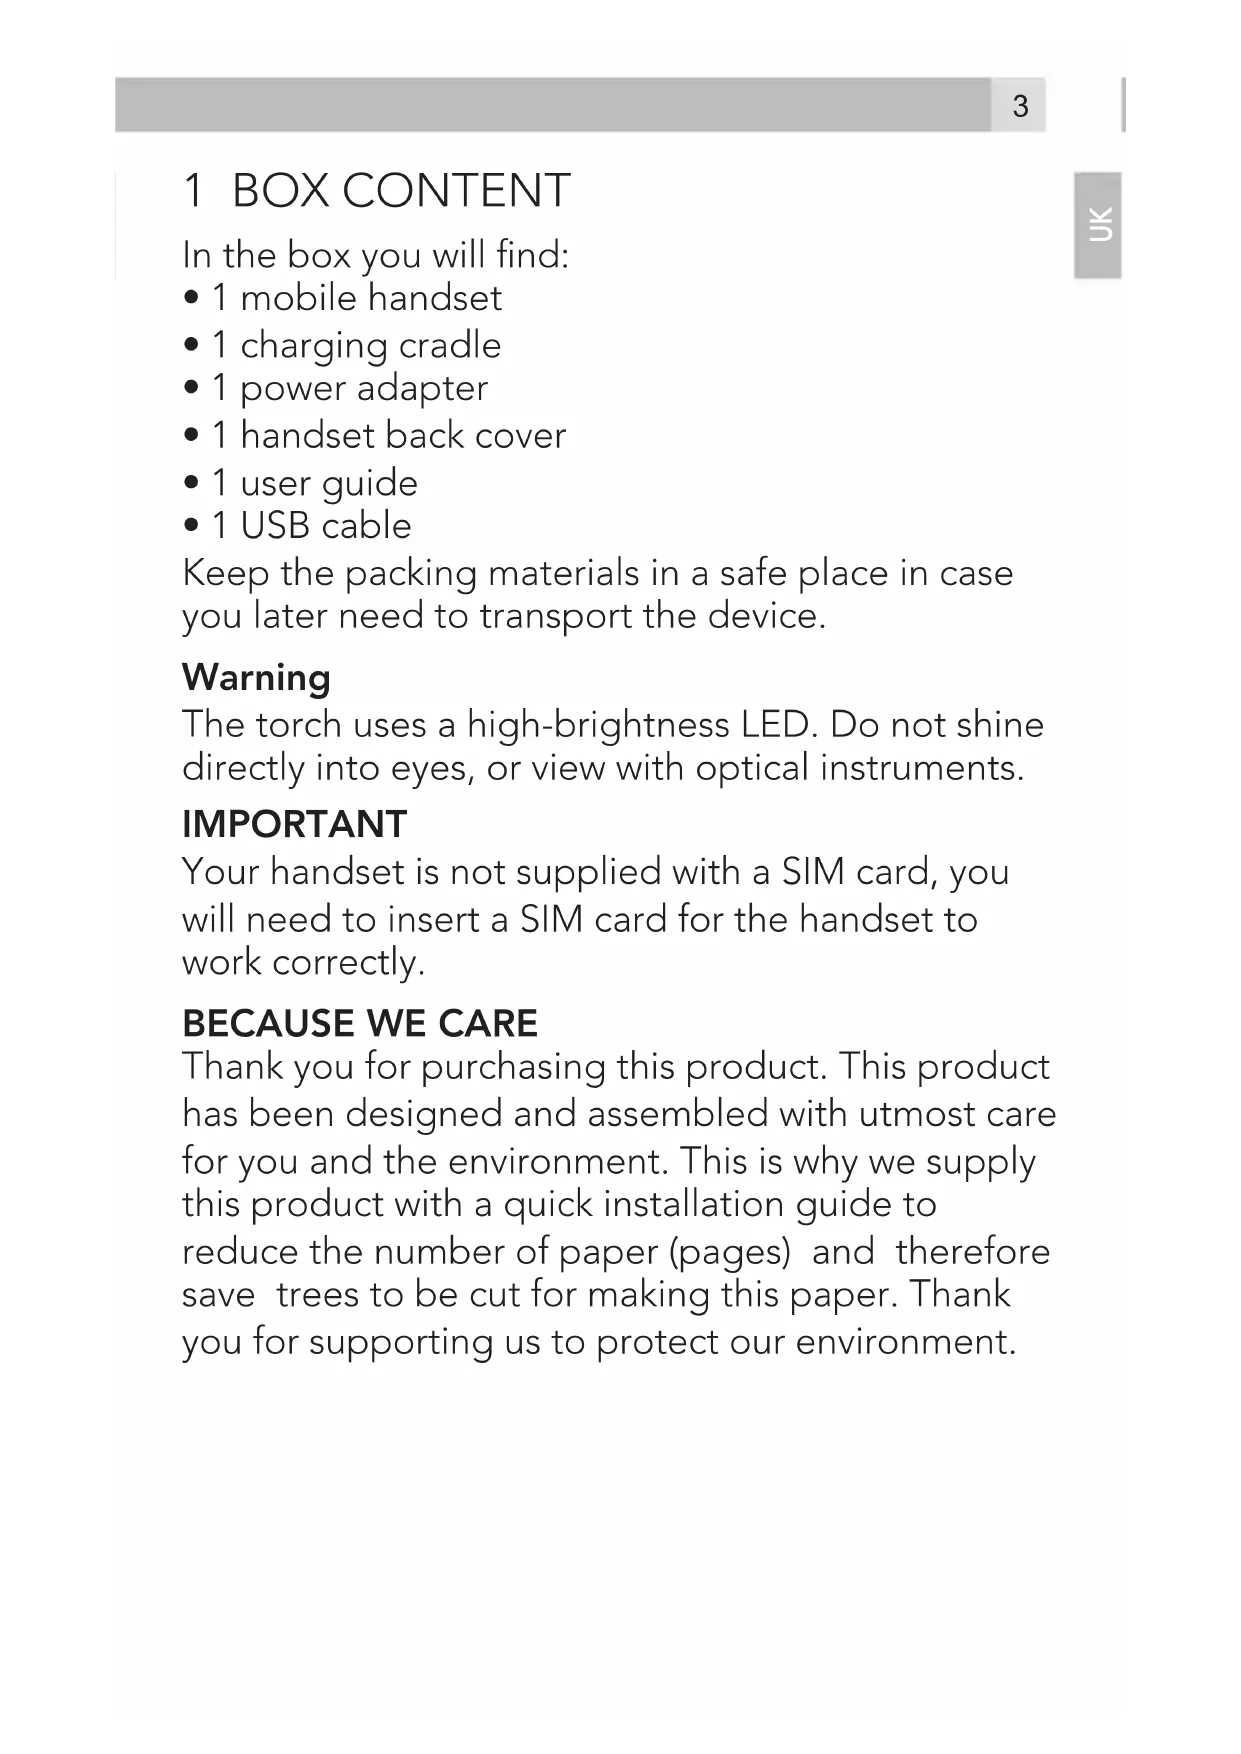
1 BOX CONTENT
In the box you will find:
- 1 mobile handset
- 1 charging cradle
- 1 power adapter
1 handset back cover
1 user guide - 1 USB cable
Keep the packing materials in a safe place in case you later need to transport the device.
Warning
The torch uses a high-brightness LED. Do not shine directly into eyes, or view with optical instruments.
IMPORTANT
Your handset is not supplied with a SIM card, you will need to insert a SIM card for the handset to work correctly.
BECAUSE WE CARE
Thank you for purchasing this product. This product has been designed and assembled with utmost care for you and the environment. This is why we supply this product with a quick installation guide to reduce the number of paper (pages) and therefore save trees to be cut for making this paper. Thank you for supporting us to protect our environment.
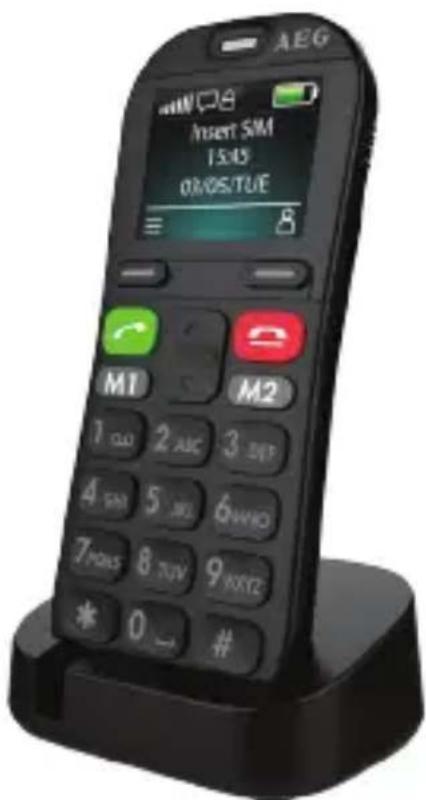
2 GETTING To KNoW YoUR PHoNE
2.1 Keys and parts
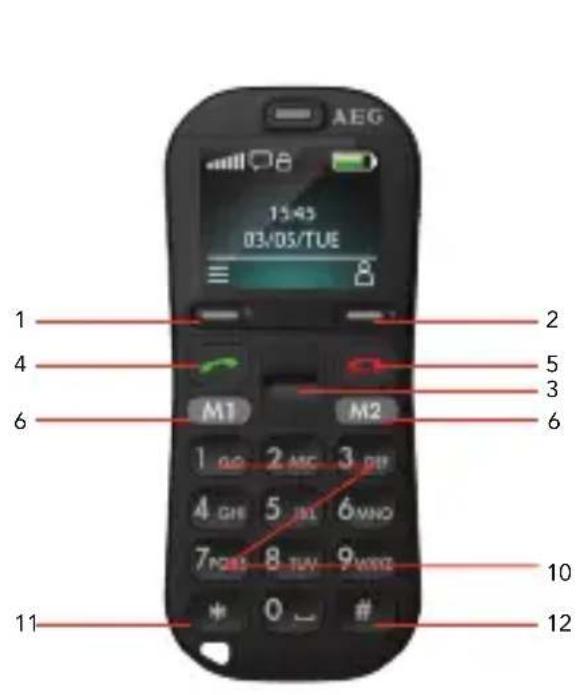
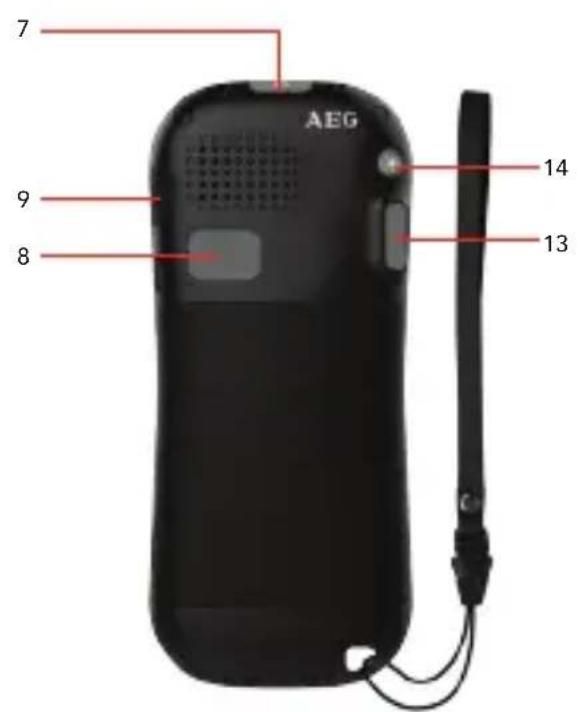
| # Meaning | ||
| 1 | Left Soft Key | Performs the function of displayed text above: Menu / OK |
| 2 | Right Soft Key | Performs the function of text above: Contacts / Back |
| 3 | Up and Down Key | Press to browse menu Press to move cursor up or down while editing Press to manually change the frequency in FM interface Press for + and - in the Calculator |
| 4 Talk key | • Press to answer a call dur- ing ringing • Press to enter the calls log in standby • Press to dial a number | |
| 5 | End key | • Press to end a call • Press to return to the Home Screen / Standby mode |
| 6 | M1/M2 key | • Direct memory keys for storing a telephone number you often use, long press to dial out M1/M2 • Press to search channel in the FM interface • Press to switch left/right in menu • Press for X and / in the Calculator |
| 7 | Power key | • Press and hold to switch the phone on or off • Press to Light the screen |
| 8 | SOS key | • Long press to start SOS procedure: SOS alarm / dial out the 5 pre-stored memory numbers/send SOS SMS |
| 9 | Keypad lock key | • Push up to lock the Keypad • Push down to unlock the Keypad |
| 10 | Number key | • Press to input telephone number. • In edit mode: press to input numbers or letters. • Long press “0” for + |
| 11 * Key | • Press to input * | |
| 12 # Key | • Press to input "#". • In edit mode: press to change input method. • Long press to active silent mode | |
| 13 | Volume control buttons | • Ring volume in standby or speaker volume in call. • Volume in FM radio |
| 14 | Torch key | • Long press to switch torch LED ON/OFF |
2.2 Display icons and symbols
The standby screen shows the following information:
| Meaning | |
| Radio link On with signal strength when linked. with mobile network. | |
| Battery charge level Internal segments cycle during battery charging. | |
| Alarm On if alarm is set. | |
| Ring and Vibrate off Ringer and vibration is off. | |
| Ring on On if only the ringer is enabled. | |
| Vibrate on On if only vibration is enabled. | |
| Vibrate and ring on On if both are enabled. | |
| Vibrate then ring On if vibrate then ring is enabled. | |
| New SMS Indicates you have new text messages. | |
| Lock On when the keypad is locked. | |
| FM radio On when FM is active. | |
| Bluetooth On when bluetooth is active. | |
| Earphone On when earphone plugged in. |
3 MENU OPERATION
Menu lists are used for set up and operation. The left and right soft key functions initially are Menu and Names.
- Press Menu to display Messaging the first entry in the main Menu list.
Use Up or Down to scroll the menu list. The display changes and soft keys become OK and Back.
- Press Ok/ Back for the next/ previous display.
When writing text, use the # key to Switch input method between (ABC), (abc), (Abc) and numerals (123).
Use Up / Down key and M1/M2 to move the cursor, right soft key to delete letters and the * key for symbols or punctuation.
4 INSTALLATION AND SETUP
Before operating, a SIM card must be installed. Keep the SIM card out of reach of small children. The SIM card and its contacts can be damaged easily by scratches or bending, so handle the card carefully.
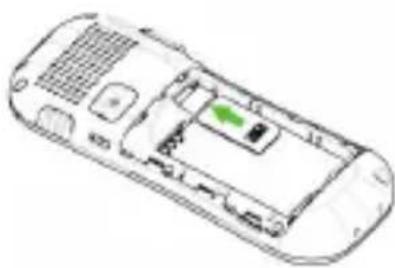
4.1 Install the SIM card and battery
- Switch off the phone, disconnect the power adaptor.
- To remove the back cover, lift the cover off from the gap at left side.
- Remove the battery.
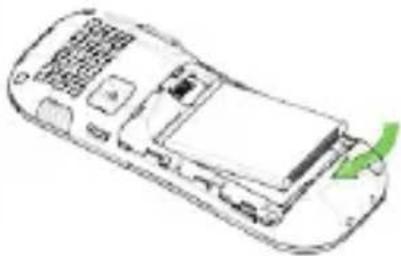
- Carefully slide the SIM card into the holder with the gold connectors face down (as shown 1).
- Replace the battery by aligning the gold connectors on the battery with those on the phone and push the end of the battery down until it clicks into place (as shown 2).
- Replace the back cover by placing it flat on the back of the handset and pushing down until it clicks into place.
1.
2.
4.2 Charge the battery
Warning:
Use only the supplied/approved batteries and chargers. Using others may be dangerous and will invalidate warranty. A battery must be fitted. Do not charge with the back cover removed.
- Connect the charger lead firmly into the USB socket in the right of the handset, or place the handset directly in the charging cradle.
- Plug the mains power adapter into an AC mains socket. If the handset is turned on, "Charger connected" displays for a few seconds and the battery symbol bars scroll to indicate that charging has started.
- If "Charger connected" does not display, disconnect and retry.
If charging still fails, contact the helpline.
- The battery is fully charged when the bars within the battery symbol are continuously on. Disconnect the charger from the phone and the AC outlet. "Charger removed" displays for a few seconds to indicate the charging has stopped.
Note:
The battery can also be charged if the handset is connected to a computer USB port.
4.3 Switching on and off
To switch the phone on and off:
- To switch off, press and hold Power key until the display turns off.
- To switch back on, press and hold Power key until the display turns on.
Warning:
Do not switch on when mobile phone use is prohibited or if it may cause interference or danger.
5 MAKING AND ANSWERING CALLS
5.1 To make a call
Ensure the phone is switched on and in service.
Key in the telephone number including area code. (To add prefix " ^+ " long press the 0 key )
- Press Talk to dial the number on the display.
- To end calls press the End Call button.
5.2 Last number redial
- In idle mode, press Talk to see the All calls list - a list of the last dialled, received and missed calls.
- Press Up/Down to go to the number you want.
- Press Talk to dial the number.
5.3 To answer a call
- When the phone rings, press Talk to answer it.
- During a call, press Volume control buttons to change the volume.
The volume level is displayed and stays for future calls.
5.4 To switch to speakerphone
- During a call, press H-Free to turn Loudspeaker on and press H-Held to turn Loudspeaker off.
- To end the call press the End Call button.
5.5 To mute the microphone
- During a call, press Left Soft Key for Option then On/Off Mute.
6 USING THE PHONEBOOK
You can store names and phone numbers in the Internal phone book (up to 300) and in the SIM phone book (SIM dependant, but a maximum of 250).
6.1 To access the phonebook
In idle mode:
- Press RSK or Menu then Down to Phonebook, OK.
Note:

Indicates entries on the SIM card

Indicates entries in the Internal phone book.
6.2 Add a new phonebook entry
- Press Menu, then Down to Phonebook, press OK to open the phonebook menu.
- Select Add new contact, and press Options, then press Select to SIM / to Phone, then OK.
- Enter the Name then press Down and then enter the telephone number.
- Press Options then Save the new contact.
Note:
When writing the name, use # to switch between (ABC), (abc), (Abc) and Numerals (123).
6.3 To call a phonebook number
- In the idle, Press Right soft key to open the phonebook.
- Press Up/Down to find the name you want to, Press Talk key to dial the number.
6.4 To edit a phonebook entry
- Press Right soft key to open the phonebook, then Up/Down to find the entry you want to change.
- Press Options then Up/Down to select Edit, then modify the name, and then Press Down and modify the Number.
- Press Options then Save the change(s).
6.5 To delete a phonebook entry
- Press Right soft key to open the phonebook, then Up/Down to find the entry you want to delete.
- Press Options then Up/Down to select Delete, then Yes to confirm the Delete.
6.6 To copy an entry to the phone or SIM card
- Press Right soft key to open the phonebook, then Up/Down to find the entry you want to copy.
- Press Options then Up/Down to select Copy, then press the LSK to select copy to Phone or to SIM.
6.7 To add an entry to Blacklist
- Press Right soft key to open the phonebook, then Up/Down to find the entry you want to add to Blacklist.
- Press Options then Up/Down to select add to Blacklist, then Yes to confirm.
Note: Before that insure the Reject numbers in blacklist is On, setting path as followed:
Settings > Call settings > Advanced settings >
Blacklist > Reject numbers in blacklist
Once you add the number to the blacklist, this number can not call you anymore.
6.8 Phonebook settings
In idle mode:
- Press RSK or Menu then Down to Phonebook, then OK to open Phonebook, and Options.
- Down to Phonebook settings and select, display as following:
| Extra numbers | When you set on, you can only call to fixed number, need SIM card support |
| Memory status | Display SIM/Phone memory status |
| Copy contacts | Copy all the contacts from SIM/Phone or Phone/SIM |
| Move contacts | Move all the contacts from SIM/Phone or Phone/SIM |
| Delete all contacts | To delete all SIM/Phone contacts |
7 CALL HISTORY
With this function, you can view the Call history. If a call is not answered, 1 missed call(s) displays until view or back.
7.1 To view the call log entries
- From the home screen/idle mode, press Talk to show the All Calls log or
- View via the Menu and Call history where you can view separate lists for Missed calls, Dialled calls, Received calls, Delete call Logs, Call timers, Text msg. counter.
- Press Menu, then Up/Down to show Call history, and then press OK to open the Call history menu.
- Press Up/Down to select the calls log you wish to view and press ok to show the selected list.
- When in a list, press Up/Down to find the call entry you want.
- Press Options to see the following list of options:
| View View details of the selected call, include number | |
| Call Call the selected number. | |
| Send text message | Send an SMS message to the selected number. |
| Save to phonebook | Save the selected number to your phonebook. |
| Add to Blacklist | Add the number to the blacklist |
| Delete Delete the selected number from the log. |
8 Messaging
Received SMS are stored in the Inbox and the icon indicates new messages.
Also "New message 1 unread" is displayed until View or Back is pressed.
8.1 To access the SMS menu
- Press Menu to show Messages.
- Press OK to open the Messages.
| Write message | to write a new message. |
| Inbox to go to your inbox to read received messages. | |
| Drafts to go to saved drafts. | |
| Outbox saved messages that not sent successfully. | |
| Sent messages | saved messages that have send successfully. |
| Broadcast messages | setting and save broadcast messages |
| SMS Settings | to check or change SMS settings. |
8.2 To write and send a text message
- Press Menu to show Messaging
- Press OK to show Write message
- Press OK again to display a flashing cursor.
Write your message using the digit / letter keys.
Note:
When writing text, use # to switch between (ABC), (abc), (Abc) or Numerals (123).
Note:
Use Up/Down and M1/M2 to move the cursor, Clear to delete letters and the * key for symbols or punctuation, or repeated pressing of the 1 key for more.
- To send, press Options and then select Send to.
- Press OK to add number from Phonebook, or Up to Enter number, input full number then OK.
- Press Options when the number is entered, then select send to send the message.
Note:
When a message is send it is also saved in the sentbox, provided Save sent messages is selected in Messaging > SMS Settings It would be saved in the Outbox without sending.
Note:
After sending, the phone returns to the Messaging menu list.
8.3 To read your messages
- Press Menu to show Messaging and OK to select.
- Press Down to choose Inbox and OK to select.
- Press Up/Down to step through the messages.
While viewing a message, press Options to display:
| View to read | the message |
| Reply to send | a reply message to the sender. |
| Call sender | to call the sender |
| Forward to forward | the message to others |
| Delete to delete | the message. |
| Delete all to | delete all the Inbox messages. save to Phonebook |
| Sort by Sort | message by date/Sender/Subject/ Unread, read/Message size/ |
| Details Display | the number of the sender |
8.4 To review the Outbox
- Press Menu to show Messaging and OK to select.
- Press Down for Outbox, Press OK to select it and then follow the menus.
8.5 To delete all messages
Delete Messages from each folder using their
Option menu.
- Press Menu to show Messaging and OK to select.
- Press Up/Down then ok to select Inbox/Drafts/Outbox/Sent messages
Press Options to open the options list.
- Press Up/Down to select Delete all then Yes to delete the required messages.
8.6 To modify SMS settings
- Press Menu to show Messaging and OK to select
- Press Up/Down to SMS Settings and OK to select:
| SIM to select S | MSC address ,Delivery report, Reply path and Voicemail server |
| Memory status | to display memory status of the SIM/ phone |
| Save sent messages | to On/Off Save sent messages |
| Preferred storage | Phone or SIM |
| Long text messages | Activated/Deactivate |
| SMS Black List | to On/Off SMS black list |
9 SETTINGS
Allows you to adjust various settings on the phone and also to reset them to their factory default values.
- Press Menu then press Up/Down to go to Settings and OK to select.
- Choose from the list the options available.
9.1 PROFILES
Profiles allow quick changes to your phone sounds and to customize them based on your situation. There are 4 preset profiles - General, Silent, Meeting, Outdoor, and each profile has settings for Alert type, Ring type, Ringtone, Ringtone volume, Message tone, Message volume, Keypad tone, Keytone volume, Power on /off tone, System alert.
9.1.1. To Activate a Profile
- Press Menu then press Up/Down to go to settings and OK to select, then OK to open the Profiles menu.
- Press Up/Down to go to the Profile you wish to select and press Options then select Activate.
9.1.2. To Customize a Profile
- Press Menu then press Up/Down to go to settings and OK to select, then OK to open the Profiles menu.
- Press Up/Down to go to the profile you wish to customize and press Options.
- Press Down to Customize and press LSK to select.
9.2 Phone settings
| Time and date | to set the displayed time and date. |
| Schedule Power on/off | set the time and enable the status, then you can schedule power on/off your phone |
| Language set | the display language |
| Writing language | set the writing language |
| Display to set | wallpaper on the idle screen, date and time displayed on the screen or not |
| Misc. settings | to set LCD backlight |
9.3 Network settings
To set the Mobile network selection: Automatic / Manual.
9.4 M1 M2 settings
- Press Menu then press Up/Down to go to settings and OK to select, then press Down to M1 M2 Setting, then ok to select.
- Input M1 and M2 number, then press Options to select Save then Yes to save the settings. In standby, long press M1/M2 key to dialing out the numbers stored under M1 or M2.
9.5 Security settings
To managed the security of your phone.
| SIM security | set SIM lock on: you need a PIN before use after startup and to Change password. Note: some SIM cards don’t allow it turned off. Warning: if you enter the wrong PIN three times the SIM card is blocked and you must enter the PUK number or contact your SIM provider to unblock it / set a new PIN code. PIN and PUK numbers come with your SIM card. |
| Phone security | set the Phone lock on to need a PIN on power-up, and to Change password Default Pin = 1122. |
9.6 Bluetooth
Press Menu then press Up/Down to go to settings and OK to select, then press Down to Connectivity then ok to select, then ok to set Bluetooth:
| Power to on\off Bluetooth | |
| Visibility set the Bluetooth visible or not | |
| My device to search new device and pair, the paired devices are saved here | |
| Search audio device | to search Bluetooth headset and pair |
| My name to modify Bluetooth name | |
| Advanced to display your Bluetooth address and set audio path :leave in phone/ forward to Bluetooth headset | |
9.7 Call settings
To set or modify the following call feature options:
| Call waiting | to activate call waiting where you can press Talk to answer a 2nd call while holding the 1st. |
| Call divert to set different incoming call diverts. | |
| Call barring to | restrict making and receiving calls. |
| Blacklist On / | Off Blacklist for coming calls, Set Blacklist numbers |
| Auto redial To | set automatic redial for failed calls. |
| Call time reminder | To set a Single or Periodic time for a reminder tone during calls. |
| Reject by SMS | If activated, when reject a incoming call, a SMS will be send to the caller. |
| Answer mode | To set Any key / Auto answer in headset mode. |
Note:
Some Network functions may not be available with all services, so check availability with your SIM provider.
To restore the phone to its initial settings. This requires the Phone Password. (Default password = 1122)
10 SOS SETTING
During standby mode with the display on, press and hold the SOS button for 3 seconds to start the emergency call operation.
An emergency siren will be heard via the speaker, before sending the emergency SMS to any of the five emergency numbers that are programmed.
Then the phone makes a call to the first programmed SOS Number. If the first number is busy or not answered within 1 minute, it will try the 2nd and then the 3rd, 4th and 5th. If it still does not get through it will repeat the sequence of calls. If you receive a SOS call you need to press „0” on the receiving phone to stop the process.
- Press Menu then press Up/Down to go to settings and OK to select, then press Down to SOS Setting, then ok to select.
- Status: ON/OFF use M1/M2 to activate or deactivate the SOS key.
Number 1-5 : Input up to 5 telephone numbers for SOS call and SOS SMS message
Message : This is the SOS SMS text send out when the SOS key is pressed. You can edit the text.
- Press End key to return to idle.
Note: Even if the screen is locked and off, the function of SOS key is enable.
11 TOOLS
- Press Menu then press Down to Tools then OK to select it.
11.1 FM radio
When in headset mode, enter FM radio, will auto activate the FM. The display shows the radio frequency or channel and the volume level currently selected.
- Press Up/Down key to manually change the frequency.
- Press Voice -+ key to change the volume level.
- Press M1/M2 to search left / right channel
- Press RSK to exit from FM.
- Press Options for the following:
| Channel list | to open a list of radio station channels that you can listen, Delete or Edit. |
| Manual input | to manual enter a new frequency to listen. |
| Auto search | to scan for radio stations and save the channels in the Channel list. |
| Settings to set background play, On/Off Loudspeaker | |
Note:
On the BG play, when the radio is playing, press End call to back to idle, use other functions on the handset, but leave the FM radio playing in the background.
11.2 Calendar
Open a Calendar to show the current month options:
| Jump to date to go | to a specific date. |
| Go to today to return | to the present day. |
| Go to weekly view to | display a weekly view |
11.3 Alarm
You can set 4 alarms. When it sounds, press LSK to stop it or RSK to Snooze to start the snooze function, if a snooze time has been set.
11.4 World clock
- Press M1/M2 to Switch time zones.
- Press Options then OK to On/Off Daylight saving time for foreign city.
11.5 Calculator
You can use the calculator to perform simple addition, subtraction, multiplication or division calculations.
- Press the number keys [0-9,#] to enter numbers.
- Press LSK to calculate the sum.
- Press clear to delete or clear the digits.
- Press UP/Down key to addition and subtraction digital
- Press M1/M2 to multiplication and division.
12 GAMES
Press Menu then Down to Games then press OK to select it, then OK to select Snake:
Control the direction of snake to eat food, and the snake will grow longer if eat the food. Please avoid hit the wall and the snake.
Before starting the game, you can select game level, or enter Games settings to modify related settings, Sound effect, Volume level.
13 SAFETY AND PRECAUTIONS
When using your telephone, basic safety precautions should always be followed to reduce the risk of fire, electric shock and injury, including the following:
- Switch off the phone in the vicinity of chemical plants, gas stations and other locations containing explosive objects.
- When driving, please use the hands free calling device (to be purchased separately) to ensure safety. Please park the car on the roadside for communication except in case of emergency.
- Switch off the phone when boarding an airplane and do not switch the phone on during the flight.
- Be careful when using the mobile phone in the vicinity of devices such as pacemakers, hearing aids and other electro-medical equipment, which may be interfered by the mobile phone.
- Never attempt to disassemble the phone by yourself.
- Do not recharge the phone without battery being installed.
- Charge the phone in well-ventilated environment and keep away from inflammable and highly explosive elements.
- To avoid demagnetization, keep the handset away from magnetic substances, such as magnetic discs or credit cards.
-
Keep the phone away from liquid. If soaking or erosion occurs, take the battery out and contact the supplier.
-
Avoid using the phone in extremely high or low temperature environments. Never leave the phone exposed under direct sunlight, in high humidity or in a dusty environment.
- Do not use liquid or anything wet with strong detergents to clean the handset.
13.1 Charging your battery
Your device is powered by a rechargeable battery. The full performance of a new Battery is achieved only after two or three complete charge and discharge cycles. The battery can be charged and discharged hundreds of times but it will eventually wear out. When the talking and standby time is noticeably shorter than normal, please replace the battery. Use only approved batteries and recharge your battery only with approved chargers designated for this device.
If a replacement battery is being used for the first time or if the battery has not been used for a long period, it may be necessary to connect the charger, disconnect it and then reconnect it to begin charging the battery.
Unplug the charger from the electrical plug and the device when not in use. Do not leave a fully charged battery connected to a charger, since overcharging may shorten its lifetime. If left unused, a fully charged battery will lose its charge over time. If the battery is completely discharged, it may take a few minutes before the charging indicator appears on the display or before any calls can be made. Use the battery only for its intended purpose. Never use any charger or battery that is damaged.
Do not short-circuit the battery. Accidental short
circuiting will occur when a metallic object such as a coin, clip or pen causes direct connection of the positive (+) and negative (-) terminals of the battery.
This might happen, for example, when you carry a spare battery in your pocket or purse. Short-circuiting the terminals may damage the battery or the connecting object.
Leaving the battery in hot or cold places, such as in a closed car in summer or winter conditions, will reduce the capacity and lifetime of the battery.
A device with a hot or cold battery may not work temporarily, even when the battery is fully charged.
Battery performance is particularly limited in temperatures well below freezing.
Do not dispose of batteries in a fire as they may explode. Batteries may also explode if damaged. Dispose of batteries according to local regulations.
Please recycle when possible. Do not dispose as household waste.
Note:
Actual operation time of the battery varies according to operation mode, network settings and call settings.
Note:
- To ensure safety, do not change the parts and accessories of the battery by yourself or take off the battery shell.
- We suggest you only use the original battery supplied with your phone to avoid any damage to your phone.
- The temperature range for charging the phone is 0^ - 40^ . Do not charge the battery in extremely high or low temperatures.
- Do not use the mobile phone during charging.
13.2 Further safety information
The unit and the accessories can contain small parts. Keep them out of the reach of small children.
13.3 Operating environment
Remember to allow any particular rules that may apply wherever you happen to be and always turn off the unit whenever its use is forbidden, as it can cause interference or danger. Only use the units in its normal user position.
This unit complies with guidelines for radiation when it is used either in a normal position against your ear, or when it is at least 2.2cm from your body.
If the unit is carried close to your body in a case, belt holder or other holder, these should not contain any metal and the product should be placed at the distance from your body specified above.
Parts of the unit are magnetic. The unit can attract metal objects. Do not keep credit cards or other magnetic elements near the unit, as information stored on them can be erase.
13.4 Medical units
The use of equipment that transmits radio signals, e.g. mobile phones, can interfere with insufficiently protected medical apparatus. Consult a doctor or the manufacturer of the apparatus to determine if it has adequate protection against external radio signals, or if you have any questions. Wherever there are notices to forbid use of mobile phones, you should comply. Hospitals and other health care facilities sometimes use equipment that can be sensitive to external radio signals.
13.5 Pacemaker
Pacemaker manufacturers recommend a distance of at least 15cm between a mobile phone and a pacemaker to avoid the risk of interference with the pacemaker. These recommendations are in accordance with independent research and recommendations from Wireless Technology Research. People with pacemakers should:
not carry the unit in a breast pocket
- hold the unit against the ear on the opposite side from the pacemaker to reduce the risk of interference
If you suspect that there is a risk of interference, turn off the unit and move it further away.
13.6 Hearing aids
Some digital wireless units can cause interference to some hearing aids.
13.7 Vehicles
Radio signals can affect electronic systems in motor vehicles (e.g. electronic fuel injection, ABS brakes, automatic cruise control, air bag systems) that have been incorrectly installed or are inadequately protected. Contact the manufacturer or its representative for more information about your vehicle or any additional equipment.
For vehicles equipped with air bags: remember that air bags fill with air with considerable force.
Do not place objects, including fixed or portable radio equipment in the area above the airbag or the area where it might expand. Serious injuries may be caused if the mobile phone equipment is incorrectly installed and the airbag fills with air.
13.8 Areas with explosion risk
Always turn off the unit when you are in an area where there is a risk of explosion and follow all signs and instructions. An explosion risk exists in the places that include areas where you are normally requested to turn off your car engine. Within such an area, sparks can cause explosions or fire which can lead to personal injuries or even death.
Turn off the unit at filling stations i.e. near petrol pumps and garages.
Follow the restrictions that are in force on the use of radio equipment near places where fuel is stored and sold, chemical factories and places where blasting is in progress.
Areas with risk for explosion are often - but not always - clearly marked.
13.9 Emergency calls
Important!
Mobile phones use radio signals and the mobile phone network. This means that connection in all circumstances cannot be guaranteed.
Therefore you should never rely solely on a mobile phone for very important calls such as medical emergencies.
14 GUARANTEE AND SERVICE
The phone is guaranteed for 24 months from the date of purchase shown on your sales receipt. This guarantee does not cover any faults or defects caused by accidents, misuse, fair wear and tear, neglect, lightning, tampering with the equipment, or any attempt at adjustment or repair other than through approved agents.
Please keep your sales (till) receipt this is your proof of guarantee.
14.1 While the unit is under Guarantee
- Pack up all parts of your phone system.
- Return the unit to the shop where you bought it, making sure you take your sales receipt.
- Remember to include the mains adapter.
14.2 After the Guarantee has expired
If the unit is no longer under Guarantee, contact us via www. aegtelephones.eu
15 TECHNICAL DETAILS
Standard: GSM Mobile
Frequency Band: GSM900/DCS1800
System: Phase 2+
Operating Time: Standby around: 400 Hours
(with fully charged battery)
Talk time : 4 hours
Charging Time: <5 hours
Temperature Range: Operating: 0^ to 40^
Storage: -20 °C to 60 °C
Handset Battery: 3.7V DC, 800mAh Battery Pack
Travel Charger: Input: 100-240V AC,50/60Hz,
Max 0.15A
Output: 5.0V DC, 550mA
16 CE DECLARATION
This product is in compliance with the essential requirements and other relevant provisions of the R&TTE directive 1999/5/EC.
The Declaration of conformity can be found on: www.aegtelephones.eu
C E 1313
17 DISPOSAL OF THE DEVICE (ENVIRONMENT)
At the end of the product lifecycle, you should not throw this product into the normal household garbage but bring the product to a collection point for the recycling of electrical and electronic equipments. The symbol on the product, user guide and/or box indicate this. Some of the product materials can be re-used if you bring them to a recycling point. By reusing some parts or raw materials from used products you make an important contribution to the protection of the environment. Please contact your local authorities in case you need more information on the collection points in your area.
Batteries must be removed before disposing of the device. Dispose of the batteries in an environmental manner according to your country regulations.

18 TRoUBLESHooTING
| "Call failed" appears | Check dialled number is correct, with full area code |
| SIM card fitted - only makes emergency call | Some SIM cards are thinner than others. Lightly press the SIM card holder to ensure a proper contact is made. |
| The mobile phone display is blank (screen off) | The phone is switched off. Press the Power key ➁ for 3 seconds to switch it on again. |
| The screen is in power save. Press any button to turn it on again. | |
| Calling outside your own country | If you are away from your network provider, your phone may link with another GSM network. |
| Contact your network provider for additional costs incurred using the phone abroad. | |
| Can an emergency call be made without a signal or credit? | You cannot make a call if the phone has no signal. |
| If your display says limited Service or SOS, the phone cannot receive a signal from your network, or has run out of credit, so can only call the emergency number 112. | |
| You can call 112 if there is no credit on your phone. | |
| How can reception be improved? | If the signal is weak, try another location to make or continue with a call, e.g. when indoors move towards a window. Reception is often poor in elevators, tunnels or underground railways and car parks. |
| Can I suppress / withhold my telephone number? | If you want withhold your phone telephone number, you will need to check with your service provider. (This network service may not be available). |
| No reaction when keys are pressed? | Slide down the key lock switch on the right hand side of the handset to unlock the keypad. |
| When do I start to incur call charges? | Charges start when a call connects to a person or an answering machine. There is no charge for writing or receiving an SMS, only when sending an SMS and none for using phone features e.g. alarm clock. |
| Did I successfully send my SMS? | If your SMS is in the SMS Sent messages box then it was OK, or you can get confirmation after the SMS is delivered - set Delivery report from Messages-SMS settings-SIM - or contact your operator for details. |
INHALT
Standard: Mobile GSM
Con这对于 me, il non si risponde a chiamata. I am not sure how to find the answer. I have tried to search for it in the literature but found no mention of it in the literature.
Standard: GSM Mobile
Uscita: 5,0 V CC, 550 mA
16 DICHIARAZIONE CE
18 RICERCA DEI PROBLEMI
© 2013 Binatone Electronics International Limited
All rights reserved Subject to availability. Rights of modification reserved. AEG is a registered trademark used under license from AB Electrolux (publ)
www.aegtelephones.eu


- MOBILE TELEPHONE VoxtelM320
- CoNTENTS
- BOX CONTENT
- Warning
- IMPORTANT
- BECAUSE WE CARE
- GETTING To KNoW YoUR PHoNE
- Keys and parts
- Display icons and symbols
- MENU OPERATION
- INSTALLATION AND SETUP
- Install the SIM card and battery
- Charge the battery
- Warning:
- Note:
- Switching on and off
- MAKING AND ANSWERING CALLS
- To make a call
- Last number redial
- To answer a call
- To switch to speakerphone
- To mute the microphone
- USING THE PHONEBOOK
- To access the phonebook
- In idle mode:
- Add a new phonebook entry
- To call a phonebook number
- To edit a phonebook entry
- To delete a phonebook entry
- To copy an entry to the phone or SIM card
- To add an entry to Blacklist
- Phonebook settings
- CALL HISTORY
- To view the call log entries
- Messaging
- To access the SMS menu
- To write and send a text message
- To read your messages
- To review the Outbox
- To delete all messages
- To modify SMS settings
- SETTINGS
- PROFILES
- To Activate a Profile
- To Customize a Profile
- Phone settings
- Network settings
- M1 M2 settings
- Security settings
- Bluetooth
- Call settings
- SOS SETTING
- TOOLS
- FM radio
- Calendar
- Alarm
- World clock
- Calculator
- GAMES
- SAFETY AND PRECAUTIONS
- Charging your battery
- Further safety information
- Operating environment
- Medical units
- Pacemaker
- Hearing aids
- Vehicles
- Areas with explosion risk
- Emergency calls
- Important!
- GUARANTEE AND SERVICE
- While the unit is under Guarantee
- After the Guarantee has expired
- TECHNICAL DETAILS
- CE DECLARATION
- DISPOSAL OF THE DEVICE (ENVIRONMENT)
- TRoUBLESHooTING
- INHALT
- DICHIARAZIONE CE
- RICERCA DEI PROBLEMI
Brand : AEG
Model : Voxtel M320
Category : Smartphone