Classic Grand Café Belluno 242237 - Coffee machine PRINCESS - Free user manual and instructions
Find the device manual for free Classic Grand Café Belluno 242237 PRINCESS in PDF.
| Product Type | Filter coffee machine |
| Brand | Princess |
| Model | Classic Grand Café Belluno 242237 |
| On/Off switch | Yes, with indicator light |
| Filter holder | Removable, rotary lock (LOCK/UNLOCK) |
| Water tank | With level indicator, removable lid |
| Tank capacity | Approximately 1.25 L (estimated) |
| Coffee pot | Glass, not microwave safe |
| Pause-and-serve function | Yes, allows serving during brewing |
| Compatible paper filter | 1x4 filters |
| Power supply | See rating plate (estimated 220-240 V, 50 Hz) |
| Power | Approximately 1000 W (estimated) |
| Dimensions (L x W x H) | Not specified |
| Weight | Not specified |
| Housing material | Plastic and metal |
| Descaling | Every 25 uses, with suitable descaling product |
| Cleaning | Accessories with soapy water, exterior with damp cloth |
| Maintenance | Do not immerse, do not use dishwasher |
| Safety | Do not use near water, fully unwind cord |
| Use | Indoor, household only |
| Warranty | Standard according to manufacturer |
Frequently Asked Questions - Classic Grand Café Belluno 242237 PRINCESS
Important: Do not use vinegar or citric acid.
Turn the filter holder until you hear a click.
This function is active only if the filter holder is locked.
Do not put in the dishwasher.
See the 'Initial Use' section of the manual.
The manual is available in several languages.
User questions about Classic Grand Café Belluno 242237 PRINCESS
0 question about this device. Answer the ones you know or ask your own.
Ask a new question about this device
Download the instructions for your Coffee machine in PDF format for free! Find your manual Classic Grand Café Belluno 242237 - PRINCESS and take your electronic device back in hand. On this page are published all the documents necessary for the use of your device. Classic Grand Café Belluno 242237 by PRINCESS.
USER MANUAL Classic Grand Café Belluno 242237 PRINCESS
You have purchased a Princess product. Our aim is to provide quality products with a tasteful design and at an affordable price. We hope that you will enjoy this product for many years.
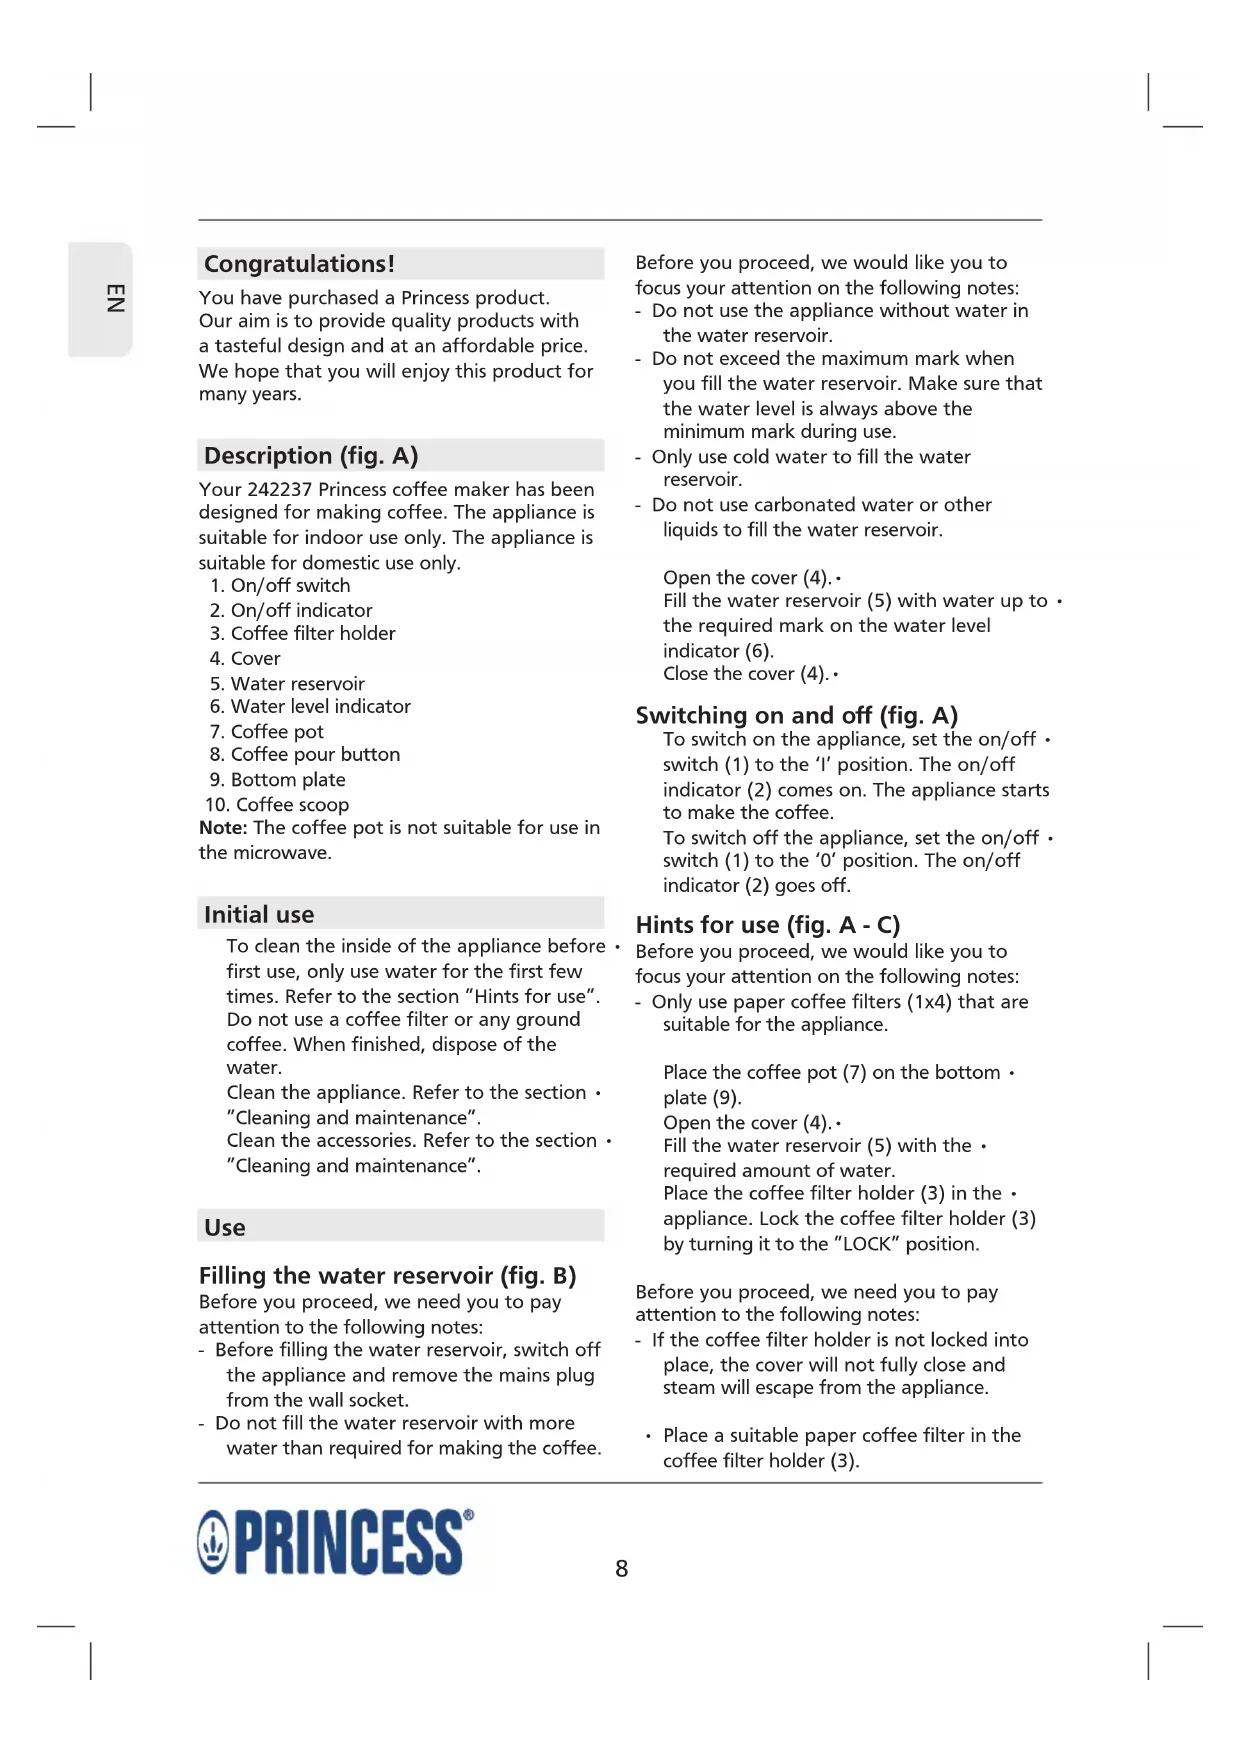
Description (fig. A)
Your 242237 Princess coffee maker has been designed for making coffee. The appliance is suitable for indoor use only. The appliance is suitable for domestic use only.
- On/off switch
- On/off indicator
- Coffee filter holder
- Cover
- Water reservoir
- Water level indicator
- Coffee pot
- Coffee pour button
- Bottom plate
- Coffee scoop
Note: The coffee pot is not suitable for use in the microwave.
Initial use
To clean the inside of the appliance before first use, only use water for the first few times. Refer to the section "Hints for use". Do not use a coffee filter or any ground coffee. When finished, dispose of the water.
Clean the appliance. Refer to the section · "Cleaning and maintenance". Clean the accessories. Refer to the section · "Cleaning and maintenance".
Use
Filling the water reservoir (fig. B)
Before you proceed, we need you to pay attention to the following notes:
- Before filling the water reservoir, switch off the appliance and remove the mains plug from the wall socket.
- Do not fill the water reservoir with more water than required for making the coffee.
Before you proceed, we would like you to focus your attention on the following notes:
- Do not use the appliance without water in the water reservoir.
- Do not exceed the maximum mark when you fill the water reservoir. Make sure that the water level is always above the minimum mark during use.
- Only use cold water to fill the water reservoir.
- Do not use carbonated water or other liquids to fill the water reservoir.
Open the cover (4).
Fill the water reservoir (5) with water up to the required mark on the water level indicator (6).
Close the cover (4).
Switching on and off (fig. A)
To switch on the appliance, set the on/off switch (1) to the 'I' position. The on/off indicator (2) comes on. The appliance starts to make the coffee.
To switch off the appliance, set the on/off switch (1) to the '0' position. The on/off indicator (2) goes off.
Hints for use (fig. A - C)
Before you proceed, we would like you to focus your attention on the following notes:
Only use paper coffee filters (1x4) that are suitable for the appliance.
Place the coffee pot (7) on the bottom plate (9).
Open the cover (4).
Fill the water reservoir (5) with the required amount of water.
Place the coffee filter holder (3) in the appliance. Lock the coffee filter holder (3) by turning it to the "LOCK" position.
Before you proceed, we need you to pay attention to the following notes:
- If the coffee filter holder is not locked into place, the cover will not fully close and steam will escape from the appliance.
- Place a suitable paper coffee filter in the coffee filter holder (3).
Put the required amount of coffee in the. · coffee filter.
Close the cover (4).
Insert the mains plug into the wall socket.
To switch on the appliance, set the on/off switch (1) to the 'I' position. The on/off indicator (2) comes on. The appliance starts to make the coffee.
Before you proceed, we need you to pay attention to the following notes:
- Do not remove the cover from the water reservoir while the water is boiling.
Note: The appliance has a pause-and-serve function which makes it possible to remove the coffee pot from the bottom plate while the coffee is being made. Remove the coffee pot from the bottom plate to pour a cup of coffee. Place the coffee pot back on the bottom plate in time to prevent the coffee filter from overflowing. The pause-and-serve function only works when the coffee filter holder is locked into place.
To switch off the appliance, set the on/off switch (1) to the '0' position. The on/off indicator (2) goes off.
Remove the mains plug from the wall - socket.
Allow the appliance to cool down completely.
Cleaning and maintenance
Before you proceed, we need you to pay attention to the following notes:
- Before cleaning or maintenance, always switch off the appliance, remove the mains plug from the wall socket and wait until the appliance has cooled down.
- Do not immerse the appliance in water or any other liquids.
Before you proceed, we would like you to focus your attention on the following notes:
- Do not use aggressive or abrasive cleaning agents to clean the appliance.
- Do not use sharp objects to clean the appliance.
- The coffee pot cannot be cleaned in the dishwasher. Do not clean the appliance and the other accessories in the dishwasher.
Regularly check the appliance for possible damage.
Clean the accessories:
- Clean the coffee pot in soapy water.
Thoroughly dry the coffee pot. - Unlock the coffee filter holder by turning it to the "UNLOCK" position. Remove the coffee filter holder from the appliance. Clean the coffee filter holder in soapy water. Thoroughly dry the coffee filter holder. Place the coffee filter holder in the appliance. Lock the coffee filter holder by turning it to the "LOCK" position.
Clean the outside of the appliance with a damp cloth. Dry the outside of the appliance with a clean, dry cloth.
Store the appliance in a dry and frost-free place, out of the reach of children.
Descending the appliance (fig. A & C)
The appliance must be descaled after every 25 uses. If the appliance must be descaled, use a suitable descending agent. Special descending agents are available from our service station.
Note: Princess will not be responsible for any damage caused by descending agents.
Damage caused by not regularly descending the appliance is not covered by the guarantee.
Before you proceed, we need you to pay attention to the following notes:
- Before descending the appliance, remove the mains plug from the wall socket and wait until the appliance has cooled down.
- Do not immerse the appliance in water or any other liquids.
Before you proceed, we would like you to focus your attention on the following notes:
- Be careful when descending the appliance to prevent damage to furniture or clothing.
- Do not use vinegar or vinegar concentrate to descale the appliance.
- Do not use citric acid to descale the appliance.
Fill the water reservoir (5) with a suitable - descending agent.
Place the coffee pot (7) on the bottom plate (9).
Insert the mains plug into the wall socket. Switch on the appliance using the on/off switch (1).
Let the appliance run until 1/3 of the · descending agent is in the coffee pot (7).
Switch off the appliance using the on/off switch (1).
Let the descending agent work for approximately 30 minutes.
Switch on the appliance using the on/off switch (1).
Let the appliance run until the remaining.
descaling agent is in the coffee pot (7).
Rinse the appliance with clean water:
- Fill the water reservoir (5) with clean water up to the maximum mark on the water level indicator (6).
- Place the empty coffee pot (7) on the bottom plate (9).
- Switch on the appliance using the on/off switch (1).
- Let all water run out of the appliance. Remove the mains plug from the wall socket. Allow the appliance to cool down completely. Clean the appliance. Refer to the section "Cleaning and maintenance".
Safety instructions
General safety
Read the manual carefully before use. Keep the manual for future reference.
Only use the appliance and the accessories for their intended purposes. Do not use the appliance and the accessories for other purposes than described in the manual.
Do not use the appliance if any part or any accessory is damaged or defective. If a part or an accessory is damaged or defective, it must be replaced by the manufacturer or an authorised repair agent.
Children should be supervised to ensure that they do not play with the appliance.
-
The use of this appliance by children or persons with a physical, sensory, mental or motorial disability, or lack of experience and knowledge can give cause to hazards. Persons responsible for their safety should give explicit instructions or supervise the use of the appliance.
-
Do not use the appliance near bathtubs, showers, basins or other vessels containing water.
- Do not immerse the appliance in water or other liquids. If the appliance is immersed in water or other liquids, do not remove the appliance with your hands. Immediately remove the mains plug from the wall socket. If the appliance is immersed in water or other liquids, do not use the appliance again.
- This appliance is intended to be used in domestic and similar applications such as staff kitchen areas in shops, offices and other working environments; farm houses; by clients in hotels, motels and other residential type environments; bed-and-breakfast type environments.
Electrical safety
- Before use, always check that the mains voltage is the same as the voltage on the rating plate of the appliance.
- The appliance is not intended to be operated by means of an external timer or separate remote-control system.
- Connect the appliance to an earthed wall socket. If necessary, use an earthed extension cable of a suitable diameter (at least 3 × 1 ~mm^2 ).
- Make sure that water cannot enter the contact plugs of the mains cable and the extension cable.
Always fully unwind the mains cable and the extension cable.
Make sure that the mains cable does not hang over the edge of a worktop and cannot be caught accidentally or tripped over.
- Keep the mains cable away from heat, oil and sharp edges.
- Do not use the appliance if the mains cable or the mains plug is damaged or defective. If the mains cable or the mains plug is damaged or defective, it must be replaced by the manufacturer or an authorised repair agent.
- Do not pull the mains cable to disconnect the mains plug from the mains.
- Disconnect the mains plug from the mains when the appliance is not in use, before assembly or disassembly and before cleaning and maintenance.
Safety instructions for coffee makers
Do not use the appliance outdoors.
Do not use the appliance in damp environments.
Only use the appliance in frost-free environments if the appliance is filled with water.
Place the appliance on a stable and flat surface.
Place the appliance on a heat-resistant and - splash-proof surface.
Do not place the appliance on a hob.
Do not place the appliance on hot surfaces or near open flames.
Make sure that the appliance does not come into contact with flammable material.
Keep the appliance away from heat sources.
Be careful with hot water and steam to avoid burns.
Store the appliance in a dry place when not in use. Make sure that children do not have access to stored appliances.
U.K. Wiring instructions
The wires in the mains lead are coloured in accordance with the following code:
BLUE NEUTRAL
BROWN LIVE
GREEN/YELLOW EARTH
As the colours of the wire in the mains lead of this appliance may not correspond with the colour markings identifying the terminals on your plug, proceed as follows:
The wire which is coloured BLUE must be connected to the terminal which is marked with the letter N or coloured black.
The wire which is coloured BROWN must be connected to the terminal which is marked with the letter L or coloured red.
The wire which is coloured GREEN/YELLOW must be connected to the terminal which is marked with the letter E or ( ) and is coloured GREEN or GREEN/YELLOW.
If a 13Amp (BS1363) plug is used, a 13Amp (BS1362) fuse must be fitted, or if any other type of plug is used, a 13Amp fuse must be fitted, either in the plug or adaptor, or on the distribution board.
Warning! This appliance must be earthed.
Disclaimer
Subject to change; specifications can be changed without further notice.
Felicitations!
ExTe ayopaoEi eva npoiov nC Princess.
Tóxoc macéivai vaacnapéxoume TIOIOTiKa Tpoiovtae wpaio oxediagmo oikovouke C Tlnc. EAnizouve aatolauoente auto to Tpoiov yia tonla xpovia.
περιγραφή (εικ. A)
H kaepiepa 242237 Princess exi oxdeltaiaotei yia npaaokean tou kape. H ouokean npoopietsai yia eawtepkn xpnn mvo. H ouokean npoopietsai yi oikiakn xpnn mvo.
- Diakokotn on/off
- 'Evδειηn on/off
- Bao n φiλtpou καφε
- Káluμα
- ox io vepou
- āéiktns σταθμης vερού
- Doxio tou kaé
- Koupi tou kaΦe
- KAtw Tλakα
- Koutala tou kaΦe
Piv PPOxwpnoE, PPeTIe Ia PPOoEgEe TIC TaPakatw anueiwoeic:
- Piv Tn yéiion Tou doxxiou vepou, θeote Tn ouakeun EKTOS λεitoupyiac kai aToouvδeote to Bua aTTOV TTpiα.
Mny vepiETo To doxeio vpou u TEPIOOTepo Vepo aT'OTxpeiaZeTaY iA to Kape.
Piv PPOxWpHcET, TpeTVA ouykeVtpwoeTe Tyn TPOooXn OaC otIg napakawonmuiewoeic:
MnV xpnoiopoioite Tn ouokean xwpié vepo oTo doxvio vepou.
Mny utepbaive to onmuéi oviotn 1nnpwo nC otav yemicTe to doxio vepou. Baeiaowte ot to einnedeo vepou oTo doxio vepou eivai naVt aVw aTTO elaxioTo onmuadi Tpiiv tn xpon.
Xpnooioaneofo Kpuo vepo yia va ymuoe to doxieo vepou.
Myn xpnaiouoieavpakouxovepo n aaaa uypa yia va yeuizeto doxeio vepou.
AvoiTe TO kaIuμa (4).
TepiTe To doxio vepou (5) vepo wTo oanabi aataouveyn PAnpwns otov deiktn otaOunc vepou (6).
Piv PPOxWpnoEe, TpeTIE VA PPOoEeTE TIC TaPakatw anueiwoeic:
Eav n 3aon Tou pIoTPOU TO KApE EV Exi KLeiooEoi Otn θeO, To KaIumu Aev Oa KLeioe I EvTeAwoC kai o atuoc Oa diaquyei aTTO uokcun.
TOnoTeInoTe eva kataaAnAo xaptivo pfIAtpo Tou Kape otn Baon Tou pfItpou Tou Kape (3).
TOnToeTrnoTe TnV aTaIouMeVn TIOoTnTa TOU KApE OTO φIATPO Tou KaPe.
Piv PPOxOPhoE, TpeTEI VA OuyKeVTpwOeTe TIV TPOooXn oac otic napakatw oneiwoeic:
Mny xpnoiopoite duvata n diaepwtikkaaapiotka yia va kaopioeTe Tn ouokuen.
Mn xnpoiopoioiOeTe aixunpa avtkeieeva yia va kathetaipoeTe tn ouokuen.
To doxio Tou kape vmuopv kaapiotei 0to TIAuVTnpio TTATwV. Mny KAtheta Tn OoKEun kai aaaa eapntmuata oTO TIAUVTPOI TIATWV.
Eéyεε TaKTiKa Tn OuaKeun Yia TIIaevc · ηημες.
Obnyiecs aosphaaleiaq ia
KaΦETIePcS
Atoquyete Tnv xponTns ouokeunc EwTepiKa.
Mny xpoaioioite Tn ouokueon 0e Tepiabaaov uypaia.
Xpnaioioiote n oukeun mvo o e Tepiaalov xwpi n ao av n ouokeun evai ymuTn ne vepo.
ToTOnTeTnOuokEun OemuOtaepn KAI EITITIDN ETTIAPVEIA.
ToTOnoTeTne OuaKeun oE ia aiaBpOxn ETTiPaveia TIOU avTEeI OTN eepuokpaaia.
Mny toTIOeTeIe Tn OuaKeun oE paTI.
Mny toTOnoTeTe t ouokeun Tavw o e Tnyec 0epoTntac n Kovta o wti.
Bebaiomegaeite ot n ouokean dev epxetai e ETTaipn uEupkeKTO uiko.
KpatnoTe Tn oukeun paKpia aTIO TUYEc · 0epoTnTac.
Na eioTe TPOoEeKIOI e To KAuto Vepo KaTov aTuO wote va aTTOQUYETUxOv EYkauata.
AtoeKeuote n oukeun e eva oeyv o.
heootavevtnxpoioTIOIE.
Jjiall 1alaii jieall iia
jia jia jia jia jia jia jia jia jia jia jia jia jia jia jia jia jia jia jia jia jia jia jia jia jia jia jia jia jia jia jia jia jia jia jia jia jia jia jia jia jia jia jia jia jia jia jia jia jia jia jia
sJlaal jslalg y
jliell 2ji jg g jll
jSlo21, g jSlo21 iSlo21, jSlo21, jSlo21,
1
a1yS11 aXu
y
yiaill a yie leiuea i blll 5y
j
Jds no Jyill Jaaia yie jell lla
aiaiaiaiaiaiaiaiaiaiaiaiaiaiaiaiaiaiaiaiaiaiaiaiaiaiaiaiaiaiaiaiaiaiaiaiaiaiaiaiaiaiaiaiaiaiaiaiaiaiaiaiaiaiaiaiaiaiaia
j 1
y
( 2p - 1,2) ( x - 1) ( y - 1)
Jyjlllclai jolll Jgnd
S_ ACD = 12 · AC · PD = 12 × CD × PD = CD.
JgS 1
- S OAB = S AOB = 12 × OB × AB = 12 × 4t
1 2
jie jie jie jie jie jie jie jie jie jie jie jie jie jie jie jie jie jie jie jie jie jie jie jie jie jie jie jie jie jie jie jie
Aa jiaill
j 1
aal gagg jll
1
JSS
11 11
jaiiaai 45 jaii jao alliyuui
S OBC = S COD + S_ BOC
y
jlll jlll
cll 12y1
Jll (5) clll jz cJy
s gio yIc I
.6) cll
CgEjll (7) gqyIy
.(9)
/Jeaii jiaaiy jiey i
.(1) Jiai
Alyn no cy jiae
blall ne yiy
laill y
"
A
aall aal l 11111111111111111111111111111111111111111111111111111111111
lll lll lll lll
y 1111111111111111111111111111111111111111111111111111111111
S = 2^2 = 8
j5 j5 j5 g j5 g b 1g a
:iiill biliil 1ie
auii 1 gai i auiis
j is a
jgl 1
a 1
s jzlll jzjzll
.
.
aalll aall 8gall
Lalai o geall y
i 1
joo gall jilla Jala all jly pa. “zial”
clally oegall jilj Jala ydiyy pa. jlgall
c. laoi o gai jilai Jolao .gauall
jala Jala . jgaJI g o gaJI jala Jala
"glll" 000000000000000000000000000000000
a b j 1j 10
jglal jg jll jll jil
a#i aia jilai iaia
Jabla Jgliae 1
(CgA) j
25 J 1 j 1 1 1 1 1 1 1 1 1 1 1 1 1 1 1 1 1 1 1 1
100
Liyolalil aolil jra no nol alalllll
.
jai jia 3) jiala Jala
(3) 8
( x + 1) ( x + 3) = 4
olii jio jj cui biai alal o
命运
Jus Jus Jus Jus Jus
jL211 jL211
jla Jala 1
(3)
. 8gell jile g wll ball o gell Jiae gina
( 0 < x) 1 - x^2 < 1 - y^2
Jull
aiai iiaialll 1ai 1aiii 1aiil
ie aagill aibg jaoi . gabll o o gell
Jolj Jaiu Cuaa Laoi loe laoi
AilSoc
/1jaiill ciaia buiai jieai Jaiii 1ay
abii.0' 1 (1)
.(2)
blall jao jg y
.
1
(B)
olil 11 10
命题成立
jlaal jaaa aag aclall jia oJia
bilaill jia 1y y
all jisi eli elil jsi eljai
S APQ = S AQP + S_ PQQ
alil jj jio g jio jio jio alol
:blllblil
eall jj 1000
jLj 1000
. clll jio Jai (gaii Liic g ai jai ball
aill" 1
"aiial
aill" aol
"al