HAVCR25OR - Radio KONIG - Free user manual and instructions
Find the device manual for free HAVCR25OR KONIG in PDF.


User questions about HAVCR25OR KONIG
0 question about this device. Answer the ones you know or ask your own.
Ask a new question about this device
Download the instructions for your Radio in PDF format for free! Find your manual HAVCR25OR - KONIG and take your electronic device back in hand. On this page are published all the documents necessary for the use of your device. HAVCR25OR by KONIG.
USER MANUAL HAVCR25OR KONIG
text_image
KÖNIG ELECTRONICHAV-CR25 GR + OR + BL
text_image
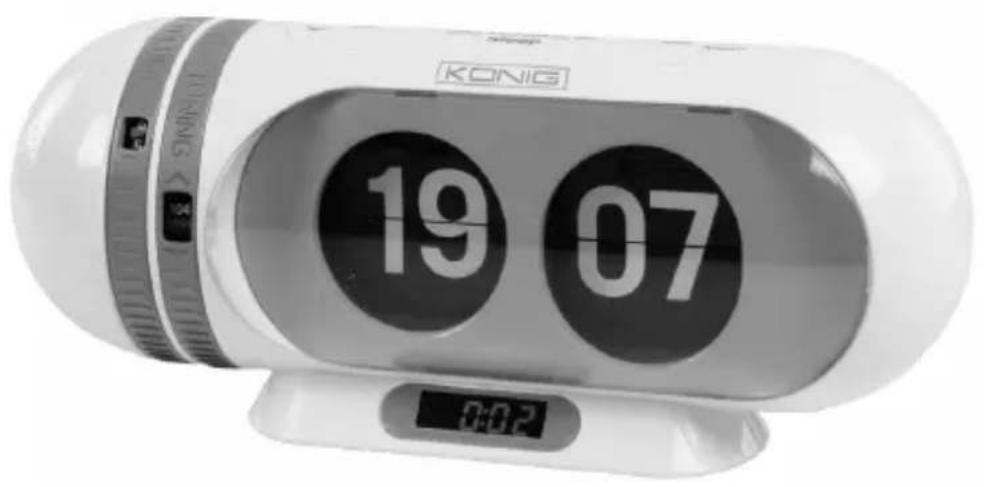
KONIG 19 07 0:02MANUAL (p. 2)
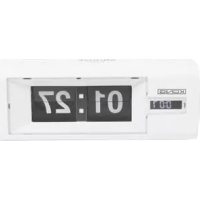
Digital Flip Clock Radio
MODE D'EMPLOI (p. 11)
Digital vippe clock radio
ANLEITUNG (s. 6)
MANUAL DE USO (p. 27)
- Flip clock with snooze alarm
- AM/FM radio
- Wake up to radio or buzzer
- Sleep function
- Back-up batteries for power failure protection
text_image
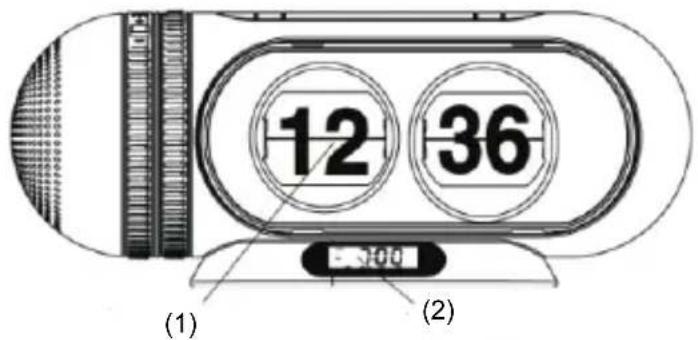
12 36 -300 (1) (2)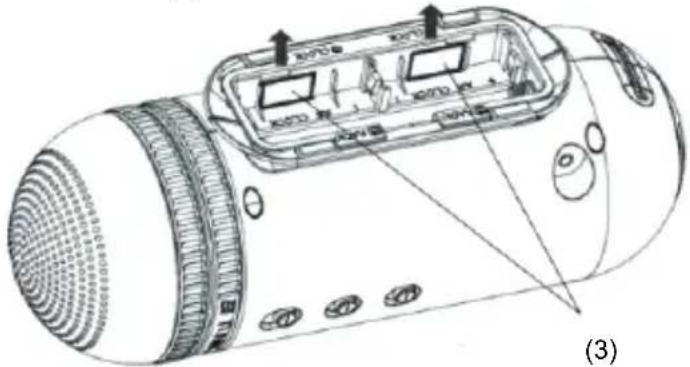
text_image
Technical diagram of a portable electronic device with labeled components and directional arrows indicating assembly or positioning.(1) Flip clock display
(2) Digital clock LCD
(3) Shipment protection strips (remove before use)
text_image
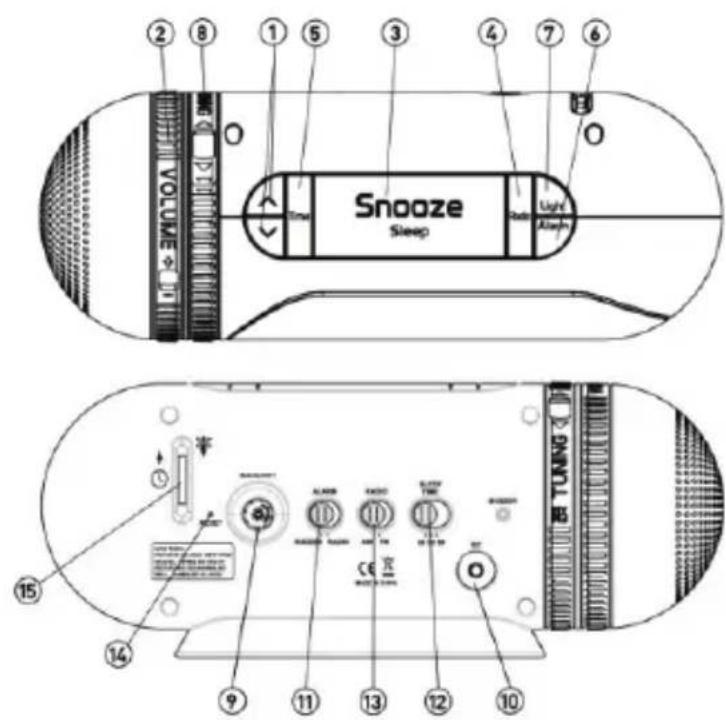
Snoaze Sleep VOLUME O Time Radio Light Light Tuning 15 14 9 11 13 12 10IMPORTANT: BE SURE TO REMOVE THE FLIP PROTECTION STRIPS FROM THE BOTTOM OF THE CLOCK BEFORE USE
These strips protect the flip mechanism during transportation. Operating the clock without removing the strips will damage the clock.
1. BATTERY INSTALLATION
Your clock has a battery back-up which will keep the clock running during a power failure. The back-up power supply uses 4x LR6 AA batteries which will run the clock for about 24 hours without AC power.
- Press the battery cover release button and open the battery compartment door on the underside of the unit.
-
Insert four (4x LR6) AA batteries inside the battery compartment, following the polarity (+/-) markings shown. DO NOT USE RECHARGEABLE BATTERIES. Rechargeable batteries discharge after several months and are not suitable to use as back-up power.
-
Replace the battery compartment cover.
2. WHEN TO REPLACE BACK-UP BATTERIES
To test the power in the back-up batteries, unplug the AC/DC adapter to initiate battery back-up. If the radio sound is weak or distorted, replace batteries. If the flip clock slows down and shows another time then the time displayed on the digital clock LCD, replace the batteries. Note: the night light function will not work and the “alarm to radio” function will automatically change to “alarm to buzzer” when the AC power is absent.
3. POWER SUPPLY
The clock operates via an AC/DC adapter. Plug the DC jack of the AC/DC adapter into the DC power in jack [10] on the rear of the product and connect to your AC supply.
4. SETTING AND SYNCHRONIZING THE TIME
- The flip clock is controlled by the digital clock with LCD display. Setting the flip clock requires synchronizing the flip display with the time shown on the LCD.
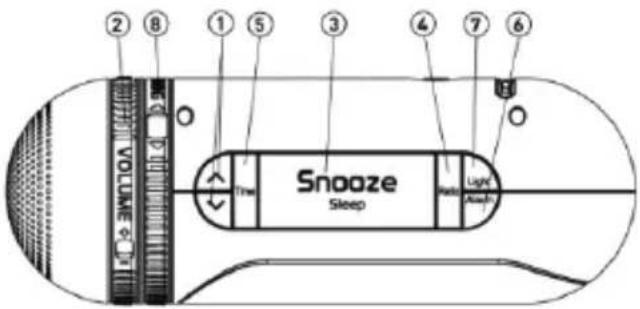
- To set the digital clock, press and hold the time key [5] for 3 seconds. The hour digits will flash. Adjust hour by pressing the ▲▼ keys [1]. Press time key [5] to set hour. Adjust minutes by pressing the ▲▼ keys [1]. Press time key [5] to set and start the clock.
- To set the flip clock, use the flip display adjustment wheel [15] on the back of the unit to match the time on the flip clock display with the digital clock. Only turn the flip display adjustment wheel [15] in the direction indicated. Turning the wheel in the reverse direction will permanently damage the clock mechanism.
5. SETTING THE ALARM
- Press and hold the alarm key [6] for 3 seconds until the LCD display shows "alarm" and the hour digits are flashing. Adjust hour by pressing the ▲▼ keys [1]. Press alarm key [6] to set the hour. Adjust minutes by pressing the ▲▼ keys [1]. Press alarm key [6] to set minutes. The LCD display will show the "alarm" icon and the alarm time.
- If the alarm is set, the LCD display will show the alarm time. Pressing the time key [5] will display the time on the LCD for 5 seconds. If the alarm is not set, the LCD will show the time.
- The alarm can wake you by either radio or buzzer. Use the alarm mode slide switch [11] on the back to toggle between "alarm to buzzer" and "alarm to radio".
- For “alarm to radio”: alarm volume follows the last set volume used in radio mode.
-
For "alarm to buzzer": volume level is fixed at a pre-set level.
-
Press the snooze button if you wish to suspend the alarm by 10 minutes.
-
For "alarm to radio", the radio will turn on for 5 minutes.
-
Press alarm key [6] to turn off radio.
-
Press snooze key [3] to suspend the radio for 10 minutes.
-
For "alarm to buzzer", the buzzer sound will turn on for 1 minute.
-
Press alarm key [6] to turn off the buzzer.
- Press snooze key [3] to suspend the buzzer for 10 minutes.
- If no key is pressed within 1 minute, the alarm will snooze for 10 minutes and turn off again.
Turn on the night light by turning the backlight dimmer knob [9] clockwise for the desired brightness. When the backlight dimmer knob is turned fully counterclockwise, the light is switched off. Press light key [7] to toggle the night light on/off.
- Press the radio on/off button [4] to turn on.
- To select between FM/AM radio, use the FM/AM slide switch [13] on the back of the unit to select AM or FM band.
- Choose a station by using the tuning wheel [8] for the desired frequency.
- Adjust the volume by turning the volume wheel [2].
- Press the radio on/off button [4] again to turn the radio off.
8. SLEEP MODE
Sleep mode will play the radio for a set time and then automatically switch off. The duration of sleep mode is set using the sleep time switch [12] on the back of the unit. The options are 30, 60 or 90 minutes. To activate sleep mode, first switch the radio on, using the radio key [4] . Then press and hold the snooze/sleep key [3] for 2 seconds. This will activate the sleep function. The LCD display will alternate every 3 seconds showing the minutes remaining in sleep mode and the time. If the alarm is


set, the LCD display will alternate every 3 seconds, showing sleep time remaining and the alarm time. Sleep function can be ended by pressing and holding the snooze/sleep key [3] for 2 seconds.
9. AUTO SYNCHRONIZATION
In rare instances the flip clock may advance two minute 'cards' simultaneously or fail to advance a minute 'card'. The clock radio has a built-in auto synchronization function to correct this. After the digital clock and flip clock have been manually synchronized (see above: setting and synchronizing the time), the flip clock will automatically be synchronized to the digital clock every 24 hours (at 0.00 hr). If the flip clock is running slow, the digital clock will automatically advance the flip display (up to five flips/minutes). If the flip clock is running fast, the digital clock will automatically postpone the movement of flips (up to five flips/minutes). The alarm function is controlled by the digital clock and is not affected by any inconsistency between the flip clock display and the digital clock.
WARNINGS RELATING TO THE USE OF BATTERIES
- Batteries must be inserted taking care to match the polarities, as shown. Make sure that the (+) and (-) terminals are placed in the correct direction.
- Do not mix old and new batteries or batteries of different types: alkaline, standard (carbon-zinc) or rechargeable (nickel-cadmium).
- Never use batteries that show signs of electrolyte leaks or cracking.
- Never dispose used batteries to open fire: risk of explosion.
- Keep batteries out of reach of children.
- Never short circuit battery terminals.
- Always remove used batteries from the appliance case.
- Remove batteries from the appliance before disposing at the end of its service life, or during long periods of non-use.
- Do not try to open the batteries.
- Batteries (battery pack or batteries installed) should not be exposed to excessive heat such as sunshine, fire or other.
- Do not charge non-rechargeable batteries.
- Ensure the battery compartment panel is secure.
CAUTIONS
- Replace only with the same or equivalent type.
- Dispose of used batteries according to instructions.
IMPORTANT
- When replacing used batteries, please comply with applicable regulation relating to their disposal. Please return them to a suitable collection facility for environmentally friendly disposal.
- The AC/DC adapter should be easily accessed during intended use.
Only use accessories provided or approved by manufacturer.
TROUBLE SHOOTING
IMPROVING RECEPTION
Rotate the unit horizontally for optimum reception. Do not put the unit near electrical appliances such as televisions, dvd-players, etc. to avoid unwanted electromagnetic interference.
DISCLAIMER
Updates to hardware components are made regularly. Therefore some of the instructions, specifications and pictures in this documentation may differ slightly from your particular situation. All items described in this guide are for illustration purposes only and may not apply to particular situations. No legal rights or entitlements may be obtained from the description made in this manual.


TECHNICAL SPECIFICATION
FM frequency: 87.5 – 108 MHz
AM frequency: 526 – 1710 KHz
Clock format: 24-Hour for EU/12-hour for North America
Alarm format: 24-Hour for EU/12-hour for North America
Batteries: 4 x LR6/AA (not included)
AC source: 100-240 V
Power source: 6.8 V 1.5 A (AC/DC adapter)
Power consumption: 0.6 W
Safety precautions:

text_image
CAUTION RISK OF ELECTRIC SHOCK DO NOT OPENTo reduce risk of electric shock, this product should ONLY be opened by an authorized technician when service is required. Disconnect the product from mains and other equipment if a problem should occur. Do not expose the product to water or moisture.
Maintenance:
Clean only with a dry cloth. Do not use cleaning solvents or abrasives.
Warranty:
No guarantee or liability can be accepted for any changes and modifications of the product or damage caused due to incorrect use of this product.
General:
Designs and specifications are subject to change without notice.
All logos brands and product names are trademarks or registered trademarks of their respective holders and are hereby recognized as such.
Keep this manual and packaging for future reference.
Attention:

This product is marked with this symbol. It means that used electrical and electronic products should not be mixed with general household waste. There is a separate collections system for these products.
DEUTSCH
VERPACKUNGSINHALT
text_image
Technical diagram of a portable electronic device with labeled ports and components, including a display screen and control buttons.text_image
Labeled diagram of a device rear panel with numbered components and buttons for status indicatorsIMPORTANT : VEILLEZ A RETIRER LES BANDES DE PROTECTION DU FOND DE L'HORLOGE FLIP AVANT L'UTILISATION.
Piles : 4 x LR6/AA (non fournies)
text_image
Technical diagram of a cylindrical device with labeled components and directional arrows indicating assembly or positioning.text_image
Labeled diagram of a device rear panel with numbered components and buttons for status indicatorsBELANGRIJK: VERWIJDER DE BESCHERMSTROKEN AAN DE ONDERKANT VAN DE KLOK VOOR GEBRUIK.
text_image
Technical diagram of a portable electronic device with labeled ports and components, including front panel and display screen.text_image
Technical diagram of a portable electronic device with labeled ports and components, including a display screen and speaker grille.text_image
② ⑧ ① ⑤ ③ ④ ⑦ ⑥ Volume O The Snoaze Sleep Light Alake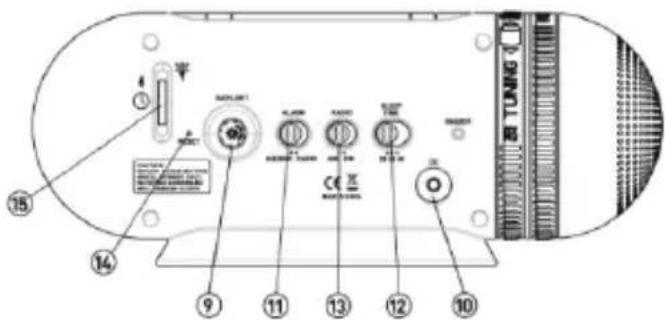
text_image
Labeled diagram of a device rear panel showing ports, buttons, and indicators with numbered annotationstext_image
Technical diagram of a portable electronic device with labeled ports and components, including ventilation grilles and display screens.text_image
Technical diagram of a portable electronic device with labeled components and directional arrows indicating assembly or positioning.text_image
② ⑧ ① ⑤ ③ ④ ⑦ ⑥ VOLUME #1 O Snoaze Sleep True False Light Alert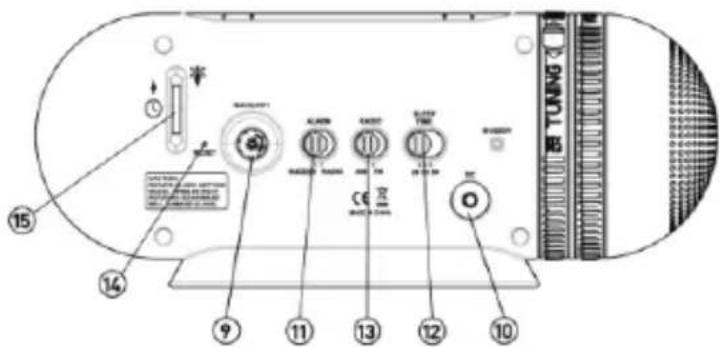
text_image
② ⑧ ① ⑤ ③ ④ ⑦ ⑥ VOLUME #1 O Snoaze Sleep True False Light Alert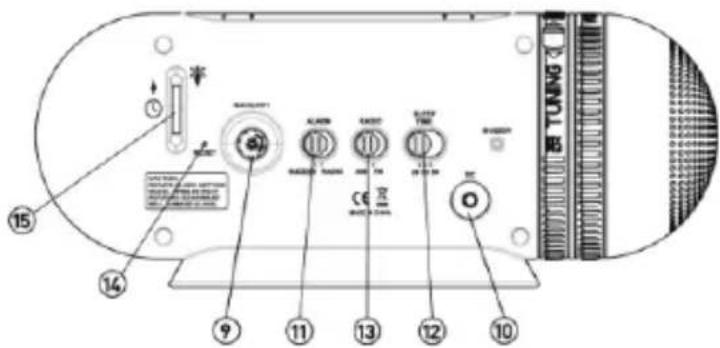
text_image
Technical diagram of a handheld device with labeled components and directional arrows indicating motion or movement.text_image
Labeled diagram of a device rear panel with numbered components and buttons for status or testing.IMPORTANT: ASIGURATI-VĂ CĂ AȚI ÎNDEPĂRTAT BENZILE DE PROTECTIE PLĂCUȚE ORĂ DIN PARTEA INFERIOARĂ A CEASULUI ANTERIOR UTILIZĂRII APARATULUI
text_image
Technical diagram of a portable electronic device with labeled ports and components, including 'X200' and 'X201'text_image
Labeled diagram of a device rear panel with numbered components and buttons, including a TUNING label.text_image
Technical diagram of a digital camera with labeled components and parts, including lens, screen, and buttons(1) Vippe ur-display
(2) Digital ur LCD
(3) Forsendelses beskyttelsesstrimler (aftag før uret tages i brug)
text_image
② ⑧ ① ⑤ ③ ④ ⑦ ⑥ VOLUME O True Snoaze Sleep False Light Alloy O
text_image
Labeled diagram of a device rear panel with numbered components and buttons for status indicatorsVIGTIGT: S∅RG FOR AT AFTAGE VIPPE BESKYTTELSESSTRIMLERNE FRA BUNDEN AF URET F∅R BRUG
text_image
Technical diagram of a portable electronic device with labeled ports and components, including 'X200' and 'X201' indicators.66