CP40 - Phone SWISSVOICE - Free user manual and instructions
Find the device manual for free CP40 SWISSVOICE in PDF.
User questions about CP40 SWISSVOICE
0 question about this device. Answer the ones you know or ask your own.
Ask a new question about this device
Download the instructions for your Phone in PDF format for free! Find your manual CP40 - SWISSVOICE and take your electronic device back in hand. On this page are published all the documents necessary for the use of your device. CP40 by SWISSVOICE.
USER MANUAL CP40 SWISSVOICE
Welcome to Swissvoice
Your CP-40 is a corded telephone designed for connection to an analog telephone network.
Please read these operating instructions carefully to familiarise yourself with and take full advantage of the benefits of your new CP-40.
Contents
Parts checklist 15
Installation 15
Display symbols and keys 17
Headset function 18
Telephone configuration 18
Phone operation 19
Caller ID features 21
Keypad functions 23
Memory management 23
Safety instructions 24
Appendix 25
Parts checklist
-1base
-1 line cord
-1 handset
-1 handset cord
-1usermanual
Installation
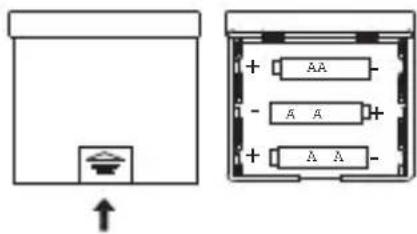
Installing and replacing the batteries
3 AA-Size alkaline batteries for receiving and storing Caller ID records and for storing frequently used numbers are required.
Important: If you are not going to use the telephone for more than 30 days, remove the batteries because they may leak and damage the unit.
- If the telephone line cord is connected, disconnect it from the base unit.
- Carefully turn the phone, open the battery compartment by pressing gently with a finger on the battery cover and remove it.
- Insert 3 AA-size alkaline batteries (not included) as shown in the illustration.
- Replace the battery compartment cover.
- If the line cord was previously connected, disconnect and reconnect it to the unit and check your memory locations.
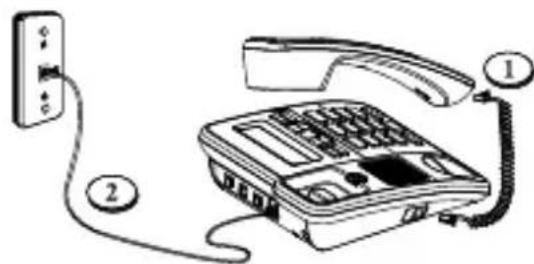
Installing the phone
Your phone should be placed on a level surface, such as a desk or table, or you can mount it on a wall.
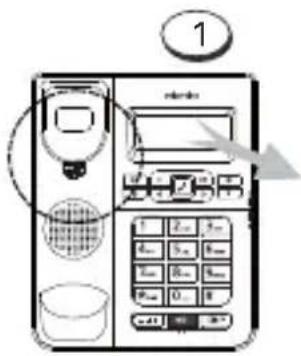
- Connecting the handset.
- Connecting the telephone line.
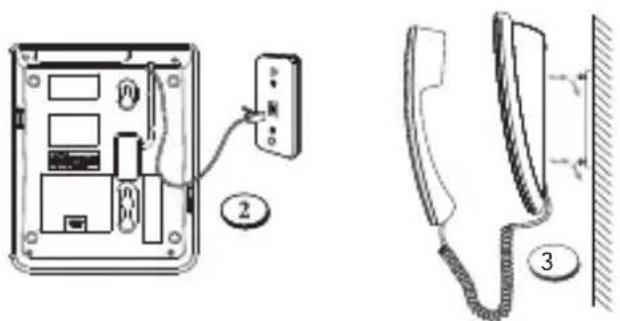
Wall mounting
- Rotate the wall mounting knob as shown in the following illustration:
Wall mounting knob
Location Rotate 180^


The knob is designed to keep the unit in place when the telephone is mounted on the wall.
- Install the base unit on the wall and then plug one end of the line cord into the telephone connection socket and the other end into the modular telephone line jack marked
- Attach the telephone at the wall as shown in the following figure.
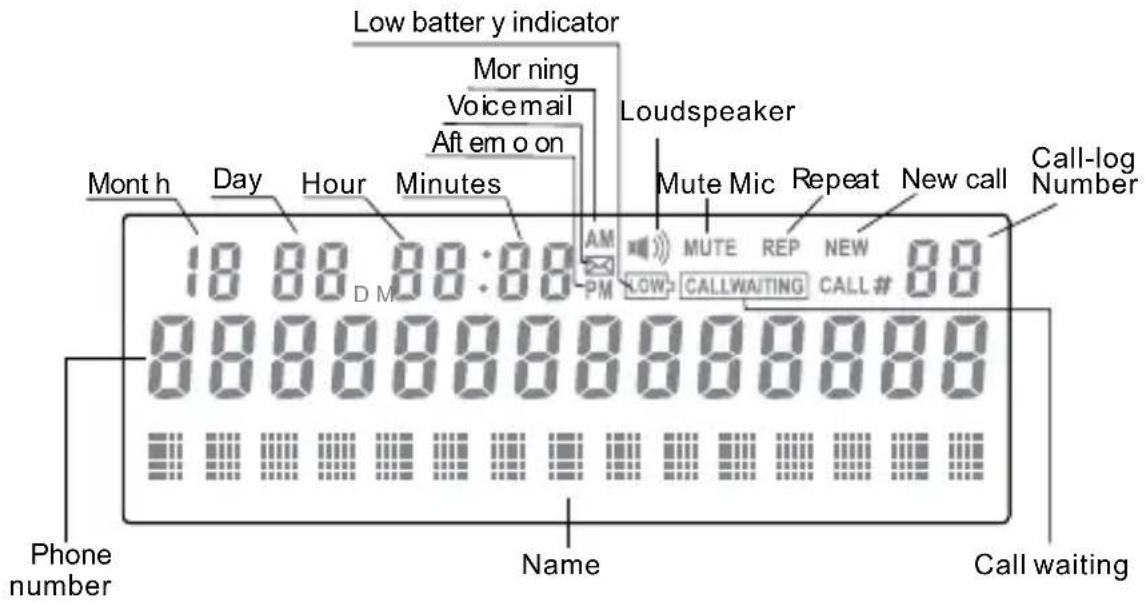
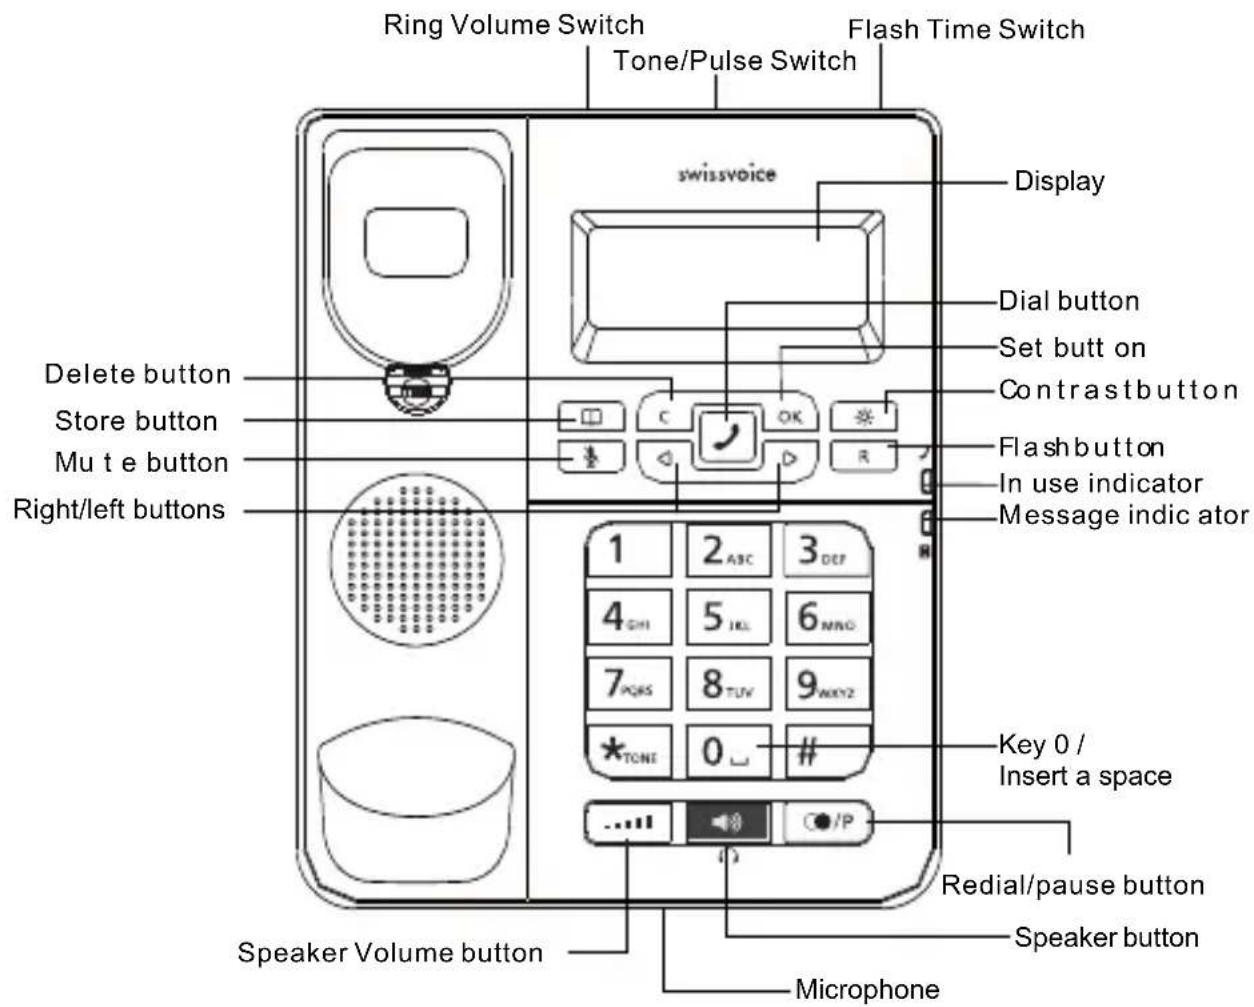
Display symbols and keys
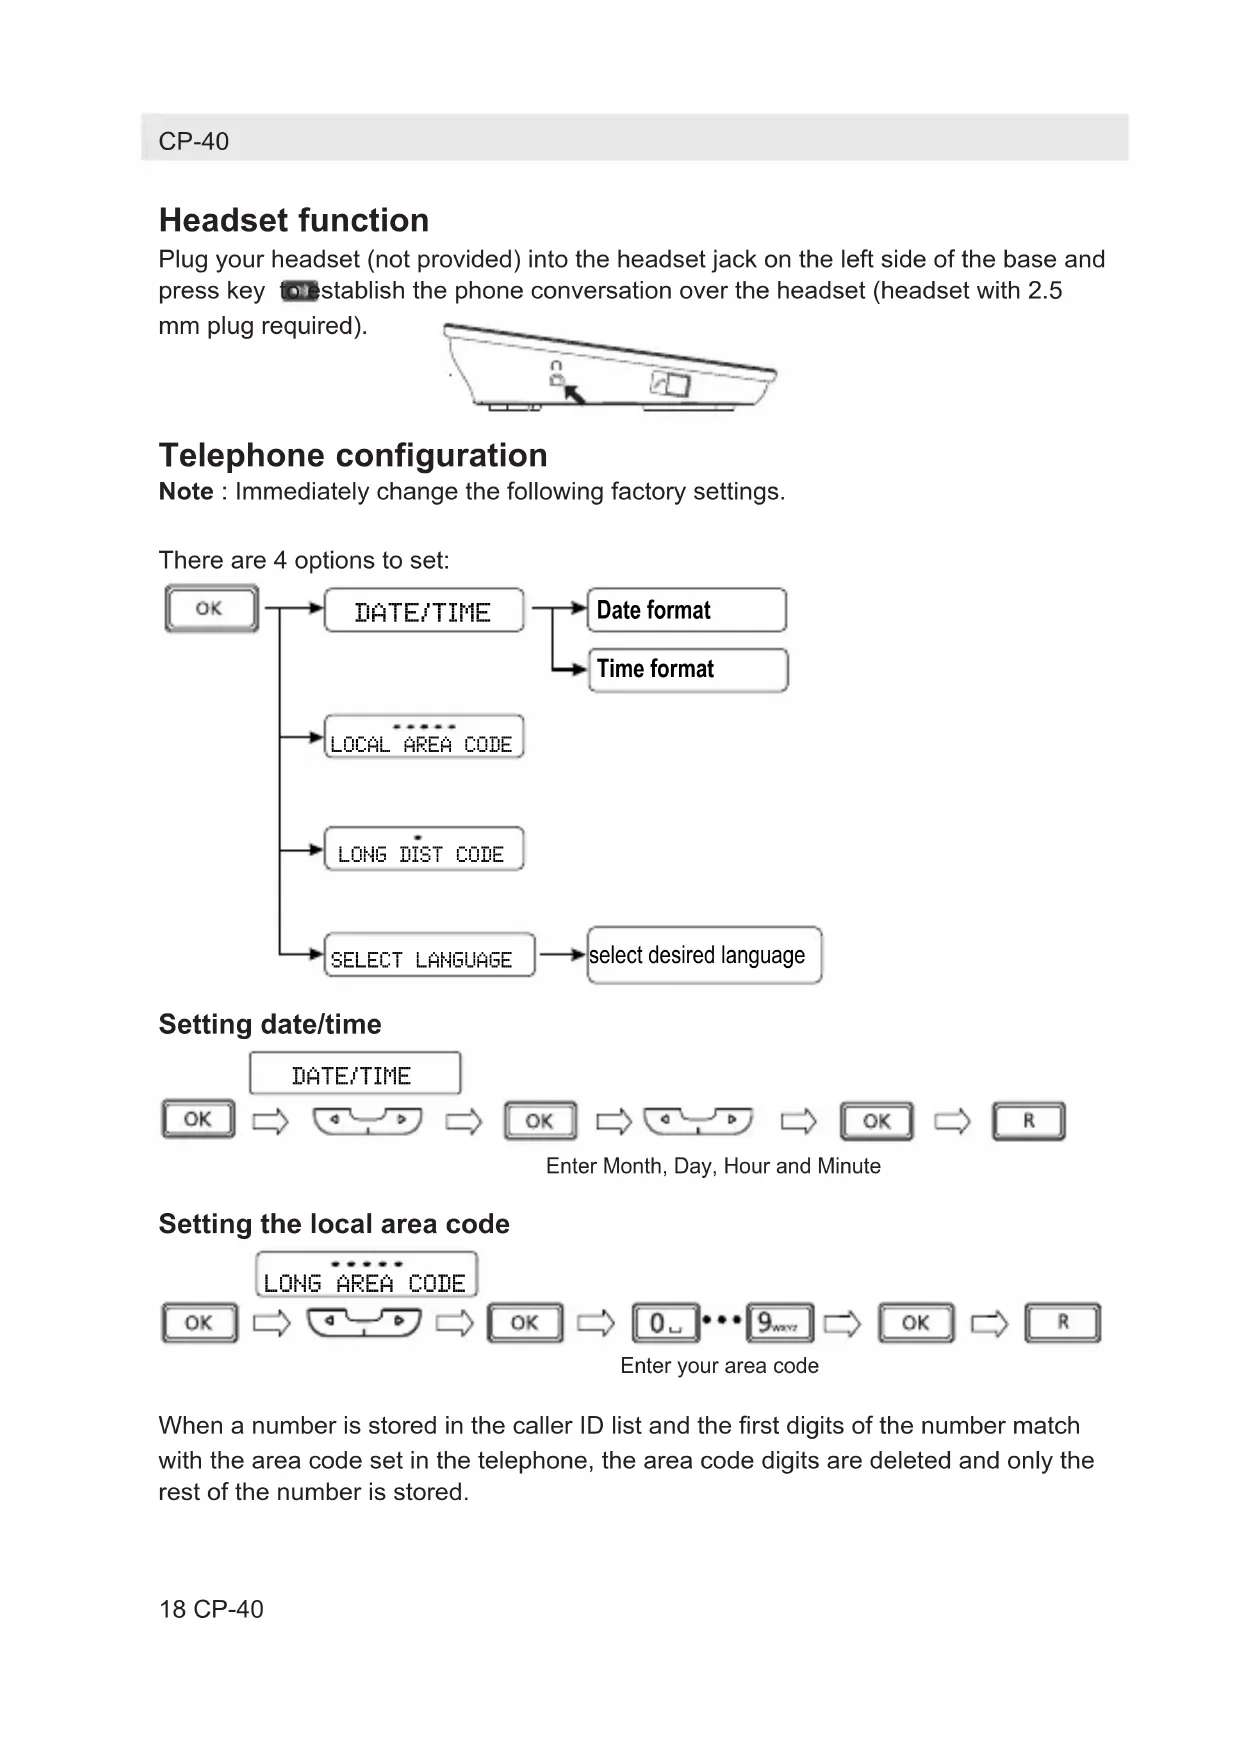
Headset function
Plug your headset (not provided) into the headset jack on the left side of the base and press key to establish the phone conversation over the headset (headset with 2.5
mm plug required).
Telephone configuration
Note : Immediately change the following factory settings.
There are 4 options to set:
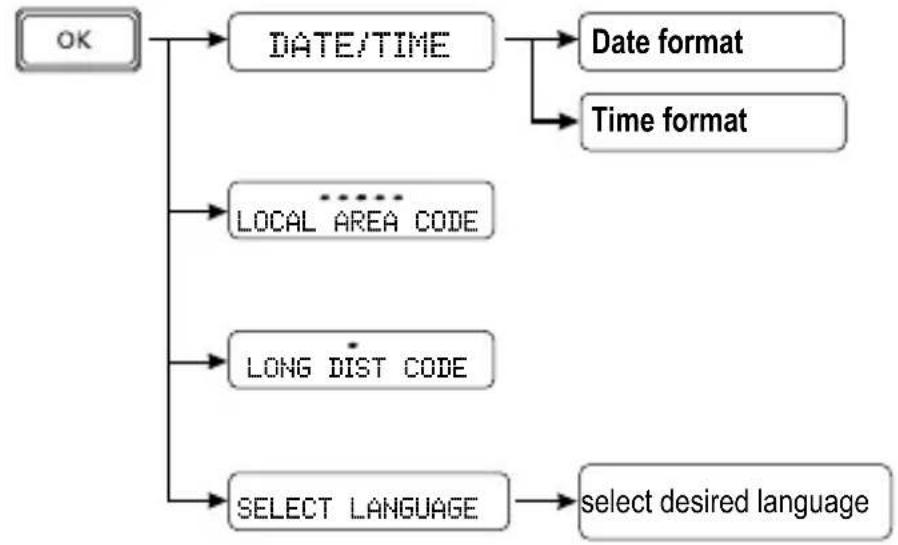
Setting date/time

Enter Month, Day, Hour and Minute
Setting the local area code

Enter your area code
When a number is stored in the caller ID list and the first digits of the number match with the area code set in the telephone, the area code digits are deleted and only the rest of the number is stored.
Setting the long distance code

Press and hold button "0" to insert the long distance code in front of the telephone number (only possible in pre-dialing mode).
Setting the language

Phone operation
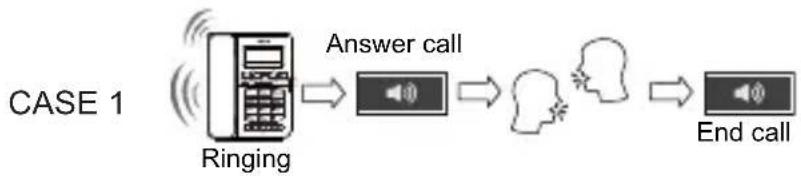
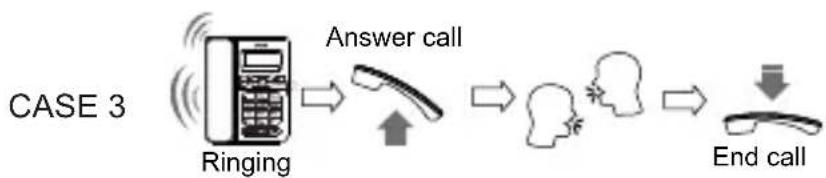
Receiving a phone call


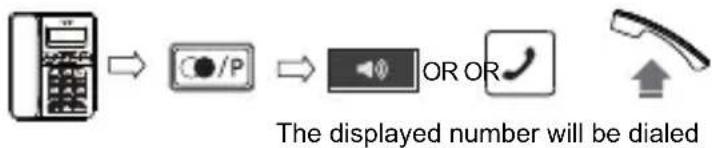
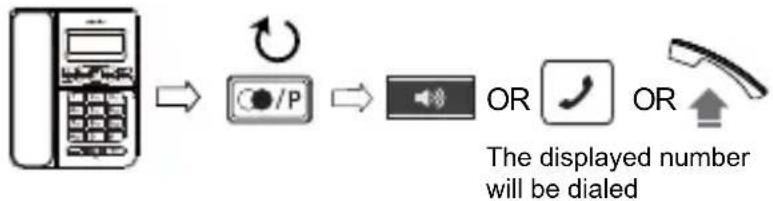
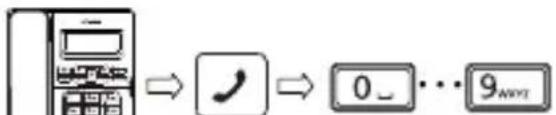
Making a phone call
CASE1

CASE 2

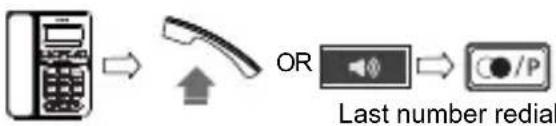
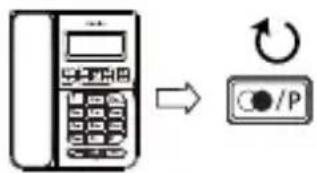
Redial
CASE 1
CASE 2
Access telephone operator services
During conversation, press button to interrupt momentarily the telephone conversation and to access your telephone operator's services.
Mute
In off-hook state, the user can press the button to activate the mute function. When MUTE is on, the MUTE symbol will appear on the screen. Press the button to deactivate the mute function and resume normal conversation.
Speaker volume level adjustment
You can adjust the speaker volume level during conversation by pressing the button.
Contrast level adjustment
Press the button to adjust the display contrast level.
Ringer volume level
The phone will ring when there is an incoming call. You can set the ringer volume to high, middle or low level. The ringer volume switch is indicated in the following illustration under A.
Pulse tone setting
You can select P (PULSE) or T(TONE) dialing mode according to the requirements from the local telephone operator. The T/P switch is indicated in the following illustration under B.
Flash time setting
You can use the Flash feature to access services provided by your telephone operator. The Flash time is dependent on the local telephone exchange. You can change the setting using the switch indicated in the following illustration under C.
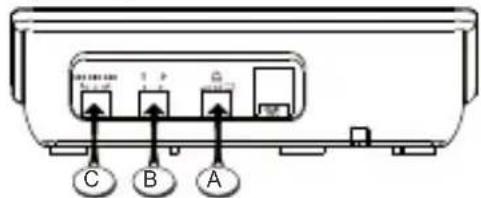
A - Ringer Volume Switch
B - Tone/Pulse Switch
C-Flash Time Switch
Caller ID features
If your network operator supports caller ID presentation* (CLIP), the caller's number (if he did not not withheld his own number) is displayed before you accept the call. To use this function, your telephone line must have active Caller Identification Presentation. Check with your network operator to find out whether the function is available and about charges, if applicable.
- Function dependent on network operator.
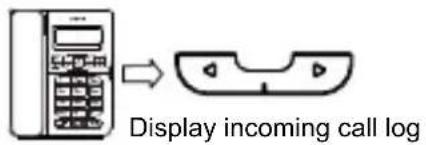
Display incoming calls
Redial a caller ID number


CASE 2
Note: Use button to truncate the number in front of the Caller ID number.
Display outgoing numbers
Redial an outgoing number
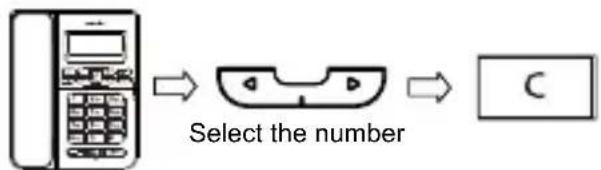
Deleting a caller ID number
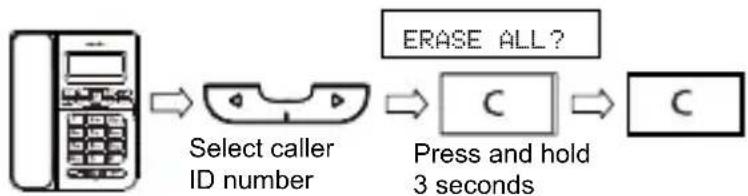
Deleting all caller ID numbers
Keypad functions
| Key | Assigned characters | Key | Assigned characters |
| 1 | 1 | 7 | PQRS7 |
| 2 | A B C 2 | 8 | T U V 8 |
| 3 | D E F 3 | 9 | W X Y Z 9 |
| 4 | G H I 4 | ★ | ★ |
| 5 | J K L 5 | 0 | 0 |
| 6 | M N O 6 | # | # |
Memory management Storing a telephone number
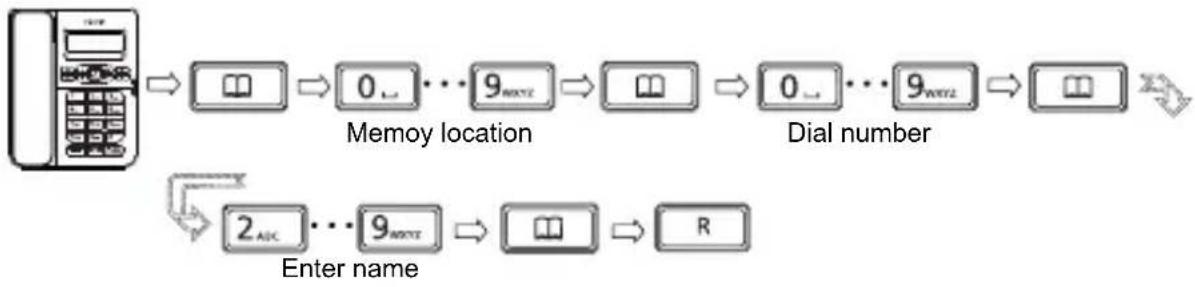
Storing an incoming call number

Storing outgoing numbers into memory

Check content of memory location
Select memory location,
number and name are displayed.
Dialing a memory location


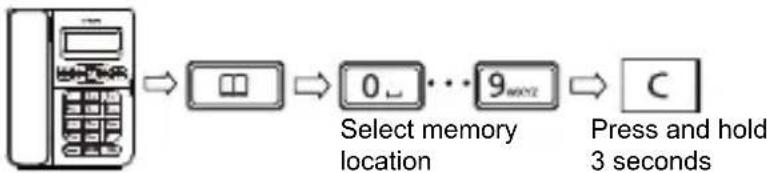
Deleting a memory location
Safety instructions
Please observe the following instructions:
- Place the phone at the appropriate distance:
from sources of heat,
from direct sunlight,
from other electrical appliances.
- Protect your phone from damp, dust, aggressive liquids and steam.
- Connect the cables only using the sockets provided.
- Connect only approved accessories.
- To clean the phone, use only a slightly damp cloth.
- Do not use your phone in damp rooms (for example, in the bath).
Appendix
Care
Your telephone is a sophisticated product in terms of design and construction, and should therefore be handled with care.
To clean the telephone, wipe first with an antistatic cloth or a damp, soft leather cloth and then dry using a dry cloth.
Recycling (environmental protection)

At the end of the product's life cycle, the telephone must not be disposed of in normal domestic waste. Please take it to a collection point for processing electrical and electronic equipment: see symbol on the product, in the user manual and/or packaging.
Some materials used in this product can be recycled if you take it to a recycling depot. By recycling parts or raw materials from used products you will be making an important contribution to environmental protection. Please contact your local authority if you require information about collection points in your neighbourhood.
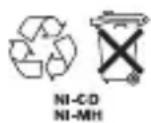
Disposing of the batteries
By law, all used batteries and accumulators must be recycled and not disposed of in domestic waste. Please dispose of them according to the official regulations. Take them to a recycling depot. The batteries/accumulators will be recycled since they may, for example, contain nickel cadmium (Ni - Cd), lead (Pb), cadmium (Cd) or mercury (Hg). The batteries and accumulators are labelled with symbols and information on their contents,
e.g.:
Warranty conditions
Your telephone is subject to a guarantee from the date of purchase in accordance with the legal provisions of the country in which the telephone was purchased. As evidence of the date of purchase, please keep the receipt or the warranty card completed by the retailer. All defects attributable to material and manufacturing faults will be corrected free of charge within the warranty period, either by repairing or replacing the defective equipment.
The warranty does not cover expendable materials, defects which affect the value or use of the equipment only insignificantly, and damage caused by incorrect use, ordinary wear and tear, or manipulation by third parties.
This warranty does not cover consequential damage caused by the use, failure or defectiveness of the product. In particular, no liability whatsoever is accepted for damage to property and pecuniary loss.
To claim under this warranty, please contact the retailer where you purchased your telephone.
Approval and conformity
This corded analog telephone complies with the basic requirements contained in the R&TTE Directive 1999/5/EC on radio equipment and telecommunications terminal equipment and is suitable for connection and operation in the member state indicated on the base station and/or packaging.
The declaration of conformity may be viewed at: www.swissvoice.net.

The CE symbol confirms the conformity of the telephone with the above directive.
Bienvenue chez Swissvoice
Warranty Certificate
swissvoice
Warranty Certificate
Garantieschein, Bon de garantie, Certificato di garanzia, Garantiebewijs, Takuutodistus, Garantibevis, Garantisedel, Garantibevis, Certificado de Garantía, Talao de garantia
| device type: | (Geräteotyp, type d'appareil, tipo di apparecchio, toesteltype, laitetyppi, maskintype, apparattyp, apparattype, modelo del aparato, modelo do aparelho): |
| serial number: (Seriennummer, numero de série, numero di serie, serienummer, sarjanumero, serienummer, serienummer, serienummer, numero de series, numero de série): | |
| dealer's stamp: | (Händlerstempel, sceau du vendeur, timbro del rivenditore, stempel van de dealer, kauppiaan leima, forhandlerens stempel, fösäljarens stämpel, forhandlerstempel, sello del commerciante. carimbo do vendedor): |
| dealer's signature: | (Unterschrift des Händlers, signature du vendeur,irma del rivenditore, handtekening van de dealer, kauppiaan allekirjoitus, forhandlerens underskrift, fösäljarens underskrift, forhandlers underskrift,irma del commerciante, assinatura do vendedor): |
| date of purchase: | (Kaufdatum, date d'achat, data d'acquisto, datum van aankoop, OSTPÄiväys, kjøpsdato, datum für köpet, salgsdato, fecha de adquisión, data de compra): |
Internet:
www.swissvoice.net
© Swissvoice SA 2010
20405708xx_ba_a0
SV 20405708