Aeris 114T - Phone SWISSVOICE - Free user manual and instructions
Find the device manual for free Aeris 114T SWISSVOICE in PDF.


| Type de produit | Corded analog telephone |
| Marque | Swissvoice |
| Modèle | Aeris 114T |
| Dimensions (L x P x H) | Approx. 200 x 150 x 80 mm |
| Poids | Approx. 500 g |
| Alimentation | Via ligne téléphonique (RJ11) |
| Type d'affichage | LCD avec rétroéclairage |
| Fonction mains-libres | Oui, haut-parleur intégré |
| Identification de l'appelant | Oui, avec mémoire des 50 derniers appels |
| Répertoire | Jusqu'à 100 contacts |
| Numérotation rapide | Oui, touches programmables |
| Contrôle du volume | Écouteur et sonnerie réglables |
| Sonnerie | Polyphonique, plusieurs mélodies |
| Fonction veille | Indicateur lumineux de message |
| Montage mural | Possible (support inclus) |
| Entretien et nettoyage | Chiffon doux et sec, éviter produits agressifs |
| Sécurité | Ne pas utiliser à proximité d'eau ou en extérieur |
| Pièces détachées et réparabilité | Non applicable (appareil scellé) |
| Informations générales | Téléphone analogique classique pour usage domestique ou bureau |
Frequently Asked Questions - Aeris 114T SWISSVOICE
User questions about Aeris 114T SWISSVOICE
0 question about this device. Answer the ones you know or ask your own.
Ask a new question about this device
Download the instructions for your Phone in PDF format for free! Find your manual Aeris 114T - SWISSVOICE and take your electronic device back in hand. On this page are published all the documents necessary for the use of your device. Aeris 114T by SWISSVOICE.
USER MANUAL Aeris 114T SWISSVOICE
Cordless analogue telephone (DECT)

text_image
Aeris 11 Cordless analogueBedienungsanleitung
User manual
text_image
swissvoice Aeris 114 102 Aeris 114 / 114T
Welcome to Swissvoice
The Aeris 114 / 114T is a cordless telephone designed for connection to an analog telephone network. International DECT (GAP)-standard digital technology offers excellent voice quality.
You can register up to 5 handsets to your base and make internal calls free of charge.
The Aeris 114T comes with a built-in digital answer machine.
Please read these operating instructions carefully to familiarise yourself with and take full advantage of the benefits of your new Aeris 114 / 114T.
Contents
Welcome to Swissvoice 20
Keys 22
Display symbols 23
Battery advice 24
Telephoning 26
Accepting a call 26
Turn off the ringer 26
Set speaker/loudspeaker volume 26
Switch handset off 26
Redial 27
Mute the handset microphone 27
Keypad lock 27
Paging – Locate mislaid handsets 27
Phonebook 27
Call list 28
Voicebox (network answering machine) 29
Extending the Aeris 114 / 114T 29
Telephoning with several call partners 30
Handset settings 31
Base station settings 31
Reset 31
Answer machine (Aeris 114T only) 32
Switch answer machine on/off 32
Set the answer mode 32
Outgoing message 33
Record memo 33
Operating the answer machine on the base station 33
Operating the answer machine from the handset 34
Answer machine settings 34
Memory full 35
Remote Access / Setting the remote access PIN code 35
Remote activation of answer machine 35
Remote acces the answer machine from an external telephone 36
Appendix 37
Keys
Handset keys
text_image
swissvoice 1 2 3 4 5 6 7 8 9 10 11 12 C/OI 1 2 ABC 3 DEF 4GHI 5JKL 6MND 7PGRS 8TUV 9MXY2 0 R RBase station Aeris 114
text_image
swissvoice Aeris 114 122 Aeris 114 / 114T
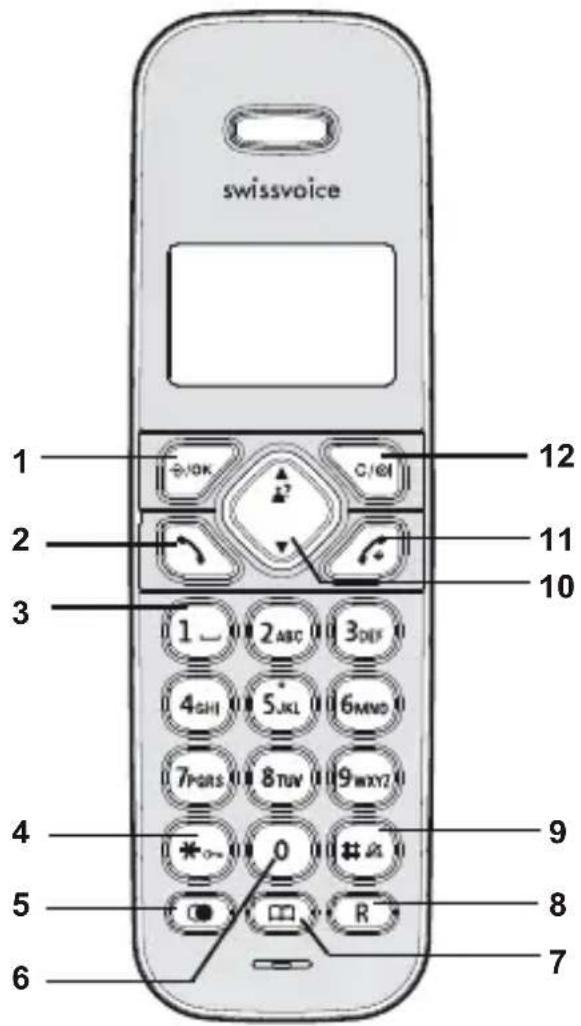
1 Confirmation key / Menu key / During conversation: Internal call
2 Talk key
3 Key 1 Insert a space
4 Star key / In standby: Long press to activate/deactivate the keypad lock.
5 Open redial list
6 Key 0
Insert a dialing pause
7 Open phonebook
8 Key R with flash function
9 Hash key / In standby: Long press to switch handset ringer on/off.
10 Navigation keys
: Open call list / Increase volume during conversation / Scroll up in a list or menu.
▼ : Decrease volume during conversation / Scroll down in a list or menu.
11 End call key / Back key / Press and hold down to switch the handset off. Press briefly to reactivate the handset.
12 Delete characters / Back in a submenu / Long press in standby: back to idle / In idle mode: Internal call. In conversation: Mute handset micro- phone.
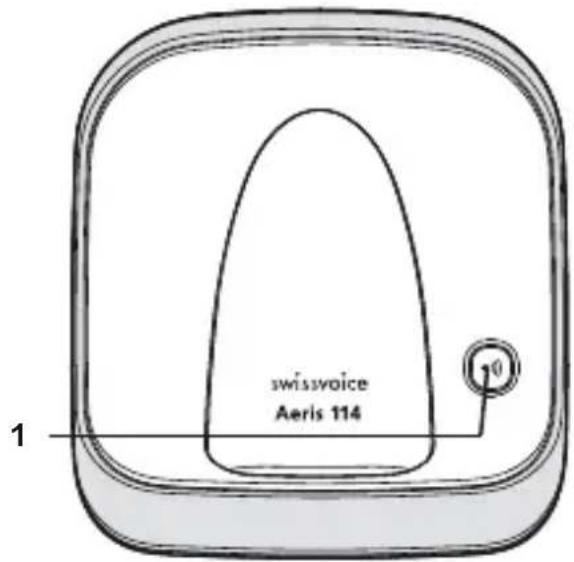
Base station Aeris 114:
1 Paging key
Display symbols
| Scroll up/down in a list or menu. | |
| Symbol is displayed when the handset is within range of the base station. Flashes when the handset is out of range or not registered to the base. | |
| Internal call in progress. Flashes for incoming internal calls. | |
| Call in progress. | |
| Answer machine switched on (only for Aeris 114T). Flashes, when you have new answer machine messages. | |
| Ringer switched off. | |
| Alarm set. | |
| Kepad locked. | |
| You have new messages in your voicebox (network answering machine). | |
| Batteries fully charged. | |
| Batteries empty. |
Range / Location
To obtain the best possible range, we recommend positioning the telephone in a location central to your sphere of activity. Avoid positioning the telephone in niches, recesses and behind steel doors.
The maximum range between base station and handset is approximately 300 meters outdoors. Depending on the surrounding conditions as well as spatial and structural factors, the range may be smaller. Silent zones can occur due to the digital transmission in the frequency range used – even within the range, depending on the structural environment. In this case the transmission quality may be reduced through the increased incidence of short breaks in transmission. Normal call quality can be restored if you move slightly out of the silent zone. If the range is exceeded, the call will be disconnected unless you move back into range within ten seconds.
Battery advice
Use only the original batteries (2 x NiMH, AAA, 1.2 V 500mAh) as well as the original power supply (6 V DC / 300 mA) for Aeris 114 and (6 V DC / 450 mA) for Aeris 114T. The handset operating times (standby 100 hours/active 10 hours) and charging times apply only if the battery is charged to the defined minimum capacity (1.2 V / 500 mAh). Charging is electronically controlled to ensure optimal charging and care of batteries in different charge states. Full capacity is achieved only after several charging cycles.
Note:
Using other rechargeable batteries or non-rechargeable batteries/primary cells can be dangerous and cause malfunctions or damage to the telephone. Do not short-circuit the batteries (danger). In particular, avoid inadvertent short-circuits during storage and transport e.g. bunch of keys, metal panels or similar objects, and make sure the batteries do not come into contact with greasy materials. When not in the handset, therefore, batteries should be stored only in insulating packaging. Ensure also that the contacts do not touch greasy parts.
Rechargeable batteries can become warm while recharging. This is a normal occurrence and is not dangerous.
Connecting the phone
text_image
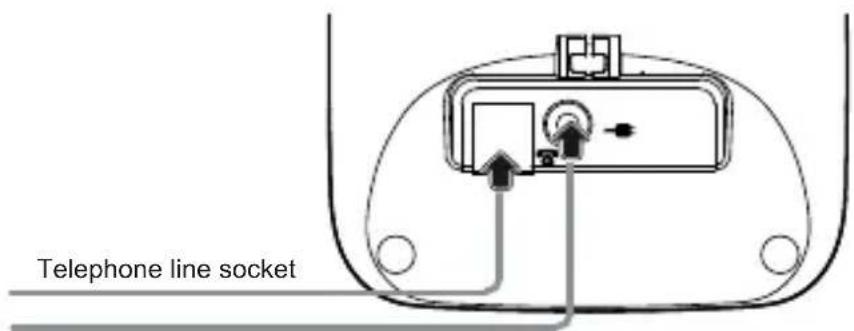
Telephone line socketMains power socket
- Before you can start using your telephone you must plug in the telephone connector cable and the mains cable.
- Insert the batteries in the battery compartment. Make sure the polarity is correct.
- To charge the batteries, insert the handset in the base station. The animated battery symbol on the handset signals the charging procedure. The batteries will take around 14 hours to fully charge (initial charge).
Set language
Default setting on delivery: German
The language of the display texts can be changed in the menu MT-Einstel.-> Sprache
Set date and time
- Press OK, Selectings and press OK.
- Select Date&Time and press OK.
- Scroll through the list using the navigation keys.
- Select date and time format. Press OK.
- Enter date and time and press OK.
- Press the End call key to return to standby mode.
Telephoning
- Dial the desired number using the keypad.
- Press the Talk key.
End the call
- Press the End call key.
Accepting a call
- Incoming calls are signalled by a ring tone on the handset.
- Press the Talk key and conduct your conversation.
End the call
- Press the End call key.
Please note: Calls cannot be made if the battery is almost discharged or the handset is out of range of the base station.
Turn off the ringer
Press key for approx. 3 seconds in standby mode: the ringer is switched off. To turn the ringer on, press again key for approx. 3 seconds.
When a call is signalled (you hear the ringtone), press key .The ringer is turned off for this call.
Set speaker/loudspeaker volume
You can adjust the speaker/loudspeaker volume during a conversation (5 levels available).
Select the desired volume using the Navigation keys.
Switch handset off
- Press and hold the End call key (approx. 3 sec).
- Press and hold again the End call key to reactivate the handset.
Redial
The Redial list contains up to 5 entries.
- Press the Redial key and select the desired entry.
- Press the Talk key.
Edit redial list
- Open the Redial list, press left softkey.
-
Select a function from the list:
-
AddtoPB – Add number to the phonebook.
- Delete – Delete the entry.
- DeleteAll – Delete the entire redial list.
Mute the handset microphone
You can temporarily mute the handset microphone to talk to someone else in the room without the caller hearing. Press key C/81
To reactivate the microphone, press key again.
Keypad lock
Activate keypad lock
- Press the Star key approx. 3 sec.
Deactivate keypad lock
- Press again the Star key approx. 3 sec.
Paging – Locate mislaid handsets
All registered handsets ring for a short time, when the Paging key on the base is pressed. To stop the ring press the End call key on the handset or the Paging key on the base.
Phonebook
You can store up to 20 names and numbers in the phonebook on each handset.
Names can be up to 12 letters long and numbers up to 20 digits.
You can combine different numbers in groups with the same ringer melody.
Digits / Characters
Different characters are printed on each key. The entries in the phonebook are sorted alphabetically.
Press and hold key to insert a pause inside a phone number. „P“ appears on the display.
Add new entries in the phonebook
- Press /OK
- Select Phonebook and press OK.
- Press left softkey. Select add and press OK.
- Enter the desired name, number and ringer melody.
- Press OK to confirm.
Edit phonebook
- Press
- Press left softkey. Select a function from the list:
- Add – as described above.
- View – View number and melody of the selected entry.
- Edit – Select the desired entry and edit it.
- Delete - Delete entry.
- DeleteAll - Delete the entire phonebook.
- PBStatus – View the number of free space.
Call list
The caller's number is displayed on the handset. The call list can contain up to 10 entries. New calls are displayed by NewCalls.
To use this function, the caller's number must be transmitted (CLIP). Contact your network operator for further information.
Call a number from the call list
- Press /OK . Selectist.
- Select the desired entry from the list.
- Press the Talk key, the number is dialled or press left softkey and select an edit function from the list.
If the caller's number is suppressed, only Call is displayed.
Edit call list
- Open the call list, press the left softkey.
-
Select a function from the list:
-
AddtoPB - Add number to the phonebook.
- Delete – Delete entry from the call list.
- DeleteAll - Delete the entire call list.
Voicebox (network answering machine)
You can forward the incoming calls to your operator's network answering machine (Voicebox).
This function must be enabled by your network operator. New Voicebox messages are signalled on your handset display by (dependent on network operator).
Extending the Aeris 114 / 114T
The delivered handset is already registered on to base station. In standby the internal number of the handset is displayed.
You can register up to 5 handsets to your base station.
If you register your Aeris 114 / 114T handset with a "third party" base station or a "third party" handset on your Aeris 114 / 114T base station (GAP), you may not be able to use some functions or only to a limited extent.
Register new handsets
Accessory handsets must be registered to the base station.
- Press on the base station approx. 5 seconds before declaration, then release the key.
- Press ⬇/OK, select Registration and press OK.
- Select the desired base station. Press OK. The handset seeks the base station you have entered (flashing display).
- Once the base station has been found, you are requested to enter the system PIN (0000 on delivery). Press OK.
- If the registration is successful you will hear a confirmation signal.
Telephoning with several call partners
During a call you can make a second internal call (enquiry call), switch between call partners (brokering) or simultaneously converse (3-way conference call) without the need for two telephone lines.
Internal conversation / Internal call
- Press
- Select the desired internal party and press OK.
If you receive an external call while you are on the phone to an internal call partner, you will hear an incoming call alert. End the internal call by pressing the End call key. Press the Talk key. You are connected to the external party.
Call transfer to another handset
You are conducting an external call and you want to transfer it to another handset.
- Press ☑/OK. Select the desired internal party and press OK.
- Press the End call key to transfer the call to the other handset.
Conference
You are conducting an external call.
- Press, select the desired internal party.
- Press the Star key approx. 3 sec. when the internal party responds. The three call partners are connected.
- Any teleconference partner can press the End call key to leave the conference and end the call.
Handset settings
- Press/OK, Selectings and press OK.
- Select a function from the following list:
- Alarm - The activated alarm is displayed in standby mode by .The alarm sounds for 30 seconds or can be deactivated immediately by pressing any key. The volume is the same as for the ringtone.
- RingSetup – Select the desired ringer melody for internal and external calls.
- ToneSetup – Activate or deactivate the following options: KeyTone – Every time a key is pressed, a brief beep is heard. BatteryTone – The batteries are almost empty. Insert the handset in the base station for charging.
OutofRange – A warning beep is sounded if you exceed the maximum range.
- Language – Choose the language for the display texts.
- RenameHS – To better distinguish between handsets, you can give each handset a name.
- H5display – Select time or handset name for idle mode display.
- AutoAnswer – Just pick up the handset from the base to answer a call (without pressing any key).
- Date&Time – Set the desired date and time format and enter date and time.
Base station settings
The system PIN on delivery is 0000.
- Press →/OK, selectBSettings and press OK.
- Select a function from the following list:
- DeleteHS – Select the handset you want to deregister. - DialMode – Tone: Normal dialling procedure on analog lines. Pulse: May be required for connecting older telephone systems. Please refer to the relevant documentation.
- FlashTime - Select short, medium or long. - ChangePIN - You can modify the PIN code (0000 on delivery).
Reset
- Press →/OK, select. and press OK.
- Enter the PIN code (0000 on delivery).
- Confirm twice to reset your phone.
Answer machine (Aeris 114T only)
Your Aeris 114T features an integrated digital answer machine with a max. recording capacity of 15 minutes.
You can operate your answer machine from the base and from any handset registered to the base. On delivery a standard outgoing message is pre-recorded for both operating modes. The answer machine is ready to use.
text_image
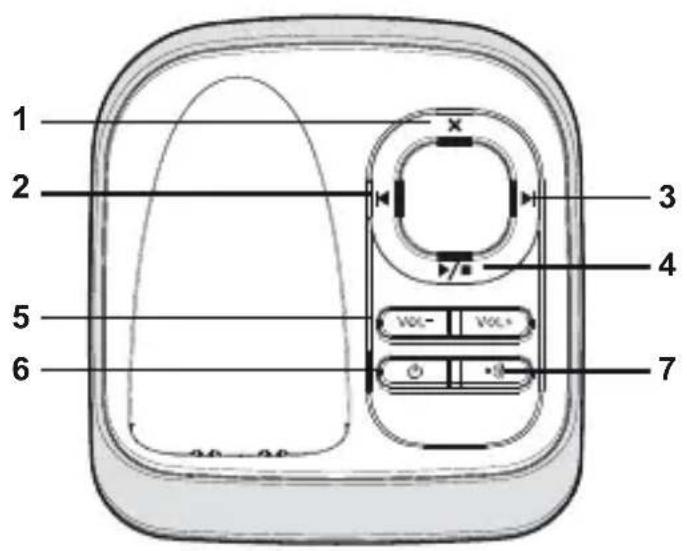
1 2 3 4 5 6 71 Delete message during play-back / long press: delete all messages
2 Repeat message/return to previous message
3 Skip to next message
4 Switch playback on/off
5 Set volume
6 Switch answer machine on/off
7 Paging key
Switch answer machine on/off
Press key On/Off on the base station to switch the answer machine on or off. Two dashes are displayed when the answer machine is switched off. Flashing dashes when answer machine is switched on = date and time are not set.
Switch on the answer machine from the handset
- Press/OK, PseleMachine and press OK.
- Select TAMOn/Off and press OK.
- Select on or off by pressing the navigation keys ▲/▼ and press OK.
Set the answer mode
You can select 2 operating modes:
- Answer & record: Callers can leave a message.
- Answer only: Callers cannot leave a message.
- Press/OK, Select machine and press OK.
- Select TAMSettings and press OK.
- Select AnswerMode and press OK.
- Select the desired operating mode and press OK.
Outgoing message
Your answer machine comes with two standard pre-recorded outgoing messages. You can replace the standard outgoing message with a personal one:
- Press/OK, Prelebchine and press OK.
- Select TAMSettings and press OK.
- Select OGMSettings and press OK.
- Select Ans&Rec or Answeronly and press OK.
- Select RecordMess and press OK.
- Speak your outgoing message into the handset microphone.
- Press OK to end recording. The recorded outgoing message is played back.
Record memo
You can leave a message behind for other internal users by recording a memo:
- Press/OK, Select machine and press OK.
• Select Memo and press OK.
• Recording appears. Speak after the tone. - Press OK to end recording.
Listening in
Incoming messages are played back over the base station loudspeaker. You can adjust the volume by pressing the keys + or -. Press the left softkey on the handset to listen in. Press the Talk key to answer an incoming call.
Operating the answer machine on the base station
If you have new messages, the message counter is flashing. The messages are played back beginning with the most recent.
- Press ▶/■ to start playback.
- During playback the following options are available:
Key Function
Repeat message/return to previous message
Skip to next message
▶/■ End playback
X Delete message during playback
VOL+ / VOL- Adjust volume
- Delete old messages to have enough memory for recording new messages.
Delete all old messages
Impossible during playback. Long press key X to delete all old messages.
Operating the answer machine from the handset
If you have new messages on your answer machine appears on the handset display. The messages are played back beginning with the most recent.
- Press/OK, Select machine and press OK.
- Select Msgplayback and press OK.
- Press the End call key to end playback.
Key Function
2 Delete message during playback
4 Repeat message/return to previous message
5 End playback
6 Skip to next message
OK Play messages

Deactivate/activate loudspeaker
▼/▲ Adjust volume
Delete all old messages
- Press OK, PedeMachine and press OK.
- Select DeleteAll and press OK.
- Confirm by pressing OK.
Answer machine settings
- Press /OK, Prelet machine and press OK.
- Select TAMsettings and press OK.
- Select the desired function by pressing the navigation keys ▼/▲ and press OK.
- AnswerMode - Answer&Record or Answer only mode
- TAMLanguage - Select the language for standard outgoing messages
- OGMSettings - Play and record outgoing messages
- AnswerDelay - Select 2, 4, 6, 8 rings or Time saver mode
- RecordTime - Set the maximum length for incoming messages
- RemoteAcc. - Switch remote access on or off
- Compression - Set the desired recording quality (low compression=high recording quality)
- BSScreening - Incoming messages are played back over the handset.
- ChangePIN - Change remote access PIN code (see below)
If you set the answer delay to Time Saver, your answer machine will answer after 2 rings if you have new messages. If you do not have new messages it will not answer until 6 rings. This enables you to save costs by hanging up before you are connected.
Memory full
The recording capacity of your answer machine is 15 minutes (including outgoing messages). If the memory is full, TAMfull appears on the handset display and FF flashes on the base station display. No more messages can be recorded. The answer machine switches to Answer only mode automatically. You must delete old messages.
Remote Access / Setting the remote access PIN code
Remote operation can only be performed using a valid remote access PIN code.
You must write over the default PIN code with any 4-digit PIN code (apart from 0000).
- Press /OK , Select machine and press OK.
- Select TAMSettings and press OK.
- Select RemoteAcc. and press OK.
- Select ON by pressing the navigation keys ▼/▲ and press OK.
- Enter the remote access PIN code (0000 on delivery) and press OK.
- Enter the new PIN code and press OK.
- Enter the PIN code again and press OK.
Remote activation of the answer machine
You can switch on your answer machine remotely.
-
Dial your number.
• After 10 rings the TAM automatically answers. -
Enter your remote access PIN code. If the PIN is correct you will hear a confirmation tone.
- If there are new messages, these are played back. Press key 1 to end message playback.
- Press key 0 (off=2 short beeps, on=1 short beep).
- End the call.
Remote acces the answer machine from an external telephone
You can remote access your answer machine from any telephone with DTMF or multifrequency dialling function.
- Dial your number.
- Press when you hear your outgoing message.
- Enter your remote access PIN code. If the PIN is correct you will hear a confirmation tone.
- If there are new messages, these are played back. Press key 1 to end message playback.
- You can now perform a number of functions by entering the relevant digits (see the following table).
- End the call.
Key Function
2 Delete message during playback
4 Repeat message/Press twice to return to previous message
5 Play messages/End playback
6 Skip to next message
7 Switch answer machine on
8 Stop playback
9 Switch answer machine off
* Enter remote access PIN code
Note:
If your answer machine doesn't accept the remote access commands, try to press the numerical keys longer or shorter. Your answer machine is sensitive to tone lengths of 0,5 to 1 second.
Appendix
Using Internet/cable telephone adapters on an analog port
When using an analog telephone on the analog connection of an Internet or cable telephone adapter, not all the described features (in particular calling line display) may function in the same way as with a standard analog telephone line. This does not cause the Aeris 114 / 114T to malfunction.
Several factors can cause a failure of specific features to function:
- The Internet/cable telephony provider may not provide the function on its Internet/cable telephony connection.
- The adapter used to convert Internet/cable telephony to analog telephony (usually supplied by the provider) may not forward the functions to connected telephones or may forward them in a non-analog format.
If this happens, please check the Aeris 114 / 114T on an analog fixed line and/or contact your Internet/cable telephony provider.
Care
Your telephone is a sophisticated product in terms of design and construction, and should therefore be handled with care.
To clean the telephone, wipe first with an antistatic cloth or a damp, soft leather cloth and then dry using a dry cloth.
Recycling (environmental protection)

At the end of the product's life cycle, the telephone must not be disposed of in normal domestic waste. Please take it to a collection point for processing electrical and electronic equipment: see symbol on the product, in the user manual and/or packaging.
Some materials used in this product can be recycled if you take it to a recycling depot. By recycling parts or raw materials from used products you will be making an important contribution to environmental protection. Please contact your local authority if you require information about collection points in your neighbourhood.
Disposing of the rechargeable battery
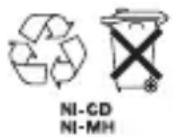
By law, all used batteries and accumulators must be recycled and not disposed of in domestic waste. Please dispose of them according to the official regulations. Take them to a recycling depot. The batteries/accumulators will be recycled since they may, for example, contain nickel cadmium (Ni - Cd), lead (Pb), cadmium (Cd) or mercury (Hg). The batteries and accumulators are labelled with symbols and information on their contents,
e.g.:
Warranty conditions
Your telephone is subject to a guarantee from the date of purchase in accordance with the legal provisions of the country in which the telephone was purchased. As evidence of the date of purchase, please keep the receipt or the warranty card completed by the retailer. All defects attributable to material and manufacturing faults will be corrected free of charge within the warranty period, either by repairing or replacing the defective equipment.
The warranty does not cover expendable materials (battery cells), defects which affect the value or use of the equipment only insignificantly, and damage caused by incorrect use, ordinary wear and tear, or manipulation by third parties.
This warranty does not cover consequential damage caused by the use, failure or defectiveness of the product. In particular, no liability whatsoever is accepted for damage to property and pecuniary loss.
To claim under this warranty, please contact the retailer where you purchased your telephone.
Approval and conformity
This analog telephone DECT complies with the basic requirements contained in the R&TTE Directive 1999/5/EC on radio equipment and telecommunications terminal equipment and is suitable for connection and operation in the member state indicated on the base station and/or packaging.
The declaration of conformity may be viewed at: www.swissvoice.net.

The CE symbol confirms the conformity of the telephone with the above directive.
Warranty Certificate
swissvoice
Warranty Certificate
Garantieschein, Bon de garantie, Certificato di garanzia, Garantiebewijs, Takuutodistus, Garantibevis, Garantisedel, Garantibevis, Certificado de Garantía, Talão de garantia
| device type: | (Gerätetyp, type d'appareil, tipo di apparecchio, toesteltype, laitetyppi, maskintype, apparattyp, apparattype, modelo del aparato, modelo do aparelho): |
| serial number: | (Seriennummer, numéro de série, numero di serie, serienummer, sarjanumero, serienummer, serienummer, serienummer, número de serie, número de série): |
| dealer's stamp: | (Händlerstempel, sceau du vendeur, timbro del rivenditore, stempel van de dealer, kauppiaan leima, forhandlerens stempel, försäljarens stämpel, forhandlerstempel, sello del comerciante. carimbo do vendedor): |
| dealer's signature: | (Unterschrift des Händlers, signature du vendeur, firma del rivenditore, handtekening van de dealer, kauppiaan allekirjoitus, forhandlerens underskrift, försäljarens underskrift, forhandlers underskrift, firma del comerciante, assinatura do vendedor): |
| date of purchase: | (Kaufdatum, date d'achat, data d'acquisto, datum van aankoop, ostopäiväys, kjøpsdato, datum för köpet, salgsdato, fecha de adquisición, data de compra): |

natural_image
Blank white image with no visible content, text, or symbolsInternet:
www.swissvoice.net
© Swissvoice SA 2009
20405418xx_ba_a0
SV 20405418