USER MANUAL AT 2287 SEVERIN
Before using the appliance, read the following instructions carefully and keep this manual for future reference. The appliance must only be used by persons familiar with these instructions.
Connection to the mains supply
The appliance should only be connected to an earthed socket installed in accordance with the regulations.
Make sure that the supply voltage corresponds to the voltage marked on the rating label.
This product complies with all binding CE labelling directives.
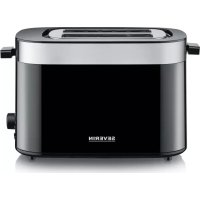
Familiarisation
- Toast slot
- Operating lever
- Infinitely adjustable browning control
- Power cord with plug
- Eject button
- Rating label (on underside of appliance)
- Power cord storage (on underside of appliance)
- Crumb tray
- Slide control for bread roll holder
- Integral bread roll holder
Important safety instructions
- Caution: There is always a danger that bread may catch fire. Therefore ensure that the appliance is not positioned or operated in close proximity to curtains or any such inflammable materials.
In order to avoid hazards, repairs to this electrical appliance or its power cord must be carried out by our customer service. If repairs are needed, please send the appliance to our customer service department (see appendix).
The appliance is not intended to be operated by means of an external timer or separate remote-control system.
Before cleaning the appliance, ensure it is disconnected from the
power supply and has cooled down completely.
- To avoid the risk of electric shock, do not clean the appliance with water and do not immerse it in water.
To empty the crumb tray, pull it out sideways. Make sure to replace the tray before the toaster is used again.
This appliance may be used by children (at least 8 years of age) and by persons with reduced physical, sensory or mental capabilities, or lacking experience and knowledge, provided they have been given supervision or instruction concerning the use of the appliance and fully understand all dangers and safety precautions involved.
Children must not be
permitted to play with the appliance.
Children must not be permitted to carry out any cleaning or maintenance work on the appliance unless they are supervised and at least 8 years of age.
The appliance and its power cord must be kept well away from children under 8 at all times.
- Caution: Keep any packaging materials well away from children – these are a potential source of danger, e.g. of suffocation.
Always position the appliance on a level heat-resistant surface.
In order to prevent damage to the housing, do not position the appliance on or near hot surfaces or open flames such as hot-plates or gas flames.
- Caution: the accessible housing surfaces become very hot during operation. Burns can occur from touching the hot parts.
Every time the appliance is used, the main body including the power cord as well as any attachment fitted should be checked thoroughly for any defects. Should the appliance, for instance, have been dropped onto a hard surface, or if excessive force has been used to pull
the power cord, it must no longer be used: even invisible damage may have adverse effects on the operational safety of the appliance.
- Do not allow the power cord to touch hot surfaces.
- Do not let the power cord hang free.
- Do not leave the appliance unattended while in use.
- Do not cover the toast slot during operation.
- Do not try to remove bread from the toaster with your fingers or insert any other objects (e.g. knives, forks) into the toast slot as the heating elements carry a live current.
-
Always remove the plug from the wall socket
-
after use,
- in case of any malfunction,
-
before cleaning the appliance.
-
When removing the plug from the wall socket, never pull on the power cord; always grip the plug itself.
- No responsibility will be accepted if damage results from improper use, or if these instructions are not complied with.
-
This appliance is intended for domestic or similar applications, such as
-
in shops, offices and other similar working environments,
- in agricultural working environments,
- by customers in hotels, motels etc. and similar establishments,
- in bed-and breakfast type environments.
Operation
- Caution: The operating lever locks down only when the plug is inserted.
- Do not use slices which are too thick or too big, as they may become stuck in the toaster. The thickness of the slices to be toasted should not exceed 14mm .
- In case of problems or malfunctions during use, and before cleaning, always remove the plug from the wall socket.
- To remove a slice caught in the slot, use a blunt wooden implement (e.g. a brush handle). Never touch the metal heating elements.
Before using for the first time
- Clean the toaster thoroughly (see Cleaning and care).
- Switch on the toaster without any bread inserted and go through at least five toasting cycles at the maximum temperature setting.
- Allow the toaster to cool down between cycles.
- When switching on the appliance for the first time, the toaster may emit a slight smell and a little smoke, but this will disappear after a short while. Ensure sufficient ventilation.
Automatic switch-off
This appliance comes with an automatic switch-off feature. If a bread slice should become stuck and cannot be ejected after the toasting cycle is complete, the toaster will automatically switch off. Should this occur, disconnect the appliance from the mains and remove the bread slice as described in the section General information.
Adjusting the degree of browning
The desired degree of browning can be varied by turning the adjustable browning control knob.
Light: turn the control knob anti-clockwise.
Dark: turn the control knob clockwise.
In the case of sliced bread specifically intended for toasting, we recommend setting the browning control to position 4.
Operation
- Insert the plug into the wall socket.
After adjusting the browning control, insert the bread into the toast slot and press the operating lever down.
Once the desired degree of browning is reached, the toaster switches off automatically and the slices are ejected.
To achieve regular browning when.
toasting several slices in succession,
allow the toaster to cool down for 60 - 90
seconds after each cycle.
- Do not cover the toast slot during operation.
Interrupting the toasting cycle
If you want to interrupt the toasting cycle, press the eject button (The toaster will switch off and the slices are ejected.
Warming up rolls, buns etc
- To warm up buns, rolls or other bakery items, push the slide control operating lever for the warming top all the way down to raise the bread roll holder.
- Place the items to be warmed up on the top, adjust the browning control to a medium setting and then push down the operating lever to switch on the toaster.
Once the browning cycle is complete and the appliance has automatically switched off, turn the roll or bread over and repeat the cycle.
After use, return the bread roll holder to its rest position by pushing the slide control back up.
- Do not place the items directly on the toast slot.
Cleaning and care
- Before cleaning the appliance, ensure it is disconnected from the power supply and has cooled down completely.
- To avoid the risk of electric shock, do not clean the toaster with water and do not immerse it in water.
- Do not use abrasives or harsh cleaning solutions.
The housing may be wiped with a dry or slightly damp lint-free cloth.
Crumb tray
During use, any bread crumbs falling down are collected in the crumb tray. To empty the tray, pull it out sideways. Make sure to replace the crumb tray before the toaster is used again.
Power cord storage
Unwind the power cord completely before operation and make sure it is kept well away from the appliance.
Allow for a sufficient cooling-down period before winding up the power cord after use.
Disposal
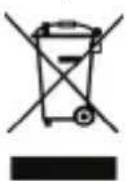
Devices marked with this symbol must be disposed of separately from your household waste, as they contain valuable materials
which can be recycled. Proper disposal protects the environment and human health. Your local authority or retailer can provide information on the matter.
FR
Chere cliente, Cher client,
Hnkorga He donyckaite K np60py n K ero shhpy
ПИТАня DeTei MlaIaIe 8 JIeT.
He pa3pewaTe detam nrgatb c npnbopom.
-ДeТЯМ можно pa3peшаТь
чИСТКУ И обслuyЖиВане
прибора только пОд
присмOTpOM И ecЛи Им He
MeHee 8 ЛeT.
- П dedурждени. Деркinte yanaKOBOчьи MaTePnAJIbI B HeIOCTyHOM IЯ DeTei MeCTe, TaK KaK OHI npedctabJIaHT ONaCHOCTb ydyWBJ.
- YTo6bI He NOBpeDnTb KOpnyc npn6opa, He cTaBbTe erO Ha TaKne Tropaune PpeDMeTbI IJI NICTOuHNK N OTKpbITOro IJaMaEH N KaK KOHΦopKn 3JIeKTPnueCKOn IJI N Ra3OB0N IIITbI IJI N PraDOM C HIMN.
Будte octopoxHbl!пр pa6ote np6op HarpeBaetc, no3tomy npnpKOKOCHOBENK TOpaym YacTm MOxHO NOJyUHTb OXkOr.
Bcerda ctaBbTe npnbop Ha poBHyTOpeMocToKyIO NOBepxHocTb.
- Ipeed kaxdbim BkIIOueHnem 3neKtpoopnbopa cJeDyET y6eINTbcB B OTCYTCTBn IOBpeJxHeN KAK Ha OCHOBHOM yCTPOIcTBe, BKIOUaY I uHyp NITAHN, TaK I HA JHObOM DOONHHTeJIbHOM, ECIN OHO yCTAHOBJeHO. EcIn Bbl POHJI IN PpIBOp Ha TBepdyIO NOBepXHOCTb IIN pPINAraJIu Ype3MepHoe ycJIne IIN pPINAraJIu Ype3MEpHoe ycJIne IIN BBITARBAHN UHpya NITAHN, 3TOT pN6Op He cJeDyET BoJIbWe
NcnoIb3OBaTb:JaXe HeBnDnMOe NOBpeXdHne MoXe TOpuCaTeJbHo cKa3aTbCnHa 3KcPnyataUHOH0 6e3Opa.
CneiTe 3a Tem, TTo6bI uHyp nHTaHnHe cOpnKacalc C hArpeBaUoSeiCnNoBepxHOCTbIO np6opa.
He donyckaTe cbo6oHoro npOBncaHna shHpya nHTAHn.
He octabTnIe BkIIOueHHbI np6Op 6e3 npncMOtpa.
He haKpbBaIte npope3b IJIa TocTOB BO BpeMpa60TbI np6opa.
He n3BnekaTe xIe6 n3 TocTepa NaJIbUaMn IIN BCTaBJaR B npope3b DnA TOCTOB TaKHe PpeIMeTbI, KaK HOxN, BNkN I T.D. HarpeBaTeJbHbIe 3JIeMeHTbl I RBLIOTcTOKOBeDyUIMN YacTAMN.
Bcerda BbHMaTe wTeNceIbHyU BnKy n3 p03eTKn:
- NocJIe IcNoJIb3OBAHnI;
- npn IIO6oH enoJaKe;
-пегд чько npбopa.
-Пи n3BHeeHn BnIKn n3 CTeHHO pO3eTKn HnKOrda He TAnHTe 3a ShHyp, 6epNTecb ToIbKO 3a BNkY.
- I3ROTOBNTeJIb He HeCet HnKaKoI OTBETCTBeHHOCTN 3a NOBpeJDeHne, Bbl3BaHHoe He npabINbHOI 3KcIIyatauNeiHn HapUSeHnem HAcTOrAUX yKa3aHnI.
- ΘTOT npi6op npeHa3NaueHДЯ
NcNoIb3OBAHnB DOMaSHnX NII
NOD6HbIX YCJIOBnX, KaK, HApPIMep:
- B OΦncax nIIN B Dpyrnx
KOMMepuecknx NOMEeHnX;
-
B npednpnayx, paCNOJoxeHHbIX BCelbCKO MECTHOCTN;
-
NOCTOJIbIaMn B OTeJIaX, MOTeJIaX I T. D.IBdpyrNX NODObHbIX 3aBeDeHnX;
- B rOCTeBbIX DOMAX C
празoctabJIeHnem HOUJIera n
3aВТракa.
ИспOLTбоване
067aHOpmaun
- Ппедунрждени! РыагфИКсИчЕТСТОЛБКО постБКПЮЧЕНЯ ВИЛКИВ рОЗЕТКУ.
He nCnoJb3yIte OyeHb TOnCTbIe NJIb 6OJIbUne JOMTN. OHN MOrYT 3aCTpA rB TOcTepe. ToIuHa xJe6a He DoJxHa 6bITb 6oJee 14 MM.
Bcnyae npo6lem nnn Hecpa6aTbIBaHnI nepead qncTkOi Bcerda BbIHMaTe BNJKy n3 po3eTKn.
- UTO6bI ydaJIHTb TOCT, 3aCTPRABmIB N pOpe3N TOCTepa, NOJb3yIeTcB TYNbIMn DepeBraHHbIMN PpeDMeTaMn (Hanp.,pykoJ uetkn).HnkOrda He npNKacaiTeCb K MeTaJIInueCKIM HarpeBaTeJIbHbIM 3JeMeHTam.
Ipeed nepBbIM nCIOJIb3OBaHHeM
TuaTeJIbHO OuNCTnTE TocTeP (CM. Obuui yxod u yucmka).
BknHouHTe TocTepe3 xle6a nporoHHTe erO He MeHee pTn pa3 npu MaKcImaJIbHOJ TemNepaType.
- После кадоу поразу Нухно ДаТь OCTыITь.
- Пи Вкlioчehи TOCTepa Bпервьл pa3 MOжET NOЯВИТбС са6bl 3anax (nIIN daxe JERKn IbIM), KOTOpbI BCKope nCye3HET. OBeCneYbTe Heo6xOДmMyU BeHTINJIaIHO.
ABTOMaTnueCKoe OTKJIoueHne
ДанныnpиборИмeeТФункцю aBTOMATNueCKOTo OTKJIOneHnЯ.EcInTOCT3aCTPraHETBTOCTepeIHe6yTeT BbITOKHyT NocIe 3aBepSeHnY CnKna PONJAPINBAHnY,TOCTe OTKJIOnHTCЯ aBTOMATNueckn. EcIn 3TO pOn3oNdeT, OTKJIOnHTe npi6opOT cEtN ydaJInte XJIe6,Kak OnPcaHoBpa3dJeO6uaJ unΦopMauzu.
PerynpoBka cTepeHn noJXapNBaHna
CTeHeH NOJxapNBaHnM OXHO peYIuPobAtb No JeJaHnO nytEm NOBOpTa pyKn:
ДЯУMeHbSeHnЯ NOBepHInTe npoTnB YacOBoN CTpeJIKN.
ДЯ yBéJIuYeHЯ NOBepHnTe nO YacOBoN CTpeIKe.
Pn nCnoB3OBaHn CneuaJbHoro XJIe6a IJa TocTOB Mbl peKOMeHdyem UCTaHaBnBaTb pykU peYIpOBAHn CTeNEH NODXapNBaHn B NOJoxEHe 4.
3Kcnpnyatazaia
BcTaBbTe BnIky B po3eTkY.
- Послpe рулровая стени
норжарваши, поожITE xлоб В
OTВерстпдя xлоба и сдвиьт
рыаг 3агрузки ви3.
- Послдддддддддддддддддддддддддддддддддддддддддддддддддддддддддддддддддддддддддддддддддддддддддддддддддддд徳н
- Дожарпваня TOCTep BOTOMATNueCKN
- ВыКЛЮчаETСЯ И TOCTbl BbITaJKNBAIOTCSY.
ДляdoctижениODINHaKOBOrO NOДЖарИВанЯ HeCKOLbKINX TOCTOB NOДрд ДаВаITE TOCTepy OCTbITb B TeueHne 60-90 cek noCJIe KaJdOro UNKla.
He haKpbIbAaTe npope3b dIy TOcTOB BO Bpempa6oTbI np6opa.
IpepbBaHne zukla noJxapnbHaHn
YTo6bl npepBaTb NOJxapNBaHne, HaxMNTe KHOKNy BbITaJIKNBaHnra (). TocTeP OTKJIIOHTcN BBITOJKNHErTOCT.
IodorpeBaHne 6yNoueK n T. n.
PONHOCTbIO pa3MOTaIte shHyp NITaHnA
Iy6eDNTecb,HTO OH HaxoDNTcHa
dOCTaTOUHOM ydaJIeHm OT npIbopa.
Ipeed tem kak CMOTaTb UHyp nHTaHnA
noCne npimHeHn np6opa, y6eInTeCb,
TO OH OCTbI.
YtNiN3aun
YCTPOINCTBa, NOMEUHbIe 3TUM CIMBOJOM, DOJIXHbI
yTNIN3NPOBaTbC8 OTdEJIbHOOT
DOMaUHero Mycopa, TaK KaK OHN
codepkaT noe3HbI MaTePnAbl, KOToPbIe MOryT 6bITb HAnpaBHeHbI Ha nepepaBoTKy.
IpaBnIbHa yTnIu3aun oBeCneuBaet 3aunTy OkpykaUoSe Cpebl N 3doPoBby ueNoBeka. HOpMaunIO n 3Tomy
BONPOCY Bbl MOXTe NOJyHTb y MeCTHbIX Bnacte nn y npoabua yctpOcTba.