R-N500 - Network audio receiver YAMAHA - Free user manual and instructions
Find the device manual for free R-N500 YAMAHA in PDF.
| Product Type | Network Audio Receiver |
| Brand | YAMAHA |
| Model | R-N500 |
| Dimensions (W × H × D) | 435 × 151 × 387 mm |
| Weight | 9.8 kg |
| Power Supply | AC 230 V, 50 Hz (European model) |
| Power Consumption | 190 W (standby < 0.1 W) |
| Output Power | 80 W + 80 W (8 Ω, 20 Hz – 20 kHz, 0.04% THD) |
| Compatible Speaker Impedance | 4 Ω min / 8 Ω default |
| Audio Inputs | PHONO (MM), CD, LINE 1-3, OPTICAL 1-2, COAXIAL 1-2, USB, network (Ethernet) |
| Audio Outputs | Speakers A/B, subwoofer (Pre Out), headphone (6.35 mm jack) |
| Network Functions | AirPlay, Internet radio, playback from PC/NAS (DLNA), NP Controller app |
| USB Playback | FAT16/32, WAV, MP3, WMA, AAC, FLAC files (up to 192 kHz) |
| FM/AM Radio | 40 presets, RDS, automatic and manual tuning |
| PURE DIRECT Function | Bypasses tonal adjustments for pure listening |
| ECO Mode | Reduces power consumption |
| Sleep Timer | Adjustable from 1 to 12 hours (in 1-hour steps) |
| Remote Control | Infrared, with dedicated TV and external device buttons |
| Supplied Accessories | Remote control, FM and AM antennas, batteries (x2), manual |
| Maintenance and Cleaning | Use a dry, clean cloth. Do not use chemical solvents. |
| Safety | Do not expose to rain/moisture. Leave 30 cm above, 20 cm at rear and sides. Do not open the casing. |
| Spare Parts and Repairability | Do not attempt to repair yourself. Consult a Yamaha authorized service. |
Frequently Asked Questions - R-N500 YAMAHA
User questions about R-N500 YAMAHA
0 question about this device. Answer the ones you know or ask your own.
Ask a new question about this device
Download the instructions for your Network audio receiver in PDF format for free! Find your manual R-N500 - YAMAHA and take your electronic device back in hand. On this page are published all the documents necessary for the use of your device. R-N500 by YAMAHA.
USER MANUAL R-N500 YAMAHA
Caution: Read this before operating your unit.
1 To assure the finest performance, please read this manual carefully. Keep it in a safe place for future reference.
2 Install this sound system in a well ventilated, cool, dry, clean place - away from direct sunlight, heat sources, vibration, dust, moisture, and/or cold. For proper ventilation, allow the following minimum clearances. Top: 30~cm (11-3/4 in) Rear: 20~cm (7-7/8 in) Sides: 20~cm (7-7/8 in)
3 Locate this unit away from other electrical appliances, motors, or transformers to avoid humming sounds.
4 Do not expose this unit to sudden temperature changes from cold to hot, and do not locate this unit in an environment with high humidity (i.e. a room with a humidifier) to prevent condensation inside this unit, which may cause an electrical shock, fire, damage to this unit, and/or personal injury.
5 Avoid installing this unit where foreign objects may fall onto this unit and/or this unit may be exposed to liquid dripping or splashing. On the top of this unit, do not place:
- Other components, as they may cause damage and/or discoloration on the surface of this unit.
- Burning objects (i.e. candles), as they may cause fire, damage to this unit, and/or personal injury.
- Containers with liquid in them, as they may fall and liquid may cause electrical shock to the user and/or damage to this unit.
6 Do not cover this unit with a newspaper, tablecloth, curtain, etc. in order not to obstruct heat radiation. If the temperature inside this unit rises, it may cause fire, damage to this unit, and/or personal injury.
7 Do not plug in this unit to a wall outlet until all connections are complete.
8 Do not operate this unit upside-down. It may overheat, possibly causing damage.
9 Do not use force on switches, knobs and/or cords.
10 When disconnecting the power cable from the wall outlet, grasp the plug; do not pull the cable.
11 Do not clean this unit with chemical solvents; this might damage the finish. Use a clean, dry cloth.
12 Only voltage specified on this unit must be used. Using this unit with a higher voltage than specified is dangerous and may cause fire, damage to this unit, and/or personal injury. Yamaha will not be held responsible for any damage resulting from use of this unit with a voltage other than specified.
13 To prevent damage by lightning, keep the power cord disconnected from a wall outlet or the unit during a lightning storm.
14 Do not attempt to modify or fix this unit. Contact qualified Yamaha service personnel when any service is needed. The cabinet should never be opened for any reasons.
15 When not planning to use this unit for long periods of time (i.e. vacation), disconnect the AC power plug from the wall outlet.
16 Be sure to read the "Troubleshooting" section in the owner's manual on common operating errors before concluding that this unit is faulty.
17 Before moving this unit, press downward to turn off this unit and then disconnect the AC power plug from the AC wall outlet.
18 Condensation will form when the surrounding temperature changes suddenly. Disconnect the power cable from the outlet, then leave this unit alone.
19 When using this unit for a long time, this unit may become warm. Turn the system off, then leave this unit alone for cooling.
20 Install this unit near the wall outlet and where the AC power plug can be reached easily.
21 The batteries shall not be exposed to excessive heat such as sunshine, fire or the like. When you dispose of batteries, follow your regional regulations.
22 Excessive sound pressure from earphones and headphones can cause hearing loss.
As long as this unit is connected to the AC wall outlet, it is not disconnected from the AC power source even if you set this unit to standby mode by . In this state, this unit is designed to consume a very small quantity of power.
WARNING
TO REDUCE THE RISK OF FIRE OR ELECTRIC SHOCK, DO NOT EXPOSE THIS UNIT TO RAIN OR MOISTURE.
CAUTION
Danger of explosion if battery is incorrectly replaced.
Replace only with the same or equivalent type.

This label is required to be attached to a product of which the temperature of the top cover may be hot during operation.
Contents
INTRODUCTION
Useful features 2
Supplied accessories 3
Controls and functions 4
Front panel 4
Front display 6
Rear panel 7
Remote control 8
Using the remote controls. 9
PREPARATION
Connections 10
Connecting speakers and source components. 10
Connecting the speakers 11
Connecting the FM and AM antennas 12
Connecting to a network. 13
Connecting power cable 13
BASIC OPERATION
Playback 14
Playing a source 14
Using the sleep timer 16
Listening to FM/AM radio. 17
FM/AM tuning. 17
Automatic preset tuning (FM stations only) 18
Manual tuning preset 18
Recalling a preset station 19
Clearing a preset station 19
Radio Data System tuning 20
Playing back iPod music 21
Connecting an iPod 21
Playback of iPod content 21
Playing back music stored
on a USB storage device. 23
Connecting a USB storage device 23
Playback of USB storage device contents 23
Playing back music stored
on media servers (PCs/NAS). 25
Setting the media sharing of music files 25
Playback of PC music contents. 26
Listening to Internet radio. 27
Playing back iTunes/iPod music
via a network (AirPlay) 28
Playback of iTunes/iPod music contents 28
Switching information on the front display 29
ADVANCED OPERATION
Configuring playback settings for different playback sources (OPTION menu). 30
OPTION menu items 30
Configuring various functions (SETUP menu).....31
SETUP menu items 31
Network Setup 32
Max Volume 33
Initial Volume 33
AutoPowerStdby 33
ECO Mode 33
DC OUT 33
Configuring the system settings (ADVANCED SETUP menu) 34
ADVANCED SETUP menu items 34
Changing the speaker impedance setting (SP IMP.) ... 34
Selecting the remote control ID (REMOTE ID) 34
Restoring the default settings (INIT) 35
Updating the firmware (UPDATE) 35
Checking the firmware version (VERSION) 35
Controlling external devices with the remote control. 36
Registering the remote control code for a TV 36
Registering the remote control codes for playback devices 37
Resetting remote control codes 38
Updating the unit's firmware via the network.....39
ADDITIONAL INFORMATION
Troubleshooting 40
Error indications on the front display. 45
Trademarks 46
Specifications 47
Index 48
(at the end of this manual)
Information about software
LIST OF REMOTE CONTROL CODES
Useful features
This unit allows you to:
| Play back music from your iPod and USB devices | → | p.21, 23 |
| Play back music from network sources (PC/NAS, AirPlay) | → | p.25, 28 |
| Listen to network streaming services | → | p.27 |
| Listen to FM and AM radio stations | → | p.17 |
| Boost bass sounds by connecting a subwoofer | → | p.10 |
| Configure speaker impedance | → | p.11 |
| Use this unit's remote control to operate other components such as a CD player, BD/DVD player or TV | → | p.36 |
| Use this unit to eco mode (power saving function) | → | p.33 |
indicates a tip for your operation.
- This manual explains operations using the supplied remote control.
- This manual describes all the "iPod", "iPhone" and "iPad" as the "iPod". "iPod" refers to "iPod", "iPhone" and "iPad", unless otherwise specified.
Easy operation and wireless music playback from iPhone or Android device.
By using the application for smartphone /tablet "NP Controller", you can control the unit from an iPhone, iPad, iPod touch or Android devices.
Features
- Basic operations such as turning the power on/off and adjusting the volume
- Switching the input source
- Displaying FM tuner information
- Selecting songs and starting/stopping playback
- Playing back music from the iPhone or Android device
- To download the application or see the latest information, access the App Store or Google Play and search for "NP Controller."
For details, please visit Yamaha website.
Supplied accessories
Check that the following accessories are supplied with the product.
Remote control
AM antenna

FM antenna
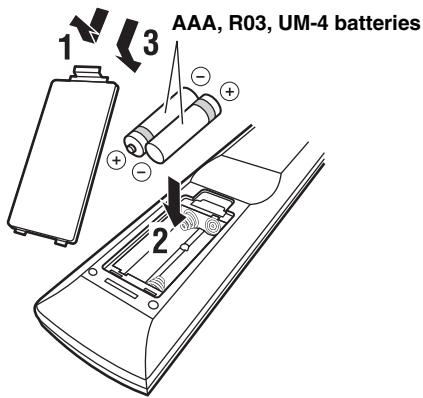
Batteries (x2) (AAA, R03, UM-4)
Notes on remote controls and batteries
- Do not spill water or other liquids on the remote control.
- Do not drop the remote control.
- Do not leave or store the remote control in the following conditions:
places of high humidity, such as near a bath
places of high temperatures, such as near a heater or stove
places of extremely low temperatures
-
dusty places
-
Insert batteries according to the polarity markings (+ and -).
- Change all batteries if you notice the operation range of the remote control narrows.
- If the batteries run out, immediately remove them from the remote control to prevent an explosion or acid leak.
- If you find leaking batteries, discard the batteries immediately, taking care not to touch the leaked material. If the leaked material comes into contact with your skin or gets into your eyes or mouth, rinse it away immediately and consult a doctor. Clean the battery compartment thoroughly before installing new batteries.
- Do not use old batteries together with new ones. This may shorten the life of the new batteries or cause old batteries to leak.
- Do not use different types of batteries (such as alkaline and manganese batteries) together. Read the packaging carefully as these different types of batteries may have the same shape and color.
- Before inserting new batteries, wipe the battery compartment clean.
- Keep the batteries in a location out of reach of children. Batteries can be dangerous if a child were to put in his or her mouth.
- If the batteries grow old, the effective operation range of the remote control decreases considerably. If this happens, replace the batteries with new one as soon as possible.
- If you plan not to use the unit for a long period of time, remove the batteries from the unit. Otherwise, the batteries will wear out, possibly resulting in a leakage of battery liquid that may damage the unit.
- Do not throw away batteries with general house waste. Dispase of them correctly in accordance with your local regulations.
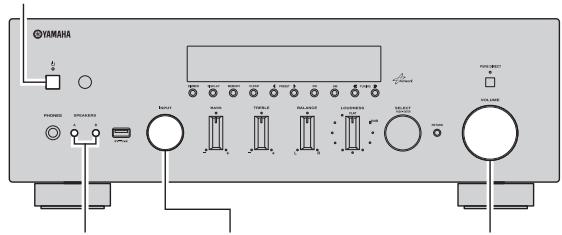
Controls and functions
Front panel
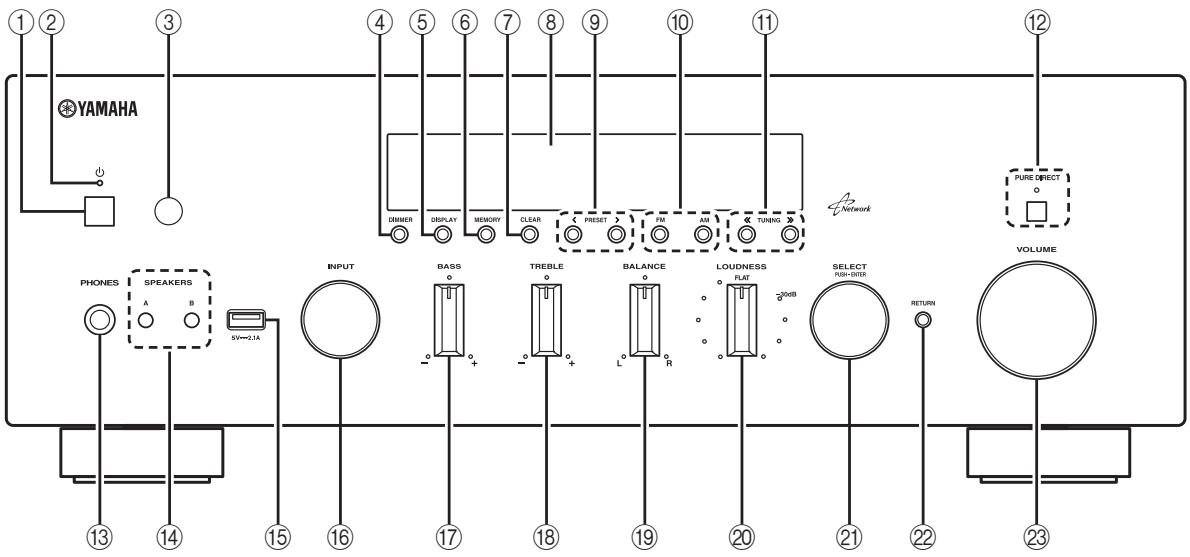
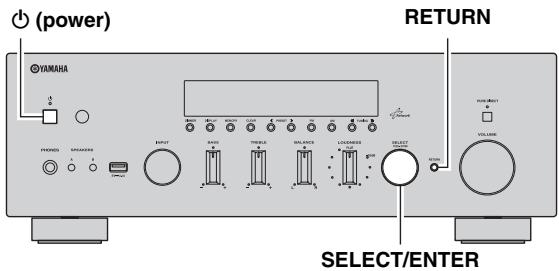
① (power)
Turns on/off (standby) the unit.
Note
In standby mode, this unit consumes a small amount of power to receive infrared signals from the remote control.
② Power indicator
Lights up as follows:
Brightly lit: Power is on
Dimly lit: Standby mode
③ Remote control sensor
Receives infrared signals from the remote control.
Note
Switch the remote control ID between ID1 and ID2 when using multiple Yamaha receivers or amplifiers (p.34).
④ DIMMER
Changes the brightness level of the front display. Choose brightness from 5 levels by pressing this button repeatedly.
This setting is retained even if you turn off this unit.
⑤ DISPLAY
Selects the information displayed on the front display (p.29).
(6) MEMORY
Stores the current FM/AM station as a preset when TUNER is selected as the input source (p.18).
⑦ CLEAR
Clearly a FM/AM preset station when TUNER is selected as the input source (p.19).
⑧ Front display
Shows information about the operational status of this unit.
(9) PRESET /
Selects a preset FM/AM station when TUNER is selected as the input source (p.19).
FM and AM keys
Switch between FM and AM (p.17).
⑪ TUNING /
Selects the tuning frequency when TUNER is selected as the input source (p.17).
② PURE DIRECT and indicator
Allows you to listen to a source in the purest possible sound (p.14). The indicator above it lights up and the front display turns off when this function is turned on.
13 PHONES jack
Outputs audio to your headphones for private listening.
14 SPEAKERS A/B
Turns on or off the speaker set connected to the SPEAKERS A and/or SPEAKERS B terminals on the rear panel each time the corresponding button is pressed.
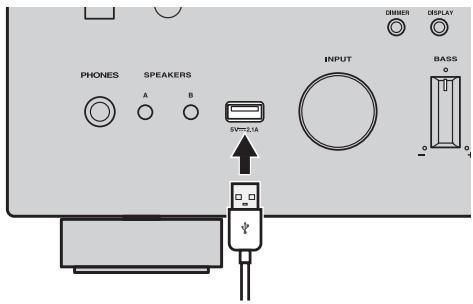
15 USB jack
For connecting a USB storage device (p.23) or an iPod (p.21).
16 INPUT selector
Selects the input source you want to listen to.
17 BASS control
Increases or decreases the low frequency response. The center position produces a flat response (p.15).
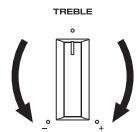
18 TREBLE control
Increases or decreases the high frequency response. The center position produces a flat response (p.15).
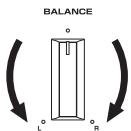
19 BALANCE control
Adjusts the sound output balance of the left and right speakers to compensate for sound imbalances caused by speaker locations or listening room conditions (p.15).
LOUDNESS control
Retains a full tonal range at any volume level to compensate for the human ears' loss of sensitivity to high and low-frequency ranges at a low volume level (p.15).
2 SELECT/ENTER (jog dial)
Turn the dial to select a numeric value or setting, and press the dial to confirm.
2 RETURN
Returns to the previous indication of the front display.
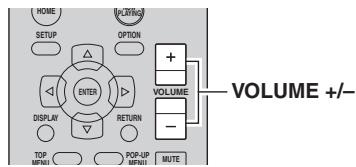
23 VOLUME control
Increases or decreases the sound output level.
Front display
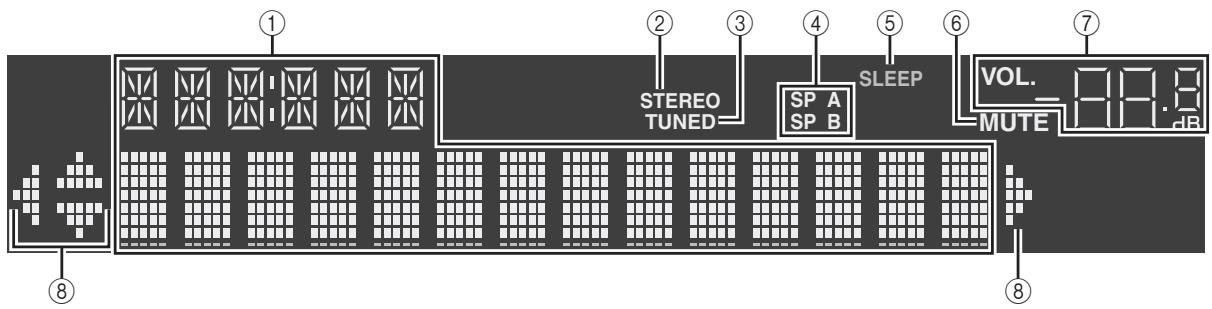
① Information display
Displays the current status (such as input name sound mode name).
You can switch the information that is displayed when you press DISPLAY (p.29).
② STEREO
Lights up when the unit is receiving a stereo FM radio signal.
(3) TUNED
Lights up when the unit is receiving an FM/AM radio station signal.
④ Speaker indicators
"SP A" lights up when the SPEAKERS A output is enabled and "SP B" lights up when the SPEAKERS B output is enabled.
⑤ SLEEP
Lights up when the sleep timer is on.
(6) MUTE
Blinks when audio is muted.
Volume indicator
Indicates the current volume.
Cursor indicators
Indicate the remote control cursor keys currently operational.

You can change the brightness level of the front display by pressing DIMMER on the remote control (p.8).
Rear panel
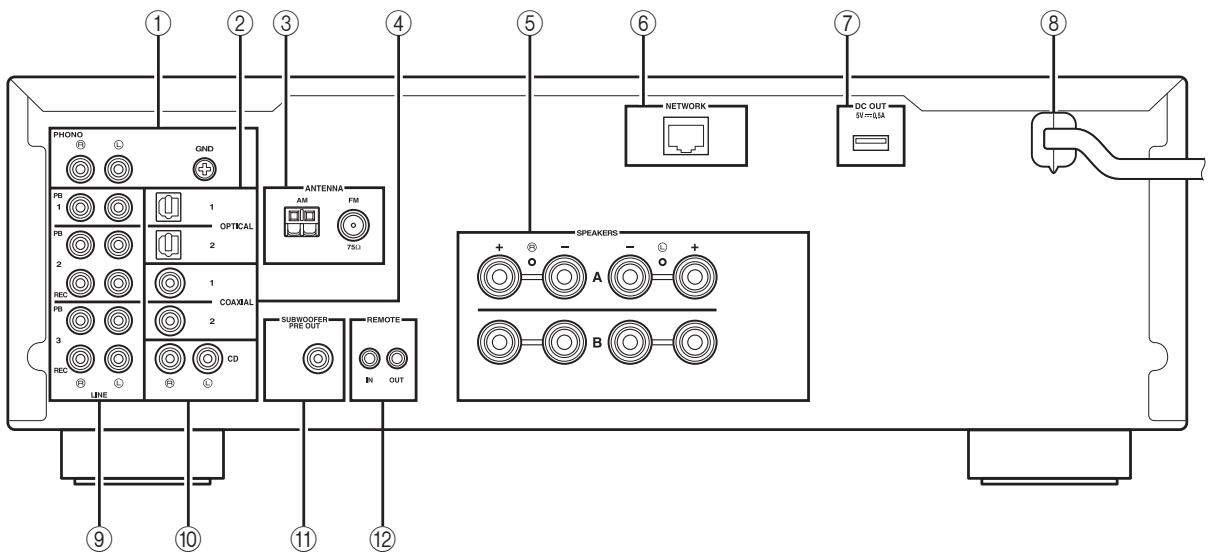
① PHONO jacks
For connecting to a turntable (p.10).
② OPTICAL 1-2 jacks
For connecting to audio components equipped with optical digital output (p.10).
③ ANTENNA terminals
For connecting to FM and AM antennas (p.12).
④ COAXIAL 1-2 jacks
For connecting to audio components equipped with a coaxial digital output (p.10).
⑤ SPEAKERS terminals
Used to connect speakers (p.11).
⑥ NETWORK jack
For connecting to a network (p.13).
⑦ DC OUT jack
For supplying power to a Yamaha AV accessory. For details on connections, refer to the instruction manual of the AV accessory.
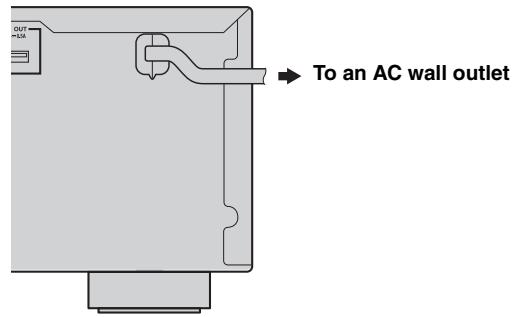
⑧ Power cable
For connecting to an AC wall outlet (p.13).
LINE 1-3 jacks
For connecting to analog audio components (p.10).
CD jacks
For connecting to a CD player (p.10).
⑪ SUBWOOFER PRE OUT jack
For connecting to a subwoofer with built-in amplifier (p.10).
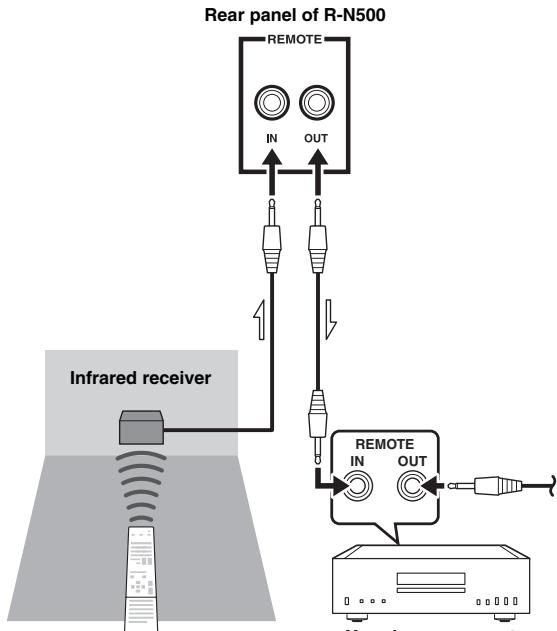
⑫ REMOTE IN/OUT jacks
When you have another Yamaha component supporting remote connection, as this unit does, an infrared
transmitter is not necessary. You can transmit remote signals by connecting an infrared receiver and the
REMOTE IN jack of the other component to the
REMOTE IN/OUT jacks of this unit, using cables with monaural miniplugs.
Up to six Yamaha components (including this unit) can be connected.
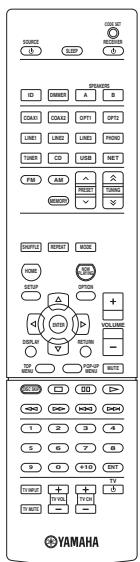
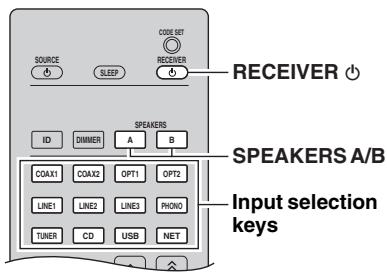
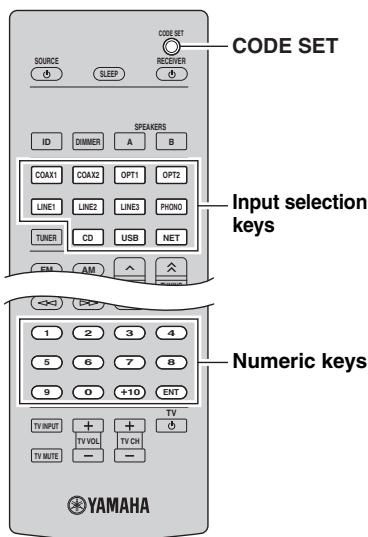
Remote control
Yamaha component up to six component
including this unit)
Remote control
This section describes the function of each key on the remote control used to control this unit or other components made by Yamaha or other manufacturers.
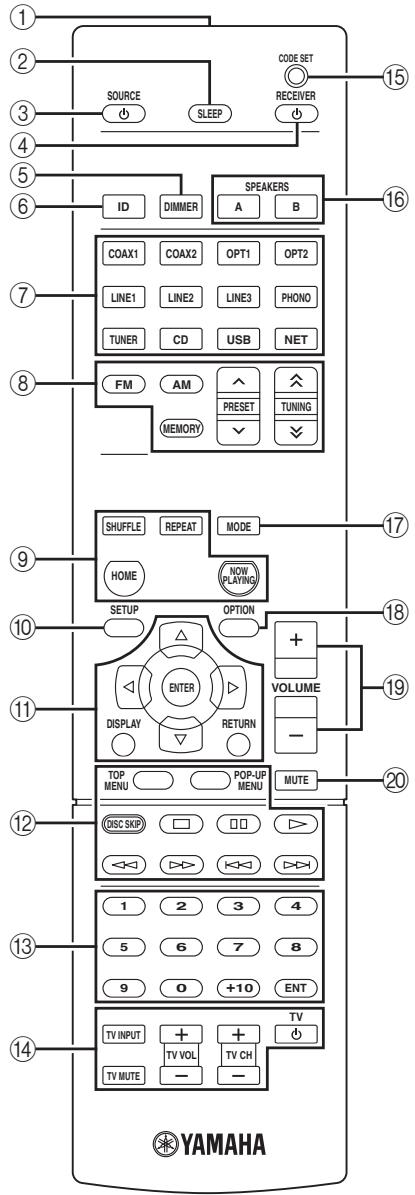
① Infrared signal transmitter
Sends infrared signals.
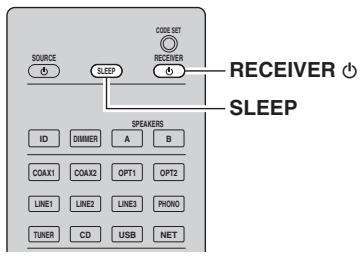
② SLEEP
Sets the sleep timer (p.16).
③ SOURCE
Turns on/off an external device.
④ RECEIVER
Turns on/off (standby) the unit.
⑤ DIMMER
Changes the brightness level of the front display. Choose brightness from 5 levels by pressing this key repeatedly.
(6) ID
Changes the remote control ID (p.34).
⑦ Input selection keys
Select an input source for playback.
COAX 1-2 COAXIAL 1-2 jackets
OPT 1-2 OPTICAL 1-2 jacks
LINE 1-3 LINE 1-3 jacks
PHONO PHONOjacks
TUNER FM/AMtuner
CD CD jacks
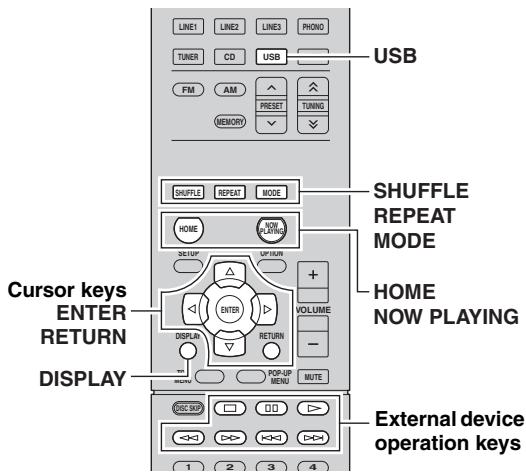
USB USB jack
NET NETWORK jack (press repeatedly to select a desired network source)
⑧ Radio keys
Operate the FM/AM radio (p.17).
FM Switches to FM radio.
AM Switches to AM radio.
MEMORY Registers FM/AM radio stations as presets.
PRESET Select a preset station.
TUNING Select the radio frequency.
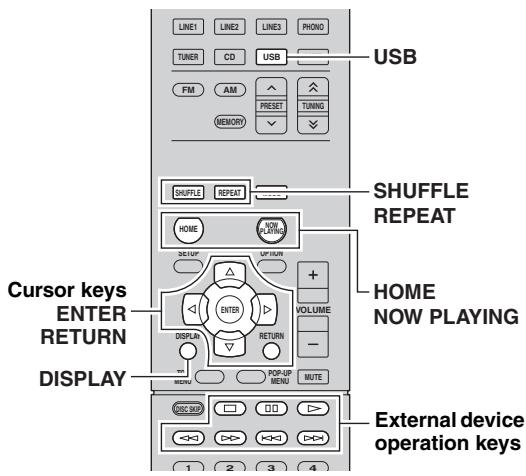
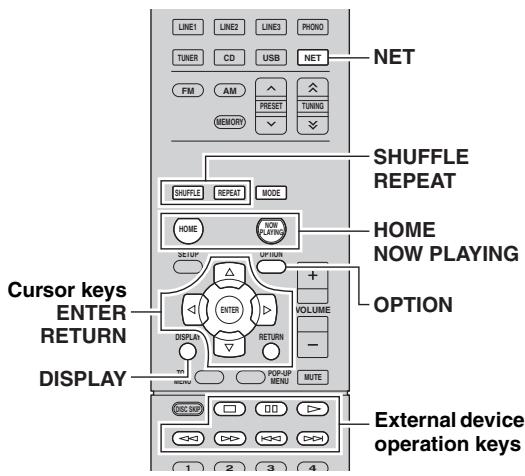
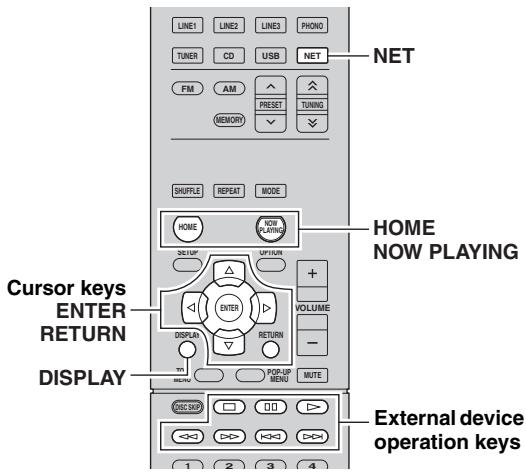
Contents operation keys
SHUFFLE Switches shuffle modes.
REPEAT Switches repeat modes.
HOME Shows top-level menu in the front display.
NOW PLAYING Shows the playback information in the front display.
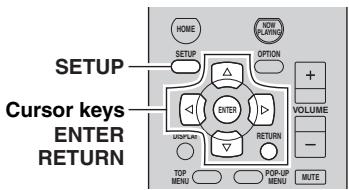
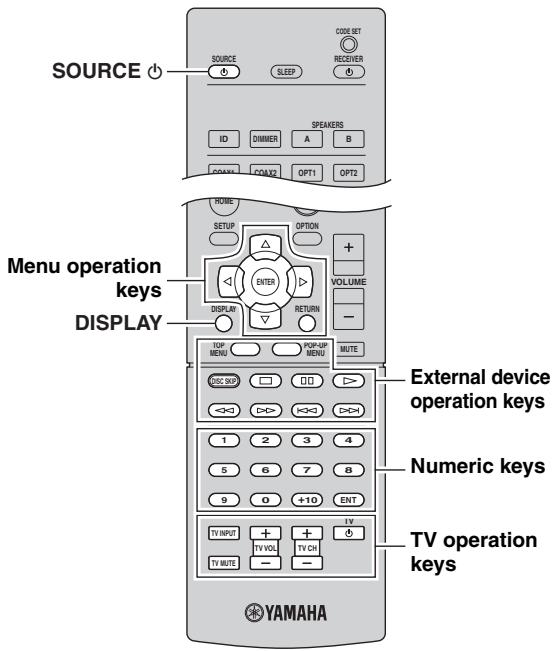
⑩ SETUP
Displays the "SETUP" menu (p.31).
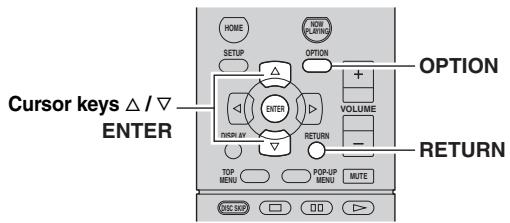
11 Menu operation keys
Cursor keys Select a menu or a parameter.
ENTER Confirms a selected item.
RETURN Returns to the previous state.
DISPLAY Switches information shown in the front display.
12 External device operation keys
Let you play back and select menus and perform other operations for external devices (p.37).
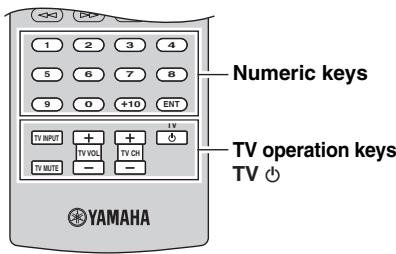
13 Numeric keys
Let you enter numerical values, such as radio frequencies.
14 TV operation keys
Let you select TV input and volume, and perform other TV operations (p.36).
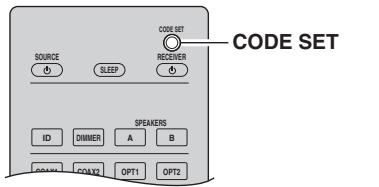
15 CODE SET
Registers remote control codes of external devices on the remote control (p.36).
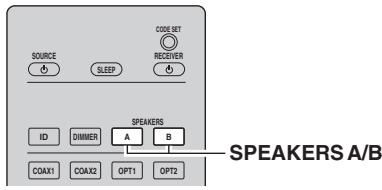
16 SPEAKERS A/B
Turns on and off the set of speakers connected to the SPEAKERS A and/or SPEAKERS B terminals on the rear panel of this unit when the corresponding key is pressed.
17 MODE
Switches between "Stereo" and "Mono" for FM radio reception (p.17).
Switches the iPod operation modes (p.22).
18 OPTION
Displays the "OPTION" menu (p.30).
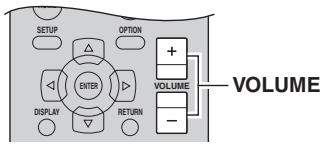
VOLUME keys
Adjust the volume.
MUTE
Mutes the audio output.
To operate external devices with the remote control, register a remote control code for each device before using (p.36).
Using the remote controls
■ Installing batteries
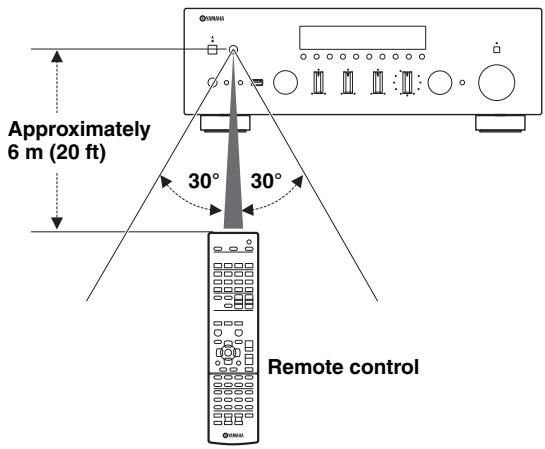
Operation range
The remote controls transmit a directional infrared beam. Be sure to aim the remote controls directly at the remote control sensor on the front panel of this unit.
Connections
Connecting speakers and source components
CAUTION
- Do not connect this unit or other components to the main power until all connections between components are complete.
- All connections must be correct: L (left) to L, R (right) to R, “+” to “+” and “-” to “-”. If the connections are faulty, no sound will be heard from the speakers, and if the polarity of the speaker connections is incorrect, the sound will be unnatural and lack bass. Refer to the owner's manual for each of your components.
- Do not let bare speaker wires touch each other or any metal part of this unit. This could damage this unit and/or the speakers.
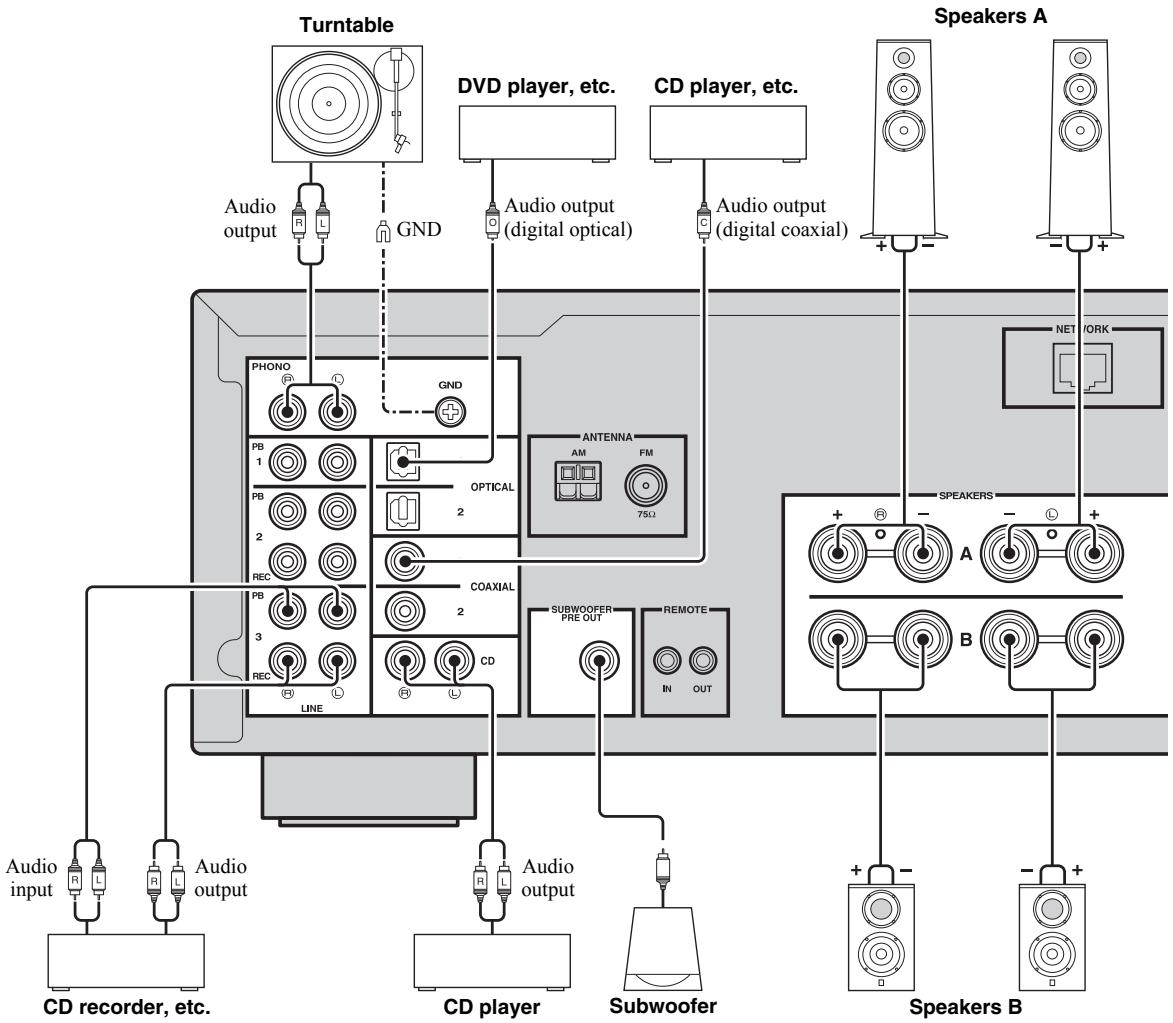

- The PHONO jacks are designed for connecting a turntable with an MM cartridge.
- Connect your turntable to the GND terminal to reduce noise in the signal. However, for some turntables, you may hear less noise without the GND connection.
Connecting recording devices
You can connect audio recording devices to the LINE 2-3 (REC) jacks. This jack output analog audio signals selected as the input.
Notes
- Be sure to use the LINE 2-3 (REC) jacks only for connecting recording devices.
- If you select LINE2 as the input source, the audio output of the LINE 2 (REC) jacks will be muted. If you select LINE3 as the input source, the audio output of the LINE 3 (REC) jacks will be muted.
Connecting the speakers
Setting the speaker impedance
Under its default settings, the unit is configured for 8-ohm speakers. When connecting 4 to 6-ohm speakers, set the speaker impedance to "4 Ω MIN".
1 Before connecting speakers, connect the power cable to an AC wall outlet.
2 While holding down RETURN on the front panel, press (power).
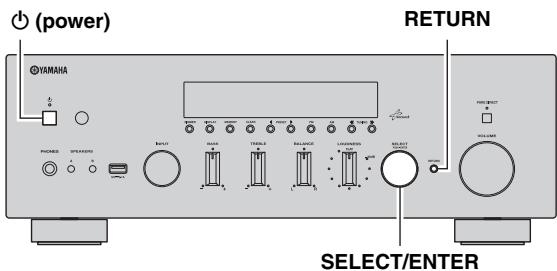
3 Check that "SP IMP." is displayed on the front display.
SP IMP. 80MIN
4 Press SELECT/ENTER to select "4Ω MIN".
5 Press (power) to set the unit to turn off and remove the power cable from the AC wall outlet.
You are now ready to connect the speakers.
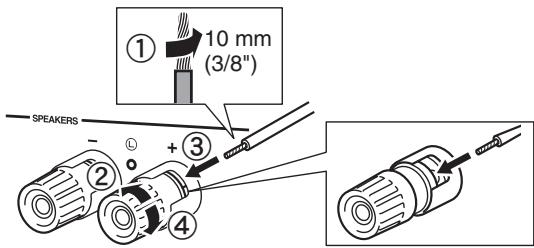
Connecting speaker cables
Speaker cables have two wires. One is for connecting the negative (-) terminal of the unit and the speaker, and the other is for the positive (+) terminal. If the wires are colored to prevent confusion, connect the black wire to the negative and the other wire to the positive terminal.
① Remove approximately 10mm (3/8^ ) of insulation from the ends of the speaker cable and twist the bare wires of the cable firmly together.
② Loosen the speaker terminal.
③ Insert the bare wires of the cable into the gap on the side (upper right or bottom left) of the terminal.
④ Tighten the terminal.
Bi-wire connection
Bi-wire connection separates the woofer from the combined midrange and tweeter section. A bi-wire
compatible speaker has four binding post terminals. These two sets of terminals allow the speaker to be split into two independent sections. With these connections, the mid and high frequency drivers are connected to one set of terminals and the low frequency driver to another set of terminals.
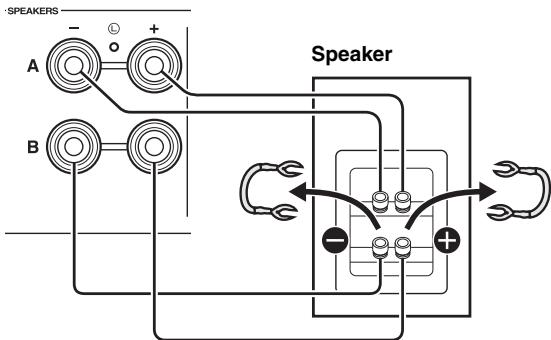
This unit
Connect the other speaker to the other set of terminals in the same way.
Note
When making bi-wire connections, remove the shorting bridges or cables on the speaker.

To use the bi-wire connections, press SPEAKERS A and SPEAKERS B on the front panel or on the remote control so that both SP A and B light up on the front display.
SPEAKERS A/B
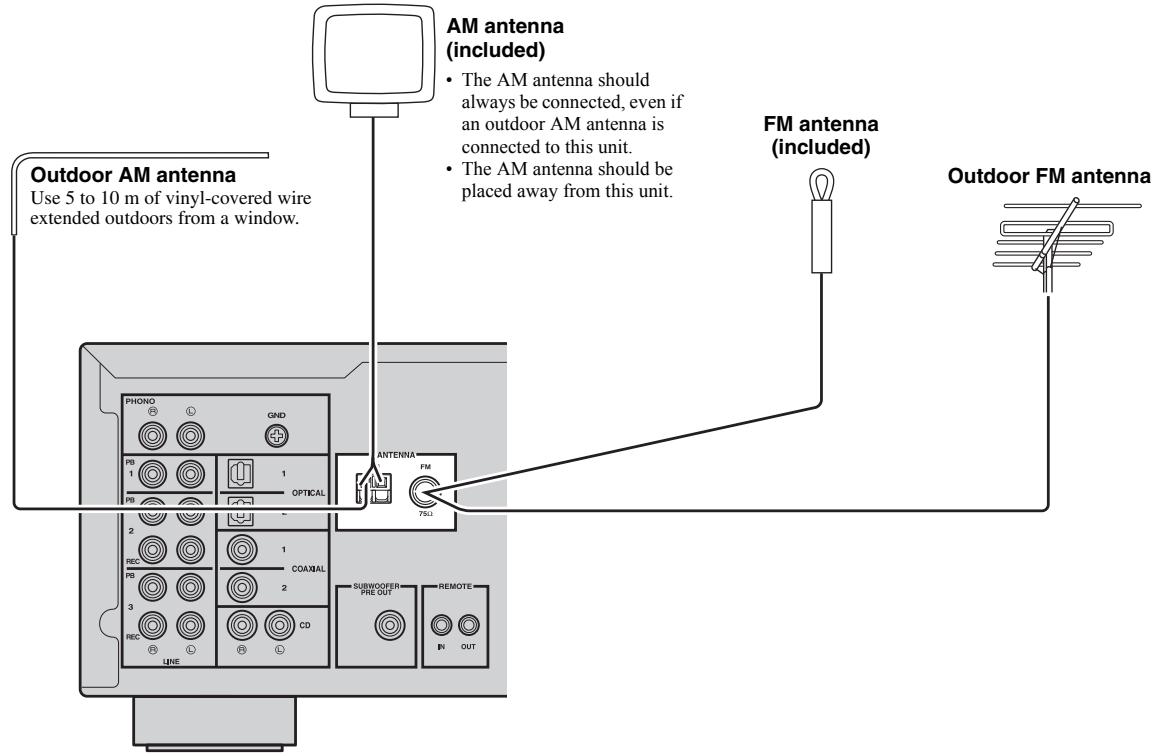
Connecting the FM and AM antennas
The antennas for receiving FM and AM broadcasts are included with this unit. In general, these antennas should provide sufficient signal strength. Connect each antenna correctly to the designated terminals.
Note
If you experience poor reception quality, install an outdoor antenna. Consult the nearest authorized Yamaha dealer or service center about outdoor antennas.
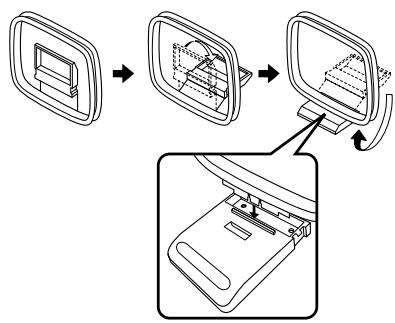
Assembling the supplied AM antenna
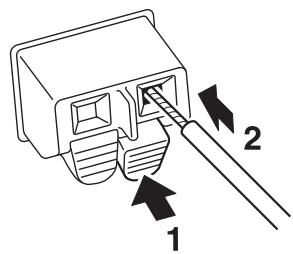
Connecting the wires of the AM antenna
Connecting to a network
You can enjoy Internet radio or music files stored on media servers, such as PCs and Network Attached Storage (NAS), on the unit.
Connect the unit to your router with a commercially-available STP network cable (CAT-5 or higher straight cable).
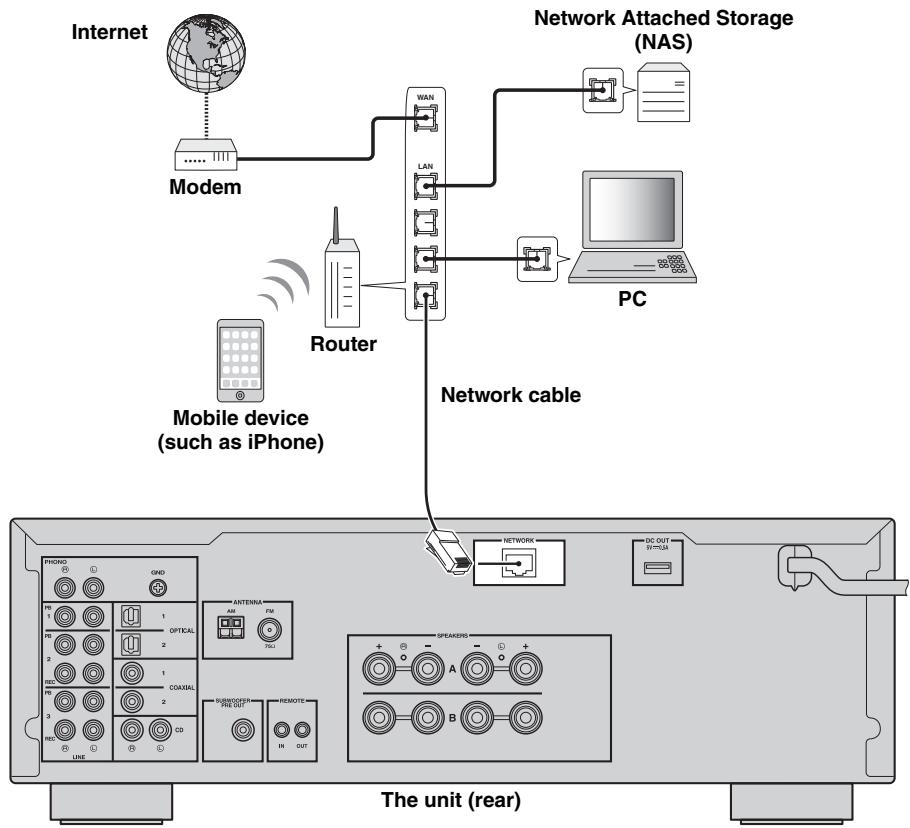
#
- If you are using a router that supports DHCP, you do not need to configure any network settings for the unit, as the network parameters (such as the IP address) will be assigned automatically to it. You only need to configure the network settings if your router does not support DHCP or if you want to configure the network parameters manually (p.32).
- You can check whether the network parameters (such as IP address) are properly assigned to the unit in "Information" (p.32) in the "SETUP" menu.
Notes
- Some security software installed on your PC or the firewall settings of network devices (such as a router) may block the access of the unit to the network devices or the Internet. In these cases, configure the security software or firewall settings appropriately.
Each server must be connected to the same subnet as the unit. - To use the service via the Internet, broadband connection is strongly recommended.
Connecting power cable
After all the connections are complete, plug in the power cable.
Playback
CAUTION
Extreme caution should be exercised when you play back CDs encoded in DTS.
If you play back a CD encoded in DTS on a CD player that does not support DTS, only noise will be heard, and this noise may damage your speakers. Check whether your CD player supports CDs encoded in DTS. Also, check the sound output level of your CD player before you play back a CD encoded in DTS.
Playing a source
(power)
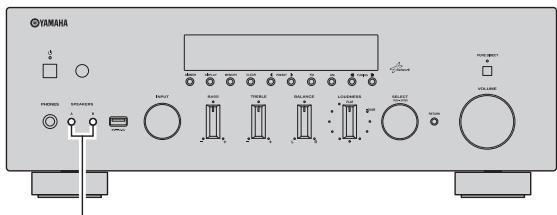
SPEAKERS A/B
INPUT selector
VOLUME
1 Press (power) on the front panel (or RECEIVER on the remote control) to turn on this unit.
2 Rotate the INPUT selector on the front panel (or press one of the input selection keys on the remote control) to select the input source you want to listen to.
3 Press SPEAKERS A and/or SPEAKERS B on the front panel or on the remote control to select speakers A and/or speakers B.
When speaker set A or speaker set B are turned on, SP A or SP B is displayed on the front display accordingly (p.6).
Notes
- When one set of speakers is connected using bi-wire connections, or when using two sets of speakers simultaneously (A and B), make sure SP A and SP B are displayed on the front display.
- When listening with headphones, turn off the speakers.
4 Play the source.
5 Rotate the VOLUME control on the front panel (or press VOLUME + / - on the remote control) to adjust the sound output level.

You can adjust the tonal quality by using the BASS, TREBLE, BALANCE and LOUDNESS controls or the PURE DIRECT switch on the front panel.
6 Press (power) on the front panel again (or RECEIVER on the remote control) to finish using this unit and set it to standby mode.
Using the PURE DIRECT switch
Routes input signals from your audio sources so that the input signals bypass the BASS, TREBLE, BALANCE and LOUDNESS controls, thus eliminating any alterations to the audio signals and creating the purest possible sound. The PURE DIRECT indicator lights up and the front display turns off after a few seconds.
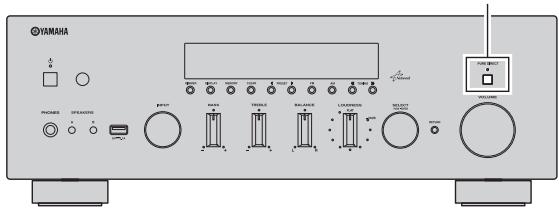
PURE DIRECT switch
Notes
- The BASS, TREBLE, BALANCE, and LOUDNESS controls do not function while the PURE DIRECT feature is turned on.
- This setting is retained even if you turn off this unit.
Adjusting the BASS and TREBLE controls
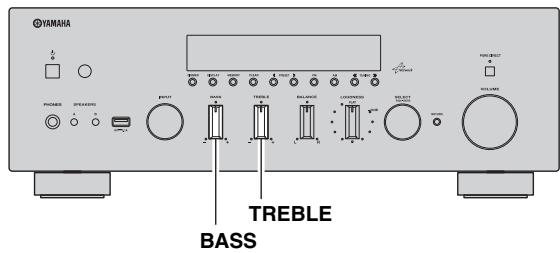
The BASS and TREBLE controls adjust high and low frequency response.
The center position produces a flat response.
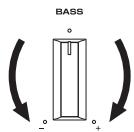
BASS
When you feel there is not enough bass (low frequency sound), rotate clockwise to boost. When you feel there is too much bass, rotate counterclockwise to suppress.
Control range: -10dB to +10dB (20 Hz)
TREBLE
When you feel there is not enough treble (high frequency sound), rotate clockwise to boost. When you feel there is too much treble, rotate counterclockwise to suppress.
Control range: -10dB to +10dB (20 kHz)
Adjusting the BALANCE control
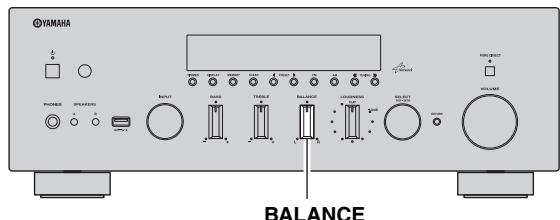
The BALANCE control adjusts the sound output balance of the left and right speakers to compensate for sound imbalance caused by speaker locations or listening room conditions.
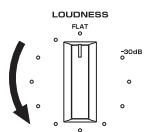
Adjusting the LOUDNESS control
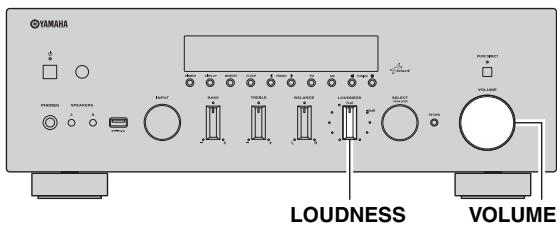
Retain a full tonal range at any volume level, thus compensating for the human ears' loss of sensitivity to high and low-frequency ranges at low volume.
CAUTION
If the PURE DIRECT switch is turned on with the LOUDNESS control set at a certain level, the input signals bypass the LOUDNESS control, resulting in a sudden increase in the sound output level. To prevent your ears or the speakers from being damaged, be sure to press the PURE DIRECT switch after lowering the sound output level or after checking that the LOUDNESS control is properly set.
1 Set the LOUDNESS control to the FLAT position.
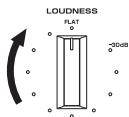
2 Rotate the VOLUME control on the front panel (or press VOLUME + / - on the remote control) to set the sound output level to the loudest listening level that you would listen to.
3 Rotate the LOUDNESS control until the desired volume is obtained.
#
After setting the LOUDNESS control, enjoy listening to music at your preferred volume level. If the effect of the LOUDNESS control setting is too strong or weak, readjust the LOUDNESS control.
Using the sleep timer
Use this feature to automatically set this unit to standby mode after a certain amount of time. The sleep timer is useful when you are going to sleep while this unit is playing or recording a source.
Note
The sleep timer can only be set with the remote control.
1 Press SLEEP repeatedly to set the amount of time before this unit is set to standby mode.
Each time you press SLEEP, the front display changes as shown below.

The SLEEP indicator blinks while setting the amount of time for the sleep timer.

If the sleep timer is set, the SLEEP indicator on the front display lights up.

- To disable the sleep timer, select "Sleep Off".
- The sleep timer setting can also be canceled by pressing RECEIVER on the remote control to set this unit to standby mode.
Listening to FM/AM radio
FM/AM tuning
1 Press TUNER to select TUNER as the input source.
2 Press FM or AM to select the reception band (FM or AM).
3 Press and hold TUNING 公 / 公 for more than 1 second to begin tuning.
Press to tune in to a higher frequency.
Press to tune in to a lower frequency.
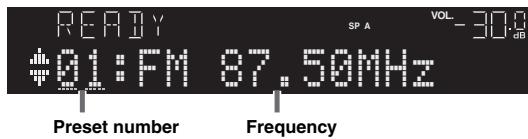
The frequency of the received station is shown in the front display.
If a broadcast is being received, "TUNED" indicator on the front display will be lit. If a stereo broadcast is being received, the "STEREO" indicator will also lit.

If the tuning search does not stop at the desired station because the station signals are weak, use the following keys to set a frequency.
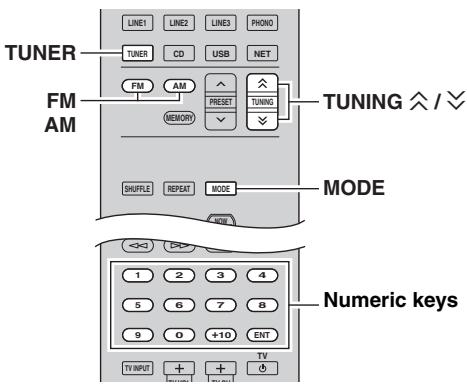
TUNINGX/
Increase/decrease the frequency.
Numeric keys:
Enter a frequency directly. For example, to select
98.50 MHz, press "9", "8", "5" and "0" (or ENT).
Notes
-
When you press the numeric keys on the remote control during preset tuning, a preset number is selected. Set the tuning mode to frequency tuning mode using TUNING / before pressing the numeric keys.
-
"Wrong Station!" is displayed on the front display if you enter a frequency that is out of receivable range. Make sure that the entered frequency is correct.
中
When the signal reception for an FM radio station is unstable, switching to monaural may improve it.
Improving FM reception
If the signal from the station is weak and the sound quality is not good, set the FM band reception mode to monaural mode to improve reception.
1 Press MODE repeatedly to select "Stereo" (automatic stereo mode) or "Mono" (monaural mode) when this unit is tuned in to an FM radio station.
When Mono is selected, FM broadcasts will be heard in monaural sound.
Note
The STEREO indicator on the front panel lights up while listening to a station in stereo.
Automatic preset tuning (FM stations only)
You can use the automatic preset tuning function to automatically register FM stations as presets. This function enables this unit to automatically tune in to FM stations that have a strong signal and store up to 40 of those stations in order. You can then easily recall any preset station by selecting its preset number.
Notes
- If a station is registered to a preset number that already has a station registered to it, the previously registered station is overwritten.
- If the station you want to store is weak in signal strength, try using the manual preset tuning method.

- FM stations registered as presets using the automatic preset registration feature will be heard in stereo.
- Only Radio Data System broadcasting stations are stored automatically by the Auto Preset function.
1 Press TUNER to select TUNER as the input source.
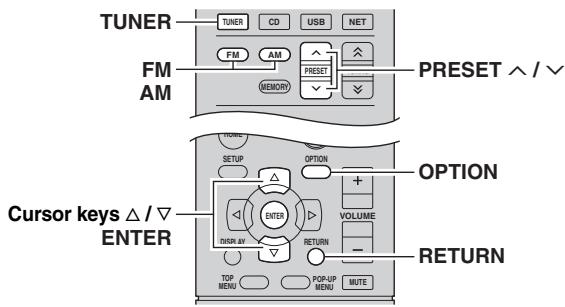
2 Press OPTION on the remote control. The "OPTION" menu is displayed (p.30).
3 Press / to select "Auto Preset", and then press ENTER.

This unit starts scanning the FM band about 5 seconds later from the lowest frequency upwards. To begin scanning immediately, hold down the ENTER key.

- Before scanning begins, you can specify the first preset number to be used by pressing PRESET / or cursor key ( / ) on the remote control.
- To cancel scanning, press FM, AM or RETURN.
When scanning is complete, "FINISH" is displayed and then the display returns to original state.
Manual tuning preset
You can manually register up to 40 FM/AM stations (40 total). You can then easily recall any preset station by selecting its preset number.
Registering a radio station manually
Select a radio station manually and register it to a preset number.
1 Follow "FM/AM tuning" (p.17) to tune into the desired radio station.
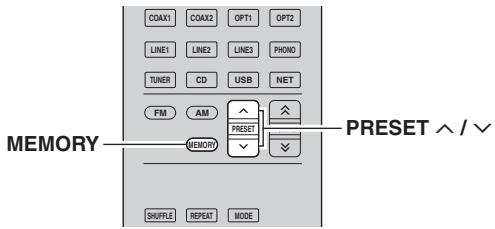
2 Hold down MEMORY for more than 2 seconds.
The first time that you do register a station, the selected radio station will be registered to the preset number "01". Thereafter, each radio station you select will be registered to the next empty (unused) preset number after the most recently registered number.


To select a preset number for registering, press MEMORY once after tuning into the desired radio station, press PRESET / to select a preset number, and then press MEMORY again.

Recalling a preset station
You can recall preset stations that were registered using automatic station preset or manual station preset.
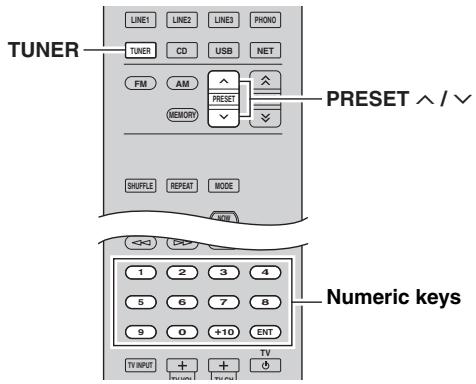
1 Press TUNER to select "TUNER" as the input source.
2 Press PRESET / to select a preset number.
#
- Preset numbers to which no stations are registered are skipped.
- "No Presets" is displayed if no stations are registered.
- You can directly select a preset number by pressing the numeric keys on the remote control while recalling a preset station. "Empty" is displayed on the display if you enter a preset number to which no station is registered. "Wrong Num." is displayed if you enter an invalid number.
- When you press the numeric keys on the remote control during normal tuning, a frequency is entered. Set the tuning mode to preset tuning mode using PRESET / before pressing numeric keys.
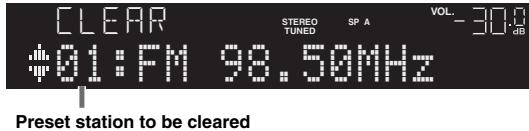
Clearing a preset station
Clear radio stations registered to the preset numbers.
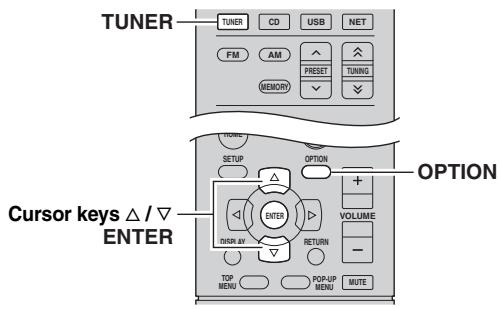
1 Press TUNER to select "TUNER" as the input source.
2 Press OPTION.
3 Use the cursor keys to select "Clear Preset" and press ENTER.

4 Use the cursor keys ( / ) to select a preset station to be cleared and press ENTER.
If the preset station is cleared, "Cleared" appears and then the next in-use preset number is displayed.

5 Repeat step 4 until all desired preset stations are cleared.
6 To exit from the menu, press OPTION.
中
You can clear a preset station from the front panel.
① Press CLEAR on the front panel.
② Rotate SELECT/ENTER to select the preset station that you want to clear.
③ Press SELECT/ENTER or CLEAR to clear the preset station.
Radio Data System tuning
Radio Data System is a data transmission system used by FM stations in many countries. The unit can receive various types of Radio Data System data, such as "Program Service", "Program Type," "Radio Text" and "Clock Time", when it is tuned into a Radio Data System broadcasting station.
Displaying the Radio Data System information
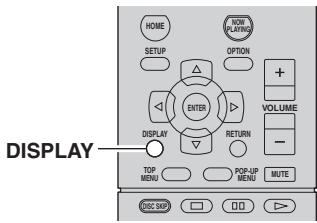
1 Tune into the desired Radio Data System broadcasting station.

We recommend using "Auto Preset" to tune into the Radio Data System broadcasting stations (p.18).
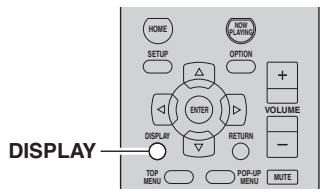
2 Press DISPLAY.
Each time you press the key, the displayed item changes.

About 3 seconds later, the corresponding information for the displayed item appears.

| Program Service | Program service name |
| Program Type | Current program type |
| Radio Text | Information on the current program |
| Clock Time | Current time |
| Frequency | Frequency |
Note
"Program Service", "Program Type", "Radio Text", and "Clock Time" are not displayed if the radio station does not provide the Radio Data System service.
Receiving traffic information automatically
When "TUNER" is selected as the input source, the unit automatically receives traffic information. To enable this function, follow the procedure below to set the traffic information station.
1 When "TUNER" is selected as the input source, press OPTION.
2 Use the cursor keys to select "TrafficProgram" and press ENTER.
The traffic information station search will start in 5 seconds. Press ENTER again to start the search immediately.

- To search upward/downward from the current frequency, press the cursor keys (/) while "READY" is displayed.
- To cancel the search, press RETURN.
- Texts in parentheses denote indicators on the front display.
The following screen appears for about 3 seconds when the search finishes.

Note
"TP Not Found" appears for about 3 seconds when no traffic information stations are found.
Playing back iPod music
You can play back iPod music on the unit using a USB cable supplied with the iPod.
Note
An iPod may not be detected by the unit or some features may not be compatible, depending on the model or software version of the iPod.
Made for
- iPod touch (1st, 2nd, 3rd, 4th and 5th generation)
- iPod nano (2nd, 3rd, 4th, 5th, 6th and 7th generation)
- iPhone 5, iPhone 4S, iPhone 4, iPhone 3GS, iPhone 3G, iPhone
- iPad (4th generation), iPad mini, iPad (3rd generation),
iPad 2, iPad
(as of August 2013)
Connecting an iPod
Connect your iPod to the unit with the USB cable supplied with the iPod.
1 Connect the USB cable to the iPod.
2 Connect the USB cable to the USB jack.
The unit (front)


The iPod charges while it is connected to the unit. If you set the unit to standby mode while the iPod is charging, the iPod continues to charge up to 4 hours.
If "NET Standby" (p.32) in the "SETUP" menu is set to "On", it continues to change without limit.
Note
Disconnect the iPod from the USB jack when it is not in use.
Playback of iPod content
Follow the procedure below to operate the iPod contents and start playback.
Note
“” (underscore) will be displayed for characters not supported by the unit.
1 Press USB to select "USB" as the input source.

2 Use the cursor keys to select an item and press ENTER.
If a song is selected, playback starts and the playback information is displayed.


- To return to the previous state, press RETURN.
- If you press the DISPLAY repeatedly, you can switch the playback information on the front display (p.29).
- To operate the iPod manually to select content or control playback, switch to the simple play mode (p.22).
Use the following remote control keys to control playback.
| External device operation keys | Function |
| ▷ | Resumes playback from pause. |
| □ | Stops playback. |
| ||| | Stops playback temporarily. |
| |←| | Skipping/backward. |
| |→| | |
| <|> | Searches forward/backward (by holding down). |
| |▷| | |
| HOME | Displays the top menu of the iPod. |
| NOW PLAYING | Displays information about the song that's playing. |
Operating the iPod itself or remote control (simple play)
1 Press MODE to switch to the simple play mode.
Between the simple play mode, only the input name is displayed on the front display. If you confirm the playback information, see the iPod screen.

If you want to exit the simple play mode, press MODE again.
2 Operate your iPod itself or the remote control to start playback.
| Operational remote control keys | Function | |
| Cursor keys | Select an item. | |
| ENTER | Confirms the selection. | |
| RETURN | Returns to the previous state. | |
| External device operation keys | ▷ | Starts playback or stops playback temporarily. |
| □ | ||
| □ | Stops playback. | |
| ←□ | Skips forward/backward. | |
| →□ | ||
| ←□ | Searches forward/backward (while holding down). | |
| →□ | ||
Repeat/shuffle settings
You can configure the repeat/shuffle settings of your iPod.
1 If the input source is "USB," press REPEAT or SHUFFLE repeatedly to select the playback method.
| Item | Setting | Function |
| Repeat | Off | Turns off the repeat function. |
| One | Plays back the current song repeatedly. | |
| All | Plays back all songs repeatedly. | |
| Shuffle | Off | Turns off the shuffle function. |
| Songs | Plays back songs in random order. | |
| Albums | Plays back albums in random order. |

- Repeat/shuffle can also be specified in the "OPTION" menu (p.30).
- The operation or display of repeat/shuffle may differ, depending on the type or software version of iPod used.
Playing back music stored on a USB storage device
You can play back music files stored on a USB storage device on the unit. Refer to the instruction manuals for the USB storage device for more information.
The unit supports USB mass storage class devices (FAT16 or FAT32 format).
Notes
- The unit supports WAV (PCM format only), MP3, WMA, MPEG-4 AAC and FLAC files (1- or 2-channel audio only).
- The unit is compatible with sampling rate of up to 192kHz for WAV and FLAC files, and 48kHz for other files.
- Some features may not be compatible, depending on the model or manufacturer of the USB storage device.
- Digital Rights Management (DRM) contents cannot be played back.
Connecting a USB storage device
1 Connect the USB storage device to the USB jack.
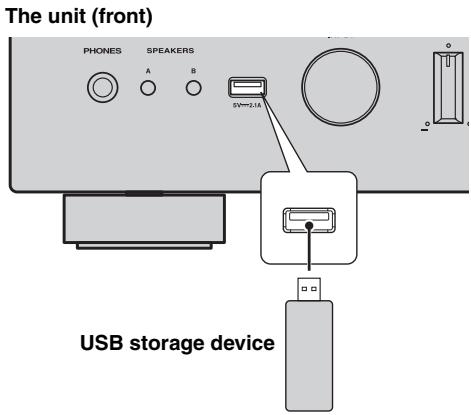

中
If the USB storage device contains many files, it may take time to load the them. In this case, "Loading..." appears in the front display.
Notes
- Disconnect the USB storage device from the USB jack when it is not in use.
- Stop playback of the USB storage device before disconnect it from the USB jack.
- You cannot connect the PC to the USB jack of the unit.
Playback of USB storage device contents
Follow the procedure below to operate the USB storage device contents and start playback.
Note
“” (underscore) will be displayed for characters not supported by the unit.
1 Press USB to select "USB" as the input source.

2 Use the cursor keys to select an item and press ENTER.
If a song is selected, playback starts and the playback information is displayed.

#
- To return to the previous state, press RETURN.
- If you press the DISPLAY repeatedly, you can switch the playback information on the front display (p.29).
- If you select a file that is not supported by this unit, it appears at top of the file name.
Use the following remote control keys to control playback.
| External device operation keys | Function |
| ▷ | Resumes playback from pause. |
| □ | Stops playback. |
| ||| | Stops playback temporarily. |
| |←| | Skips forward/backward. |
| |→| | |
| HOME | Displays the top menu of the USB device. |
| NOW PLAYING | Displays information about the song that's playing. |
Repeat/shuffle settings
You can configure the repeat/shuffle settings for playback of USB storage device contents.
1 If the input source is "USB," press REPEAT or SHUFFLE repeatedly to select the playback method.
| Item | Setting | Function |
| Repeat | Off | Turns off the repeat function. |
| One | Plays back the current song repeatedly. | |
| All | Plays back all songs in the current album (folder) repeatedly. | |
| Shuffle | Off | Turns off the shuffle function. |
| On | Plays back songs in the current album (folder) in random order. |
中
Repeat/shuffle can also be specified in the "OPTION" menu (p.30).
Playing back music stored on media servers (PCs/NAS)
You can play back music files stored on your PC or DLNA-compatible NAS on the unit.
Notes
- To use this function, the unit and your PC must be connected to the same router (p.13). You can check whether the network parameters (such as the IP address) are properly assigned to the unit in "Information" (p.32) in the "SETUP" menu.
- The unit supports playback of WAV (PCM format only), MP3, WMA, MPEG-4 AAC and FLAC files.
- The unit is compatible with sampling rates of up to 192kHz for WAV and FLAC files, and 48kHz for other files.
- To play back FLAC files, you need to install server software that supports sharing of FLAC files via DLNA on your PC or use a NAS that supports FLAC files.
Setting the media sharing of music files
To play back music files in your computer with this unit, you need to make the media sharing setting between the unit and computer (Windows Media Player 11 or later). In here, setting with Windows Media Player in Windows 7 is taken as an example.
1 Start Windows Media Player 12 on your PC.
2 Select "Stream", then "Turn on media streaming."
The control panel window of your PC is shown.
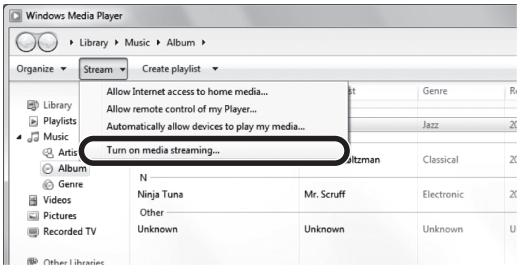
(Example of English version)
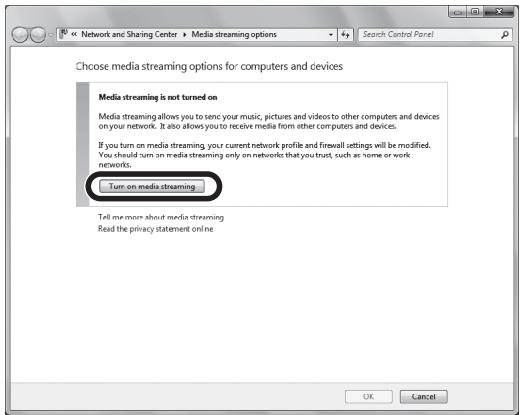
3 Click "Turn on media streaming."
4 Select "Allowed" from the drop-down list next to "R-N500".
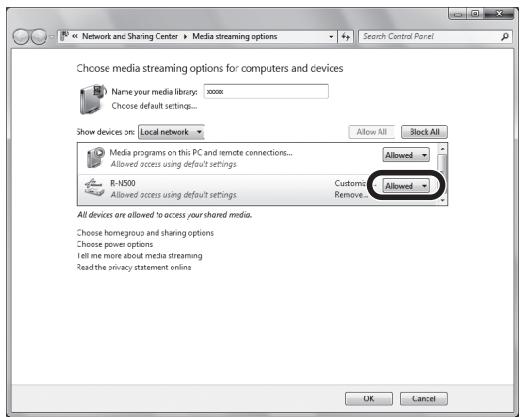
5 Click "OK" to exit.

For details on media sharing settings, refer to Windows Media Player help.
- For Windows Media Player 11
① Start the Windows Media Player 11 on your PC.
② Select "Library" then "Media Sharing".
③ Check the "Share my media to" box, select the "R-N500" icon, and click "Allow".
④ Click "OK" to exit.
- For a PC or a NAS with other DLNA server software installed
Refer to the user's manual of your device or software and configure the media sharing settings.
Playback of PC music contents
Follow the procedure below to operate the PC music contents and start playback.
Note
“_” (underscore) will be displayed for characters not supported by the unit.
1 Press NET repeatedly to select "SERVER" as the input source.

#
If playback of a music file selected from the unit is ongoing on your PC, the playback information is displayed.
2 Use the cursor keys ( / ) to select a music server and press ENTER.
3 Use the cursor keys to select an item and press ENTER.
If a song is selected, playback starts and the playback information is displayed.

中
- To return to the previous state, press RETURN.
- If you press the DISPLAY repeatedly, you can switch the playback information on the front display (p.29).
- If you select a file that is not supported by this unit, it appears at top of the file name.
Use the following remote control keys to control playback.
| External device operation keys | Function |
| ▷ | Resumes playback from pause. |
| □ | Stops playback. |
| ||| | Stops playback temporarily. |
| |←| | Skips forward/backward. |
| |→| | |
| HOME | Displays the root directory of the music server. |
| NOW PLAYING | Displays information about the song that's playing. |
#
You can also use a DLNA-compatible Digital Media Controller (DMC) to control playback. For details, see "DMC Control" (p.32).
Repeat/shuffle settings
You can configure the repeat/shuffle settings for the playback of PC music content.
1 When the input source is "SERVER," press REPEAT or SHUFFLE repeatedly to select the playback method.
| Item | Setting | Function |
| Repeat | Off | Turns off the repeat function. |
| One | Plays back the current song repeatedly. | |
| All | Plays back all songs in the current album (folder) repeatedly. | |
| Shuffle | Off | Turns off the shuffle function. |
| On | Plays back songs in the current album (folder) in random order. |
#
Repeat/shuffle can also be specified in the "OPTION" menu (p.30).
Listening to Internet radio
You can listen to Internet radio stations from all over the world.
Notes
- To use this function, the unit must be connected to the Internet (p.13). You can check whether the network parameters (such as the IP address) are properly assigned to the unit in "Information" (p.32) in the "SETUP" menu.
- You may not be able to receive some Internet radio stations.
- The unit uses the vTuner Internet radio station database service.
- This service may be discontinued without notice.
1 Press NET repeatedly to select "NET RADIO" as the input source.
The station list appears on the front display.

2 Use the cursor keys to select an item and press ENTER.
If an Internet radio station is selected, playback starts and the playback information is displayed.

If you want to display the station list during playback, press HOME. To return the playback information, press NOW PLAYING.
#
- To return to the previous state, press RETURN.
- If you press the DISPLAY repeatedly, you can switch the playback information on the front display (p.29).
-
By accessing the following website from your computer's web browser, you can register your favorite Internet radio stations in the Bookmarks folder.
-
Before you register an Internet radio station, play back any Internet radio station on this unit.
- To create the account that is required for registration, you'll need the vTuner ID of this unit (the MAC address of this unit) and an email address. You can confirm the vTuner ID of this unit in "Information" of the "Network Setup (SETUP menu)" (p.32).
http://yradio.vtuner.com/
- Use the external device operation key (□) to stop playback.
- Some information may not be available depending on the station.
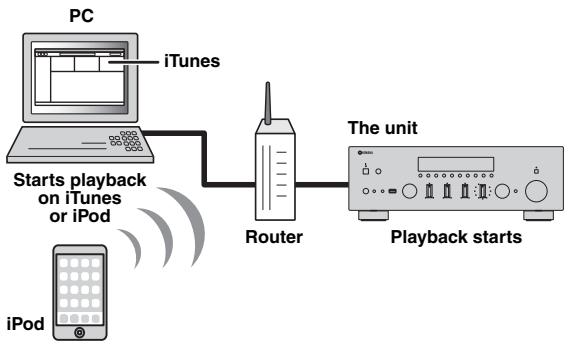
Playing back iTunes/iPod music via a network (AirPlay)
The AirPlay function allows you to play back iTunes/iPod music on the unit via network.
Note
To use this function, the unit and your PC or iPod must be connected to the same router (p.13). You can check whether the network parameters (such as the IP address) are properly assigned to the unit in "Information" (p.32) in the "SETUP" menu.
AirPlay works with iPhone, iPad, and iPod touch with iOS 4.3.3 or later, Mac with OS X Mountain Lion, and Mac and PC with iTunes 10.2.2 or later. (as of August 2013)
Playback of iTunes/iPod music contents
Follow the procedure below to play back iTunes/iPod music contents on the unit.
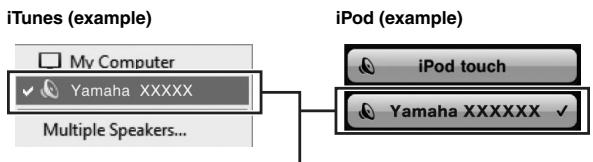
1 Turn on the unit, and start iTunes on the PC or display the playback screen on the iPod.
If the iTunes/iPod recognizes the unit, the AirPlay icon ( ) appears.

iTunes (example)

iPod (example)
Note
If the icon does not appear, check whether the unit and PC/iPod are connected to the router properly.
2 On the iTunes/iPod, click (tap) the AirPlay icon and select the unit (network name of the unit) as the audio output device.
Network name of the unit
3 Select a song and start playback.
The unit automatically selects "AirPlay" as the input source and starts playback. The playback information is displayed on the front display.
#
- If you press the DISPLAY repeatedly, you can switch the playback information on the front display (p.29).
- You can turn on the unit automatically when starting playback on iTunes or iPod by setting "NET Standby" (p.32) in the "SETUP" menu to "On".
- You can edit the network name (the unit's name on the network) displayed on iTunes/iPod in "Network Name" (p.33) in the "SETUP" menu.
- If you select the other input source on the unit during playback, playback on the iTunes/iPod stops automatically.
- You can adjust the unit's volume from the iTunes/iPod during playback. To disable volume controls from iTunes/iPod, set "Vol.Interlock" (p.30) in the "OPTION" menu to "Off".
Caution
- When you use iTunes/iPod controls to adjust volume, the volume may be unexpectedly loud. This could result in damage to the unit or speakers. If the volume suddenly increases during playback, stop playback on the iTunes/iPod immediately.
Use the following remote control keys to control playback.
| External device operation keys | ▷ | Resumes playback from pause. |
| □ | Stops playback. | |
| □□ | Stops playback temporarily. | |
| ↔□ | Skipping forward/backward. | |
| ↔□□ | ||
| Repeat | Changes the Repeat settings | |
| Shuffle | Changes the Shuffle settings | |
Note
To control iTunes playback with the remote control of the unit, you need to configure the iTunes preferences to enable iTunes control from remote speakers in advance.
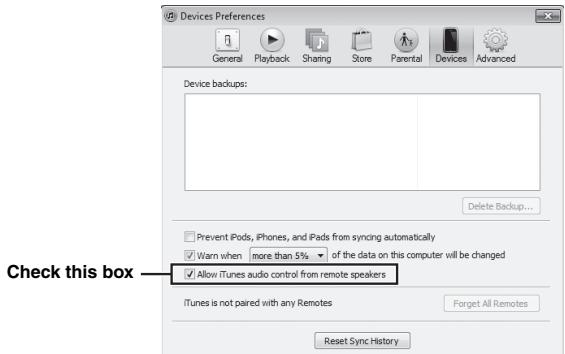
iTunes (example of English version)
Switching information on the front display
When you select USB or a network source as the input source, you can switch playback information on the front display.
1 Press DISPLAY.
Each time you press the key, the displayed item changes.
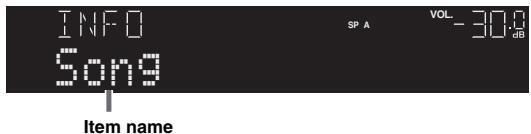
About 3 seconds later, the corresponding information for the displayed item appears.

| Input source | Item |
| USB (iPod) | Song (song title), Artist (artist name), |
| SERVER | Album (album name), Time |
| AirPlay | |
| NET RADIO | Song (song title), Album (album name), |
| Station (station name), Time |
Configuring playback settings for different playback sources
(OPTION menu)
You can configure separate playback settings for different playback sources. This menu allows you to easily configure settings during playback.
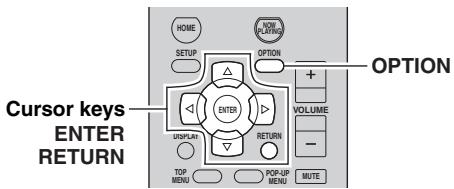
1 Press OPTION.

2 Use the cursor keys to select an item and press ENTER.

To return to the previous state during menu operations, press RETURN.
3 Use the cursor keys ( / ) to select a setting.
4 To exit from the menu, press OPTION.
OPTION menu items

Available items vary depending on the selected input source.
| Item | Function | Page |
| Volume Trim | Corrects volume differences between input sources. | 30 |
| Signal Info | Displays information about the audio signal. | 30 |
| Auto Preset | Automatically registers FM radio stations with strong signals as presets. | 18 |
| Clear Preset | Clear radio stations registered to preset numbers. | 19 |
| TrafficProgram | Automatically searches for a traffic information station. | 20 |
| Repeat | Configs the repeat setting for the iPod, USB storage device, or media server. | 22, 24, 26 |
| Shuffle | Configs the shuffle setting for the iPod, USB storage device, or media server. | 22, 24, 26 |
| Vol.Interlock | Enables/disables volume controls from iTunes/iPod via AirPlay. | 30 |
Volume Trim
Corrects volume differences between input sources. If you are bothered by volume differences when switching between input sources, use this function to correct it.

This setting is applied separately to each input source.
Setting range
-10.0 dB to +10.0 dB (0.5 dB increments)
Default
0.0 dB
Signal Info
Displays information about audio signal.
Choices
| FORMAT | Audio format of the input signal |
| CHAN | If other than two-channel audio is being input, the indication will be “---.” |
| SAMPL | The number of samples per second of the input digital signal |

To switch the information on the front display, press the cursor keys ( / ) repeatedly.
Vol.Interlock
Enables/disables volume controls from iTunes/iPod via AirPlay.
Settings
| Off | Disables volume controls from iTunes/iPod. |
| Ltd (default) | Enables volume controls from iTunes/iPod within the limited range (-80.0 dB to 0.0 dB and mute). |
| Full | Enables volume controls from iTunes/iPod in the full range (-80.0 dB to +16.5 dB and mute). |
Configuring various functions (SETUP menu)
You can configure the unit's various functions.
1 Press SETUP.

2 Use the cursor keys ( / ) to select a menu.

3 Press ENTER.

4 Use the cursor keys ( / ) to select a setting and press ENTER.

To return to the previous state during menu operations, press RETURN.
5 Exit from the menu, press SETUP.
SETUP menu items
| Menu item | Function | Page | |
| Network Setup | Information | Displays the network information on the unit. | 32 |
| IP Address | Configures the network parameters (such as IP address). | 32 | |
| MAC Filter | Filter Sets the MAC address filter to limit access to the unit from other network devices. | 32 | |
| DMC Control | Selects whether to allow a DLNA-compatible Digital Media Controller (DMC) to control playback. | 32 | |
| NET Standby | Selects whether to enable/disable the function that turns on the unit from other network devices. | 32 | |
| Network Name | Edits the network name (the unit's name on the network) displayed on other network devices. | 33 | |
| Update | Updates the firmware via the network. | 33 | |
| Max Volume | Sets the maximum volume to prevent excessive loudness. | 33 | |
| Initial Volume | Sets the initial volume for when this receiver is turned on. | 33 | |
| AutoPowerStdby | Sets the amount of time for the auto-standby function. | 33 | |
| ECO Mode | Enables/disables the eco mode (power saving mode). | 33 | |
| DC OUT | Selects how to supply power through the DC OUT jack. | 33 | |
Network Setup
Configures the network settings.
Information
Displays the network information on the unit.
| NewFwAvailable | Appears if an update for this unit's firmware is available (p.39). |
| STATUS | The connection status of the NETWORK jack |
| MAC | MAC address |
| IP | IP address |
| SUBNET | Subnet mask |
| GTWY | The IP address of the default gateway |
| DNS P | The IP address of the primary DNS server |
| DNS S | The IP address of the secondary DNS server |
| VTUNER | The ID of the Internet radio (vTuner) |
IP Address
Configures the network parameters (such as IP address).
DHCP
Select whether to use a DHCP server.
| Off | Does not use a DHCP server. Configure the network parameters manually. For details, see “Manual network settings”. |
| On (default) | Uses a DHCP server to automatically obtain the unit’s network parameters (such as IP address). |
Manual network settings
1 Set "DHCP" to "Off".
2 Use the cursor keys ( / ) to select a parameter type.
| Address | Specifies an IP address. |
| Subnet Mask | Specifies a subnet mask. |
| Default Gateway | Specifies the IP address of the default gateway. |
| DNS Server(P) | Specifies the IP address of the primary DNS server. |
| DNS Server(S) | Specifies the IP address of the secondary DNS server. |
3 Use the cursor keys ( / ) to select the edit position.

(Example: IP address setting)
Use the cursor keys ( / ) to switch between segments (Address1, Address2...) of the address.
4 Use the Cursor keys ( / ) or numeric keys to change a value.
5 To exit from the menu, press SETUP.
MAC Filter
Sets the MAC address filter to limit access to the unit from other network devices.
Filter
Enables/disables the MAC address filter.
| Off (default) | Disables the MAC address filter. |
| On | Enables the MAC address filter. In “MAC Address 01-10”, specify the MAC addresses of the network devices that will be permitted access to the unit. |
MAC address filter settings
1 Set "Filter" to "On".
2 Use the cursor keys ( / ) to select an MAC address number (01 to 10).
3 Use the cursor keys ( / ) to move the edit position and the cursor keys ( / ) to select a value.
4 To exit from the menu, press SETUP.
When using "AirPlay" (p.28) and "DMC Control" (p.32), you cannot limit access from network devices regardless of the MAC address filter.
DMC Control
Selects whether to allow DLNA-compatible Digital Media Controller (DMC) to control playback.
| Disable | Does not allow DMCs to control playback. |
| Enable (default) | Allows DMCs to control playback. |
A Digital Media Controller (DMC) is a device that can control other network devices through the network. When this function is enabled, you can control playback of the unit from DMCs (such as Windows Media Player 12) on the same network.
NET Standby
Selects whether the unit can be turned on from other network devices (network standby).
| Off (default) | Disables the network standby function. |
| On | Enables the network standby function. (The unit consumes more power than when “Off” is selected.) |
Network Name
Edits the network name (the unit's name on the network) displayed on other network devices.
1 Select "Network Name".

2 Press ENTER to enter the name edit display.

3 Use the cursor keys ( / ) to move the edit position and the cursor keys ( / ) to select a character.

4 To confirm the new name, press ENTER.
5 To exit from the menu, press SETUP.
Update
Updates the firmware via the network.
| Perform Update | Starts the process to update the unit's firmware. For details, see “Updating the unit's firmware via the network” (p.39). |
| Version | Displays the version of the firmware installed on the unit. |
| ID | Displays the system ID number. |
Max Volume
Sets the maximum volume to prevent excessive loudness.
Setting range
-30.0 dB to +15.0 dB (5.0 dB increments), +16.5 dB
Default
+16.5 dB
Initial Volume
Sets the initial volume when the receiver is turned on.
| Off (default) | Sets the level to the volume level of the unit when it last entered standby mode. |
| Mute | Sets the unit to mute the audio output. |
| -80.0 dB to +16.5 dB (0.5 dB increments) | Sets the level to the specified volume level. |
AutoPowerStdby
Sets the amount of time for the auto-standby function. If you do not operate the unit for the specified time, the unit will automatically go into standby mode.
| Off | Does not set the unit to standby mode automatically. |
| 2 hours,4 hours,8 hours (default),12 hours | Sets the unit to standby mode when you have not operated the unit for the specified time. For example, when “2 hours” is selected, the unit will switch to standby mode if you do not operate it for 2 hours. |

Just before the unit enters standby mode, "AutoPowerStdby" appears and then countdown starts in the front display.
ECO Mode
Enables/disables the eco (power saving) mode.
When the eco mode is enabled, you can reduce the unit's power consumption.
| Off (default) | Disables the eco mode. |
| On | Enables the eco mode. |
Notes
- Be sure to press ENTER to restart the unit after selecting a setting. The new setting will take effect after the unit is restarted.
- When "ECO Mode" is set to "On", the front display may become dark.
- If you want to play audio at high volume, set "ECO Mode" to "Off".
DC OUT
Configures the DC OUT jack setting.
Power Mode
Selects how to supply power to the Yamaha AV accessory connected to the DC OUT jack.
| Cont (default) | Supplies power through the DC OUT jack continuously regardless of the power state (on/ standby) of the unit. |
| Sync | Supplies power through the DC OUT jack only when the unit is turned on. |
Configuring the system settings (ADVANCED SETUP menu)
Configure the system settings of the unit while viewing the front display.
1 Turn off the unit.
2 While holding down RETURN on the front panel, press (power).
3 Rotate SELECT/ENTER to select an item.
4 Press SELECT/ENTER to select a setting.
5 Press (power) to set the unit to turn off and turn it on again.
The new settings take effect.
ADVANCED SETUP menu items
| Item | Function | Page |
| SP IMP. | Changes the speaker impedance setting. | 34 |
| REMOTE ID | Selects the unit's remote control ID. | 34 |
| INIT | Restores the default settings. | 35 |
| UPDATE | Updates the firmware. | 35 |
| VERSION | Checks the version of firmware currently installed on the unit. | 35 |
Changing the speaker impedance setting (SP IMP.)
SP IMP.·8QMIN
Change the unit's speaker impedance settings depending on the impedance of the speakers connected.
Settings
| 4 Ω MIN | Select this option when you connect 4-ohm speakers to the unit. |
| 8 Ω MIN (default) | Select this option when you connect 8-ohm or higher speakers to the unit. |
Selecting the remote control ID (REMOTE ID)
REMOTE ID·ID2
Change the unit's remote control ID so that it matches the remote control's ID (default: ID2). When using multiple Yamaha AV receivers, you can set each remote control with a unique remote control ID for its corresponding receiver.
Settings
ID1, ID2 (default)
Changing the remote control ID of the remote control
1 To select ID1, while holding down the ID, hold down numeric key "1" for more than 3 seconds.
To select ID2, while holding down the ID, hold down numeric key "2" for more than 3 seconds.
Once the remote control code is successfully registered, "Rem: Success" appears on the front display.
If "Rem: Fail" appears on the front display, registration has failed. Repeat from Step 1.

The registered remote control codes (p.36) are not cleared even if you change the remote control ID.
Restoring the default settings (INIT)
INIT·CANCEL
Restores the default settings for the unit.
Choices
| ALL | Restores the default settings for the unit. |
| CANCEL | Does not perform an initialization. |
Updating the firmware (UPDATE)
UPDATE: USB
New firmware that provides additional features or product improvements will be released as needed. Updates can be downloaded from our website. If the unit is connected to the Internet, you can download the firmware via the network. For details, refer to the information supplied with updates.
■ Firmware update procedure
Do not perform this procedure unless firmware update is necessary. Also, make sure you read the information supplied with updates before updating the firmware.
1 Press SELECT/ENTER repeatedly to select "USB" or "NETWORK" and press DISPLAY to start firmware update.
Choices
| USB | Update the firmware using a USB memory device. |
| NETWORK | Update the firmware via the network. |
#
If the unit detects newer firmware over the network, "NewFwAvailable" appears as the "Information" menu item in "Network Setup". In this case, you can also update the unit's firmware by following the procedure in "Updating the unit's firmware via the network" (p.39).
Checking the firmware version (VERSION)
VERSION:xx.xx
Check the version of firmware currently installed on the unit.
中
- You can also check the firmware version in "Update" (p.33) in the "SETUP" menu.
- It may take a while until the firmware version is displayed.
Controlling external devices with the remote control
You can use the unit's remote control to operate external devices (such as CD players) if you have registered the remote control code of the external device.
Notes
- You cannot control an external device that does not have a remote control sensor.
- Ensure that the remote control ID of the external device is set to "ID1". If any other ID is selected, the remote control operations may not work properly.
- If the unit's remote control is without batteries for more than 2 minutes, the registered codes may be cleared. If this happens, insert new batteries and register the codes again.
Registering the remote control code for a TV
You can use the unit's remote control to operate a TV if you have registered its remote control code.

You can also register your TV's remote control code to the unit's input selection keys (p.37). This would allow you to use the cursor keys or numeric keys to operate the TV (this function may not be available on some TV models).
1 Refer to “LIST OF REMOTE CONTROL CODES” (end of this manual) to find your TV's remote control code.

If there are multiple remote control codes, register the first code in the list. If that does not work, try the other codes.
2 Press CODE SET using a pointed object such as the tip of a ballpoint pen.
Perform each of the following steps within 1 minute. Otherwise, the setting will be canceled. If this happens, repeat from Step 2.
3 Press TV 念
4 Use the numeric keys to enter the 4-digit remote control code.
Once the remote control code is successfully registered, "Rem: Success" appears on the front display.
If "Rem: Fail" appears on the front display, registration has failed. Repeat from Step 2.
TV operations
Once you have registered the remote control code for your TV, you can control it using the TV operation keys, regardless of the input source selected on the unit.
| TV operation keys | INPUT | Switches the video inputs of the TV. |
| MUTE | Mutes the audio output of the TV. | |
| TV VOL | Adjust the volume of the TV. | |
| TV CH | Switch the channels of the TV | |
| TV ⋅ | Turns on/off the TV. |
Registering the remote control codes for playback devices
You can use the unit's remote control to operate playback devices if you have registered their remote control codes. You can also use the input selection keys to change the playback devices that are controlled by the remote control, because their remote control codes are assigned to the input selection keys.
1 Refer to "LIST OF REMOTE CONTROL CODES" (end of this manual) to find the remote control code for your playback device.

If there are multiple remote control codes, register the first code in the list. If that does not work, try the other codes.
2 Press CODE SET using a pointed object such as the tip of a ballpoint pen.
Perform each of the following steps within 1 minute.
Otherwise, the setting will be canceled. If this happens, repeat from Step 2.
3 Press the input selection key.
For example, press CD to set the remote control code for the playback device connected to the CD jack.
4 Use the numeric keys to enter the 4-digit remote control code.
Once the remote control code is successfully registered, "Rem: Success" appears on the front display.
If "Rem: Fail" appears on the front display, registration has failed. Repeat from Step 2.
Playback device operations
Once you have registered the remote control code for your playback device, you can control it using the following keys after selecting the input source or scene.
| SOURCE | Turns on/off the playback device. | |
| Menu operation keys | Cursor keys | Select an item. |
| ENTER | Confirms a selected item. | |
| RETURN | Returns to the previous state. | |
| DISPLAY | Switches information on the display. | |
| External device operation keys | TOP MENU | Displays the top menu. |
| POP-UP MENU | Displays the pop-up menu. | |
| ☐ | Stops playback. | |
| ☐ | Stops playback temporarily. | |
| ▷ | Starts playback of the selected song/video. | |
| ◁◁ | Searches forward/backward (by holding down). | |
| ▷▷ | ||
| ◁◁ | Skipping forward/backward. | |
| ▷▷ | ||
| Numeric keys | Enter numerical values. | |
| TV operation keys | Control the TV (p.36). | |
Note
These keys work only if the corresponding function is available on your playback device and if the device can be operated with an infrared remote control.
Resetting remote control codes
You can reset the remote control codes assigned to each input selection keys to the factory default.
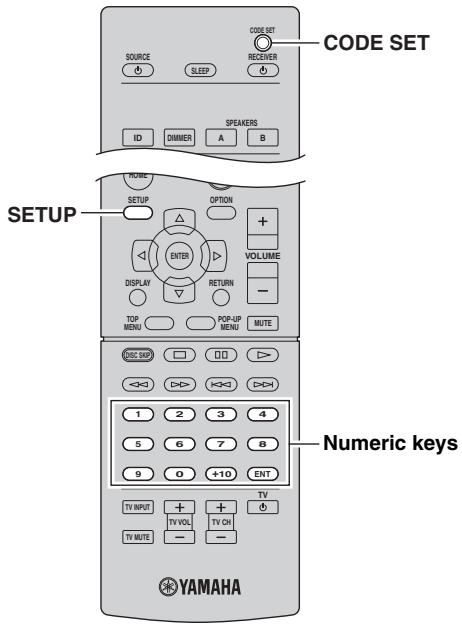
1 Press CODE SET using a pointed object such as the tip of a ballpoint pen.
Perform each of the following steps within 1 minute. Otherwise, the setting will be canceled. If this happens, repeat from Step 1.
2 Press SETUP.
3 Use the numeric keys to enter "9981".
Once the remote control code is successfully registered, "Rem: Success" appears on the front display.
If "Rem: Fail" appears on the front display, registration has failed. Repeat from Step 1.
Updating the unit's firmware via the network
New firmware that provides additional features or product improvements will be released as needed. If the unit is connected to the Internet, you can download the firmware via the network and update it.
Notes
- Do not operate the unit or disconnect the power cable or network cable during firmware update. Firmware update takes about 20 minutes or more (depending on your Internet connection speed).
- If the unit is connected to the wireless network via a wireless network adapter, network update may not be possible depending on the condition of the wireless connection. In this case, update the firmware using the USB memory device (p.35).

You can also update the firmware using the USB memory device from the "ADVANCED SETUP" menu (p.35).

1 Press SETUP.
2 Use the cursor keys to select "Network Setup" and press ENTER.
3 Use the cursor keys to select "Information" and press ENTER.
If new firmware is available, "NewFwAvailable" appears on the front display.

4 Press RETURN to return the previous state.
5 Use the cursor keys to select "Update" and press ENTER.

6 To start the firmware update, press ENTER.
The unit to restart and the firmware update starts.

To cancel the operation without updating the firmware, press SETUP.
7 If "UPDATE SUCCESS" appears on the front display, press (power) on the front panel.
The firmware update is complete.
Troubleshooting
Refer to the chart below if this unit does not function properly. If the problem you are experiencing is not listed below or if the instructions below do not help, set this unit to standby mode, disconnect the power cable, and contact the nearest authorized Yamaha dealer or service center.
General
| Problem | Cause | Remedy | See page |
| This unit fails to turn on. | The protection circuitry has been activated three times consecutively. If the unit is in this condition, the standby indicator on the unit blinks when you try to turn on the power. | As a safety precaution, capability to turn on the power is disabled. Contact your nearest Yamaha dealer or service center to request repair. | — |
| The power cable is not connected or the plug is not completely inserted. | Connect the power cable firmly. | — | |
| The impedance setting is incorrect. | Set the impedance to match your speakers. | 11 | |
| The protection circuitry has been activated because of a short circuit, etc. | Check that the speaker wires are not touching each other and then turn the power of this unit back on. | 10 | |
| This unit has been exposed to a strong external electric shock (such as lightning or strong static electricity). | Set this unit to standby mode, disconnect the power cable, plug it back in after 30 seconds, then use it normally. | — | |
| No sound | Incorrect input or output cable connections. | Connect the cables properly. If the problem persists, the cables may be defective. | 10 |
| No appropriate input source has been selected. | Select an appropriate input source with the INPUT selector on the front panel (or one of the input selection key on the remote control). | 14 | |
| The SPEAKERS A/B switches are not set properly. | Turn on the corresponding SPEAKERS A or SPEAKERS B. | 14 | |
| Speaker connections are not secure. | Secure the connections. | 10 | |
| Output has been muted. | Turn off the mute. | 8 | |
| The Max volume or Initial volume setting is set too low. | Set the setting to a higher value. | 33 | |
| The component corresponding to the selected input source is turned off or is not playing. | Turn the component on and make sure it is playing. | — | |
| The audio output of a device connected to a digital audio input (COAXIAL 1-2/OPTICAL 1-2 jacks) is set to other than PCM. | Set the audio output of the connected device to PCM. | — | |
| The sound suddenly goes off. | The protection circuitry has been activated because of a short circuit, etc. | Set the speaker impedance to match your speakers. | 11 |
| Check that the speaker wires are not touching each other and then turn the power of this unit back on. | 10 | ||
| This unit has become too hot. | Make sure the openings on the top panel are not blocked. | — | |
| The auto power standby function has turned this unit off. | Change the auto power standby (“AutoPowerStdby” in the “SETUP” menu) to a longer setting or turn off. | 34 | |
| Only the speaker on one side can be heard. | Incorrect cable connections. | Connect the cables properly. If the problem persists, the cables may be defective. | 10 |
| Incorrect setting for the BALANCE control. | Set the BALANCE control to the appropriate position. | 15 | |
| There is a lack of bass and no ambience. | The + and - wires are connected in reverse at the amplifier or the speakers. | Connect the speaker wires to the correct + and - phase. | 10 |
| A “humming” sound can be heard. | Incorrect cable connections. | Connect the audio plugs firmly. If the problem persists, the cables may be defective. | 10 |
| No connection from the turntable to the GND terminal. | Make the GND connection between the turntable and this unit. | 10 | |
| The volume level is low while playing a record. | The record is being played on a turntable with an MC cartridge. | The turntable should be connected to this unit through the MC head amplifier. | — |
| The sound is degraded when listening with the headphones connected to the CD player or the tape deck connected to this unit. | The power of this unit is turned off, or this unit is set to standby mode. | Turn on the power of this unit. | 14 |
| The sound level is low. | The loudness control function is operating. | Turn down the volume, set the LOUDNESS control to the FLAT position, and then adjust the volume again. | 15 |
Tuner
| Problem | Cause | Remedy | See page | |
| FM | FM stereo reception is noisy. | The particular characteristics of the FM stereo broadcasts being received may cause this problem when the transmitter is too far away or the antenna input is poor. | Check the antenna connections. Try using a high-quality directional FM antenna. | 12 |
| Switch to monaural mode. | 17 | |||
| There is distortion, and clear reception cannot be obtained even with a good FM antenna. | There is multipath interference. | Adjust the antenna position to eliminate the multipath interference. | — | |
| The desired station cannot be tuned in with the automatic tuning method. | The signal is too weak. | Try using a high-quality directional FM antenna. | 12 | |
| Try using the manual tuning method. | 17 | |||
| FM/AM | NO PRESETS is displayed. | No preset stations are registered. | Register stations you want to listen to as preset stations before operation. | 18 |
| WRONG STATION is displayed. | An invalid FM/AM frequency has been input. | Input a frequency that can be received. | 17 | |
| AM | The desired station cannot be tuned in with the automatic tuning method. | The signal is weak or the antenna connections are loose. | Tighten the AM antenna connections and orient it for the best reception. | — |
| Try using the manual tuning method. | 17 | |||
| Automatic station preset does not work. | Automatic station preset is not available for AM stations. | Use manual station preset. | 18 | |
| There are continuous crackling and hissing noises. | The noises may result from lightning, fluorescent lamps, motors, thermostats or other electrical equipment. | Try using an outdoor antenna and a ground wire. This will help somewhat, but it is difficult to eliminate all noise. | — | |
| There are buzzing and whining noises. | A TV set is being used nearby. | Move this unit away from the TV set. | — | |
USB and network
| Problem | Cause | Remedy | See page |
| The unit does not detect the USB device. | The USB device is not connected to the USB jack securely. | Turn off the unit, reconnect your USB device, and turn the unit on again. | — |
| The file system of the USB device is not FAT16 or FAT32. | Use a USB device with FAT16 or FAT32 format. | — | |
| Folders and files in the USB device cannot be viewed. | The data in the USB device is protected by the encryption. | Use a USB device without an encryption function. | — |
| The network feature does not function. | The network parameters (IP address) have not been obtained properly. | Enable the DHCP server function on your router and set “DHCP” in the “SETUP” menu to “On” on the unit. If you want to configure the network parameters manually, check that you are using an IP address which is not used by other network devices in your network. | 32 |
| The unit does not detect the PC. | The media sharing setting is not correct. | Configure the sharing setting and select the unit as a device to which music contents are shared. | — |
| Some security software installed on your PC is blocking the access of the unit to your PC. | Check the settings of security software installed on your PC. | — | |
| The unit and PC are not in the same network. | Check the network connections and your router settings, and then connect the unit and the PC to the same network. | 13 | |
| The MAC address filter is enabled on the unit. | In “MAC Filter” in the “SETUP” menu, disable the MAC address filter or specify the MAC address of your PC to allow it to access to the unit. | 32 | |
| The files in the PC cannot be viewed or played back. | The files are not supported by the unit or the media server. | Use the file format supported by both the unit and the media server. For information about the file formats supported by the unit, see “Playing back music stored on media servers (PCs/NAS)”. | 25 |
| The Internet radio cannot be played. | The selected Internet radio station is currently not available. | There may be a network problem at the radio station, or the service may have been stopped. Try the station later or select another station. | — |
| The selected Internet radio station is currently broadcasting silence. | Some Internet radio stations broadcast silence at certain of times of the day. Try the station later or select another station. | — | |
| Access to the network is restricted by the firewall settings of your network devices (such as the router). | Check the firewall settings of your network devices. The Internet radio can be played only when it passes through the port designated by each radio station. The port number varies depending on the radio station. | — | |
| The application for smartphone/tablet “NP Controller” does not detect the unit. | The MAC address filter is enabled on the unit. | In “MAC Filter” in the “Network Setup”, disable the MAC address filter or specify the MAC address of your smartphone/tablet to allow it to access to the unit. | 32 |
| The unit and smartphone/tablet are not in the same network. | Check the network connections and your router settings, and then connect the unit and smartphone/tablet to the same network. | — | |
| Firmware update via the network is failed. | It may not be possible depending on the condition of the network. | Update the firmware via the network again or use a USB memory device. | 35 |
Remote control
| Problem | Cause | Remedy | See page |
| The remote control does not work nor function properly. | Wrong distance or angle. | The remote control will function within a maximum range of 6 m (20 ft) and no more than 30 degrees off-axis from the front panel. | 9 |
| Direct sunlight or lighting (from an inverter type of fluorescent lamp, etc.) is striking the remote control sensor of this unit. | Reposition this unit. | — | |
| The batteries are weak. | Replace all batteries. | — | |
| The remote control ID and this unit's ID do not match. | Switch the remote control ID or this unit's ID. | 34 | |
| The remote control code was not correctly set. | Try setting another code of the same manufacturer using “LIST OF REMOTE CONTROL CODES” at the end of this manual. | — | |
| Even if the remote control code is correctly set, there are some models that do not respond to the remote control. | Use the supplied remote control for the components. | — | |
| You did not press the input selection key corresponding to the component you are trying to control. | Press the input selection key corresponding to the component you are trying to control, and then press the desired remote control key(s). | — |
Error indications on the front display
| Message | Cause | Remedy |
| Access denied | Access to the PC is denied. | Configure the sharing settings and select the unit as a device to which music contents are shared (p.25). |
| Access error | The unit cannot access the USB device. | Turn off the unit and reconnect your USB device. If the problem persists, try another USB device. |
| The unit cannot access the iPod. | Turn off the iPod and turn it on again. | |
| The connected iPod is not supported by the unit. | Use an iPod supported by the unit (p.21). | |
| There is a problem with the signal path from the network to the unit. | Make sure your router and modem are turned on. | |
| Check the connection between the unit and your router (or hub) (p.13). | ||
| Check SP Wires | The speaker cables short circuit. | Twist the bare wires of the cables firmly and connect to the unit and speakers properly. |
| No content | There are no playable files in the selected folder. | Select a folder that contains files supported by the unit. |
| No device | The unit cannot detect the USB device. | Turn off the unit and reconnect your USB device. If the problem persists, try another USB device. |
| The unit cannot detect the iPod. | Turn off the iPod and then turn it on again. | |
| Please wait | The unit is preparing for connecting to the network. | Wait until the message disappears. If the message stays more than 3 minutes, turn off the unit and turn it on again. |
| RemID Mismatch | The remote control IDs of the unit and the remote control are not identical. | Change the remote control ID of the unit or the remote control (p.34). |
| Unable to play | The unit cannot play back the songs stored on the iPod for some reason. | Check the song data. If it cannot be played on the iPod itself, the song data or storage area may be defective. |
| The unit cannot play back the songs stored on the PC for some reason. | Check if the format of files you are trying to play is supported by the unit. For information about the formats supported by the unit, see “Playing back music stored on media servers (PCs/NAS)” (p.25). If the unit supports the file format, but still cannot play back any files, the network may be overloaded with heavy traffic. | |
| Version error | Firmware update is failed. | Update the firmware again. |
Trademarks
Made for

iPod

iPhone

iPad

AirPlay
"Made for iPod," "Made for iPhone," and "Made for iPad" mean that an electronic accessory has been designed to connect specifically to iPod, iPhone, or iPad, respectively, and has been certified by the developer to meet Apple performance standards.
Apple is not responsible for the operation of this device or its compliance with safety and regulatory standards. Please note that the use of this accessory with iPod, iPhone, or iPad may affect wireless performance.
AirPlay, iPad, iPhone, iPod, iPod nano, and iPod touch are trademarks of Apple Inc., registered in the U.S. and other countries.

Fraunhofer
Institut
MPEG Layer-3 audio coding technology licensed from Fraunhofer IIS and Thomson.

dna
CERTIFIEDTM
DLNA™ and DLNA CERTIFIED™ are trademarks or registered trademarks of Digital Living Network Alliance. All rights reserved. Unauthorized use is strictly prohibited.
WindowsTM
Windows is a registered trademark of Microsoft Corporation in the United States and other countries.
Internet Explorer, Windows Media Audio and Windows Media Player are either registered trademarks or trademarks of Microsoft Corporation in the United States and/or other countries.
AndroidTM
Android is a trademark of Google Inc.

This receiver supports network connections.
Specifications
AUDIO SECTION
- Minimum RMS Output Power (20 Hz to 20 kHz, 0.04% THD, 8 Ω) .80W + 80W
- Dynamic power per channel (IHF) (8 / 6 / 4 / 2) .105/125/150/178 W
Maximum power per channel [Europe model only] (1 kHz, 0.7% THD, 4 Ω) 105 W - IEC power [Europe model only] (1 kHz, 0.04% THD, 8 Ω)......84 W
Power band width (0.06% THD, 40W, 8 Ω) 10 Hz to 50 kHz - Damping factor (SPEAKERS A) 1 kHz, 8 Ω. 150 or more
Maximum effective output power (JEITA) [Asia and General models only] (1 kHz, 10% THD, 8 Ω) 115 W
Input sensitivity/Input impedance PHONO (MM) 3.5 mV/47 kCD, etc. 200 mV/47 k
Maximum input signal PHONO (MM) (1kHz,0.003%) THD) 60 mV or more CD, etc. (1kHz,0.5%) THD) 2.2 V or more
Output level/Output impedance CD,etc.(Input 1kHz 200~mV REC OUT 200 mV/1.0 kSubwoofer OUT .4.0 V/1.2 kCUT off frequency 90 Hz CD,etc.(Input 1kHz 200mV,8 PHONES 410 mV/470
Frequency response CD, etc. (20 Hz to 20 kHz) 0 ± 0.5 dB CD, etc., PURE DIRECT on (10 Hz to 100 kHz) 0 ± 1.0 dB - RIAA equalization deviation
PHONO (MM) ± 0.5 dB
Total harmonic distortion PHONO (MM) to REC (20Hz to 20kHz,3V) .. 0.025% or less CD, etc. to SPEAKERS (20Hz to 20kHz,40.0W,8) . 0.015% or less - Signal to noise ratio (IHF-A network)
PHONO (MM) (5 mV input shorted) 87 dB or more
CD, etc., PURE DIRECT on
(200 mV input shorted) 100 dB or more - Residual noise (IHF-A network) 30 V
- Channel separation CD, etc. (5.1 kΩ input shorted, 1/10 kHz) 65/50 dB or more
- Tone control characteristics
- BASS
- Boost/Cut (20 Hz) ± 10 dB
- Turnover Frequency 350 Hz
- TREBLE
- Boost/Cut (20 kHz) ± 10 dB
- Turnover Frequency 3.5 kHz
Continuous loudness control Attenuation (1 kHz) . 30 dB
- Gain tracking error (+16.5 to -80 dB) .0.5 dB or less
- Digital input OPTICAL COAXIAL Support audio sample rate 32 kHz to 192 kHz
FM SECTION
Tuning range [U.S.A. and Canada models] .87.5 to 107.9 MHz [Asia and General models] .87.5/87.50 to 108.0/108.00 MHz [U.K., Europe, Korea, Australia models] .87.50 to 108.00 MHz
- 50 dB quieting sensitivity (IHF, 1 kHz, 100% MOD.)
Mono 3.0 μV (20.8 dBf)
- Signal to noise ratio (IHF)
Mono/Stereo 71 dB/69 dB
Harmonic distortion (1 kHz)
Mono/Stereo 0.3%/0.5%
Antenna input 75Ω unbalanced
AM SECTION
Tuning range [U.S.A. and Canada models] 530 to 1710kHz [Asia and General models] 530/531 to 1710/1611 kHz [U.K, Europe, Korea, Australia models] 531 to 1611kHz
GENERAL
- Power supply
[U.S.A. and Canada models] AC 120 V, 60 Hz
[General model] AC 110-120/220-240 V, 50/60 Hz
[Korea model] AC220V 60Hz
[Australia model] AC 240 V, 50 Hz
[U.K. and Europe models] AC 230 V, 50 Hz
[Asia model] AC 220-240 V, 50/60 Hz
Power consumption 190 W - Standby power consumption 0.1 W or less Network standby on 2.0 W Typical
Maximum power consumption [General model only] 380 W - Dimensions (W × H × D) 435 × 151 × 387 mm (17-1/8" × 6" × 15-1/4")
- Weight 9.8 kg (21.6 lbs)
- Specifications are subject to change without notice.
Index
A
ADVANCED SETUP menu. 34
AirPlay 28
AM antenna connection 12
AM radio listening. 17
Audio device connection 10
Audio file format (PC/NAS) 25
Audio file format (USB storage device) 23
AUDIO jack. 7,10
Auto Power Standby (SETUP menu) 33
Auto Preset (FM radio, OPTION menu) 18
Automatic station preset (FM radio) 18
AutoPowerStdby (SETUP menu) 33
B
BALANCE (Tone Control) 15
Basic playback operation. 14
BASS (Tone Control) 15
Batteries 9
Bi-Amp (Speaker connection) 11
Bi-wire (Speaker connection) 11
C
CAT-5 cable 13
CHAN (Signal Info, OPTION menu) 30
Clear Preset (FM/AM radio, OPTION menu) 19
Clock Time (Radio Data System) 20
COAXIAL jack 7,10
D
DC OUT (SETUP menu) 33
DC OUT jack 7
Default Gateway (Information, SETUP menu) 32
Default Gateway (IP Address, SETUP menu) 32
DHCP (IP Address, SETUP menu) 32
Digital Media Controller (DMC) 32
Dimmer (Front display) 6
Direct playback 14
DISPLAYkey 4,8,29
DLNA 25
DMC Control (Network Setup, SETUP menu) 32
DNS Server (Information, SETUP menu) 32
DNS Server (IP Address, SETUP menu) 32
E
ECO Mode (SETUP menu) 33
Error indication 45
F
Filter (MAC Filter, SETUP menu) 32
Firmware update 39
Firmware update (network) 35, 39
Firmware update (USB) 35
Firmware version check 33, 35
FM antenna connection 12
FM radio listening 17
FM/AM radio tuning. 17
FORMAT (Signal Info, OPTION menu) 30
G
Gateway 32
H
Headphones 4
HOME key (Internet radio) 27
HOME key (iPod) 21
HOME key (PC/NAS) 26
HOME key (USB storage device) 23
1
ID (Network Setup, SETUP menu) 33
In.Trim (Volume Trim, OPTION menu) 30
Indicator (part names and functions) 6
Information (Network Setup, SETUP menu) 32
Information display (front display) 6
Information switching (front display) 29
INIT (ADVANCED SETUP menu) 35
Initial Volume (SETUP menu) 33
Input selection key 8
Input Trim (Volume Trim, OPTION menu) 30
Internet radio listening 27
IP Address (Information, SETUP menu) 32
IP Address (Network Setup, SETUP menu) 32
iPod charge 21
iPod connection 21
iPod content playback 21
iPod content playback (AirPlay) 28
iTunes content playback (AirPlay) 28
L
LOUDNESS (Tone Control) 15
M
MAC Address (Information, SETUP menu) 32
MAC Address (MAC Filter, SETUP menu) 32
MAC Filter (Network Setup, SETUP menu) 32
Manual station preset (FM/AM radio) 18
Max Volume (SETUP menu) 33
Media sharing setup 25
MODE key 8
Monaural reception (FM radio) 17
MUTE key 8
N
NAS (Network Attached Storage) connection. 13
NAS content playback 25
NET Standby (Network Setup, SETUP menu) 32
Network cable. 13
Network connection 13
Network information 32
Network Name (Network Setup, SETUP menu) 33
Network Setup (SETUP menu) 32
Network Update (Network Setup, SETUP menu) 33
NewFwAvailable 39
NOW PLAYING key (Internet radio) 27
NOW PLAYING key (iPod) 21
NOW PLAYING key (PC/NAS) 26
NOW PLAYING key (USB storage device) 23
Numeric key. 8
0
OPTICAL jack. 7
OPTION key 8
OPTION menu 30
P
PC connection 13
PC content playback 25
Perform Update (Network Setup, SETUP menu) 33
PHONES jack 4
Playback device connection. 10
Playback device operation (remote control) 36
Power cable connection 13
Power indicator (front panel) 4
Power Mode (DC OUT, SETUP menu) 33
Preset station selection (FM/AM radio) 19
Program Service (Radio Data System) 20
Program Type (Radio Data System) 20
PURE DIRECT 14
R
Radio Data System (FM radio) 20
Radio Data System information. 20
Radio Data System tuning 20
Radio Text (Radio Data System) 20
Rear panel (part names and functions) 7
REC (REC OUT) jack 10
Recording device connection. 10
Remote control (part names and functions) 8
Remote control code registration (playback device).... 36
Remote control range. 9
Remote control signal transmitter (remote control) 8
REMOTE ID (ADVANCED SETUP menu) 34
Rename (network name) 33
Repeat (iPod) 22
Repeat (PC/NAS). 26
Repeat (USB storage device) 24
Reset (remote control) 38
Router connection 13
S
SAMPL (Signal Info, OPTION menu) 30
SETUP key 8
SETUP menu 31
Shuffle (iPod) 22
Shuffle (PC/NAS) 26
Shuffle (USB storage device) 24
Signal Info (OPTION menu) 30
Signal information 30
Simple play (iPod) 22
SLEEP key. 16
Sleep timer 16
SP IMP. (ADVANCED SETUP menu) 34
Speaker cable connection 11
Speaker impedance 11,34
Speaker indicator (front display) 6
Station preset (FM/AM radio). 18
Status (Information, SETUP menu) 32
STP network cable 13
Subnet Mask (Information, SETUP menu) 32
Subnet Mask (IP Address, SETUP menu) 32
T
TONE CONTROL 15
TP (Traffic Program) 20
Traffic information (Radio Data System) 20
Traffic Program (FM radio, OPTION menu) 20
TREBLE (Tone Control) 15
U
UPDATE (ADVANCED SETUP menu) 35
Update (Network Setup, OPTION menu) 33
USB jack 4
USB mass storage class device 23
USB storage device connection 23
USB storage device content playback 23
V
VERSION (ADVANCED SETUP menu) 35
Version (Network Setup, SETUP menu) 33
Vol.Interlock (OPTION menu) 30
Volume Interlock (OPTION menu) 30
Volume Trim (OPTION menu). 30
vTuner ID (Information, SETUP menu) 32
(2) Prises OPTICAL 1-2
12 Prises REMOTE IN/OUT
Antenne AM, raccordement 12
Antenne FM, raccordement 12
Appareils de lecture, raccordement 10
Attén. vol. (menu OPTION) 30
Auto Preset (radio FM, menu OPTION) 18
AutoPowerStdby (menu SETUP) 33
B
BALANCE (commande de请及时) 15
BASS (commande de请及时) 15
C
Cable CAT-5 13
Cable de réseau 13
CHAN (Signal Info, menu OPTION) 30
Clear Preset (radio FM, menu OPTION) 19
Clock Time (RDS) 20
Connexion NAS (Network Attached Storage) 13
Connexion PC. 13
Connexion réseau 13
Default Gateway (IP Address, menu SETUP) 32
DHCP(IP Address,menuSETUP) 32
DMC Control (Network Setup, menu SETUP) 32
DNS 32
DNS Server (Information, menu SETUP) 32
E
ECO Mode (menu SETUP) 33
FORMAT (Signal Info, menu OPTION) 30
1
ID (Network Setup, menu SETUP) 33
In.Trim (Volume Trim, menu OPTION) 30
Information (Network Setup, menu SETUP) 32
Initial Volume (menu SETUP) 33
Input Trim (Volume Trim, menu OPTION) 30
IP Address (Information, menu SETUP) 32
IP Address (Network Setup, menu SETUP) 32
iPod, charge 21
iPod, connexion 21
iPod, lecture 21
iPod, lecture de contenu (AirPlay) 28
iTunes, lecture de contentu (AirPlay) 28
L
Lecture, operations de base 14
LOUDNESS (commande de请及时) 15
M
MAC Address (Information, menu SETUP) 32
MAC Address (MAC Filter, menu SETUP) 32
MAC Filter (Network Setup, menu SETUP) 32
NET Standby (Network Setup, menu SETUP) 32
Network Name (Network Setup, menu SETUP) 33
Network Setup (menu SETUP) 32
Network Update (Network Setup, menu SETUP) 33
NewFwAvailable 39
P
Perform Update (Network Setup, menu SETUP) 33
9
Power Mode (DC OUT, menu SETUP) 33
Prise REC (REC OUT) 10
Prise USB 4
Program Service (RDS) 20
Program Type (RDS) 20
PURE DIRECT 14
R
Signal Info (menu OPTION) 30
Signal, informations 30
SP IMP. (menu ADVANCED SETUP) 34
Statut (Information, menu SETUP) 32
Syntonisation FM/AM 17
T
CHAN (Signal Info, OPTION-MENU) 30
DC OUT (SETUP-MENU) 33
DC OUT-Buchse 7
Default Gateway (Information, SETUP-MENU) 32
Default Gateway (IP Address, SETUP-Menu) 32
DHCP (IP Address, SETUP-MENU) 32
Digital Media Controller (DMC) 32
Dimmer (Frontblende-Display) 6
Direktwiedergabe 14
DISPLAY-Taste 4,8,29
DLNA 25
DMC Control (Network Setup, SETUP-Menu) 32
DNS Server (Information, SETUP-MENU) 32
DNS Server (IP Address, SETUP-MENU) 32
E ECO Mode (SETUP-Menui) 33
Eingangswahltaste 8
ID (Network Setup, SETUP-Menu) 33
In.Trim (Volume Trim, OPTION-Menu) 30
Information (Network Setup, SETUP-MENU) 32
IP Address (Network Setup, SETUP-MENU) 32
iPodanschlieben 21
iPod laden 21
MAC Address (Information, SETUP-MENU) 32
MAC Address (MAC Filter, SETUP-Menu) 32
MAC Filter (Network Setup, SETUP-MENU) 32
Subnet Mask (Information, SETUP-MENU) 32
Subnet Mask (IP Address, SETUP-MENU) 32
T
TONE CONTROL 15
TP (Traffic Program) 20
Traffic Program (UKW-Radio, OPTION-MENU) 20
TREBLE (Klangregler) 15
U
Stalla in mediedelning for musikfiber 25
⑪ SUBWOOFER PRE OUT-jack
⑫ REMOTE IN/OUT-jack
Stalla in mediedelning for musikfiler
Uppdatera firmware (UPDATE)
UPDATE: USB
Uppdatera receives fast program via natverket
Digital Media Controller (DMC) 32
Dimmer(frontdisplay). 6
DMC Control (Network Setup, SETUP-menyn). 32
DNS Server (Information, SETUP-menyn) 32
DNS Server (IP Address, SETUP-menyn) 32
E
ECO Mode (SETUP-menyn) 33
Firmwareupppatering 39
HOME-knapp (dator/NAS). 26
HOME-knapp (Internetradio) 27
HOME-knapp (iPod) 21
HOME-knapp (USB-lagringsenhet) 23
Hörlunar 4
1
ID (Network Setup, SETUP-menyn) 33
In.Trim (Volume Trim, OPTION-menyn) 30
IP Address (Network Setup, SETUP-menyn) 32
K
Network Update (Network Setup, SETUP-menyn)..... 33
NewFwAvailable 39
NOW PLAYING-knapp (dator/NAS) 26
NOW PLAYING-knapp (Internetradio) 27
NOW PLAYING-knapp (iPod) 21
NOW PLAYING-knapp (USB-lagringsenhet) 23
0
OPTICAL-jack 7
OPTION-knapp. 8
OPTION-menyn 30
P
Perform Update (Network Setup, SETUP-menyn) 33
PHONES-jack 4
Power Mode (DC OUT, SETUP-menyn) 33
Program Service (Radio Data System) 20
Program Type (Radio Data System) 20
PURE DIRECT 14
R
Radio Data System (FM-radio) 20
Radio Data System-informationen 20
Radio Data System-installing 20
Radio Text (Radio Data System) 20
REC (REC OUT)-jack. 10
TP (Traffic Program) 20
Traffic Program (FM-radio, OPTION-meny) 20
Trafikinformation (Radio Data System) 20
TREBLE (Tonkontroll) 15
U
UMS-enhet 23
UPDATE (ADVANCED SETUP-menyn) 35
Update (Network Setup, OPTION-menyn) 33
12 Prese REMOTE IN/OUT
COAX 1-2 Prese COAXIAL 1-2
OPT 1-2 Prese OPTICAL 1-2
Collegamento bi-wire
Auto Preset (radio FM, menu OPTION) 18
AutoPowerStdby (menu SETUP) 33
B
BALANCE (Tone Control) 15
BASS (Tone Control) 15
Batterie 9
CHAN (Signal Info, menu OPTION). 30
Clear Preset (radio FM/AM, menu OPTION) 19
Clock Time (Radio Data System) 20
COAXIAL, presa. 7, 10
Default Gateway (IP Address, menu SETUP) 32
DHCP (IP Address, menu SETUP) 32
Digital Media Controller (DMC) 32
Dimmer (display anteriore) 6
Display informativo (display anteriore) 6
DISPLAY,tasto. 4,8,29
DMC Control (Network Setup, menu SETUP) 32
DNS Server (Information, menu SETUP) 32
DNS Server (IP Address, menu SETUP) 32
FORMAT (Signal Info, menu OPTION) 30
Formato file audio (PC/NAS) 25
ID (Network Setup, menu SETUP) 33
In.Trim (Volume Trim, menu OPTION) 30
Information (Network Setup, menu SETUP) 32
INIT (menu ADVANCED SETUP) 35
Initial Volume (menu SETUP) 33
Input Trim (Volume Trim, menu OPTION) 30
IP Address (Information, menu SETUP) 32
IP Address (Network Setup, menu SETUP) 32
MAC Address (Information, menu SETUP) 32
MAC Address (MAC Filter, menu SETUP) 32
MAC Filter (Network Setup, menu SETUP) 32
Max Volume (menu SETUP) 33
Menu ADVANCED SETUP 34
NAS (Network Attached Storage), collegamento. 13
NET Standby (Network Setup, menu SETUP) 32
Network information. 32
Network Name (Network Setup, menu SETUP) 33
Network Setup (menu SETUP) 32
Network Update (Network Setup, menu SETUP) 33
NewFwAvailable 39
NOW PLAYING, taste
Perform Update (Network Setup, menu SETUP) 33
PHONES, presa 4
Power Mode (DC OUT, menu SETUP) 33
Radio Data System (radio FM) 20
REC (REC OUT), presa 10
UPDATE (menu ADVANCED SETUP) 35
Update (Network Setup, menu OPTION) 33
USB, presa 4
V
VERSION (menu ADVANCED SETUP) 35
Version (Network Setup, menu SETUP) 33
Versioned firmware, controlo 33, 35
Vol.Interlock (menu OPTION) 30
Volume Interlock (menu OPTION) 30
Volume Trim (menu OPTION). 30
vTuner ID (Information, menu SETUP) 32
12 Tomas REMOTE IN/OUT
De -30,0 dB a +15,0 dB (incrementos de 5,0 dB), +16,5 dB
Predeterminado
+16.5 dB
Initial Volume
Auto Preset (radio FM, menu OPTION) 18
AutoPowerStdby (menu SETUP) 33
B
BALANCE (control de tono) 15
CHAN (Signal Info, menu OPTION) 30
Clear Preset (radio FM/AM, menu OPTION) 19
Clock Time (Radio Data System) 20
Default Gateway (IP Address, menu SETUP) 32
DHCP (IP Address, menu SETUP) 32
Digital Media Controller (DMC) 32
Dimmer (visor delantero) 6
DMC Control (Network Setup, menu SETUP) 32
DNS Server (Information, menu SETUP) 32
DNS Server (IP Address, menu SETUP) 32
FORMAT (Signal Info, menu OPTION) 30
ID (Network Setup, menu SETUP) 33
Impedancia del altovoz 11,34
In.Trim (Volume Trim, menu OPTION) 30
Information (Network Setup, menu SETUP) 32
INIT (menu ADVANCED SETUP) 35
Initial Volume (menu SETUP) 33
IP Address (Information, menu SETUP) 32
IP Address (Network Setup, menu SETUP) 32
L
LOUDNESS (control de tono) 15
M
MAC Address (Information, menu SETUP) 32
MAC Address (MAC Filter, menu SETUP) 32
MAC Filter (Network Setup, menu SETUP) 32
NET Standby (Network Setup, menu SETUP) 32
Network Name (Network Setup, menu SETUP) 33
Network Setup (menu SETUP) 32
Network Update (Network Setup, menu SETUP) 33
NewFwAvailable 39
P
UPDATE (menu ADVANCED SETUP) 35
Update (Network Setup, menu OPTION) 33
V
VERSION (menu ADVANCED SETUP) 35
Version (Network Setup, menu SETUP) 33
Visualización de información (visor delantero) 6
Vol.Interlock (menu OPTION) 30
Volume Trim (menu OPTION). 30
vTuner ID (Information, menu SETUP) 32
1 Stel "DHCP" in op "Off".
1 Stel "Filter" in op "On".
1 Selecteer "Network Name".
| NET | VOL-308 | |
| Network Name | ||
Digital Media Controller (DMC) 32
DMC Control (Network Setup, SETUP-menu) 32
DNS Server (Information, SETUP-menu) 32
DNS Server (IP Address, SETUP-menu) 32
ID (Network Setup, SETUP-menu) 33
In.Trim (Volume Trim, OPTION-menu) 30
IP Address (Network Setup, SETUP-menu) 32
iPod laden 21
iPod-aansluiting 21
MAC Filter (Network Setup, SETUP-menu) 32
Max Volume (SETUP-menu) 33
MODE-toets 8
Mono-ontvangst (FM-radio) 17
MUTE-toets 8
N
NAS (Network Attached Storage)-aansluiting 13
NET Standby (Network Setup, SETUP-menu) 32
Network Update (Network Setup, SETUP-menu) 33
NewFwAvailable 39
NOW PLAYING-toets (internetradio) 27
NOW PLAYING-toets (iPod) 21
NOW PLAYING-toets (pc/NAS) 26
NOW PLAYING-toets (USB-opslagapparaat) 23
Nummertoets 8
0
Perform Update (Network Setup, SETUP-menu) 33
PHONES-aansluiting 4
Power Mode (DC OUT, SETUP-menu) 33
Program Service (Radio Data System) 20
Program Type (Radio Data System) 20
PURE DIRECT 14
R
Radio Data System (FM-radio) 20
Radio Data System-informatie 20
Radio Text (Radio Data System) 20
TP (Traffic Program) 20
Traffic Program (FM-radio, OPTION-menu) 20
Update (Network Setup, OPTION-menu) 33
USB-aansluiting 4
Version (Network Setup, SETUP-menu) 33
Vol.Interlock (OPTION-menu) 30
Volume Interlock (OPTION-menu) 30
Volume Trim (OPTION-menu) 30
Voorkeurstation (FM/AM-radio) 18
Voorkeuzestation selectoren (FM/AM-radio) 19
vTuner ID (Information, SETUP-menu) 32
W
Weergaveapparaat bedienen (afstandsbediening) 36
IIOKJIIOUeHHe aHTeHH dHaIIa3OHa FM n AM 12
IoiKJIIOUeHHe K cetn 13
IIOJIIOUeHHe Ka6eJIa IITaHn. 13
OCHOBHbIE ΦYHKLIMM
Bocnpoh3BeJeHne 14
Bocipon3BeJeHne 3Byka HcToUHHka. 14
HcIOJIb3OBaHHe TaIMepe cIIJIeO pexHMa 16
IIpocIyIHHBaHne FM/AM-paIHO. 17
HactpoikafM/AM-paio 17
ABTomatHuecka HacTPOJa IIpeDyuctaHOBOK (ToJIbKO IJIg CTaHnI B DnHaIa3OHe FM) 18
PyuHaHa HacTpoIka IpeDyCTaHOBok 18
BbI3OB IIpeIyucTaHOBJIeHHoI CTaHINH 19
YdaJIeHHe cTaHcHn H3 cIIHcKa IIpeDyucTaHOBOK 19
HactpoiKa Radio Data System 20
BocpoH3BeJeHHe My3bIKn c iPod. 21
IIOKJIIOUeHHe yCTpoiCTBa iPod 21
Bocipon3BeHHe coepKHMoro iPod 21
BocnpoH3BeHeHne My3bIKN c 3aIOMHHaIOIIero yctpoiCTBa USB. 23
Плклочене 3aПOMMHaIOIeOуства USB...23
BocnpoH3BeJeHHe coJepKHMOrO 3aIIOMHHaIOIeO yctpoiCTBa USB 23
BocnpoH3BeDeHHe My3bIKHa MeiHa-cepBepax (IIK/NAS) 25
HacTpoIka 06IeTo IOcTyIIa K My3bIkaJIbHbIM
paIam 25
BocnpOn3BeJeHHe My3bIkaJIbHOrO KOHTeHTa Ha IIK... 26
IpocJyHbAHHe HHTepHcT-paHno 27
BocpoH3BeHeMe My3bIKn iTunes/iPod nO cetn (AirPlay) 28
BocipOn3BeJeHHe My3bIkaJIbHOro KOHTeHTa ciTunes/iPod. 28
IIepeKJIIOUeHHe HnΦoPMAuHH Ha IINcIIJIe e IIepeIHeH IaHeJIH. 29
DONOHHTENbHbIE ΦYHKUIM
HacpoiKaInapaMeTPOB BocnpoH3BeDeHnIpa3JIuHbIX HcToUHKnOB BocnpoH3BeDeHnI
(MehIO OPTION) 30
3JIeMeHTbI MeHIO OPTION 30
Hacrpoika pa3JInuHbIX fynKcui
(MehIO SETUP) 31
3JIeMeHTbI MeHIO SETUP 31
Network Setup 32
Max Volume 33
Initial Volume 33
AutoPowerStdby 33
ECO Mode 33
DC OUT 33
HacpoiKa chCTeMHbIX npaMeTpOB (MeHIO ADVANCED SETUP) 34
34
I3meHeHHe 3HaueHnHa HmIIeJaHca KOJIOHOK (SP IMP.). 34
Bb6op HNeHTHΦHKaIHHOHO KOJa IyIbTa JY (REMOTE ID) 34
BocstaHOBJIeHHe NaCTpoE KIO yMOJuaHHO (INIT)....35
O6HOBJIeHHe BCTpoEHHOro IporpaMMHOro
06ecIeueHnra (UPDATE) 35
Поверка Версин BCтpoeHHOrO ПограмMHOrO обсячени (VERSION) 35
YIpaBJIeHHe BHeIIHHMn ycTpoiCTBaMH c IHOOMIbIO IIyJbTa IY. 36
CoxpaenHne Koda IIyIbTa IVIJIeTeJIeBn3opa. 36
CoxpaHeHHe KOIOB IyIbTa DY JIyIyIpaBJIeHHBOcIIPOHN3BOJIAIMM yCTPoIHCTBaMH 37
C6poc KOIOB IyIbTa IY 38
O6HOBJeHHe BCTpoEHOro IIporpAMMHOO 06ecneueHHaIIapataYepe3 cetb. 39
DONOJIHNTeIbHAR INHΦOPMALU
Поньн устраенье Несниравноctr.. 40
Co06eHHa 6oH6Kax Ha IINcIIe IepeIHei HaeJIH. 45
ToBapHbIe 3HaKn 46
TexHHueckHe xapaKtepeHCTnKn 47
Hndekc 48
(B KOHcE HaCToIeRo pyKOBOdCTBa)
HΦopMaζη o nporpamMhOM oecneueHn ......i
CINCOK KOIOB INCTAHUOHHO
ynpabJIeHnI .V
POnJe3HbIeФyHKcUH
C NOMOIOBIO 3TOTO aIINapata MOKHO BbIIOJIHHTb OIIHCaHHbIe HNKe DeIcTBH:
PpmeuHnO npIbTe Dy n 6aTapeKax
- H36eaiTe IonoIaHnB BObI HJIN dpyrHx KHNKocTe Ha npJIbT y.
- He poHnIte IIyIbT IV.
He xpaHHTe H He octabJIte IyBt YB tAKHX MeCTax:
C BbICOKOJI BIAJXHOCTbIO, HAnpHMeP, PAnOM C BaHHoI;
c BbICOKo TeMnepaTpyoH, HApHmep, pJOM c 06orpeBaTeJIeH JInI NeBbIO;
C OueHb Hn3KHM TeMIIpeaTpaMH;
- c 60JIbIIOI KOHIIeHTpaIneI IIJIIN.
Bctabte 6aatapeiKN B COOTBeTCTBHN C metkAMN IOJARPHOCTH (+H -)
-Пиу'meньшенpa6ooyeroДиапазонa ПиьтадуЗамeнITEбeбатeК.
- EcJH 6aTapeKn pa3pIaTcra, HeMeJIeHHO H3BJIeKHTe Hx H3 IIyTa IY, YTO6bI H36eKaTb B3pbIBa HJIN yTeKHNICJIObl.
- O6hApyKbY teyk Ky KHNIOCTn Ha 6aTapeiKaX, HEmeJIeHHO N36abBtceb OT TAKHX 6aTapeek, HN B Koem CJUyae He IprHKacaycK bVITEKIIeMy BeIeCTBy. EcIN BBTEKeIeE BeIeCTBO IIOIaIO Ha KOxy, B rIa3a HJIn pot, IpOMoIte MeTo IOnIAJaHHN BOIoN HEmeJIeHHO 6paHTecb K BpaCy. IpeE yCTaHOBko HObIX 6aTapeek TIIaTeJIbHo OHCTHTe OTcEK IIra 6aTapeek.
- He IncIOJIb3yIte cTapeBie 6aTapeiKN BmecTe C HOBbIMN. ΘTO MOKeT IIpNBecTH K COKpaIIeHHIO cPoka CJIyK6bI HOBBIX 6aTapeek HIN K IIpoTEKaHHIO cTapeix 6aTapeek.
He hnoJIb3yIte pa3IINHbIe TIIbI bIaapeek OIOHOBpeMeHHO (HaIIpHMep, IIeIOHbIe I MapraIHcEbIe). BHNMaTeJIbHO IpoHTte yka3aHHa Ha yIaNOBKe, IIOCKoJIbKy pa3HbIe TIIbI bIaapeek MOrY IMeT bOINHaKOByU foPMy I cBET.
-Перед установков HOвьх баразек Начно португе отсек Ддбаразек.
XpaHHTe 6aTapeKn B He IOCTyIHOM IJIg ITeI MeCTe. BaTapeKn MOYr 6bITb OIIacHbI, ecJIN pe6eHOK IIOJOxHT Hx B pot.
- EcJH 6aTapeiKN CTAHOBTcSTapbIMN,paOchI dHaIIa3OH IyJIbTa DY 3NaHTeJIbHO cOKpaIIaetc. Ecln 3TO IIPOHCXODHT,3aMeHNTe 6aTapeiKN Ha HOBBe KaK MoKHO cKOpee.
- EcIN BbI IIaHpye He HcIOJIb3OBaTb aIIIapAT B TeYeHne IIOIgTO IepHOa BpeMeHN, BbIHbTe 6aTaapeKn H3 aIIIapara. B IpOTHBOM cIyae, 6aTaapeKn 6yUT IOJIHOCTbIO pa3pJKeHbI, YTO MOKe T pHBeCTN K yTeUke JHKIOGO BeIeCTBa 6aTaapeKn N IOBpeINTb aIIIapAT.
- He bly6pa8baiBaiTe 6aTapeiKHN BMeCTe C 06IIMN 6bITOBbIMN OTXOJaMn. YTHJIN3HpyIte Hx IIpaBnJIbHO B COOTBETCTBNN C MeCTHBIM 3aKOHODaTEJIbCTBOM.
IpeednnaheJIb
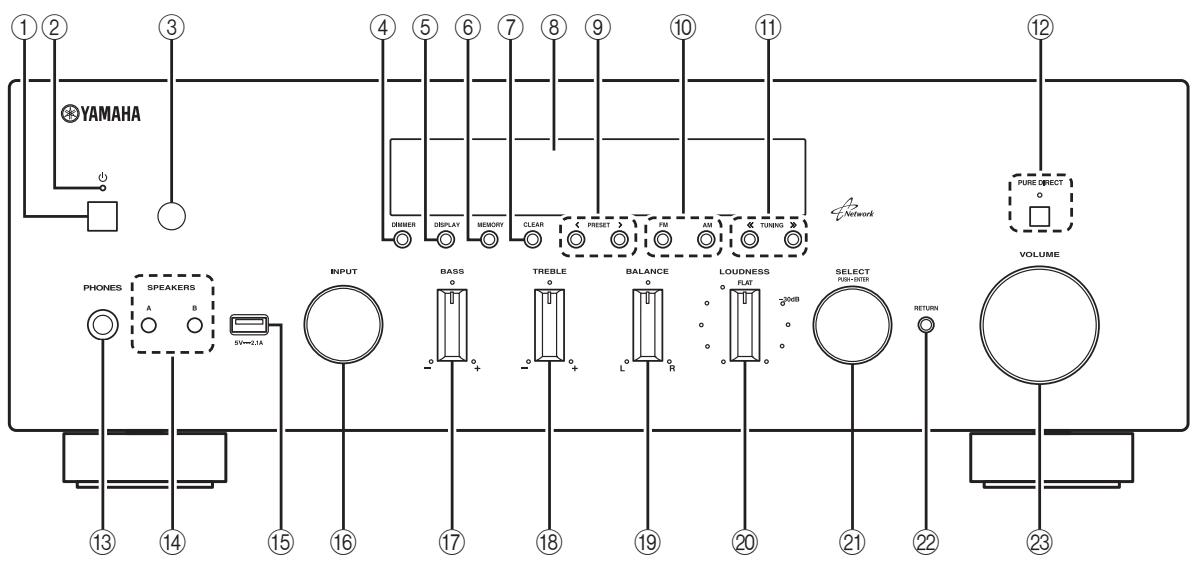
① (Ntahme)
BkJIOueHHe/BbIKJIOueHHe (IepeXoI B peKHM OKeJaHHa) aIIIapata.
PnmeaHne
BpeKHe MOKHdAHHaHb aHIIapat IOTpe6JIeT MaIOe KOINueCTBO 3HepHn IJIa IIpHema HhOpaKpaCbIX cHHaIOB O T IIyIbTa DY.
②ИндикаTopптаня
HnHaIaIIOOyIeCTBJIeTcI OIIHCaHHbIM HNKe o6pa3OM:
Jrko ropnt: nHTaHne BkJIIOueHo
TyckIO ropHT: pekHM OxHJaHHa
③ CechopДy
Ipnem HnΦpaKpaChbIX CNHnAIOB OT nYJbTa dY.
PpmeaHne
IpeKJIIOuAHTe HJeHTHΦKHATOp IyJIbTa JY MeKJy 3HaueHnMn ID1 nID2 npn HcNoJIb3OBAHH HeCKoJIbKHX pecHBepOB HJIN ycHJIteIeYama (c.34).
④ DIMMER
H3meHeHne npKoCTn DnCIIJIe pOHTaJIbHOI NaHeJIH.
Bb6op HhΦopMaunH, OTo6paKaemn Ha HncPiiee IpeJHei NaHei (c.29).
(6) MEMORY
CoxpaHeneHe TekyiEe FM/AM-CTaHiINB KaueCTBe IIpeIyuctaHOBKn,ecJIn HcTouHnKOM BXoIHOrO cHrHaJa Bb6paH TUNER (c.18).
(7) CLEAR
C6poc IIpeIyucTaHOBJIeHHoI FM/AM-CTaHcIIH,ecIIH CTOUYHKOM BXOJHOI CnIHHaJIa BbI6paH TUNER (c.19).
⑧ Duscpnei nepeDnei paHeni
OTo6paKeHHe HHΦOpMaIIHH O pa6ooyem coctOaHHn daHHoro aIapapa.
(9) PRESET(/)
Bb6op IpeIyuctaHOBJeHHo FM/AM-CTaHIN,ecJIHcTOUHKOM BXOJHOCrHnHaJa Bb6paH TUNER (c.19).
10 Khonkn FM u AM
IpekeJIIOUeHHe MeKJy IHaIa3OHaMn FM n AM (c.17).
⑪ TUNING /
Bb6op yactotbHaCTpoHKn,ecJIN B KaueCTBe HcToHHKa BXoHOrO cHrHaJa Bb6paH TUNER (c.17).
② PUREDIRECTuHdkaTop
IpocJyHbAHHe HCTOCHNka C MaKcHMaJIbHO YHCTbIM 3ByaHHem (c.14).IIpn BkJIIOueHHN 3TOI yHKiIN 3aRopaetc ee HHJNKaTOp cBepxu, a IINcIIeI pOHTaJIbHO IIaHEJI IN BbIKJIIOuaETcJ.
13 THe3do PHONES
BbIOJ 3ByKa Ha HayuHnKn IJIa HnIINBnIyaJIbHOI npocJyIHHaHH.
14 SPEAKERS A/B
BkIIOUeHHe HJIN BbIKIIOUeHHe KOMIIIEKTA INHaMKNOB, IIOIJKIOUeHHoro K pa3beMaM SPEAKERS A H/HJIN SPEAKERS B Ha 3aJNei PaHeJIi, KaKbIy pa3 IIpn HaKaATn COOTBeTCTByIOUe KHOIIKn.
15 THe3do USB
Bb6op HcToHnKa BBOa, KOTOpb Tpe6yeTc npocJyIaTb.
⑰ PerylTop BASS
YBeJIHueHHe HJIy UMeHbIeHHe TeM6pa HN3KHX YAcTOr. B IeHTpaJIbHOM IOJIOKeHHO bcEChyHBAeTc IIOcka JXapakTepeHCTnKa (c.15).
18 PerylaTop TREBLE
YBeJIuHHeHne HJIN YMeHbIIeHHe TeM6pa BbICOKHX YaCTOT. B IeHTpajIbHOM IIOJIOKeHHN OeCIIeHNBaETcR IIOCKaXapakTepnCTHa (c.15).
19 PeryjIaTOp BALANCE
HacTpoIka 3ByKOBOrO 6aJIaHca JIeBOrO H IpaBATO INHaMHKOB IJIa KOMIIeHcAciHH pa3HNiIbI rPOMKocTH, BbI3BaHHoI pAcIOJIOKeHHeM INHaMHKOB HINXapaKTepHcHTKAMH KOMHaTbI, B KOTOpOH cCyIeCTBJIaETcR IIpOcJIyIuINBaHHe (c.15).
20 Peryntop LOUDNESS
CoxpaHHeHne IIOJIHOrO ToHaJIbHOrO DIIaIa3OHa IIpn JIO6oM yPoBHe rPOMKocTH, 6JIaOJapra YEmy KOMIIeHCnpyETc CHNKeHHe YUBCTBnTEJIbHOCTn CJIyXa K BOJIHaM BbICOKHX HHN3KHX YAcTOTHBxI XIIaIIa3OHOB IIpn HN3KOM yPoBHe rPOMKocTH (c.15).
2 SELECT/ENTER (IOBOPOTbI nepeKJIuOHaTeJIb)
ПовернITE пеклочать, чTOбы ВИбраТчHCIOBOE 3нанeн HeHn HacTpOиу, И habKMHT He HeRo, ChTOБы IIOITBepNTb BИбOp.
2 RETURN
Bo3BpAr K IIpeIbIyIeMy COo6IeHnIO Ha IIncIIJIe IpePeIHeI NaHeI.
23 Peryjatop VOLUME
YBeJIuHcHHe HJIy UMeHbIeHHe yPoBHa rPoMKOCTn 3ByKa.
Dincpnei nepednei nahei
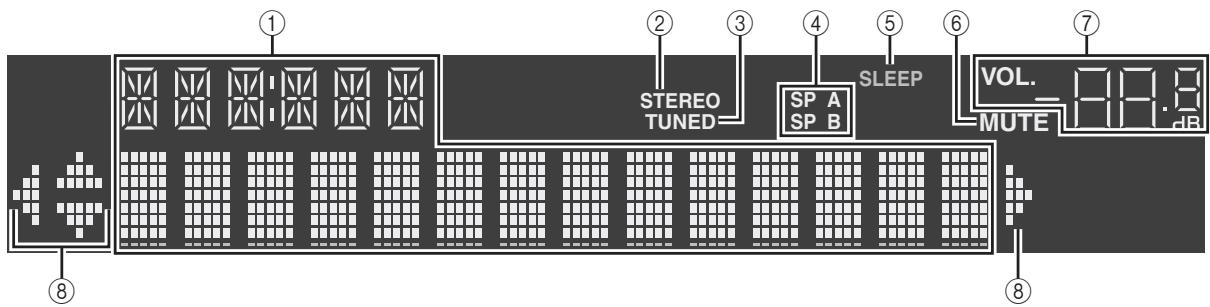
① Okho InHΦopMaζm
HcIOJIb3yETcIJI OTO6paJKeHHN TeKUIIeRO COCTOHHN (HaIphMep, Ha3BaHHN HcTouHHKa BXoIHORO cHrHaJa N Ha3BaHHN peXHMa 3ByuAHN).
Mozho IpekeJIOaTHb OTO6paKaemyIHHΦOpMaIIHIO, HauKIma KHOIIKy DISPLAY (c.29).
② STEREO
3aropaetc npn npheMe aIIIapaTOM cTepeofoHueckoro paAnocnHaJa FM.
(3) TUNED
3aropaetcIpiHIIpHeme anIInapaTOM cHHaJa paAnIOCTaHINFM/AM.
11 THe3do SUBWOOFER PRE OUT
IIJIIOIJKJIOUeHnHKeCa6ByΦepyCoBCTpoEHHbIM yCNJIHTeJIeM (c.10).
12 THe3da REMOTE IN/OUT
IIpn HaJIiHnH eIe OJHOro KOMIOHeHTa Yamaha, IIOJIePJKNBAIOJIeO IINCTaHIIOOHoe IIOKJIIOHeHne, KaK I daHHbI aIInapat, IpeEJaTCHK INHΦpaKpaCbIX cIHHaIOB He Tpe6yETc. IINCTaHIIOHNbIe cIHHaJIb MOxHO IpeJaBaTb, IIOKJIIOUHb INHΦpaKpaCbHb I pIneMHNK I pa3bEm REMOTE IN dpyrTO KOMIOHEHTa K pa3bEmAM REMOTE IN/OUT DaHHoro aIInapaTa, HcIOJIb3yra Ka6JIIM c MOHOΦOHueCKHM MHH-IIIteKepaMn.
H3MeHeHHe HHeHTnΦKaTopa NylTa IV (c.34).
⑦ KlaBnBbI6opa BxoJa
Bb6op HcToUHHKa BXoHOrO cHHaJa IJIa BocIpOn3BeDeHnI.
COAX 1-2 THe3da COAXIAL 1-2
OPT 1-2 The3Ja OPTICAL 1-2
LINE 1-3 He3la LINE 1-3
The31a PHONO PHONO
TUNER FM/AM-TIOHEP
Ihe3da CD CD
Tne3o USB USB
Ihe3IO NET NETWORK (HaKHMaiTe IO To tex Iop, Ioka He 6yIDet BbI6paH HyKbHc cTeBOH NCTOHHK)
⑧ KlaBnips paImo
UypaBJIeHne FM/AM-paJHo (c.17).
FM IpekeJIOueHHe Ha paIHO FM.
AM IpekeJIIOueHHe Ha paJHO AM.
MEMORY CoxpaHeHne paIIOcTaHnI FM/AM bKaueCTBe IpeJyctaHOBJIeHHbIX.
PRESET Bb6op IpeIycTaHOBJeHHoCTaHIN.
TUNING Bby6op paIIOHocTToBtI.
⑨ KlaBnUn ynpaBJeHnKoHTeTOM
SHUFFLE IpeKJIIOUeHHe peKHMOB BOCIIPOH3BeIeHnB cJIyuaHOM IopraJIke.
REPEAT IpeekJIIOueHHe peKHMOB IOBTOPOHO BOCIIPOHN3BeEHHA.
HOME OTo6paKeHHe MeHNo BepXHeRo yPoBnHa IINcPiIe IpePeIHei NaHeJI.
NOW PLAYING OTo6paKeHHe NaHHbIX BOCIpoH3BeJeHnHa HnCIIJIe IIpeJHHe IaHeJIH.
10 SETUP
OTo6paJKeHHe MeHIO“SETUP”(c.31).
11 KnaBnun ynpabJeHMaMeH0
KlaBHH Kypcopa BbI6Op MeHIO HJIN IpaMaTePa.
ENTER IIOITBepKdEHeN BeIbpaHHOrIyHKTa.
RETURN Bo3BpaT K IIpeIbIyIeMy coCTOHHIO.
DISPLAY IpeKJIIOHHe HnOOPMaUNn HaIcIIepepeJeHneHaHeJN.
② KlaBnShyynpaBHeNnBHeHm yCTpoiCTBOM
ПОЗВОЛЯТ ВКИОЧАТВОСПОНЗBEДЕНЕ, pa6OTaTb C MEOH, a TAKKE BынOLIЯт Дуг themselves Hа BHeIIHHx yctpoiCTBax (c.37).
⑬ LüdpöBbIe KlaBnIa
IIO3BOJIaET BBOITb IIΦpOBBIE 3NaueHnHaIpaHMeP paIHOuAcTObI.
14 KlaBnUs ynpaBHeHn TeJeBn3Opom
PergnctpnpyET KoIbI NcHCTaHcHONHOrO yIpaBJIeHNH BHeIIHHMn yCtpoIcbAMHa IIyIbTe IY (c.36).
16 SPEAKERS A/B
BkIIOUeHHe N bIKIOUeHHe Na6Opa IINHAMKOB, IIOKIIIOUeHHbIX Ka3BaemAM SPEAKERS A n/In SPEAKERS B Ha 3aJNei PaHeJI DaHHoro aIInapara, IIpn HauKaTHN COOTBeTCTByIOJe KHOIIKN.
17 MODE
IpekeJIIOUeHHe MeKJy peKHMamn "Stereo" n "Mono" IJIa FMpaIIOCTaHI (c.17).
IIepeKJIIOUeHHe BpeKHMbI pa60tBi iPod (c.22).
18 OPTION
Отоображенье мени “OPTION” (c.30).
19 KhonkVOLUME
PeryInpOBKa rPOMKocTH.
20 MUTE
Пиглтушени BBIBOДИМОЗ 3BYka.
#
Iy ynpabIIeHH BHeIHHMN yCTPOHCTBaMn C IIMOIObIO IyIbTa IY HeoXIOHMO IpeepI HcIOJIb3OBAHHem 3apeHCTprpOBaTB KoI IyIbTa IY Iy KaKIOrO yCTPOHCTBa (c.36).
IcnoJIb3OBAHne npJbTOB IY
YctaHOBka 6aTapeek
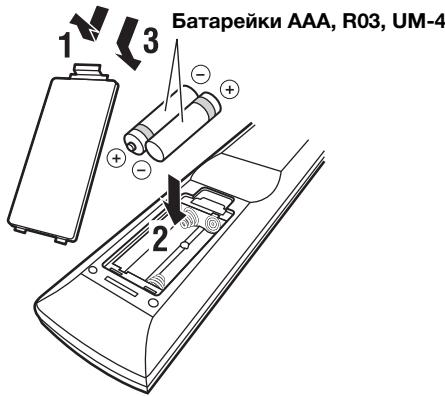
Pa6oyn dnaana3OH
IyIbT IY IpeJaet HnPaBJIeHHbI INHpKaPacHbI Lyu. O63aTeJbHO HnPaBJIte IyIbT IyIprMo Ha ceHcop IInCTaHIOHHORO yIpaBJIeHHra, pacIOJOKeHHbI Ha IpeJeHHe IaHeJIN DaHHoro aIInapata.
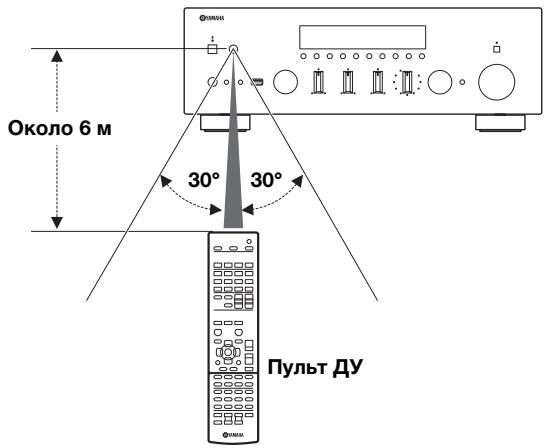
Повлочене ДнhamNKOB И KOMноHETOB ICTOчнКOB
BHIMAHHE
HeIOKJIIOUaIte 3OT aIIIapat HIN dpyrHne KOMIOHOHTbI K HCTOUYHKY rIaBHORO IITaHHN, IOKa He 6yTe 3aBepHHe IOIKJIIOUeHHe BCEx KOMIOHETOB.
Bce IIOKJIIOHeHn IOJIKHbI 6bITb BbIIIOJIHeHbI IIpaBbIbHO: L (JIeBbI) K L, R (IIpaBbI) K R, “+” K “+” N “-” K “-”. EcJIN IIOKJIIOUeHn BbIIIOJIHeHbI HeIIpaBbIbHO, ИЗ ДИнhamNKOB He 6уДET cJIbIiEh 3ByK, a ecJIN He co6JIIOHeHa IIOJIaRHOCT bIHHAMKOB, 3ByK 6yIeT HeecTeCTBeHHbIM C HeIOCTaTOHbIM KOJIInueCTBOM HIXKHHX YaactOT. CM. INHcTpYkUHIO NO 3KcIIiyAraaHn KaJIoTO H3 KOMIIHOHTOB.
- I36eaiTe cOpnKOCOBHnI OOrJIeHHbIX qactei Ka6eJIe IINHaMHKOB Ipyr C pyrTom HIN C M TaJIInueCKHM NactMNI TOA anIIapata. B IpOTnBHOM cIyae 3TO MOKeT cTaB IIpNHHOI IOBpeKDeHnAIIapata H/IN HIN dINHaMHKOB.
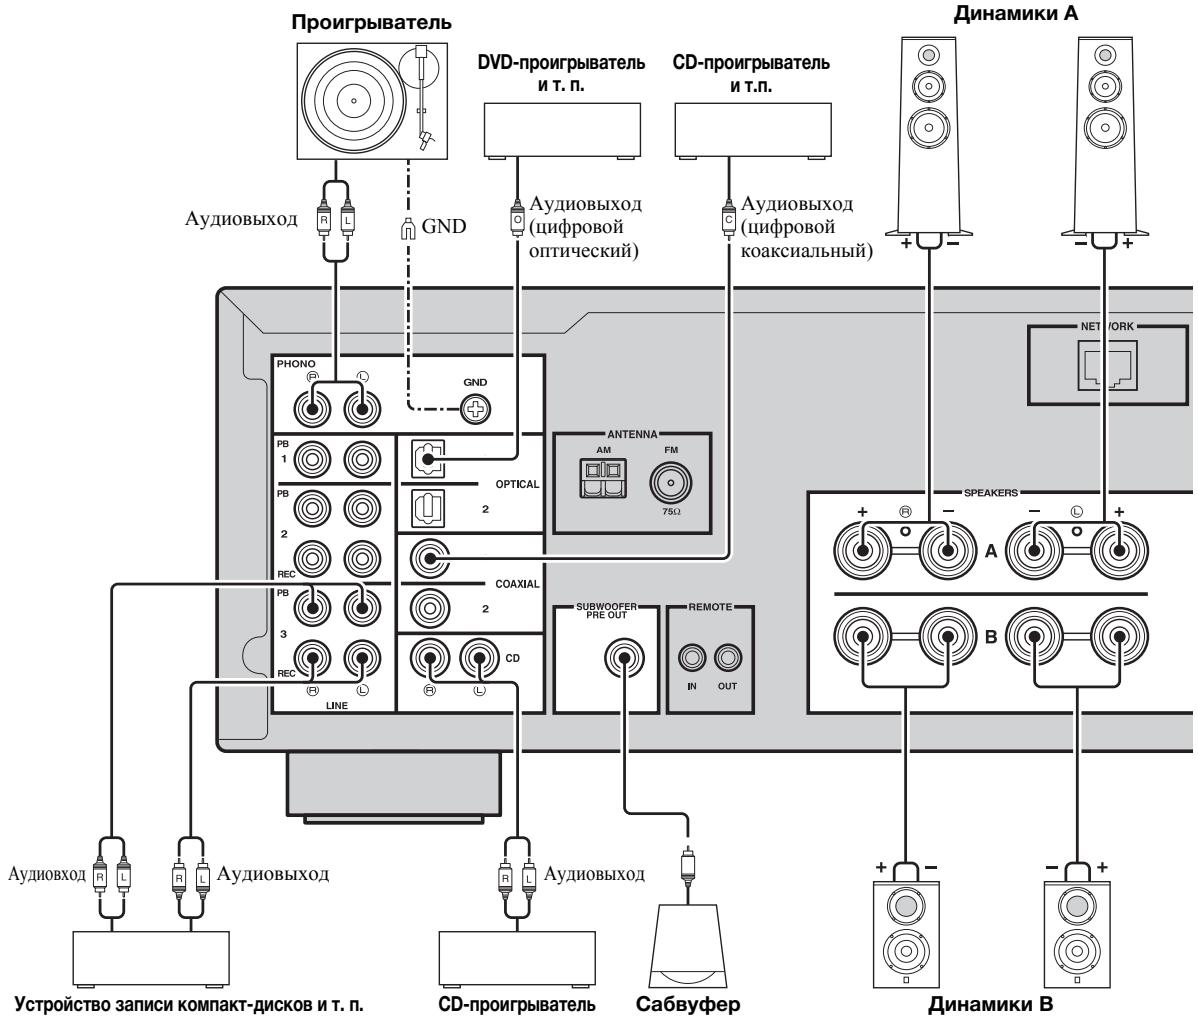

- _He3da PHONO IIpeIHa3NaueHb IJIIOKJIIOUeHnI IPOINpBbATEJcO 3ByKoCmHaOIIeI roJIOBkoM MM.
-ПолбоeHнHTe ПОнгрьВaTeЛь К раЗБуМ GND ДЯ умЕньшеня ШуМOB сннla.Однako ДЯ неКOTopbIX поигрьВaTeJIe MeHBIeve KOLIYeCTBO IyMa Na6JIIOaTeC 6e3 ПОДКЛIOчЕпЯ раЗБema GND.
IopKluoyHne 3aHncbIBaIOux yctpoNCTB
EcJH H3-3a cIa6ocTn CnHraJa HyxHoJ CtAHuHN ABTomatNueckn IOnCK He IpeKpaIaetc, HCIOJIb3yIe CJIeDyIOUHe KJIaBnIH NJI HaCTpOiKN YaactOTbl.
TUNING 公 / 公
YBEJIHHeHHe/YMeHbIeHHe YAcTOTbI.
IIuΦpObBie KJIaBnHnI:
BVeIHTe TaCTOTy HAnpMyIO. HAnpHMeP, YTo6bI BbIbpaTb TaCTOTy 98.50 MΓι, HαχMHTe “9”, “8”, “5” n “0” (NJIIN ENT).
PpmeaHn
-Пин haKaTHH Na IIJIbTe Iy ΙИФpoBx KJIaBnIb BO BpeMЯ NaCTPOiKN IpeUcTaHOBOK 6byET Bbl6paH HOMe IpeUcTaHOBKn. BKJIIOHTe peKHM NaCTPOiKN "HaCTPOiKa HaCTOtBi" c IMOUbIO KHOIIOK TUNING 念 /念 Do haKaTnI NΦpOBbIX KJIaBHI.
B CJIyuae BBOJa YacCTOBy, KOTOPa HAXOJNTc 3a IpeJeJAMH IOIyuctHMOrO dHaIIa30Ha, Ha IIcNJIe e IpeDHeI IaHEJI NTO6paKaaETc coo6IeHne "Wrong Station!". B TaKOM CJyuyae IIPOBepbTe 3NaueHne BBOIDMOJ YacCTOBy.
#
EcJIN IIpHem CnIHaJI FM-paIIOCTaHIHH HeCTa6JIeH, MoKHO IOBbICHT bKaueCTBO 3ByaHIn, IpeEKeJIIOuHbIIHCb Ha MOHOoHNueckn CnIHJI.
UnyucheHne npHemaB dHaana3OHe FM
YTO6bI yUyUHHTb KaueCTBO IIpHEMa IIpH cJIa6OM CNrHaJIe paAIOCTaHUN H IIOXOM KaueCTBe 3ByKa yCTaHOBHTe MOHOfoHNueckn peKHM IIpHEMa IIpoIpaMMbI B dHaIIa3OHe FM.
1 Haxmnte HeckoIbko pa3 KJIaBnUy MODE, 706bl Bbl6paTb 3HaueHne "Stereo" (abTomatNueckn cTepeofoHnueckn peKIM) nIN 3HaueHne "Mono" (MOHOFOHnueckn peKIM), npu HacTroPoiKe daHHoro annapaTa Ha npneM FM-paIOCTaHcnn.
EcJIN Bb6paH peKHM Mono, BeIaHHe FM-paIIOHcTaIHHH 6yIeT BOCIIPOH3BOIDHTbcB MOHOfoHHueckOM peKHMe.
PnmeaHne
Mozho BV3bIbTaB cTahHn H3 cINHcKa IpeyctaHOBOK, COCTaBJeHHO BrpyHIO HJN ABTOMaTHueCKN.
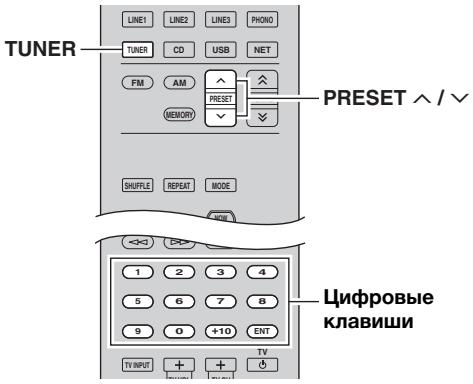
1 Haxmnte TUNER, YTo6bI Bbl6paTb "TUNER" B KaueCTBe NcTOUYHka BXoJHOrO cnHaJa.
2 HaxmTe KhoNky PREsT / ,YTo6bI Bbl6paTb HOMep npedyctaHOBKN.
中
- Homepa npetyctahOBOK, JIJI KOTOpbIX yJce coXpaHeHbCTAHIIIN, 6yDyT IIpOpyIeHbI.
- Ha IIINIIeO OTo6paKaAETcOooIeHHe "No Presets",ecIIIN coXpaHHeHHbIe cTaHnH OTCyTCTBYIOT.
- IIpeIyuctaHOBJeHHYIO cTAHIIHIO MOKHO BbI6paTb HaIIpIMyO c IOMOIIbIIO IINΦpOBbIX KJIABHIII Na IYJIbTe DY BO BpEmBaI3OBA IIpeIyctaHOBKN. IIpr IN BBOe HOMepa IIpeIyCTaHOBKN,ДЯ KOTOpOI He COXpAHEnO HN OJHOI CTaHIIHN, Na IINcIIJIeE oTO6paKaetc coo6IeHne "Empty". IIpr IN BBOe HeIIpApHbIbHorO HOMepa OT6paKaETc coo6IeHne "Wrong Num."
- EcJIH BO BpEma ObIyHOn HaCTpoiKN HaKaTb ΦIePobBle KJIaBnIH Na IyJIte D, ByIe T BVeEHa cActOra. BKIOHHTe peXHM HAcTpoiKn "HAcTpoiKa IpeDyCtahOBKn" C NOMOIIbHO KHOIIOK PRESET / Do hauKaTHa IuΦpOBbIX KJIaBnIII.
YdaJIeHne CTAHcIIMn N3 CnNcKa npedyCTaHOBOK
YdaJIeHHe paIIOcTaHII, coXpaHEHHbIX IOI HOMepAMn IIpeDyctaHOBOK.
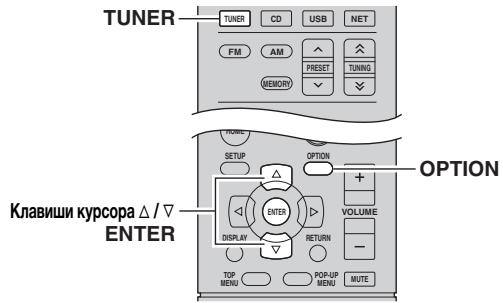
1 HaxmTe TUNER, 4To6bl BbI6paTb "TUNER" B KaueCTBe NcTOUHnKa BXoDHoro CnHaJa.
2 HaxmTe KhONky OPTION.
3 C nomoou Klaabu Kypcopa Bb6epnte "Clear Preset" n Haxmnte ENTER.

4 CnomoouknaBnKypcopa ( /) BbI6epnte npedyctaHOBJeHHyo cTaHcuIO, KOtOpyu cIeJeT ydaJIITb, N haXmTe KhoNky ENTER.
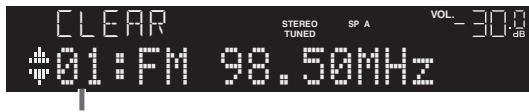
PpeyctahOBenHnaCTaHnI, KOtOpyo cJeMyet ydaNtB
EcJINIpeUcTaHOBJIeHHaCTaHUNyJaJIeHa, OTO6paKaTeCra "Cleared" H HOMep cJeUIOSei HCIOJIb3UIOSeiCRApeUcTaHOBKn.

5 NOBTOPA Te 14, noka Bce Heo6xOaMbIe npedyctaHOBLeHHbIe CTAHm He 6ydyT ydaJIeHbl.
6ДлЯБыховаи3MeHIOHAxMnTe OPTION.
中
BbMOkeTe ydaJIHTb IIpeJyctaHOBJIeHHyIO CTaHcIIIO Ha IpeJeHN He IaHeJIN.
① HαχmHTe KhoIIky CLEAR Ha IpeIeHη IaHEnI.
②ПовернITEperyIaTOpSELECT/ENTER,YTO6bIbIbpaIbIpeIyctaHOBJIeHHUOCTAHIIIO,KOTOPYIOJIcIeYerYdaJIHTB.
③ HαχKMHTe KHOIIKy SELECT/ENTER IIN CLEAR, ηΤΟБы yДАЛNTь IπeДустановлЕнHyU CTaHиИ.
Hactpoika Radio Data System
PekomeHnyetcH cnoJIb3OBaTb "Auto Preset" IJIa HacIpoKn cTaHIIH, TpaHcJIpyUOuNX Radio Data System (c.18).
2 HaxMMTe KHONKy DISPLAY.
IIpn KaJOM HkaTIN 3ToI KHOIIKN OTO6paKaembI 3JIeMeHT I3MeHReTcI.

Pn6JIn3HteJIbHoYepe3 3cekyHbI OTo6paKaetc coOTBETCTByIOuIa IHHΦOpMaIIIg OTo6paKaemOrO 3JIeMeHTA.

1 Ecni nCTOuHnKOM BXoDHoro CnHaIa YBJIeTcra "USB," haxMnte KnaBnUy REPEAT nII SHUFFLE heckoJbKO pa3, yTO6bl BbI6paTb cnOCo6 Bocnpou3BeDeHn.
Hnke Ioka3aHO kHO nHaHeIy npaBJIeHHI PIK.
(B KaueCTBe npImepa npNBOuNTc Bercn Ha aHrJ. Ra3bKe)
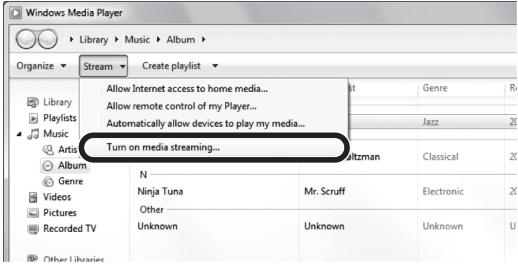
3 BbIbepHTe nyHKT "BkJIIOuHTb NOTOKOByIO nepeJaCy MyIbTmMeJna."
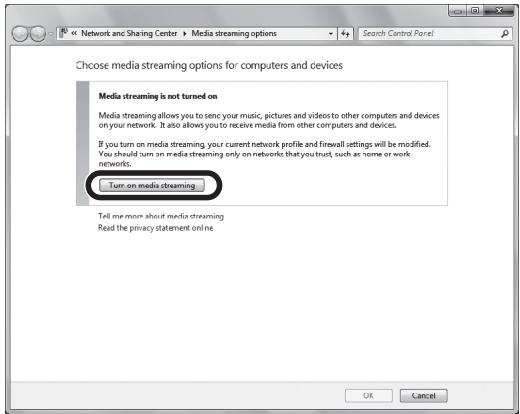
4 BbI6epnTe nyHKT "Pa3peSeHo" n3packpbIbAIOUeOcra CInCKa pIaOM c"R-N500".
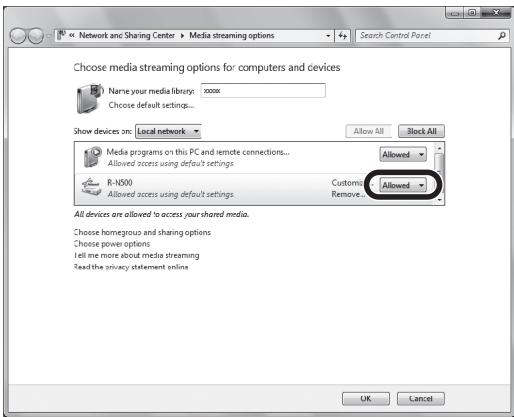
5 HaxmTe KhoNky "OK", YTO6bl BbIMTH.

IIOIO6Hee O NaCTpoKe 06IeO IOctTuHa K paJIaM MyJIbTHMeJHa cM. B pa3JeIe CIIpaBKN IIO Windows Media Player.
Ддя Windows Media Player 11
① 3aynycthre Windows Media Player 11 ha cboem PIK.
② BbIbepHTe“BbIbHOTeKa”NHaKMMTe“ObuHIOCTyIK aIIaM MyJIbTHMeJHa."
③ YctaHOBHTe ΦIaJOK “OTKpbIbTb O6IIH IOCTyI K MOH φaJIaM MyJIbTHMeJIHa", BbIbEpHtE 3HaOHK “R-N500” H aJaKMITE KHOIIKY "Pa3peHHTb".
④ HαKMnTe“OK”,TTO6bI BbITH.
- CeTeBoe xpaHHJIHIIe DaHHbIX HIN IIK c yctaHOBJeHHbIM dpyrHM cepBepHBIM IIO DLNA
HacpoTe npaMeTpbl oIeeroIOctTyia K aaiam MyJIbTHMeIDHa B COOTBeTCTBHN C HNCTpyKIIHMAH IOKCIIyataaHH yctpoiCTBa HJIN IIO.
Bocnpo3BeHne My3bikaJbHoro KOHTeHTa Ha NK
IyipabIeHMy3bIkaJIbHbIM COIepKHMbIM IIK 3aIycca BocnpOH3BeJeHHN BbIIIOJIHnTe CJIeYIOUHe JeCTBn.
Примеане
Bmcto CnmbolOB, KOtOpbIe He IIOJIepeKHBaHOTcAIIpaTOM, OTO6paKaacTc * (IOJIepeKHBaHHe).
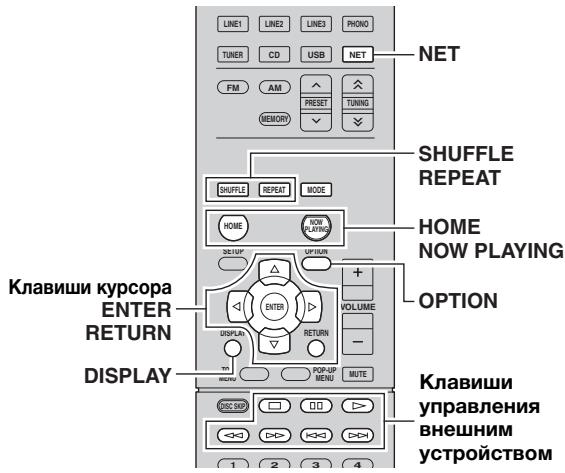
1 HeckoJbko pa3 haxMITE KHONky NET JnBbl6opa "SERVER" B kaueCTbe nctOuHnkaBXoDHoro cnHaJa.


EcJH Na IIK BbIIOJIHaTeCBA OcIIPOHN3BeDeHHe My3bKaJIbHOrO
paJa, BbI6paHnHO c aIIIapata, OTO6paKaIoTc JaHHbIE
BOcIIPOHN3BeDeHn.
2 C nOMOUI KJIaBIuI KUpcopa ( /) BbI6epNTe My3bIkaJIbHbI cepBep I haxMnte ENTER.
3 C NOMOusbIO KlaBmU Kypcopa Bbl6epnTe 3JIeMeHT N HaxMnTe ENTER.
EcJIN BbIbpaHa KOMIIIO3HIIa, HauHHeTcE ee BOCIpOHN3BeDeHne, H6yUT OTbOpaKaatcbc daHHbIe BOCIpOHN3BeDeHn.


-ДлЯ BOЗВРАТа K ПпeБыДУПЕМу COСТОЧИНЮ НaжмITE RETURN.
- IIpH MHOKpaTHOM HaKaTHN KJIaBHIN DISPLAY MOKHO IpeKeJIOUaTb DaHHbIe BOCIIPOH3BVeDEHnHa IHCIIJIee IpePeJHe IaHeJI (c.29).
- EcJN Bb6paH qaJI, KOTOpBHe IIOIePKeHBaetcra DAHHIM aIIapatOM, CnMBoJI. IOBHTcRaHmHEMeHem qaiJa.
Длуправлийь BOCПОнЗБЕн hem HcIOJIb3yIte cIeJyIOUIIne KHOJKN IyJIbTa IY.
CINcOK paHIOCTaHmI IOABHTcHa IHCIIe IpeepHeI NaHeJI.

2 C nOMOuIbIO KJIaBmII Kypcopa Bbl6epnTe 3JIeMeHT N HaxMnTe ENTER.
EcJIN Bb6paHa HHTepHET-paHocTaHnH, NaHHeTcye BOCpOHN3BeDeHHe, N 6yDyT OTO6paKaTbcS DaHHbIeBOCpOHN3BeDeHn.

EcJIN 3HaUOK He IIOABJIaETCI, IPOBepbTe IIpaBnJIbHOCTb IIOKJIIOHcHNNI PIK/iPod K mapIpyTH3atopy.
2 B iTunes/iPod BBi6epnte 3naoyk AirPlay n ykaXnTe yCTpoiCTBO (ceTEBOe nMa yCTpoiCTBa) B KaueCTBe yCTpoiCTBa dIra BBiBOda 3ByKa.
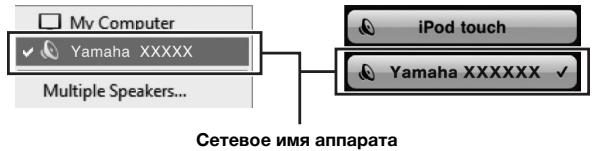
iTunes (nprimep)
3 BbI6epTe neChIO u BKIOUOHTe BOCpON3BeDeHne. AIIIapAT ABTOMATuueckn BbIbHpaeT "AirPlay" B KaueCTBe HCTOUYHKA BXOJHOTo CTHHaJa H NaunHHaet BOCpON3BeDeHne.ДaHHbIe BOCpON3BeDeHnA OTO6paKaJOTcra Ha IINCIJIe IpePeHne IIaHeJIi.

-ПиMHOROKpaTHOMHaKaTINHKJIaBbIiIN DISPLAYMOxHOHepeKeJIIOuATb DaHnBte BocIIPOH3BeDEeHnHaДncIIeEpeJHneIaHEn(c.29).
-Чтобу сизар вкючадся AVTomathueckн пин начале Bocpon3beHnna uepe3 iTunes Или iPod, устовITEллпарametpa“NET Standby”(c.32)ВMeHIO"SETUP"Знчehнe“On".
- Можно редактураьт tcTeBoe Имя (нмя aiПараза в ceTH), отобрахаиме наiTunes/iPod,иплььзу паметр "Network Name" (c.33)ВMeHNo "SETUP".
- EcJN Bb6paTb IpyroH NcTOUHNK CnHnAIA BO BpEma BOCpOu3BeDEnH,Ha iTunes/iPod BocpOu3BeDEnHe 6ydet OCTAHOBJIeHO ABToMaTHueCKH.
- PeryuInpoBaTb rPOMKocTB BOCIPOH3BeHeHH aAnIapaTa MoKHO uepe3iTunes/iPod. YTo6bI OTKJIIOHTb yIpabJIeHne rPOMKocTbIO c iTunes/iPod 3aJaiTe IJI naPametpa "Vol.Interlock" (c.30) B MeHIO "OPTION" 3naueHne "Off".
PpeynpexdneHn
3NeMeHbI MeHIO OPTION
IocTyHbIe 3JIeMeHTbI MeHIO MeHIOITcB 3aBHCHMOCTN OT BbIbpaHHOro HcTOUHHKa BXoIHORO cHHaJa.
PyuHaHa HacToPiKa cTeN
1 UctaHOBInTe IJI naPamEtpa "DHCP" 3NaueHne "Off".
2 C NOMOUIKJIaBNI Kypcopa ( /) BBI6epNTe TnnpapaMeTpa.
| Address | Установka IP-aадра. |
| Subnet Mask | Установka маски пдсети. |
| Default Gateway | Установka IP-aадра сиюза по умлчан积极作用. |
| DNS Server(P) | Установka IP-aадра основно гор серва DNS. |
| DNS Server(S) | Установka IP-aадра дожаленьто серва DNS. |
3 C nomooubno KnaBnsh Kypcopa ( / ) Bbl6epnte pacnoJIOxHne peDaKtnpoBaHn.

(Pnmupep:IP-apec)
C IIOMOIbIy KJIaBnII Kypcopa ( /) IpeKeIIOuaiTeCb MeKJy ceMeHTamH (Address1, Address2...) aIpeca.
4 C nOMOUIKJIaBNI Kypcopa ( /) IINIuΦpOBbIX KJIaBNI N3MeHInTe 3HaueHne.
5ДЯ BBIXOda n3 MeHIO HaxMITE SETUP.
MAC Filter
UctaHOBka fHJIbTpMa MAC-aIpeca IJIa OpraHnueHnIocTyIIa K aIIIapaty co cTOpHbI dpyTHx ceTeBbIX ycTpoiCTB.
Filter
BkJIIOUeHHe HJIN BbIKJIIOUeHHe ΦJIbTpa MAC-aIpeca.
HOBbIe HAcTpOuKn BcTyIaT B cHny.
3JIeMeHtbl MeHIO ADVANCED SETUP
BbI6Op NdeHTnΦnKaaOnHOrO KoJa nyIbTa Dv (REMOTE ID)
REMOTE ID·ID2
H3MeHHTe HJeHTnФHKaIHOHHb KOD IIyIbTa IY aIIIapata TaK, YTO6bIO OH COBIIaJI C HJeHTnФHKaIHOHHbIM KOJOM IIyIbTa IY (IIO yMOJIuaHHo: ID2). IIpr HcIOJIb3OBAHH HeCKOJIbKHX pecHBepOB Yamaha AV MOJHO yCTaHOBHT bIJI KAJDOI O IIyIbTa IY yHNIkaJIbHbI NDEHTnФHKaIHOHHb KOD, COOTBETCTByIOUH erO pecHBepy.
HacptpoKu
ID1, ID2 (Iyo ymoJIyauHHIO)
I3meHHe nIeHTnΦnKauHOHOro KoJa Dy nyJbTa Dy
1ДЯВыбopa3наченяID1,yedpxnBaJKnaBnuy ID,ODHOBpeMeHNO yedpxnBaITe zuΦpoByo KnaBnuy“1”B TeueHne 6OJee 3 cekyHd. ⅡЯВыбopa3начenяID2,yedpxnBaJKnaBnuy ID,ODHOBpeMeHNO yedpxnBaITe zuΦpoByo KnaBnuy“2”B TeueHne 6OJee 3 cekyHd.
EcJIN coXpaHEnHe KOJa IIyIbTa IY BByIOJIHeHO ycIIeIIHO, NaIcIJIe IpeIeHne IaHeJI INoBHTcra coO6IeHHe "Rem: Success".
EcJH Na IINCIJIe IIpeJHNe IaHEJN IOBHTcOooIeHne "Rem:Fail",coXpaHHe He BbIOJIHeHO.IOBTropHTe IPOUeDpyc Ⅲara 1.

3apeHCTprpOBaHHbIe KOJIbI IyJIbTa DY (c.36) coXpaHrTc,JaKe ecJH 0dyET H3MeHeH NDeHTNΦHKaUHOHHbIKoD YI.
BocstaHOBJIeHne HacTpoE Kno yMOnuHaHnIO (INIT)
INIT:···CANCEL
BocstaHOBJIeHHe HacTpoE IIO yMOJIuHaHHIO IaIaIIapata.
Bo3MOxHbIe 3HaueHnIa
HanpHmep,JIy yCTaHOBKn KOJa IyJIbTa DY JIJI BOCIIPOH3BOJIAIero yCTpoiCTBa,IOIKJIIOUeHHORO K rHe3dy CD,HaKMHTe KJIaBnIy CD.
4 NcnoJIb3yIte UnΦpOBoIe KnaBnIu, YTo6bl BBecTn 4-3HaUHbI KOd npIbTa DY.
EcJIN coXpaHHe NcOJa IIyIbTa IY BByIOJIHeHO ycIIeIHNO,Ha IINcIIJIe IpeIeHNe IaHEJIIN IOBHTcra coo6IeHHe "Rem:Success".
EcJIN HaIINJIeIe IpeEIneII NaHeJIN IOBHTcOo6IeHne "Rem:Fail",coxpaHEnHe BbIOJIHeHO.IOBTOPIte IpoUeDpyc IIara 2.
UnpaBJIeHne BOCpOu3BOJaIyM yCTpoiCTBOM
IocJe yctaHOBKn KOna Dv IJIg BOCIIPOH3BOJIAIIErO yCTpoHcTBa Hm MOKHO yIpaBJIyTb c NOMOIIbHO CJeIyIOuHX KJIaBnIII, BbIbpaB COOTBeTcTBYIOuN HCTOCHNK BXoIHOrO CnHHaJa HJIN CJIeHy.

ID (Network Setup, MeHIO SETUP) 33
In.Trim (Volume Trim, MeHIO OPTION) 30
Information (Network Setup, MeHIO SETUP) 32
INIT (MeHIO ADVANCED SETUP) 35
Initial Volume (MeHIO SETUP) 33
Input Trim (Volume Trim, MeHIO OPTION) 30
IP Address (Information, MeHIO SETUP) 32
IP Address (Network Setup, MeHIO SETUP) 32
L LOUDNESS (PeryJInpOBka Tem6pa) 15
M
MAC Address (Information, MeHIO SETUP) 32
MAC Address (MAC Filter, MeHIO SETUP) 32
MAC Filter (Network Setup, MeHIO SETUP) 32
Max Volume (MeHIO SETUP) 33
N
NET Standby (Network Setup, MeHIO SETUP) 32
Network Name (Network Setup, MeHIO SETUP) 33
Network Setup (MeHIO SETUP) 32
Network Update (Network Setup, MeHIO SETUP) 33
NewFwAvailable 39
P Perform Update (Network Setup, MeHIO SETUP) 33
Power Mode (DC OUT, MeHIO SETUP) 33
Program Service (Radio Data System). 20
Program Type (Radio Data System). 20
PURE DIRECT. 14
R Radio Data System (FM-paio) 20 Radio Text (Radio Data System) 20 REMOTE ID (MeHIO ADVANCED SETUP) 34
S
SAMPL (Signal Info, MeHIO OPTION) 30
Signal Info (MeHIO OPTION) 30
SP IMP. (MeHIO ADVANCED SETUP) 34
T TONE CONTROL 15 TP (Traffic Program) 20 Traffic Program (FM-paДно, MeHIO OPTION) 20 TREBLE (PerguInpoBka Tem6pa) 15
U
UPDATE (MeHIO ADVANCED SETUP) 35
Update (Network Setup, MeHIO OPTION) 33
V
VERSION (MeHIO ADVANCED SETUP) 35
Version (Network Setup, MeHIO SETUP) 33
Vol.Interlock (MeHIO OPTION) 30
Volume Trim (MeHIO OPTION) 30
vTuner ID (Information, MeHIO SETUP) 32
Information about software
Information sur le logiciel
Information uber Software
Information om programvara
Informazioni sul software
Información sobre el software
Informatie over software
IHHΦopMaцЯ O npoPramMHom obecneueHn
This product uses the following free software.
For information (copyright, etc) about each software, read the original sentences stated below.
About ASN.1 object dumping code
ASN.1 object dumping code, copyright Peter Gutmann pgut001@cs.auckland.ac.nz, based on ASN.1 dump program by David Kemp dpkemp@missi.ncsc.mil, with contributions from various people including Matthew Hamrick hamrick@rsa.com, Bruno Couillard bcouillard@chrysalis-its.com, Hallvard Furuseth h.b.furuseth@usit.uio.no, Geoff Thorpe geoff@raas.co.nz, David Boyce d.boyce@isode.com, John Hughes
john.hughes@entegrity.com, Life is hard, and then you die ronald@trustpoint.com, Hans-Olof Hermansson hans-olof.hermansson@postnet.se, Tor Rustad
Tor.Rustad@bbs.no, Kjetil Barvik
kjetil.parvik@bbs.no,James Sweeny
jsweeny@us.ibm.com, and several other people whose names I've misplaced.
This code grew slowly over time without much design or planning, with features being tacked on as required.
It's not representative of my normal coding style.
About FLAC codec Library
Copyright © 2000,2001,2002,2003,2004,2005,2006,2007, 2008,2009 Josh Coalson
Redistribution and use in source and binary forms, with or without modification, are permitted provided that the following conditions are met:
Redistributions of source code must retain the above copyright notice, this list of conditions and the following disclaimer.
Redistributions in binary form must reproduce the above copyright notice, this list of conditions and the following disclaimer in the documentation and/or other materials provided with the distribution.
Neither the name of the Xiph.org Foundation nor the names of its contributors may be used to endorse or
promote products derived from this software without specific prior written permission.
THIS SOFTWARE IS PROVIDED BY THE
COPYRIGHT HOLDERS AND COLNTRIBUTORS "AS
IS" AND ANY EXPRESS OR IMPLIED
WARRANTIES, INCLUDING, BUT NOT LIMITED TO,
THE IMPLIED WARRANTY OF
MERCHANTABILITY AND FITNESS FOR A
PARTICULAR PURPOSE ARE DISCLAIMED. IN NO
EVENT SHALL THE FOUNDATION OR
CONTRIBUTORS BE LIABLE FOR ANY DIRECT,
INDIRECT, INCIDENTAL, SPECIAL, EXEMPLARY,
OR CONSEQUENTIAL DAMAGES (INCLUDING,
BUT NOT LIMITED TO, PROCEDURE OF
SUBSTITUTE GOODSOR SERVICES;LOSSOFUSE,
DATA,OR PROFITS;OR BUSINESS
INTERRUPTION)HOWEVERCAUSEDAND ON
ANY THEORY OF LIABILITY,WHETHERIN
CONTRACT,STRICTLIABILITY,ORTART
(INCLUDINGNEGLIGENCEOROTHERWISE)
ARISING IN ANYWAYOUT OF THE USE OF THIS
SOFTWARE,EVEN IF ADVISED OF THE
POSSIBILITY OF SUCH DAMAGE.
About libexpat
Copyright © 1998, 1999, 2000 Thai Open Source Software Center Ltd and Clark Cooper
Copyright © 2001, 2002, 2003, 2004, 2005, 2006 Expat maintainers.
Permission is hereby granted, free of charge, to any person obtaining a copy of this software and associated documentation files (the "Software"), to deal in the Software without restriction, including without limitation the rights to use, copy, modify, merge, publish, distribute, sublicense, and/or sell copies of the Software, and to permit persons to whom the Software is furnished to do so, subject to the following conditions:
The above copyright notice and this permission notice shall be included in all copies or substantial portions of the Software.
THE SOFTWARE IS PROVIDED "AS IS", WITHOUT WARRANTY OF ANY KIND, EXPRESS OR IMPLIED, INCLUDING BUT NOT LIMITED TO THE WARRANTYES OF MERCHANTABILITY, FITNESS FOR A PARTICULAR PURPOSE AND NONINFRINGEMENT. IN NO EVENT SHALL THE AUTHORS OR COPYRIGHT HOLDERS BE LIABLE FOR ANY CLAIM, DAMAGES OR OTHER LIABILITY, WHETHER IN AN ACTION OF CONTRACT, TORT OR OTHERWISE, ARISING FROM, OUT OF OR IN CONNECTION WITH THE SOFTWARE OR THE USE OR OTHER DEALINGS IN THE SOFTWARE.
About The Independent JPEG Group's JPEG software
The Independent JPEG Group's JPEG software
Copyright © 1991-2010, Thomas G. Lane, Guido Vollbeding.
All Rights Reserved except as specified below.
The authors make NO WARRANTY or representation, either express or implied, with respect to this software, its quality, accuracy, merchantability, or fitness for a particular purpose. This software is provided "AS IS", and you, its user, assume the entire risk as to its quality and accuracy.
Permission is hereby granted to use, copy, modify, and distribute this software (or portions thereof) for any purpose, without fee, subject to these conditions:
(1) If any part of the source code for this software is distributed, then this README file must be included, with this copyright and no-warranty notice unaltered; and any additions, deletions, or changes to the original files must be clearly indicated in accompanying documentation.
(2) If only executable code is distributed, then the accompanying documentation must state that "this software is based in part on the work of the Independent JPEG Group".
(3) Permission for use of this software is granted only if the user accepts full responsibility for any undesirable consequences; the authors accept NO LIABILITY for damages of any kind.
These conditions apply to any software derived from or based on the IJG code, not just to the unmodified library. If you use our work, you ought to acknowledge us.
Permission is NOT granted for the use of any IJG author's name or company name in advertising or publicity relating to this software or products derived from it. This software may be referred to only as "the Independent JPEG Group's software".
We specifically permit and encourage the use of this software as the basis of commercial products, provided that all warranty or liability claims are assumed by the product vendor.
About JsonCpp
Permission is hereby granted, free of charge, to any person obtaining a copy of this software and associated documentation files (the "Software"), to deal in the
Software without restriction, including without limitation the rights to use, copy, modify, merge, publish, distribute, sublicense, and/or sell copies of the Software, and to permit persons to whom the Software is furnished to do so, subject to the following conditions:
The above copyright notice and this permission notice shall be included in all copies or substantial portions of the Software.
THE SOFTWARE IS PROVIDED "AS IS", WITHOUT WARRANTY OF ANY KIND, EXPRESS OR IMPLIED, INCLUDING BUT NOT LIMITED TO THE WARRANTYES OF MERCHANTABILITY, FITNESS FOR A PARTICULAR PURPOSE AND NONINFRINGEMENT. IN NO EVENT SHALL THE AUTHORS OR COPYRIGHT HOLDERS BE LIABLE FOR ANY CLAIM, DAMAGES OR OTHER LIABILITY, WHETHER IN AN ACTION OF CONTRACT, TORT OR OTHERWISE, ARISING FROM, OUT OF OR IN CONNECTION WITH THE SOFTWARE OR THE USE OR OTHER DEALINGS IN THE SOFTWARE.
About Network
Copyright © 1988 Stephen Deering.
Copyright © 1992, 1993
The Regents of the University of California. All rights reserved.
Copyright © 1985, 1986, 1993
The Regents of the University of California. All rights reserved.
Redistribution and use in source and binary forms, with or without modification, are permitted provided that the following conditions are met:
- Redistributions of source code must retain the above copyright notice, this list of conditions and the following disclaimer.
- Redistributions in binary form must reproduce the above copyright notice, this list of conditions and the following disclaimer in the documentation and/or other materials provided with the distribution.
- All advertising materials mentioning features or use of this software must display the following acknowledgement:
This product includes software developed by the University of California, Berkeley and its contributors.
- Neither the name of the University nor the names of its contributors may be used to endorse or promote products derived from this software without specific prior written permission.
THIS SOFTWARE IS PROVIDED BY THE REGENTS AND COLNTRIBUTORS "AS IS" AND ANY EXPRESS OR IMPLIED WARRANTY, INCLUDING, BUT NOT LIMITED TO, THE IMPLIED WARRANTY OF MERCHANTABILITY AND FITNESS FOR A PARTICULAR PURPOSE ARE DISCLAIMED. IN NO EVENT SHALL THE REGENTS OR COLNTRIBUTORS BE LIABLE FOR ANY DIRECT, INDIRECT, INCIDENTAL, SPECIAL, EXEMPLARY, OR CONSEQUENTIAL DAMAGES (INCLUDING, BUT NOT LIMITED TO, PROCEDURE OF SUBSTITUTE GOODSOR SERVICES;LOSSOFUSE, DATA,OR PROFITS;OR BUSINESS INTERRUPTION)HOWEVERCAUSEDAND ON ANY THEORY OF LIABILITY,WHETHERIN CONTRACT,STRICTLIABILITY,OR TORT (INCLUDING NEGLIGENCEOR OTHERWISE) ARISING IN ANYWAYOUT OF THE USE OF THIS SOFTWARE,EVEN IF ADVISED OF THE POSSIBILITY OF SUCH DAMAGE.
Copyright © 1982, 1986 Regents of the University of California.
All rights reserved.
Copyright © 1982, 1986, 1988 Regents of the University of California.
All rights reserved.
Redistribution and use in source and binary forms are permitted provided that the above copyright notice and this paragraph are duplicated in all such forms and that any documentation, advertising materials, and other materials related to such distribution and use acknowledge that the software was developed by the University of California, Berkeley. The name of the University may not be used to endorse or promote products derived from this software without specific prior written permission.
THIS SOFTWARE IS PROVIDED "AS IS" AND WITHOUT ANY EXPRESS OR IMPLIED WARRANTY, INCLUDING, WITHOUT LIMITATION, THE IMPLIED WARRANTY OF MERCHANTIBILITY AND FITNESS FOR A PARTICULAR PURPOSE.
About PNG Reference Library
ibpng versions 1.2.6, August 15, 2004, through 1.4.5, December 9, 2010, are Copyright © 2004, 2006-2010 Glenn Randers-Pehrson, and are distributed according to the same disclaimer and license as libpng-1.2.5 with the following individual added to the list of Contributing Authors
Cosmin Truta
libpng versions 1.0.7, July 1, 2000, through 1.2.5 - October 3, 2002, are Copyright © 2000-2002 Glenn Randers-Pehrson, and are distributed according to the same disclaimer and license as libpng-1.0.6 with the following individuals added to the list of Contributing Authors
Simon-Pierre Cadieux
Eric S. Raymond
Gilles Vollant
and with the following additions to the disclaimer:
There is no warranty against interference with your enjoyment of the library or against infringement.
There is no warranty that our efforts or the library will fulfill any of your particular purposes or needs. This library is provided with all faults, and the entire risk of satisfactory quality, performance, accuracy, and effort is with the user.
libpng versions 0.97, January 1998, through 1.0.6, March 20, 2000, are Copyright © 1998, 1999 Glenn Randers-Pehrson, and are distributed according to the same disclaimer and license as libpng-0.96, with the following individuals added to the list of Contributing Authors:
Tom Lane
Glenn Randers-Pehrson
Willem van Schaik
libpng versions 0.89, June 1996, through 0.96, May 1997, are Copyright © 1996, 1997 Andreas Dilger Distributed according to the same disclaimer and license as libpng-0.88, with the following individuals added to the list of Contributing Authors:
John Bowler
Kevin Bracey
Sam Bushell
Magnus Holmgren
Greg Roelofs
Tom Tanner
libpng versions 0.5, May 1995, through 0.88, January 1996, are Copyright © 1995, 1996 Guy Eric Schalnat, Group 42, Inc.
For the purposes of this copyright and license, "Contributing Authors" is defined as the following set of individuals:
Andreas Dilger
Dave Martindale
Guy Eric Schalnat
Paul Schmidt
Tim Wegner
The PNG Reference Library is supplied "AS IS". The Contributing Authors and Group 42, Inc. claim all warranties, expressed or implied, including, without limitation, the warranties of merchantability and of fitness for any purpose. The Contributing Authors and Group 42, Inc. assume no liability for direct, indirect, incidental, special, exemplary, or consequential damages, which may result from the use of the PNG Reference Library, even if advised of the possibility of such damage.
Permission is hereby granted to use, copy, modify, and distribute this source code, or portions thereof, for any purpose, without fee, subject to the following restrictions:
- The origin of this source code must not be misrepresented.
- Altered versions must be plainly marked as such and must not be misrepresented as being the original source.
- This Copyright notice may not be removed or altered from any source or altered source distribution.
The Contributing Authors and Group 42, Inc. specifically permit, without fee, and encourage the use of this source code as a component to supporting the PNG file format in commercial products. If you use this source code in a product, acknowledgment is not required but would be appreciated.
About RC4 Algorithm
Copyright Mocana Corp 2003-2005. All Rights Reserved.
Proprietary and Confidential Material.
About WPA Suppliant
Copyright © 2003-2008, Jouni Malinen j@w1.fi and contributors
All Rights Reserved.
Redistribution and use in source and binary forms, with or without modification, are permitted provided that the following conditions are met:
- Redistributions of source code must retain the above copyright notice, this list of conditions and the following disclaimer.
-
Redistributions in binary form must reproduce the above copyright notice, this list of conditions and the following disclaimer in the documentation and/or other materials provided with the distribution.
-
Neither the name(s) of the above-listed copyright holder(s) nor the names of its contributors may be used to endorse or promote products derived from this software without specific prior written permission.
THIS SOFTWARE IS PROVIDED BY THE
COPYRIGHT HOLDERS AND COLNTRIBUTORS "AS
IS" AND ANY EXPRESS OR IMPLIED
WARRANTIES, INCLUDING, BUT NOT LIMITED TO,
THE IMPLIED WARRANTY OF
MERCHANTABILITY AND FITNESS FOR A
PARTICULAR PURPOSE ARE DISCLAIMED. IN NO
EVENT SHALL THE COPYRIGHT OWNER OR
CONTRIBUTORS BE LIABLE FOR ANY DIRECT,
INDIRECT, INCIDENTAL, SPECIAL, EXEMPLARY,
OR CONSEQUENTIAL DAMAGES (INCLUDING,
BUT NOT LIMITED TO, PROCEDURE OF
SUBSTITUTE GOODSOR SERVICES;LOSSOFUSE,
DATA,OR PROFITS;OR BUSINESS
INTERRUPTION) HOWEVER CAUSED AND ON
ANY THEORY OF LIABILITY,WHETHER IN
CONTRACT,STRICTLIABILITY,OR TORT
(INCLUDING NEGLIGENCE OR OTHERWISE)
ARISING IN ANY WAY OUT OF THE USE OF THIS
SOFTWARE,EVEN IF ADVISED OF THE
POSSIBILITY OF SUCH DAMAGE.
About zlib Library
Copyright notice:
© 1995-2010 Jean-loup Gailly and Mark Adler
This software is provided 'as-is', without any express or implied warranty. In no event will the authors be held liable for any damages arising from the use of this software.
Permission is granted to anyone to use this software for any purpose, including commercial applications, and to alter it and redistribute it freely, subject to the following restrictions:
- The origin of this software must not be misrepresented; you must not claim that you wrote the original software. If you use this software in a product, an acknowledgment in the product documentation would be appreciated but is not required.
- Altered source versions must be plainly marked as such, and must not be misrepresented as being the original software.
- This notice may not be removed or altered from any source distribution.
Do not disassemble, decompile, or reverse engineer the software included in Yamaha AV products.
LIST OF REMOTE CONTROL CODES LISTE DES CODES DE COMMANDE LISTE DER FERNBEDIENUNGSCODES LISTA ÖVER FJÄRRKONTROLLKODER
| TV | AudioTon | 0161, 0282, 0342 | |
| Audiovox | 0058, 0179, 0194 | ||
| Ausind | 0171 | ||
| A.R. Systems | 0320 | Autovox | 0171, 0282, 0337, 0339, 0342 |
| Acme | 0342 | ||
| Acura | 0323, 0343 | Aventura | 0051 |
| ADC | 0337 | Awa | 0277, 0282 |
| Admiral | 0054, 0178, 0336, 0337, 0339, 0346, 0347 | Axion | 0156 |
| Baird | 0282 | ||
| Bang & Olufsen | 0180, 0339 | ||
| Advent | 0158 | Basic Line | 0282, 0320, 0323, 0340, 0343, 0350 |
| Adventura | 0057 | ||
| Adyson | 0277, 0282, 0342 | Bastide | 0282, 0342 |
| Agashi | 0277, 0282 | Baur | 0320, 0349 |
| Agazi | 0337 | Bazin | 0282 |
| Aiko | 0277, 0282, 0320, 0323, 0342, 0343 | Beko | 0161, 0269, 0294, 0302, 0311, 0320, 0328, 0351 |
| Aim | 0320 | ||
| Aiwa | 0078, 0379 | Belcor | 0008 |
| Akai | 0050, 0055, 0109, 0159, 0181, 0277, 0282, 0320, 0323, 0340, 0343, 0349, 0350 | Bell & Howell | 0019, 0054 |
| Bestar | 0161 | ||
| Bestar | 0161, 0320, 0350 | ||
| Akiba | 0320, 0340 | BGH | 0400 |
| Akura | 0320, 0323, 0337, 0340 | Bimatone | 0282, 0342 |
| Blue Sky | 0320, 0340 | ||
| Alaron | 0277 | Blue Star | 0348 |
| Alba | 0161, 0277, 0320, 0323, 0340, 0342, 0343, 0344, 0349, 0351, 0372, 0382 | Boots | 0282, 0342 |
| BPL | 0320, 0348 | ||
| Bradford | 0058, 0179 | ||
| Brandt | 0322, 0345 | ||
| Albatron | 0140 | Brillian | 0182 |
| Alcyon | 0171 | Brinkmann | 0320 |
| Alleron | 0059 | Brionvega | 0320, 0339, 0349, 0350 |
| Allorgan | 0282 | ||
| Allstar | 0320, 0350 | Britannia | 0277, 0282, 0342 |
| America Action | 0179 | Brockwood | 0008 |
| AMOi | 0276 | Broksonic | 0109, 0179 |
| Amplivision | 0161, 0282, 0321, 0342 | Bruns | 0339 |
| BTC | 0340 | ||
| Amstrad | 0320, 0323, 0337, 0340, 0343 | Bush | 0269, 0282, 0283, 0304, 0320, 0323, 0328, 0332, 0340, 0343, 0344, 0346, 0348, 0349, 0350, 0372, 0382, 0463, 0470, 0472 |
| Candle | 0093 | ||
| Ansonic | 0161, 0168, 0320, 0323, 0341, 0343 | ||
| AOC | 0008, 0026, 0050, 0053 | Capsonic | 0337 |
| Carena | 0320 | ||
| Apex | 0039, 0111, 0217 | Carnivale | 0050 |
| Arcam | 0277, 0282 | Carrefour | 0344 |
| Arcam Delta | 0342 | Carver | 0010 |
| Aristona | 0320, 0349, 0350 | Cascade | 0320, 0323, 0343 |
| Arthur Martin | 0321 | Casio | 0367 |
| ASA | 0339, 0347 | Cathay | 0320, 0349, 0350 |
| Asberg | 0171, 0320, 0350 | CCE | 0183, 0282 |
| Astra | 0343 | Celebrity | 0055, 0107 |
| Asuka | 0277, 0282, 0337, 0340, 0342 | Centurion | 0039 |
| Cerema | 0320, 0349, 0350 | ||
| Atlantic | 0277, 0320, 0342, 0349, 0350 | Century | 0339 |
| CGE | 0161, 0171 | ||
| Atori | 0323, 0343 | Changhong | 0039 |
| Auchan | 0321 | Chimei | 0273 |
| Audiosonic | 0161, 0282, 0320, 0340, 0342, 0343, 0350 | Cimline | 0323, 0343 |
| Citizen | 0007, 0008, 0026, 0050, 0058 |
LISTA DEI CODICI DI TELECOMANDO LISTA DE CÓDIGOS DE MANDO A DISTANCIA LIJST MET AFSTANDBEDIENINGSCODES CINICOK KODOB ДICTAHCUHHOуYPABLEHЯ
| City | 0323, 0343 | Dual-Tec | 0342, 0343 |
| Clarion | 0179 | Dumont | 0008, 0030, 0062, |
| Clarivox | 0349 | 0282, 0339, 0341, | |
| Clatronic | 0161, 0171, 0282, | 0342 | |
| 0320, 0323, 0337, | Durabrand | 0031, 0051, 0179, | |
| 0340, 0342, 0343, | 0215 | ||
| 0350, 0351 | Dux | 0349 | |
| CMS | 0277 | Dwin | 0178 |
| CMS Hightec | 0282 | Dynatron | 0320, 0349, 0350 |
| Coby | 0197 | Dynex | 0228, 0231 |
| Colortyme | 0008, 0026 | EIZO | 0509 |
| Commercial Solutions | Elbe | 0161, 0168, 0282, | |
| 0021 | 0320 | ||
| Concerto | 0008, 0026 | Elcit | 0339 |
| Concorde | 0323, 0343 | Electa | 0348 |
| Condor | 0161, 0277, 0320, | ELECTRO TECH | 0343 |
| 0323, 0342, 0350, | Electroband | 0055, 0107 | |
| 0351 | Electrograph | 0176 | |
| Contec | 0179, 0277, 0323, | Electrohome | 0008, 0026, 0052, |
| 0342, 0343, 0344 | 0055 | ||
| Contec/Cony | 0012, 0058 | Element | 0230 |
| Continental Edison | Elin | 0277, 0320, 0323, | |
| 0345 | 0342, 0349, 0350 | ||
| Cosmel | 0323, 0343 | Elite | 0320, 0340, 0350 |
| Craig | 0058, 0179 | Elman | 0341 |
| Crosley | 0010, 0037, 0171, | Elta | 0277, 0323, 0343 |
| 0339 | Emerson | 0000, 0007, 0008, | |
| Crown | 0058, 0161, 0171, | 0012, 0013, 0019, | |
| 0179, 0320, 0323, | 0026, 0031, 0037, | ||
| 0343, 0349, 0350, | 0051, 0058, 0059, | ||
| 0351 | 0161, 0179, 0320, | ||
| CS Electronics | 0277, 0340, 0342 | 0339 | |
| CTC Clatronic | 0341 | Emprex | 0154 |
| CTX | 0205 | Envision | 0008, 0026, 0050 |
| Curtis Mathes | 0007, 0008, 0010, | Epson | 0155, 0206, 0359 |
| 0019, 0021, 0026, | Erres | 0320, 0349, 0350 | |
| 0049, 0050, 0178 | ESA | 0051 | |
| CXC | 0058, 0179 | ESC | 0282 |
| Cybertron | 0340 | Etron | 0343 |
| Cytron | 0152 | Eurofeel | 0282 |
| Daewoo | 0007, 0008, 0026, | Euro-Feel | 0337 |
| 0037, 0053, 0167, | Euroline | 0349 | |
| 0266, 0275, 0277, | Euroman | 0161, 0277, 0282 | |
| 0282, 0315, 0320, | Euromann | 0320, 0337, 0342, | |
| 0323, 0331, 0335, | 0350 | ||
| 0342, 0343, 0350, | Europhon | 0277, 0282, 0320, | |
| 0381, 0465 | 0341, 0342, 0350 | ||
| Dainichi | 0277, 0340 | Expert | 0321 |
| Dansai | 0277, 0282, 0320, | Exquisit | 0320 |
| 0337, 0349, 0350 | Fenner | 0323, 0343 | |
| Dantax | 0161, 0349 | Ferguson | 0322, 0345, 0349 |
| Dawa | 0320 | Fidelity | 0277, 0320, 0342, |
| Daytron | 0007, 0008, 0026, | 0346 | |
| 0323, 0343 | Filsai | 0282 | |
| De Graaf | 0346 | Finlandia | 0346 |
| Decca | 0282, 0320, 0342, | Finlux | 0171, 0282, 0320, |
| 0349, 0350 | 0339, 0341, 0342, | ||
| Dell | 0145, 0245 | 0349, 0350 | |
| Denver | 0358, 0362 | FIRST LINE | 0342, 0343, 0350 |
| Desmet | 0320, 0349, 0350 | Firstline | 0277, 0282, 0320, |
| Diamant | 0320 | 0323 | |
| Diamond | 0277 | Fisher | 0019, 0161, 0282, |
| DiamondVision | 0135, 0143 | 0339, 0342, 0344, | |
| Dimensia | 0049 | 0351 | |
| Disney | 0219 | Flint | 0320, 0350 |
| Dixi | 0282, 0320, 0323, | Formenti | 0171, 0277, 0336, |
| 0343, 0349, 0350 | 0339, 0342, 0349 | ||
| Dream Vision | 0461, 0498 | Formenti/Phoenix | 0277 |
| DTS | 0323, 0343 | Fortress | 0336, 0339 |
| Dual | 0282, 0320, 0342 | Fraba | 0161, 0320 |
| Friac | 0161 | HCM | 0282, 0320, 0323, 0337, 0342, 0343, 0348 | JC Penney | 0007, 0008, 0026, 0027, 0049, 0053, 0056 | M Electronic | 0342, 0343, 0345, 0347, 0349, 0350 |
| Frontech | 0282, 0323, 0337, 0343, 0346, 0347 | ||||||
| Fujitsu | 0059, 0069, 0074, 0075, 0282 | Hema | 0282, 0323 | JCB | 0055, 0107 | Magnadyne | 0339, 0341, 0349 |
| Hewlett Packard | 0192 | Jensen | 0008, 0026 | Magnafon | 0171, 0277, 0341, 0342 | ||
| Fujitsu General | 0282 | HiGashi | 0277 | JVC | 0012, 0014, 0015, 0056, 0064, 0065, 0067, 0169, 0174, 0297, 0314, 0344, 0350, 0375 | Magnum | 0342 |
| Fujitsu Siemens | 0504, 0505, 0507, 0510, 0511 | HiLine | 0320 | Kaisui | 0277, 0282, 0320, 0323, 0340, 0342, 0343, 0348 | Magnum | 0342 |
| Hinari | 0320, 0323, 0340, 0343, 0344, 0349, 0350 | Kamosonic | 0343, 0348 | Majestic | 0054 | ||
| Funai | 0051, 0058, 0059, 0112, 0113, 0115, 0118, 0119, 0179, 0337, 0488, 0489 | Hisawa | 0321, 0340, 0348 | Kawashio | 0008, 0026, 0055, 0277 | Marelli | 0339, 0343 |
| Hisense | 0247 | Kendyo, 0012, 0026, 0066, 0084, 0092, 0093, 0120, 0179, 0174, 0176 | 0343, 0348 | Mark | 0337 | ||
| Futuretech | 0058, 0179 | Hitachi | 0008, 0012, 0026, 0066, 0084, 0092, 0120, 0179 | Kamosonic | 0342 | Mandor | 0337 |
| Galaxi | 0320, 0351 | Hoshii | 0320, 0350 | Kamp | 0277, 0342 | Manesth | 0282, 0320, 0337, 0342, 0349, 0350 |
| Galaxis | 0161, 0320 | Hoshii | 0321, 0325, 0370, 0344, 0345, 0346 | Kapsch | 0347 | Marantz | 0008, 0010, 0026, 0050, 0266, 0343, 0349, 0350 |
| Gateway | 0176, 0177, 0241 | Hoshii | 0321, 0325, 0370, 0344, 0345, 0346 | Karcher | 0161, 0320, 0342, 0343, 0349 | Marantz | 0008, 0010, 0026, 0050, 0266, 0343, 0349, 0350 |
| GBC | 0008, 0021, 0023, 0026, 0027, 0031, 0034, 0049, 0052, 0056, 0209 | Hygashi | 0335, 0338, 0342, 0344, 0346, 0347, 0365, 0382, 0448, 0456, 0467, 0482, 0492, 0512, 0515 | Kawashio | 0277, 0342 | Marelli | 0339 |
| Geant Casino | 0321 | Hypson | 0484, 0487 | KEC | 0179 | Mark | 0277, 0282, 0320, 0323, 0349, 0350 |
| GEC | 0282, 0320, 0342, 0347, 0349, 0350 | Hornyphon | 0320, 0350 | Kendo | 0161, 0320, 0341, 0346 | Masuda | 0282 |
| GIC | 0277 | Hyshai | 0340 | Kenwood | 0008, 0026, 0050 | Matsui | 0282, 0320, 0323, 0342, 0349, 0350 |
| Geloso | 0323, 0343, 0346 | Huanyu | 0277, 0342 | KIC | 0282 | Matsui | 0282, 0320, 0323, 0342, 0349, 0350 |
| General Technic | 0323, 0340, 0347, 0350 | Hyper | 0277, 0282, 0320, 0323, 0342, 0343, 0346, 0350 | Kingsley | 0277, 0342 | Marelli | 0346, 0349, 0350 |
| Genexxa | 0277, 0282, 0323, 0323, 0346, 0347, 0350 | Ilio | 0148, 0153 | KLH | 0342 | Memorex | 0455 |
| GFM | 0128, 0227 | Hypson | 0282, 0320, 0321, 0337, 0342, 0348, 0349, 0350 | Kneissel | 0161, 0168, 0320 | Mastushita | 0176 |
| Giant | 0282 | Hoshii | 0337, 0342, 0348, 0349, 0350 | Kolster | 0320, 0350 | Mediator | 0320, 0349, 0350 |
| Gibraltar | 0008, 0030, 0050, 0062 | Hyundai | 0141 | Konka | 0340 | Medion | 0320, 0337, 0343 |
| GoldHand | 0277 | Iberia | 0320 | Korpel | 0320, 0349, 0350 | Megapower | 0140 |
| Goldline | 0320 | ICE | 0277, 0282, 0320, 0323, 0337, 0344, 0349, 0350 | Korting | 0161, 0339 | Megatron | 0026, 0031 |
| GoldStar | 0007, 0008, 0012, 0026, 0031, 0050, 0053, 0161, 0277, 0282, 0323, 0342, 0349, 0350 | InFocus | 0323, 0337, 0340, 0342, 0343, 0345, 0350 | Koyoda | 0343 | Melvox | 0321 |
| Goodmans | 0266, 0311, 0505 | ICeS | 0277 | Kingsley | 0007, 0050, 0058, 0179, 0183, 0282, 0323, 0342 | Memorex | 0199, 0026, 0031, 0553, 0137 |
| Gorenje | 0161, 0351 | Ingelen | 0347 | Kyoto | 0277, 0282 | Memphis | 0215, 0323, 0343 |
| GPM | 0340 | Ingersol | 0323, 0343 | Lusat | 0161 | Memphis | 0323, 0343 |
| GPX | 0129 | Initial | 0153 | Lenvo | 0323, 0343 | Mercury | 0320, 0323 |
| Gradient | 0240 | Inno Hit | 0171, 0282, 0320, 0323, 0340, 0342, 0343 | Lenoir | 0323, 0342, 0343 | Metz | 0339 |
| Graetz | 0347 | InFocus | 0250, 0327, 0363, 0479, 0508 | LG | 0350 | Mikromaxx | 0337, 0343 |
| Granada | 0171, 0282, 0320, 0321, 0342, 0344, 0345, 0346, 0350 | Innovation | 0337, 0343 | Lefetec | 0346, 0349, 0350 | Mintek | 0153 |
| Grandin | 0340, 0343, 0348, 0349 | Insignia | 0131, 0228, 0236, 0238 | Loewe | 0466, 0471, 0478 | Mitsubishi | 0053, 0053, 0137 |
| Gorenje | 0161, 0351 | Ingelen | 0347 | LG/GoldStar | 0164 | Microstar | 0337, 0343 |
| GPM | 0340 | Ingersol | 0323, 0343 | Liesenkotter | 0320 | Midland | 0077, 0281, 0282, 0323, 0344, 0350 |
| GPX | 0129 | Initial | 0153 | Logik | 0323, 0343, 0349, 0350 | Minerva | 0171 |
| Gradiente | 0240 | Inno Hit | 0171, 0282, 0320, 0323, 0342, 0343, 0349, 0350 | Lenaor | 0320, 0323, 0337, 0349, 0350 | Mivar | 0161, 0168, 0171, 0277, 0282, 0342 |
| Graetz | 0347 | InFocus | 0277 | Lifetec | 0346, 0348, 0357 | Mitsubishi | 0140 |
| Granada | 0171, 0282, 0320, 0321, 0342, 0344, 0345, 0346, 0350 | International | 0347, 0349, 0350 | Lufat | 0343 | Monivision | 0140 |
| Halifax | 0277, 0282, 0323, 0347, 0349, 0350 | Integret | 0161, 0282, 0320, 0337, 0347, 0350 | Loewe | 0161, 0168, 0265, 0164 | Montgomery Ward | |
| Hallmark | 0008, 0026, 0031 | Irradio | 0171, 0320, 0323, 0342, 0349, 0350 | Loewe Opta | 0339, 0349, 0350 | Motion | 0171 |
| Hampton | 0277, 0282, 0342 | Irradio | 0340, 0343, 0349, 0350 | Logik | 0354 | Motorola | 0054 |
| Hanseatic | 0161, 0168, 0282, 0320, 0323, 0342, 0349, 1TC | Interfunk | 0161, 0320, 0339, 0515 | Lima | 0337, 0343 | MTC | 0088, 0026, 0050, 0161, 0277 |
| Haier | 0157, 0277, 0282, 0323 | ITCS | 0282, 0342 | Lumatron | 0349 | Multi System | 0349 |
| Hantarex | 0320, 0323, 0343 | ITCS | 0277, 0320, 0340, 0348, 0350 | Loewe | 0349, 0350 | Multitech | 0058, 0161, 0179 |
| Hantor | 0320 | ITT | 0343, 0347 | Lux May | 0350 | ||
| Harman/Kardon | 0010 | ITV | 0320, 0343, 0349 | Luxman | 0008, 0026 | ||
| Harvard | 0058, 0179 | Janeil | 0057 | Luxor | 0282, 0342, 0346 | ||
| Harwood | 0320, 0323 | JBL | 0010 | LXI | 0010, 0019, 0021, | ||
| Havermy | 0178 | 0026, 0027, 0031, | |||||
| 0049, 0111 |
| Naonis | 0346 | Philco | 0008, 0009, 0010, | RadioShack/Realistic | Scott | 0008, 0012, 0026, |
| NEC | 0008, 0026, 0050, | 0012, 0026, 0050, | 0007, 0008, 0012, | 0031, 0058, 0059, | ||
| 0052, 0053, 0072, | 0052, 0053, 0161, | 0026, 0049, 0058 | 0149, 0179 | |||
| 0103, 0282, 0344 | 0171, 0320, 0339 | Radiola | 0282, 0320, 0349, | Sears | 0008, 0010, 0019, | |
| Neckermann | 0161, 0282, 0320, | 0282, 0342 | 0350 | 0021, 0026, 0027, | ||
| 0339, 0342, 0346, | Philips | 0320, 0339 | 0031, 0049, 0051, | |||
| 0349, 0350, 0351 | 0011, 0012, 0032, | Radiotone | 0059, 0111 | |||
| NEI | 0320, 0349, 0350 | 0048, 0049, 0052, | 0350 | SEG | 0277, 0282, 0320, | |
| Net-TV | 0176 | 0122, 0128, 0134, | Rank | 0323, 0337, 0341, | ||
| Neufunk | 0320, 0323 | 0186, 0187, 0213, | RCA | 0342, 0344, 0349, | ||
| New Tech | 0343, 0350 | 0221, 0224, 0226, | Realistic | 0382 | ||
| New World | 0340 | 0239, 0256, 0257, | 0042, 0049, 0052, | SEI | 0320 | |
| NewTech | 0282, 0320, 0323 | 0259, 0261, 0263, | 0053, 0063, 0136, | SEI-Sinudyne | 0339, 0341, 0347 | |
| Nicamagic | 0277, 0342 | 0267, 0280, 0281, | 0225 | Seleco | 0344, 0346, 0347 | |
| Nikkai | 0277, 0282, 0320, | 0287, 0296, 0299, | Realistic | 0323, 0343 | 0323, 0343 | |
| 0323, 0337, 0340, | 0301, 0303, 0305, | 0179 | Sentra | 0323 | ||
| 0342, 0349, 0350 | 0313, 0319, 0320, | Recor | Serino | 0277 | ||
| Nikko | 0026, 0031, 0050 | 0324, 0333, 0339, | Redstar | 0320 | Sharp | 0000, 0001, 0002, |
| Nobliko | 0171, 0277, 0341, | 0342, 0349, 0350, | Reflex | 0320 | Sharp | 0003, 0007, 0008, |
| 0342 | 0353, 0357, 0360, | Revox | 0343 | 0370, 0449, 0450, | ||
| Nokia | 0347 | 0380, 0383, 0452, | 0350 | 0012, 0026, 0060, | ||
| Norcent | 0201 | 0459, 0460 | Rex | 0088, 0089, 0091, | ||
| Nordic | 0282 | Philips Magnavox | 037, 0346, 0347 | 0138, 0165, 0170, | ||
| Nordmende | 0339, 0345, 0347, | Phoenix | 0161, 0277, 0320, | 0178, 0198, 0229, | ||
| 0350 | 0339, 0349, 0350 | R-Line | 0262, 0278, 0279, | |||
| Nordvision | 0349 | Phonola | 0323, 0337, 0340, | 0291, 0308, 0312, | ||
| Novatronic | 0320 | 0349, 0350 | 0343 | 0336, 0344, 0354, | ||
| Oceanic | 0321, 0347 | Pilot | 0007, 0008, 0050 | 0451, 0464, 0474, | ||
| Okano | 0161, 0320, 0351 | Pioneer | 0008, 0026, 0094, | 0476, 0481 | ||
| Olevia | 0102, 0199, 0200, | 0095, 0161, 0320, | 0403, 0494 | Sheng Chia | 0178 | |
| 0207, 0222 | 0345, 0347, 0349, | Royal Lux | Shogun | 0008 | ||
| ONCEAS | 0342 | 0350, 0458, 0480 | RTF | Siarem | 0320, 0339, 0341 | |
| Onwa | 0058, 0179 | Plantron | Runco | 0320, 0330, 0341, | ||
| Opera | 0320 | 0350 | Saba | 0326, 0327, 0350 | Sierra | 0320, 0350 |
| Oppo | 0130 | Playsonic | 0282 | 0161 | ||
| Optimus | 0017, 0019 | Polaroid | 0323, 0342, 0202, | 0345, 0347 | Signature | 0054 |
| Optoma | 0144 | Phonopy | 0234 | 0342, 0343 | Silver | 0344 |
| Optonica | 0178 | Poppy | 0323, 0343 | 0346, 0347 | Singer | 0321, 0339, 0341 |
| Orbit | 0320, 0350 | Portland | Sampo | 0346, 0347 | Sinudyne | 0320, 0339, 0341, |
| Orion | 0043, 0146, 0283, | Prandoni-Prince | 0053 | 0349 | ||
| 0320, 0323, 0328, | Precision | 0171, 0346 | 0347 | |||
| 0343, 0349, 0350 | Precision | 0282, 0342 | 0348 | |||
| Orline | 0320 | Prima | 0175, 0243, 0323, | 0349 | ||
| Osaki | 0282, 0320, 0337, | 0343, 0347 | Royal Lux | Shogun | 0178 | |
| 0340, 0342 | Princeton | 0140 | 0349 | |||
| Oso | 0340 | Prism | 0023, 0056 | 0349 | ||
| Otto Versand | 0282, 0320, 0336, | Profex | 0323, 0343 | 0347 | ||
| 0342, 0344, 0348, | Profi-Tronic | 0320, 0350 | 0349, 0350 | |||
| 0349, 0350 | Proline | 0320, 0350 | 0349 | |||
| Pael | 0277, 0342 | Proscan | 0021, 0027, 0049 | 0347 | ||
| Palladium | 0161, 0282, 0320, | Prosonic | 0161, 0277, 0282, | 0349, 0350 | ||
| 0342, 0351 | Proscan | 0320, 0342, 0349 | 0349 | |||
| Palsonic | 0282 | Protech | 0282, 0337, 0341, | 0347 | ||
| Panama | 0277, 0282, 0320, | Protech | 0342, 0343, 0349, | 0104, 0105, 0107, | ||
| 0323, 0337, 0342, | Proton | 0350 | 0453, 0468 | Soundwave | 0110, 0123, 0184, | |
| 0343 | Proton | 0008, 0012, 0026, | 0220, 0248, 0249, | |||
| Panasonic | 0016, 0017, 0020, | Proton | 0031 | 0251, 0252, 0254, | ||
| 0022, 0023, 0035, | Proton | 0196 | 0326, 0343, 0344, | |||
| 0052, 0056, 0084, | PROVIEW | 0096, 0246 | 0347 | |||
| 0085, 0133, 0163, | Provision | 0320, 0349 | 0347 | |||
| 0193, 0284, 0286, | Pulsar | 0008, 0030, 0062 | Sound & Vision | 0340, 0341 | ||
| 0290, 0292, 0320, | Pye | 0256, 0320, 0349, | Sounddesign | 0008, 0026, 0031, | ||
| 0325, 0347, 0356, | Proton | 0350, 0378 | Soundwave | 0320, 0349, 0350 | ||
| 0483, 0485, 0490 | Pymi | 0323, 0343 | 0342, 0344, 0369, | |||
| Panavision | 0320 | Quanda Vision | 0321 | Squarewave | 0051 | |
| Pathe Cinema | 0161, 0168, 0277, | Quasar | 0017, 0023, 0052, | SSS | 0088, 0058, 0179 | |
| 0321, 0342 | Quasar | 0056 | Standard | 0282, 0320, 0323, | ||
| Pausa | 0323, 0343 | Quelle | 0282, 0320, 0337, | 0347 | ||
| Penney | 0050, 0111 | Questa | 0344 | 0342, 0349, 0350, | Starlite | 0350 |
| Perdio | 0277, 0320 | Radialva | 0320 | Stenway | 0348 | |
| Perfekt | 0320 | RadioShock | 0199, 0021, 0031, | Sten | 0346, 0347 | |
| Scotch | Strato | 0320, 0323 | ||||
| Stylandia | 0282 |
| Sunkai | 0343 | Toshiba | 0018, 0019, 0040, | Yamaha | 0008, 0026, 0050, | Daewoo | 1009, 1025, 1030, |
| Sunstar | 0320, 0323 | 0041, 0046, 0073, | 0053, 0080, 0081, | 1038, 1069, 1223 | |||
| Sunwood | 0320, 0323, 0343, | 0100, 0103, 0108, | 0082, 0083, 0086, | Dansai | 1008, 1009, 1029 | ||
| 0350 | 0109, 0111, 0121, | 0087 | Dantax | 1024 | |||
| Superla | 0277, 0282, 0342 | 0132, 0166, 0208, | Yamishi | 0282, 0320 | Daytron | 1009, 1025 | |
| Superscan | 0013, 0178 | 0210, 0214, 0217, | Yokan | 0320 | DBX | 1064 | |
| SuperTech | 0277, 0320, 0323 | 0260, 0268, 0282, | Yoko | 0161, 0277, 0282, | De Graaf | 1028 | |
| Supra | 0323, 0343 | 0283, 0293, 0304, | 0320, 0323, 0337, | Decca | 1026, 1027, 1028 | ||
| Supre-Macy | 0057 | 0306, 0307, 0329, | 0340, 0342, 0343, | Dell | 1016 | ||
| Supreme | 0055, 0107 | 0344, 0355, 0454, | 0349, 0350 | Denko | 1008 | ||
| Susumu | 0340 | 0491 | Yorx | 0340 | DiamondVision | 1096 | |
| Sutron | 0323, 0343 | Totevision | 0007 | Zanussi | 0282, 0346 | DigiFusion | 1014 |
| SVA | 0151 | Towada | 0282, 0347 | Zenith | 0008, 0028, 0029, | DIRECTV | 1019, 1105, 1110, |
| Sydney | 0277, 0282, 0342 | Trakton | 0282 | 0030, 0031, 0054, | 1111, 1113, 1116, | ||
| Sylvania | 0008, 0009, 0010, | Trans Continens | 0282, 0320 | 0061, 0062 | 1122 | ||
| 0011, 0013, 0026, | Trantec | 0277 | Dish Network | 1018 | |||
| 0048, 0050, 0051, | Trident | 0282 | Dishpro | 1018 | |||
| 0128, 0227, 0253 | Triumph | 0320 | Dual | 1009, 1027, 1028 | |||
| Symphonic | 0051, 0058, 0062, | Uher | 0161, 0171, 0320, | Adventura | 1069 | Dumont | 1026, 1028 |
| 0128, 0179, 0215 | 0347, 0350 | Durabrand | 1114 | ||||
| Syntax | 0199 | Ultravox | 0277, 0320, 0339, | Aiwa | 1024, 1026, 1027, | Dynatech | 1069 |
| Syntax-Brillian | 0199 | 0341, 0342 | 1069 | Echostar | 1018 | ||
| Sysline | 0349 | Unic Line | 0320 | Elbe | 1009 | ||
| Sytong | 0277 | United | 0349 | Eclatech | 1008 | ||
| Tandy | 0178, 0282, 0336, | Universum | 0161, 0171, 0282, | Akira | 1008, 1027, 1029 | Electrohome | 1071 |
| 0340, 0342, 0347 | 0320, 0337, 0349, | 1008, 1009, 1024, | Electrophonic | 1071 | |||
| Tashiko | 0277, 0282, 0342, | 0350, 0351 | 1025, 1029, 1030 | Elsay | 1008 | ||
| 0344, 0346 | Univox | 0320 | Elta | 1008, 1009, 1029 | |||
| Tatung | 0052, 0177, 0282, | Vector Research | 0050 | Emerson | 1008, 1020, 1068, | ||
| 0320, 0342, 0349, | Vestel | 0282, 0320, 0346, | American High | 1068 | 1069, 1071 | ||
| 0350 | 0347, 0349, 0350, | ||||||
| TCM | 0337, 0343 | 0351 | |||||
| 0400, 0401, 0403, | Vexa | 0320, 0323, 0343, | Anitech | 1008, 1029 | Etzuko | 1008, 1029 | |
| 0406, 0494 | 0349 | ||||||
| Teac | 0282, 0320, 0400 | Victor | 0015, 0344, 0350 | ||||
| 0282, 0323, 0342, | VIDEOLOGIC | 0277 | |||||
| 0343 | Videologique | 0277, 0282, 0340, | |||||
| Technics | 0017, 0023, 0056 | 0342 | |||||
| 0274, 0496, 0497, | VideoSystem | 0320, 0350 | |||||
| 0499 | Videotechnic | 0277, 0282 | |||||
| Techwood | 0008, 0023, 0026, | Vidikron | 0010 | ||||
| 0056 | Vidtech | 0008, 0026, 0031, | |||||
| TEDELEX | 0282 | 0053 | |||||
| 0007, 0008, 0010, | Viewsonic | 0176, 0203, 0232, | Basic Line | 1008, 1009, 1024, | Fiji | 1068 | |
| 0012, 0026, 0053, | 0364 | ||||||
| 0054, 0058, 0059, | Viking | 0057 | |||||
| 0179 | Viore | 0148 | |||||
| Teleavia | 0345 | Visiola | 0277, 0342 | ||||
| 0282, 0320 | Vision | 0282, 0320, 0350 | |||||
| Telecor | 0320, 0322, 0345, | Vizio | 0008, 0177, 0218, | ||||
| 0350 | 0242, 0500, 0501, | ||||||
| Telefunken | 0320 | 0502, 0503, 0506 | |||||
| 0320 | Vortec | 0320, 0349, 0350 | |||||
| Telemeister | 0320 | Voxson | 0171, 0320, 0339, | ||||
| 0320 | 0346, 0347, 0350 | ||||||
| Telestar | 0320 | 0282, 0320, 0342 | |||||
| 0320, 0323, 0343, | Waltham | 0282, 0320, 0342 | |||||
| 0349 | Wards | 0008, 0009, 0010, | |||||
| Teleton | 0282, 0342 | 0026, 0031, 0048, | |||||
| 0277 | 0049, 0050, 0053, | ||||||
| Televiso | 0321 | 0054, 0059 | |||||
| 0282, 0320, 0323, | Watson | 0320, 0349, 0350 | |||||
| 0340, 0343, 0350 | Watt Radio | 0277, 0341, 0342 | |||||
| Tesai | 0350 | 0111 | |||||
| 0337, 0343 | Waycon | 0320, 0339, 0344 | |||||
| 0342 | Weltblick | 0282, 0320, 0349, | |||||
| Thomson | 0162, 0188, 0189, | 0350 | |||||
| 0285, 0320, 0322, | Westinghouse | 0107, 0216, 0220 | |||||
| 0342, 0345, 0350 | White Westinghouse | ||||||
| Thorn | 0320, 0349 | 0037, 0090, 0277, | |||||
| 0320, 0343, 0350 | 0320, 0341, 0342, | ||||||
| 0349 | |||||||
| TNCi | 0030 | ||||||
| 0282, 0320, 0350 | Wincom | 0101, 0106 | |||||
| 0277, 0342 | Xrypton | 0320 | |||||
| 0348 | |||||||
| Hewlett Packard 1016 | Medion | 1024 | Radialva | 1008 | Sylvania | 1020, 1068, 1069, | |
| Hinari 1008, 1009, 1024, | MEI | 1068 | RadioShack | 1071 | 1102, 1126 | ||
| 1029 | Memorex | 1023, 1026, 1031, | RadioShack/Realistic | Symphonic | 1008, 1069, 1126 | ||
| 1024 | 1065, 1068, 1069, | 1065, 1068, 1069, | Systemax | 1016 | |||
| Hisawa 1011, 1026, 1027, | 1070, 1071, 1098, | 1070, 1071 | Tagar Systems | 1016 | |||
| 1028, 1046, 1062 | 1114 | Radiola | 1028 | Taisho | 1024 | ||
| HNS 1110 | Memphis | 1008, 1029 | Radix | 1071 | Tandberg | 1009 | |
| Howard Computers | MGN Technology | 1070 | Randex | 1071 | Tandy | 1065 | |
| 1016 | Micromaxx | 1024 | RCA | 1019, 1068, 1070, | Tashiko | 1026, 1071 | |
| HP 1016 | Microsoft | 1016 | 1075, 1110, 1113, | Tatung | 1026, 1027, 1028 | ||
| HTS 1018 | Microstar | 1024 | 1122, 1125 | TCM | 1015, 1024, 1042 | ||
| Hughes 1111, 1113, 1122 | Migros | 1026 | Realistic | 1065, 1068, 1069, | Teac | 1009, 1069 | |
| Hughes Network Systems | Mind | 1016 | 1070, 1071 | Tec | 1008, 1009, 1030 | ||
| 1110, 1116 | Mitsubishi | 1026, 1028, 1079 | ReplayTV | 1022, 1123 | Technics | 1068 | |
| Humax 1012, 1110, 1113 | Motorola | 1068 | Rex | 1027 | Teknika | 1068, 1069, 1071 | |
| Hush 1016 | MTC | 1070 | RFT | 1008, 1028, 1030 | Teleavia | 1027 | |
| Hypson 1008, 1009, 1024, | Multitech | 1008, 1026, 1028, | Ricavision | 1016 | Telefunken | 1027 | |
| 1029 | 1029, 1030, 1069, | Roadstar | 1008, 1009, 1025, | Teletech | 1008, 1009 | ||
| iBUYPOWER 1016 | 1070 | 1029, 1031 | Tenosal | 1008, 1029 | |||
| Impego 1030 | Murphy | 1026 | Royal | 1008 | Tensai | 1008, 1026, 1029, | |
| Imperial 1026 | NEC | 1027, 1064, 1065 | Runco | 1114 | 1031 | ||
| Inno Hit 1008, 1009, 1025, | Neckermann | 1027, 1028 | Saba | 1027 | Tevion | 1024 | |
| 1028, 1029, 1030 | NEI | 1028 | Saisho | 1024, 1029 | Thomson | 1005, 1027 | |
| Innovation 1024 | Nesco | 1008, 1029 | Samsung | 1002, 1034, 1041, | Thorn | 1027 | |
| Instant Replay 1068 | Nikkai | 1008, 1009, 1030 | 1043, 1057, 1060, | Tivo | 1108, 1110, 1111, | ||
| Interbuy 1008, 1031 | Nikko | 1071 | 1070, 1084, 1110, | 1113, 1117, 1118, | |||
| Interfunk 1028 | Niveus Media | 1016 | 1116, 1122, 1124, | 1119, 1122 | |||
| Intervention 1009, 1026 | Noblex | 1070 | 1220, 1222 | TMK | 1070 | ||
| Irradio 1008, 1029, 1031 | Nokia | 1009, 1027 | Samurai | 1008, 1030 | Tokai | 1008, 1029, 1031 | |
| ITT 1027 | Nordmende | 1027 | Sanky | 1114 | Tonsai | 1029 | |
| ITV 1009, 1025, 1031 | Northgate | 1016 | Sansui | 1023, 1027, 1106, | Toshiba | 1004, 1016, 1027, | |
| JC Penney 1064, 1065, 1068, | Oceanic | 1026, 1027 | 1115 | 1028, 1037, 1049, | |||
| 1070, 1071 | Okano | 1008, 1009, 1024 | Sanyo | 1032, 1065, 1070 | 1052, 1086, 1087, | ||
| JCL 1068 | Olympus | 1068 | 1009 | 1097, 1109, 1112, | |||
| JVC 1007, 1018, 1027, | Optimus | 1071 | SBR | 1028 | 1194 | ||
| 1039, 1064, 1065, | Orion | 1023, 1024, 1051, | Schaub Lorenz | 1026, 1027 | Totevision | 1070, 1071 | |
| 1066, 1077, | 1115, 1217 | Schneider | 1008, 1009, 1024, | Touch | 1016 | ||
| 1089, 1092, 1093, | Orson | 1026 | 1025, 1026, 1028, | Towada | 1008, 1029 | ||
| 1094, 1095, 1113, | Osaki | 1008, 1026, 1029, | 1029, 1030, 1031 | Towika | 1008, 1029 | ||
| 1208, 1209, 1212, | Otto Versand | 1031 | Sears | 1065, 1068, 1071 | TVA | 1030 | |
| 1213, 1215, 1218 | Palladium | 1028 | SEG | 1008, 1009, 1029 | Uher | 1031 | |
| Kaisui 1008, 1029 | Palladium | 1008, 1027, 1029, | SEI-Sinudyne | 1028 | UltimateTV | 1019 | |
| Karcher 1028 | 1031 | Seleco | 1027 | Ultravox | 1009 | ||
| Kendo 1008, 1024, 1025, | Panasonic | 1000, 1022, 1044, | Sentra | 1008, 1030 | Unitech | 1070 | |
| 1030 | 1055, 1068, 1072, | Sentron | 1008, 1029 | United Quick Star 1009, 1025 | |||
| Kenwood 1027, 1064, 1065 | 1085, 1090, 1091, | Sharp | 1003, 1033, 1077, | Universum | 1026, 1028, 1031 | ||
| Kodak 1068, 1071 | 1120, 1121, 1214 | 1107, 1127, 1219 | Vector Research 1064 | ||||
| Korpel 1008, 1029 | Pathe Marconi | 1027 | Shintom | 1008, 1029 | Video Concepts | 1064 | |
| Kyoto 1008 | Perdio | 1026 | Shivaki | 1031 | Videon | 1024 | |
| Lenco 1025 | Philco | 1008, 1068 | Shogun | 1070 | Videoonic | 1070 | |
| Leyco 1008, 1029 | Philips | 1006, 1013, 1028, | Siemens | 1031 | Viewsonic | 1016 | |
| LG 1010, 1026, 1031 | 1035, 1040, 1045, | Silva | 1031 | 1016 | |||
| 1047, 1054, 1056, | 1046, 1050, 1058, | Silver | 1009 | Wards 1068, 1069, 1070, | |||
| 1071, 1103, 1221 | 1059, 1061, 1068, | Singer | 1068 | 1071 | |||
| Lifetec 1024 | 1076, 1101, 1110, | Sinudyne | 1028 | Weltblick | 1031 | ||
| Linksys 1016 | 1113, 1116, 1117, | Solavox | 1030 | XR-1000 | 1068, 1069 | ||
| Lloyd's 1069 | 1122, 1126, 1210, | Sonnic Blue | 1022, 1123 | Yamaha | 1064, 1065 | ||
| Loewe Opta 1028, 1031 | 1211 | Sonneclair | 1008 | Yamishi | |||
| Logik 1008, 1029 | Philips Magnavox 1076 | Sonoko | 1009, 1025 | Yokan | 1008, 1029 | ||
| Lumatron 1009, 1025 | Phonola 1028 | Sontec | 1031 | Yoko | |||
| Luxor 1008 | 1071 | Sony | 1001, 1016, 1048, | 1031 | |||
| LXI 1071 | Pioneer | 1028, 1036 | 1053, 1073, 1074, | Zenith | |||
| M Electronic 1026 | 1088, 1099 | 1080, 1081, 1082, | ZT Group | ||||
| Magnavox 1020, 1068, 1114, | 1009, 1025, 1030 | 1083, 1108, 1118, | |||||
| 1126 | 1026 | 1216 | |||||
| Magnin 1071 | Profex | 1029 | Stack | 1016 | DVD | ||
| Manesth 1008, 1029 | Proline | 1026 | Stack 9 | 1016 | 4Kus | 2051 | |
| Marantz 1028, 1064, 1065, | 1019 | Standard | 1009, 1025 | Accurian | 2142 | ||
| 1068 | 1009, 1024 | Stern | 1009 | Advent | 2155, 2251 | ||
| Mark 1009 | 1114 | 1068 | AEG | 2362 | |||
| Marta 1071 | 1028, 1102 | Sunstar | 1024 | Airis | 2364 | ||
| Matsui 1024, 1031 | 1065 | 1026 | Aiwa | 2322 | |||
| Matsushita 1068 | Quartz | 1026 | Akai | 2145, 2177, 2179, | |||
| Media Center PC 1016 | Quasar | 1029 | 2248 | ||||
| Mediator 1028 | Quelle | 1026 | 2356 |
| Alba | 2064, 2165, 2186, | Desay | 2205 | Kawasaki | 2149 | Panasonic | 2011, 2024, 2034, |
| 2337, 2346 | Diamond | 2354, 2355 | Kennex | 2362 | 2042, 2058, 2062, | ||
| Alco | 2149 | DiamondVision | 2225, 2232 | Kenwood | 2041, 2151, 2348 | 2066, 2067, 2093, | |
| Alize | 2361 | Disney | 2010, 2028 | KeyPlug | 2362 | 2116, 2117, 2118, | |
| Allegro | 2133 | DK Digital | 2339 | Kiiro | 2362 | 2119, 2120, 2121, | |
| Amitech | 2362 | Dmtech | 2176 | Kingavon | 2358 | 2122, 2123, 2151, | |
| Amphion MediaWorks | 2195 | Dual | 2380 | Kiss | 2380 | 2159, 2164, 2166, | |
| DUNE | 2509 | KLH | 2131, 2149 | 2167, 2172, 2173, | |||
| AMW | 2195, 2363 | Durabrand | 2136 | Koda | 2358 | 2175, 2209, 2214, | |
| Apex | 2030, 2124, 2125, | DVX | 2355 | Koss | 2013, 2148, 2158 | 2275, 2277, 2278, | |
| 2126, 2127, 2130, | Easy Home | 2359 | KXD | 2359 | 2281, 2282, 2283, | ||
| 2131 | Eclipse | 2354 | Landel | 2143 | 2301, 2374, 2470 | ||
| Apple | 2241 | E-Dem | 2364 | Lasonic | 2132 | Parasound | 2197 |
| Arrgo | 2138 | Electrohome | 2362 | Lawson | 2355 | peeKTON | 2364 |
| Asono | 2364 | Elin | 2362 | Lescon | 2381 | Philips | 2008, 2012, 2025, |
| Aspire | 2152, 2222 | Elta | 2341, 2361, 2362 | Lenco | 2358, 2362, 2367 | 2044, 2050, 2051, | |
| Astar | 2240 | Emerson | 2129, 2137, 2150 | Lenoxx | 2136, 2153 | 2053, 2060, 2072, | |
| ATACOM | 2364 | Enterprise | 2129 | LG | 2002, 2033, 2038, | 2108, 2111, 2147, | |
| Audiovox | 2061, 2149 | Enzer | 2380 | 2057, 2129, 2133, | 2159, 2163, 2169, | ||
| Avious | 2367 | Epson | 2247 | 2189, 2191, 2223, | 2174, 2181, 2185, | ||
| Awa | 2363 | ESA | 2137 | 2238, 2270, 2288, | 2230, 2261, 2266, | ||
| Axion | 2249 | Finlux | 2354, 2362, 2367 | 2335, 2373, 2375 | 2267, 2286, 2287, | ||
| Bang & Olufsen | 2128 | Fintec | 2377 | Life | 2182 | 2289, 2295, 2300, | |
| Baze | 2367 | Fisher | 2134 | Lifetec | 2182 | 2302, 2317, 2328, | |
| BBK | 2364 | Funai | 2137 | Limit | 2355 | 2338, 2342, 2350, | |
| Bellagio | 2363 | Gateway | 2051 | Liquid Video | 2158 | 2467 | |
| Best Buy | 2359 | GE | 2029, 2131, 2156 | Liteon | 2043, 2051, 2142 | Phonotrend | 2367 |
| Blaupunkt | 2131 | Gericom | 2351 | Loewe | 2320 | Pioneer | 2016, 2017, 2018, |
| Blue Parade | 2157 | GFM | 2226 | LogicLab | 2355 | 2019, 2035, 2092, | |
| Boghe | 2382 | Giec | 2382 | Magnavox | 2025, 2050, 2137, | 2094, 2095, 2109, | |
| Brainwave | 2362 | Global Solutions | 2355 | 2150, 2159, 2224, | 2157, 2180, 2190, | ||
| Brandt | 2148, 2188 | Global Sphere | 2355 | 2230, 2358 | 2212, 2269, 2272, | ||
| Broksonic | 2145, 2146 | Go Video | 2133, 2213 | Magnex | 2367 | 2299, 2304, 2305, | |
| Bush | 2064, 2110, 2170, | Goodmans | 2165, 2280, 2291, | Majestic | 2360 | 2306, 2307, 2308, | |
| 2268, 2290, 2346, | 2358, 2371, 2376, | Marantz | 2328 | 2309, 2310, 2311, | |||
| 2358, 2367, 2383 | 2382 | Marquant | 2362 | 2344, 2345, 2347, | |||
| California Audio Labs | GPX | 2227 | Matsui | 2148, 2378 | 2379 | ||
| 2151 | Gradiente | 2151 | McIntosh | 2199 | Pointer | 2362 | |
| Cambridge Audio | 2354 | Graetz | 2380 | Mecotech | 2362 | Polaroid | 2125, 2215, 2235 |
| CAT | 2352, 2353 | Greenhill | 2131 | Medion | 2182 | Portland | 2362 |
| CAVS | 2192 | Grundig | 2349 | Memorex | 2028, 2145, 2234 | Powerpoint | 2363 |
| Centrum | 2353 | Grunkel | 2362, 2366 | MiCO | 2354, 2382 | Prima | 2252 |
| CGV | 2354, 2362 | GVG | 2377 | Micromaxx | 2182 | Proceed | 2130 |
| Changhong | 2140 | H&B | 2358 | Microsoft | 2156 | Proscan | 2156 |
| Cinetec | 2363 | H_her | 2364 | Microstar | 2182 | Prosonic | 2360, 2377 |
| CineVision | 2133, 2237 | Haaz | 2354, 2355 | Minoka | 2362 | Protron | 2202 |
| Clatronic | 2358, 2367 | Haier | 2254 | Minowa | 2367 | Provision | 2358 |
| Coby | 2031, 2046, 2360 | Harman/Kardon | 2047, 2135 | Mintek | 2131, 2245 | Pye | 2144 |
| Conia | 2383 | HiMAX | 2359 | Mitsubishi | 2003 | Qwestar | 2148 |
| Continental Edison | Hitachi | 2062, 2090, 2115, | Mizuda | 2358, 2359 | Raite | 2380 | |
| 2363 | 2274, 2316, 2359, | Monyka | 2380 | RCA | 2021, 2029, 2104, | ||
| Crown | 2362 | 2380 | Mustek | 2186 | 2105, 2131, 2149, | ||
| C-Tech | 2355 | 2130 | Mx Onda | 2354 | 2156, 2157, 2229 | ||
| Curtis Mathes | 2139 | Home Tech Industries | Mystral | 2366 | RedStar | 2356, 2360, 2362 | |
| CVG | 2377 | 2364 | Naiko | 2362 | Regent | 2153 | |
| CyberHome | 2022, 2098, 2138, | 2366 | Nesa | 2131 | Reoc | 2355 | |
| 2187, 2336 | Ilo | 2245 | Neufunk | 2380 | Rimax | 2361 | |
| Cytron | 2244 | 2131, 2245 | Nevir | 2362 | Rio | 2133 | |
| Daenyx | 2363 | 2182 | Next Base | 2143 | Roadstar | 2331, 2358 | |
| Daewoo | 2001, 2133, 2276, | 2002, 2137, 2253 | Nexxtech | 2243 | Ronin | 2363 | |
| 2298, 2330, 2362, | 2157 | NU-TEC | 2383 | Rotel | 2203 | ||
| 2363, 2377 | 2053 | Onkyo | 2159, 2368 | Rowa | 2154, 2383 | ||
| Daewoo International | iSymphony | 2246 | Oopla | 2051 | Rownsonic | 2353 | |
| 2363 | 2135 | Oppo | 2196, 2255 | Saba | 2148, 2188 | ||
| Dalton | 2357 | 2020, 2096, 2097, | Optim | 2381 | Sabaki | 2355 | |
| Dansai | 2362, 2381 | 2099, 2100, 2101, | Optimus | 2180 | Saivod | 2362 | |
| 2102, 2103, 2106, | Orava | 2358 | Sampo | 2141 | |||
| 2107, 2160, 2257, | Orbit | 2363 | Samsung | 2000, 2045, 2077, | |||
| 2260, 2262, 2263, | Orion | 2073, 2110 | 2112, 2113, 2114, | ||||
| 2321, 2324, 2326, | Oritron | 2148, 2158 | 2115, 2151, 2200, | ||||
| 2327, 2343, 2464, | P&B | 2358 | 2216, 2219, 2228, | ||||
| 2465, 2468, 2469, | Pacific | 2355 | 2264, 2265, 2271, | ||||
| 2471 | 2279, 2294, 2303, | ||||||
| Jwin | 2198 | 2329, 2365 | |||||
| Kansai | |||||||
| Sanskrit | 2073, 2145, 2354, 2355, 2362 | Toshiba | 2032, 2036, 2037, 2039, 2048, 2049, 2054, 2055, 2072, 2073, 2076, 2078, 2079, 2086, 2145, 2159, 2218, 2233, 2256, 2259, 2296, 2369, 2508 | Pioneer | 2016, 2017, 2018, 2019, 2092, 2094, 2095, 2109 | COX | 3084 | |
| Sanyo | 2134, 2145, 2217, 2292 | Cryptovision | 3110 | |||||
| ScanMagic | 2186 | Everquest | 3123 | |||||
| Schaub Lorenz | 2362 | Fidelity | 3098 | |||||
| Schneider | 2176 | Filmnet | 3107 | |||||
| Scientific Labs | 2355 | Filmmat Cabling | 3111 | |||||
| Scott | 2161, 2357 | TRANScontinents | 2363, 2367 | Victor | 2475 | |||
| Seeltech | 2364 | Transonic | 2367 | Yamaha | 2089, 2118 | Filmnet Comcrypt | ||
| SEG | 2161, 2355, 2363, 2380 | Trio | 2362 | 3111 | ||||
| Sharp | 2006, 2040, 2088, 2091, 2182, 2194, 2220, 2221, 2231, 2236, 2293, 2340 | Tritech | 2242 | 3097 | ||||
| Shinsonic | 2245 | Urban Concepts | 2159 | Aspire | 2222 | Fios | 3005 | |
| Signmatek | 2359, 2364 | US Logic | 2245 | Astar | 2240 | Focus | 3126 | |
| Silva | 2356 | Venturer | 2149 | Broksonic | 2146 | Foxtel | 3022 | |
| Singer | 2354, 2355 | Viewmaster | 2364 | Go Video | 2213 | Freebox | 3023 | |
| Skymaster | 2325, 2355 | Vocopro | 2206 | Hitachi | 2062 | GC Electronics | 3070 | |
| Skyworth | 2356 | VocoStar | 2207 | Insignia | 2002 | GE | 3066, 3093 | |
| Slim Art | 2362 | Waitec | 2364 | Irradio | 2053 | GEC | 3105 | |
| SM Electronic | 2355 | Welltech | 2382 | JVC | 2100, 2101, 2106, 2107 | Gemini | 3072, 3123 | |
| Sonic Blue | 2133 | Westinghouse | 2063, 2250 | LG | 2033, 2057, 2223, 2238 | General Instrument | 3017, 3025, 3066, 3084, 3090, 3096, 3117 | |
| Sontech | 2366 | Wharfedale | 2354, 2355 | Liteon | 2043 | Goldstar | 3120 | |
| Sony | 2004, 2005, 2007, 2009, 2014, 2015, 2023, 2026, 2027, 2052, 2068, 2069, 2070, 2071, 2074, 2075, 2084, 2085, 2087, 2168, 2171, 2180, 2211, 2258, 2273, 2284, 2285, 2312, 2313, 2314, 2315, 2318, 2319, 2466 | Xbox | 2156, 2183 | Philips | 2008, 2044, 2050, 2051, 2147 | Hirschmann | 3097 | |
| Soundmaster | 2355 | Yamada | 2051, 2361, 2363 | Pioneer | 2017, 2035 | HomeChoice | 3106 | |
| Soundmax | 2355 | Yamada | 2056, 2064, 2065, 2080, 2081, 2082, 2083, 2089, 2118, 2151, 2323 | Pye | 2144 | Humax | 3021, 3080, 3083 | |
| Soundmaster | 2355 | Yamada | 2056, 2064, 2065, 2080, 2081, 2082, 2083, 2089, 2118, 2151, 2323 | Sansung | 2000, 2112, 2216 | ITNokia | 3097 | |
| Soundmaster | 2355 | Yamada | 2056, 2064, 2065, 2080, 2081, 2082, 2083, 2089, 2118, 2151, 2323 | Sansung | 2073 | Jasco | 3123 | |
| Soundmaster | 2355 | Yamada | 2056, 2064, 2065, 2080, 2081, 2082, 2083, 2089, 2118, 2151, 2323 | Sanyo | 2217 | Jerrold | 3017, 3018, 3025, 3066, 3072, 3084, 3090, 3096, 3119, 3123 | |
| Soundmaster | 2355 | Zenith | 2002, 2129, 2133, 2159, 2223 | Yukai | 2186 | 2074, 2208, 2210, 2211 | JVC | 3099 |
| Soundmaster | 2355 | |||||||
| Soundmaster | 2355 | |||||||
| Soundmaster | 2355 | |||||||
| Soundmaster | 2355 | |||||||
| Soundmaster | 2355 | |||||||
| Soundmaster | 2355 | |||||||
| Soundmaster | 2355 | |||||||
| Torch | 2363 | |||||||
| Spectra | 2301 | |||||||
| Spectroniq | 2201 | |||||||
| Standard | 2355 | Blu-ray Disc | Toshiba | 2032, 2036, 2037, 2039, 2049, 2054, 2055, 2076 | Macab | 3024, 3027, 3121 | ||
| Star Cluster | 2355 | Denon | 2452, 2500, 2501 | Magnavox | 3079 | |||
| StarMedia | 2358, 2364 | Hitachi | 2460, 2461, 2463 | Yamaha | 2056 | Maspro | 3099 | |
| Sungale | 2204 | JVC | 2472, 2473, 2475, 2478, 2496, 2499, 2511 | Matsui | 3099 | |||
| Sunkai | 2362 | MegaCable | 3117 | |||||
| Superscan | 2150 | Memorex | 3076, 3122 | |||||
| Soundmaster | 2355 | LG | 2033, 2456, 2457 | ABC | 3002, 3003, 3017, 3066, 3067, 3086, 3093, 3119, 3122 | Minerva | 3099 | |
| Soundmaster | 2012, 2137, 2150, 2178, 2230, 2239 | Marantz (US) | 2454, 2455 | Mnet | 3107 | |||
| Symphonic | 2108, 2230 | Onkyo | 2504 | ADB | 3020 | |||
| Synn | 2355 | Panasonic | 2011, 2209, 2214, 2476, 2477, 2479 | Adelphia | 3081 | |||
| T.D.E. Systems | 2366 | |||||||
| Tatung | 2001, 2362 | Philips | 2510 | Alcatel | 3016 | Movie Time | 3077, 3109 | |
| TCM | 2182, 2297 | Pioneer | 2212, 2506 | Americast | 3124 | Mr Zapp | 3101 | |
| Teac | 2149, 2333, 2355, 2383 | Samsung | 2045, 2113, 2498 | Amstrand | 3022, 3098 | Multichoice | 3107 | |
| Tec | 2356 | Sharp | 2194, 2220, 2221, 2497, 2502, 2503 | Arcon | 3070 | NEC | 3064 | |
| Technics | 2151 | Sony | 2075, 2453, 2458, 2459, 2507 | AT&T | 3098 | NET Brazil | 3085 | |
| Technics | 2151 | Toshiba | 2462 | Bell South | 3124 | NSC | 3077 | |
| Technics | 2151 | Yamaha | 2064, 2448, 2449, 2474, 2505 | Cablevision | 3092 | Oak | 3074 | |
| Technics | 2182, 2355, 2357 | Pace | 3006, 3089, 3121 | |||||
| Theta Digital | 2157 | |||||||
| Thompson | 2183, 2188, 2334, 2372 | |||||||
| Tokai | 2356, 2380 | DVR | Clearmaster | 3127 | Paragon | 3122 | ||
| Top Suxess | 2364 | Bush | 2110 | ClearMax | 3127 | Philips | 3068, 3071, 3079, 3099, 3100, 3101, 3103 | |
| Hitachi | 2090 | Clyde Cablevision3105 | ||||||
| Panasonic | 2066, 2067, 2093, 2116, 2117, 2119, 2120, 2122, 2123 | Colour Voice | 3068 | |||||
| Comcast | 3084, 3088, 3117 | Pioneer | 3001, 3006, 3094, 3098, 3114, 3116, 3120 | |||||
| Comcrypt | 3107 | |||||||
| Comtronics | 3069 | |||||||
| Contec | 3074 | |||||||
| Coolmax | 3127 | |||||||
| Proscan | 3066, 3093 | Alltech | 4217 | DIRECTV | 4056, 4064, 4067, | Grothusen | 4001, 4049 |
| Pulsar | 3122 | Alpha | 4053 | 4068, 4070, 4071, | Grundig | 4004, 4006, 4015, | |
| PVP Stereo Visual Matrix | 3018 | Alpha Digital | 4104 | 4074, 4107, 4116, | 4035, 4211, 4218, | ||
| Alphastar | 4077 | 4119, 4121, 4122, | 4222, 4246 | ||||
| Quasar | 3122 | Amitronica | 4217 | 4123, 4127, 4192, | Hänsel & Gretel 4219 | ||
| RadioShack | 3123, 3127 | Amstrad | 4011, 4035, 4217, | 4193, 4194, 4195, | Hantor | 4001, 4013 | |
| RCA | 3030, 3031, 3087, | Anglo | 4218 | 4196, 4197, 4198, | Hanuri | 4010 | |
| 4199, 4200, 4201, | Hauppauge | 4044 | |||||
| Realistic | 3070 | Ankaro | 4005, 4008, 4024, | 4202, 4203, 4206, | Heliocom | 4219 | |
| Recotron | 3126 | ASLF | 4217 | 4207, 4221 | Helium | 4219 | |
| Regal | 3078 | Anttron | 4001, 4004 | Discoverer | 4212 | Hinari | 4007 |
| Regency | 3075 | Apollo | 4001 | Discovery | 4216 | Hirschmann | 4015, 4024, 4210, |
| Rembrandt | 3066 | Armstrong | 4011, 4053 | Diseqc | 4216 | 4216, 4218, 4219 | |
| Runco | 3122 | Artec | 4100 | Dish Network | 4018, 4065, 4089, | Hisawa | 4013 |
| Sagem | 3101 | Asat | 4053, 4055 | 4092, 4094, 4095, | Hisense | 4016 | |
| Samsung | 3069, 3089, 3114, | ASLF | 4217 | 4117 | Hitachi | 4006, 4114, 4199, | |
| 4207, 4221 | Helium | 4203 | |||||
| Regal | 3078 | Antron | 4001, 4004 | Discoverer | 4212 | Hinari | 4007 |
| Regency | 3075 | Apollo | 4001 | Discovery | 4216 | Hirschmann | 4015, 4024, 4210, |
| Rembrandt | 3066 | Armstrong | 4011, 4055 | Diseqc | 4216 | 4216, 4218, 4219 | |
| Runco | 3122 | Artec | 4100 | Dish Network | 4018, 4065, 4089, | Hisawa | 4013 |
| Sagem | 3101 | Asat | 4053, 4055 | DStv | 4222, 4246 | Hughes | 4064, 4068, 4192, |
| 4194, 4196, 4202 | |||||||
| Samsung | 3069, 3089, 3114, | ASLF | 4217 | 4117 | Hitachi | 4006, 4114, 4199, | |
| 4207, 4221 | Hueset al Systems | 4013, 4014, 4050, | |||||
| 4216, 4217 | Hueset al Systems | 4219, 4223 | |||||
| Starcom | 3017, 3072, 3119, | BBK | 4205 | Elekta | 4010 | Hypson | 4031 |
| Starcom | 3017, 3072, 3119, | Best | 4008, 4024 | Elsat | 4217 | Ilo | 4016 |
| Stargate | 3072, 3123 | Blaupunkt | 4015 | Elta | 4001, 4008, 4024, | Imex | 4031 |
| Starquest | 3072, 3123 | Boca | 4011, 4054, 4059, | Emanon | 4001 | Innovation | 4008 |
| Supercable | 3090 | Boca | 4217 | Emme Esse | 4008, 4024 | Insignia | 4107 |
| Supermax | 3127 | Boston | 4216 | Engel | 4217 | Intertronic | 4011 |
| Tele+1 | 3107, 3111 | Brain Wave | 4013 | Ep Sat | 4006 | Intervention | 4048, 4219 |
| TELENET | 3004 | Broadcast | 4012 | EURIEULT | 4031 | ITT Nokia | 4006 |
| Telepiu | 3107 | Broco | 4217 | Eurodec | 4052 | Jerrold | 4019 |
| Thomson | 3082, 3091 | BSkyB | 4035, 4041 | Europa | 4053, 4218, 4219 | Johansson | 4013 |
| TIME WARNER | 3084 | BT | 4216 | Europhon | 4219 | JOK | 4216 |
| Tocom | 3067 | Bubu Sat | 4217 | Eurosat | 4011 | JSR | 4048 |
| Torx | 3017 | Bush | 4006, 4045 | Eurosky | 4008, 4011, 4215, | JVC | 4029, 4065, 4089, |
| Toshiba | 3122 | Cambridge | 4218 | 4218, 4219, 4204 | 4117 | ||
| Tristar | 3127 | Canal Satellite | 4213 | Eurostar | 4011, 4215, 4219 | Kamm | 4217 |
| Tudi | 3102 | Canal+ | 4213 | Eutelsat | 4217 | Kathrein | 4015, 4034, 4042, |
| Tusa | 3072, 3123 | CaptiveWorks | 4099 | Exator | 4001, 4004 | 4053, 4055, 4063, | |
| TV86 | 3077 | Channel Master | 4007, 4110 | Expressvu | 4117 | 4215, 4216, 4217 | |
| Unika | 3065, 3070 | Chaparral | 4075 | Fenner | 4024, 4212, 4217 | Kathrein Eurostar | 4215 |
| United Cable | 3018, 3119 | CHEROKEE | 4216 | Ferguson | 4006, 4052, 4214 | Klap | 4216 |
| Universal | 3065, 3070 | Chess | 4212, 4217 | Fidelity | 4218 | Konig | 4219 |
| Universum | 3097, 3099 | CityCom | 4006, 4215, 4219 | Finlandia | 4006 | Kosmos | 4049 |
| V2 | 3127 | Clatronic | 4013 | Finlux | 4006 | KR | 4004 |
| Verizon Fios | 3007 | CNT | 4010 | FinnSat | 4050, 4052 | Krieselmeyer | 4015 |
| Videoay | 3019 | Comag | 4080, 4081, 4082, | Flair Mate | 4217 | K-SAT | 4217 |
| View Star | 3074, 3077, 3079 | Commlink | 4083, 4086 | Foxtel | 4204, 4222, 4244, | Kyostar | 4001 |
| Viewmaster | 3127 | Commlink | 4005 | 4245, 4246, 4247 | L&S Electronic | 4024 | |
| Vision | 3127 | Comtech | 4050 | Freecom | 4001, 4049, 4218 | Lasat | 4008, 4010, 4024, |
| Visiopass | 3097, 3100, 3101 | Condor | 4008, 4024, 4219 | FTEmaximal | 4024, 4217 | 4054, 4212, 4215, | |
| V2 | 3127 | Connexions | 4014, 4024 | Fuba | 4001, 4008, 4014, | 4219 | |
| Wittenberg | 3098 | Conrad | 4024, 4215, 4218 | 4015, 4024, 4055, | 4108 | ||
| Zenith | 3113, 3122, 3124 | Conrad Electronic | 4219 | 4215 | Lenco | 4001, 4024, 4049, | |
| Zentek | 3126 | Conrad Electronic | 4217, 4219 | Galaxis | 4005, 4008, 4009, | 4215, 4217, 4219 | |
| Contec | 4050 | ||||||
| Coolsat | 4096 | ||||||
| Cosat | 4048 | ||||||
| Coship | 4109 | ||||||
| Crown | 4011 | ||||||
| Daeryung | 4014 | ||||||
| Daewoo | 4057, 4217 | ||||||
| Macab | 4052 | Paysat | 4127 | Skinsat | 4218 | UltimateTV | 4070 | |
| Magnavox | 4127, 4101 | PCT | 4110 | SKR | 4217 | Uniden | 4079, 4127 | |
| Manata | 4031, 4216, 4217 | Philco | 4101 | Sky Italia | 4204 | Unisat | 4011, 4050, 4053 | |
| Manhattan | 4006, 4010, 4048, 4216 | 4006, 4033, 4053, 4055, 4061, 4068, 4071, 4127, 4196, 4201, 4202, 4203, 4206, 4213, 4216 | Skymaster | 4005, 4017, 4022, 4212, 4217 | Unisorsum | 4015, 4215, 4219 | ||
| Marantz | 4055 | 4201, 4202, 4203, 4206, 4213, 4216 | Skymax | 4053, 4055 | US Digital | 4016 | ||
| Mascom | 4010 | 4201, 4202, 4203, 4206, 4213, 4216 | SkySat | 4212, 4217, 4218, 4219 | Variosat | 4015 | ||
| Maspro | 4006, 4217 | 4206, 4213, 4216 | Skyvision | 4048 | Vento | 4053, 4055 | ||
| Matsui | 4216 | Phoenix | 4050 | Skyvision | 4048 | Vento | 4098 | |
| Max | 4219 | Photonrend | 4006, 4005, 4048 | SM Electronic | 4212, 4217 | Viewsat | 4013, 4048, 4216, 4217 | |
| Mediabox | 4213 | Pioneer | 4046, 4213 | Smart | 4215, 4217 | Visiosat | 4013, 4048, 4216, 4217 | |
| Mediamarkt | 4011 | Polsat | 4052 | Sony | 4067, 4070, 4213 | |||
| Mediasat | 4009, 4213, 4218 | Predki | 4013 | SR | 4011, 4054 | Voom | 4019 | |
| Medion | 4008, 4024, 4217 | Premiere | 4048, 4213 | Star Choice | 4019 | Vortec | 4001 | |
| Medison | 4217 | Priesner | 4011 | Starland | 4217 | Welltech | 4212 | |
| Mega | 4053, 4055 | Primestar | 4076 | Starring | 4013 | WeTeKom | 4212, 4218 | |
| Memorex | 4127 | Profile | 4216 | Start Trak | 4001 | Wevasat | 4006 | |
| Metronic | 4001, 4004, 4005, 4010, 4028, 4031, 4217 | Promax | 4006 | Strong | 4001, 4004, 4008, 4024, 4049, 4222, 4246 | Wewa | 4006 | |
| Metz | 4015 | 4197 | STS | 4115 | 4218, 4219 | |||
| Micro electronic | 4217, 4218, 4219 | Protek | 4051 | STVI | 4031 | Woorisat | 4010 | |
| Micro Technology | 4217 | Proton | 4016 | Sumida | 4011 | Worldsat | 4216 | |
| MicroGem | 4106 | Provision | 4010 | Sunny Sound | 4024 | Xrypton | 4024 | |
| Micromaxx | 4008, 4024 | Quadral | 4005, 4007, 4008, 4216, 4224 | Sunsat | 4217 | XSat | 4217 | |
| Microstar | 4008 | Sunstar | 4011, 4024, 4054 | Zehnder | 4008, 4209, 4010, 4215, 4024 | |||
| Microtec | 4217 | Quelle | 4015, 4215, 4219 | Supermax | 4223 | |||
| Minerva | 4015 | Quiero | 4052 | Tandberg | 4052 | Zenith | 4102, 4107, 4195 | |
| Mitubishi | 4006, 4015, 4202 | RadioShack | 4019 | Tandy | 4004 | Zodiac | 4004 | |
| Mitsumi | 4054 | Radiola | 4053, 4055 | Tantec | 4006 | |||
| Morgan's | 4011, 4053, 4054, 4055, 4217 | Radix | 4014, 4037 | TCM | 4008 | |||
| Motorola | 4019, 4088, 4090, 4091 | Rainbow | 4004 | Techniland | 4012 | CD | 5082, 5095, 5114 | |
| Multichoice | 4222, 4246 | 4066, 4093, 4112, 4113, 4116, 4118, 4119, 4197, 4122, 4207, 4208, 4309, 4353, 4212, 4213, 4218 | ||||||
| Multitech | 4212 | |||||||
| Muratto | 4049 | Realistic | 4078 | Technology | 4222 | |||
| Mysat | 4217 | Redpoint | 4009 | Technosat | 4223 | |||
| Navex | 4013 | Redstar | 4008, 4024 | Technowelt | 4219 | |||
| Neuhaus | 4009, 4048, 4217, 4218, 4219 | RFT | 4005, 4053, 4055 | Teco | 4011, 4054 | |||
| Neusat | 4217 | Roch | 4031 | Telasat | 4215, 4219 | |||
| Next Level | 4019 | Rover | 4024, 4217 | Telecom | 4217 | |||
| NextWave | 4223 | Saba | 4010, 4215, 4216, 4219 | Telefunken | 4001, 4017, 4216 | |||
| Nikko | 4011, 4217 | Teleka | 4004, 4011, 4014, 4218, 4219 | |||||
| Nokia | 4006, 4040 | Sabre | 4006 | |||||
| Nordmende | 4001, 4006, 4007, 4010, 4052 | Sagem | 4023, 4052 | Telemaster | 4010 | |||
| Nova | 4222 | Samsung | 4050 | TELENET | 4241 | |||
| Novis | 4013 | Telesat | 4219 | |||||
| Oceanic | 4051 | Telestar | 4212, 4213, 4218 | |||||
| Octagon | 4001, 4004, 4050 | Televes | 4006, 4218 | |||||
| Okano | 4011 | SAT | 4007, 4218 | Tempo | 4223 | |||
| Optex | 4048 | Sat Cruiser | 4223 | Tevion | 4008, 4217 | |||
| Optus | 4204, 4213, 4222, 4223, 4246 | Sat Partner | 4001, 4004, 4010, 4013, 4049, 4218 | Thomson | 4006, 4020, 4052, 4058, 4208, 4213, 4215, 4216, 4217, 4219 | |||
| Orbitech | 4001, 4212, 4213, 4218 | Sat Team | 4217 | |||||
| OSat | 4004 | Satcom | 4012, 4219 | |||||
| Otto Versand | 4015 | Satelco | 4024 | Thorens | 4051 | |||
| Pace | 4006, 4015, 4035, 4043, 4047, 4204, 4216, 4243 | Satford | 4012 | Thorn | 4006 | |||
| Tovna | 4006, 4012, 4048, 4217, 4218 | |||||||
Information for Users on Collection and Disposal of Old Equipment and Used Batteries

These symbols on the products, packaging, and/or accompanying documents mean that used electrical and electronic products and batteries should not be mixed with general household waste.
For proper treatment, recovery and recycling of old products and used batteries, please take them to applicable collection points, in accordance with your national legislation and the Directives 2002/96/EC and 2006/66/EC.

By disposing of these products and batteries correctly, you will help to save valuable resources and prevent any potential negative effects on human health and the environment which could otherwise arise from inappropriate waste handling.

For more information about collection and recycling of old products and batteries, please contact your local municipality, your waste disposal service or the point of sale where you purchased the items.
[Information on Disposal in other Countries outside the European Union]
These symbols are only valid in the European Union. If you wish to discard these items, please contact your local authorities or dealer and ask for the correct method of disposal.
Note for the battery symbol (bottom two symbol examples):
This symbol might be used in combination with a chemical symbol. In this case it complies with the requirement set by the Directive for the chemical involved.
If the socket outlets in the home are not suitable for the plug supplied with this appliance, it should be cut off and an appropriate 3 pin plug fitted. For details, refer to the instructions described below.
!
The plug severed from the mains lead must be destroyed, as a plug with bared flexible cord is hazardous if engaged in a live socket outlet.
Special Instructions for U.K. Model
IMPORTANT
THE WIRES IN MAINS LEAD ARE COLOURED IN ACCORDANCE WITH THE FOLLOWING CODE:
Blue: NEUTRAL
Brown: LIVE
As the colours of the wires in the mains lead of this apparatus may not correspond with the coloured markings identifying the terminals in your plug, proceed as follows:
The wire which is coloured BLUE must be connected to the terminal which is marked with the letter N or coloured BLACK. The wire which is coloured BROWN must be connected to the terminal which is marked with the letter L or coloured RED.
Make sure that neither core is connected to the earth terminal of the three pin plug.
| Important Notice: Guarantee Information for customers in EEA* and Switzerland | English |
| For detailed guarantee information about this Yamaha product, and Pan-EEA* and Switzerland warranty service, please either visit the website address below (Printable file is available at our website) or contact the Yamaha representative office for your country. * EEA: European Economic Area | |
| Remarque importante: informations de garantie pour les clients de l'EEE et la Suisse | Français |
| Pour des informations plus détaillées sur la garantie de ce produit Yamaha et sur le service de garantie applicable dans l'ensemble de l'EEE ainsi qu'en Suisse, consultez notre site Web à l'adresse ci-dessous (le fichier imprimable est disponible sur notre site Web) ou contactez directement Yamaha dans votre pays de résidence. * EEE : Espace Economique Européen | |
| Wichtiger Hinweis: Garantie-Information für Kunden in der EWR* und der Schweiz | Deutsch |
| Für{nahere Garantie-Information über ceses Produkt von Yamaha, sowie über den Pan-EWR*- und Schweizer Garantieservice, besuchen Sieitte entweder die folgend angegebene Internetadresse (eine druckfähige Version befindet sich auch auf unserer Website), oder wenden Sie sich an den fur Ihr Land zuständigen Yamaha-Vertrieb. *EWR: Europäischer Wirtschaftsa rum | |
| Viktigt: Garantiinformation für kunder i EES-området* och Schweiz | Svenska |
| Für detailjerad information omenna Yamahaproduktsam garantiservice i hela EES-området* och Schweiz kan du antingen besöka nedanständende webbaddress (en utskriftsvänlig fil finns på webbplatsen) erler kontakta Yamaha officiella representant i ditt land. * EES: Europeiska Ekonomiska Samarbetsområdet | |
| Avviso importante: informazioni sulla garanzia per i clienti residenti nell'EEA* e in Svizzera | Italiano |
| Per informazioni dettagliate sulla garanzia relativa a questo prodotto Yamaha e l'assistenza in garanzia nei paesi EEA* e in Svizzera, potete consulhare il situ Web all'indirizzo riportato di seguito (è disponibile il file in formato stampabile) oppure contattare l'ufficio di rappresentanza locale della Yamaha. * EEA: Area Economica Europea | |
| Avviso importante: información sobre la garantía para los clienteles del EEE* y Suiza | Espanol |
| Para una información detallada sobre este produits Yamaha y sobre el soporte de garantía en la zona EEE* y Suiza, visite la direction web que se incluye más bajo (la version del archivo para imprintir esta disponible en是我国 sitcom web) o pángase en contacto con el representante de Yamaha en su País. * EEE: Espacio Económico Europeo | |
| Belangrijke meededeling: Garantie-informatie voor klanten in de EER* en Zwitserland | Nederland |
| Voor gedetailleerde garantie-informatie over dit Yamaha-product en de garantieservice in heel de EER* en Zwitserland, gaat u waar de onderstaande website (u vind een afdrukbaar bestand op once website) of neemt u contact op met de vertegenwoordigin van Yamaha in uw land. * EER: Europese Economische Ruimte | |
http://europe.yamaha.com/warranty/