
HSP 4 - Microphone SENNHEISER - Free user manual and instructions
Find the device manual for free HSP 4 SENNHEISER in PDF.
| Brand | Sennheiser |
| Model | HSP 4 |
| Product Type | Neckband headset |
| Polar Pattern | Cardioid |
| Frequency Response | 40 - 20,000 Hz ± 3 dB |
| Nominal Impedance (1 kHz) | 1 kΩ |
| Min. Terminal Impedance | 4.7 kΩ |
| Sensitivity (at 1 kHz) | 4 mV/Pa ±3 dB |
| Capsule Diameter | 8.4 mm |
| Max. Sound Pressure Level | 150 dB SPL |
| Equivalent Noise Level | 37 dB(A) |
| Current Consumption | approx. 250 μA |
| Supply Voltage | 4.5 - 15 V (phantom power) |
| Operating Temperature | -10 °C to +50 °C |
| Cable Length | 1.6 m |
| Connector | 3.5 mm mini-jack (3-pole) |
| Microphone Weight (without cable) | 4.8 g |
| Neckband Weight | 4.4 g |
| Neckband Width | 110 mm |
| Package Contents | Microphone boom, neckband, 5 clips, silicone tube, connection cable, carrying case, windscreen, instruction manual |
| Maintenance and Cleaning | Protective grid: gently brush with isopropyl alcohol; connector: clean with isopropyl alcohol to remove salt deposits |
| Safety | Do not open the product; use only original accessories; reduce volume before connecting to avoid feedback |
| Warranty | 24 months (Sennheiser) |
Frequently Asked Questions - HSP 4 SENNHEISER
User questions about HSP 4 SENNHEISER
0 question about this device. Answer the ones you know or ask your own.
Ask a new question about this device
Download the instructions for your Microphone in PDF format for free! Find your manual HSP 4 - SENNHEISER and take your electronic device back in hand. On this page are published all the documents necessary for the use of your device. HSP 4 by SENNHEISER.
USER MANUAL HSP 4 SENNHEISER
Important safety instructions
- Read these safety instructions and the instruction manual of the product.
- Keep these safety instructions and the instruction manual of the product. Always include all instructions when passing the product on to third parties.
- Only use attachments, accessories and spare parts specified by the manufacturer.
- Caution: The protective basket and pop shield must be completely dry when you mount them on the microphone. Moisture can cause malfunctions or damage to the capsule.
- Do not attempt to open the product housing on your own.
- Refer all servicing to qualified service personnel. Servicing is required when the product has been damaged in any way, liquid has been spilled or objects have fallen into the product, when the product has been exposed to rain or moisture, does not operate normally, or has been dropped.
- Use the product only under the conditions of use listed in the specifications.
- Let the product come to ambient temperature before switching it on.
- Do not operate the product if it was damaged during transportation.
- Always run cables so that no one can trip over them.
- Keep the product and its connections away from liquids and electrically conductive objects that are not necessary for operating the product.
- Do not use any solvents or aggressive cleaning agents to clean the product.
- Caution: Very high signal levels can damage your hearing and your loudspeakers. Reduce the volume on the connected audio devices before switching on the product; this will also help prevent acoustic feedback.
Intended use
The product is designed for indoor and outdoor use.
The product can be used for commercial purposes.
It is considered improper use when the product is used for any application not named in the corresponding instruction manual.
Sennheiser does not accept liability for damage arising from improper use or misuse of this product and its attachments/accessories.
Before putting the products into operation, please observe the respective country-specific regulations!
Delivery includes
- boom microphone
neckband - 5 clips
- silicone tube
- connection cable
- plastic transport case, foam-lined with cut-outs
- windshield
- instruction manual
Putting into operation
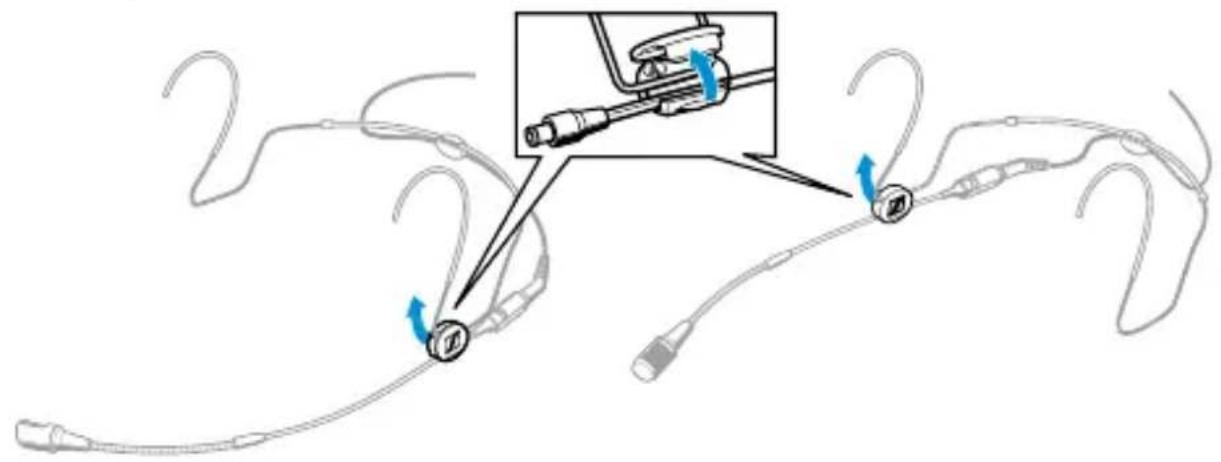
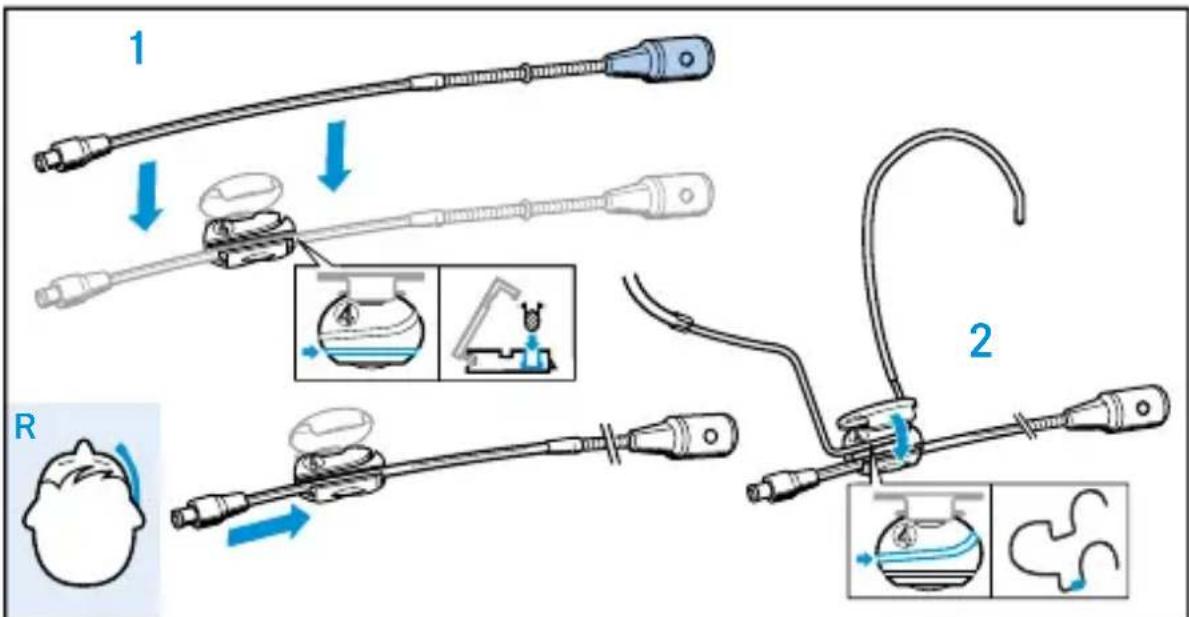
The HSP 4 is ready for operation on delivery. The microphone can be worn on the left or right side of the mouth.
Attaching the microphone to the left or right side
The neckband has as a clip which is designed so that the microphone boom can be worn on either side of the mouth.

NOTICE
Damage to the microphone boom!
The microphone boom can break or be impaired in its function when you bend or turn it.
Only adjust the microphone boom as described in this chapter.
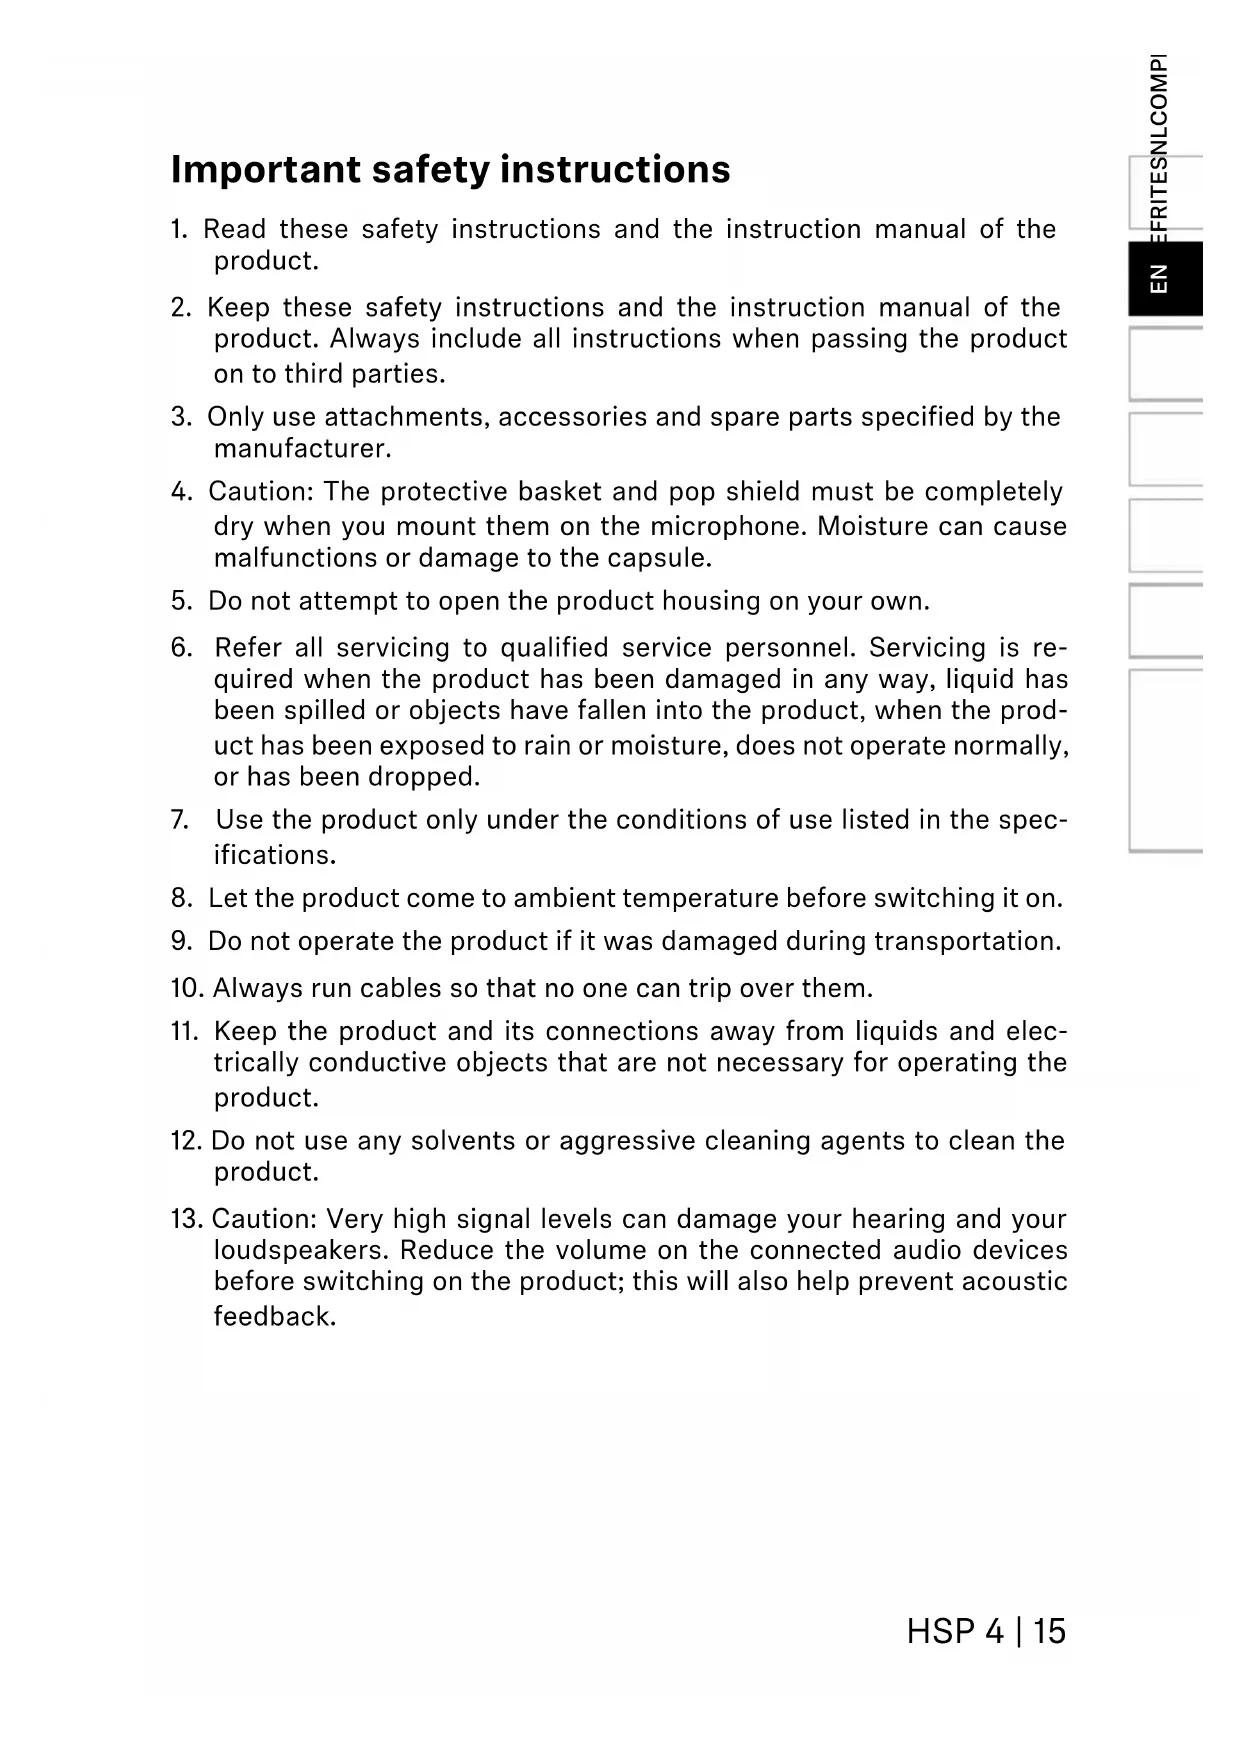
To remove the microphone boom:
Open the clip on the neckband.
Carefully remove the microphone boom and the neckband from the clip.
To reattach the microphone boom:
1 First press the microphone boom and then the neckband into the clip as shown.
2 Close the clip.
Adjusting the microphone boom and the neckband
For best possible comfort and optimum fit of the headmic, the neckband and the microphone boom have to be adjusted to properly fit your head.
NOTICE
Damage to the microphone boom!
The microphone boom can break or be impaired in its function when you bend or turn it.
For adjusting the microphone boom, ONLY bend or turn the neckband or the flexible gooseneck at the forward part of the microphone boom.
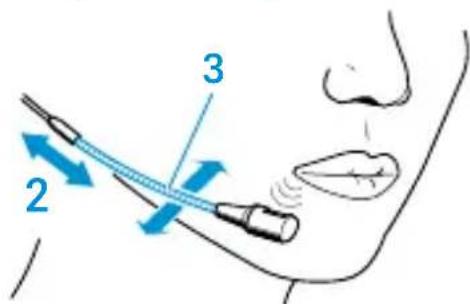
Positioning the microphone towards the corner of the mouth
To individually position the microphone:
Bend the neckband 1 at the clip to adjust the angle of the microphone boom 2.
Push the microphone boom 2 backwards or forwards in the clip so that the microphone is positioned directly at the corner of the mouth as shown.

If necessary, precisely position the microphone by using the flexible gooseneck 3.
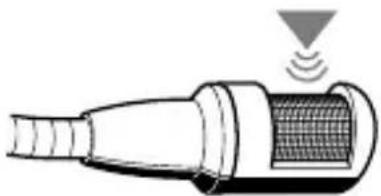
Attaching the sound inlet basket
Notes:
Do not position the microphone directly in front of your mouth as it will pick up your breathing and plosive noises from your mouth. In addition, moisture can adversely affect the sound and performance of your microphone.
When attaching the sound inlet basket, make sure that it locks into place with an audible click.

Make sure not to cover the sound inlet.
Adjusting the neckband
The neckband is flexible and ensures an optimum fit.
Change the length of the neckband until a snug but comfortable fit is achieved.
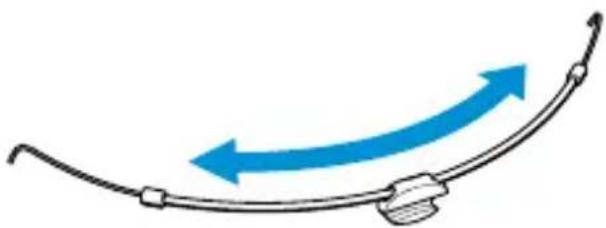
If necessary, adjust the neckband at the earhooks.
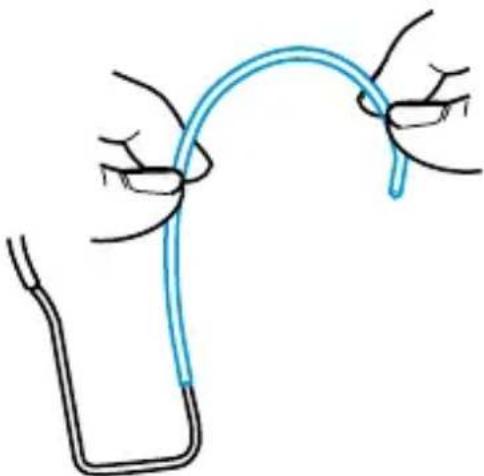
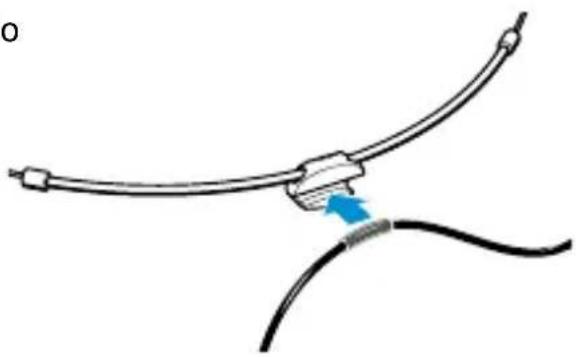
Attaching the cable to the cable grip
Attach the microphone cable to the cable grip in the centre of the neckband.
Note:
When attaching the thin cable, makesure you also press the small cable sleeve into the cable grip or the cable will fall out.
Care and maintenance
NOTICE
Liquids can damage the electronics of the device!
Liquids entering the housing of the device can cause a short-circuit and damage the electronics.
Only use a soft, slightly damp cloth to clean the device.
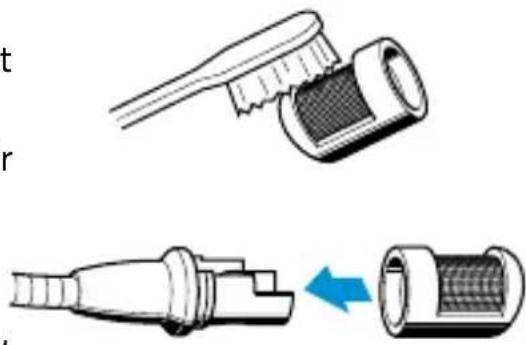
Cleaning the sound inlet basket
To clean or replace the sound inlet basket, carefully pull it from the capsule.
Moisten a small brush (bristle brush or toothbrush) with isopropyl alcohol.
Carefully brush off the sound inlet basket.
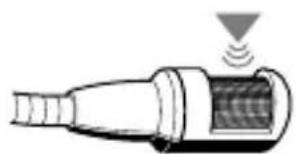
- Allow the sound inlet basket to air dry for approx. 1 hour so that the remaining isopropyl alcohol can evaporate.
Reattach the sound inlet basket to the capsule so that it locks into place with an audible click. When attaching the sound inlet basket, make sure not to cover the sound inlet.
Cleaning the contacts of the connection cable
Over time, salt deposits from sweat can build up on the connector and the socket. Clean the connector and the socket using standard isopropyl alcohol.
To loosen the connection:
Slide the silicone tube aside.
Insert your fingernail into the join.
Pull the connector and the socket apart as shown.

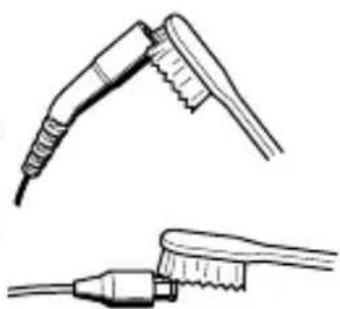
Moisten a small brush (bristle brush or toothbrush) with isopropyl alcohol.
Carefully brush off the connector and the socket and remove the salt deposits.
Rinse the connector and the socket with isopropyl alcohol to remove the remaining salt deposits.
Dry the connector and the socket using a soft cloth or a small piece of cotton wool and carefully tap them off.
- Allow the connector and the socket to air dry for approx. 1 hour so that the remaining isopropyl alcohol can evaporate.
Slide the silicone tube onto the connector.
Connect the connector to the socket.
Specifications
| Frequency range 40 - 20,000 Hz ± 3 dB | |
| Pick-up pattern Cardioid | |
| Rated impedance (at 1 kHz) 1 kΩ | |
| Min. terminating impedance 4.7 kΩ | |
| Sensitivity 4 mV/Pa ±3 dB | |
| Diameter of mic capsule 8.4 mm | |
| Sound pressure level limit 150 dB | |
| Equivalent noise level 37 dB(A) | |
| Power consumption approx. 250 μA | |
| Supply voltage 4.5 - 15 V | |
| Operating temperature -10 °C – +50 °C | |
| Cable length 1.6 m | |
| Diameter of boom arm 2 mm | |
| Weight 4.8 g | |
| Connector 3.5 mm mini-jack or 3-pin | |
| Neckband | |
| Width | 110 mm |
| Weight | 4.4 g |
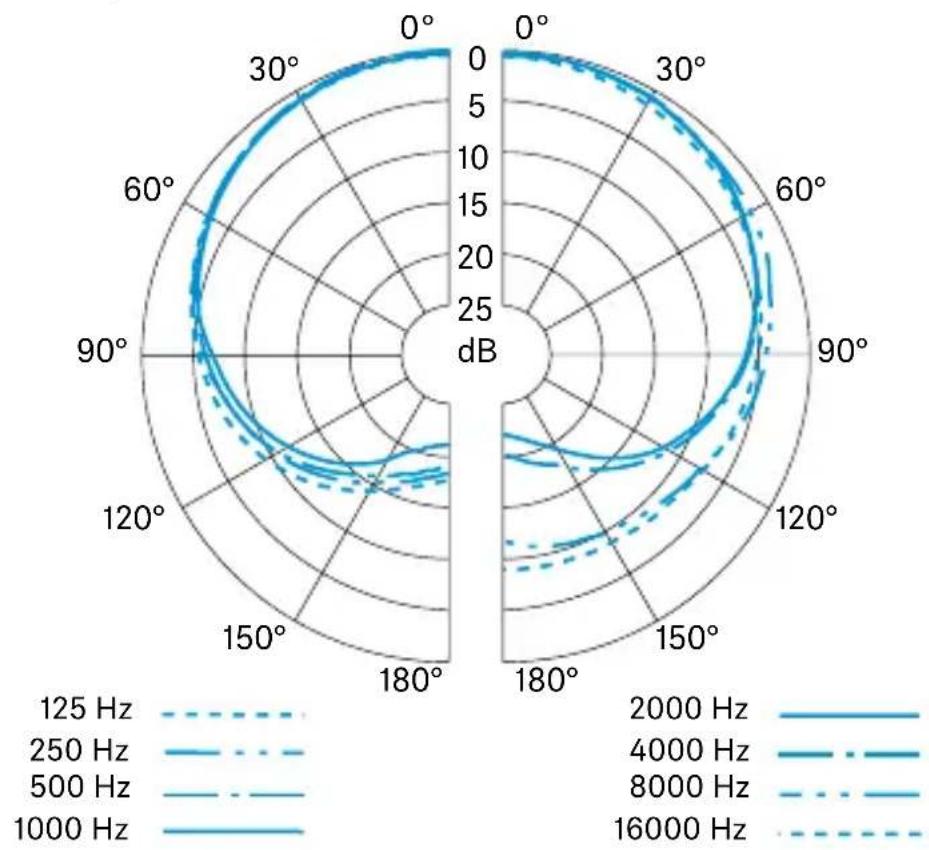
Polar pattern

Frequency response
Manufacturer declarations
Warranty
Sennheiser electronic SE & Co. KG gives a warranty of 24 months on these products.
For the current warranty conditions, please visit our website at www. sennheiser.com or contact your Sennheiser partner.
In the US please contact:
Sennheiser Electronic Corporation
1 Enterprise Drive, Old Lyme, CT 06371
www.sennheiser.com
Warranty FOR AUSTRALIA and NEW ZEALAND ONLY:
Sennheiser Australia Pty Ltd provides a warranty of 24 months on these products.
For the current warranty conditions, visit Sennheiser website:
Australia: https://en-au.sennheiser.com/
New Zealand: https://en-nz.sennheiser.com/
Sennheiser goods come with guarantees that cannot be excluded under Australian and New Zealand Consumer law. You are entitled to a replacement or refund for a major failure and compensation for any other reasonably foreseeable loss or damage. You are also entitled to have the goods repaired or replaced if the goods fail to be of acceptable quality and the failure does not amount to a major failure.
This warranty is in addition to other rights or remedies under law. Nothing in this warranty excludes, limits or modifies any remedy available to be consumer which is granted by law.
To make a claim under this contract, raise a case via Sennheiser website
Australia:
https://en-au.sennheiser.com/service-support-contact
New Zealand:
https://en-nz.sennheiser.com/service-support-contact
All expenses of claiming the warranty will be borne by the person making the claim.
Sennheiser international warranty is provided by: Sennheiser Australia Pty Ltd (ABN 68 165 388 312) Level 14, Tower A Zenith Building, 821 Pacific Highway, Chatswood NSW 2067, Australia
In compliance with the following requirements
EU: WEEE Directive (2012/19/EU)
UK: WEEE Regulations (2013)

Notes on disposal
The symbol of the crossed-out dumpster on the product, the (rechargeable) battery (if applicable) and/or the packaging indicates that these products must not be disposed of with normal household waste, but must be disposed of separately at the end of their service life. For the packaging, follow the regulations in your country for separating waste. Improper disposal of packaging materials can be harmful to your health and the environment.
The separate collection of waste electrical and electronic equipment, (rechargeable) batteries (if applicable) and packaging is intended to promote reuse and recycling and to prevent negative impacts on public health and the environment, for example due to hazardous substances contained in these products. At the end of their service life, recycle electrical and electronic equipment and (rechargeable) batteries so that their materials can be reused and to prevent environmental pollution.
If (rechargeable) batteries can be removed without destroying them, you are obliged to dispose of them separately (see the product's operating instructions for information on how to remove the batteries safely). Be especially careful when handling (rechargeable) batteries containing lithium, as these pose special hazards, such as the risk of fire and/or health risks if button cells are swallowed. Reduce battery waste as much as possible by using longer-life batteries or rechargeable batteries.
Further information on the recycling of these products can be obtained from your municipal administration, from the municipal collection points, or from your Sennheiser partner. You may also be able to return electrical or electronic equipment to your distributor, if they are legally required to do so. By disposing of your batteries properly, you are helping to protect public health and the environment.
UK Declaration of conformity
RoHS Regulations (2012)
EMC Regulations (2016)
Importer: Sennheiser UK Ltd.
Pacific House, Third Avenue, Globe Park, Marlow
Buckinghamshire SL7 1EY, United Kingdom
EU Declaration of conformity
RoHS Directive (2011/65/EU)
EMC Directive (2014/30/EU)
The full text of the EU declaration of conformity is available at the following internet address:
www.sennheiser.com/download.
- Directive RoHS (2011/65/UE)
- Directive CEM (2014/30/UE)
www.sennheiser.com/download.
www.sennheiser.com/download.
Paraocularly, the most important part of the visual system is the eye. The eye is composed of three parts: the retinal pigment epithelium, the retinal ganglion, and the retinal nerve (Fig. 1).
ATENCLON
- Directa RoHS (2011/65/UE)
- Directa CEM (2014/30/UE)
www.sennheiser.com/download.
www.sennheiser.com/download.
Compliance
China RoHS
Sennheiser electronic SE & Co. KG
Am Labor 1, 30900 Wedemark, Germany
www.sennheiser.com
Printed in Germany, Publ. 02/24, 527045/A05