
KRL46V - TV PIONEER - Free user manual and instructions
Find the device manual for free KRL46V PIONEER in PDF.
| Product Type | LCD Flat Panel TV |
| Brand | Pioneer |
| Model | KRL46V (KRL-46V) |
| Screen Size | 46 inches (117 cm) |
| Display Technology | Advanced Super View & BLACK TFT LCD |
| Resolution | 1920 x 1080 (Full HD) |
| Brightness | 450 cd/m² |
| Viewing Angles | H: 176°, V: 176° |
| Backlight Life | 60,000 hours |
| Colour Systems | PAL, SECAM, NTSC 3.58/4.43, PAL 60 |
| TV Reception | Analogue (B/G, I, D/K, L/L') and digital DVB-T |
| Connectivity | 3x HDMI, 1x SCART (INPUT1), 1x SCART (INPUT2), 1x S-Video, 1x Composite, 1x Component, 1x VGA (D-Sub 15), 1x RS-232C, 1x optical digital audio output, 1x analogue audio output, 1x headphone |
| Audio Power | 15 W x 2 (4 speakers) |
| Audio Functions | Dolby Digital, TruSurround XT, multiplex sound mode, dialog enhancement |
| Special Functions | HDMI Control (CEC), i/o link A, EPG, teletext, MHEG-5, parental control, child lock, sleep timer, eco mode |
| Power Supply | 220-240 V AC, 50 Hz |
| Power Consumption | 253 W (0.5 W standby) |
| Weight (with stand) | 30.5 kg |
| Weight (without stand) | 25.5 kg |
| Operating Temperature | 0 °C to +40 °C |
| Supplied Accessories | Remote control, AA batteries (x2), power cord (x2), stand assembly, cable ties, manual, warranty leaflet |
| Care and Cleaning | Unplug before cleaning; use a damp cloth, no liquid or aerosol products |
| Safety | Do not expose to water, do not block ventilation, do not place naked flame sources, carry with two people |
Frequently Asked Questions - KRL46V PIONEER
User questions about KRL46V PIONEER
0 question about this device. Answer the ones you know or ask your own.
Ask a new question about this device
Download the instructions for your TV in PDF format for free! Find your manual KRL46V - PIONEER and take your electronic device back in hand. On this page are published all the documents necessary for the use of your device. KRL46V by PIONEER.
USER MANUAL KRL46V PIONEER
This product complies with the Low Voltage Directive 2006/95/EC and EMC Directive 2004/108/EC.
D3-4-2-1-9a_A_En
Replacement and mounting of an AC plug on the power supply cord of this unit should be performed only by qualified service personnel.
IMPORTANT: THE MOULDED PLUG
This appliance is supplied with a moulded three pin mains plug for your safety and convenience. A 13 amp fuse is fitted in this plug. Should the fuse need to be replaced, please ensure that the replacement fuse has a rating of 13 amps and that it is approved by ASTA or BSI to BS1362.
Check for the ASTA mark or the BSI mark on the body of the fuse.
If the plug contains a removable fuse cover, you must ensure that it is refitted when the fuse is replaced. If you lose the fuse cover the plug must not be used until a replacement cover is obtained. A replacement fuse cover can be obtained from your local dealer.
If the fitted moulded plug is unsuitable for your socket outlet, then the fuse shall be removed and the plug cut off and disposed of safely. There is a danger of severe electrical shock if the cut off plug is inserted into any 13 amp socket.
If a new plug is to be fitted, please observe the wiring code as shown below. If in any doubt, please consult a qualified electrician.
IMPORTANT: The wires in this mains lead are coloured in accordance with the following code:
Blue: Neutral Brown:Live
As the colours of the wires in the mains lead of this appliance may not correspond with the coloured markings identifying the terminals in your plug, proceed as follows;
The wire which is coloured BLUE must be connected to the terminal which is marked with the letter N or coloured BLACK.
The wire which is coloured BROWN must be connected to the terminal which is marked with the letter L or coloured RED.
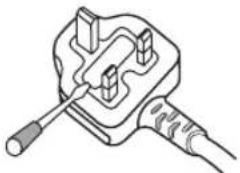
How to replace the fuse: Open the fuse compartment with a screwdriver and replace the fuse.
D3-4-2-1-2-2_B_En
OPERATION MANUAL
ENGLISH
The illustrations and the OSD (On-Screen Display) in this operation manual are for explanation purposes and may vary slightly from the actual operations.
- The examples used throughout this manual are based on the KRL-46V model.
Contents
Contents 1
Introduction 2
Dear Pioneer customer 2
Important Safety Precautions 2
Remote control unit. 3
Controlling other equipment using the supplied remote control unit 4
Trademarks 8
TV (Front view) 9
TV (Rear view) 9
Preparation 10
Supplied accessories 10
Attaching the stand unit 10
Inserting the batteries 11
Using the remote control unit 11 Cautions regarding the remote control unit 11 Installation precautions 12
Quick guide 13
Initial installation overview 13
Before turning on the power. 14
Bundling the cables 14
Initial auto installation 15
Checking signal strength and channel strength 15
Watching TV 16
Daily operation 16
Switching on/off 16
Switching between analogue and digital broadcasts 16
Changing channels 16
Selecting an external video source 16
Selecting a sound mode 16
EPG (Electronic Programme Guide) 17
EPG Overview 17
Useful settings for using EPG 17
Selecting a programme using EPG. 18
Timer recording using EPG 19
Cancelling the timer recording 19
Teletext 20
Using the MHEG-5 application (UK only) 20
Connecting external devices 21
Introduction to connections 21
HDMI connection 22
Component connection 22
S-VIDEO/VIDEO connection 22
SCART connection 23
Controlling devices with SCART using i/o link.A .... 23
Speaker/amplifier connection 24
Inserting a smart card 25
HDMI CONTROL 26
Controlling HDMI devices using HDMI CONTROL 26
HDMI CONTROL connection 27
HDMI CONTROL Setup 27
Operating an HDMI CONTROL device 28
Menu operation. 29
What is the HOME MENU? 29
Common operations 29
Basic adjustment 30
Picture Settings 30
AV SELECTION 31
Sound Settings 31
Power Save Settings 31
Channel Settings 32
Auto Installation 32
Digital channel settings 32
Analogue channel settings 33
Password/Parental lock settings 34
Language Settings (language, subtitle, multi audio) .... 34
Useful Viewing functions 35
Selecting the picture size 35
Selecting the WSS (Wide Screen Signalling) picture size automatically 35
Selecting the WSS (Wide Screen Signalling) picture size manually 35
Selecting the picture size manually 35
Selecting the recording picture size manually 36
Selecting the HDMI picture size automatically 36
Other picture and audio settings 36
Adjusting image position 36
Reducing noise on the screen 36
Automatic volume adjustment 36
Emphasing dialogue 36
Outputting audio only 36
Display Settings 37
Channel display 37
Time and Title display 37
Other useful features 38
Setting when using external devices 38
Input source settings 38
Skipping specified inputs 38
Colour system settings 38
Additional features 38
Connecting a PC 39
Connecting a PC 39
Displaying a PC image on the screen 39
Selecting the picture size 39
Adjusting the PC image automatically 40
Adjusting the PC image manually 40
Selecting input resolution 40
RS-232C port specifications 41
PC compatibility chart 42
RS-232C command list. 42
Appendix 43
Troubleshooting 43
Updating your TV via DVB-T 44
Reset 44
Identification 44
Specifications 45
End of life disposal 46
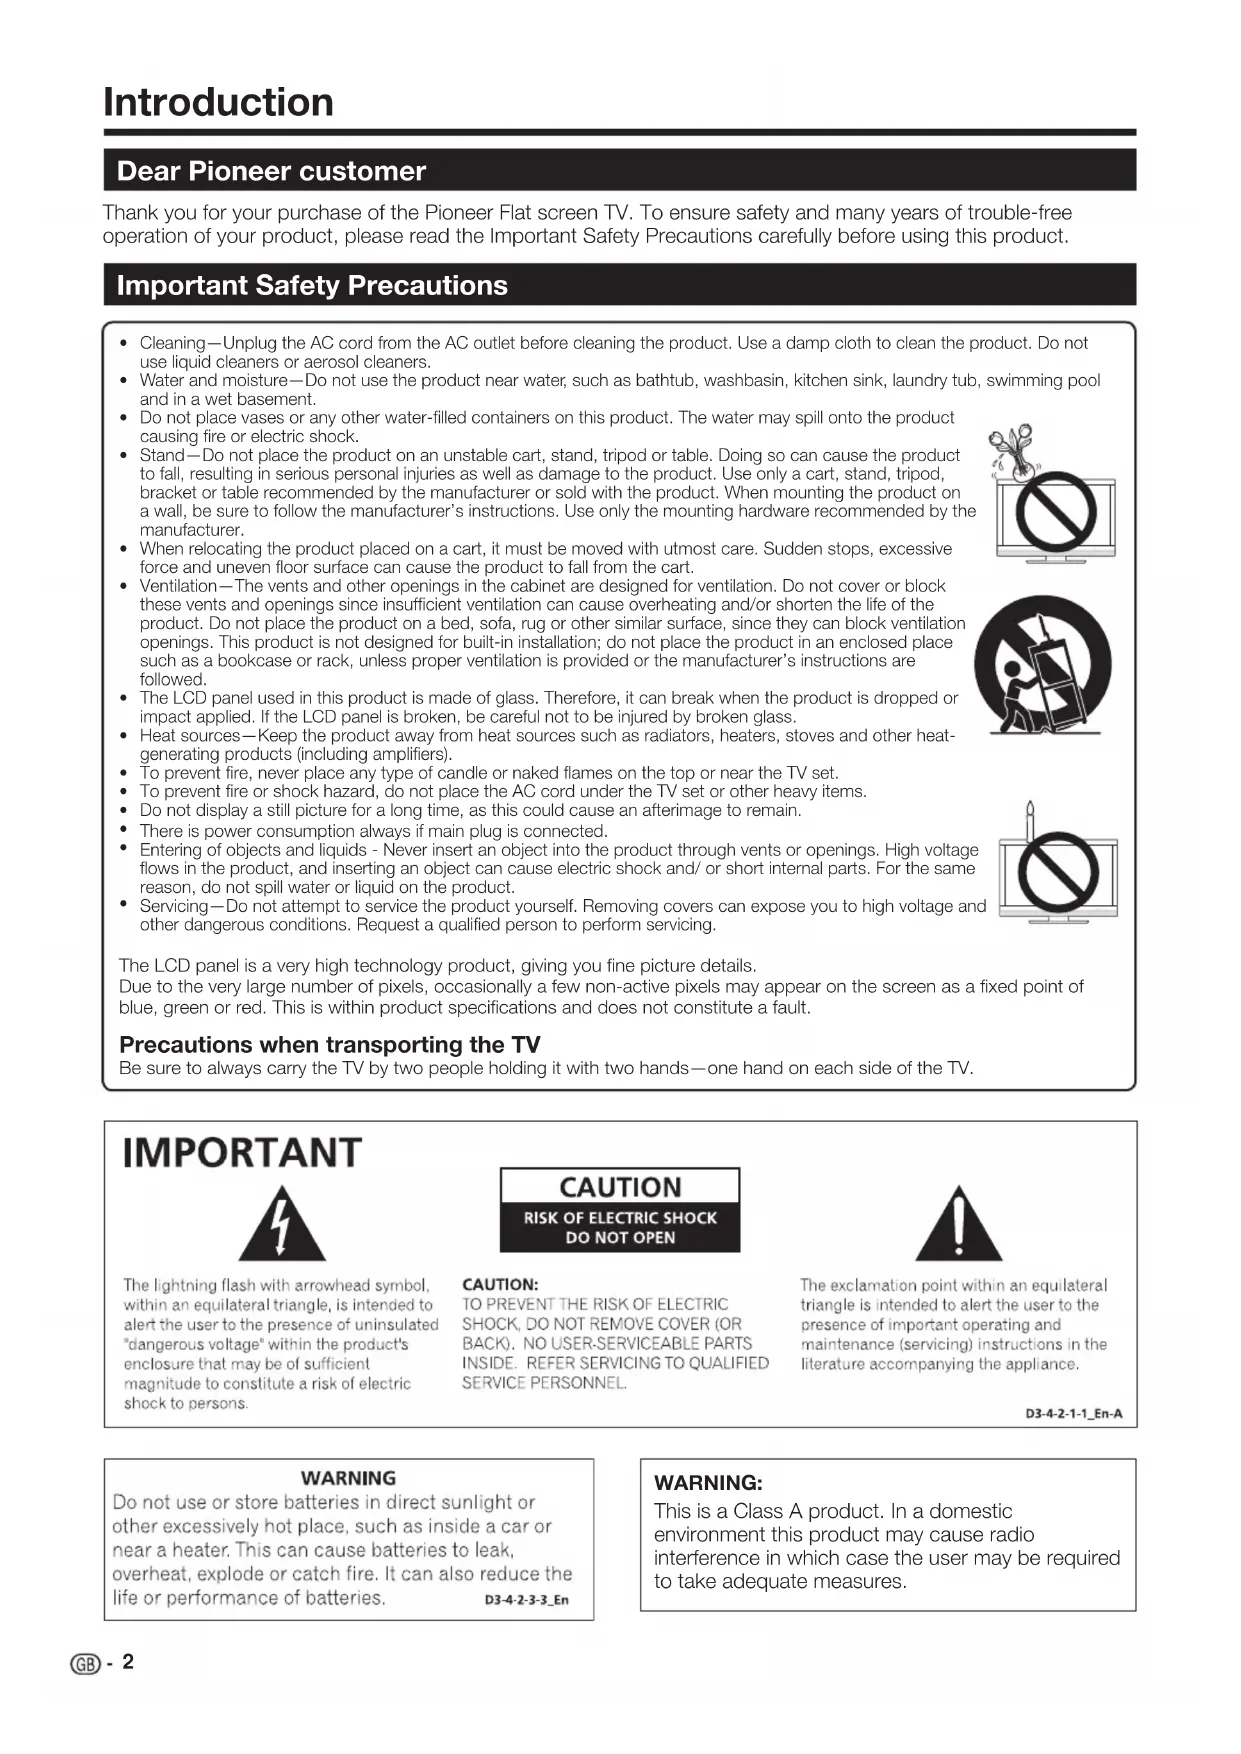
Dear Pioneer customer
Thank you for your purchase of the Pioneer Flat screen TV. To ensure safety and many years of trouble-free operation of your product, please read the Important Safety Precautions carefully before using this product.
Important Safety Precautions
- Cleaning—Unplug the AC cord from the AC outlet before cleaning the product. Use a damp cloth to clean the product. Do not use liquid cleaners or aerosol cleaners.
Water and moisture—Do not use the product near water, such as bathtub, washbasin, kitchen sink, laundry tub, swimming pool and in a wet basement. - Do not place vases or any other water-filled containers on this product. The water may spill onto the product causing fire or electric shock.
- Stand—Do not place the product on an unstable cart, stand, tripod or table. Doing so can cause the product to fall, resulting in serious personal injuries as well as damage to the product. Use only a cart, stand, tripod, bracket or table recommended by the manufacturer or sold with the product. When mounting the product on a wall, be sure to follow the manufacturer's instructions. Use only the mounting hardware recommended by the manufacturer.
- When relocating the product placed on a cart, it must be moved with utmost care. Sudden stops, excessive force and uneven floor surface can cause the product to fall from the cart.
- Ventilation—The vents and other openings in the cabinet are designed for ventilation. Do not cover or block these vents and openings since insufficient ventilation can cause overheating and/or shorten the life of the product. Do not place the product on a bed, sofa, rug or other similar surface, since they can block ventilation openings. This product is not designed for built-in installation; do not place the product in an enclosed place such as a bookcase or rack, unless proper ventilation is provided or the manufacturer's instructions are followed.
The LCD panel used in this product is made of glass. Therefore, it can break when the product is dropped or impact applied. If the LCD panel is broken, be careful not to be injured by broken glass. - Heat sources—Keep the product away from heat sources such as radiators, heaters, stoves and other heat-generating products (including amplifiers).
To prevent fire, never place any type of candle or naked flames on the top or near the TV set. - To prevent fire or shock hazard, do not place the AC cord under the TV set or other heavy items.
- Do not display a still picture for a long time, as this could cause an afterimage to remain.
- There is power consumption always if main plug is connected.
- Entering of objects and liquids - Never insert an object into the product through vents or openings. High voltage flows in the product, and inserting an object can cause electric shock and/ or short internal parts. For the same reason, do not spill water or liquid on the product.
Servicing—Do not attempt to service the product yourself. Removing covers can expose you to high voltage and other dangerous conditions. Request a qualified person to perform servicing.


The LCD panel is a very high technology product, giving you fine picture details.
Due to the very large number of pixels, occasionally a few non-active pixels may appear on the screen as a fixed point of blue, green or red. This is within product specifications and does not constitute a fault.
Precautions when transporting the TV
Be sure to always carry the TV by two people holding it with two hands—one hand on each side of the TV.
IMPORTANT

The lightning flash with arrowhead symbol, within an equilateral triangle, is intended to alert the user to the presence of uninsulated "dangerous voltage" within the product's enclosure that may be of sufficient magnitude to constitute a risk of electric shock to persons.
CAUTION
RISK OF ELECTRIC SHOCK DO NOT OPEN
CAUTION:
TO PREVENT THE RISK OF ELECTRIC SHOCK,DO NOT REMOVE COVER (OR BACK).NO USER-SERVICEABLE PARTS INSIDE.REFER SERVICING TO QUALIFIED SERVICE PERSONNEL

The exclamation point within an equilateral triangle is intended to alert the user to the presence of important operating and maintenance (servicing) instructions in the literature accompanying the appliance.
D3-4-2-1-1_En-A
WARNING
Do not use or store batteries in direct sunlight or other excessively hot place, such as inside a car or near a heater. This can cause batteries to leak, overheat, explode or catch fire. It can also reduce the life or performance of batteries. D3-4-2-3-3_En
WARNING:
This is a Class A product. In a domestic environment this product may cause radio interference in which case the user may be required to take adequate measures.
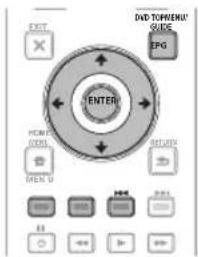
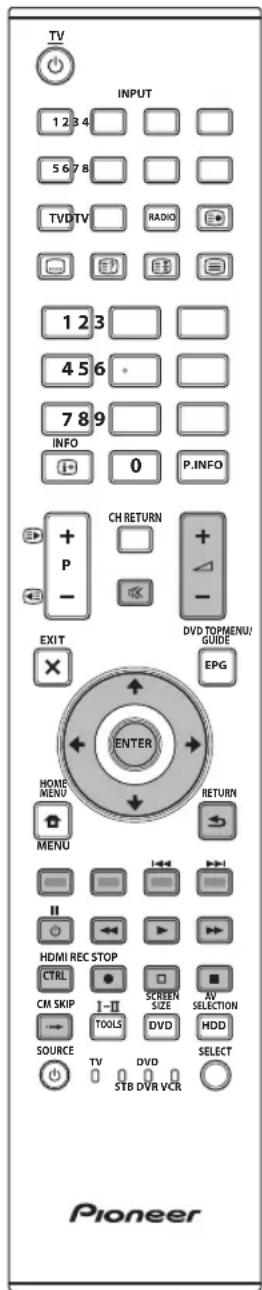
Remote control unit
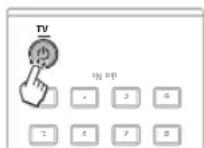
1 (TV) (Standby/On) (Page 16)
2 INPUT1-8 Select an input source (Page 16).
3 Buttons for mode switch TV Press to access convention analogue TV mode.
DTV Press to access digital TV mode.
RADIO DTV. Switch between Radio and Data mode.
- When only data broadcasting (no radio broadcasting) is transmitted by DVB, the radio broadcasting will be skipped.
4 0-9 numeric buttons Set the channel.
Enter desired numbers. Set the page in teletext mode.
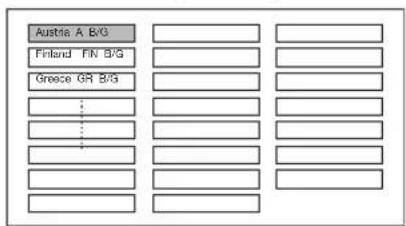
- When the five Nordic countries (Sweden, Norway, Finland, Denmark, or Iceland) are selected in the country setting from "Auto Installation" (page 32), DTV services are four digits. When another country is selected, DTV services are three digits.
5 (1 + ) INFO) Press to display the station information (channel number, signal, etc.) in the upper right corner of the screen (Page 37).
6 CH RETURN
Press to return to the previously selected channel or external input.
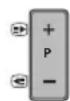
7 P + / - (三) / (三)
Select the TV channel.
Select the page in teletext mode.
8 Mute)
TV sound on/off.
9 X (EXIT)
Exit the "HOME MENU" screen.
10 / / / (Cursor)
Select a desired item on the setting screen.
ENTER
Execute a command within the "HOME MENU" screen.
ATV/DTV: Display the programme list when no other "HOME MENU" screen is running.
11 (HOME MENU)
"HOME MENU" screen on/off.
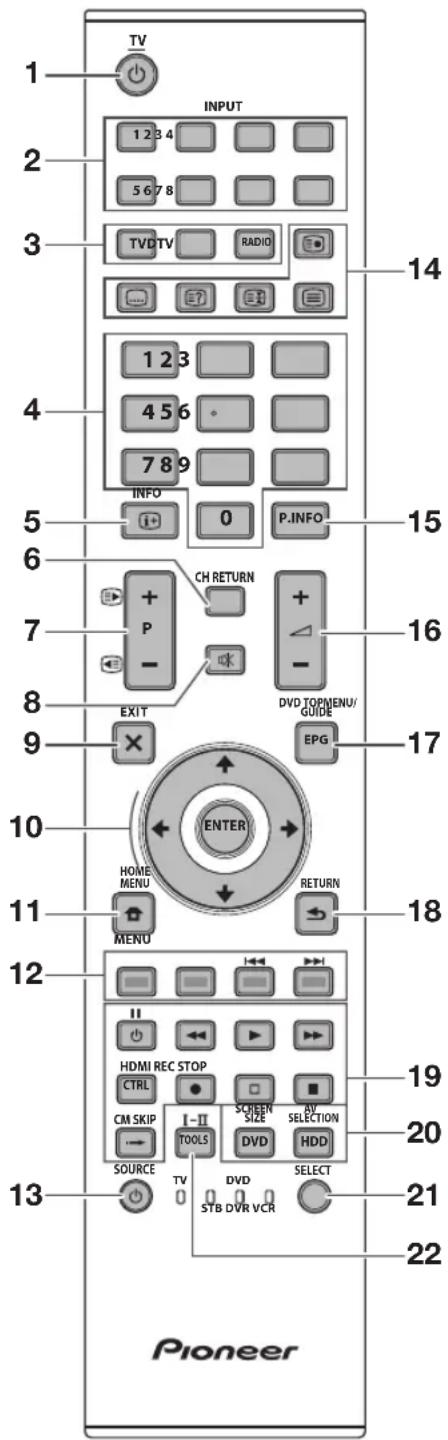
12 Colour (Red/Green/Yellow/Blue) buttons
The coloured buttons are correspondingly used to select the coloured items on the screen (e.g. EPG, MHEG-5, Teletext).
13 (SOURCE)
Pages 6-7
14 Buttons for useful operations
Subpage)
(Page 20)
Subtitle)
Switch subtitle languages on/off (Pages 20 and 34).
(Reveal hidden Teletext) (Page 20)
(Freeze/Hold)
Press to freeze a moving image on the screen.
Teletext: Stop updating teletext pages automatically or release the hold mode.
Teletext
ATV: Display analogue teletext (Page 20).
DTV: Select MHEG-5 and teletext for DTV (Page 20).
15 P. INFO
Press to display programme information which is transmitted through digital video broadcasting in the upper left corner of the screen (DTV only).
16 +/-(Volume)
Increase/decrease TV volume.
17 EPG
DTV: Display the EPG screen (Pages 17-19).
18 一 (RETURN)
Return to the previous "HOME MENU" screen.
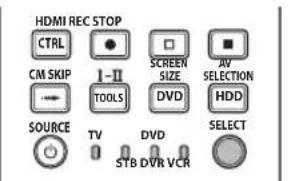
19 Buttons for HDMI CONTROL
If external equipment is connected via HDMI cables and is HDMI CONTROL compatible, you can use these HDMI CONTROL buttons. See pages 26 and 28 for details.
20 Buttons for picture adjustments SCREEN SIZE
Select a screen size (Pages 35 and 39).
AV SELECTION
Select a video setting (Page 31).
21 SELECT
Switch the selection among TV, STB, DVD/DVR, and VCR, so that you can control other connected equipment, using the supplied remote control unit (Page 4-7).
22 I-II (Sound mode)
Select a sound multiplex mode (Page 16).
NOTE
- Press and hold both 9 and 18 on the remote control unit to show "100Hz" demonstration in a dual screen.
Controlling other equipment using the supplied remote control unit
Using the supplied remote control unit, you can control other equipment in connection: a set-top box (STB), DVD player, DVD/HDD recorder (DVR), BD player or VCR.
Before using this function, you need to preset the supplied remote control unit with the manufacture code of the equipment to be controlled. When you then want to control the equipment, press SELECT on the remote control unit to select an appropriate mode depending on the equipment; the selection is switched among TV, STB, DVD/DVR, and VCR. The corresponding mode indicators on the remote control unit show the currently selected mode.
NOTE
- When you control a BD player, select the DVD/DVR mode.
Presetting manufacture codes
1 Press SELECT on the remote control unit to select the STB, DVD/DVR, or VCR mode depending on the equipment.
2 After confirming that the indicator of the previously selected mode goes off, press and hold SELECT, and then press 1 on the remote control unit.
- The corresponding mode indicator flashes.
3 Press 0-9 to enter a three-digit manufacture code.
See the manufacture code list to identify an appropriate code. The mode indicator lights up for approximately one second and then goes off; presetting the manufacture code is completed.
NOTE
- If you perform no operation for approximately one minute while a mode indicator is flashing, the code presetting procedure is quitted.
- If you enter a code not listed in the table, a mode indicator flashes quickly for approximately one second and then flashes as before.
- To quit the code presetting procedure halfway while a mode indicator is flashing, you may press SELECT on the remote control unit.
- The factory default manufacture codes for the STB, DVD/DVR, and VCR modes are "000", "100", and "500" respectively.
Manufacture codes
- You may not be able to control some equipment in the tables partially or entirely with the supplied remote control unit.
| STB | |
| 000 | PIONEER 1 (factory default) |
| 001 | PIONEER 2 |
| 002 | CANAL SATELLITE |
| 003 | HUMAX |
| 004 | PACE 1 |
| 005 | PACE 2 |
| 006 | QUALI-TV |
| 007 | SKY DIGITAL |
| DVD | |
| 100 | PIONEER 1 (factory default) |
| 101 | PIONEER 2 |
| 102 | AKAI |
| 103 | DENON |
| 104 | HITACHI |
| 105 | JVC |
| 106 | KENWOOD 1 |
| 107 | KENWOOD 2 |
| 108 | PANASONIC 1 |
| 109 | PANASONIC 2 |
| 110 | PHILIPS 1 |
| 111 | PHILIPS 2 |
| 112 | SAMSUNG |
| 113 | SHARP |
| 114 | SONY 1 |
| 115 | SONY 2 |
| 116 | SONY 3 |
| 117 | THOMSON |
| 118 | TOSHIBA |
| 119 | YAMAHA |
| DVR |
| 200 PIONEER 1 |
| 201 PIONEER 2 |
| 202 PIONEER 3 |
| 203 PANASONIC |
| 204 PHILIPS 1 |
| 205 PHILIPS 2 |
| 206 SHARP |
| 207 SONY |
| 208 TOSHIBA |
| BD |
| 300 PIONEER |
| 301 LG |
| 302 PANASONIC |
| 303 SAMSUNG |
| 304 SONY |
| 305 TOSHIBA |
| VCR |
| 500 PIONEER 1 (factory default) |
| 501 PIONEER 2 |
| 502 AIWA 1 |
| 503 AIWA 2 |
| 504 AKAI 1 |
| 505 AKAI 2 |
| 506 AKAI 3 |
| 507 DAEWOO |
| 508 GRUNDIG 1 |
| 509 GRUNDIG 2 |
| 510 GRUNDIG 3 |
| 511 GRUNDIG 4 |
| 512 HITACHI 1 |
| 513 HITACHI 2 |
| 514 HITACHI 3 |
| 515 JVC 1 |
| 516 JVC 2 |
| 517 JVC 3 |
| 518 JVC 4 |
| 519 JVC 5 |
| 520 LOEWE 1 |
| 521 LOEWE 2 |
| 522 MATSUI |
| 523 ORION |
| 524 PANASONIC 1 |
| 525 PANASONIC 2 |
| 526 PHILIPS 1 |
| VCR |
| 527 PHILIPS 2 |
| 528 PHILIPS 3 |
| 529 SANYO |
| 530 SAMSUNG 1 |
| 531 SAMSUNG 2 |
| 532 SAMSUNG 3 |
| 533 SAMSUNG 4 |
| 534 SHARP |
| 535 SONY 1 |
| 536 SONY 2 |
| 537 SONY 3 |
| 538 SONY 4 |
| 539 SONY 5 |
| 540 SONY 6 |
| 541 SONY 7 |
| 542 THOMSON |
| 543 TOSHIBA |
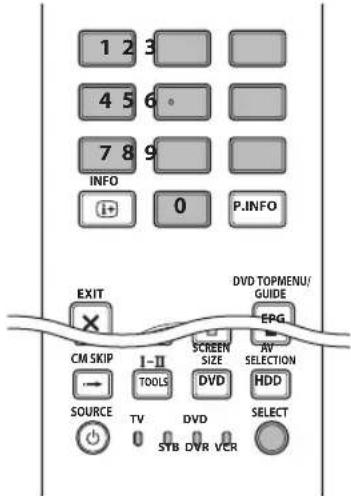
Using with other equipment (STB)
Using with other equipment (VCR)
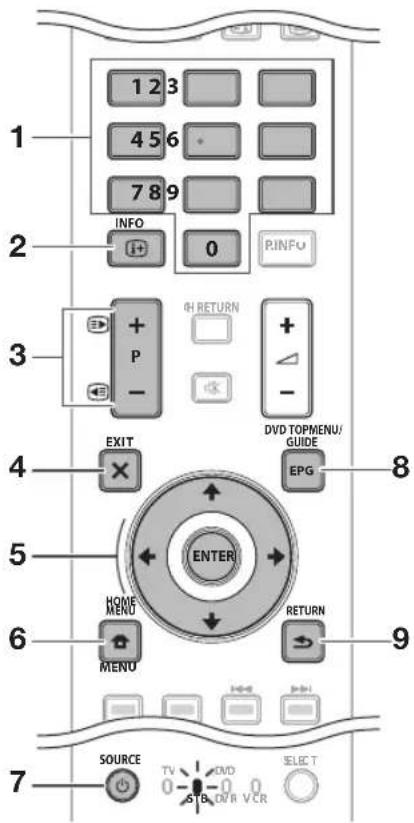
STB (set-top box) control buttons
When in the STB mode, the buttons on the remote control unit function as below.
1 0-9 Function as the numeric buttons.
2 INFO Press to display information on the current broadcasting.
3 + / - Press to tune in a higher or lower channel.
4 EXIT Press to exit the broadcasting menu screen or the broadcasting guide screen.
5 ENTER Press to activate the selected function.
+/+/+
Press to select items on the broadcasting menu screen or the broadcasting guide screen.
6 MENU Press to display the broadcasting menu screen.
7 SOURCE Turns the set-top box on and off.
8 GUIDE Press to display the broadcasting guide screen.
9 RETURN When the broadcasting menu screen is in display, press to restore the immediately previous screen.
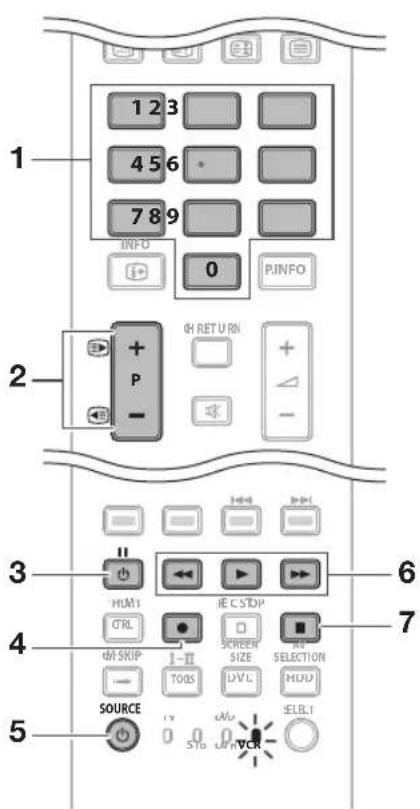
VCR control buttons
When in the VCR mode, the buttons on the remote control unit function as below.
1 0-9 Function as the numeric buttons.
2 P + / - Press to select channels of the TV tuner on the VCR.
3 (PAUSE/STILL) Set pauses and still pictures.
4 (REC) Start recording.
5 SOURCE ① Turn the power of the VCR on and off.
6 (REW) Rewind the tape and allows picture search. (PLAY) Start playback. (FF) Fast-forward the tape and allows picture se
7 (STOP) Stop playback.
Using with other equipment (DVD/DVR)
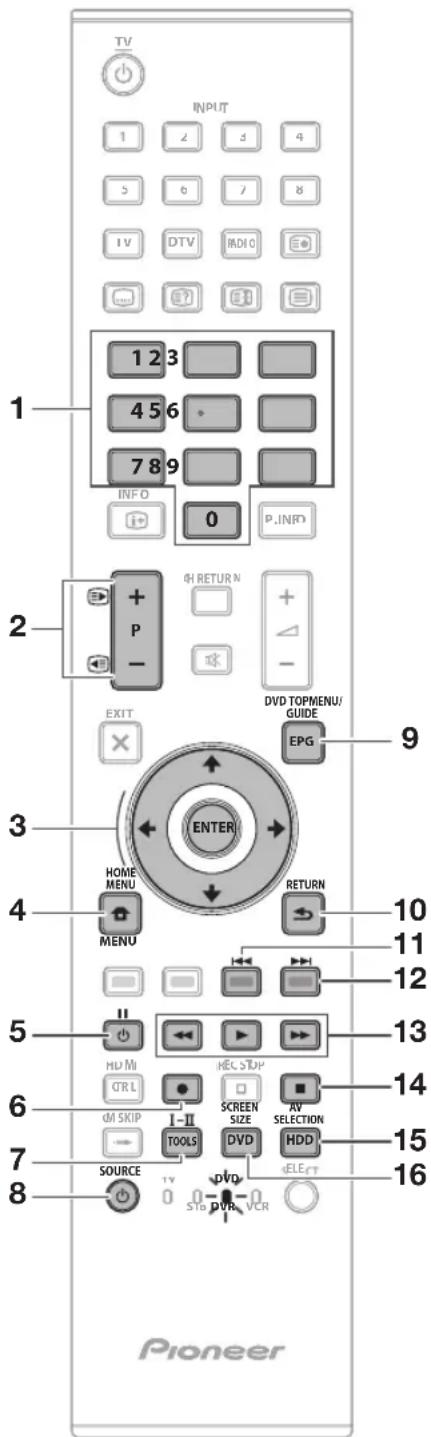

DVD/DVR control buttons
When in the DVD/DVR mode, the buttons on the remote control unit function as below.
1 0-9
Function as the numeric buttons.
2 + / - DVD/HDD recorder (DVR) only
Press to change the channel of the tuner built in the DVD/HDD recorder (DVR).
3 ENTER
Press to activate the selected function.

Press to select items on the DVD menu screen.
4 MENU
Press to display the DVD menu.
5 (PAUSE/STILL)
Set pauses and still pictures.
6 (REC) (DVD/HDD recorder (DVR) only)
Start recording.
7 TOOLS (Pioneer BD player only)
Press to display the "TOOLS" menu.
8 SOURCE
Turn on and off the power of the DVD player or DVD/HDD recorder (DVR).
9 DVD TOP MENU
When this button is pressed, the DVD top menu will appear.
10 RETURN
When the DVD menu is in display, press to restore the immediately previous screen.
11 (CHAPTER SEARCH)
Each time you press, you move back to the start of the previous chapter.
12 CHAPTER SEARCH
Each time you press, you move ahead to the start of the next chapter.
13 (SCAN)
Press to go backward.

Start playback.

Press for fast forward.
14 (STOP)
Press to stop playback or recording. With some DVD players or DVD/HDD recorders (DVRs), pressing the button twice may open the disc tray.
REC STOP (DVD/HDD recorder (DVR) only)
Press and at the same time to stop recording. This operation is available for only Pioneer and Sony DVD/ HDD recorders (DVRs).
15 HDD (DVD/HDD recorder (DVR) only)
Press to select the hard disk (HDD) for playback or recording.
16 DVD (DVD/HDD recorder (DV R) only)
Press to select the DVD for playback or recording.
NOTE
- You can control a BD player in the DVD/DVR mode.
- The DVD player, DVD/HDD recorder (DVR) or BD player cannot be selected at the same time.
| Trademarks | |
| HDMI® HIGH-DEFINITION MULTIMEDIA INTERFACE | “HDMI, the HDMI logo and High-Definition Multimedia Interface are trademarks or registered trademarks of HDMI Licensing LLC.” |
| DOLBY. DIGITAL | Manufactured under license from Dolby Laboratories. “Dolby” and the double-D symbol are trademarks of Dolby Laboratories. |
| SRS(●) TruSurround XT | TruSurround XT, SRS and (●) symbol are trademarks of SRS Labs, Inc. TruSurround XT technology is incorporated under license from SRS Labs, Inc. |
| HD ready 1080p | The “HD ready 1080P” Logo is a trademark of EICTA. |
| DVB® Digital Video Broadcasting | The DVB logo is the registered trademark of the Digital Video Broadcasting—DVB—project. |
| “x.v.Color” and xarColormarks of Sony Corporation. | |
TV (Front view)

RLS = Room Light Sensor*
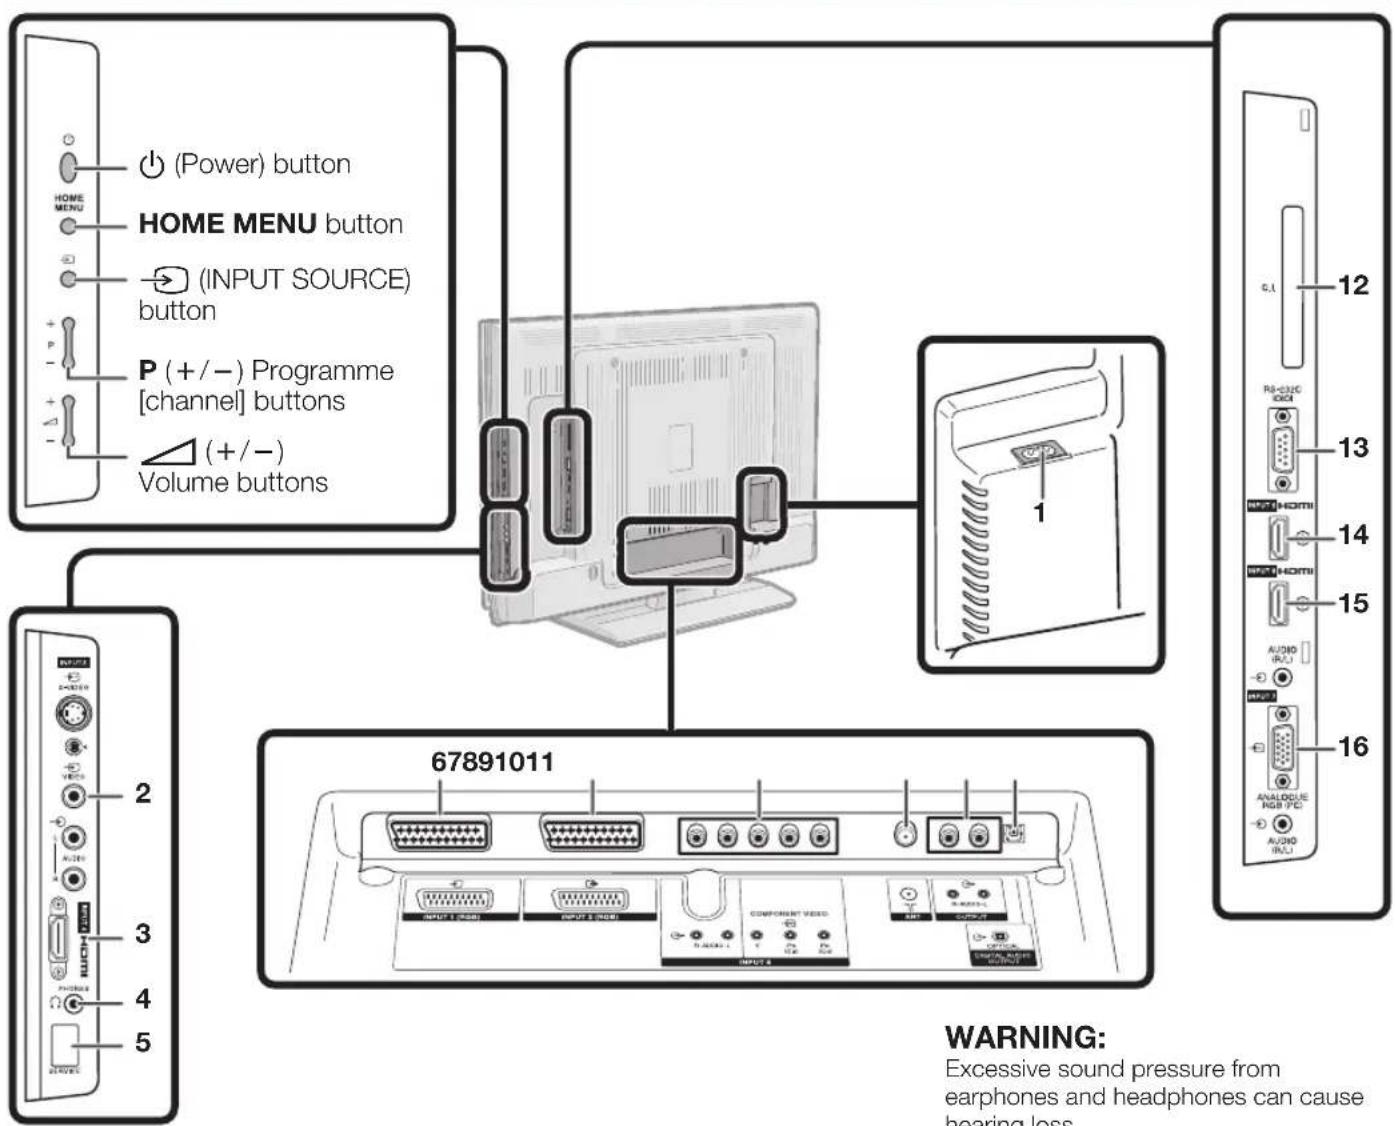
TV (Rear view)
1 AC INPUT terminal
2 INPUT3 terminals
3 INPUT4 (HDMI) terminal
4 PHONES (Headphones)
5 SERVICE socket
6 INPUT1 (RGB) terminal
7 INPUT2 (RGB) terminal
8 INPUT8 (COMPONENT/AUDIO) terminal
9 ANT (aerial) terminal
10 OUTPUT (AUDIO) terminals
11 DIGITAL AUDIO OUTPUT terminal
12 COMMON INTERFACE slot
13 RS-232C terminal
14 INPUT5 (HDMI) terminal
15 INPUT6 (HDMI/AUDIO) terminals
16 INPUT7 (ANALOGUE RGB/AUDIO) terminals
Supplied accessories
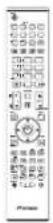
Remote control unit (× 1)
Pages 3 and 11 Page 10
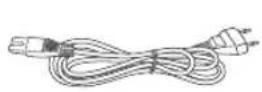
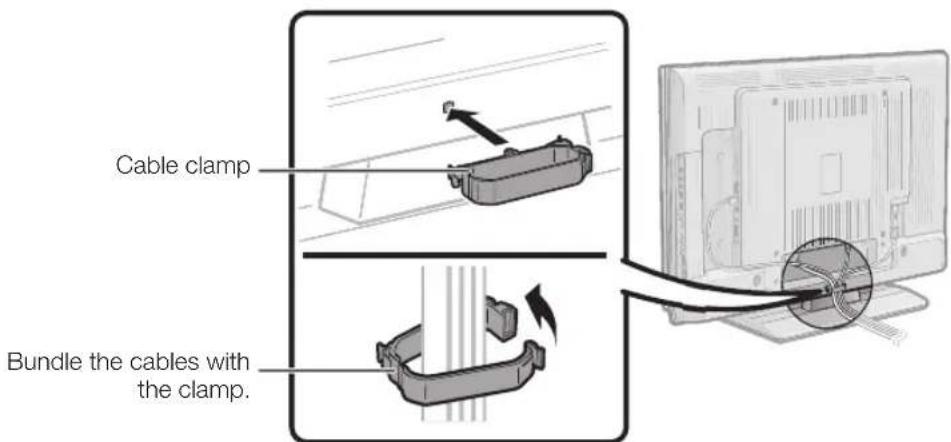
AC cord (× 2) Stand unit (× 1) Cable clamp (× 1)


Page 14Page 14

"AA" size alkaline battery (× 2) ... Page 11
Attaching the stand unit
- Before attaching (or detaching) the stand, unplug the AC cord from the AC INPUT terminal.
- Before performing work, spread cushioning over the surface on which you will be laying the TV. This will prevent it from being damaged.
CAUTION
- Attach the stand in the correct direction.
- Be sure to follow the instructions. Incorrect installation of the stand may result in the TV falling over.
1 Confirm that there are eight screws (four short screws and four long screws) with the stand unit.


2 Attach the supporting post for the stand unit onto the base using the four long screws with the hex key (supplied) as shown.
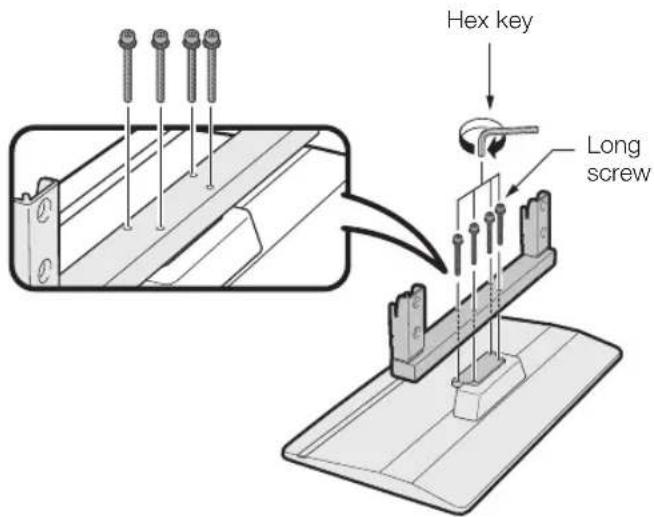
3 ① Insert the stand into the openings on the bottom of the TV. (Hold the stand so it will not drop from the edge of the base area.)
② Insert and tighten the four short screws into the four holes on the rear of the TV
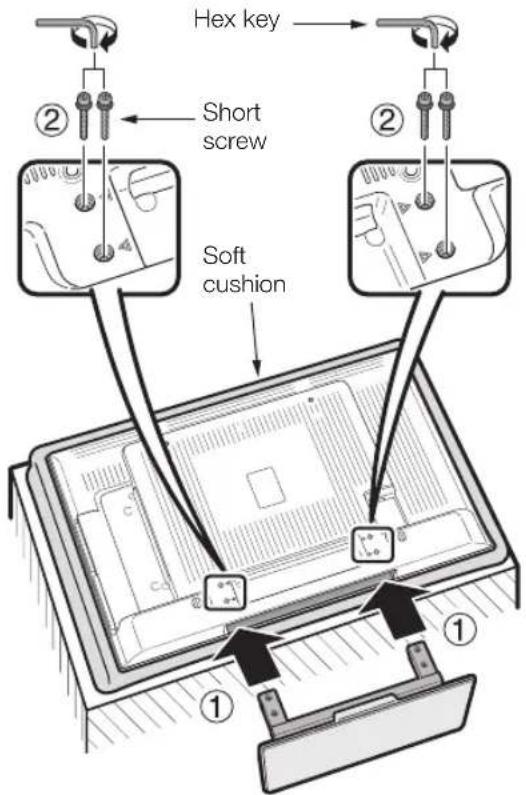
NOTE
- To detach the stand unit, perform the steps in reverse order.
Inserting the batteries
Before using the TV for the first time, insert two supplied "AA" size alkaline batteries. When the batteries become depleted and the remote control unit fails to operate, replace the batteries with new "AA" size batteries.
1 Open the battery cover.
2 Insert two supplied "AA" size alkaline batteries.
- Place batteries with their terminals corresponding to the (+) and (-) indications in the battery compartment.

3 Close the battery cover.
CAUTION
Improper use of batteries can result in chemical leakage or explosion. Be sure to follow the instructions below.
- Do not mix batteries of different types. Different types of batteries have different characteristics.
- Do not mix old and new batteries. Mixing old and new batteries can shorten the life of new batteries or cause chemical leakage in old batteries.
- Remove batteries as soon as they have worn out. Chemicals that leak from batteries can cause a rash. If you find any chemical leakage, wipe thoroughly with a cloth.
- The batteries supplied with this product may have a shorter life expectancy due to storage conditions.
- If you will not be using the remote control unit for an extended period of time, remove the batteries from it.
- When replacing the batteries, use alkaline batteries instead of zinc-carbon ones.
When disposing of used batteries, please comply with governmental regulations or environmental public institution's rules that apply in your country/area.
D3-4-2-3-1_En
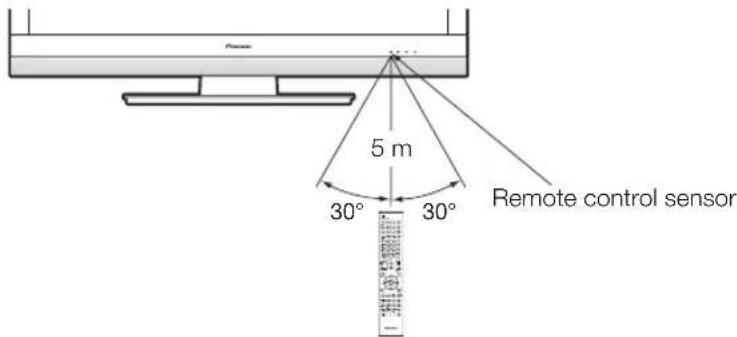
Using the remote control unit
Use the remote control unit by pointing it towards the remote control sensor. Objects between the remote control unit and sensor may prevent proper operation.
Cautions regarding the remote control unit
- Do not expose the remote control unit to shock. In addition, do not expose the remote control unit to liquids, and do not place in an area with high humidity.
- Do not install or place the remote control unit under direct sunlight. The heat may cause deformation of the unit.
- The remote control unit may not work properly if the remote control sensor of the TV is under direct sunlight or strong lighting. In such cases, change the angle of the lighting or the TV, or operate the remote control unit closer to the remote control sensor.

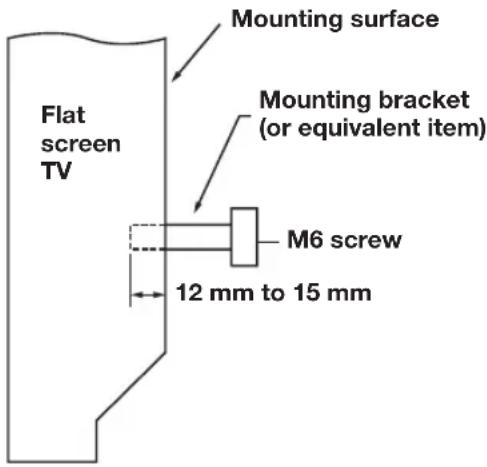
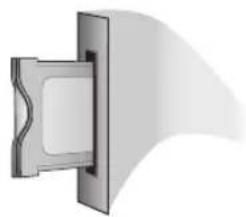
Installation precautions
Observe the following precautions when installing with any items such as the optional stand.
When using other stands, brackets or equivalent items
- Consult your dealer.
- The following mounting holes can be used for the installation.

Rear view
NOTE
- The mounting holes can be used after removing the black seals and the screws.
CAUTION
- Use M6 screws, which go 12mm to 15mm in depth from the mounting surface of the flat screen TV. See the side view shown to the right.
- Be careful not to block the ventilation opening at the rear of the flat screen TV.
- Be sure to install the flat screen TV on a flat surface because the LCD panel used in this product is made of glass.
- The screw holes other than the illustrations above are to be used only for the specified products. Never use them for mounting non-specified products.
NOTE
- Pioneer shall not be liable for any personal injury or product damage that results from the use of mounting items.
Side view
Initial installation overview
Follow the steps below one by one when using the TV for the first time. Some steps may not be necessary depending on your TV installation and connection.
123
Preparation
Power on and run the auto installation
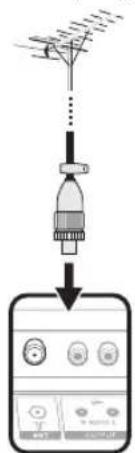
1 Connect an aerial cable to the ANT terminal (Page 14).
If necessary, insert a smart card into the Common Interface slot to watch scrambled broadcasts (Pages 14 and 25).
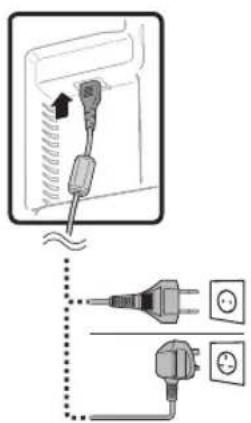
3 Connect the AC cord to the TV (Page 14).
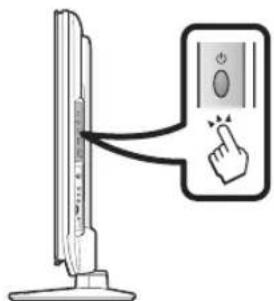
1 Turn on the power using on the TV (Page 16).
2 Run the initial auto installation (Page 15).
Language setting
Country setting
Channel search setting


Start searching channels
Watch TV
1 Congratulations! Now you can watch TV.
If necessary, adjust the aerial to attain maximum signal reception (Page 15).
Connect external devices
1 Connect external devices such as a DVD player/recorder as instructed (Pages 21-23).
Connect external audio devices such as speakers/amplifier as instructed (Pages 21 and 24).

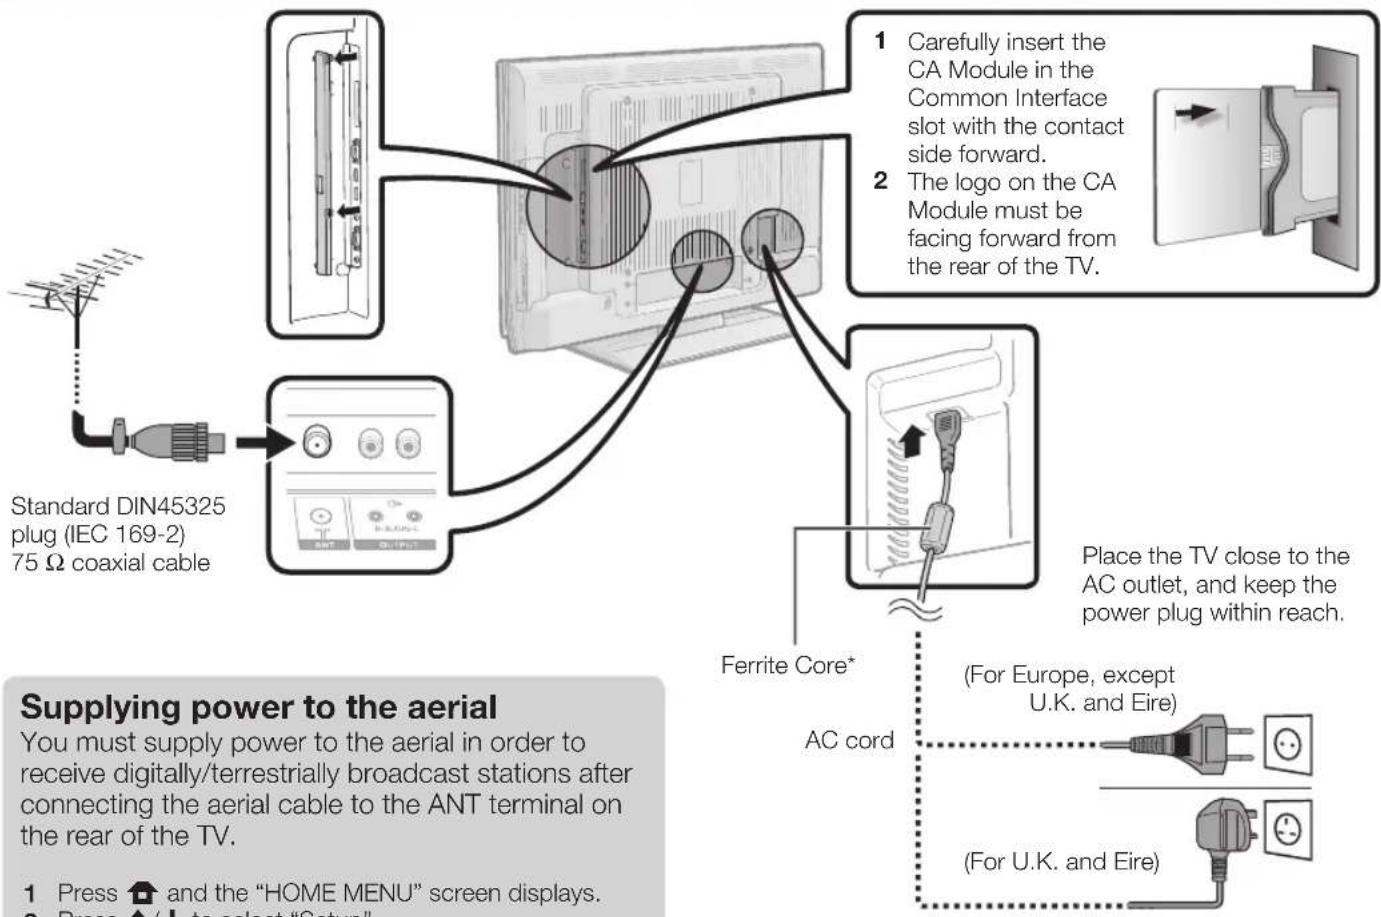
Before turning on the power
* Ferrite Core
The Ferrite Core should be permanently attached and never removed from the AC cord.
Bundling the cables
Initial auto installation
When the TV is powered on for the first time after purchase, the initial auto installation wizard appears. Follow the menus and make the necessary settings one after another.
Confirm the following before turning on the power
Is the aerial cable connected?
Is the AC cord plugged in?
1 Press on the TV.
- The initial auto installation wizard appears.
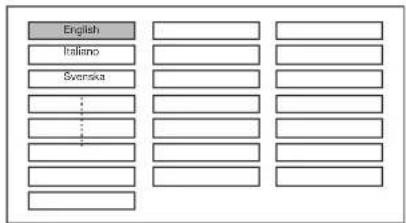
2 Setting the OSD language.
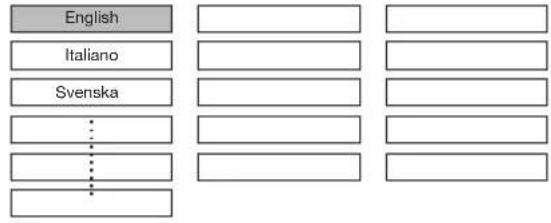
Press / / / to select the desired language, and then press ENTER.
3 Setting the country (Location of the TV).
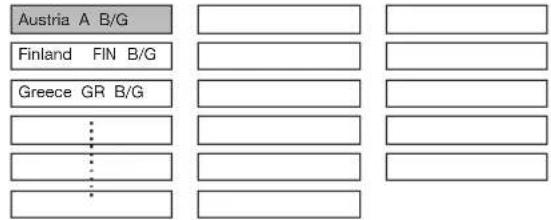
Press / / / to select your country or area, and then press ENTER.
- This setting screen only appears during the first installation.
4 Starting channel search.

Press / to select "Digital Search" or
"Analogue Search", and then press ENTER.
- If you want to search for more broadcasts, execute "Additional Search" from the "Programme Setup" menu (Pages 32 and 33).
- To watch both analogue broadcasts and digital broadcasts, you should perform the channel search setting for each format.
EXAMPLE
- If you execute "Digital Search" in the initial auto installation wizard, you should perform "Analogue Search" from "Auto Installation" under the "Setup" menu.
5 The TV searches for, sorts and stores all the receivable TV stations according to their settings and the connected aerial.
To abort the initial auto installation in progress, press (RETURN).
NOTE
- If you turn off the power on the TV after performing step 4, the initial auto installation wizard does not appear. The auto installation function allows you to execute the installation again from the "Setup" menu (Page 32).
- The initial auto installation wizard will go off if you leave the TV unattended for 30 minutes before searching for channels in step 5.
Checking signal strength and channel strength
If you install a DVB-T aerial for the first time or relocate it, you should adjust the alignment of the aerial to receive a good reception while checking the antenna setup screen.
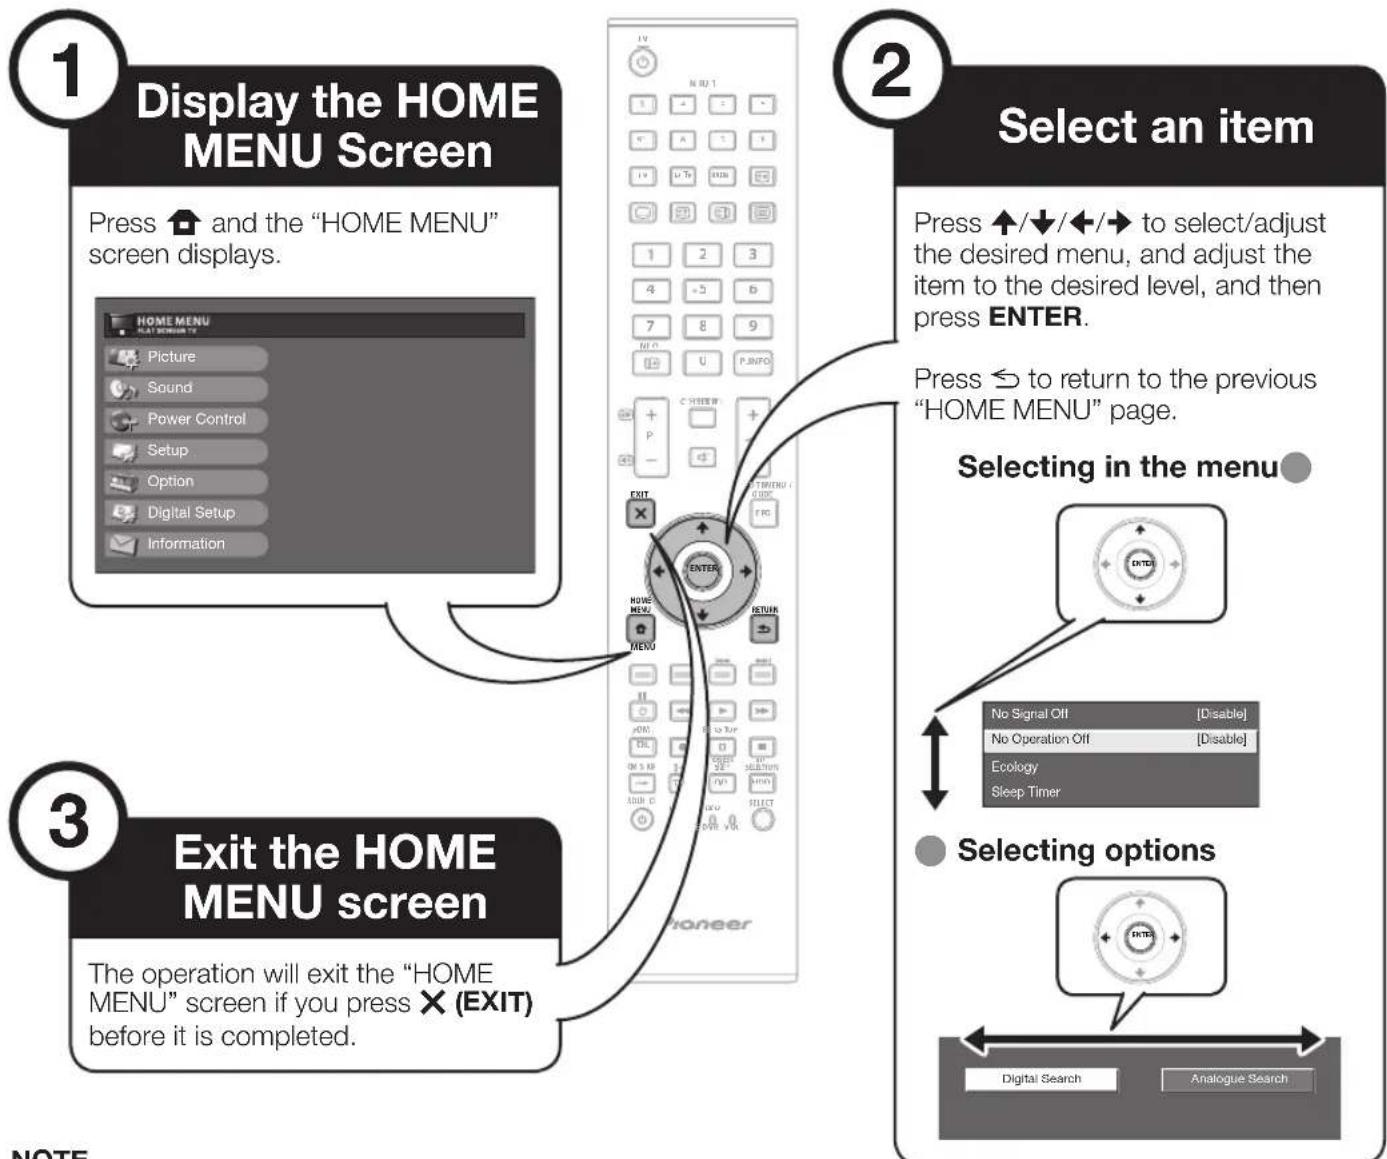
1 Press and the "HOME MENU" screen displays.
2 Press / to select "Setup".
3 Press / to select "Antenna Setup-DIGITAL", and then press ENTER.
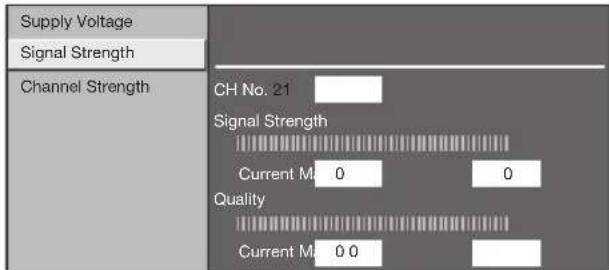
- Checking signal strength
Press / to select "Signal Strength".
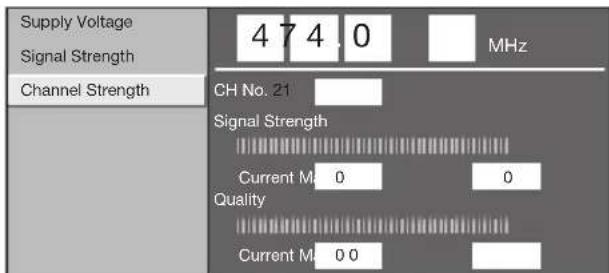
- Checking channel strength
Press / to select "Channel Strength", and then press ENTER.
- You can input a specified frequency band using the 0-9 numeric buttons.
4 Position and align the aerial so that the maximum possible values for "Signal Strength" and "Quality" are obtained.
NOTE
- The values of "Signal Strength" and "Quality" indicate when to check the appropriate alignment of the aerial.
Daily operation
Switching on/off
Turning on/off the power
Press on the TV.
Switch it off by pressing on the TV.

NOTE
- When turning off the power using on the TV, EPG data (Electronic programme guide) will be lost, and programmed timer recordings will not be performed by the TV.
Standby mode
To standby mode
If the TV is switched on, you can switch it to standby by pressing (TV) on the remote control unit.
Switching on from standby
From standby, press (TV) on the remote control unit.
TV indicator status
| TV indicator | Status |
| ON (Blue) | Power on |
| STANDBY (Red) | Standby |
| SLEEP (Orange) | Sleep timer is on |
NOTE
If you are not going to use this TV for a long period of time, be sure to remove the AC cord from the AC outlet.
- A small amount of electric power is still consumed even when is turned off.
Switching between analogue and digital broadcasts

broadcasts


What things digitadguesbroadcasts

Changing channels
With + / -
With 0-9:

Selecting an external video source
Once the connection is made, press INPUT1-8 on the remote control unit or on the TV to switch over to the appropriate external source.
Selecting a sound mode
DTV mode:
If multi sound modes are received, each time you press I-Ⅱ the mode switches as follows.
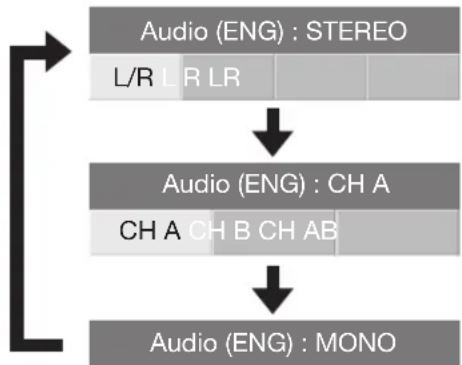
Press / to select L or R sound when the STEREO or DUAL MONO screen is displayed.
Audio (ENG) : STEREO
L/R L R
NOTE
The sound mode screen disappears in six seconds.
- Selectable items vary depending on the received broadcasts.
ATV mode:
Each time you press I-II, the mode switches as shown in the following tables.
| NICAM TV broadcasts selection | |
| Signal Selectable items | |
| Stereo | NICAM STEREO, MONO |
| Bilingual | NICAM CH A, NICAM CH B, NICAM CH AB, MONO |
| Monaural | NICAM MONO, MONO |
| A2 TV broadcasts selection | |
| Signal Selectable items | |
| Stereo | STEREO, MONO |
| Bilingual | CH A, CH B, CH AB |
| Monaural | MONO |
NOTE
- When no signal is input, the sound mode will display "MONO".
EPG (Electronic Programme Guide)
EPG (Electronic Programme Guide) is a programme list that is displayed on the screen. With the EPG, you can check the schedule of DTV/RADIO/DATA, view detailed information about them, tune to an event currently on-air and set a timer for future events.
EPG Overview
Basic functions
- Select a programme using EPG (Page 18)
- Check programme information (Page 18)
Useful functions
Search for a programme by category (Page 18)
Search for a programme by date and time (Page 18)
Timer recording using EPG (Page 19)
Useful settings for using EPG
Common Operation
1 Press and the "HOME MENU" screen displays.
2 Press / to select "Digital Setup".
3 Press / to select "EPG Setup", and then press ENTER.
| REC Picture Size | [16:9 TV] |
| Download Setup | [Yes] |
| EPG Setup | |
| Subtitle | |
| CI Menu |
4 Press / to select the desired item, and then press ENTER (Example: "EPG Setup", "Display Range Setup", etc.).
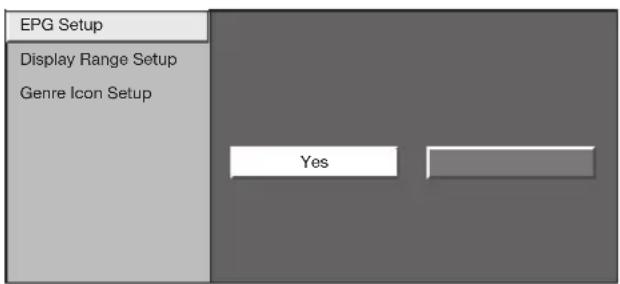
5 Press / / / to select or adjust the desired item, and then press ENTER (Example: "Yes", "No", etc.).
EPG display settings
- EPG Setup (setting for receiving EPG data)
If you want to use the EPG for digital stations, select "Yes". The EPG data must be automatically captured while the TV is in standby mode. After setting to "Yes", it may take some time to turn off the power using the remote control unit due to the process of the data capture.
NOTE
- If the TV main power is switched off, the EPG data will not be captured.
Display Range Setup
The "Display Range Setup" allows you to select three types of time spans for display on the screen.
Item
Mode1: Displays six hours of programme information.
Mode2: Displays three hours of programme information.
Mode3: Changes to the EPG display format with a vertical time span.
Genre Icon Setup
You can grey out or place a mark on desired genres and smoothly search for programmes you frequently watch.
Genre Icon List
| Icon Genre Icon Genre | |||
| Movie/Drama Music/ | |||
| News/Current affairs | Arts/Culture (without music) | ||
| Show/Game show | Social/Political Issues/Economics | ||
| Sports | Education/Science/Factual Topics | ||
| Children's/Youth programmes | Leisure hobbies | ||
Selecting a programme using EPG
Basic Operation
The illustrations on this page are explained using three digit services.
Display/Close the EPG screen
Press EPG.
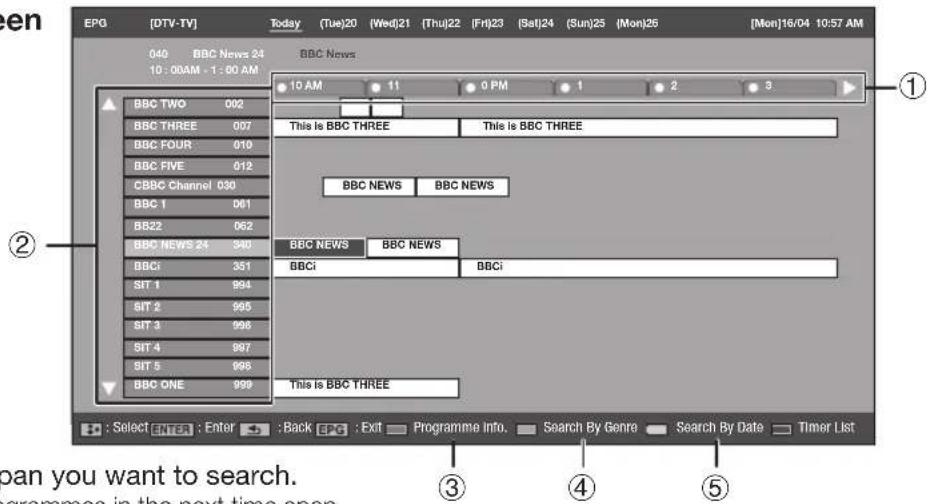
Select a programme
① Select the time span
Press / to select the time span you want to search.
- Continue to press to display programmes in the next time span.
② Select the desired programme
Press / to select the desired programme.
- If or are displayed on the left of the services, continue to press / to display next or previous screen.
Selecting a programme
③ Check programme information
1 Press / / / to select the programme you want to check.
2 Press Red button.
Programme Information
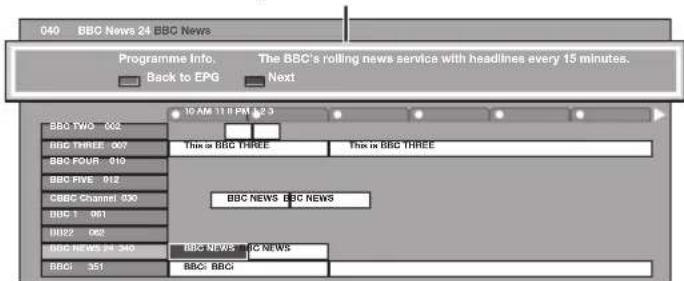
3 Press ENTER to tune to the selected programme.
④ Search a programme in a category
1 Press Green button.
2 Press / to select the desired genre, and then press ENTER.
3 Press / to select a programme you want to watch, and then press ENTER.
Genre
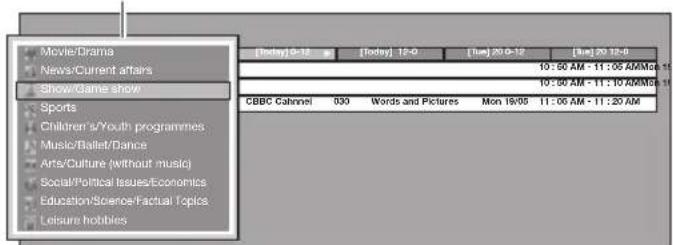
Refer to page 17 for the genre setting.
Search for a programme by date/time
1 Press Yellow button.
2 Press to select the desired time span, and then press ENTER.
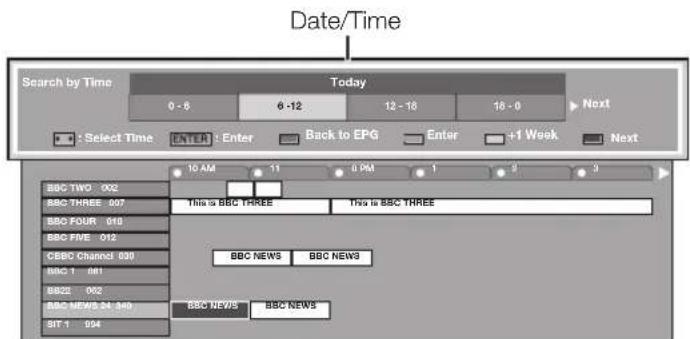
3 Press / to select the desired programme, and then press ENTER.
NOTE
- When you select a programme outside of the current time span, the timer setting screen is displayed (Page 19).
Timer recording using EPG
You can record TV programmes using data from the EPG.
1 Press EPG.
2 Press / / / to select the programme you want to record, and then press ENTER.
3 Press / to select the preferred timer setting, and then press ENTER.

If you select "No", the TV returns to the EPG screen.
- Watching a programme at a set time
1 Press / to select "Watch", and then press ENTER.
2 Press / to select "Yes", and then press ENTER.
- The selected TV programme is marked with an icon.
Recording a programme at a set time
1 Press / to select "Record", and then press ENTER.
2 Press / to select the preferred timer recording type, and then press ENTER.
Item
i/o link.A: Records a programme at a set time when a device compatible with i/o link.A is connected.
VHS tape: Records a programme at a set time when a device compatible with VHS tape is connected.
3 Press / to select "Yes", and then press ENTER.
- The selected TV programme is marked with an icon.
NOTE
Refer to pages 21-23 for connecting external devices.
Cancelling the timer recording
1 Press EPG.
2 Press / / / to select the programme on timer setup, and then press ENTER.
3 Press / to select "Cancel", and then press ENTER.
4 Press / to select "Yes", and then press ENTER.
Cancelling using the Blue button on the remote control unit
1 Press EPG.
2 Press Blue button to display the timer recording screen.
3 Press / to select a programme with a set timer recording you want to change, and then press ENTER.
4 Press / to select "Cancel" and then press ENTER.
5 Press / to select "Yes", and then press ENTER.
Teletext
What is Teletext?
Teletext broadcasts pages of information and entertainment to specially equipped TV. Your TV receives teletext signals broadcast by a TV network, and decodes them into graphical format for viewing. News, weather and sports information, stock exchange prices and programme previews are among the many services available.
Turning Teletext on/off
1 Select a TV channel or external source providing a teletext programme.
2 Press to display the Teletext.
- Many stations use the TOP operating system, while some use FLOF (e.g. CNN). Your TV supports both these systems. The pages are divided into topic groups and topics. After switching on the teletext, up to 2,000 pages are stored for fast access.
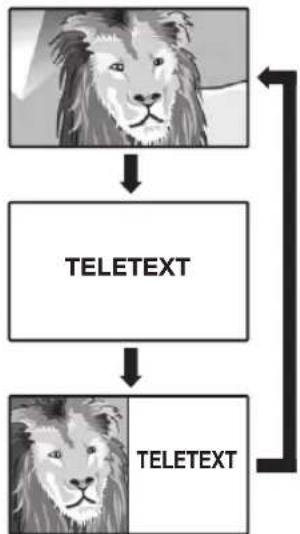
Each time you press, the screen switches as shown below. - Press again to display the teletext on the right screen and the normal image on the left screen.
- If you select a programme with no teletext signal, "No Teletext available" displays.
- The same message displays during other modes if no teletext signal is available.
NOTE
- Teletext will not work if the selected signal type is RGB (Page 38).
Buttons for teletext operations
| Buttons Description |
| P+/- (3)/4) Increase or decrease the page number. |
| Colour (Red/Green/Yellow/Blue) Select a group or block of pages displayed in the coloured brackets at the bottom of the screen by pressing the corresponding Colour (Red/Green/ Yellow/Blue) buttons on the remote control unit. |
| 0-9 Directly select any page from 100 to 899 by using the 0-9 numeric buttons. |
| (Reveal hidden Teletext) Reveal or hide hidden information such as an answer to a quiz. |
| (Freeze/Hold) Stop updating teletext pages automatically or release the hold mode. |
| (Subtitle for Teletext) Display the subtitle or exit the subtitle screen. • Subtitles will not be displayed when the service does not contain subtitle information. |
| (Subpage) Reveal or hide subpages. • Red button: Move to the previous subspage. • Green button: Move to the following subspage. • These two buttons are shown on the screen by the symbols "+" and "-". |
Using the MHEG-5 application (UK only)
Some services bring you programmes with the MHEG (Multimedia and Hypermedia Expert Group) application encoded, letting you experience DTV interactively. If provided, the MHEG-5 application will start when you press l
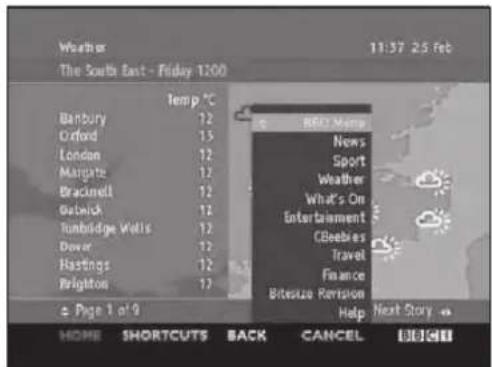
Sample MHEG-5 screen
Before connecting ...
- Be sure to turn off the TV and any devices before making any connections.
- Firmly connect a cable to a terminal or terminals.
- Carefully read the operation manual of each external device for possible connection types. This also helps you get the best possible audiovisual quality to maximise the potential of the TV and the connected device.
Refer to page 39 for connecting a PC to the TV.
Introduction to connections
The TV is equipped with the terminals as shown below. Find the cable corresponding the TV's terminal and connect the device.
NOTE
- The cables illustrated in pages 21-24 are commercially available items.
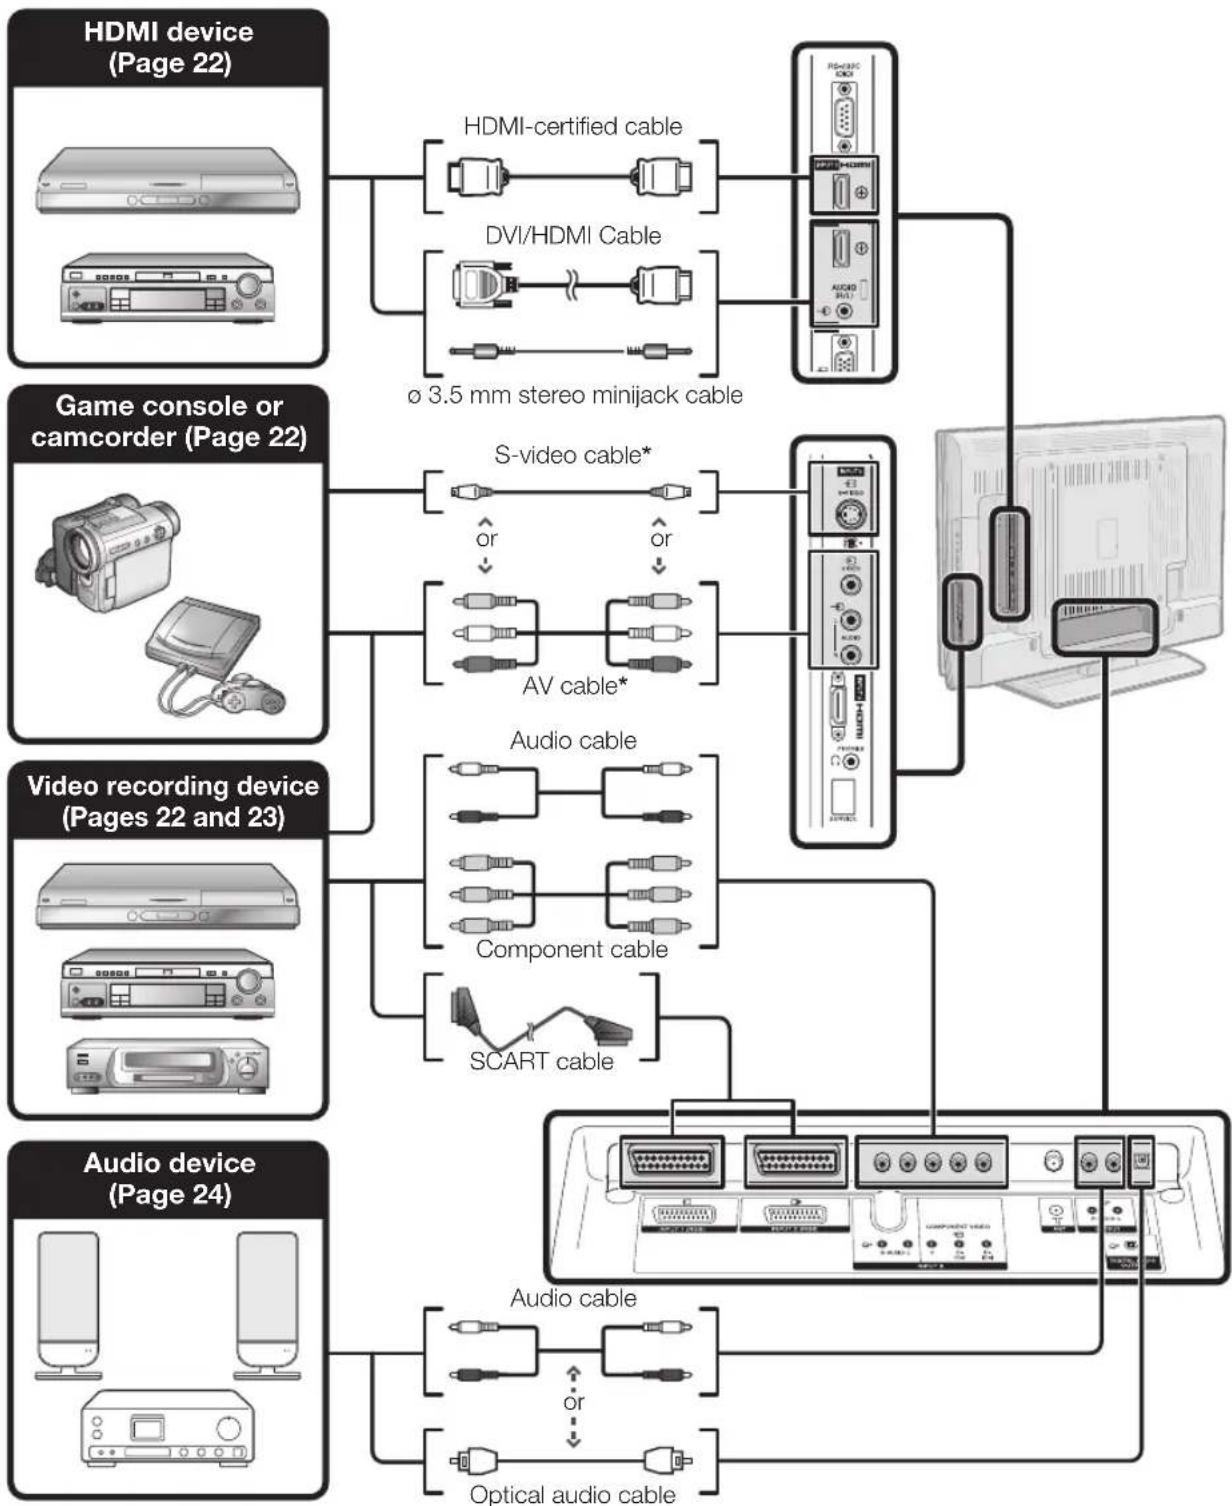

HDMI connection
Example of connectable devices
DVD player/recorder Blu-ray player/recorder
The HDMI connections (High Definition Multimedia Interface) permit digital video and audio transmission via a connection cable from a player/recorder. The digital picture and sound data are transmitted without data compression and therefore lose none of their quality. Analogue/digital conversion is no longer necessary in the connected devices, which also would result in quality losses.
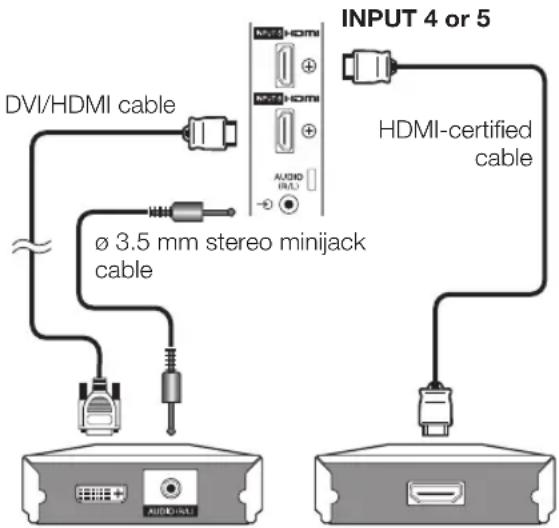
DVI/HDMI conversion
Using an DVI/HDMI adapter cable, the digital video signals of a DVD can also be played via the compatible HDMI connection. The sound must be fed in additionally.
- When connecting a DVI/HDMI conversion adapter/cable to the HDMI terminal, the image may not come in clearly.
Both HDMI and DVI use the same HDCP copy protection method.
NOTE

After connecting
HDMI Audio Select
After connecting, you must set the audio signal compatible with the cable you use for the HDMI device.
1 Go to "HOME MENU" > "Option" > "HDMI Audio Select".
2 Select "Digital" for audio signals via the HDMI terminal. Select "Analogue" for audio signals via the AUDIO jack (INPUT6).
- If a connected HDMI device is HDMI CONTROL compatible, you can take advantage of versatile functions (Pages 26-28).
Video noise may occur depending on the type of HDMI cable used. Make sure to use a certified HDMI cable. - When playing the HDMI image, the best possible format for the picture will be detected and set automatically.
Supported video signal:
576i, 576p, 480i, 480p, 1080i, 720p, 1080p
See page 42 for PC signal compatibility.


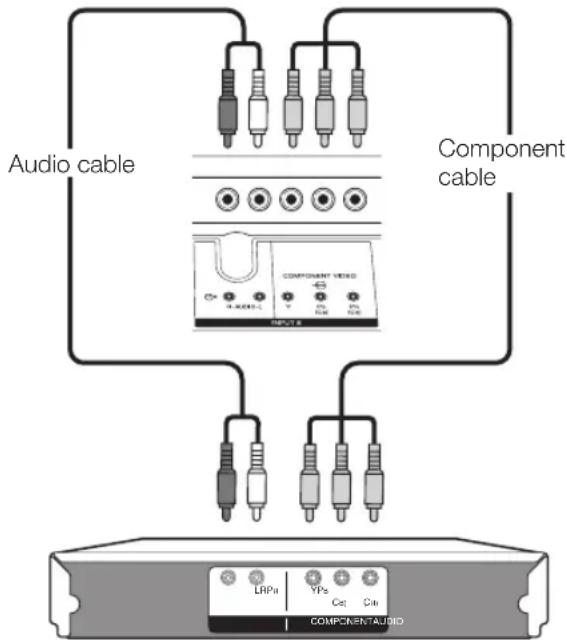
Component connection
Example of connectable devices

VCR
DVD player/recorder

- ray player/recorder
You will enjoy accurate colour reproduction and high quality images through the INPUT8 terminal when connecting a DVD player/recorder or other device.

S-VIDEO/VIDEO connection
Example of connectable devices
VCF

DVD player/ recorder
Blu
ray player/recor

Gai
ne console
Camcorder
You can use the INPUT3 terminal when connecting to a game console, camcorder, a DVD player/recorder or other device.
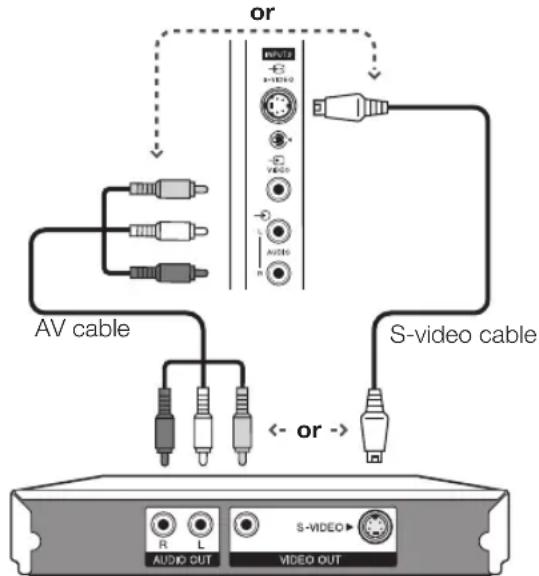
NOTE
- When using an S-video cable, you also need to connect an audio cable (R/L).
- INPUT3: The S-VIDEO terminal has priority over the VIDEO terminal.

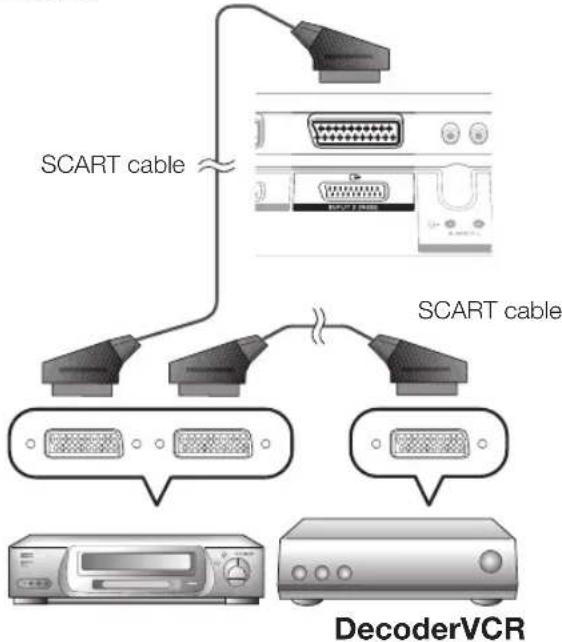
SCART connection
Example of connectable devices
Decoder
Example of connectable devices
VCR DVD player/recorder
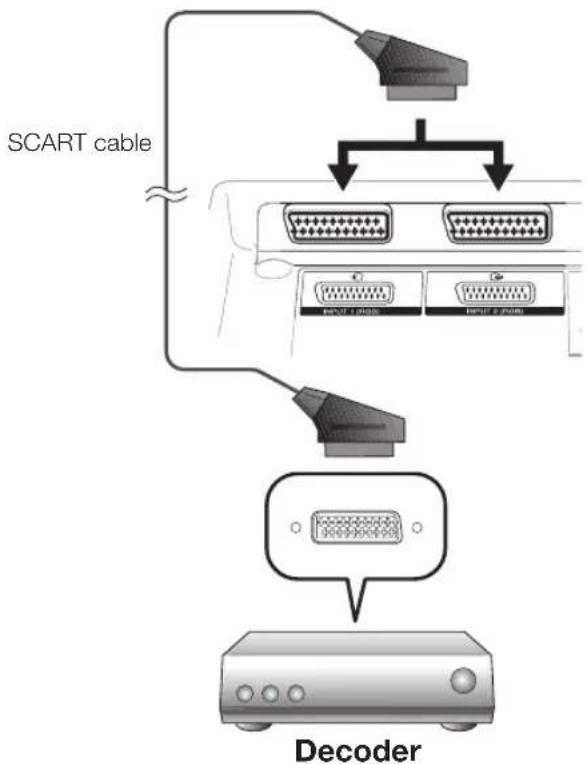
When using the INPUT2 (SCART) terminal
If your VCR supports TV-VCR advanced AV Link systems, you can connect the VCR using a fully wired SCART cable.
NOTE
- In cases when the decoder needs to receive a signal from the TV, make sure to select the appropriate input terminal to which the decoder is connected in "Manual Adjust" in the "Analogue Setting" menu (Page 33).
- TV-VCR advanced AV Link systems may not be compatible with some external sources.
- You cannot connect the VCR with Decoder using a fully wired SCART cable when selecting "Y/C" under "INPUT2" in the "Input Select" menu.
Controlling devices with SCART using i/o link.A
This TV incorporates four typical i/o link.A functions for smooth connections between the TV and other audiovisual equipment.
One Touch Play
While the TV is in standby mode, it automatically turns on and plays back the image from the audiovisual source (e.g. VCR, DVD player/recorder).
TV Standby
When the TV enters standby mode, the connected audiovisual equipment (e.g. VCR, DVD player/recorder) enters standby mode as well.
WYSIWYR (What You See Is What You Record)
When the remote control unit of the connected VCR has the WYSIWYR button, you can automatically start recording by pressing the WYSIWYR button.
Preset Download
Automatically transfers the channel preset information from the tuner on the TV to the one on the connected audiovisual equipment (e.g. VCR) via the INPUT2 terminal.
NOTE
Refer to the operation manuals of external equipment for details.
The i/o link.A function works only when audiovisual equipment is connected to the INPUT2 terminal with a fully wired SCART cable.
The use of the i/o link.A function is only possible if the TV has enforced a complete auto installation with the connected audiovisual equipment (Page 15, Initial auto installation). The availability of the i/o link.A function depends on the audiovisual equipment used. Depending on the manufacturer and type of equipment used, it is possible that the described functions may be completely or partially unusable.
Speaker/amplifier connection
Connect an amplifier with external speakers as shown below.

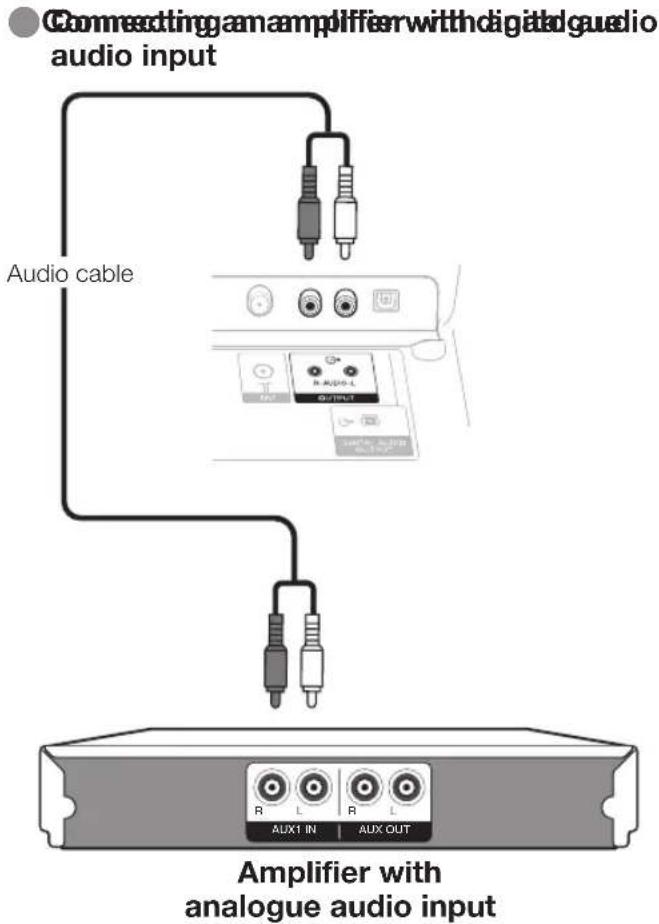
After connecting
Digital audio output setting
After connecting an amplifier with digital audio input and external speakers as shown, you should set an audio output format compatible with the programme you are watching or the device connected.
Go to "HOME MENU" > "Option" > "Digital Audio Output" > select "PCM" or "Dolby Digital".
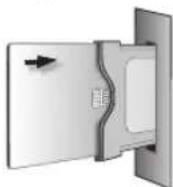
Inserting a smart card
In order to receive coded digital stations, a Common Interface Module (CA Module) and a smart card must be inserted in the Common Interface slot of the TV (Page 14).
The CA Module and the smart card are not supplied accessories. They are usually available from your dealers.
Inserting the smart card into the CA Module
1 With the side with the gold coloured contact chip facing the side of the CA Module marked with the provider's logo, push the smart card into the CA Module as far as it will go. Note the direction of the arrow printed on the smart card.

Inserting the CA Module in the Common Interface slot
2 Carefully insert the CA Module in the Common Interface slot with the contact side forward. The logo on the CA Module must be facing forward from the rear of the TV. Do not use excessive force. Make sure the module is not bent in the process.
Checking CA Module information
NOTE
- Make sure that the CA Module is properly inserted.
- This menu is only available for digital stations.
1 Press l and the "HOME MENU" screen displays.
2 Press / to select "Digital Setup".
- The content of this menu depends on the provider of the CA Module.
3 Press / to select "CI Menu", and then press ENTER.
Module
General information on CA Module displays.
Menu
Adjustment parameters of each smart card displays.
Enquiry
You can input numerical values such as passwords here.
NOTE
- The content of each screen depends on the provider of the CA Module.
Removing the CA Module
1 Remove the cover from the rear of the TV.
2 Remove the module from the TV.
3 Replace the cover.

Controlling HDMI devices using HDMI CONTROL
What is HDMI CONTROL?
Using the HDMI CEC (Consumer Electronics Control) protocol, with HDMI CONTROL you can interactively operate compatible system devices (AV amplifier, DVD player/ recorder, Blu-ray player/recorder) using a single remote control unit.
What you can do with HDMI CONTROL
√ One Touch Recording
You do not have to search for the remote control unit of your recording device. Press the or the REC STOP buttons to start/stop recording what you see on the recorder.
One Touch Play
When the TV is in standby mode, it will automatically turn on and play back the image from the HDMI source.
Single remote control operation
HDMI CONTROL automatically recognises the connected HDMI device and you can control the TV and the devices as if using a universal remote control unit.
Operating Title list of external devices
In addition to displaying the TV's own Timer list (Page 18), you can also call up the external player's Top menu or Pioneer BD Player's/Pioneer Recorder's Title list provided that the devices support HDMI CONTROL.
Multiple control of HDMI devices
You can select which HDMI device to operate using the HDMI CTRL button.
NOTE
- When you use HDMI CONTROL, make sure to use a certified HDMI cable.
- Point the remote control unit toward the TV, not to the connected HDMI de
Video noise may occur depending on the type of HDMI cable used. Make sure to use a certified HDMI cable. - Up to three HDMI recording devices, one AV amplifier and two players can be connected using this system.
- These operations affect the HDMI device selected as the current external source. If the device does not operate, turn on the device and select the appropriate external source using INPUT1-8 on the remove control unit or on the TV.
- After unplugging connection cables or changing the connection pattern, turn on all connected HDMI devices before turning on the TV. Confirm that picture and audio are correctly output by selecting "INPUT4", "INPUT5" or "INPUT6" using INPUT1-8 on the remove control unit or on the TV.
- The KURO LINK function name used on the web and in catalogues is referred to as HDMI CONTROL in the operating instructions and on the product.
HDMI CONTROL connection
First connect the Pioneer AV Sound system or a Pioneer BD Player/Pioneer Recorder that supports the HDMI CEC protocol.
NOTE
Refer to the operation manual of the device to be connected for further details.
After unplugging connection cables or changing the connection pattern, turn on the power of the TV after all relevant devices' power have been turned on. Change the external input source by pressing INPUT1-8, select the appropriate external source and verify the audiovisual output.
- The cables illustrated in the following explanation are commercially available items.
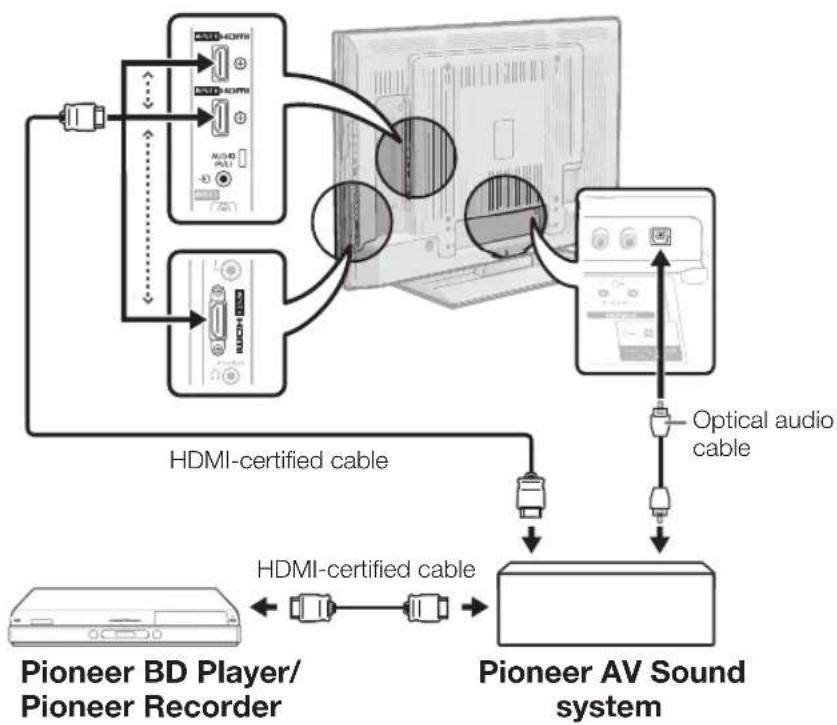
Connecting a Pioneer BD Player/Pioneer Recorder via the Pioneer AV Sound system
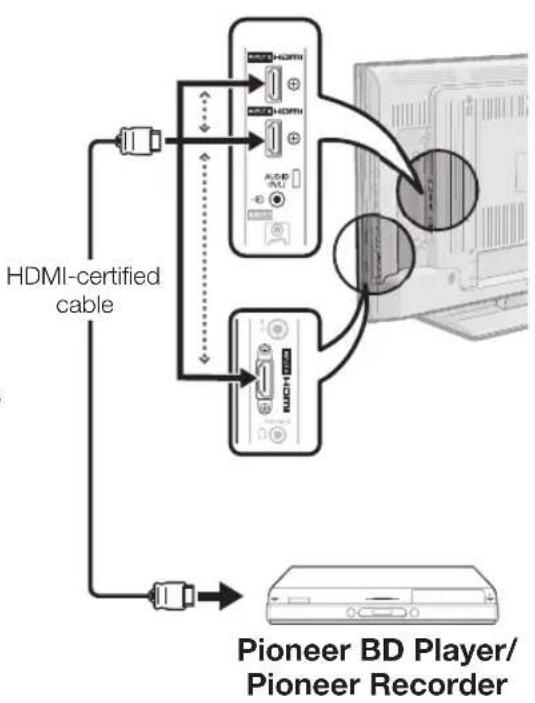
Connecting a Pioneer BD Player/Pioneer Recorder only
HDMI CONTROL Setup
HDMI CONTROL
Set to "On" to enable HDMI CEC functions. When turning on the power while "HDMI CONTROL" is set to "On", the connected HDMI devices' power will be turned on in conjunction with the TV.
1 Press and the "HOME MENU" screen displays.
2 Press / to select "Option".
3 Press / to select "HDMI CONTROL Setup", and then press ENTER.
4 Press / to select "HDMI CONTROL", and then press ENTER.
5 Press / to select "On", and then press ENTER.
Auto Power On
If this is activated, the One Touch Play function is enabled. While the TV is in standby mode, it automatically turns on and plays back the image from the HDMI source.
1 Repeat steps 1 to 3 in HDMI CONTROL.
2 Press / to select "Auto Power On", and then press ENTER.
3 Press / to select "On", and then press ENTER.
NOTE
The factory default for this item is "Off".
Selecting recorder
Here, you can select a recorder for the recording from several connected recorders.
1 Repeat steps 1 to 3 in HDMI CONTROL.
2 Press / to select "Selecting Recorder", and then press ENTER.
3 Select the recorder, and then press ENTER.
NOTE
- If you have connected the Pioneer AV Sound system between the TV and a Pioneer Recorder, the external source's indication changes (e.g. from "INPUT5" to "INPUT5(Sub)").
Operating an HDMI CONTROL device
HDMI CONTROL allows you to operate the HDMI-connected device with a single remote control unit.
1 Press to start playback of a title.
See below, the section "Playback of titles using HDMI CONTROL" if you want to start playback using the list of the titles of the Pioneer BD Player/Pioneer Recorder.
2 Press to fast forward.
Press to reverse.
Press to stop.
Press (TV) to turn the HDMI-connected device on/off.
Recording via the Pioneer Recorder EPG (only for recorders)
You can call up the CEC-compatible recorder's EPG and preset timer recordings using the TV's remote control unit.
1 Press HDMI CTRL.
HDMI CONTROL Menu
Recorder EPG
Top Menu/Title List
Media change
Switch to AV Sound
Switch to TV Sound
Sound mode change
Setup Menu
Model select
2 Press / to select "Recorder EPG", and then press ENTER.
- The external input source switches and the recorder's EPG is displayed.
3 Select the programme to record.
Refer to the operation manual of the recorder for details.
Playback of titles using HDMI CONTROL
This section explains how to play back a title in the Pioneer BD Player/Pioneer Recorder.
1 Press HDMI CTRL.
2 Press / to select "Top Menu/Title List", and then press ENTER.
- The linked recorder now powers on and the TV automatically selects the appropriate external input source.
- The title list data from the connected Pioneer BD Player/Pioneer Recorder displays.
3 Select the title with / / / , and then press.
Selecting media type for CEC-compatible recorder
If your recorder has multiple storage media, select the media type here.
1 Press HDMI CTRL.
2 Press / to select "Media change", and then press ENTER.
3 Select the desired medium, such as DVD recorder or HDD. The media type changes every time you press ENTER.
NOTE
- This function may not work depending on the connected recording devices.
Listening with the Pioneer AV Sound system
You can choose to listen to the TV sound only from the Pioneer AV Sound system.
1 Press HDMI CTRL.
2 Press / to select "Switch to AV Sound", and then press ENTER.
- The sound from the TV speaker and headphone terminal is silenced and only the sound from the Pioneer AV Sound system is audible.
Listening with the TV Sound system
You can choose to listen to the TV sound only from the TV Sound system.
1 Press HDMI CTRL.
2 Press / to select "Switch to TV Sound", and then press ENTER.
Manually changing the Pioneer AV Sound system's sound mode
1 Press HDMI CTRL.
2 Press / to select "Sound mode change".
3 The sound mode changes every time you press ENTER.
Refer to the operation manual of the Pioneer AV Sound system for details.
Calling up the menu of an external device connected with the TV via HDMI
You can call up the menu of an HDMI CEC-compatible external device (player, recorder, decoder, etc.) using the "Setup Menu" function.
1 Press HDMI CTRL.
2 Press / to select "Setup Menu", and then press ENTER.
NOTE
- If a connected device does not have this function or the device is in a status where the menu cannot be displayed (recording, entering standby, etc.), this function may not be available.
HDMI device selection
If multiple HDMI devices are connected in a daisy chain, you can specify which device to control here.
1 Press HDMI CTRL.
2 Press / to select "Model select", and then press ENTER. The HDMI device changes every time you press ENTER.
What is the HOME MENU?
- You need to call up the OSD to perform settings for the TV. The OSD for the settings is called "HOME MENU".
The "HOME MENU" enables various settings and adjustments. - The "HOME MENU" can be operated with the remote control unit.
Common operations
NOTE
- "HOME MENU" options differ in the selected input modes, but the operating procedures are the same.
The screens in the operation manual are for explanation purposes (some are enlarged, others cropped) and may vary slightly from the actual screens. - Items with cannot be selected for various reasons.
Operation without a remote control unit
This function is useful when there is no remote control unit within your reach.
1 Press HOME MENU and the "HOME MENU" screen displays.
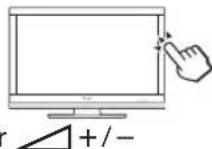
2 Press P + / - instead of / or instead of / to select the item.
3 Press to complete the setting.
NOTE
- The "HOME MENU" screen will disappear if left unattended for several seconds.
About the Guide Display
The Guide Display at the bottom of the screen shows operations with the OSD.

The bar above is an operational guide for the remote control unit. The bar will change in accordance with each menu setting screen.
Picture Settings
DYNAMIC

Picture
RLS
Automatically adjusts the brightness of the screen.
Item
Off: The brightness is fixed at the value set in "Backlight".
On: Automatically adjusts.
On:Display: Displays the RLS effect on the screen while adjusting the brightness of the screen.
NOTE
- When set to "On", the TV senses the surrounding light and automatically adjusts the backlight brightness. Make sure no object obstructs the RLS, which could affect its ability to sense surrounding light.

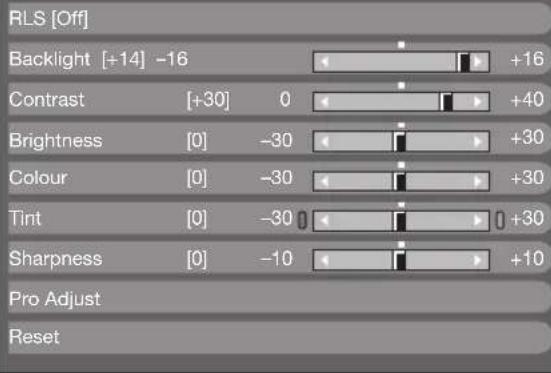
Picture
Picture adjustments
Adjusts the picture to your preference with the following picture settings.
Adjustment items
| Selectable items | ← button → button | |
| Backlight | The screen dims The screen brightens | |
| Contrast | For less contrast For more contrast | |
| Brightness | For less brightness For more brightness | |
| Colour | For less colour intensity | For more colour intensity |
| Tint | Skin tones become purplish | Skin tones become greenish |
| Sharpness | For less sharpness | For more sharpness |

Picture
Pro Adjust
This TV provides various advanced functions for optimising the picture quality.
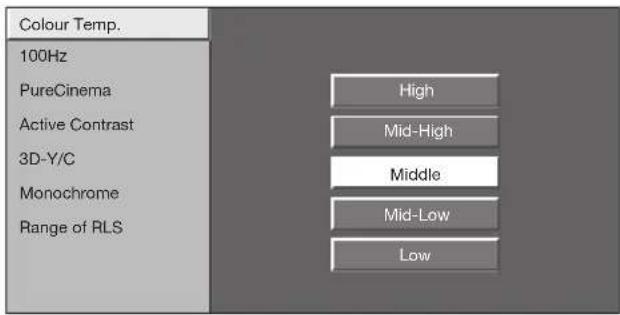
Colour Temp.
Adjusts the colour temperature to give the best white image.
Item
High: White with bluish tone
Mid-High: Intermediate tone between "High" and "Middle".
Middle: Natural tone.
Mid-Low: Intermediate tone between "Middle" and "Low".
Low: White with reddish tone.
100Hz
"100Hz" technology provides superior solutions for digital display picture quality removing motion blur.
NOTE
- Press and hold both × and on the remote control unit to show "100Hz" demonstration in a dual screen format.
This effect is greater on fast moving images. - "100Hz" will have no effect in the following cases;
1) The type of signal received is a PC signal.
2) An OSD is being displayed.
3) Teletext is activated.
If images appear blurred, set the "PureCinema" to "Off".
PureCinema
Automatically detects a film-based source (originally encoded at 24 or 25 frames per second, depending on the vertical frequency), analyses it and then recreates each still film frame for high-definition picture quality.
Active Contrast
Automatically adjusts the contrast of an image according to the scene.
3D-Y/C
Provides high quality images with minimal dot crawl and cross colour noise by detecting changes in the image.
Item
Standard: Normal adjustment.
Fast: Sets the optimum image quality for fast-moving images.
Slow: Sets the optimum image quality for slow-moving images.
Off: No detecting.
NOTE
- "3D-Y/C" may not operate depending on the input signal type or when the input signal is noisy.
- "3D-Y/C" has even more effect on composite video signals (CVBS).
Monochrome
For viewing a colour video in black & white.
Range of RLS
The brightness level range of the RLS's automatic adjustments can be set according to your preferences. The adjustment range of the RLS can be set to a maximum of +16 and a minimum of -16 .
| Selectable items | Description |
| Max. | -16 through +16 |
| Min. | -16 through +16 |
NOTE
- This function is available only when the "RLS" setting is set to "On" or "On:Display".
- The maximum setting cannot be set to a smaller number than the minimum setting.
The minimum setting cannot be set to a bigger number than the maximum setting.
The maximum and minimum settings cannot be set to the same number. - Depending on the brightness of the surrounding light, the RLS might not operate if the adjustment range is small.
AV SELECTION
AV SELECTION gives you several viewing options to choose from to best match the system environment, which can vary due to factors like room-brightness, type of programme watched or the type of image input from external equipment.
1 Press AV SELECTION.
2 Each time you press AV SELECTION, the mode changes.
- You can also switch the mode on the "Picture" and "Sound" menu screen by pressing AV SELECTION.
Item
STANDARD: For a highly defined image in a normally bright room.
MOVIE: For viewing a movie in a darkened room.
GAME: For playing of video games.
PC*: For PC
x.v.Color**: Produce realistic colour on the TV screen unlike any other signal.
USER: Allows you to customise settings as desired. You can set the mode for each input source.
DYNAMIC (Fixed): For a clear-cut image emphasising high contrast for sports viewing (The "Picture" and "Sound" settings cannot be adjusted).
DYNAMIC: For a clear-cut image emphasising high contrast for sports viewing.
NOTE
- The item marked with * is available only when selecting "INPUT4", "INPUT5", "INPUT6" or "INPUT7" using INPUT1-8 on the remote control unit or on the TV.
- The item marked with ** is available only when accepting an "x.v.Color" signal through an HDMI terminal.
Sound Settings

Sound
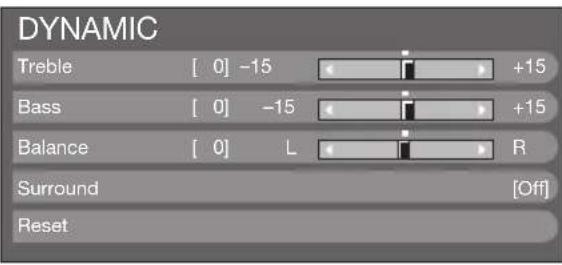
Sound adjustment
You can adjust the sound quality to your preference with the following settings.
| Selectable items | ← button → button | |
| Treble | For weaker treble For stronger treble | |
| Bass | For weaker bass For stronger bass | |
| Balance | Decrease audio from the right speaker | Decrease audio from the left speaker |

Sound
Surround
This function allows you to enjoy realistic live sound.
Power Save Settings
No Signal Off
No Operation Off
Ecology
Sleep Timer
[Disable]
[Disable]

Power Control
No Signal Off
When set to "Enable", the TV will automatically enter standby mode if there is no signal input for 15 minutes.
- Five minutes before the TV enters standby mode, the remaining time displays every minute.
NOTE
- Even if a TV programme finishes, this function may not operate because of interference from other TV stations or other signals.

Power Control
No Operation Off
The TV will automatically enter standby mode if no operations are performed during the time span you set ("30min." or "3hr.).
- Five minutes before the TV enters standby mode, the remaining time displays every minute in the lower-left corner of the screen.

Power Control
Ecology
When set to "Yes", the TV activates the following power saving mode.
- "RLS" set to "On" (Page 30).
- "Standby Mode" set to "Mode2" (Page 38).
- "No Signal Off" set to "Enable" (Page 31).
- "No Operation Off" set to "3hr." (Page 32).

Power Control
Sleep Timer
Allows you to set a time when the TV automatically enters standby mode.
NOTE
- Select "Off" to cancel the sleep timer.
- When the time has been set, countdown automatically starts.
- Five minutes before the preset of time expires, the remaining time displays each minute in the lower-left corner of the screen.
Channel Settings
Auto Installation

Setup
Auto Installation
The TV automatically detects and stores all available services in your area. This function also allows you to perform the channel setting for digital and analogue individually and reconfigure the settings after the initial auto installation has been completed.
After selecting "Yes" on the screen, you can set language and channel search the same as in the initial auto installation. Follow steps 2, 4 and 5 on page 15.
NOTE
- You cannot set the country setting in "Auto Installation" in the "Setup" menu. If you want to reconfigure the country setting, automatically execute initial auto installation after executing "Reset" from the "Setup" menu.
- The current country setting is displayed on the screen.
Digital channel settings

Setup
Programme Setup
Digital Setting
You can reconfigure the DTV service settings automatically or manually.
Additional Search
Use this menu to add new services automatically after auto installation has been completed.
Manual Search
Add new services within a specified frequency band.
- Enter the frequency using 0–9 numeric buttons.
- You can perform "Manual Search" with a service number only when the five Nordic countries have been selected in the country setting.
Manual Adjust
Configure various settings for each service using the Colour (Red/Green/Yellow/Blue) buttons.

1 Press / to select the desired service.
2 Press the colour button on the remote control unit corresponding with the item you want to reconfigure.
- The mark indicates the operation is set to on. Each time the colour button is pressed, you can switch the corresponding operation on/off.
Buttons for Manual Adjust operation
Lock: Press Red button.
When the service is locked, you must enter your PIN whenever you tune to the service.
CH Skip: Press Green button.
Services with a mark are passed over when pressing P + / - on the TV or remote control unit.
EPG Skip: Press Yellow button.
Services with a mark are passed over in the Electronic Programme Guide (EPG).
Sort: Press Blue button.
The item position of services can be sorted.
① Press / to select the service whose item position you want to move, and then press ENTER.

② Press / to move it to the desired position, and then press ENTER.

Repeat steps 1 and 2 until all desired service items are sorted.
Analogue channel settings

Setup
Programme Setup
Analogue Setting
You can reconfigure the analogue TV channels settings automatically or manually.
Additional Search
Use this menu to add new channels automatically after auto installation has been made.
- Start searching channels after selecting the colour system and sound system.
Manual Adjust
Use this menu to set up analogue TV channels manually.
After selecting "Yes" on the screen, press / to select the channel you want to set and then press ENTER.
Fine
You can adjust the frequency to the desired position.
NOTE
- Adjust while checking the background picture as a reference.
Instead of pressing / to adjust the frequency, you can set by directly entering the frequency number of the channel with 0-9 numeric buttons.
EXAMPLE
179.25 MHz: Press 1 7 9 2 5.
49.25 MHz: Press 4 9 2 5 ENTER.
Colour sys.
Select the optimum colour system to receive ("Auto", "PAL", "SECAM").
Sound sys. (Broadcasting systems)
Select the optimum sound systems (Broadcasting systems) to receive ("B/G", "D/K", "I", "L/L").
Label
When a TV channel sends its Network Name, the "Auto Installation" detects the information and assigns a name to it. However, you can change channel names individually.
1 Press / / / to select each character of the new name for the channel, and then press ENTER.
2 Repeat step 1 above until the name is fully spelt out.
NOTE
The name can be five characters or less.
- If a channel name is less than five characters, select "END" to set the channel name.
Skip
Channels with "Skip" set to "On" are passed over when using + / - even if selected while watching the image from the TV.
Decoder
When connecting a decoder to the TV, you need to select "INPUT1" or "INPUT2".
NOTE
The factory preset value is "Off".
Lock
You can block the viewing of any channel.
NOTE
See "Child Lock" for setting a PIN.
- When "Lock" is set to "On" for a channel, "Child lock has been activated" displays, and the image and sound of the channel are blocked.
- When pressing while "Child lock has been activated" displays, the PIN input window will display. Inputting the correct PIN unlocks the "Child Lock" temporarily until the power is turned off.
Sort
Channel positions can be sorted freely.
1 Press / to select "Yes", and then press ENTER.
2 Press / / to select the channel you want to move, and then press ENTER.
3 Press / / / to move it to the desired position, and then press ENTER.
4 Repeat steps 2 and 3 until all desired channels are sorted.
Erase Programme
Channels can be erased individually.
1 Press / to select "Yes", and then press ENTER.
2 Press / / / to select the channel you want to erase, and then press ENTER. A message window pops up.
3 Press / to select "Yes", and then press ENTER to erase the selected channel. All the subsequent channels move up.
4 Repeat steps 2 and 3 until all desired channels are erased.
Password/Parental lock settings

Setup
Child Lock
Allows you to use a PIN to protect certain settings from being accidentally changed.
Change PIN
Register a four-digit password number to use the "Child Lock" function.
1 Enter the four-digit number as a PIN using 0-9 numeric buttons.
2 Enter the same four-digit number as in step 1 to confirm.
The system PIN has been changed successfully" displays.
NOTE
- To view a locked channel, you must enter the PIN (See pages 32 and 33 for locking channels from viewing in DTV and ATV mode). When you select a locked channel, a PIN prompt message pops up. Press to display the PIN input window.
Cancel PIN
Allows you to reset your PIN.
NOTE
- As a precautionary measure, make a note of your PIN on the back of this operation manual, cut it out and keep it in a safe place that children cannot reach.
Parental rating
This function allows DTV services to be restricted. It prevents children from watching violent or sexual scenes that may be harmful.
NOTE
- "Universal viewing" and "Parental approval pref." are ratings used exclusively in France.
Refer to page 46 for details about ratings.

Option
Key Lock
This function allows you to lock the buttons on the TV or remote control unit in order to prohibit children from changing the channel or volume.
Item
Off: Unlocks the buttons.
RC Control Lock: Locks all buttons on the remote control unit.
Button Control Lock: Locks the buttons on the TV except the
power switch.
NOTE
- You cannot set both "RC Control Lock" and "Button Control Lock" at the same time.
Cancelling the lock
Press the HOME MENU button on the TV and set to "Off" to cancel the "RC Control Lock". Press the button on the remote control unit and set to "Off" to cancel the "Button Control Lock".
Refer to page 29 for menu operation using the button on the TV.
Language Settings (language, subtitle, multi audio)

Setup
Language
You can select a OSD language from the "Setup" menu. Select from among 22 languages (Czech, Danish, Dutch, English, Estonian, Finnish, French, German, Greek, Hungarian, Italian, Latvian, Lithuanian, Norwegian, Polish, Portuguese, Russian, Slovak, Slovene, Spanish, Swedish, Turkish).

Digital Setup
Subtitle
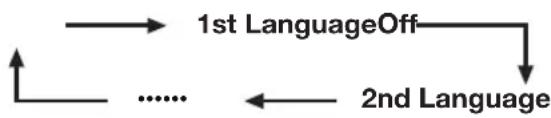
Set up to two preferred subtitle languages (including subtitles for the hearing impaired) to display if subtitles are available.
Selectable items

1st Language 2nd Language

For hearing impaired
Switching subtitle languages
Each time you press on the remote control unit, the subtitle switches.
Set "For hearing impaired" to "Yes"
Subtitles for the hearing impaired have priority over each of the subtitle language settings (Example: "1st Language", "2nd Language", etc.).
EXAMPLE
1st Language1st (For hearing impaired)
NOTE
- Subtitles will not be displayed when the service does not contain subtitle information.

Option
Digital Audio Language
Set up to three preferred multi audio languages to display if the audio languages are available.
Switching the multi audio languages
Each time you press I-Ⅱ on the remote control unit, the audio language switches.
Selecting the picture size
Selecting the WSS (Wide Screen Signalling) picture size automatically

Setup
WSS
The "WSS" allows the TV to switch automatically among the different picture size.
NOTE
- Use SCREEN SIZE if an image does not switch to the appropriate picture size. When the broadcast signal contains no "WSS" information, the function will not work even if enabled.
Selecting the WSS (Wide Screen Signalling) picture size manually

Setup
4:3 Mode
The "WSS" signal has 4:3 auto-switching that allows you to select between "4:3" and "WIDE".
Item
4:3: Normal range keeping 4:3 or 16:9 aspect ratio.
WIDE: Wide image without side bars.
WSS signal 4:3 screen
Selecting the picture size manually
You can select the picture size. Selectable picture size varies with the type of signal received.
Item (for SD [Standard-Definition] signals)
4:3: Keeps the original aspect ratio in a full screen display.
CINEMA 14:9: For 14:9 letterbox pictures. A thin side bar appears on each side, and you may also see bars on the top and bottom with some programmes.
WIDE: In this mode, the picture is stretched toward each side of the screen.
FULL: For 16:9 squeeze pictures.
ZOOM: For 16:9 letterbox pictures. Bars may appear on the top and bottom with some programmes.
CINEMA: For 14:9 letterbox pictures. Bars may appear on the top and bottom with some programmes.
Item (for HD [High-Definition] signals)
FULL: Displays with an Overscan image. Crops all sides of screen.
Underscan: Displays with an Underscan image only when receiving a 720p signal. Displays with the High-Definition image adjusted optimally. Noise may appear on the edge of the screen with some programmes.
Dot by Dot: Displays an image with the same number of pixels on the screen when receiving 1080i/1080p signals only.
NOTE
- Some items do not appear depending on the type of received signal.
1 Press SCREEN SIZE.
- The SCREEN SIZE menu displays.
- The menu lists the SCREEN SIZE options selectable for the type of video signal currently received.
4:3 mode "WIDE"4:3 mode
"Rss SCREEN SIZE or / while the
SCREEN SIZE menu displays on the screen.
- As you toggle the options, each is immediately reflected on the screen. There is no need to press ENTER.


Basically, if you set "WSS" to "On" in the "Setup" menu, the optimum SCREEN SIZE is automatically chosen for every broadcast, VCR or DVD player/ recorder.
NOTE
- Even if you select your desired SCREEN SIZE manually, the TV may automatically switch to the optimum SCREEN SIZE depending on the signal received when "WSS" is set to "On".
Selecting the recording picture size manually

Digital Setup REC Picture Size
You can use this menu to set the appropriate picture size for viewing a 16:9 format TV programme on a 4:3 TV.
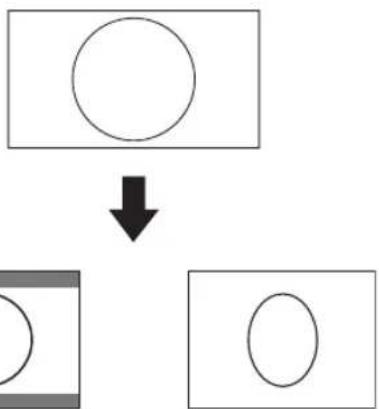
Setting to "4:3 TV" Setting to "16:9 TV"
NOTE
- This function must be set before recording.
Selecting the HDMI picture size automatically

Setup HDMI Auto View
This function allows you to automatically change to the appropriate picture size when viewing an HDMI signal using the INPUT4, 5 and 6 terminals.
Other picture and audio settings
Adjusting image position

Setup Position
For adjusting a picture's horizontal and vertical position.
Item
H-Pos.: Centres the image by moving it to the left or right.
V-Pos.: Centres the image by moving it up or down.
NOTE
- Adjustments are stored separately for each input source.
- Depending on the input signal type or SCREEN SIZE setting, a position setting may not be available.
Reducing noise on the screen

Option DNR
"DNR" (Digital Noise Reduction) produces a clearer image ("Off", "High", "Low").
Automatic volume adjustment

Option Auto Volume
Different sound sources sometimes do not have the same volume level, such as a programme and its commercial breaks. The Automatic Volume Control (Auto Volume) reduces this problem by equalizing levels.
Emphasising dialogue

Option Clear Voice
This function emphasises speech against background noise for greater clarity. It is not recommended for music sources.
Outputting audio only

Option Audio Only
When listening to music from a music programme, you can set the TV off and enjoy audio only.
- Item
Off: Both screen images and audio are output.
On: Audio is output without a screen image.
Display Settings
Channel display
You can display the channel information by pressing i + on the remote control unit.
DTV Mode ATV Mode
| BBC2 DTV 001 | BBC1 ATV 01 |
| Audio (ENG) STEREO: Video 1080i: Subtitle ENG 1/3: New Information | PALI NICAM STEREO Subtitle Teletext Off: New Information |
- Four digit numbers (e.g. 0001) are displayed after selecting the five Nordic countries in the country setting.
Time display in channel information
You can display the time information included in DTV and teletext broadcasts.
NOTE
- Skip step 1 if receiving DTV broadcasts.
1 Select a TV channel (The time information is automatically captured).
2 Press + . The channel display will appear on the TV.
3 Press 1 + again within the several seconds that the channel display is on the screen. Time information will be shown in the lower-right corner of the screen for several seconds.
4 Even when you change the TV channel, you can display the time information with steps 2 and 3 above.
NOTE
If acquired successfully, the time information will appear in the upper-right corner of the screen by pressing +
Time and Title display

Option
Time Display
Time Display
This function allows you to display the clock time in the lower-right corner of the screen.
Item
On: Displays the clock time.
On (half-hourly): Displays the clock time in 30-minute increments.
Off: Hides the clock time.
Time Format
You can select the time format (either "24HR" or "AM/PM") for the clock time.

Option
Game Play Time
This function allows you to display the elapsed time on the screen when AV SELECTION is set to "GAME".
Item
On: Under connecting a game console to the TV, the elapsed time is displayed in 30-minute increments in the lower-left corner of the screen after AV SELECTION is set to "GAME".
Off: Hides the time.

Option
Programme Title Display
This function allows you to display programme information such as the title and airtime by tuning a channel.
NOTE
- This function is available only when the DTV mode is selected.
Setting when using external devices
Input source settings

Option
Input Select
For setting the signal type of external equipment.
Item
INPUT1: Y/C, CVBS, RGB
INPUT2:Y/C,CVBS,RGB
INPUT3: Auto, S-VIDEO,VIDEO
NOTE
- If no (colour) image displays, try changing to another signal type.
- Check the operation manual of the external equipment for the signal type.
- When the signal type is set to "Auto", the input terminal where a cable is connected is automatically selected.

Setup
Input Label
You can label each input source with a custom description.
1 Press INPUT1-8 on the remote control unit or on the TV to select the desired input source.
2 Go to "HOME MENU" > "Setup" > "Input Label".
3 Press / / / to select each character of the new name for the input source, and then press ENTER.
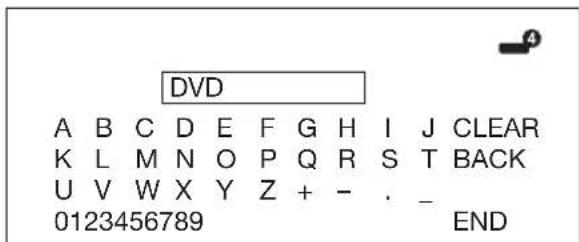
4 Repeat until the label is fully spelt out.
NOTE
The label can be six characters or less.
- When you want to set an input source label of less than six characters, select "END" to set the name.
- You cannot change labels if the input source is "TV".
Skipping specified inputs

Setup
Input Skip
This setting allows you to skip the SCART, HDMI or RGB input on the Input Source Selection operation.
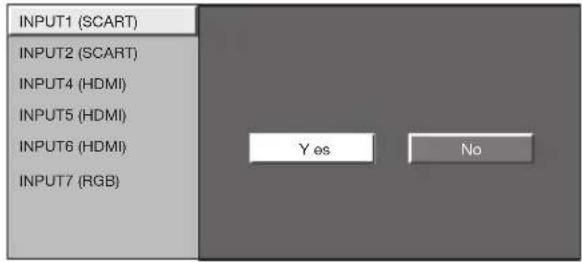
Colour system settings

Option
Colour System
You can change the colour system to one that is compatible with the image on the screen.
NOTE
The factory preset value is "Auto".
- If "Auto" is selected, the colour system for each channel is automatically set. If an image does not display clearly, select another colour system (e.g. "PAL", "SECAM").
Additional features

Setup
Standby Mode
You can reduce the TV's start-up time after turning on the power with the remote control unit.
Item
Mode1: The TV quickly starts up from standby. 30 W or more of power consumption is required during standby.
Mode2: Power consumption is small during standby.
Connecting a PC
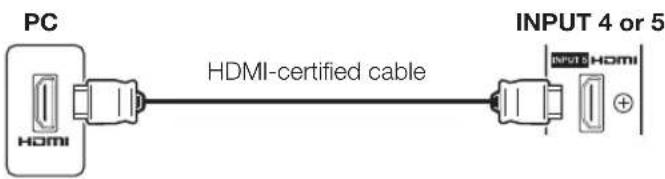
HDMI Connection
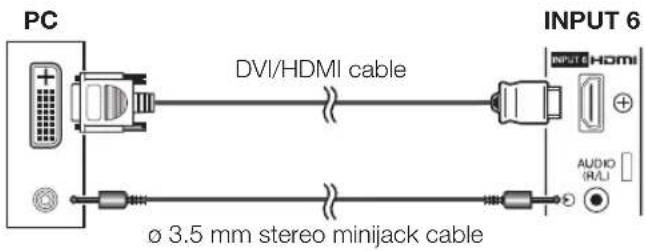
Analogue Connection
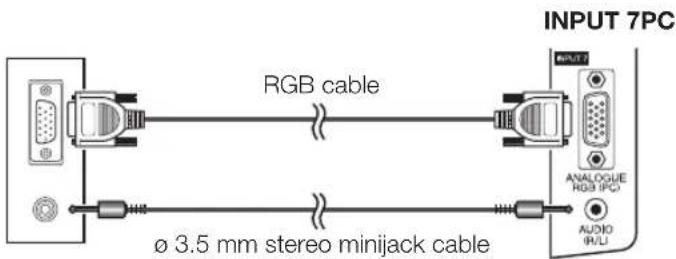

NOTE
The PC input terminals are DDC1/2B-compatible.
Refer to page 42 for a list of PC signals compatible with the TV.
- A Macintosh adaptor may be required for use for some Macintosh computers.
- When connecting to a PC, the input signal type is automatically detected except 1,024 × 768 and 1,360 × 768 signals. Refer to Selection input resolution on page 40.
Displaying a PC image on the screen
Selecting the picture size
You can select the picture size.
1 Press SCREEN SIZE.
- The SCREEN SIZE menu displays.
2 Press SCREEN SIZE or / to select a desired item on the menu.
NOTE
- Connect the PC before making adjustments.
- Selectable picture size may vary with input signal type.
EXAMPLE
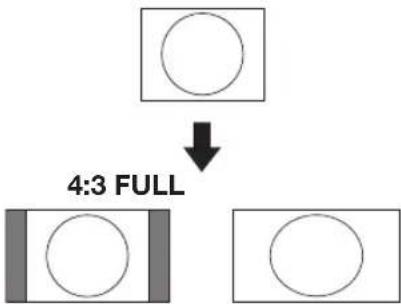
Item
FULL: An image fully fills the screen.
CINEMA: For 14:9 letterbox pictures. Bars may appear on the top and bottom with some programmes.
4:3: Keeps the original aspect ratio in a full screen display.
Dot by Dot: Displays an image with the same number of pixels on the screen.
NOTE
Refer to page 35 for AV signals (480i/480p/576i/576p/ 720p/1080i/1080p). The ANALOGUE RGB (PC) terminal (INPUT7) is not compatible with 480i/576i/1080p signals.
Adjusting the PC image automatically
This function enables the screen to be automatically adjusted to its best possible condition when the analogue terminals of the TV and PC are connected with a commercially available DVI/RGB conversion cable, etc.

Setup
Auto Sync.

NOTE
- When "Auto Sync." is successful, "Auto Sync completed successfully" displays. If not, "Auto Sync." failed.
- "Auto Sync." may fail even if "Auto Sync completed successfully" displays.
- "Auto Sync." may fail if the PC image has low resolution, has unclear (black) edges, or is moved while executing "Auto Sync".
- Be sure to connect the PC to the TV and switch it on before starting "Auto Sync."
- "Auto Sync." can be executed only when inputting analogue signals through the INPUT7 terminal.
Adjusting the PC image manually
Ordinarily you can easily adjust the picture as necessary to change image position using "Auto Sync." In some cases, however, manual adjustment is needed to optimise the image.

Setup
Fine Sync.
1 Press / to select the specific adjustment item.
2 Press / to adjust the item to the desired position.
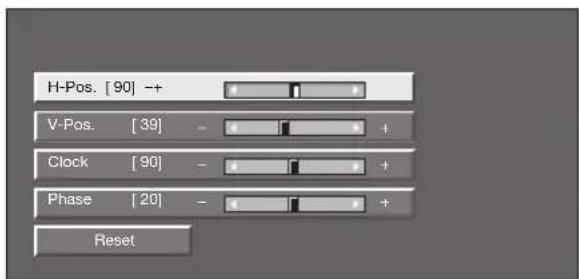
Item
H-Pos.: Centres the image by moving it to the left or right.
V-Pos.: Centres the image by moving it up or down.
Clock: Adjusts when the image flickers with vertical stripes.
Phase: Adjusts when characters have low contrast or when the image flickers.
NOTE
- For resetting all adjustment items to the factory preset values, press / to select "Reset", and then press ENTER.
- "Clock" and "Phase" in the "Fine Sync." menu can be adjusted only when inputting analogue signals through the INPUT7 terminal.
Selecting input resolution
- Some input signals may have to be registered manually to display properly.
- The pairs of input signals (resolutions) in the list below are not distinguishable when received. In such cases, you have to set the correct signal manually. After setting once, it will display when the same signal (resolution) is input again.

Setup
Input Signal
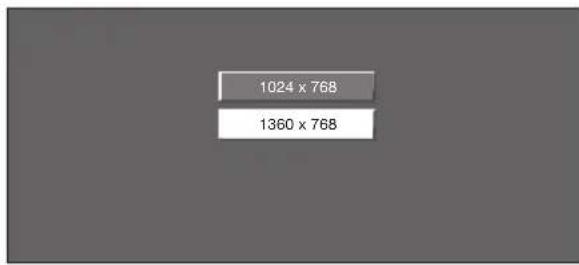
(Example)
NOTE
- You can only select the "Input Signal" on the "Setup" menu when receiving one of the two input signals listed above.
RS-232C port specifications
PC Control of the TV
- When a programme is set, the TV can be controlled from the PC using the RS-232C terminal. The input signal (PC/video) can be selected, the volume can be adjusted and various other adjustments and settings can be made, enabling automatic programmed playing.
- Use an RS-232C serial control cable (cross type) (commercially available) for the connections.
NOTE
- This operation system should be used by a person who is accustomed to using PCs.
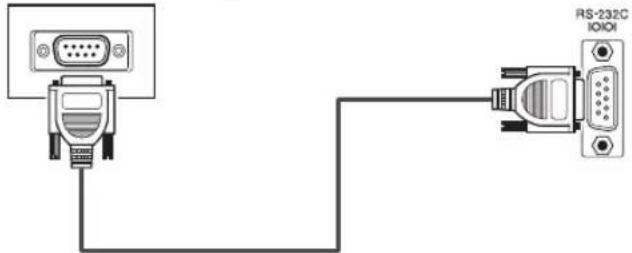
RS-232C serial control cable (cross type)
Communication conditions
Set the RS-232C communications settings on the PC to match the TV's communications conditions. The TV's communications settings are as follows:
| Baud rate: | 9,600 bps |
| Data length: | 8 bits |
| Parity bit: | None |
| Stop bit: | 1 bit |
| Flow control: | None |
Communication procedure
Send the control commands from the PC via the RS232C connector.
The TV operates according to the received command and sends a response message to the PC.
Do not send multiple commands at the same time.
Wait until the PC receives the OK response before sending the next command.
Make sure to send "A" with the carriage return and confirm that "ERR" returns before operating.
Command format
Eight ASCII codes +CR

Command four-digits Parameter four-digits Return code
Command four-digits: Command. The text of four characters.
Parameter four-digits: Parameter 0-9, blank, ?
Parameter
Input the parameter values, aligning left, and fill with blank(s) for the remainder (Be sure that four values are input for the parameter).
When the input parameter is not within an adjustable range, "ERR" returns (Refer to "Response code format").
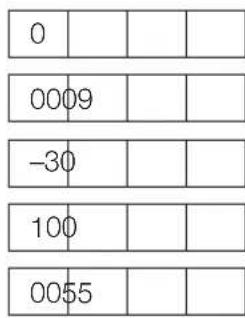
When "?" is input for some commands, the present setting value responds.
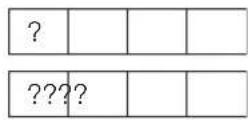
Response code format
Normal response
Return code (ODH)
Problem response (communication error or incorrect command)
Return code (ODH)
After sending the return code (ODH), make sure to send the line feed (OAH) as well.
PC compatibility chart
| Resolution | Horizontal Frequency | Vertical Frequency | Analogue (D-Sub) | Digital (HDMI) | VESA Standard | |
| VGA | 640 × 480 | 31.5 kHz | 60 Hz | ✓ | ✓ | ✓ |
| SVGA | 800 × 600 | 37.9 kHz | 60 Hz | ✓ | ✓ | ✓ |
| XGA | 1,024 × 768 | 48.4 kHz | 60 Hz | ✓ | ✓ | ✓ |
| WXGA | 1,360 × 768 | 47.7 kHz | 60 Hz | ✓ | ✓ | ✓ |
| SXGA | 1,280 × 1,024 | 64.0 kHz | 60 Hz | ✓ | ✓ | ✓ |
| SXGA+ | 1,400 × 1,050 | 65.3 kHz | 60 Hz | ✓ | ✓ | |
VGA, SVGA, XGA, WXGA, SXGA and SXGA+ are registered trademarks of International Business Machines Corporation.
NOTE
- This TV has only limited PC compatibility, correct operation can only be guaranteed if the video card conforms exactly to the VESA 60 Hz standard. Any variations from this standard will result in picture distortions.
RS-232C command list
| CONTROL ITEM COM | MAND PARAMETER CONTROL | CONTENTS | ||||
| POWER SETTING POWER | W | C | _ | POWER OFF | ||
| INPUT SELECTION A1 | G | D | _ | INPUT SWITCHING (TOGGLE) | ||
| I | T | V D | _ | TV (CHANNEL FIXED) | ||
| I | D | T V | _ | DTV (CHANNELFIXED) | ||
| I | A | V D* | _ | INPUT1-8(1-8) | ||
| CHANNEL D C C H** | _TV DIRECT CHANNEL (1-99) | |||||
| CH U P | _ | CHANNEL UP | ||||
| CH D W | _ | CHANNEL DOWN | ||||
| D T V D* | * | THREE DIGIT DTV DIRECT CHANNEL (1-999) (Non-Nordic countries) | ||||
| D T V D* | * | * FOUR DIGIT DTV DIRECT CHANNEL (1-9999) (Nordic countries only) | ||||
| D T U P | _ | DTV CHANNEL UP | ||||
| D T D W | _ | DTV CHANNEL DOWN | ||||
| INPUT SELECTION B1 | IN P 10 | _ | INPUT1(Y/C) | |||
| IN P 11 | _ | INPUT1(CVB5) | ||||
| IN P 12 | _ | INPUT1(RGB) | ||||
| IN P 20 | _ | INPUT2(Y/C) | ||||
| IN P 21 | _ | INPUT2(CVB5) | ||||
| IN P 22 | _ | INPUT2(RGB) | ||||
| IN P 30 | _ | INPUT3 | ||||
| IN P 31 | _ | INPUT3(S-VIDEO) | ||||
| IN P 32 | _ | INPUT3(VIDEO) | ||||
| AV SELECTION | AV M D 0 | _ | TOGGLE | |||
| AV M D 1 | _ | STANDARD | ||||
| AV M D 2 | _ | MOVIE | ||||
| AV M D 3 | _ | GAME | ||||
| AV M D 4 | _ | USER | ||||
| AV M D 5 | _ | DYNAMIC (Fixed) | ||||
| AV M D 6 | _ | DYNAMIC | ||||
| AV M D 7 | _ | PC | ||||
| AV M D 8 | _ | x.v.Color | ||||
| AV M D 9 | ? ? ? | 1-8 | ||||
| VOLUME | VOL M * | _ | VOLUME (0-60) | |||
| CONTROL ITEM COM | MAND PARAMETER CONTROL | CONTENTS | |||||
| POSITION | H POS * | * _ H-POSITION (AV/PC) | |||||
| V POS * | * _ V-POSITION (AV/PC) | ||||||
| C_C_K* | * _ CLOCK (0-180) | ||||||
| PHSE * | * _ PHASE (0-40) | ||||||
| SCREEN SIZE | W DE 0 | - - TOGGLE (AV) | |||||
| WIDE 1 | - - 4:3 (AV) | ||||||
| WIDE 2 | - - CINEMA 14:9 (AV) | ||||||
| WIDE 3 | - - WIDE (AV) | ||||||
| WIDE 4 | - - FULL (AV) | ||||||
| WIDE 5 | - - ZOOM (AV) | ||||||
| WIDE 6 | - - CINEMA (AV) | ||||||
| WIDE 7 | - - 4:3 (PC) | ||||||
| WIDE 8 | - - CINEMA (PC) | ||||||
| WIDE 9 | - - FULL (PC) | ||||||
| WIDE 10 | - - DOT by DOT (AV/PC) | ||||||
| WIDE 11 | - - UNDERSCAN (AV) | ||||||
| MUTE | MUTE 0 | - - TOGGLE | |||||
| MUTE 1 | - - MUTE ON | ||||||
| MUTE 2 | - - MUTE OFF | ||||||
| SURROUND | A CS U 0 | - - SURROUND | TOGGLE | ||||
| A CS U 1 | - - SURROUND | ON | |||||
| A CS U 2 | - - SURROUND | OFF | |||||
| AUDIO CHANGE | A CH A | - - TOGGLE | |||||
| SLEEP TIMER | OFT M 0 | - - OFF | |||||
| OFT M 1 | - - SLEEP TIMER 30 MIN | ||||||
| OFT M 2 | - - SLEEP TIMER 1 HOUR | ||||||
| OFT M 3 | - - SLEEP TIMER 1 HOUR 30 MIN | ||||||
| OFT M 4 | - - SLEEP TIMER 2 HOUR | ||||||
| OFT M 5 | - - SLEEP TIMER 2 HOUR 30 MIN | ||||||
| TEXT | T E X T 0 | - - TEXT OFF | |||||
| T E X T 1 | - - TEXT ON (TOGGLE) | ||||||
| D C P G * | * _ | DIRECT PAGE JUMP (100-899) | |||||
Troubleshooting
| Problem Possible Solution | |
| No power. | Check if you pressed (TV) on the remote control unit.If the indicator on the TV lights up red, press (TV).Is the AC cord disconnected?Check if you pressed (on the TV. |
| The TV cannot be operated. | External influences such as lightning, static electricity, etc., may cause improper operation. In this case, operate the TV after first turning off the power, or unplugging the AC cord and re-plugging it in after one or two minutes. |
| Remote control unit does not operate. | Are batteries inserted with polarity (+,-) aligned?Are batteries worn out? (Replace with new batteries.)Are you using it under strong or fluorescent lighting?Is a fluorescent light illuminating to the remote control sensor? |
| Picture is cut off. Is the image position correct? | Are screen mode adjustments (SCREEN SIZE) such as picture size made correctly? (Pages 35 and 39) |
| A Bright blue picture, alignment, or dark colour, or colour misalignment. | Is the room too bright? The picture may look dark in a room that is too bright. Check the "Colour System" setting (Pages 33 and 38). |
| Power is suddenly turned off. The TV's internal temperature has increased. Remove any objects blocking the vent or clean.Is the "Sleep Timer" set? Select "Off" from the "Sleep Timer" menu (Page 32).Is "No Signal Off" or "Ecology" activated? | |
| No picture. Are connections to external equipment correct? (Pages 21-23)Is the input signal type selected correctly after connection? (Page 38)Is the correct input source selected? (Page 16)Is a non-compatible signal being input? (Page 42)Is the picture adjustment correct? (Pages 30-31)Is the aerial connected properly? (Page 14)Is "On" selected in "Audio Only"? (Page 36) | |
| No sound. Is the volume too low? | Make sure that headphones are not connected. Check if you pressed OK on the remote control unit. |
| This is a hot start feature, please use the sound. | the cabinet slightly expands and contracts according to changes in temperature. This does not affect the TV's performance. |
Cautions regarding use in high and low temperature environments
- When the TV is used in a low temperature space (e.g. room, office), the picture may leave trails or appear slightly delayed. This is not a malfunction, and the TV will recover when the temperature returns to normal.
- Do not leave the TV in a hot or cold location. Also, do not leave the TV in a location exposed to direct sunlight or near a heater, as this may cause the cabinet to deform and the LCD panel to malfunction. Storage temperature: +5^ to +35^ .
Information on the software license for this product
Software composition
The software included in this product is comprised of various software components whose individual copyrights are held by Pioneer or by third parties.
Software developed by Pioneer and open source software
TheCopyrights for the software components and various relevant documents included with this product that were developed or written by Pioneer are owned by Pioneer and are protected by the Copyright Act, international treaties, and other relevant laws. This product also makes use of freely distributed software and software components whose copyrights are held by third parties. These include software components covered by a GNU General Public License (hereafter GPL), a GNU Lesser General Public License (hereafter LGPL) or other license agreement.
Obtaining source code
Some of the open source software licensors require the distributor to provide the source code with the executable software components. GPL and LGPL include similar requirements. For information on obtaining the source code for the open source software and for obtaining the GPL, LGPL, and other license agreement information, contact your local Pioneer Customer Service. We are unable to answer any questions about the source code for the open source software. The source code for the software components whose copyrights are held by Pioneer is not distributed.
Acknowledgements
The following open source software components are included in this product:
- linux kernel - modutils - glibc - zlib - libpng
Updating your TV via DVB-T
Ensure that your TV software version is always up to date. From time to time Pioneer will make updated TV base software and DVB software available.

Digital Setup
Download Setup
Searching for updates*
- All countries except UK and Sweden are set to “No” for this function.
The TV automatically determines whether a new software version is available when the TV is in standby mode.
Item
Yes: Automatically searches for new software updates available when the TV is in standby mode.
No: Does not search for update information.
Now: Checks if there is new software immediately.
Downloading the software
You can select the method of update.
1 If the software is updated, the confirmation message "New download information has been detected." appears.
- If the TV receives the update service while in standby mode, a confirmation message displays after turning on the power.
2 Follow the screen prompts.
Item
Yes: Starts downloading immediately. It takes approximately one hour to update. You cannot carry out other operations while downloading.
- Cancel the download by pressing ENTER on the remote control unit when "Discontinue" is displayed on the screen during the update.
No: Starts downloading automatically several minutes after entering standby mode.
NOTE
- The TV must remain in standby mode for download. Do not turn off the power using on the TV.
- Updating the software may take some time.

Information
Message List
When new software is detected, you can confirm the update information and download the software from "Message List".
NOTE
- When the TV succeeds at downloading new software, the message is updated in the "Message List" of the "Information" menu.
- The software update will not be carried out if there is no new software available at the specified download time.
Information
Receiver Report
Display reports regarding failures and changes for timer settings.
Reset
If complex adjustments are made so that the settings cannot be restored to normal, you can reset the settings to the factory preset values.

Setup
Reset
1 Go to "HOME MENU" > "Setup" > "Reset".
2 Press / to select "Yes", and then press ENTER.
- "Now, TV will restart automatically. OK?" displays on the screen.
3 Press / to select "Yes", and then press ENTER.
- "Now initialising..." displays on the screen and blinks.
After the reset has completed, the power shuts off and then comes back on. The screen will have returned to its original settings.
Now initialising...
Identification

Setup
Identification
You can check the TV ID on the screen for reporting to customer service.
CLEARING THE PIN
1 Go to "HOME MENU" > "Setup".
2 Press / to select "Auto Installation", "Programme Setup", "Child Lock" or "Reset", and then press ENTER. The PIN input window will display.

3 Press and hold both + and P + on the TV simultaneously until the message appears on the screen.
Specifications
| Item | 46" Flat screen TV, Model: KRL-46V | ||
| LCD panel | 46" Advanced Super View & BLACK TFT LCD | ||
| Resolution | 2 073 600 pixels (1 920 × 1 080) | ||
| Video Colour System PAL/SECAM/NTSC 3.58/N | NTSC 4.43/PAL 60 | ||
| TV Function TV | Standard Analogue | Que CCIR (B/G, D/K, I, L/L') | |
| Digital DVB-T (CFDM) | |||
| Receiving Channel | VHF/UHF E2-E2 ch (VHF), E21-E69 ch (UHF), F2-F10 ch, I21-I69 ch, IR A-IR J ch (Digital: E5-E69 ch) | ||
| CATV Hyper-band, S1-S41 ch | |||
| TV-Tuning System Auto Preset 9999 ch: non-Nordic / 9999 ch: Nordic (ATV: 99 ch), Auto Label, Auto Sort | |||
| Audio Analogue | NICAM/A2 | ||
| Digital MPEG AUDIO | |||
| Brightness 450 cd/m | ? | ||
| Backlight life 60 000 hours (when "Backlight" is set to the default position) | |||
| Viewing angles H: 176°, V: 176° | |||
| Audio Power | 15 W × 2 | ||
| Speaker | (100 mm × 40 mm) × 4 | ||
| Terminals | ANT | UHF/VHF 75 Ω Din type (Analogue & Digital) | |
| RS-232C | D-Sub 9 pin male connector | ||
| INPUT1 | SCART (AV input, Y/C input, RGB input, TV output) | ||
| INPUT2 | SCART (AV input/monitor output, Y/C input, AV Link, RGB input) | ||
| INPUT3 | S-VIDEO (Y/C input), RCA pin (AV input) | ||
| INPUT4 | HDMI | ||
| INPUT5 | HDMI | ||
| INPUT6 | HDMI, Ø 3.5 mm jack | ||
| INPUT7 | 15 pin mini D-sub, Ø 3.5 mm jack | ||
| INPUT8 | COMPONENT IN: Y/PE(CB)/PR(CR), RCA pin (AUDIO R/L) | ||
| DIGITAL AUDIO OUTPUT | Optical SPDIF Digital audio output | ||
| C. I. (Common Interface) | EN50221, R206001 | ||
| OUTPUT | RCA pin (AUDIO R/L) | ||
| Headphones | Ø 3.5 mm jack (Audio output) | ||
| OSD language | Czech, Danish, Dutch, English, Estonian, Finnish, French, German, Greek, Hungarian, Italian, Latvian, Lithuanian, Norwegian, Polish, Portuguese, Russian, Slovak, Slovene, Spanish, Swedish, Turkish | ||
| Power Requirement | AC 220-240 V, 50 Hz | ||
| Power Consumption | 253 W (0.5 W Standby) (Method IEC60107) | ||
| Weight | 25.5 kg (Without stand), 30.5 kg (With stand) | ||
| Operating temperature | 0 °C to +40 °C | ||
- As a part of our policy of continuous improvement, Pioneer reserves the right to make design and specification changes for product improvement without prior notice. The performance specification figures indicated are nominal values of production units. There may be some deviations from these values in individual units.
NOTE
Refer to the inside back cover for dimensional drawings.
End of life disposal
Information for users on collection and disposal of old equipment and used batteries
(Symbol for equipment)

Symbol examples for batteries

These symbols on the products, packaging, and/or accompanying documents mean that used electrical and electronic products and batteries should not be mixed with general household waste.
For proper treatment, recovery and recycling of old products and used batteries, please take them to applicable collection points in accordance with your national legislation.
By disposing of these products and batteries correctly, you will help to save valuable resources and prevent any potential negative effects on human health and the environment which could otherwise arise from inappropriate waste handling.
For more information about collection and recycling of old products and batteries, please contact your local municipality, your waste disposal service or the point of sale where you purchased the items.
These symbols are only valid in the European Union.
For countries outside the European Union:
If you wish to discard these items, please contact your local authorities or dealer and ask for the correct method of disposal.
K058a_A1_En
Rating table for Child Lock
| Broadcasted ratingUser-adjusted rating | AGE | ||||||||||||||
| 4 5 | 6 | 7 8 9 | 10 11 1 | 2 13 14 | 15 16 | 17 18 | |||||||||
| Universal viewing | ✓ | - | - | - | - | - | - | - | - | - | |||||
| Parental approval pref. | ✓ | ✓ | ✓ | ✓ | ✓ | - | - | - | - | - | |||||
| X-rated | ✓ | ✓ | ✓ | ✓ | ✓ | ✓ | ✓ | ✓ | ✓ | ✓ | ✓ | ||||
| Broadcasted ratingUser-adjusted rating | Universal viewing Parental approval pref. X-rated | ||||||||||||||
| Universal viewing | -- -- | ||||||||||||||
| Parental approval pref. | ✓ | - | - | ||||||||||||
| X-rated | ✓ | ✓ | - | ||||||||||||
| Austria A B/C | ||
| Finland Fin B/G | ||
| Greece OH B/G | ||
Installation programme
Réglage numérique
Installation programme
Réglage analogue
Conditions de communication
m = 311
]
P
TBDV
司
GREEN SIZE
DVD
D.
R VCR
SELECTION
HDD
SELECT
ZUR.BEACHTUNG
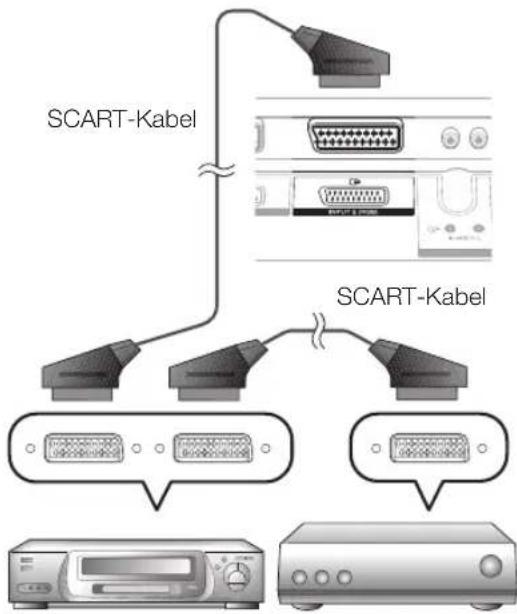
DecoderVideorecorder
ZUR BEAuchtUNG
K L M N O P Q R S T ZURÜCK
U V W X Y Z + - .
0123456789
ENDE
EPG (Electronic Programme Guide =
Off: Nasconde I'orario.

Opzioni
13 (VERSNELDE WEERGAVE)
(VERSNELDE WEERGAVE)
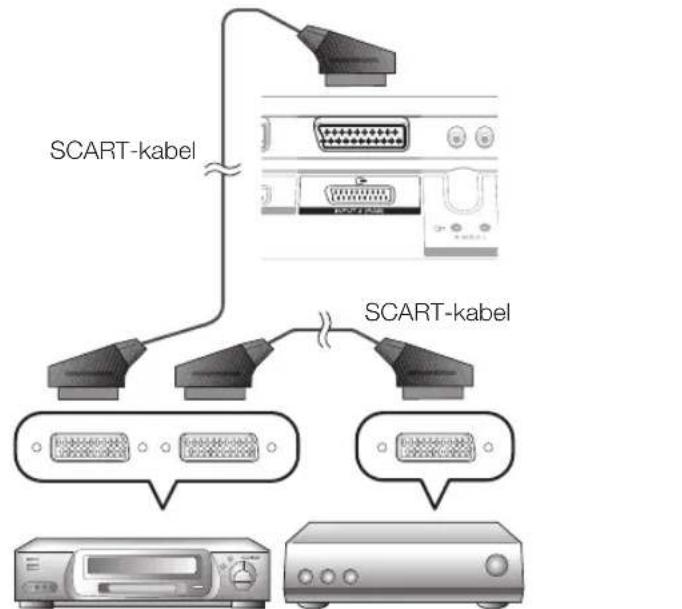
DecoderVideorecorder
OPMERKING
De fabrieksinstalling is "Uit".
Slot
| GEKOZEN FUNC TIE CO M M A N D O P A R A M E T E R | INHOUD VAN DE GEKOZEN F U N C T I E | |||||
| POSITIE | H POS S * * | H POSITIE (AV/PC) | ||||
| V POS S * * | V-POSITIE (AV/PC) | |||||
| C L O K * * | K L O K (0-80) | |||||
| P H S E * * | F A S E (0-40) | |||||
| SCHERMFORMAAT | WIDE 0 | BEURTE L I N G S K I E Z E N (AV) | ||||
| WIDE 1 | 4:3 (AV) | |||||
| WIDE 2 | C INEMA 14:9 (AV) | |||||
| WIDE 3 | B R E D B E E L D (AV) | |||||
| WIDE 4 | VOLLEDIG (AV) | |||||
| WIDE 5 | Z O O M (AV) | |||||
| WIDE 6 | C INEMA AV) | |||||
| WIDE 7 | 4:3 (FC) | |||||
| WIDE 8 | C INEM (FC) | |||||
| WIDE 9 | V O L L E D I G (FC) | |||||
| WIDE 10 | DOT BY DOT (AV/PC) | |||||
| WIDE 11 | U N D E R S C A N (AV) | |||||
| GELUIDSDEMP I N G | M U T E 0 | BEURTE L I N G S K I E Z E N | ||||
| M U T E 1 | G E L U I D S D E M P I N G A A N | |||||
| M U T E 2 | G E L U I D S D E M P I N G U I T | |||||
| SURROUND | A C S U 0 | S U R R O U N D | (BEURTE L I N G S K I E Z E N) | |||
| A C S U 1 | S U R R O U N D | A A N | ||||
| A C S U 2 | S U R R O U N D | U I T | ||||
| W U Z I G E N G E L U I D A C H | H A | BEURTE L I N G S K I E Z E N | ||||
| S L E E P T I M E R | O F T M 0 | U T | ||||
| O F T M 1 | S L E E P T I M E R 30 MIN. | |||||
| O F T M 2 | S L E E P T I M E R 1 U U R | |||||
| O F T M 3 | S L E E P T I M E R 1 U U R 30 MIN. | |||||
| O F T M 4 | S L E E P T I M E R 2 U U R | |||||
| O F T M 5 | S L E E P T I M E R 2 U U R 30 MIN. | |||||
| T E K S T | T E X T 0 | T E K S T U I T | ||||
| T E X T 1 | T E K S T A A N (B EURTE L I N G S K I E Z E N) | |||||
| D C P G * * | R E C H T S T R E K S NAAR P A G I N A (100-899) | |||||
Problemen oplossen
CINE: Para imagenes tipo但由于 some programs could be able to do the same, but it was not possible.
BBeHeHne 2 YBaKaembI nokyNaTeJIb npOdyKcIMPioneer .2
BaxhIe MebpI npedoctoPOXHOCTn PO 630nacHOCTn .2
IyblT DnCTaHNoHHOrO ynpabNeHnna 3
YnpabHeHne dpyrMn yctpOcTBAMn C nOMoCbHO
PnlaeraEMo IyIbTa DnCTaHNoHHOrO ynpabHeHnna 4
Toprobles MapK 8
Tepeun3op (Bud cnpepu) 9
TepeBn3op (Bud c3aui) 9
Ioprotobka. 10 PpnilaraembIe npHnadnHexhocTn 10
PpNkpeHne nOcTaBKn 10
BcTabka 6aTapei 11
IcnoJb30BaHHe nylbTa DnCTaHNoHHoro ynpabLeHnna 11
IpeoOctepeKeHn oTHocTeBHO nylbTa DnCTaHNoHHoro ynpabLeHnna 11
MepbI npedoctopoXHocTn npu ycTaHOBKe 12
PykoBoCTBO no 6bICTpoH hAcTpoKe 13
O63op nepBOHaayabHOn HcTaanraun 13
Ipeed BKJIoueHHeM NITaHnI 14
Cb3bBaHHe uHypOB 14
IepBoHaayabHna aBOMaTHuecka HnCTaJIpyu 15
IpoBepKa MoHocTn CnHaJa N MoHocTn KaHa... 15
PpocmoTpeBn3opa 16
EkeHHeBna pa6ota 16
BkIoueHne/BbIKIOueHne 16
IpeeknueHne MeKdy aHaJorOBbIM uNcpobbIM npieMOM 16
IpeeknueHne KaHaoB 16
BbIbOp BHeuHero nCTOHTHka BnDEoCnHana 16
Bb6op pexnma 3Byka 16
EPG (Electronic Programme Guide = 3neKtpoHHa nporpamma nepeda) 17
O63op EPG 17
Ione3hble yctaHOBKn IJI INcnoJIb3ObaHHaEPG. 17
Bb6op nporpaMMbI c noMoouEPG 18
3aIcB no TaImepy c nOmoIe EPG 19
OTMeHa 3aIncn no TaImepy 19
TeTeTeKCT 20
IcnoJIb3OBAHnE npInIOJKeHnMHEG-5 (ToJIbKO dIy BeIIKo6pHTAHn) 20
PoiKnIoueHne BHeuHnx yctpoiCTB 21
BBeHeHne nepeBbINOpHeHnem noKIOUeHn 21
ПоdkноченеHDMI 22
KOMnoHeHTHOe noDKJIOUChEne 22
Поdkлочене S-VIDEO/VIDEO 22
Подклочене SCART 23
UnpaBHeHne yctPoIcTBaMn,IMHeOuMn rHe3do SCART, npi nomoOni o link.A 23
IopknHueHne rpmKorOBOpnteYyCnNTeY 24
BcTabKa cMapr-KapTbI 25
HDMI CONTROL 26
UnpaBHeIe yCtpoiCtBamHDMI npn nomoHDMI CONTROL ... 26
ПоdkлоченеHDMI CONTROL 27
YctaHOBka HDMI CONTROL 27
UnpaBHeHne yCtpoiCTbOM HDMI CONTROL 28
Onepaun MeHIO 29
TO TAKOE HOME MENU? 29
OchOBhble onepaunn 29
OchOBnA perynipOBKa 30
HactpoKn 1306paXeHn. 30
AV SELECTION 31
YCTaHOBKn 3Byka 31
YctaHOBKn 3KOHOMMn 3Heprnn 31
YctaHOBKn KaHana 32
ABTOHCTaJIpyu 32
UctahOBKm UmppoBoro KaHana 32
UctahOBn aHaIorOBOKaHana. 33
UctaHOBnnapoI/poInteJIbCKO6NOKPOBKn 34
YCTAHOBKN3bIKA(a3bIK,Cy6TITpbl,MylbTINJIeKCHbnpeKIM 3Byka) 34
Pone3hie yHKmnpocMToPa 35
Bb6op pa3mepa n3o6paKeHnra 35
ABTomatueckn BbIbOp pa3Mepa n3O6paKeHnWSS (abTomatueckoe nepeKJIuoyehne Ha IInpOKoΦopMaTHbI pexm) 35
PuyhOByB6Op pa3Mepa n306paKeHnWSS (aBTOMaTHueCKoe nepeKJIouHeHn Ha 1npOKoΦopMaTHbI peXmM) 35
Bb6op pa3Mepa 1306paXeHnBpyHyu 35
BbI6Op BpyHyIO pa3Mepa 3aINCbIAeMoro I3O6paXeHn. 36
ABTomatnueckm Bb6op pa3mepa n06paKeHMA HDMI 36
Ipyrme yctaHOBKn n3OpaXeHnN 3ByKa 36
Perynpobka noIokhenia n3o6paKeHnna 36
YMeHbWeHne nomex Ha 3KpaHe 36
ABTomatuecka perynipOBka rpmKocTn 36
BbIeJIeHne dnaIora 36
BbIBoD toIbKO 3ByKa 36
UcTaHOBKn HndnKaun 37
HnDnKaunKaHana 37
INHdkaunBpeMeHH 3arolobka 37
Dpyrne none3HbIe cyHKcnn 38
YcTaHOBka B Cnyuae IcNoIb3OBaHnBHeUHX YcTpOINCTB 38
YCTAHOBKNICTOUYHKBAxOJHOroCmHaHa 38
Iponyck 3aHaHHoro BxOJHoro ciHaHa 38
UCTAHOBKN LBETOBOB CNTEMbl 38
DOnonHnTeIbHbIe yHKcnn 38
Iopknioyene PIK 39
Поdkлочене ПК 39
OTo6paKeHHe Ha 3KpaHe N3o6paKeHn c PIK 39
Bb6op fOpMaTa n3o6paKeHn 39
ABTomatuecka perynipobka n3o6paekhenc PIK 40
PerynpoBka n3o6paKeHnI K BpyHyu 40
Bb6op pa3peuHn BxOndHO CnHaJa 40
Texmune xapaKepnncn npTa RS-232C. 41
CoBmectHMOCTb c PIK. 42
CnncokKomAnrRS-232C 42
PpunnoKeHne 43
Ponck u yctpaHHe HncnpaBHOCTeI 43
OboBnHeHne BaIeTeIeBn3opa uepe3 DVB-T 44
C6poc 44
Pacno3HabAHne 44
Texnueckne xapaktepcntkn 45
YBaJxAeMbI nokyntb npOdyKznn Pioneer
Blaqapm Bac 3a npno6pehene TeleBn3opa Pioneer c nlockm 3kpaHOM. Iy o6cepeheny 6e0nacHO mHorix net 6ecpeboHOn EKnpyatau Bawero n3denn, noKnycta, nepe naIom erO 3KcNpyatau BHMaTeJbHo npoHTnte NyKT BaxhIe Mepbl pdeoctoopokhoCTn no 6e0nacHOCTn.
BaxhIe MepbI npedocTopoxHocTn no 6e3onacHOCTN
OuNTKaIpeepd ouCTKoN3deNnO rTOcoeHNHHTe UHP NITAHNNEpeMeHHOrTo kAOTcTeBOy POETKN. Jnra uCTKn 3deJINr NCNOB3yTe BnaxHyIO TKAHB.He IcNoB3yTE KNDKne INa aP030JIbHbE ONUCTNTEN.
B0a n Bnara-He IcnoIb3yIte H3dJIHe B6IIN BOIbI, HApIMep, PAdOM C BaHOn, YMbIBaIbHnKOM, KxOHHO MoIKoN, EMKOCtIO DITcIPKN, IJIaBaTeIbHbIM 6accEHOM IN BCipOM NOBane.
He pa3meaIte Ha daHHom n3denn B3bI IIN dpyme EMKcTn C BOIO. B0a moKET npOITbcra Ha n3dne, YTO pNBEeT K BO3rOpAHHIO IIN IopAkeHHIO 3NEKTPUeCKM TOKOM.
- PnOCTaBka-He pa3MeauAte H3dene Ha HeyctOuHBOI TeEke, NOCTaBKe, TpeHore HIN CTone. 3TO MOKET Bb3BaT naDeHne H3dJIIN, YTO pInBeDET Ke cepBc3HbIM TpABMaM, a TaKke K erO nobPexDEHIO. NcNOnb3yTe TOhko TENeKxy, NOCTaBky, TpEHORY, kPOOHTEHN INI CToE, POKOMEHyEMe IpnON3BOUeIeM NIN IIN PNOAbaEMe BMEcE cN3dEeM. PnI yCTAHOBKe H3dEeHna CHTHe O83aTeNbHO CNEyIe INHCTpykUMm PnON3BOUeITeR. INCOnb3yTeTOhKO MOnTaHXBeIe DetAni, PekOMEHyEMyE bIpON3BOUTeEN.
- Pn nepemeueHn H3neHn, pa3meueHHo H a TeneXe, erc neyet npedBnrtb C mKcHmAbHo octopoXhoctbo. BHe3aHbIe octahOBKn, Ype3MeHbIe ycHn H epoBna NOBepxHOCTb NOna MOrT bBb3BaTb NaeHHe N3dEINC TeneXKn.
- BeHTnIaHn--BeHTnIaHIOHHbIe N dpyIne OTBepCTN B KOpnyce IpeHa3NaYeHbI dJIe BeHTnIaHm. He 3akpbIbAteIe H He 3arpOMOkaJTe daHbIe UeHN NT BOPCTN, TaK KAHEDCTAOHAR BEHTINIA MOnKET npBecNT K penerpeBy W/NI COKpaUeHNO cPoka 3KcPiYatauMn 3dEtnHe pa3MeuaHne 13dEne Ha KpOaTn, DnBaHe, KOpe N HA NoDObHix NOePBxHOCTX, TAK KAC OHMYT 3AkpbITb BEHTnIaHIOHHbIe OTEpcTH. DaHHOe 13dEne He pePaHsHaHcNo I nraCTPOeHHOY cTaHOBKn, He paMaeeJaTe ERO BA3kpBTom PocTpaHCTBe, TAKOM KAK KHXJ NOIIKA, He ObecNeUVB COOTBETCTBYoHyo BEHTnIaHIO, Ykaa3aHyO B INCHPTyKlXn XpON3BOIDTeJI.
PaeHbXnKoPCCTaNNueCKO DcNlne,NCONb3yEmaB DAHNOM 13eEIN, CpeNa H3 CTkna. CnEOBATEbHO, OHA MOKeT pa36nbc npn naeHNm cInbHOB BCTpckne 13eJnR. B cnyae nobpeKdEHHa nHeHnn KIOKpIcTANIIMeCKO dnCnIe 6ydbTe octopoxhbl. 406bl He npapHntCBOCOKKAMCTKNA
VcTOUHNIK TENNA-XpaHNTe H3dEINe BdaJIOT MTOCTOUYHKOB TENNA, TaKNX KAK paMaTOpbl, HarpeBaTeN, Neu N Dpyrme H3dEINRA, BbIeJIAIOUe TENIO (BKNIOYAR yCmNTeN).
- I npeodTbpaeHnB3ropaHn HkOrda He pa3MeaaTe CBepx ynn Chn3y TeNeBu3opa KaKne-Jn6o CBeun nnOTKpbItbOroHb.
- InpneoTbpauHnB0rOpaHnHnI npaKaHnA3JIeKTPuYeCKM TOKOM He pa3MeuaTe UHyp NITaHnpeMeHHoro TOKa nOd TEENB3OpOM HnI DpyHMn TAgKeJbIMn PpeMetamn.
He oTo6paKaHte HeNoDmNkHoe H3o6paKeHHe B TeueHHe DnITeIbHOrO Nepmoa BpeMeHn, TAK KAK 3TO MOKcET Bbl3BaTb NOBJIHe MeocTaToCHoro H3o6paKeHn.
- Ntahme notpe6nraTcBcerda, KOrda WTeNCenb BCTaBneH Bpo3eKy.
IocopOHHe npEmTb HJIKOCTN-3aPUEaTeCBATBnBkHe-NIO6 npEmTb B IeHN NTBPCTNAIDHIN B INeHN IMeETC BbICOKE HAPRKeHNE, nTOcOpOHHe npEmTb MOny TByB3BaTb NopaxKHe TKOM H/IMN KopoTKoe 3aMbKaHHe BVHTpeHHX DeTaEn. No 3ToN Ke npHHe He DOnyckAte NoJaHHe Ha 3dJIe 6bIr BoIi nn dpyrO JIKKOCTn
- 06cnykbaHme-He nbTaiTebc obcnykBaTb n3dne camOToTe bHo. Iocne cHrtna KpbIeK Bbl MoKeTe oka3aTbCn IOB3dEChTBEm BbICOKo HapJxehn H npOHx OAnchOteN. ObpaTtceK KBaHmHpOBAHHOMy nepcoHany DnBbInOnHeHHOBcnykBaHn.
PahenbKIOKpCTaIIueckoroDcIeRaeBbICOKTeXHOHnHbIMN3dennm,KOTOpoeObecneuBaet Blickyo detannaio 106paqhenia.
I3-3a 60nburo KOJIueCTBa NIKCEJEN HOrTa Ha 3KpaHE MOrY TNOBnTbCRe HEKOToBle HEAKTNBHe IINKcEIN B BuDe CInHEn, 3eHoi INI KpaHOH HeIOBnKHO TOKN. 3TO COOTBeTCTByET TEXHueCKIM XapakTePncTHkAM I3JeINu H He ABnTeCra DepeKTOM.


MepbI npedoctoPOXHOCTn pni TpaHcnpTnpoBKe TeJeBn3opa
O83aTeIbHO nepehocite TeneBn3Op Bdoem, ydepknaBAByMa pyKaHa KaKdoCTopoHe TeneBn30pa.
BAxHO

CIMBOJ MOHNN,3AKNHOeHHbB
paBHOCTOPOHHN TpeyroIbHNK,
HCNOJIb3yETcIgI npDeynpeXeHnI
NoIb3OBaTeIeO6 OOnachOM HAnpXeHHN
BHyTpN KOpNyca N3dEHHN, KOtOpoe MoXeT
6bITb DOCTaTOH0 BbICOKM IN CTaTb
PnPHHOIopAXeHHN IIOeI
3JIeKTpyeCKHM TOKOM.
CAUTION
RISK OF ELECTRIC SHOCK DO NOT OPEN
BHIMAHNE:
BO IN36EKAHNE NOPAXEHHN 3JIKTPNHECKIM TOKOM HE CHIMAIITE KpBIIHK (INN 3ADHIOCTEHK). BHYTPN HE CODEPKATCNEATIN, PEPDAHA3HAUEHHIE INPPEMOHTA NOJb3OBATEEN. INI OBCNYKBAHNI OBPATNTECK KBAJINPHUPOBAHHOMCOTPYDHNKY CEPBNCHOIUYKbI

BocknucateIbHbI 3HaK,3aKnIOHeHHbIBpaBHOCTOpOHn TpeYrOblHNK,NCNoNb3yeTcIyI npEynpeXeHnnoIb3OBaTeIg O HauuM B IInTEpaType,NOCTABnREMOB KOMNKeTc C N3dennEM,BAxNbIX yka3aHn No paBoTe C HmIMo6CnykBaHIO.
D3-4-2-1-1_Ru-A
PPEyPPEKDEHNE
He nCnONb3yIte HxpaHITe 6aTapeKHa npAOM COJIHEHOM CBETY NIN B OChEh XkapKnx MecTx (HAnpIMep, B CaIOHe ABTOMOBUN NIN pRdOM C o6OrpeBaTeNEM).3To MoKET Bbl3BaTB npoteky, neperpeB, B3pbIB NIN BO3ropaHne 6aTapeek. KpOme Toro, cPOK Cnyk6bl NIN POnu3BODInTeNbHOCTb 6aTapeek MoKet cOKpaHTbcr. D3-4-2-3-3_Ru
PNEyPEXDEHNE:
DaHHoe n3dJIne OTHOCNTc K npOdyKuN Knacca A.B DOMaunHx ycNoBnX daHHoe n3dJIne MoKeT BbI3bIBaTb paHIOnomExn, B cIyuee BO3HKnHOBeHnKOTOpbIX NOIb3OBaTeIIO MOKeT NOTpe6oBaTbcr PpHnAtnE COOTBeTCTByUxMep.
20 KhoNkI dIa peYInpOBKn 3o6paKeHnA SCREEN SIZE
BbI6op pa3mepa 3kpaHa
(Ctp. 35 n 39).
AV SELECTION
BbI6Op ycTaHOBKn BnDeOpEkmma (CTp. 31).
21 SELECT
IpeeknueHne MeKdy ONUyMa
TV,STB,DVD/DVRVCR,
NIOyueHn BO3MOXHOCTu YnpaBHeHnI
DpyHM NOcOeUNHeHHbIM YcTPOiCTBOM
C NOMOUsbIO npINarAeMOro NylTa
DnCTaHNoHnHO ynpaBHeHnI (Ctp.4-7).
22 I-Ⅱ (Pexm 3Byka)
Bb6op MyIbTnIeKCHOrO pexkma 3Byka (Ctp.16).
PIMMEUHNE
HaxmTe u ydepKmbTe obe KhoNk 9 u 18 na npIbTe duCTaHcNOHOrO ynpaBHeNn dIra OTo6paXeHn FyHKuIN «100 Tg Ha DboHOM 3KpaHe.
YnpaBHeHne Dpyrnnu yCTpOiCTBaMn C NOMoUbIO PpIlaRaEMoro NylbTa DnCTaHcNoHHOrO ynpaBHeHna
C NOMOUIIO npnnaeraMoro NybTa DnCTaHNOHHORO
ynpabHeHMO KNYPABNtB CNeyUOUMN NOKJIPOeHHBMN
ycTPOIcTBAMn: npNCTabo (STB), DVD-npeepom, DVD/HDD-
pekOpEpoM (DVR), BD-npeepom nIN BnDEOMarHHTofoHOM.
Ipeed nCNoJIb3OBaHNem 3ToI cyHKuHn Heo6xOdmo
npEdBapNTbHO yCTAHOBITB B npnnaeAOM MnybTe
InCTaHIOHOYnpaBHeHRA TeXHOJrueckn KOd
yCTPOIcTBa, YnpaBHeHNE KOTOpBIM 6yDet OcyUeCTBnTbcra.
3aTeM, KOrDa NoRbITcRA Heo6xOdMMocTb ynpaBHeHNA
yCTPOIcTBOM, BOCNoJIb3yIteCb KHOKNoI SELECT Ha
nybTe DnCTaHIOHOYnpaBHeHNA DnBaBopa peKIma,
COOTBeTCTByIOUeO yCTPOIcTBy; BB1Op 6yDet OcyUeCTBnTbcra
MeKdy OIIzmaTV, STB, DVD/DVRN VCR. INHdkaTopbl
COOTBeTCTByIOUeO peKIma Ha nybTe DnCTaHIOHHORO
ynpabHeHNA 6yDt NOKa3bIBaTb peKIm, BB1bpaHHbI B daHHbI
Momet BpemeHn.
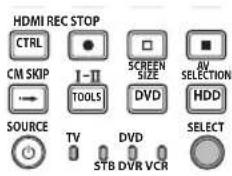
ПРИМЕЧАНЕ
- Pn ynpabHeHm BD-npeepom Bb6epTe peKm DVD/DVR.
PpeBapnteIbHa yTaHOBka TexHONOrnueckx KoIOB
1 BocnoIb3yntecb KhoNkoi SELECT Ha npNbTe DnCTaHIOHOHorO ynpabJIeHnI dIg BbIbopa peKmAs TB, DVD/DVR nnn VCRB 3aBNCIMoCTn OT o6OpdyOBAHn.
2 y6eINBwncb, qTO INHnKaTOp paHee Bbl6paHHoro pexMa norac, HaxMITE u YdepKuBaTe KHOKNy SELECT, a 3aTEM HAXMITE KHOKNy 1 Ha Nylte DnCTaHcNOHORO ynpabJIeHn.
- Haynet MItraTb INHdkaTop COOTBETCTByIOeero peKIma.
3 BocnoNbayTec bHONkAMn 0-9 nBBA Tpex3HaHOro TEXHOJrueckoro Koda.
Cm. ctncoK texHOIOIueCKNX KOIOB DnI ONpeJeHHeo6xOIMORO KOa.IHHNkATOp pexKIMa 6yET ROPTe Np6IN3NTeHBO B TceHne OHOI CEkyHbI, a 3aTEM NorachET; npeBaPITeHbHa YcTaHOBKa TEXHOIOIueCKoro KOA 6yET 3aBePeHHe.
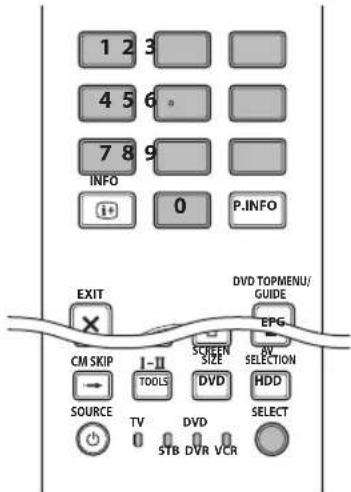
PIMMEUHNE
- Pnp OTCyTcBn ONepaun npin6n3nteHbHO B TeueHne OHOH MInHytBI pIN MInraIoE m HdNkatope, pOceDpya npedBaPnteHbON yCTaHOBKn Byet npeKpaueHa.
B Cnyae BBOda KoDa, He npBBeHnHO B Ta6JIce, HnDnKaTOp pexmAb 6yEt 6bICTpo MrrTaB TteHeHne np6n3nteBHO OOnHO CEkyHdbI, a 3aTeM HaHT MrrTaB B npexkhem pexmme.
-ДяпpeкрашеняHa noJnytn npocedupybl npedBapntelhoYCTaHOBKn KODApn MmraHoueM nHdNkatope,MOxHo HaxKaTbKHonky SELECT Ha nyIbTe dNCTaHcUHNOHOrO ynpaBLeHnry.
CTaHdapTHbIM3aBOIDCKIMMTEXHOJIOrueCKIMMKoAMnIpeKIMOBSTB,DVD/DVRuVCRcoOTBeTCTBeHHOraJIHOITc3HaueHIN《000》,《100》N《500》.
TexHONOrnueckne KoDbI
YnpabHeHne HeKOTOpbIMn nepeuCnHeHbIMN B TaBnucax yCTPOIcTBAMN C NOMOUsIO npNJraEMOr OyIbTa DnCTaHIOHHOrO YnpabJIeHnM MoKET 6bITb qactNuHO nIN IOHOCTbIO HEO3MOXHO.
| STB | |
| 000 | PIONEER 1 (стандартыная заюdeckая установka) |
| 001 | PIONEER 2 |
| 002 | CANAL SATELLITE |
| 003 | HUMAX |
| 004 | PACE 1 |
| 005 | PACE 2 |
| 006 | QUALI-TV |
| 007 | SKY DIGITAL |
| DVD | |
| 100 | PIONEER 1 (стандартыная заюская установka) |
| 101 | PIONEER 2 |
| 102 | AKAI |
| 103 | DENON |
| 104 | HITACHI |
| 105 | JVC |
| 106 | KENWOOD 1 |
| 107 | KENWOOD 2 |
| 108 | PANASONIC 1 |
| 109 | PANASONIC 2 |
| 110 | PHILIPS 1 |
| 111 | PHILIPS 2 |
| 112 | SAMSUNG |
| 113 | SHARP |
| 114 | SONY 1 |
| 115 | SONY 2 |
| 116 | SONY 3 |
| 117 | THOMSON |
| 118 | TOSHIBA |
| 119 | YAMAHA |
DVR
200PIONEER1
201PIONEER 2
202PIONEER 3
203PANASONIC
204PHILIPS 1
205PHILIPS 2
206SHARP
207SONY
208TOSHIBA
BD
300PIONEER
301LG
302PANASONIC
303SAMSUNG
304SONY
305TOSHIBA
BudoeMaHHToDoh
11 (NAY3A/CTON-KA.DP)
Pn KaJOM HaxaTNBblIOHReTcpeMeueHne Ha3aKHaayI npedbIyuee rnaBl.
12 (NAY3A/CTON-KA.DP)
Pn KaJdOM HauKaTm BbIOnJIHReTCr NpeMeUeHHe BnepeD K Naay CneNyUoSe rnaBbl.
13 (3ANCb)
HakimMaTe TnI nepMeueHnHa3aD.
(BOCPON3BEDEHNE)
Bknquenhe Bocnpon3bvehenr.
(3AINCb)
HaximaiTeIyckopenhoro nepemeuenBnepei.
14 (OCTAHOBKA)
HaxmMaTe DnOcTaHOBKn BocpnOn3BeDeHn Hn 3aHnc.Bo BpeMpaBoTbI C HeKoToPbIMN DVD-nHeepamn Hn DVD/HDDpeKOpDapmN (DVR) DBOHoe HaKaTne 3ToH KhoNk MoKeT npNBecTN KOTKpbIBaHnIO NtKa DnCk.
REC STOP (ToIbko DVD/HDD-peKOppep (DVR))
HaximaiTe OndHOBpeMeHHo KHONKn ⅢI nOCTaHOBKn 3aIncN. 3Ta onepaunna doctynha tonbko Iy DVD/HDD-pekopdepob (DVR) Pioneer n Sony.
15 HDD (ToIbKO DVD/HDD-peKOpIep (DVR))
HaxmaiTeIyBb6opaJkeCTKOroNcKa(HDD)IBOcPOn3BVeDeHnI 3aIncn.
16 DVD (ToIbko DVD/HDD-peKOpEep (DVR))
HaxmamteIyBb6opaDVDIyBocnpOn3BeDeHnryNJIN3aNNsC.
ПРИМЕЧАНЕ
- YnpabBHeNE BD-nPeePOM ocUeCTbIeTcR B peKIMe DVD/DVR.
DVD-nleep, DVD/HDD-pekopdep (DVR) nIN BD-nleep HeIb3a Bbl6paTb OndHOBpeMeHHO.
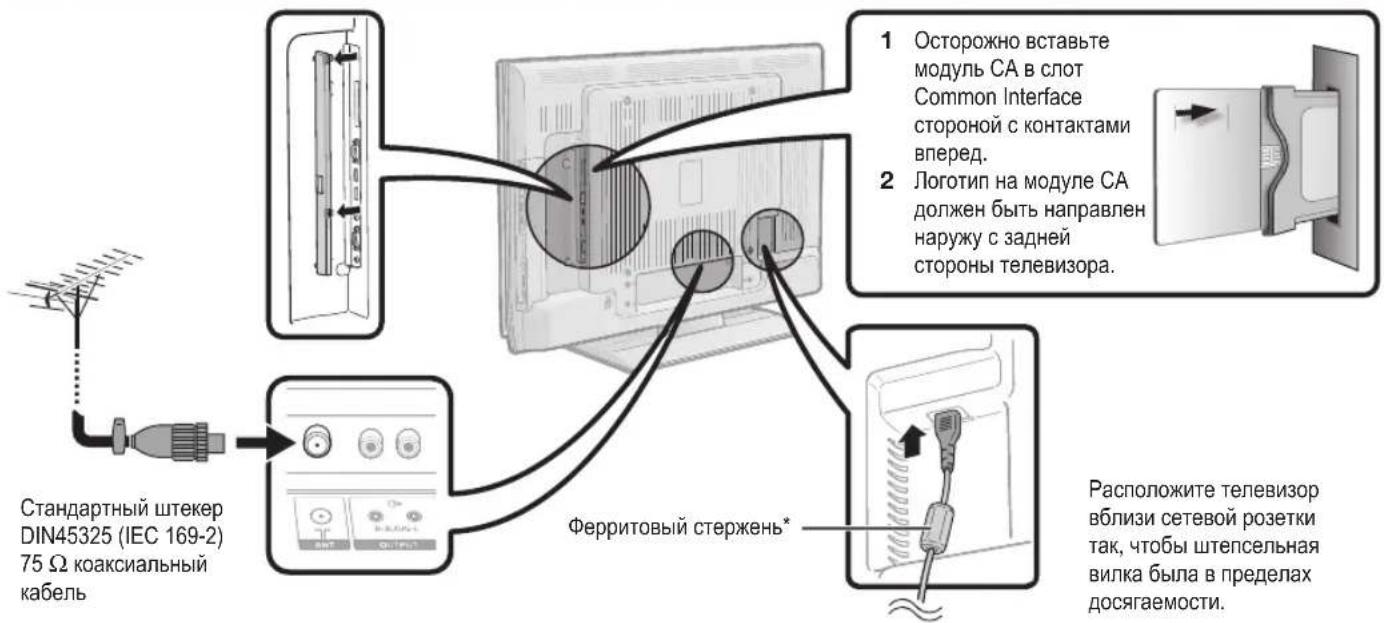
Ipeed BKJIOUeHHeM IITaHnA
Iodaua nItaHnKaHTeHHe
Pocne noDCoeHHeHnAHTeHHOro Ka6eJr K rHe3dy aHTeHHbI C 3aHHe cTOPOhblTeEBN3Opa dln PnEma cTaHcuiuΦpOBoro/ Ha3eMHOro cHHaNa Bam Heo6xOdmo NoaTb NTaHHe K aHTeHHe.
1 Haxmte KhoNky nocne yero noBntc 3kpan HOMEMENU
2 BocnoIb3yItecb KhoNkamn / dIra BbIbopa onuH «YctaHOBAK
3 BocnoBsyIeCb KOnkamn / DnBb6opa onuMn «YctaHObKa aHTeHHb-LuΦpOBA», a 3aTeM HaxMnte KONky ENTER.
4 BocnoB3yIeCb KOnkamn / nna Bb6opa onuHn(HanpJNITaHNA, a 3aTeM HaxmTe KOnky ENTER.
5 BocnoIb3yIteCb KOnkamn / - DnBb6opa onuN «BKJ», a 3aTeM HauKMTE KOnkY ENTER.
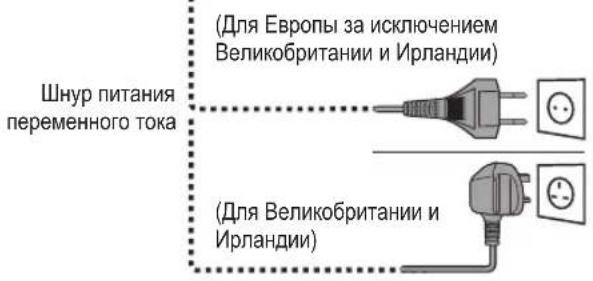
*ΦeppnTOBbl cTepxeHb
PeppntOBbI cTepeXeH bOJIKeH 6bITb npKpeIIeH NOCToARHO HIKOrDa He OJKeH OTcoEINrTbcra OT shypa NHTAHnI nepemEHHO TOka.
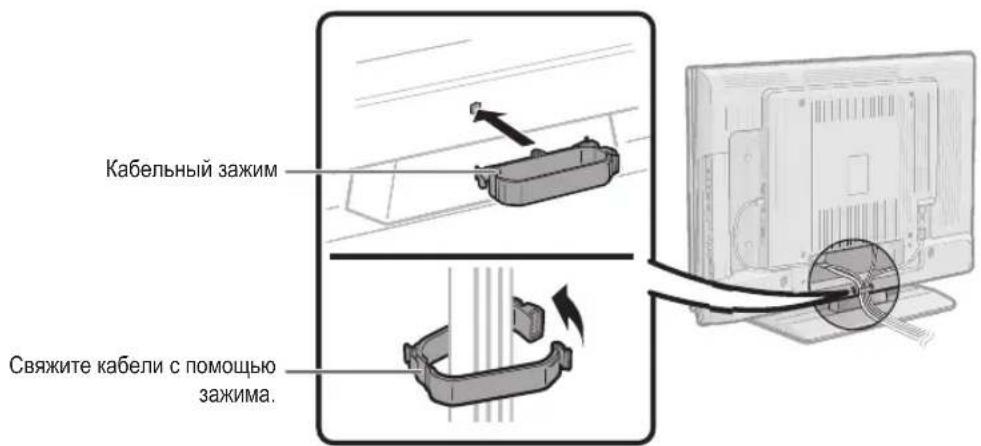
CBy3bIbAHne shypoB
IepBoHaayalbHa aBTOMaTnuecka HnHCTaJIpyu
Pn nepBOM BKNUOeHm TeNeBUN3Opa Nocne npNo6peHnnaIPOBbIeTcMaCTep nepBOHaayalbHOaABTomAtuYeCKoIHCTaJIaCm. CneNyte yka3AHm MeHIO nocJeOBaTeJIbHOBbINHHTe Heo6XoDImbIe YcTaHOBKn.
Ipeed BkIIOueHnem nHTaHn npOBepbTe cJeDuOuee
PoiocoeHHeHn aHTeHHbI Ka6eJIb?
BkIquenJn shypr nntaHn nepeMeHHoro Toka?
1 HaxmTe KhoNky Ha TeJeBn3ope.
- NpBNTcMACTep nepBOHaayalbHOaBTOMaTHueckoHnHCTaJIYAM.
2 YcTaHOBka Ra3bika OSD.
English
Italiano
Svenska


BocnoIb3yItecb KHOIIKAMn / / nIy Bbl6opa HyxHOrO r3bIka, a 3aTEM HaxMITE KHOINKY ENTER.
3 YcTaHOBka CTpaHbI (MecToHAXOxJDeHne TeNEBu3Opa).
Austria A B/G
Finland
FIN B/G
Greece GR B/G


BocnoIb3yItecKHNkAMn / / / nIy Bb6opa Baewi cTpaHb iNn oBlaCTn, a 3aTeM hXKMITE KONKy ENTER.
3KpaH yCTaHOBKn NOBnAeTcra TOnbKO BO BpEmr nepBOu HcTaanlAUN.
4 HauJIO nonCKaHaJIOB.

BocnoIb3ayTeCb KHOKamn / IJN Bbl6opa onuIN «LcnpoBoi nonck» INI «Piouck aHaIorOboix KaHaIOB», a 3aTeM Haxmte KhoNkY ENTER.
EcnBbXOTNE BbINONHb NOCK DpyHX NpeDau,CHOBA BInONHnIe npOeDpy《OobabNtNoCK》M3 MeHNO《YCTaHOBa PporpaMM》(CTp. 32 n33).
- nIPOCMOTpa n aHaIorOBoro N uΦpOBOrTeNeBeeuaHnHeo6xOIMMO BbIIOHNHTb yCTaHOBky NOcKa KaHaIIOB DnK KaKdOrO FOpMaT。
IIPUMEP
EcnBbBInonHReI npOeDpy UInpPobOn nONCK B MaTepe nepBOHaayabHOABOTMAUHeckoMHCTaNNLIM,BblDnKbbl BbINOHbI npOeDpy TOnCK aHaJOrOBbIX KaHaONB IV3 nyHKTa ABOTHCTaNNLIA RBMENHO YcTahOBKa.
5 TeNEBn3Op BbINOHT NOMCK, COPTNPOBky u COXpaHEHne BCEX NOJNeKaUHX PnEMy TEKeKaHaONOB B COOTBeTCTBN C INX YCTaHOKBAMN I NOKJIIOHeHHOAHTeHHOH.
INHdNkaTOP COCTOHHN TeJIeBn3Opa
- Ecln BxOHOH CINHaH He NoCTynaET, B KaYeCTBe peXmHa 3ByKa 6yDet OTo6paXaTbCra INDnKauZnE《MOHO》.
Peped nodkJIOUeHHem ...
- He 3a6yDbTe BbIKNoUHTb TeJIeBn3Op n BCE ocTaIbHbIe ycTpoCTBa nepei BBInONHeHMe KaKx-JI6o NoKnIOueHm.
- Hadejxno nodknIOuHTe Ka6eIb K rHe3ny nnnrHe3dAm.
BHNMaTeNbHO npoTuHnHCTpyKuHIO NO kCnIyataun K KaJDoMy BHeUHEmy yCTpOCTBY IJI BAIBcHEnra BO3MOXHBIX TINOB NOkIIOHeHNA TO TAKKe NOMoKET Bam IOCTnH Hanluyeero BO3MOxHOrO KaeeCTBa 3Byka IN3O6paKeHn IMakCmAlbHo NCNoB3OBaTb NToEHuaI TeLEBn3opa I NODKnIOUeHHORO yCTpOCTBa. - 06paTntecbKCTp.39 dIy BblOnHeHn IOnkIuOeHn I K TeIeBn3opy.
BBeDeHne nepeD BbINOJIHeHHeM NOdKJIIOUeHn
TeBn3Op Oshaen Hezamn, KaK nokaaHOn Hxke. HanDte Ka6ebn, COOTBeTCTByIOuIy rHe3Ny TeBn3Opa I NOdkIIOUHTe yctpoiCTBO.
ПРИМЕЧАNH
Ka6eHn, nokaahhble Ha cTpaHuaX c 21-24, npoDAIOTc OTeNbHO.
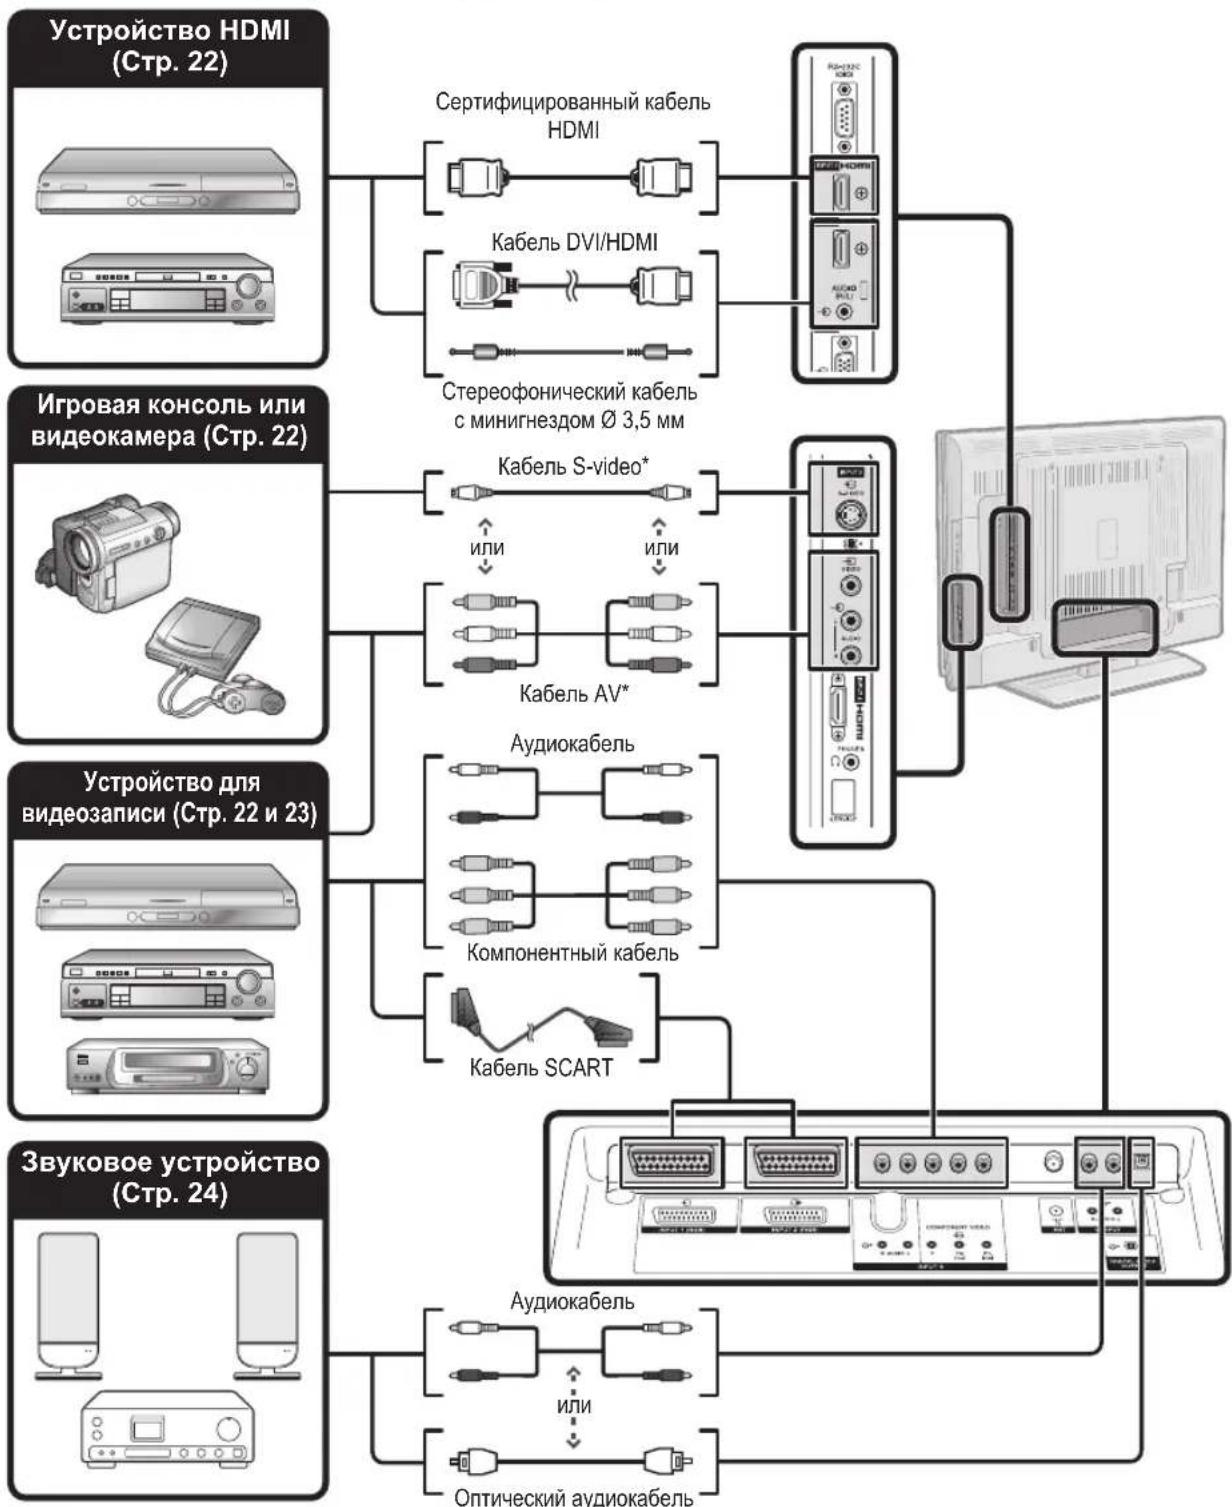
B cnuyae ncoNBJ3OBAHnra Ka6eJ S-video Bam TaKke Heo6xOuMo 6yJeT noKnHouHt b ayDnokkaeb (R/L).

PoiKJIIOUeHneHDMI
PpIMepbI NOIDcoeINHReMbIX yCTPOINCTB
DVD-nleep/pekopdep ●Пleep/pekopdepBlu-ray
IodknouheniHDMI (High Definition Multimedia Interface) no3BOJnOT nepeauy uΦpOBO rBHeo n 3Byka c nneepa/ peKOpEpa uee3 coeHNHTbHbN Ka6JIb. DaHHbIe uΦpOBO r3ObpaKeHn e 3Byka nepeaOTc 6e3 CKaTHN COOTBETCTBEHNO 6e3 NOTEPuNX KaueeCTBa. PepeCTaET 6bITb Heo6xOIMMbIM anAIONoBO/uΦpOBoe poeobpaOBAHne B IODKnUeHbIX yCTPOINCTBax, TaIKe npINBOINBWee Knotepm KaueCTBa.
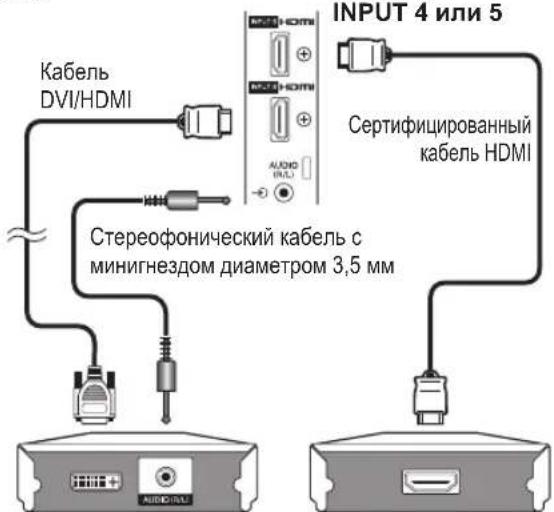
Ppeo6pa3oBaHne DVI/HDMI
Pnnpomoo npaepnoro kabe DVI/HDMI uippoBbe Bundeocmharbli DVD moryr taKke BOcpon3BODntbCpeE3 COBMeCTHMoe IOKIHOeHHe HDMl. 3BykdoJKeH 6bItbNoaH DononHttenho.
- Pn noCoeHHeHn nepeXoHoro aanTepa/ka6eY DVI/HDMI K rHe3y HDMI nO6paKeHne MoKet 6bItb HeeTKM.
KakHDMI Tak i DVI nCnoJb3yOt OHy KOnnMoTeoJa 3aunTbHDCP.

Pocne nocknoyenr
Bb6op aydnocnHana HDMI
Pocne noKJIuOeHnB Bam Heo6xOJIMO yCTaHOBHTb ayINOcMHN, COBMeTmbl C ka6eJEM, INONb3yEmbIM DnY yCTpoIcTb HDMl.
YcTaHOBKa CnΦpOBOrO 3ByKOBOrO BbIXoJa
Pocne noKIOHcHnY cINITeN C uΦpOBbIM 3BYKOBbIM BXODOM BHeUHXrPOMKOrOBOpNTeN, KaK NOKa3aHO Ha pucyHKe, Bam Heo6xOdMnO 6yIeT yCTaHOBt bΦopMaT BbIXOHorO 3ByKa, COBMeCTHMbl C nPoCMaTPBaEMOn IporpaMMOn INN C NOKIOHcHbIM YCTPOINCTBOM.
YctaHOBkaMoDyNA CABcnot Common Interface
2 OctopoXHO BCTaBBTe Moynb CA B cnot Common Interface CTOPOH C KOHTaTMn Bnepe. Iorotn Ha Moyne CA doJKeH 6bIt HaprabNeH HApKy C3aHne CTOpObI TeneBn3opa. He npnaarte Upe3MepHyIO cnUy. Y6eInTecb, YTO MOynHe crNaBaETcB npocece.

PpOBepKa HhOpMaun MoyJyCA
IPIMEYAHNE
- Y6eInTeCb, yTo moDyIb CA npabInIbHo ycTaHOBnEh.
- 3To MeHIO DoCTynHO ToIbKO dIy cIuPPOBbIX CTAHcN.
1 Haxmte KhoNky nocJe yero noBnTcA kpaH «HOME MENU».
2 BocnoIb3yItecKHOHkAMn / Dna BBi6opa onuN «UnpoBa yCTaHoBka».
CodepkaHne 3TOro MeHIO 3aBnCt OT nOCTaBUNKa MoDyNA CA.
3 BocnoIb3yItecKhoNkamn / nIyBbIbopaOniN «MeHIO CI», a 3aTeM HaxMITE KhoNky ENTER.
Moody
OTo6paKeHHe o6e HnΦopMaun O MoDyne CA.
MeHIO
OTo6paKeHne npaMeTpOB peryInpOBKN KOHKpeTHOH CMapT-KapTbI.
ykaataeIb
Ha dAnHOM 3Tane Heo6xOIMOBBecTuInpobbte 3HaueHn, TAKne KaK npoJb.
PIMMEUHNE
- CopepkanHe KaKJOrO u3 3TuX 3KpaHOB 3aBcNt OT NoCTaBnKa Moynr CA.
H3BneueHnmeModynaCA
1 CHIMITE KpbIky C 3aHne CTOpObI TEJEBn3opa.
2 13BneKeTe MoDyIb I3 TeJeBu3Opa.
3 YCTAHOBHTE KpbIUKY HA MECTO.

YnpaBHeHne yctpoiCtBamn HDMI npn nomoOnn HDMI CONTROL
YTo TaKoe HDMI CONTROL?
IcnoB3y npotoKoHDMI CEC (Consumer Electronics Control) npn noMoUHDMI CONTROL Bbl MOxKeTe B INTEpaKTbHOM pexmpepaOtaTb c yCTpoNCTBaMn, COBMeCTMbIMn C 3Toi CNCTeMOI (AV-ycnInTelem, DVD-nPeepOM/pekopdepom, nPeepOM/pekopdepom Blu-ray), IcnoB3y oINH pJbT dNCTaHIOHO ynpabNeHn.
BbI3OB MeHIO BHeuHero yCTpoiCtBa, NOdcoeINHeHHoro K TeJeBuN3Opy C NOMOuHo HDMI
C NOMOJIbIyHKUIN «MeHIO yCTaHOBOK» MOXHO BbI3bIbATb MeHIO HDMI CEC-COBMeCTmORo yCTpoiCTBa (nneepa, peKOpDEpa, KeoPepa, nT.D.).
1 Haxmnte KhoNky HDMI CTRL.
2 BocnoIb3yItecKHOJkAMn / IJIaBbIbOpaOniun «MeHIO yCTaHOBOK》,a 3aTeM HAXMITE KHOJky ENTER.
ПОНМЕЧАНЕ
Ecnn noocoeHHHoe yctpoCTBO He IMeET 3ToI dyHKnIN nNecn ycTPOCTBO HaxoNTCB COCTOHN, KOrda OTo6paKeHne MeHIOHEBO3MOXHO (3aNNb, BXoB B PEXNM OXNuHaHNA T.D.), 3Ta dyHKnIMoKet 6bITb HeDocTyHNo.
BbI6Op yCTpoiCTBaHDMI
EcHn Heckonbko yctpoiCTB HDMIOndcoeINHeHb B BnDE cenoouKn, Bby mokeTe yka3aTb 3deCb, KaKM yctpoiCTBOM ynpabnTb.
1 Haxmnte KhoNky HDMI CTRL.
2 BocnoJb3yITeCb KhoNkAmn / dans Bb6opa onuMn «Bb6op moJeN》,a 3aTeM hakmTe KhoNky ENTER. YcTpoiCTBO HDMI 6ydet n3MeHrTaC npn KaKdOM hKaKaTN KhoNk ENTER.
TO TAKoe HOME MENU?
Bam Heo6xOIMO BbIeCTn OSD nBbINHeHn yCTaHOBOK TEeBn3opa. OSD nY cTaNHOBOK Ha3bIaetc HOME MENU
- «HOME MENU» Истору Доступа ведимся заимени на сюлдов的基础上 устору ведимся на сюлдов的基础上.
CnCTeMoN《HOME MENU》MOxHNO ynpabTb c NOMOUsbNoyIbTa dncTaHcHOro ynpabNeHrA.
OchOBhIe onepaun
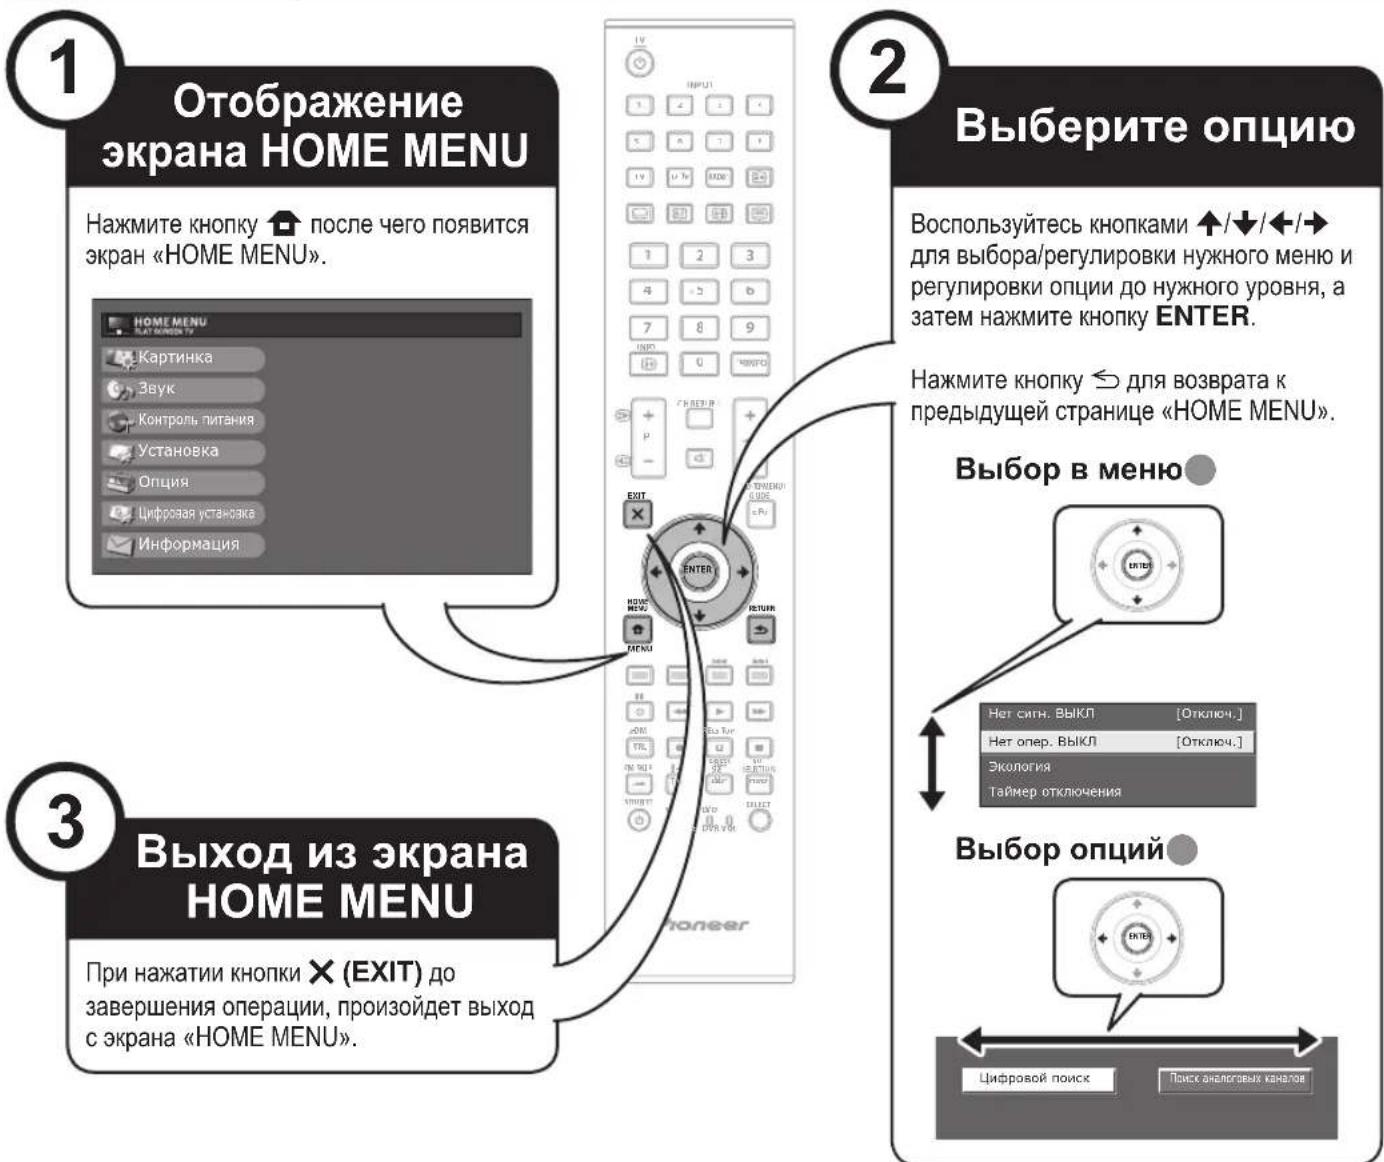
ПОНМЕЧАНО
B BBbpaHbix pexkmax BxOHoro CnHaTAnOnmN NOME MEnuOTnauaTOc, ONaKo nocJeDoBaTeNbHOCTBeJCTBn OCTaETCn HEN3MeHHoH.
CHMKN3KpaHa npBedeHb B INCTpykunn no 3KcnnyatauB NnnIOCTpAIBhIX cenax (HEKOTOpBie yBeJIueHbI, HEKOTOpBie KaDnPOBaHbI) mOryT He3NaHTeNBHO OTJNUATcR O peaNbHbIX 3KpaHO.
OnuMco3HaKOM HeMOrY6bItbBbIbpaHbI NO pa3nHbIM pNHNHAM.
Pa6ota 6e3 nylbTa dncTaHcnoHHoro ynpaBneHn
DAnHnA FyHKnI NOE3Ha, ECIN N6JI3OCTn HET NyIbTa DInCTaHIOHOYnpabHeH.
1 Haxmte KhoNky HOME MENU nocJe yero noBntc 3KpaH «HOME MENU».
2 BocnoB3yItecB KHONKAMN P+/—BMECTO KHOHOK ↑/■ NIN KHOHKA M +/- BMECTO KHONK ←/→ДЯ BBbopa ONM.
3 Haxmnte KhoNky ⅡIa 3aBepseHn yctaHOBKn.
ПРИМЕЧАНЕ
3KpaH《HOME MENU》ncye3HT,ecn er He nCnoIb3oBaTbB TeueHHeckOJIbKIX cekyHd.
06 yka3aTeIbHoi mHdNkaCm
Yka3aTeIbHa HnDnKaUBA HmKHe Yactn 3KpaHa NOKa3bIbAeT onepaunnc OSD.

NoIocKa CBepxY ABJETcRApyKOBOCTBOM NO onepaunm C nyIbTOM INCTAHUONHO ynpaBHeHn. 3Ta noIOCKa 6yDet MeHrTBcR B COOTBeTCTBnC 3KpaHOM KAKdo yCTaHOKn MeHIO.
Hactpoynn306paXeHna
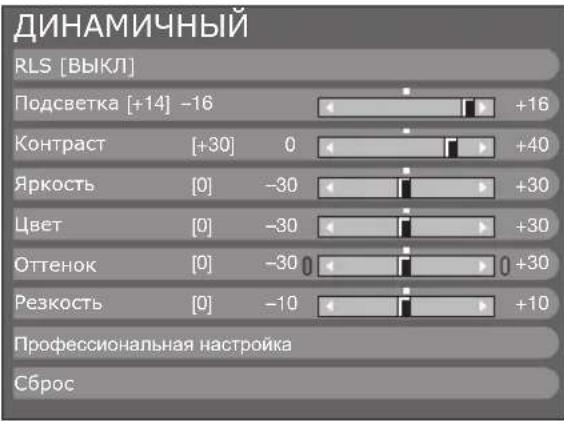

KaptnHka
RLS
ABTomatneckn peryynpyeT rpkoctb 3kpaHa.
Onzna
BbIKJ: ApKoCTb qnkCpyeTcra Ha 3HaueHm, yCTaHOBneHHOM B MeHIO «POnCBETKa».
BKN: ABTomatmeckar peyIpOBka.
Bkn:HHdkau.: OTo6paKaet Ha 3kpaHe 3pΦeKT RLS BO BpeMa peYnnpOBKn npKocTn 3kpaHa.
IPIMEYAHNE
Ipn yctanOBke B noJoxeHne «BKnTe neBm3Op onpeJeT rpkoctb OkpykaiooOcBeuHn n ABOtAMHeckn peYnpyET rpkoctb NOCBETKn. Y6dntecb, TTO Hkakme PpeMeTb, KOtOpble MOrTy NOBnraTb Ha CNOC6HOCTRLS onpeJeTb rpkoctb okpykaiooero ocBeuHn, He 3akpbiaot ero.

KaptnHka
PerynpoBkn n3o6paXeHna
BbMOxTe OTpEryIpOBaTb N3o6paXeHHe No CBOEmy IpeIIOHTeHIO C NOMOuIyKa3aHHbIX HIXe peRyIpOBoK N3o6paXeHn.
OnuHaCTpOKn
CpeHbICOKN: PpOMeKyoTHMH OTHEK MEyDy OTHEKAMN BbIcOKM N CpeHMH
CpeHn: ECTeCTBeHHbI OTTeHOK.
CpeHHe-Hn3KnPiPOMexyTOHbI OTteHOK MEXyO TTEHKaMn «CpeHmN» H«Hn3KnM
Hn3kn:BeIbI C KpaCHOBaTbIM OTTeHKOM.
100
TexHOrnIg 100 Tg) o6ecneuBaet npeBocxOHDle peueHnIa KaeeCTBeHHoro OTo6paXeHnI cHpPoBOrIO I3o6paXeHnI, yCTpaHra pa3MbITOCbI N3o6paXeHnI, BbI3BaHHyDmKHeHemObekTa.
ПРИМЕЧАНЕ
Haxmte n ydepknBnTe oBe KhoNkx n ha nynte dctaHIOHOY npabneHnI aOtbapkeHHyHKuM 100Tg BΦopMaTe DboHOrO kpaHa.
- 3TOT aΦΦeKt 6ydt 6oJee 3aMeTeH Ha 6bICTPO D8NkUxnxCn 3oBpaKeHHx.
-ФyHKUHg100FHe6bDetaBpaOtaBcneDyUOxcnnyaX;
1) Tn nonyaemoro CnHana oTHocntc K cnHany PIK.
2)OTo6paKaaeTcR OSD.
3) BkIIOUeH TeJIeTeKCT.
Ecnn306paekhenBaBrrnPaPamblbMm,ycTahOBHTeOnuK《PureCinema》BnonoKeHMeBbIKJI。
PureCinema
ABTomuueckn onpeJeIeT nCTOHHK, co3daHbHa oCHOBne IeHNK (06bUHO 3aKoDnpoBaH B opMATE 24 nn 25 KaPob B cekyHdy, B 3aBNCIMoCTn OT aCtToBb BEpTKaJIbHO CINHXPOH3aUN), aHaJIIN3pyET erO 3aTeM BOCO3Daet KaKdb HeNoDBNkHb KaDP nJeHKn DnI NOBIIeHnY qEtKoCTn N3o6paKeHn.
AKTINBHa KOHTpactHOCTb
ABOMATWECKN peryynpyET KOHTpactHcOtB N306paXeHMa B COOTBeTCTBm Co cueHOI.
3D-Y/C
06ecneuBaet BbICOKOE KaeeCTBO N3OpaKeHnM C MmHMMaJIbHbIM CMeueHEm ToeK INCKaKeHnEM LBeTob NpTeM ONpeDeJeHnN 3MeHeHnB N3OpaKeHnM.
Onzna
CtAnapt:ObuHnpeynpoBka.
YckopeHHoe: YcTaHabIMBaET ONITMAMNbHOe KaeeCTBO BcIrTO DnKyUxXcR 306paexEHm.
3aMeDneHHeo:YCTAHABINBAETOTTMAMNbHOEKAeCTBOMeDNEHNO DmKyHXCRH06paXeHn.
INHAMMHyBbI:ДЯ BBiBOa OTyETnIBo r3O6paJxHc NOBbIeHHo KHTpactHOCTbIO npn npocmOTpe CnpTnHBix nepeaay.
PIMMEYAHNE
Onuca co 3nakom * DocTyHa ToIbKO B Cnyaee Bb6opa onuIN «INPUT4》,《INPUT5》,《INPUT6》NIM《INPUT7》C NOMOuH KONKIN INPUT1-8 Ha Nylte Da nCTaHcUHO HOrO ynpabNeHn Nn KHONK HA TeneBn3ope.
Onuia co 3nakom ** doctynha ToIbko B cnyuae npneMa CnHana «x.v.Colour» Uepe3 rhe3do HDMl.
YCTaHOBKn 3ByKa
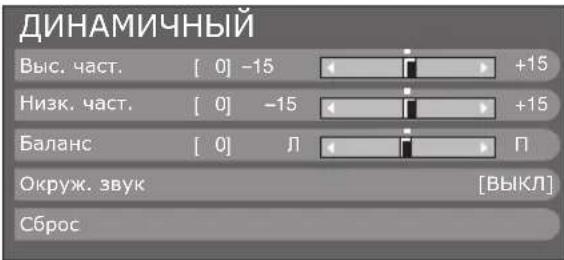

3ByK
Pereynipopka 3Byka
BbMOKETeOTpeRyJINPOBaTkaueCTBO3ByKaNo CBOemy npednoHTehIO c NOMOsbIO yKa3aHHbIX HIXe YcTaHOBOK.
EPG Iponyck: Haxmte XeIpyo KhoNky.
IporpamMb co 3hakom 6ydyT nponyckaTbC B 3neKtpoHHO nporpamme nepedaue (EPG).
CoptpoBka: HaxMnte CnHIO KhoNky.
Moxho coptnoBaTb nonoJHe ne OIuN nporpaMM.
① Bocnonb3yntecb KONkamn ↑/↓ДЯ Bby6opa nporpamMbI, noNOKeHne OIzIMKOTopoB BblXOTNE nepemecNTb, a 3aTeM HAXMnTE KONky ENTER.
DTV 994√SIT2
DTV 995 SIT1
② BocnoIb3yItecb KhoNkAMn ↑/↓ nIe ee nepeMeueHnB HyxHoe nIOJKeHne, a 3aTeM hXaMnte KhoNkY ENTER.
| DTV | 994 | SIT 1 | ✓ | ||
| DTV | 995 | SIT 2 | ✓ | ✓ |
③ Повторапунктbi 1и2do tex nop, noka BCE hyxhbie onци nporpaMM He 6ydyT coptnipoBaHbI.
YctaHOBKn aHaIorOBOrKaHaJa

YctaHOBka
YcTaHOBka nporpaMM
Yctah. aHaNoROBoro
Bb moKeTe aBTOMaTnueckn ININ BpyHyIO n3MeHAreTb KOHcIpyaunio yCTaHOBOK kaHaNoB aHaNoROBOrO TEneBuJeHra.
DobabTbNONCK
BocnoIb3yIteCb 3TMM MeHIO nIa ABToMaTuYeCKOro Do6abJIeHNr HOBix KaHaIOB NOCNe BbINOJIHeHNr ABToMaTuYeCKoINHCTaIIaIuN.
3anyck noncka KaHAnOB nocJe BbIbopa CnCTembl CBETHOTeJEuDHeHn N CnCTembl 3Byka.
Pунаянастpoиka
BocnoIb3yItec 3TMM MeHIO dIyCTaHOBKn BpyHyO aHaIorOBbIX TeNEBu3NHOHHbIX KAHaIob.
Iocne BbIbopa Ha 3Kpahe OUHIN «Ja» BOCNoJIb3yITecb KONkamn / / / nJRA BbIbOp KaHa, KoTOpBn Bbl XOTNe yCTaHOBNTb, a 3aTEM HAXMnTe KONKy ENTER.
ToHbI
Bb mokeTe OtpeynipoBaT HyxHoe 3haueHne yactoTbI.
ПРИМЕЧАНЕ
BbINOHTe HAcTpoKy,pyKOBoIDCTBycB DnI CnpaBKn POnOBbIM n3o6paKeHneM.
BMeTO HcNoIb3OBAHnK HONOK / DnIpeyIIMPOBKn qACToTb, BblMOKeTe yCTaHOBHTbe, BBeJ3HaueHHe qACToTb C NOMOJIbIO UΦpOBbIX KONOK 0-9.
PIMMEP
179,25 MHz: HαχMιTe KΗοΝΚι 1 → 7 → 9 → 2 → 5.
- 49,25 MHz: HabKMnTe KhoNkU 4 → 9 → 2 → 5 → ENTER.
UBeT.CnCTema
Bb6epnte onTmMaJIbHyO cnCTemy cIbETHO r3o6paKeHnA nI npHeMa CnHaHa («ABTO», «PAL», «SECAM»).
3Byk.cnt.(CnCTeMbI TpaHcJIaUN)
Bb6epnte onTmMaIbHyKcTeMcy 3Byka (CcTeMb1 TpaHcnaun) dny npnemacurhana ( B / G , D / K , |J , L / L^)
Metka
EcHnTeNeBn3NOHHbKaHAn TpaHCnIpye CBOE cTeBoe Ha3BaHne,《ABToHCTaJIaIaIg》O6hApyKNaBaET 3Ty HΦOpMaUIO Na3HaayaeT eMy Ha3BaHne. HecMOTpHa 3TO, Bb moKeTe n3MeHrTa bHa3BaHna KaHaNOB IO OTdJIbHOCTN.
1 BocnoIb3yITeCb KHOIIKaMn / / nIa BBIOpa KaJIOro CmBOJIa HOBOr Ha3BaHnKaHaJa, a 3aTEM HaxMIte KHOIIKy ENTER.
2 NOBTOPaIe DeIcTBnepNBedeHnOro BbIe NyHKTa 1 Do Tex nOp, nOKa Ha3BaHne He 6yDet NOHOCtBu YkA3aHO.
ПРИМЕЧАНЕ
Ha3BaHHe MoKet CoepKaTb PAnTb 3HaKOB NIM MeHee.
- Ecni Ha3BaHne KaHaJa cOePKeNT MeHee PAnT 3HaKOB, BbI6epnte onuio «3ABEPU.» nrycTaHOBKn Ha3BaHnKaHaJa.
Iponyck
KaHaIbI,ДЯ KOTopBIXФункIMY «Пponyck» yctaHOBJIeHa B nIoJKeHne «BKJI», 6dIy TnpOnyUeHbI BO BpeM nOb3OBAHnKhONkAMN P+/-,daXe B cIyuae Ix BBi6opa BO BpeM npocmOTpa TeNeBu3NoHHoro N3o6paJKeHn.
Dekodep
PnnoKIOHcHmK TeJIeBn3Opy DeKoIepa Bam noHaOboNTcBbIbpaTb THe3Do «INPUT1» nn «INPUT2».
ПРИМЕЧАNH
3aBODCKO cTaNdAPTHOY yCTAHOBKO JBnEeTcO onpIy《BbIKN》.
Бл_OKировka
Bb mokeTe 3a6nokpoBaT npocMoTp JIO6o KaHana.
ПРИМЕЧАНЕ
- CM. 《3anpeT DeTAM》ДЯ ПОЛучЕня Инфорmaци O6 yctahOBKe PIN-KoJa.
- Ecnnnapametp《BnokupoBa》nnaKakoro-n6oKaHana yctahOBnEn B3aueHne《BKN》,noaBntc nHdkaun(3anpet DeTAMAKTNBn3npoBaH.,a 306paXeHne N3Byk KaHaJa 6ydyT 3aJIOkpObaHbl.
B cnuyae haxatna KhoNk 一 BO Bpemr OTo6paKeHn HnDnkaunn «3anpet Detam AKTNBn3npoBaH.》,noBNTcR OKHO BBOda PIN-KoJa. BBoI npabInbHorO PIN-KoJa BpeMeHHo ChnMaet «3anpet Detam DO CneDyUoJero BBKIOUeHn IITaHn.
CopTnpoBka
BbMOKTe CBO6OdHO COPTnPoBaTb NIOJoxeHne KaHaNoB.
1 BocnoIb3yItec bKHOIIKaMn / IJIaBbIbopa oniN «Ja», a 3aTeM HauKMITE KHOINKY ENTER.
2 BocnoIb3yITeCb KHOJIkAMn / / IЯ BBI6opa KaHana, KOtOpBb Bby XOTNe NepemecTb, a 3aTeM HaxMITE KHOJky ENTER.
3 BocnoJIb3yITeCb KHOJIkAMn / / / IЯ erO npemeHnB HnyKHOe MeCTo, a 3aTeM HaKMITE KHOJky ENTER.
4 IobTopaTe DeIcTBnI NyHKTOB 2 n3 Do OKOHaTeJbHOI COPTINPOBKn BCEx HUKNbIX KaHaJIOB.
Udaanntb nporpamMy
KaHaJIb MoXHo ydaJIaTb IO OTeJIbHOCTN.
1 BocnoIb3yItecb KhoNkamn / 对BbIbopa onuN «Ja》,a 3aTeM HaxMnte KhoNky ENTER.
2 BocnoIb3yItecb KHOIIKAMU / / / IINBbIbopa KaHana, KOtOpBb Bbl XOTnTE ydaNITb, a 3aTeM HaxmITE KhoNkY ENTER.
- PONBUTCOKHO C COO6ueHHeM.
3 BocnoIb3yITeCb KhoNkAmn / Дя Вьбopa onuIN «Дa», a 3aTeM HaxMITE KhoNky ENTER dЯ удалену BvybpaHoro kaHaJa. BCE nocJeDyuOuNe HOMepa KaHaNoB nepemecTcR BBePx.
4 NOBTOPaTe DeIcTBnI NyHKTob 2 n 3 do IOnHO rJaJIeHnHyXhblx KaHaIOB.
YcTaHOBKn npoJr/poInteJIbckO6IoknpoBKn

YctaHOBka
3anpeT deTЯM
3TaФyHKUINo3BOJREBAMnCNoIb3OBAtPIN-KoIdI npedOTBpaueHnCnyaHOrIOmMeHHeHHeKToPbIX HAcTpoE.K
YctaHOBNTb napoIb
BBeDnTe YetbIpeX3HaHbI napOB IINr INcNoIb3OBAHnA FyHKUIM «3anpet DetAM
1 BBeDInTe B KaueCTBE PIN-KoJa YeTbIpex3HaUHoe YnCNo C NOMOuIu UINpOBbIX KHOJOK 0-9.
2 IIOIOTBEPKJDEHNA BBEINTE TO JXe YETbIPEx3NaHoe YNcNO, QTO N BYHKTe 1.
HaekpaenonBHTCoc6uHHeN《PoxaanyCTA,BBeJeTHeHObblnapoB.》
ПРИМЕЧАНЕ
ДпяnpocmToPa 3a6bOKpOBaHHOrO KaHAna Heo6xoIMMo BBeCTn PIN-KoD (Cm. ctp. 32 n 33 OTHOCInTeJIbHO 6bOKpOBKn KaHAnOB B peXmme DTV n ATV). IpnBbIope 3a6bOKpOBaHHOrO KaHAna IorBHTc 3anPoc Ha BBOd PIN-KoDa. HaxMITE KhoNkY 一 npAOTobpaKeHnO kHa hBaOda PIN-KoDa.
OTM PIN-ko
I03BOJnEepeyCTaHOBnTB PIN-KoI.
ПРИМЕЧАНЕ
B KaueCTBe MepbI npEOctOpOxHocTH 3aHHuTe BaW PIN-KoHa nocnEne ChpAHue DaHHo INHcTpyKunno 3Knpyataun, BbipexkBe ee HpaHHTe B HAdExHOM MeCTe, HeIOCTyINHom DnA DetEn.
OueHka podnteJe
DAnHHa yHKnIg No3BONJET ORpAHmHBaT bOCTyN K npOrpaMMam DTV. OHa npEoTbPaUaETnpOCMToP dEtMbIM CcEH HacnINr INI cKcyAIBHO xapakTepa, KOtOpbIe MOrY 6bITb BpeHbI dIHNX.
ПРИМЕЧАНЕ
KateropnB《Bceo6uyn npocmToP》N CpaepenHn poNTeH Ncnonb3yTOc TOnbKO BΦpaHUN.
- 06patntecb K ctp. 46 Ддя поуеня Инфорmaци O kateropnx.

Onzna
YCTaHOBka 3aROJIOBka
3TaФyHKUINNo3BONRt Bam 6nOKPBOATb KHOKNH aTeJIeBIOpe HINnyIbTe INCTAHMOHHORO ynpaBNEHIN dINr 3anPeTaN3MeHEHNeJdTeBMN KaHana NINr pROMKoCTN.
Onzna
BbIKL:CHrTB6NOKPOBKyKHONOK.
Блokровka ynpaBneHnAД:Блokровka BceX KhoNOK Ha nYbTe.ДиCTAHUHOHOrOуPapBneHnA.
BnOKpOBKa YnpabJeHn KHOKAM: BnOKpOBKa KHOKHaTeBEH3Ope 3a NCKIOUeHEm BbIKHOuTeJI NITAHN.
ПРИМЕЧАNH
BbI He MoXeTe OJHOBpeMeHHO yCTaHOBnTb oBe onUIM 《EKnPOBaKa ynpabHeHn IAII N EKnPOBaKa ynpabHeHn KhoKamn

OTmeHa 6JoknpoBkn
Haxmnte KhONky HOME MENU Ha TeBn3ope n yctahOBITE onnIO B noJOnKeHne «BbIKI» nIa OTMeHb fynKuIN «BloKnOpOBKa ynpabHeNIA I. Haxmnte KhONky
Ha npIbTe DnCTAHUHOHOrO ynpABNeHn I yCTAHOBnTE OOnIO B nONOxHeN E[BbIK]DnT OTMHeBfOyHKuIN 《6nOKpOBKa ynpABNeHn KOniKaMn
Дпя поуveньболеси порбнй Иформци no pa6oTeс менюобразнтecь Кст.29 пи поши Кноги NaHa TeNeBnOpe.
YcTaHOBKn Ja3bIka (Ja3bIK, cy6TNTpbl, MyJbTnIJIeKCHbI pEXIM 3ByKa)

YctaHOBKa
3blk
BbMOKeTe Bb6paTb 3bkHHO INHnKaUIN B MeHIO «YCTAHOBKA». Bb6epnte OmN n2 23 bkoB (YeWCKn, DaTCKn, rOJNAHDCKn, aHnckn, 3cTOHCKn, FnHCKn, ppaHcy3CKn, HemeKn, rpeecKn, BEHRpCKn, nTalbHCKn, NaTBnCKn, NITOBCKn, HOpBeXckn, nonbckn, nopTyraIbCKn, pyccKn, cNoBaCkn, cNoBeHCKn, Ucnahckn, WbeDckn, TpeCkn).

UΦpOBA yCTaHOBKa
Cy6TnTpbl
YCTAHOBKa OTO6paJHnI DO DByX N36paHHbIX RaBikOB cyBTnTPOB (BKJIQUaCyBTnTpbl IINIIOe C HApUWeHNrMn Cnyxa) B Cnyae,ecnn CyBTnTpbl DocTyNHbl.
BbIbpaemble onu
1-biY3bIK 2-0yra3bIK
Dnna noIb3.c HapyueneHMaM cnyxa
IpeeknoueHne 3bIKOB cy6TntpoB
PnKaJDOM HauKaTNI KHOKN Ha NylbTe DnCTAHUHNOHOrO ynpabHeHnCy6TITpbI 6yDy Tn3MeHrTaC.

UcTaHOBtB onuHIO «ДЯ noJb3.c HapyuHeHnMa CnyXa» B NOJoxeHne «Da»
Cy6TnTpbl dny 3pnteJe C HapyuHneHMy Cnyxu HmEOT npOpntet Haq kaoDoy n3 yctahOBok Ra3bIka Cy6TnTpob (Hanpimep: «1-bi Ja3bIK», «2-oi Ra3bIK» n.T.n.).
IIPIMEP

Ipeeknoyehne 3bIKOB MylbTtInNeKCHoro 3Byka
Bo BpemKaJdoRo Haxatn KaHONKII Ha NytBe DnCTaHcNOHHOr OynpaBHeHn, 3bIK 3ByKa 6yEd T3MeHrTaC.
BbI6op pa3Mepa n3o6paXeHnA
ABTomaTnueckn BbI6op pa3Mepa n3o6paXeHn WSS (aBtOMaTnueckoe nepeKJIoueHne Ha shnpOKoΦopMaTHbI pexm)

YctaHOBKa
WSS
Функця«WSS» no3BONЯТ TeJIeBn3Opy BbIOnHЯТь abTomatUcheckoe NepeKJIQUeHne Mekdya pa3HbIMn pa3MepaMn n3o6paKeHЯ.
IPIMEYAHNE
Ecnn noxodpa3mpn3o6paekhen He yctanabnaeTc, nonp0yTe Bb6paTb SCREEN SIZE (PA3MEP 3KPAHA).Ecnn TpaHcnpyembl CnHan He coepknt HOpmaun «WSS», 3ta fynKqna He 6ydt pa6otab daKe B cnyuae, ecnn OHa Bknnohe.
PyuHoi BbI6op pa3Mepa n3o6paXeHn WSS (aBTOMaTHueCKoe nepeKlIOUeHne Ha shIpOKoΦopMaTHbI peXm)

YctaHOBKa
PeknM 4:3
Bb moxete Bb6paTb fOpMaT n3o6paKeHn. Bb6op Doctynhix fOpMaTOB n3o6paKeHn 3aBNCIT OT Tnna npHnHaemoro cnHana.
Onu (nra CnHaJa SD [CTaHapThoYeTKocTn])
4:3:CoxpaHReT NcXoHbIΦopMaT N3O6paKeHnB B NOHOOKPAHHOM pEXIMe.
- HeKOTOpbIe OIuHn He OTO6paXaHO TcB 3aBNCMOCTn OT Tnna npHHMaEMOrO CnHaHa.
1 Haxmnte KhoNky SCREEN SIZE.
- ПоветсmaHIO SCREEN SIZE (PA3MEP 3KPAHA).
B 3OM MeHIO nepeuNCJIeHbI ONmN SCREEN SIZE (PA3MEP 3KPAHA), KOTOpBIE MOJHO BbIbpaTb DnA TeKyUeTo TINa PpHHMaEMO BOuDEOCnHaJa.
2 Haxmte KhoNky SCREEN SIZE nnn ↑/↓ BO Bpemr OTo6paXeHn Ha 3KpaHe MeHIO SCREEN SIZE PAQMEP 3KPAHA).
- Ppi nepekIIOUeHm ONI KAKJaA n3 HnX 6yJeT HeMeIeNHO OTo6paKaTbCra Ha 3KpaHe. Ppi 3OM HET Heo6xoDMOCTH NaKIMaTb KHONKY ENTER.
O6bIHO, ecnnapaMeTp «WSS» yctahOBnEH B noIOXeHne «BKI» B MeHIO «YCTAHOBka», ONTImaJIbHaY yCTAHOBKa napaMetpa SCREEN SIZE (PA3MEP 3KPAHA) BbIbnpaETcA bOTOMaTHeCKN dIy KaKdORo CnHaJa BeuHaHry BInDeomarHntofoHa nIIN DVD-nIeepa/ pekOpdepa.
IPIMMEYAHNE
JaKe ecnBbBb6peTe XeNaEmyO yCTaHOBY SCREEN SIZE (PA3MEP 3KPAHA) BpyHyO, TeneBn3Op MOxET ABToMaTHueckn nepeKnIOHTbcra Ha ONTmAmlbHyO yCTaHOBY SCREEN SIZE (PA3MEP 3KPAHA) B 3abNCIMoCTn OT pInHmAmero CnHa, KOrda onuRA «WSS» yCTaHOBHeA B NoOnKeHne «BKlI.


Bb6op BpyHyo pa3Mepa 3anncbIbAeMOro n3O6paXeHnra

UcHpOBAy yCTaHOBka Pa3Mep 3annc.n3o6paXeHnra
BbMOKTe BOCIOJIb3OBAbC8aTINMeHIOIJIyUCTAHOBKnpeed 3AnncbIO COOTBeTCTByIOUeIooΦopMaTa IIO6paKeHnI InpocMOTpa TeNEBUNHOHNOI pOrpAmMbIBΦopMaTe 16:9 Ha TeNEBnOpeΦopMaTa 4:3.
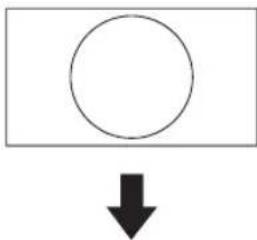

YcTaHOBKa onZnn «ΦOpMaT 4:3 TB»

YcTaHOBka OOnuNn «ΦopMaT 16:9 TB»
ПРИМЕЧАНЕ
3TaФyHKHJIOJIKNHb6bITbYcTaHOBHeHa nepeHauANOM 3aHNC.
ABTOMaTnueckn Bbl6op pa3Mepa n3o6paXeHnH HDMI

YctaHOBka
Abtonpocm. HDMI cnrgana
3TaФyHKUЯNo3BOJRAETABOTOMaTnueckN yCTaHaBnBaTb COOTBeTCTByIOUmФopMat N3O6paXeHn BO BpEmI IpOCMOTpa CnHanaHDMICnomoBkoRHe3D INPUT4,5n6.
BbMOKeTe BbIEcTn HOpMaquO KaHane, HkAB KOnKy 1+ Ha Nylte DnCTaHNoHHoro YnpabNeHn.
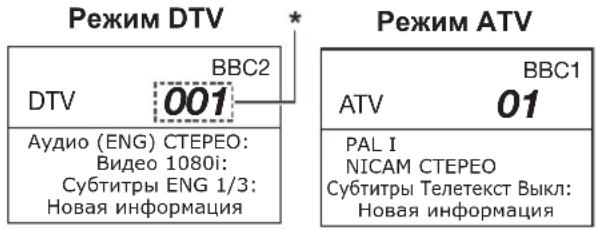
YeTbipex3HaHbIe YnCna (HaNPmEp, 0001) oTo6paKaHOtca nocne BbIbopa B yctaHOBKe CtpaHbI OdHoi I3 pTn CeBepHbIX cTpaH.
NnDnKaunBpeMeHn B nHΦopMaun O KaHaJe
Bb moxete OTo6paKaTb HOpmauH O BpeMeHN, BKIOueHHyO B TpaHcIaIIO DTV n TeIeTeKCTa.
ПРИМЕЧАНЕ
- PpOpyCTnTe nyHKT 1 B cIyuee npHema CnHAnOB DTV.
1 BbIbepnTe TeIeBn3IOHHbI KaHJI (INHΦopMaJrO BpeMeHN 6yJeT npINHaT aBTOMaTHueCKN).
2 HaxMnte KhoNky + .Ha 3KpaHe TeNeBn3opa NOBNTcH INDnKaun KaHana.
3 HaKmTe KONky eue pa3 B TeueHne HeckoIbKnx ceKyH,Ha npotJxKeHH KOtOpbIX Ha 3KpaHe OTo6paKaAeTcR HnDnkaCnKaHana. 3Ta HnOopMaCn IOnBnTCra Ha HECKoJIbKO cKyHn B HnKHeM PpABOM yrJy 3KpaHa.
4 Daxe B cnyueae nepeKIOUeyHnTe TEeBn3NOHOro KaHaNa BbI BCE paBHO CMOKeTe npocMaTpNBaTb INOpMaCNI O BpEmHN, BblONJIHra DeiCTBnryHKTOB 2 n 3, PpNBedeHHbx Bblwe.
ПРИМЕЧАНЕ
Bcnyae yceuHoro npema HOpmaqua O bpeMeH 6ydtnoBbTbcra B BepxHem npabOM yIpy 3kpaHa npn HaxaTN KHOKN
Hdkaun BpeMeHn 3arOJOBka

Onzna
Инданаця Врemeи
HdkaunBpeMeHH
3TaФункци NOZBOJЯET OTO6paKaTb Bpem YacOB B HIXKHeM npabom yIpy 3KpaHa.
Onzna
BKN: INHnkaun BpeMeHHaCOB.
BkI (KaKbIe noJyaca): INHdNkaun BpeMeHN yacOB c 30-TM MHyTHbIMN HHTepBaJAM.
BbIK: CkpbTne BpeMeHn yacOB.
ΦopMaT BpeMeHn
Bb mokeTe Bb6paTb foopMaT BpemeH (foopMaT «24U» nnn «AM/PM») dIa BpeMeH yacob.

Onzna
BpeMa BocnpOn3BeDeHnI rpgbl
3TaФункци NO3BOJЯET NOKa3bIbATb BpeMЯ, npoweDiuee C MOMeHTa YcTaHOBKN OIcN N AV SELECTION (BbIBOP AV) B noLoKeHne «ИГРА».
Onzna
BKN: B cnyyae noKJIIOUeHnK TeneBn3Opy IrpoBoN KOHcOIN npoWeJuee Bpem6 6ydt OTo6paKaTcB C HNXHEM JIeBOm Yrny EkpAHaYepe3 30-MnHyTHbIe INHTepBaIbI nocIe yCTaHOBKn ONuAV SELECTION (BbIBOP AV) B noIoKeHne «IΓPA».
BbIK: CkpbTHe BpeMeHn.

Onzna
Hdkaun Ha3BaHn nporpaMMbl
3TaФyHKUЯ NO3BONJET OTObpaKaTb INHΦopMaIIO O npOrpamMe, Takyu KaK 3aRojOBOK N aΦnHoe BpeM BO BpeM NaCTpoiKn KaHaHa.
ПРИМЕЧАНЕ
UcTaHOBKn CBeTOBOI CNCTeMbI

Onzna
LBeToBaCnCTema
BbMOKeTe N3MeHnTb CBeTOByo CnCTeMy Ha OOnHy N3 COBmecTmblx C N3O6paKeHHem Ha 3KpaHe.
ПРИМЕЧАNH
3aBoDcKoCTaHdapTHOyycTaHOBkoYbJIeTcOOnuA《ABTo》
- Ecnn Bb6paHO 3NaueHHe «ABTO», CBetOBa CnCTemaДЯ KAKDOrO KaHaHa HacTpaNBAeTcA BtOMaTHueckn. EcIn N3o6paKeHne He OTo6paXaEeTcdoJKNbIM o6pa3Om, Bb6epNTe dpyryU cBeTobYIO cnCTemy (HanpImep, «PAL», «SECAM»).
DonoHnTeIbHbIe yHKcnn

YctaHOBka
Pexim OxindaHna
Bb mokeTe cokpaTb Bpem3aIycka nocne BkIOueHn IITAHN pni NOMOUI NyIbTa DnCTaHcNOHHOro ynpabHeHn.
Onzna
Pexm1:TeIeBn3Op 6bIcTpo 3aIyCKaETcN 3peXMa OxuaH.N.B peXmE OxuaH.NOTpe6nMa MOnHOCTb coCTaJIReT 30BTnn6OJe.
PexnM 2:BpeKIme oxuHaHn noTpe6neHn eHeprnn 6yndet H3KM.
IopdkloueHne PK
PoiKJIoueHneHDMI
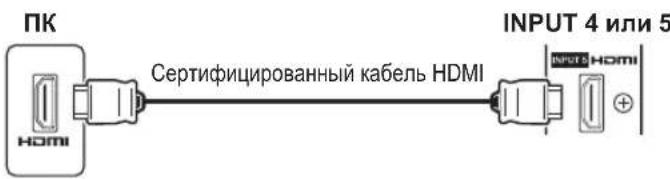
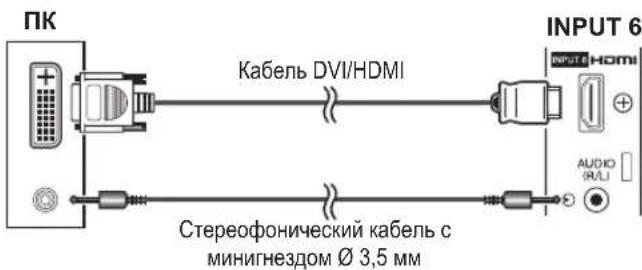
AHaIorOBoe nOdknIouHeHne
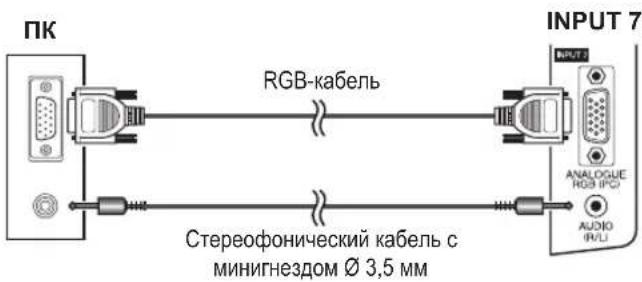
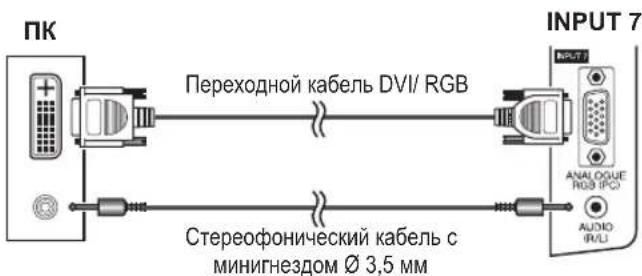
ПРИМЕЧАNH
BxOaHbIe pa3beMbI PIK ABnHOcTc DDC1/2B-COBMeCTnMbIMN.
-ДяпolyeHЯ cHncka CnHAnOB PIK, COBmecTmblx C TeJIeBn3OpOM, CM. cTp. 42.
-ПиИСЮЛБЗОВАнHHEKOTOPBIX KOMNBJTOPEOB Macintosh moKet noHaO6bTbCа aanTeP nA Macintosh.
- Pn noKIOHcHm K TIN BXoHO rHana onpeJeTcra bTOMaTtueckn, 3a NCKIOHcHem CnHaNoB 1024 X 768 n 1 360 X 768. OpaTeCb K pa3dEny BbI6Op pa3peHHe HxOHO rHana Ha cTp. 40.
OTo6paXeHne Ha ekpaHe n3o6paXeHn c PK
Bb6opΦopMaTa n3o6paXeHn
Bb mokeTe BbipTaB cOpMaT n3o6paKeHnA.
1 Haxmte KhONky SCREEN SIZE.
- ПОВИТСЕМENJO SCREEN SIZE (PA3MEP 3KPAHA).
2 BocnoIb3yTeCb KHOHkAMn SCREEN SIZE nnn +/DnBaBb6opa HxKHOI ONmM MeHIO.
ПРИМЕЧАNH
- Pooklouyte PIK nepei BbInonHeHnem perynipoBok.
IOCTYINHbIeOOPMaTbI 306paKeHnMOry MOrTy N3MeHrTaBcB 3aBNCIMOCHTOn OT TnA BXoHOro CnHaJa.
ПРМЕР
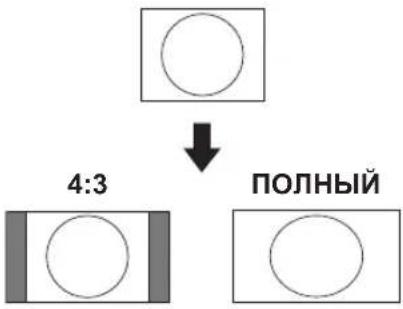
Onu
NOLHbI: IV3o6paKHe 3aONHReT BeCb 3kpan.
KINHO3KPAH:Igna 3o6paXeHn fopMaTa letterbox 14:9.B HEKOToPbIX npOrpAmMax B BepxHne HnKHeuactrx EkpHa MORYT NOBHTBCaNOLOcbI.
4:3:CoxpaHReT NcXoDhBn fOpMaT N3O6paKeHnB B NOHO3KpAHHom peKIMe.
IToOueHNo: OTo6paKaTe Ha 3KpaHe N3o6paKeHne C TeM Xe KOJIuYeCTBOM NIKCeIeN.
ПРИМЕЧАNH
- 06paTncbKcTp.35ДЯ NOIpyeHnIHΦoPmauNo AV-crHaJaM (480i/480p/576i/576p/720p/1080i/1080p).ΓHe3do ANALOGUE RGB (PC) (INPUT7) HecOBMeCTmO C CRHaJaMn 480i/576i/1080p.
AByOMaTnuecka peRyInpOBKa n3o6paXeHn c Pk
3TaФyHKnIgNo3BONJrEaTOMaTHUeCKNycTahOBNTb HauNyUHne BO3MOXHbIe npaMeTpbl 3KpaHa B cnyuae coeDInHeHHaAnlOrOBbIX THe3d TeNeBn3Opa nIK npn NmOuI npoDaBaemoro OTeNbHO nepexoHoro Ka6eJIa DV/RGB, n.T.I.

YCTaHOBKa
ABTo Sync

IPIMEYAHNE
- Pn ydaHOM 3aBepseHm FyHKUrae ABO Sync) NOBNTc coo6uHHe ABO Sync ycneuHo 3aBepSeHa).Ecn OHO He NOBtC, 3TO 03HauaET, 4TO FyHKUrae ABO Sync) HE BbINOJIHeHa.
-ФунцИЯ «АВTO Sync» можетьг He Bыногнehа дaze B cnya e OTobpaхеня cooбшени «АВTO Sync ycneшно 3abepseha.
ФункцИA《ABTo Sync》MOKET6bITbHe3aBepueHa,ecnI 3o6paXeHne PI NmEeT H3Koe pa3peuHne,Henpo3paHbIe (YepHbIe) KpA,NINb6bINO nepemEueHO BO BpEMBaINOnHeHnФyHKUIM«ABTO Sync»
He 3a6ydbTe NOKINIOHTb KOMBIOTep K TeJIeBn3Opy N BKNIOHTb ERO nepeH hauanom BblnoHHeHH yHKUHN ABO Sync
-ФункURA《АТСync》MOKET6bITbBINONHeHaTOLbKOBCnUyae npHema ananorOBbIX CnHAnOBuepe3rHe3o INPUT7.
PerynpoBka n3o6paXeHnI K BpyHyU
Kak npabnO, Bbl moxete JERKO OTERpynilpoBaT N3o6paXeHne HyxhbIM o6pa3OM dIy I3MeHEnr NIOXeHn N3o6paXeHn Pn NiMoOni FyHKUIN «ABTo Sync». Ondako, B HeKOTopbIX CnyaJx dIy NOnyuHn HAnNyUWeRo N3o6paXeHn Heo6xoDima pyHna HaCTpOJa.

YctaHOBKa
Touhaj Sync
1 BocnoJIb3yIteScb KHOJKaMn / IINBbIbopa HuyKHOI onu nperynpoBkn.
2 BocnoIb3yItec bKHOJkAMn / IpynpOBKn OIuB H HyxHoe NOIOXKeHne.
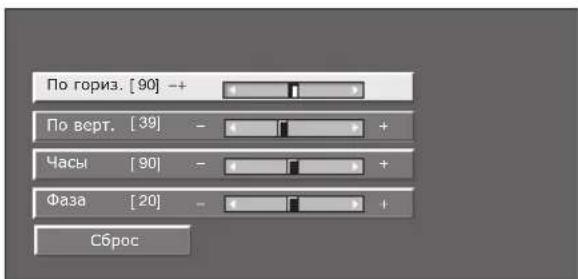
Onzna
No ropn3.: LcHTpuyET n3o6paKeHne, nepemuea erO BnEBO
No Bepr.: LcHTpnpyET n3o6paXeHne, nepeMeaJra erO BBepx nnBHN3.
Yacb: PerynpyET MepuaOoee H3o6paXeHne C BepTKaJIbHbIMN NOOCAMN.
Φa3a: Perynpyet n3o6paKeHne, ecn cIMBOI bI MMeET H3Kyo KOHTpactHOCTb INN ecn n3o6paKeHne MePuaET.
PIMMEUHNE
-ДяпесутоановкВСЕОПЧЕРУПОВКИ N ПЕДУСТАНБЛЕHHБIM 3aBODcKIM 3нayehnЯM BOCOЛьзYITecb KHONKaMn ↑/↓ДЯ BBbOpa onцIN «C6poc》,a 3aTeM HAXMITE KHONky ENTER.
Onu(Hacb)I(Φa3a)BMeHO《ToHAR Sync.》MOYt 6blTb OTpeynpoBaHb ToIbKO B CnUyae npneMa aHaIorOBbx CnHAnOB Hepe3rHe3do INPUT7.
BbI6op pa3peeHnBxOdHorocnHaHa
-Длгправиьного OTOбраженЯ HeKOTObxTNOB BXODHORO CnHaJMoKetNotpe6oBaTcRpyHra perntpaunr.
- IapbI BXOdHbIX CNrHaONOB (pa3peuHn) B npBBeEHOM Hxke cnNcKe Hepa3nUHMbl npn npneMe. B taKHX cnYaX npaBnHbIM CNrHaJI Heo6xoDmO yCTaHABnBaTb BpyHyIO. Iocne yCTaHOBKn Odn pa3 OH byet OTobpaxTaC B cnUyae NOBTOPHOro nOnyuHn TaKOrO Xe CNrHaJa (pa3peuHn).

YCTaHOBKa
Bxod. cnrgnaI

(Приимер)
PIMMEYAHNE
BbCMOXETe Bb6paTb ToJIbKO ONUHIO BxOJ. CnHaJI B MeHO 《YcTaHOBA》B Cnyae npIeMa OndHO rDByx BXoDHbIX CNHaIOB, nepeuNCNEHHbIX Bblie.
TexHnueckne XapaKTepeNCTnKN npota RS-232C
UnpaBHeHne TeJeBn3Opom npn nOmoN PK
Nocne yctahOBKn nporpammbI TeBn3Opom MOxHO ynpabnTb C PIK uepe3 rHe3do RS-232C. MoxHO Bbl6paTb BXoHoi cnHAn (PK/ BNdeO), perynipobatb rpOMKoCTb N BblONJIHTb pa3NIHhIE dpYrne peylnpOBKn u YcTaHOBKn, YTO DeJaet BO3MOXHbIM ABOTMATHECKoe 3anporpammpoBaHHoe BOCpnoun3BeDeHne.
- IcnoIb3yIte nocneIobateIbIbIy npaBnIoumKabEn RS-232C nepekpcTHOrO Tnna (npdaetcOTdIbHo) dnn 3TNX NOKnIOueHm.
PIMMEYAHNE
3Ta npOeDpyoDnKHa BbINONHrTbCry YeIOBekOM,IMMeIOUM HABBIKINcONb3OBAHNAIK.
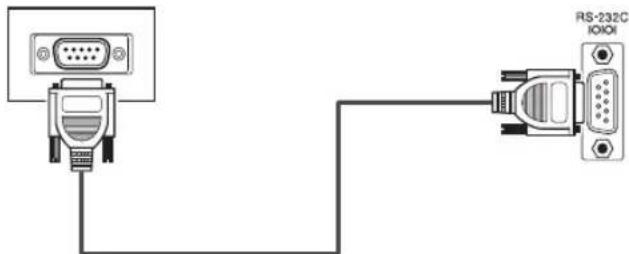
PocneoBatehny npabJIOU KabeIb
RS-232C (nepeKpeCTHoro Tuna)
YcnoBna nepeaun daHHbIX
YcTaHOBnTe npaMeTpbl nepeDaun DaHHbIX uepe3 rHe3do RS-232C Ha NK B COOTBeTCTBUN C yCNoBnMn nepeDaun DaHHbIX TeNeBn3Opa. TeNeBn3Op mMeet cIeDyUoune npaMeTpbl nepeDaun DaHHbIX:
VGA, SVGA, XGA, WXGA, SXGA u SXGA+ yBnIyTc8 3apeHCTpnpOBaHHbIMu TropOBbIMu MapkAm International Business Machines Corporation.
ПРИМЕЧАНЕ
-Дань TeIeBnOp ImMeT OrpaHnueHny COBMecTmOcTb C PIK, NO3ToMу HaJIeXaJaa pa60Ta MoKeT rapaHTnpoBaTc TOnbKO npu YcIOBm, ecN BInDeOeKApTa B ToUHOCTcoOTBeTcTByET cTaNdapTy VESA 60 T. JIo6bIe OTINHnO rTOrO CTaNdApTa pNbEyt K NckaxHeHm N3OpaxHeHn.
Cnncok komaHd RS-232C
| ОЛЦМЕТУЛМЮВКИ KM | OMAHДA ПAPAMET | COДЕРЖАМЕ | REТУЛМЮВКИ |
| YSTAHOBKA ПINTAHIMяР | OWR0_ПNTAHIMBEВКЛ | ||
| БыБОР BвODA A IT G D | ПЕРКЛСHEHINBXOДHOTC | СИГHAЛ(A TEPEKJIQUHENHE) | |
| ITVD_ТВ(KAHALФИССРОВАН) | |||
| IDTV_DTV(KAHALФИССРОВАН) | |||
| IAVD_INPUT1-8(1-8) | |||
| ΚΑΗΑΙΝΟΤΟ H**_ПΥΡΑ | ΟΥΚΑΗΤΑΤ(B(1-99) | ||
| СЧИР_УВЕЛМЕHOMΕPAΚΑΗΑΙA | |||
| СЧИD_W_УМЕнБ楚EHINEHOMΕPAΚΑΗΑΙA | |||
| DТВ_П*_ | ПΥΡΑΜΟΥΚΑΗΙΤВ(1-999) | ||
| DТU_YP_ | YEBELMCHEIMEHOMΕPAΚΑΗΑΙA | НМЕРΑΚΑΗΑΙA | |
| DТD_WM_UMEH楚HINEHOMΕPAΚΑΗΑΙA | DTV | ||
| БыБОР BвODA B IN P 10 | INPUT1(Y/C) | ||
| INP11_INPT1(CVBSS) | |||
| INP12_INPT1(RGB) | |||
| INP20_INPT2(Y/C) | |||
| INP21_INPT2(CVBSS) | |||
| INP22_INPT2(RGB) | |||
| INP30_INPT3 | |||
| INP31_INPT3(S-VDEO) | |||
| INP32_INPT3(VIDEO) | |||
| БыБОР AV AVM D 0_ПЕР | КПОЕHIME | ||
| AVMD1_CTAHДAPT | |||
| AVMD2_КИНОФИБМ | |||
| AVMD3_ИТРА | |||
| AVMD4_ПОЛБВОВATEПь | |||
| AVMD5_ДИНAMMHbIM(ФИСИРован.) | |||
| AVMD6_ДИНAMMHbIM | |||
| AVMD7_ПК | |||
| AVMD8_х.Y.CoUr | |||
| AVMD...?...?...1-8 | |||
| ΓΡΟΚΟΥΤΒ V O L M**_ | ΓΡΟΚΟΥΤΒ (0-60) | ||
| ОЛЦИЙ PEGУЛМЮВКИ KO | MAHДA ПAPAMETР | СОДЕРЖАМЕ | PEGУЛМЮВКИ |
| ПОЛIOЖЕНIE | H P O S ** | _ _ _ _ _ _ _ _ _ _ _ _ _ _ _ _ _ _ _ _ _ _ _ _ _ _ _ _ _ _ _ _ _ _ _ _ _ _ _ _ _ _ _ _ _ _ _ _ _ _ _ _ _ _ _ _ _ _ _ _ _ _ _ _ _ _ _ _ _ _ _ _ _ _ _ _ _ _ _ _ _ _ _ _ _ _ _ _ _ _ _ _ _ _ _ _ _ _ _ _ _ | |
| V P O S ** | _ _ _ _ _ _ _ _ _ _ _ _ _ _ _ _ _ _ _ _ _ _ _ _ _ _ _ _ _ _ _ _ _ _ _ _ _ _ _ _ _ _ _ _ _ _ _ _ _ _ _ _ _ _ _ _ _ _ _ _ _ _ _ _ _ _ _ _ _ _ _ _ _ _ _ _ _ _ _ _ _ _ _ _ _ _ _ _ _ _ _ _ _ _ | ||
| C L C K *** | _ _ _ _ _ _ _ _ _ _ _ _ _ _ _ _ _ _ _ _ _ _ _ _ (0-180) | ||
| P H S E ** | _ _ _ _ _ _ _ _ _ _ _ _ _ _ _ _ _ _ _ _ (0-40) | ||
| РАЗМЕ ЗКРАHA W I D EФ | _ _ _ _ _ _ _ _ _ _ _ _ _ _ _ _ _ _ _ _ _ _ _ _ _ _ _ _ _ _ _ _ _ _ _ _ _ _ _ _ _ _ _ _ _ _ _ _ _ _ _ _ _ _ _ _ _ _ _ _ _ _ _ _ _ _ _ _ _ _ _ _ _ _ _ _ _ _ _ _ _ _ _ _ _ _ _ _ _ _ _ _ _ _ _ _ _ _ | ||
| W D E1_4:3(AV) | |||
| W D E2_ KMIOHSKPAH 149(AV) | |||
| W D E3_ KMIOOKIM(AV) | |||
| W D E4_ NOINHIM(AV) | |||
| W D E5_ MACIITABIMPOBAHME(AV) | |||
| W D E6_ KMIOHSKPAH(AV) | |||
| W D E7_4:3(PK) | |||
| W D E8_ KMIOHSKPAH(PK) | |||
| W D E9_ NOINHIM(PK) | |||
| W D E10_ NOOTUCHNO(AV/PK) | |||
| W D E11_ YMENBUSHENIE | PACTPA(AV) | ||
| ПРИПЛУSHENIE 3BYUKA | M U T E0_ _ _ _ _ _ _ _ _ _ _ _ _ _ _ _ _ _ _ _ _ _ _ _ _ _ _ _ _ _ _ _ _ _ _ _ _ _ _ _ _ _ _ _ | ||
| M U T E1_ _ _ _ _ _ _ _ _ _ _ _ _ _ _ _ _ _ _ _ _ _ _ _ _ _ BKV | 3BYKA BKV | ||
| M U T E2_ _ _ _ _ _ _ _ _ _ _ _ _ _ _ _ _ _ _ _ _ _ _ _ _ 3BYKA BKV | |||
| OKРУЖАЮШМ 3BYUK | A CS U 0_ OKРУЖАЮШМ 3BYK(PEKREЛQUОHEHIME) | ||
| A CS U 1_ OKРУЖАЮШМ 3BYK BKV | |||
| A CS U 2_ OKРУЖАЮШМ 3BYK BKV | |||
| ИЗМЕНЕМ 3BYUKA | A CH A_ _ _ _ _ _ _ _ _ _ _ _ _ _ _ _ _ _ _ _ _ _ _ _ _ _ _ _ | ||
| ТАМЕР OTKЛЮ楚EHIMЯ G | F T M 0_ _ _ _ _ _ _ _ _ _ _ _ _ _ _ _ _ _ _ _ _ | 3BYKJIQUOHEH | |
| O F T M 1_ _ _ _ _ _ _ _ _ _ _ _ _ _ _ _ _ _ _ _ _ _ _ _ 3MYHIM | |||
| O F T M 2_ _ _ _ _ _ _ _ _ _ _ _ _ _ _ _ _ _ _ _ _ _ _ 3YACH | |||
| O F T M 3_ _ _ _ _ _ _ _ _ _ _ _ _ _ _ _ _ _ _ _ _ _ 3YACH | |||
| O F T M 4_ _ _ _ _ _ _ _ _ _ _ _ _ _ _ _ _ _ _ _ 3YACH | |||
| O F T M 5_ _ _ _ _ _ _ _ _ _ _ _ _ _ _ _ _ _ _ 3YACH | |||
| TEKCT | T E X T 0_ _ _ _ _ _ _ _ _ _ _ _ _ _ _ _ _ _ _ | 3BYKJ | |
| T E X T 1_ _ _ _ _ _ _ _ _ _ _ _ _ _ _ _ _ _ _ _ 3BYKJ | (ПЕKПOLUEHIME) | ||
| D C P G *** | _ _ _ _ _ _ _ _ _ _ _ _ _ _ _ _ _ _ _ _ 3BYK | PEKDDK CTPAHMLCE(100-899) |
Discover the benefits of registering your product online at http://www.pioneer.co.uk (or http://www.pioneer.eu).
PIONEER ELECTRONICS (USA) INC.
P.O. BOX 1540, Long Beach, California 90801-1540, U.S.A. TEL: (800) 421-1404
PIONEER ELECTRONICS OF CANADA, INC.
300 Allstate Parkway, Markham, Ontario L3R 0P2, Canada TEL: 1-877-283-5901, 905-479-4411
PIONEER EUROPE NV
Haven 1087, Keetberglaan 1, B-9120 Melsele, Belgium TEL: 03/570.05.11
PIONEER ELECTRONICS ASIACENTRE PTE. LTD.
253 Alexandra Road, #04-01, Singapore 159936 TEL: 65-6472-7555
PIONEER ELECTRONICS AUSTRALIA PTY. LTD.
178-184 Boundary Road, Braeside, Victoria 3195, Australia, TEL: (03) 9586-6300
PIONEER ELECTRONICS DE MEXICO S.A. DE C.V.
Blvd. Manuel Avila Camacho 138 10 piso Col.Lomas de Chapultepec, Mexico, D.F. 11000 TEL: 55-9178-4270 K002 Ru
Published by Pioneer Corporation.
Copyright © 2008 Pioneer Corporation.
All rights reserved.
Publication de Pioneer Corporation.
© 2008 Pioneer Corporation.

- IMPORTANT: THE MOULDED PLUG
- OPERATION MANUAL
- Contents
- Contents 1
- Introduction 2
- Preparation 10
- Quick guide 13
- Watching TV 16
- Connecting external devices 21
- HDMI CONTROL 26
- Menu operation. 29
- Basic adjustment 30
- Useful Viewing functions 35
- Other picture and audio settings 36
- Display Settings 37
- Other useful features 38
- Connecting a PC 39
- Selecting input resolution 40
- Appendix 43
- Dear Pioneer customer
- Important Safety Precautions
- Precautions when transporting the TV
- IMPORTANT
- CAUTION
- RISK OF ELECTRIC SHOCK DO NOT OPEN
- CAUTION:
- WARNING
- WARNING:
- Remote control unit
- NOTE
- Controlling other equipment using the supplied remote control unit
- Presetting manufacture codes
- Manufacture codes
- Using with other equipment (STB)
- Using with other equipment (VCR)
- STB (set-top box) control buttons
- VCR control buttons
- Using with other equipment (DVD/DVR)
- DVD/DVR control buttons
- Supplied accessories
- Attaching the stand unit
- Inserting the batteries
- Using the remote control unit
- Cautions regarding the remote control unit
- Installation precautions
- When using other stands, brackets or equivalent items
- Initial installation overview
- Connect external devices
- * Ferrite Core
- Bundling the cables
- Initial auto installation
- Confirm the following before turning on the power
- EXAMPLE
- Checking signal strength and channel strength
- Daily operation
- Switching on/off
- Turning on/off the power
- Standby mode
- To standby mode
- Switching on from standby
- Switching between analogue and digital broadcasts
- Changing channels
- Selecting an external video source
- Selecting a sound mode
- DTV mode:
- ATV mode:
- EPG (Electronic Programme Guide)
- EPG Overview
- Basic functions
- Useful functions
- Useful settings for using EPG
- Common Operation
- EPG display settings
- - EPG Setup (setting for receiving EPG data)
- Display Range Setup
- Item
- Genre Icon Setup
- Genre Icon List
- Selecting a programme using EPG
- Basic Operation
- Display/Close the EPG screen
- Select a programme
- ① Select the time span
- ② Select the desired programme
- Selecting a programme
- ③ Check programme information
- ④ Search a programme in a category
- Search for a programme by date/time
- Timer recording using EPG
- - Watching a programme at a set time
- Recording a programme at a set time
- Cancelling the timer recording
- Cancelling using the Blue button on the remote control unit
- Teletext
- What is Teletext?
- Turning Teletext on/off
- Using the MHEG-5 application (UK only)
- Before connecting ...
- Introduction to connections
- HDMI connection
- Example of connectable devices
- DVI/HDMI conversion
- After connecting
- HDMI Audio Select
- Supported video signal:
- Component connection
- S-VIDEO/VIDEO connection
- SCART connection
- When using the INPUT2 (SCART) terminal
- Controlling devices with SCART using i/o link.A
- One Touch Play
- TV Standby
- WYSIWYR (What You See Is What You Record)
- Preset Download
- Speaker/amplifier connection
- Digital audio output setting
- Inserting a smart card
- Inserting the smart card into the CA Module
- Inserting the CA Module in the Common Interface slot
- Checking CA Module information
- Module
- Menu
- Enquiry
- Removing the CA Module
- Controlling HDMI devices using HDMI CONTROL
- What is HDMI CONTROL?
- What you can do with HDMI CONTROL
- √ One Touch Recording
- Single remote control operation
- Operating Title list of external devices
- Multiple control of HDMI devices
- HDMI CONTROL connection
- HDMI CONTROL Setup
- HDMI CONTROL
- Auto Power On
- Selecting recorder
- Operating an HDMI CONTROL device
- Recording via the Pioneer Recorder EPG (only for recorders)
- Playback of titles using HDMI CONTROL
- Selecting media type for CEC-compatible recorder
- Listening with the Pioneer AV Sound system
- Listening with the TV Sound system
- Manually changing the Pioneer AV Sound system's sound mode
- Calling up the menu of an external device connected with the TV via HDMI
- HDMI device selection
- What is the HOME MENU?
- Common operations
- Operation without a remote control unit
- About the Guide Display
- Picture Settings
- Picture
- RLS
- Picture adjustments
- Pro Adjust
- Colour Temp.
- 100Hz
- PureCinema
- Active Contrast
- 3D-Y/C
- Monochrome
- Range of RLS
- AV SELECTION
- Press AV SELECTION.
- Sound Settings
- Sound
- Sound adjustment
- Surround
- Power Save Settings
- Power Control
- No Signal Off
- No Operation Off
- Ecology
- Sleep Timer
- Channel Settings
- Auto Installation
- Setup
- Digital channel settings
- Programme Setup
- Digital Setting
- Additional Search
- Manual Search
- Manual Adjust
- Buttons for Manual Adjust operation
- Lock: Press Red button.
- CH Skip: Press Green button.
- EPG Skip: Press Yellow button.
- Sort: Press Blue button.
- Analogue channel settings
- Analogue Setting
- Fine
- Colour sys.
- Sound sys. (Broadcasting systems)
- Label
- Skip
- Decoder
- Lock
- Sort
- Erase Programme
- Password/Parental lock settings
- Child Lock
- Change PIN
- Cancel PIN
- Parental rating
- Option
- Key Lock
- Cancelling the lock
- Language Settings (language, subtitle, multi audio)
- Language
- Digital Setup
- Subtitle
- Selectable items
- Switching subtitle languages
- Set "For hearing impaired" to "Yes"
- Digital Audio Language
- Switching the multi audio languages
- Selecting the picture size
- Selecting the WSS (Wide Screen Signalling) picture size automatically
- WSS
- Selecting the WSS (Wide Screen Signalling) picture size manually
- 4:3 Mode
- WSS signal 4:3 screen
- Selecting the picture size manually
- Item (for SD [Standard-Definition] signals)
- Item (for HD [High-Definition] signals)
- Press SCREEN SIZE.
- 4:3 mode "WIDE"4:3 mode
- Selecting the recording picture size manually
- Digital Setup REC Picture Size
- Selecting the HDMI picture size automatically
- Setup HDMI Auto View
- Other picture and audio settings
- Adjusting image position
- Setup Position
- Reducing noise on the screen
- Option DNR
- Automatic volume adjustment
- Option Auto Volume
- Emphasising dialogue
- Option Clear Voice
- Outputting audio only
- Option Audio Only
- - Item
- Display Settings
- Channel display
- Time display in channel information
- Time and Title display
- Time Display
- Time Format
- Setting when using external devices
- Input source settings
- Input Select
- Input Label
- Skipping specified inputs
- Input Skip
- Colour system settings
- Colour System
- Additional features
- Connecting a PC
- Displaying a PC image on the screen
- Adjusting the PC image automatically
- Auto Sync.
- Adjusting the PC image manually
- Fine Sync.
- Selecting input resolution
- Input Signal
- RS-232C port specifications
- PC Control of the TV
- Communication conditions
- Communication procedure
- Command format
- Parameter
- Response code format
- Cautions regarding use in high and low temperature environments
- Information on the software license for this product
- Software composition
- Software developed by Pioneer and open source software
- Obtaining source code
- Acknowledgements
- Updating your TV via DVB-T
- Download Setup
- Searching for updates*
- Downloading the software
- Information
- Message List
- Receiver Report
- Reset
- Identification
- CLEARING THE PIN
- End of life disposal
- Information for users on collection and disposal of old equipment and used batteries
- Installation programme
- Réglage numérique
- Réglage analogue
- Conditions de communication
- ZUR.BEACHTUNG
- ZUR BEAuchtUNG
- OPMERKING
- Slot
- Ioprotobka. 10 PpnilaraembIe npHnadnHexhocTn 10
- PykoBoCTBO no 6bICTpoH hAcTpoKe 13
- PpocmoTpeBn3opa 16
- PoiKnIoueHne BHeuHnx yctpoiCTB 21
- Onepaun MeHIO 29
- OchOBnA perynipOBKa 30
- Pone3hie yHKmnpocMToPa 35
- Ipyrme yctaHOBKn n3OpaXeHnN 3ByKa 36
- UcTaHOBKn HndnKaun 37
- Dpyrne none3HbIe cyHKcnn 38
- Iopknioyene PIK 39
- PpunnoKeHne 43
- YBaJxAeMbI nokyntb npOdyKznn Pioneer
- BaxhIe MepbI npedocTopoxHocTn no 6e3onacHOCTN
- MepbI npedoctoPOXHOCTn pni TpaHcnpTnpoBKe TeJeBn3opa
- BAxHO
- BHIMAHNE:
- PPEyPPEKDEHNE
- PNEyPEXDEHNE:
- KhoNkI dIa peYInpOBKn 3o6paKeHnA SCREEN SIZE
- SELECT
- I-Ⅱ (Pexm 3Byka)
- PIMMEUHNE
- YnpaBHeHne Dpyrnnu yCTpOiCTBaMn C NOMoUbIO PpIlaRaEMoro NylbTa DnCTaHcNoHHOrO ynpaBHeHna
- ПРИМЕЧАНЕ
- PpeBapnteIbHa yTaHOBka TexHONOrnueckx KoIOB
- TexHONOrnueckne KoDbI
- DVR
- BD
- BudoeMaHHToDoh
- Iodaua nItaHnKaHTeHHe
- *ΦeppnTOBbl cTepxeHb
- IepBoHaayalbHa aBTOMaTnuecka HnHCTaJIpyu
- Ipeed BkIIOueHnem nHTaHn npOBepbTe cJeDuOuee
- IIPUMEP
- Peped nodkJIOUeHHem ...
- BBeDeHne nepeD BbINOJIHeHHeM NOdKJIIOUeHn
- ПРИМЕЧАNH
- PoiKJIIOUeHneHDMI
- PpIMepbI NOIDcoeINHReMbIX yCTPOINCTB
- Ppeo6pa3oBaHne DVI/HDMI
- Pocne nocknoyenr
- Bb6op aydnocnHana HDMI
- YcTaHOBKa CnΦpOBOrO 3ByKOBOrO BbIXoJa
- YctaHOBkaMoDyNA CABcnot Common Interface
- PpOBepKa HhOpMaun MoyJyCA
- IPIMEYAHNE
- Moody
- MeHIO
- ykaataeIb
- H3BneueHnmeModynaCA
- YnpaBHeHne yctpoiCtBamn HDMI npn nomoOnn HDMI CONTROL
- YTo TaKoe HDMI CONTROL?
- BbI3OB MeHIO BHeuHero yCTpoiCtBa, NOdcoeINHeHHoro K TeJeBuN3Opy C NOMOuHo HDMI
- ПОНМЕЧАНЕ
- BbI6Op yCTpoiCTBaHDMI
- TO TAKoe HOME MENU?
- OchOBhIe onepaun
- ПОНМЕЧАНО
- Pa6ota 6e3 nylbTa dncTaHcnoHHoro ynpaBneHn
- yka3aTeIbHoi mHdNkaCm
- Hactpoynn306paXeHna
- KaptnHka
- Onzna
- PerynpoBkn n3o6paXeHna
- 100
- AKTINBHa KOHTpactHOCTb
- PIMMEYAHNE
- YCTaHOBKn 3ByKa
- 3ByK
- Pereynipopka 3Byka
- YctaHOBKn aHaIorOBOrKaHaJa
- YctaHOBka
- YcTaHOBka nporpaMM
- Yctah. aHaNoROBoro
- DobabTbNONCK
- Pунаянастpoиka
- ToHbI
- PIMMEP
- UBeT.CnCTema
- 3Byk.cnt.(CnCTeMbI TpaHcJIaUN)
- Metka
- Iponyck
- Dekodep
- Бл_OKировka
- CopTnpoBka
- Udaanntb nporpamMy
- YcTaHOBKn npoJr/poInteJIbckO6IoknpoBKn
- 3anpeT deTЯM
- YctaHOBNTb napoIb
- OTM PIN-ko
- OueHka podnteJe
- YCTaHOBka 3aROJIOBka
- OTmeHa 6JoknpoBkn
- YcTaHOBKn Ja3bIka (Ja3bIK, cy6TNTpbl, MyJbTnIJIeKCHbI pEXIM 3ByKa)
- 3blk
- UΦpOBA yCTaHOBKa
- Cy6TnTpbl
- BbIbpaemble onu
- IIPIMEP
- Ipeeknoyehne 3bIKOB MylbTtInNeKCHoro 3Byka
- BbI6op pa3Mepa n3o6paXeHnA
- PeknM 4:3
- Onu (nra CnHaJa SD [CTaHapThoYeTKocTn])
- Haxmnte KhoNky SCREEN SIZE.
- Haxmte KhoNky SCREEN SIZE nnn ↑/↓ BO Bpemr OTo6paXeHn Ha 3KpaHe MeHIO SCREEN SIZE PAQMEP 3KPAHA).
- IPIMMEYAHNE
- Bb6op BpyHyo pa3Mepa 3anncbIbAeMOro n3O6paXeHnra
- UcHpOBAy yCTaHOBka Pa3Mep 3annc.n3o6paXeHnra
- ABTOMaTnueckn Bbl6op pa3Mepa n3o6paXeHnH HDMI
- Abtonpocm. HDMI cnrgana
- NnDnKaunBpeMeHn B nHΦopMaun O KaHaJe
- Hdkaun BpeMeHn 3arOJOBka
- HdkaunBpeMeHH
- ΦopMaT BpeMeHn
- UcTaHOBKn CBeTOBOI CNCTeMbI
- LBeToBaCnCTema
- DonoHnTeIbHbIe yHKcnn
- Pexim OxindaHna
- IopdkloueHne PK
- PoiKJIoueHneHDMI
- AHaIorOBoe nOdknIouHeHne
- OTo6paXeHne Ha ekpaHe n3o6paXeHn c PK
- Bb6opΦopMaTa n3o6paXeHn
- ПРМЕР
- Onu
- AByOMaTnuecka peRyInpOBKa n3o6paXeHn c Pk
- ABTo Sync
- PerynpoBka n3o6paXeHnI K BpyHyU
- Touhaj Sync
- BbI6op pa3peeHnBxOdHorocnHaHa
- Bxod. cnrgnaI
- TexHnueckne XapaKTepeNCTnKN npota RS-232C
- UnpaBHeHne TeJeBn3Opom npn nOmoN PK
- YcnoBna nepeaun daHHbIX
Brand : PIONEER
Model : KRL46V
Category : TV