
FET6310 - Washing machine FAGOR - Free user manual and instructions
Find the device manual for free FET6310 FAGOR in PDF.
User questions about FET6310 FAGOR
0 question about this device. Answer the ones you know or ask your own.
Ask a new question about this device
Download the instructions for your Washing machine in PDF format for free! Find your manual FET6310 - FAGOR and take your electronic device back in hand. On this page are published all the documents necessary for the use of your device. FET6310 by FAGOR.
USER MANUAL FET6310 FAGOR
- NÁVOD K OBSLUZE
- KEZELESI ES UZEMBE HELYZESI UTMUTATIO
- NÁVOD NA OBSLUHU
BEDIENUNGSCANLEITUNG
INSTRUCTIONS FOR USE
GUIDE D'UTILISATION
GUIDA D'INSTALLAZIONE E DI UTILIZZO - PYKOBODCTBO NO 3KCNYATAUIN

Strana 3
As part of our commitment to constantly improving our products, we reserve the right to make changes to them based on technical advances to their technical and functional features and appearance.
Warning:
Before installing and using your appliance, please carefully read this Guide to Installation and Use, which will allow you to quickly familiarise yourself with its operation.

Pagina 43
BbICOKn paCXoJ 3NEKToP03Heprnn
IopTepeJIeHHe 3JIeKtpo3HeprnK, KBTyUKNCTnPK
(ADNNDH5D20)TATUTB1GDMONCHOTPOPTOR3B
CaxnXnOpaXnOxJXnOxJXnOxJXnOxJXnOxJXnOxJXnOxJXnOxJXnOxJXnOxJXnOxJXnOxJXnOxJXnOxJXnOxJXnOxJXnOxJXnOxJXnOxJXnOxJXnOx
KJIACCAHCTBACTPKM
A:MAKO.KHOCTBO
G:MMKKBHOCTBO
Knacc KaeeCTBa OTKIMa
A:MAKCI.KAHCTBO
G. MHH, KAACTBO
MaKc. yactote BpaueHHeHTp4yTn (06/MH)
HOMHH.3arpy3ka (xNIOK), K
PacxoadBod3aunkn,n
KoppekthipobaaHHbIypoBaHb
38yKOBOMMOUHOCTn,DA
Cmpka
OTKMM
- OBSAH
StranaStrana
MANIPULACE S PRAČKOU
Umisteni na transportni kolecka:
Vymena hadice privodu vody
A MOSOGEP ELHELYEZSE
Gorgokre helyezes:
A MOSOGEP ELHELYEZÉSE
Fontos:
For this programme, the doses of detergent should be reduced by half.
Rucne pranie
Zasvilo in se posebej obcutljivo tkanino.
Especially for sensitive and allergic skin': adds an extra rinse to the washing cycle.
- Odkvapkanie (Odstedrovanie poloha «100»)
Tato fungcia sluizi na zruisenie odstedovania pri jemnych latkach, cim cyklus prejde priamo k vybraniu bielizne z pračky.
Zastavenie splnym bubnom
Removing the transport packing 36
Moving your machine 36
Connecting to the cold water supply 36
Draining away the waste water 36
Connecting to the electricity supply 37
Installing your machine 37
Loading your washing 37
Loading the washing products 37
Programming 38
Details of the programmes and options 39
Modifying a washing programme 40
Automatic safety systems 40
Cleaning the pump filter 41
Maintaining your machine 41
Incidents that may arise 42
Messages shown on the display 42
SAFETY ADVICE
Important:
This machine is only for domestic use and is designed to wash, rinse and spin machine-washable textiles.
You must observe the following instructions. We refuse to accept any liability and the guarantee if you do not observe these recommendations since this could result in damage to equipment or physical injury.
- This appliance is not intended for use by persons (including children) with reduced physical, sensory or mental capabilities, or lack of experience and knowledge, unless they have been given supervision or instruction concerning use of the appliance by a person responsible for their safety.
- The machine must only be used in accordance with its normal method of operation in order to avoid damaging your washing and your machine. Only use washing and maintenance products certified for use in domestic washing machines.
If you pre-treat your washing with stain removers, solvents or, in general, any inflammable or potentially highly explosive product, do not insert them into the machine immediately.
Furthermore, you are also recommended not to use solvents or products in aerosol cans near to your washing machine or any electrical appliance in general in a poorly ventilated room (risk of fire and explosion).
If any incidents occur and you cannot resolve them using the remedies we recommend (see the section "INCIDENTS THAT MAY ARISE"), call in a qualified professional.
- If you have to open your machine during a cycle (for example, to add or remove washing), depending on the stage the programme is at (during washing essentially), be careful of the temperature inside the machine, which may be very high (risk of severe burns).
- When making a new installation, the machine must be connected to the water supply with a new hose: the old hose must not be re-used.
-
Do not let children play with the machine and keep your pets away from it.
-
You must immediately make any obsolete machine unusable. Disconnect and cut off the power cable flush with the machine. Close the water tap and remove the hose. Disable the door lock.
If there is a risk of frost, disconnect the water hose and drain off any water that may remain in the drain hose by placing this as low as possible in a bowl.
SAVING ENERGY
- Only programme a prewash when it is absolutely necessary: for example, for very dirty sports or working clothes, etc.
- A low temperature programme is sufficient for impeccable washing results when your washing is only slightly or moderately dirty.
For washing that is only slightly dirty, select a short washing cycle - Use the right amount of washing products for the hardness of the water, the amount of washing and how dirty it is and follow the instructions on the detergent packs.
ENVIRONMENTAL PROTECTION
This appliance's packaging material is recyclable. Help recycle it and protect the environment by dropping it off in the municipal receptacles provided for this purpose.

Your appliance also contains a great amount of recyclable material. It is marked with this label to indicate that in countries that are a members of the European Union the used appliances should not be mixed with other waste.
This way, the appliance recycling organised by your manufacturer will be done under the best possible conditions, in compliance with European Directive 2002/96/EC on Waste Electrical and Electronic Equipment.
Contact your town hall or your retailer for the used appliance collection points closest to your home.
We thank you doing your part to protect the environment.
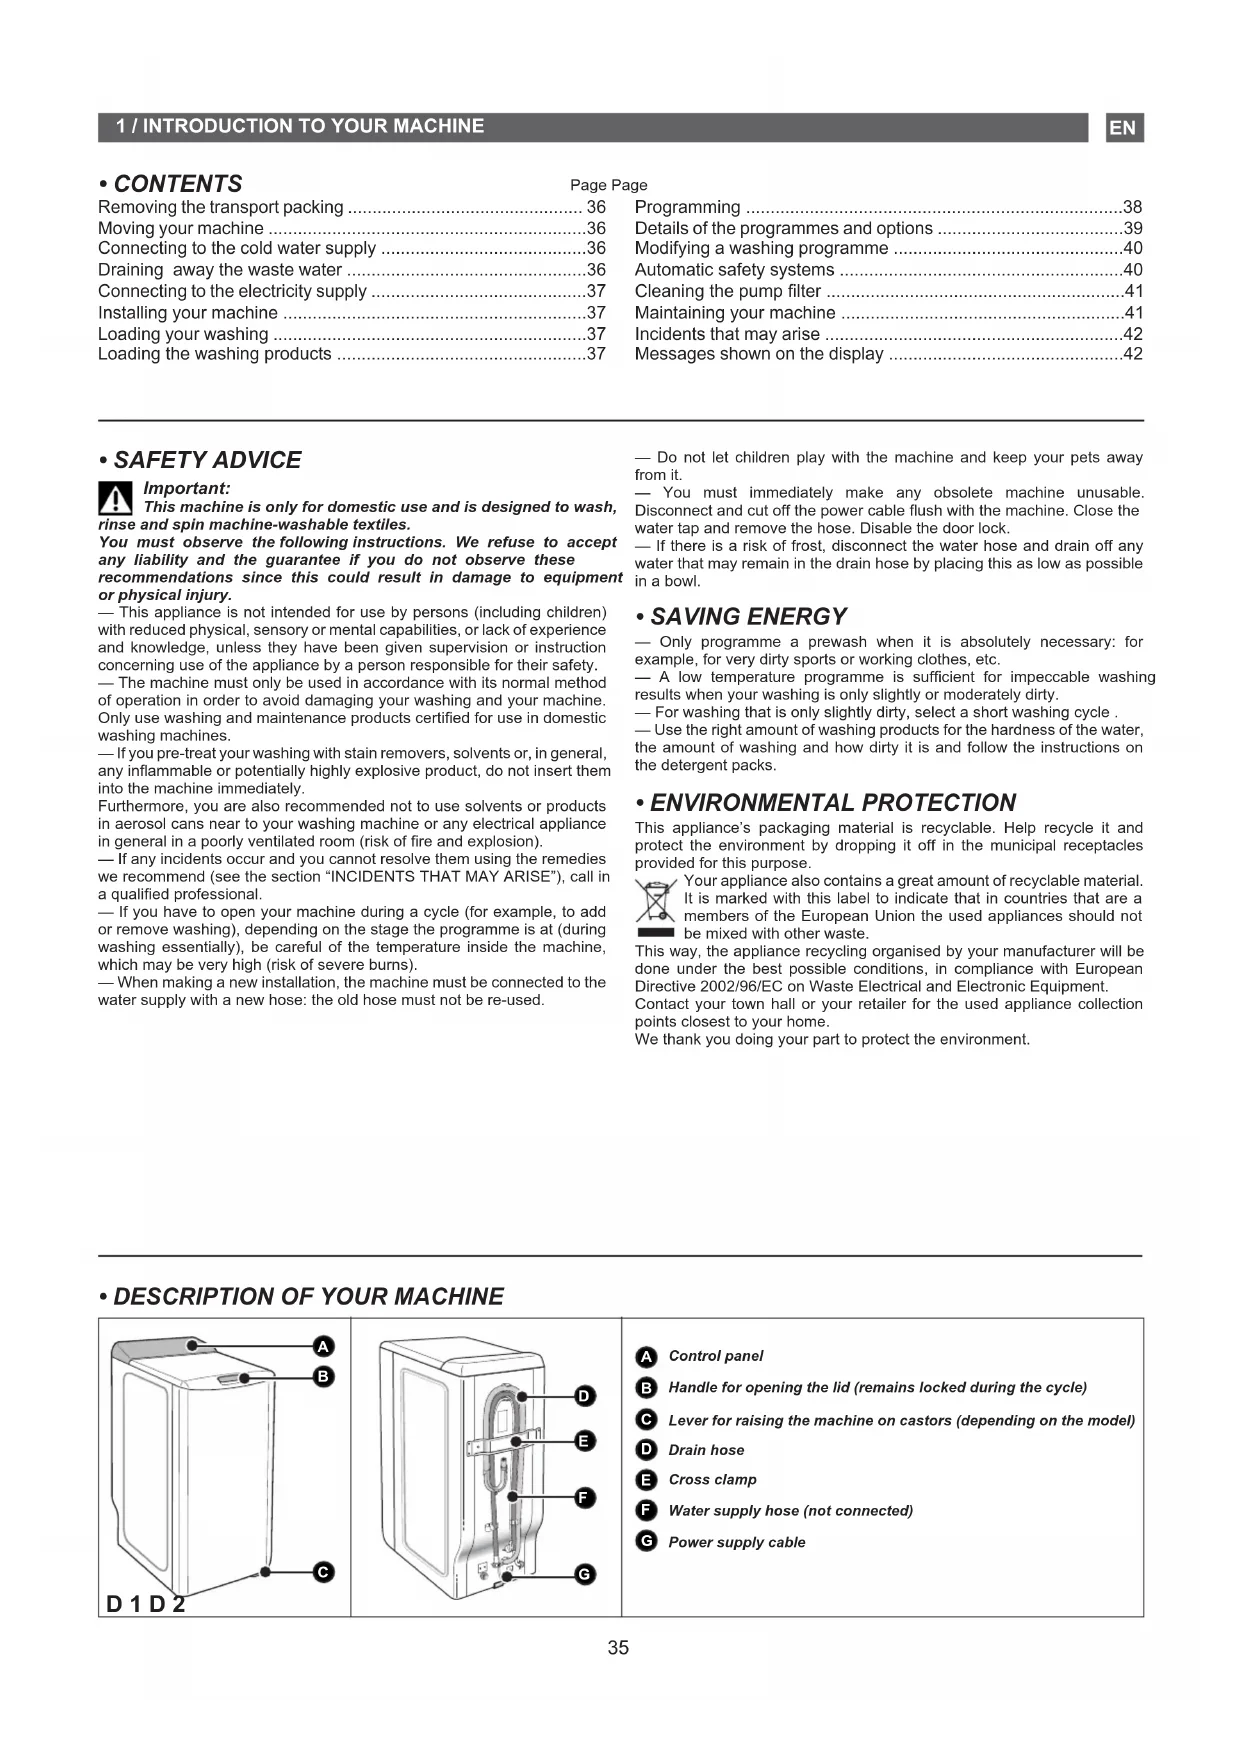
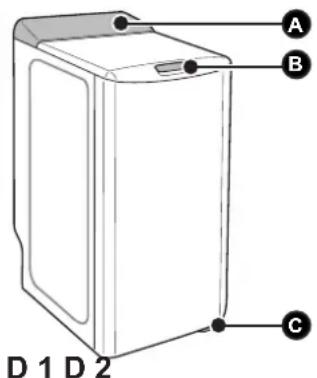
DESCRIPTION OF YOUR MACHINE
A Control panel
B Handle for opening the lid (remains locked during the cycle)
C Lever for raising the machine on castors (depending on the model)
Drain hose
Cross clamp
Water supply hose (not connected)
6 Power supply cable
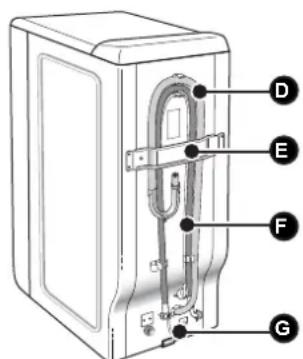
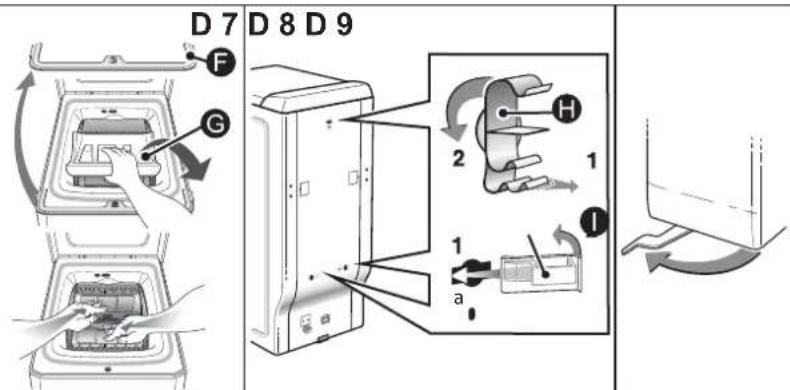
- REMOVING THE TRANSPORT CLAMPS

Important:
Before using the machine in any way, you must first perform following operations.
These comprise removing all the components designed to immobilise the drum in your machine during transport.
These so-called "releasing" operations are necessary for your machine to operate correctly and to conform to the prevailing safety standards.
If they are not carried out completely, this could cause severe damage to your machine while it is operating.
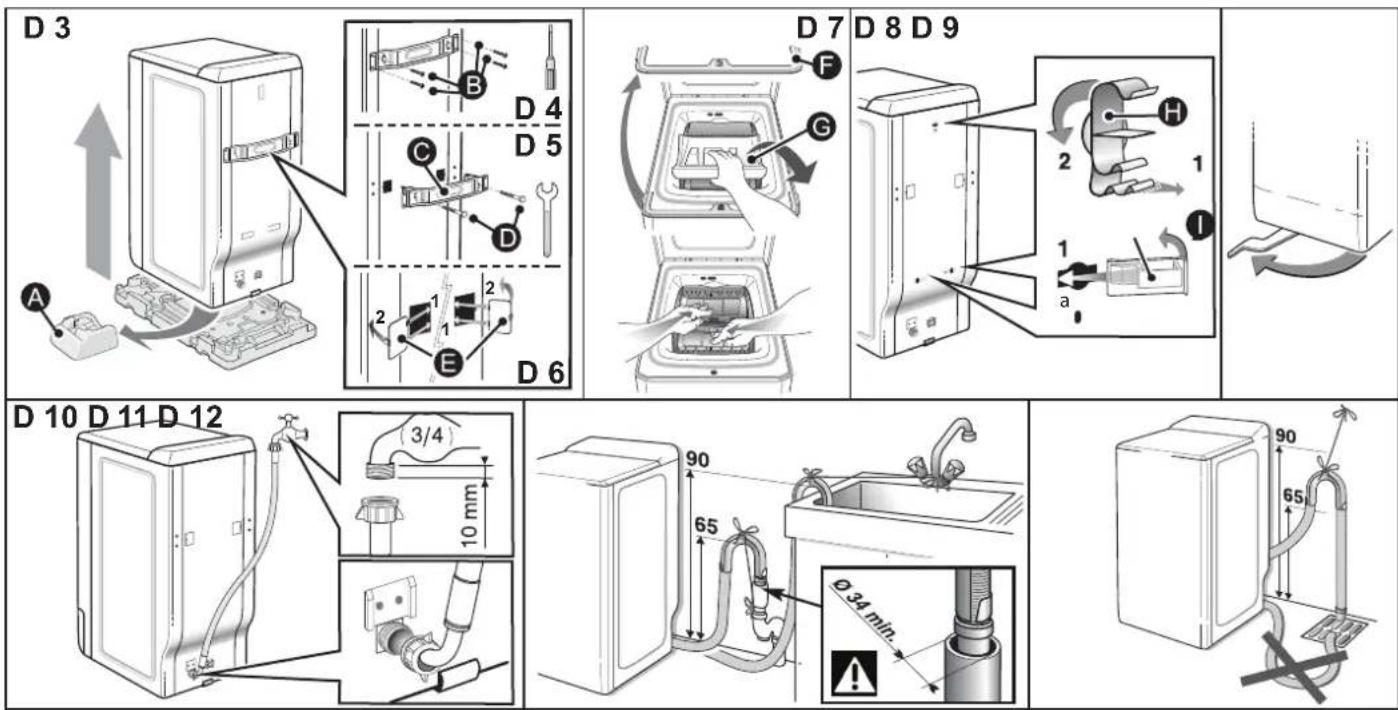
Remove the washing machine from its plinth (check that the wedge supporting the motor is not still inserted in the machine) (Diagram D3)
Remove the 4 screws with a screwdriver (Diagram D4)
- Remove the cross clamp by removing the 2 screws (Diagram D5) using a 10 or 13mm spanner (depending on the model). (Ensure that you remove the two plastic braces fixed on the cross clamp at the same time as the clamp itself).
—Replace the screws in their initial positions.

Warning:
You must block off the two holes using the hole covers provided (supplied in the accessories bag) (Diagram D6)
- Remove the drum-tank assembly locking wedge (Diagram D7). To do this:
Lift the lid on the machine
Remove wedge F Remove wedge G
— Release the drum doors, locked in the lower position, by pressing down on both eaves simultaneously.

Warning:
Remove the pipe support collars You must block off the holes revealed with the hole covers supplied in the accessories bag (Diagram D8).

Advice:
We would recommend that you keep all the locking components since these must be refitted if you must subsequently transport your machine again.

Information:
Your machine has been scrupulously checked before it left the factory. You may therefore notice a little water still remaining in the tank or the products box.
- MOVING YOUR MACHINE
- Mounting it on castors
If your machine is equipped with removable castors, you will be able to move it quite easily.
To mount it on castors, swivel the lever on the bottom of the machine from the right to the far left (Diagram D9).
Important:
The machine must not rest on the "front" castors while it is operating: remember to return the lever to its initial position.
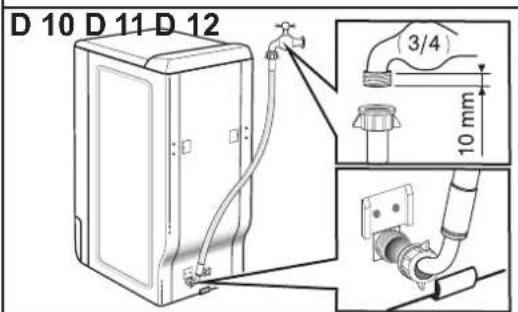
- CONNECTING TO THE COLD WATER SUPPLY
Connect the supply hose (Diagram D10):
At one end to the connection on the back of the machine
On the other end to a tap fitted with a threaded end 20mm dia. x 27 (3/4 BSP).
If you use a self-piercing tap, the useful aperture must have a minimum diameter of 6mm.
Water supply:
- Minimum water pressure: 0.1 MPa or 1 bar
Maximum water pressure: 1 MPa or 10 bars
- Replacing a water supply hose
When replacing the hose, ensure that the hose is tightly fastened and that there is a seal at both ends.
- DRAINING AWAY THE WASTE WATER
Fit the hose bracket provided inside your machine to the end of the drain hose and then connect the hose (Diagram D11):
Either, temporarily, over a sink or a bathtub.
Or permanently to a ventilated U-bend.
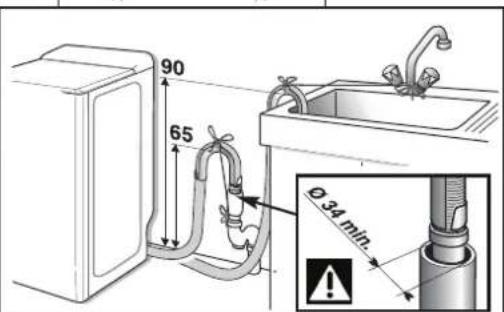
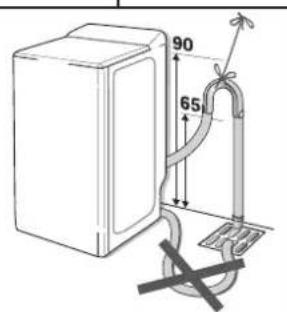
If your installation does not have a ventilated U-bend, check that the connection is not sealed. In fact, to avoid any waste water flowing back into the machine, you are strongly recommended to leave an air gap between the machine's drain hose and the drainpipe. In any case, the drain hose bracket must be placed at a height of 65 to 90cm higher than the base of the machine.
Important: Ensure that
avoid the bracket coming loose during draining and causing a flood. For correct draining of the waste water, make sure that the drain hose is as straight as possible. In fact, the more bends the less effective the drain pump.
The waste water can be drained away to the ground provided that the drain hose passes through a point 65 to 90cm higher than the base of the machine (Diagram D12).
- CONNECTING TO THE ELECTRICITY SUPPLY

Important:
For your safety, you must comply with the instructions below. Before connecting your machine, you must ensure that your installation's electrical characteristics match those of your machine (see the details provided on the information plate affixed to the back of the machine). The electrical installation must comply with the prevailing standards and the Electricity Board's regulations in the country concerned, particularly as regards Earthing and installation in shower rooms. We cannot be held responsible for any incident caused by the machine being incorrectly earthed.

Advice:
Advice on the electrical installation of your machine
- Do not use an extension lead, adapter or multiple socket.
- Never cut out the Earth wire.
- The socket must be readily accessible but out of the reach. If in any doubt, please contact your installer.

Important:
Your machine conforms to European Directives 2006/95/ CE (Low Voltage Directive) and 2004/108/CE (Electromagnetic Compatibility).
- INSTALLING YOUR MACHINE

Important:
If you are installing your machine next to another machine or a unit, we recommend that you leave a gap between them to allow for ir circulation.

Advice:
We also strongly recommend that you do NOT:
Install your machine in a damp, poorly ventilated room.
- Install your machine in an area where it could be subject to water splashes.
Install your machine on a carpeted floor.
If you cannot avoid doing this, please take every precaution to avoid blocking air circulation at the bottom of the machine in order to ensure that the internal components are well ventilated.
- Levelling the machine:
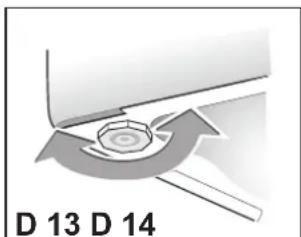
Use a spirit level to check that the floor is horizontal: maximum slope 2^ , i.e. a discrepancy of approximately 1cm over the width and of 1.5cm over the depth of the machine.
- Adjustable feet
Some machines are fitted with two adjustable feet at the front to enable you to compensate for any unevenness in the floor. Proceed as follows to adjust the feet to level and stabilize your machine:
- Set the machine on its castors (or tilt it slightly backwards if it does not have retractable castors)
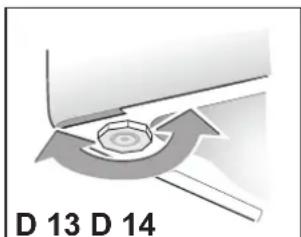
Screw in or unscrew the feet to adjust the height to suit the shape of the floor (Diagram D13)
Set the machine back on its feet and check that it is stable.
- TEXTILE MAINTENANCE CODES
Washing: Never exceed the indicated temperatures Use of cold diluted bleach possible:
—Iron:Low Medium High
Dry clean: mineral spirit F,perchlorethylene P, all solvents A
NB: A crossed-out code indicates that it is forbidden
- LOADING YOUR WASHING
Perform these actions in the following order:
- Open the machine
- Check that the Programme selector is correctly positioned on « Ⓞ ».
- Lift the opening handle on the front of the machine.
The lid will open. - Open the drum by pressing the button on the front door.
- Insert your washing
For optimum washing performance, place your washing, preferably sorted and folded, in the drum, distributing it evenly without heaping it up. Mix large and small items to obtain an optimum, well-balanced spin.
- Close the drum
Ensure that the drum is correctly closed.

Important:
Check that the three hooks and the border of the button are visible.
- LOADING THE WASHING PRODUCTS
Important: (Diagram D14)
- The "WASH" container may contain powder or liquid but liquid detergent should not be used for programmes WITH Prewash and/or WITH "Delayed Start" (depending on the model).
Concentrated softener should be diluted with warm water.
Concentrated bleach must be diluted.
To fill the product containers correctly, place the lid fully open.
- Do not exceed the MAX level.
Dispensing the detergent
The amount of detergent to be used depends on the hardness of the water, the extent to which your washing is soiled and the amount of washing to be washed.
Please refer to the dosing instructions on your pack of detergent. Warning: in most cases, the detergent manufacturer's recommendations apply to the drum filled to the maximum. Adjust the dosage correctly to the weight of the washing you have placed in the machine.
These recommendations will help you to avoid using too much detergent, which causes foam to be produced. Too much foam can reduce your machine's performance and increase the length of the washing cycle and the consumption of water.
- Detergents for woollens and delicate fabrics
You are recommended to use an appropriate detergent for washing these fabrics (avoid placing such detergents directly on the drum because they have an aggressive action on the metal).
Before your first wash
Before making your first wash, we recommend that you carry out a "COTTON 90 wash without pre-wash" and with no washing in the drum, using a 1/2 measure of your usual detergent in order to eliminate any residues from manufacturing that may remain in your machine.
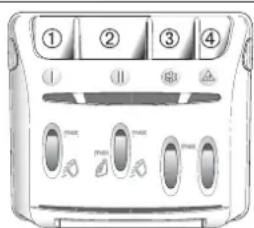
Pre-wash container (powder)
② Wash container (powder or liquid)
③ Softener
④ Bleach
POWDERED DETERGENT: LIQUID DETERGENT
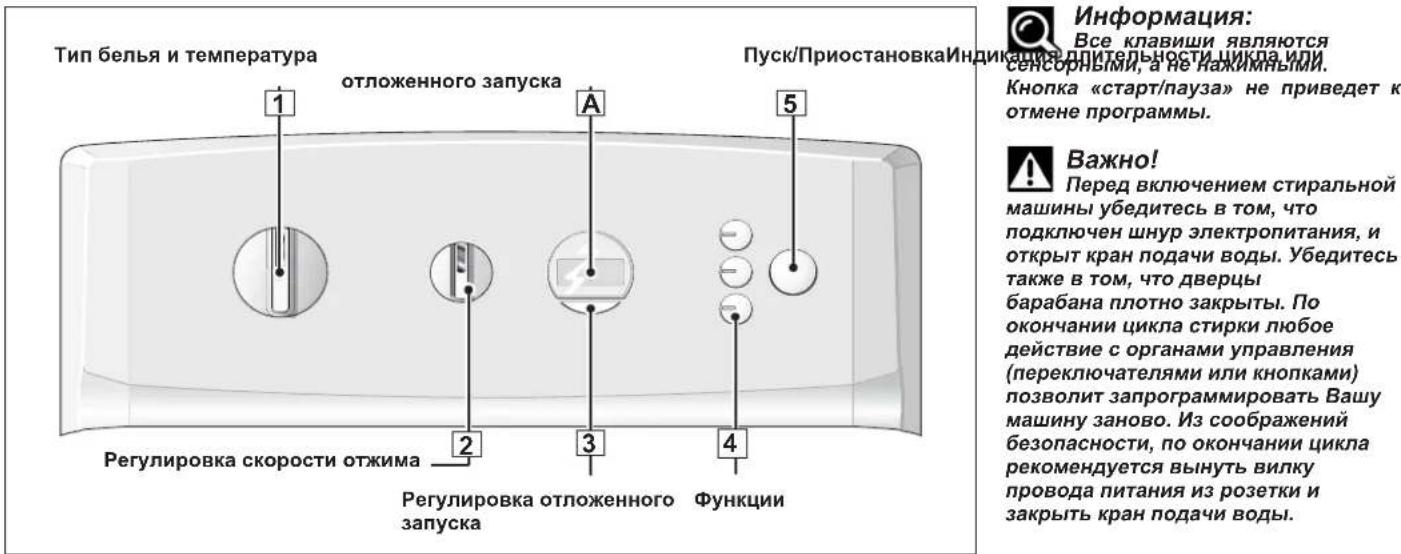
- PROGRAMMING
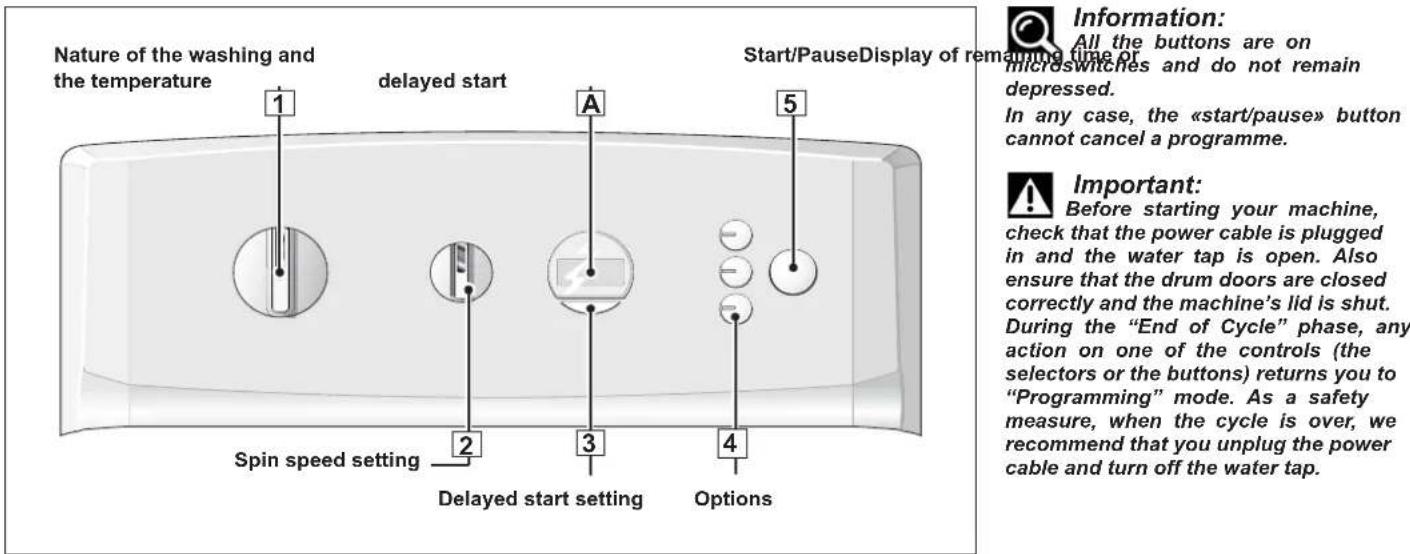
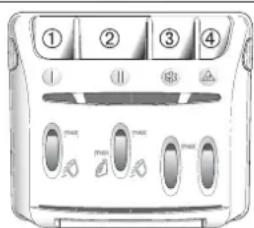
| ·Programming a washing cycle: | Display and position of the selectors |
| —Turn the selector 1 to choose the most suitable programme and washing temperature for the type of fabric to be washed.NB: Turning the selector to any position other than «0» provides power to the machine. | In A display of the length of the selected programmefor example: 150 |
| —Using the selector 2,choose:- Either a suitable spin speed for your type of washing.The spin speed is automatically restricted in the «Synthetics», «Delicates/Woollens» and «Hand wash» programmes.- Or drip dry.The cycle will finish with a gentle spin at 100 rpm.- Or stop with tub full of water.Your machine will stop with the tub full of water before the final spin. | Selector 2 on- Position «800» for example- Position «100»- Position |
| —Use the buttons 4to select any options you wish.Light(s) for the option(s) selected | |
| —Select immediate start by pressing «strat/pause» 5. | Countdown in Aof the time remaining before the end of the cycle(the two dots flash throughout the whole of the cycle) |
| —...or you can choose to delay the cycle, using button 3.You can select the time to elapse before the cycle starts. | H02 |
- Adding or removing an item during the cycle (impossible during spin):
| — Press the «strat/pause» button |5 to interrupt the cycle. — Add or remove the items of laundry*. (*) the time the lid remains locked depends on the temperature inside the machine and, for safety reasons, may take several minutes if you are interrupting a cycle at more than 40°C. — Press the «strat/pause» button |5 to restart the cycle. NB: If you have selected a delayed start, you can access the drum instantly at any time in the period before the washing cycle starts without having to interrupt and restart the cycle. | Countdown of the time is stopped in A(the displayed time flashes) Resumption of the countdown in A(the two dots start flashing again) |
- Cancelling while programming, washing or during a pause
| Set the selector 1 to the « 0 » position. This can be done at any time during the cycle or during programming, or even during a pause. NB : - In all cases, after cancelling you must reprogramme everything from the start. - If you have cancelled during the washing phase, remember to empty the water, if necessar. | Selector 1 set to « 0 » All the indicator lights and the display are OFF |
| End of the cycle: | |
| NB: After spinning, some models automatically position the drum opening at the top to provide easy access to the washing. This operation lasts at most 3 minutes. - Screen A then displays “- ” - , indicating that the cycle has finished. Set the selector 1 to the « 0 » position. You can now open the lid and remove your washing. | - 0 - |
- Maintaining your machine's performance (Maintaining the pump filter):
You must clean the drain pump filter regularly (for how to do this, see the section «CLEANING THE PUMP FILTER»).

Important:
Your machine's performance can be affected if you do not clean the pump filter regularly.
For more details on the various functions, please refer to the sections «DETAILS OF THE PROGRAMMES» and «DETAILS OF THE OPTIONS».

Information:
After a power failure, when the power is restored, the washing cycle automatically resumes at the point where it was interrupted.
- SOME EXAMPLES OF PROGRAMMES
To select the most suitable programme for your type of washing, follow the instructions on the labels that most textiles bear.
Rinse
| Programmes table | ◎》 | + | 《100》 | |||||
| Programmes table | Temperature (°C) | Maximum weight of dry clothes (kg) | Reducing the time | Anti creasing | Extra rinse | Drip-dry | Full drum stop | |
| ○ | COTTON - 90 6.0 | * | ● | ● | ● | ● | ● | |
| △ | SYNTHETICS - 60 2.5 | * | ● | ● | ● | ● | ● | |
| 山/♀ | PREWASH COTTON | 40 6.0 | ● | ● | ● | ● | ● | |
| ♀ | DELICATES / WOOLLONES | * - 30 1.5 | ● | ● | ● | |||
| Special programmes | ||||||||
| OptiA 45 min 40 3.0 | ● | ● | ● | |||||
| Flash 30 min 40 2.5 | ● | ● | ||||||
| ♂ | HAND WASH 1.0 | * | ● | ● | ● | |||
| Additional programmes | ||||||||
| RINSING - - | ● | ● | ||||||
| ◎ | SPINNING - - | ● | ||||||
These functions can be used alone or in combinations: no illogical combinations can be made.
TEST PROGRAMMES ACCORDING TO DELEGATED REGULATION (EU) No. 1061/2010
- Standard cotton programme at 60^ : cottons 60^ : no option - max spin
- Standard cotton programme at 40^ : cottons 40^ : no option - max spin
- DETAILS OF THE PROGRAMMES
The main programmes provided by the machine are as follows:
COTTON
If your washing comprises hard-wearing white or coloured COTTONS.

Important:
When washing coloureds do not exceed a maximum temperature of 60^
NB: During the first few minutes of the programme, your machine automatically evaluates the washing load you have introduced and adapts the water consumption and the length of the programme accordingly to provide a perfect wash.
SYNTHETICS
If your washing comprises of DELICATE COLOURS, HARD-WARING SYNTHETICS or MIXED FIBRES.
- PREWASH COTTON
Specially designed for heavily soiled washing (mud, blood, etc.). A specific initial agitation in cold water precedes a phase of heating to 40^ . This agitation phase in cold water enables the particles soiling the washing to be removed before the water is heated.

Important:
Detergent must be placed in the « » container in the products
box.
DELICATES/WOOLLENS
If your washing comprises NETTING, DELICATE FABRICS, FRAGILE TEXTILES or «MACHINE-WASHABLE WOOLLENS».
NB: A programme with agitation and spin phases specially adapted to these types of fabrics.
OptiA 45 min
This 40^ cycle washes a normal 3 kg load of cotton and mixed fabrics in 45 minutes, ensuring perfect washing results and maximum energy saving.
- Flash 30 min
This programme enables you to refresh a small load of 2.5kg of lightly soiled washing composed of WHITES, COTTONS, COLOUREDS or HARD-WEARING SYNTHETICS.
The cycle time is restricted to around 30 minutes.
In this programme, the washing temperature is automatically programmed at 40^ .
Important:
For this programme, the doses of detergent should be reduced If.
HAND WASH
If your washing comprises SILK or PARTICULARLY DELICATE FABRICS.
NB: A programme with a very gentle mechanical action and no intermediate spins between rinses.
The cycle ends with a very gentle, progressive spin restricted to 600 rpm.
A separate rinse followed by a choice of:
Either spin and drain
Or drain only («Drip-dry» option)
Or a stop with the drum full of water.
EN
4/PROGRAMMING YOUR MACHINE
- DETAILS OF THE PROGRAMMES
Spin
This allows a separate spin and drain.
Important:
In the case of «Rinse only » followed by a spin or «Spin only », ensure that you select a suitable spin speed for the type of washing in the machine.
- DETAILS OF THE OPTIONS
- Anti-creasing
This option washes your laundry more gently, but with an identical washing performance. The spin speed is slower so that your laundry creases less.
-Extra rinse
«Especially for sensitive and allergic skin»: adds an extra rinse to the washing cycle.
Drip Dry (spin speed 100)
This function, for very delicate linen, enables you to remove spinning and to pass directly to the draining of the washing machine.
Full drum stop
This function enables you to remove the washing from your machine before the spin phase or to delay this phase with you washing remaining in water to prevent creasing.
NB: When the machine is stopped with the tub full of water, the display A|shows alternately:
Then:
If you want to drain after spinning, use the selector 2 to choose a suitable spin speed for your type of washing.
The programme will end automatically.
If you just want to drain, turn the selecto2 to "Drip Dry" (position «100»).
- Reducing the time
Allows for a reduction in the cycle time according to 2 levels that can be accessed by pressing on the button several times. Level 1, reduces the average time by 20% . Level 2 reduces the average time by 40% for laundry that is only lightly soiled.
- Delayed start
You can delay the start of your programme by 1 to 19 hours so that you can benefit from cheap rate electricity or to have the cycle finish at a desired time.
To do this, select the time that must pass before the cycle starts by pressing successively on button 3 (this is done hour by hour) and then press «start/ pause» 5 .
NB:
-
Even if you forget to press the «start/pause» button | 5 after selecting this option, your choice will still be accepted after a few seconds.
-
The time remaining before the start of the cycle is counted down hour by hour from 19 hours to 1 hour.


- At the end of the waiting period, the programme starts and the display shows the duration of the selected cycle.
- MODIFYING A WASHING PROGRAMME
- During programming:
Anything can be changed before the «start/pause» button 15 is pressed.
After the cycle has started:
You can change the type of textile (for example, switch from "COTTON" to "SYNTHETICS", etc.). In this case, check that the options you previously selected are still there.
You must confirm your new selection by pressing the «inicio/pausa» button.
The machine may then possibly drain off some of its water.
- Throughout the cycle:
Depending on your model, the following changes are possible without pressing the «start/pause» button [D5].
-
You can change the temperature for the same type of textile. NB: If the temperature achieved by the washing cycle is higher than your new selection, heating the water stops immediately and the cycle continues.
-
You can alter the spin speed throughout the cycle.
-
You can select «drip dry» and «full drum stop».
-
You can activate the «extra rinse» option until rinsing starts.
-
You can deactivate all the options throughout the cycle provided that their action has not already finished.
- During delayed start:
Any kind of programme modification is accepted during a delayed start's waiting period.
- You can alter the length of a delayed start throughout the waiting period before the cycle effectively starts.
NB:
- During this period, selecting a new time cancels out the previous selection.
The new period selected is accepted based on the last selection made.
- If you want to cancel the delayed start completely during this period, first display «19h» using button 3.
Then press the button again and briefly press «start/pause» 15. The cycle will start immediately.
- If you want to reduce the length of time of the delayed start, proceed in the same way but do not press the «start/pause» button.
Your machine is then ready for a new setting.
- You can only activate the «extra rinse» and «anti-creasing» options during a delayed start's waiting period.
- When the cycle is over:
When the screen A shows 四 - 口 - 口 you can programme a new cycle without having to reset the selector 1 to the 四 - 口 position.
For this, all you have to do is turn one of the selectors or press one of the buttons.
The screen shows the duration of the programme selected.
The machine is then ready to be reprogrammed.
AUTOMATIC SAFETY SYSTEMS
- Lid opening safety system:
As soon as washing commences, the lid on your machine is locked. When the cycle is finished or when the machine has stopped with the drum full of water, the lid unlocks.
If you have programmed a «delayed start», the lid is not locked until the waiting period is over and the cycle starts.
If you wish to open the lid during the cycle, press button «start/pause» [▶5] briefly and wait 1-2 minutes for the safety system to unlock the lid.
Important:
Depending on when you wish to open the lid during the cycle, this time delay may be a little longer because a cooling down period may also have to be included.
In fact, to avoid your being severely burnt, the lid safety system will not open during the cycle unless the temperature inside the machine is below a certain threshold.
Water safety system:
During operation, constant control of the water prevents any overflows.
- Spin safety system:
Your washing machine is fitted with a safety system that restricts the spin when poor load distribution is detected.
In this case, your washing may be insufficiently spun. Redistribute your washing in the drum and programme a new spin.
- Anti-foam system:
You machine can detect when too much foam is being produced during spinning.
At such times, spinning stops and the machine drains.
The cycle then restarts, adapting the spin rates and possibly adding an extra rinse.
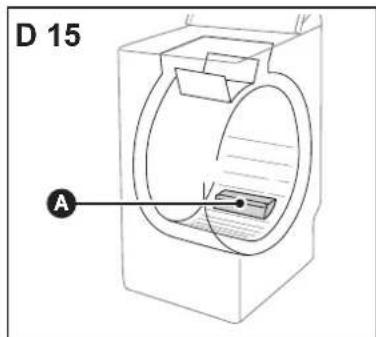
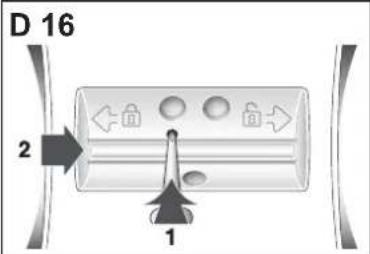
- CLEANING THE PUMP FILTER
This filter collects the small objects you may have inadvertently left in your clothes and prevents them from disrupting the pump's operation.
To clean the filter, proceed as follows:
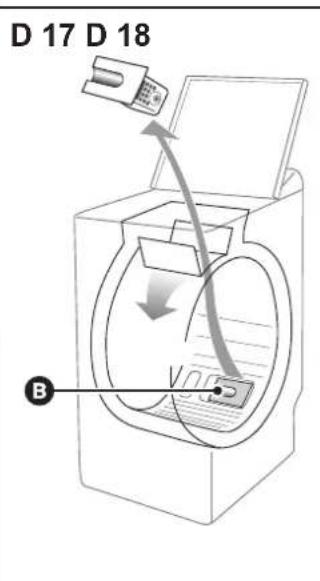
- Open the drum doors. At the back of the drum, you will see a plastic component A (Diagram D15)
— Release this (Diagram D16)
To do this:
-
Insert a rod (a pencil or a screwdriver, for example) into the hole in the component A.
-
Press down vertically with the rod, while pushing the component over to the right until it is released from its housing A.
-
Remove the component A
Turn the drum slightly towards the front of the machine, with the doors open (Diagram D17)
You can access the pump filter through the openings freed by removing the plastic component A.
-
Remove the filter from its housing (Diagram D17)
-
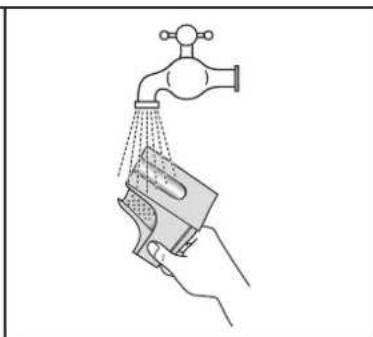
Remove the various objects it may have in it
Rinse it under the tap (Diagram D18)
— Re-insert it, pushing it firmly into its housing after checking that the housing is clean
- Re-insert the plastic component A ensuring that it is positioned correctly in the openings at the bottom of the drum and pushing it to the left until it is fully engaged (Diagram D19).
- CLEANING THE MACHINE

Important:
To clean the casing, the control panel and all the plastic parts
in general, use a sponge or a soft cloth dampened only with water and liquid soap.
In all cases, do not use:
— Abrasive powders
Metal or plastic sponges
Alcohol-based products (alcohol, thinners, etc.)
- CARE OF THE INTERNAL COMPONENTS
To ensure better hygiene, we recommend that you:
-Leave the lid open for a short time after washing.
Clean the plastic and rubber access components to the tank approximately once a month using a slightly chlorinated product. Run a rinsing cycle to remove any residue of this product.
Run a washing cycle at 90^ at least once a month.
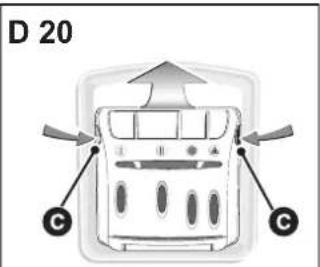
- CLEANING THE PRODUCTS' BOX
Clean the products' box regularly.
To do this:
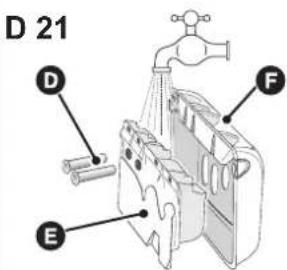
Press the bosses on each side of the box simultaneously to extract it from its housing (Diagram D20)
- Remove the siphon D from the rear of the box E and separate the box from its front cover F (Diagram D21)
Rinse everything under the tap (taking care to empty any excess water remaining inside the box)
— Refit all the box' components, ensuring that the box section itself is properly clipped into the cover and then re-insert the complete assembly into its location under the machine's lid.
PERIODIC CHECKS
To avoid any water damage, we recommend that you regularly check the condition of the water and drain hoses. If you notice the slightest cracking, do not hesitate to replace the hoses with identical ones available from the manufacturer or his After-Sales Service. For how to replace the water supply hose, please refer to the section «CONNECTING TO THE COLD WATER SUPPLY».
- REPLACING THE POWER SUPPLY CABLE
Warning:
For your safety, the power cable and, depending on the model, the complete electric box and its associated cable must only be replaced by the manufacturer's After-Sales Service or a qualified electrician.

- INCIDENTS THAT MAY OCCUR
The cycle does not start
-You have not pressed the «start/pause»|5 button
- There is no power to the machine:
- Check that the plug is correctly in the socket
- Check the circuit breaker and the fuses.
The water tap is closed
- The machine's lid is not closed properly
- A puddle of water forms around the machine
Warning:
First of all remove the plug and the fuse and shut off the water by tap.
While the machine is operating, the permanent level control prevents the water from overflowing. If, despite this, water comes out of your machine, it may be that:
- The drain hook is wrongly positioned in the drain pipe.
-
The water supply hose is not sealed tightly at the machine or tap end:
-
Check that the seals are in place and the connections are tight.
- Heavy vibration during spin
-
All the transport materials have not been removed correctly from the machine:
-
Check that all the transport wedges have been removed (see
《REMOVING THE TRANSPORT CLAMPS》).
The floor is not level. - Your machine is resting on its two «front» castors (depending on the model):
- Reset your machine on its feet by pushing the castor engagement lever to the right.
- The washing is not spun or not spun enough
You have selected a programme with no spin, for example «drip-dry»
- The spin safety system has detected poor distribution of the washing in the drum:
- Untangle the washing and programme a new spin.
- The machine does not drain
- You have programmed «Full drum stop»
The pump filter is blocked: - Clean it (see «CLEANING THE PUMP FILTER» for the relevant procedure)
- The drain hose is kinked or squashed
The lid does not open
The programme has not yet finished
The lid remains locked throughout the programme.
The drum doors open very slowly
(On machines fitted with gently opening doors)
- Your machine has not operated for a long time
-
It is located in too cold a position.
Detergent residue (powder) is blocking the hinges -
In all cases, everything returns to normal after the doors have opened initially
Important :
As a general rule, whatever the anomaly detected, you should stop the machine, unplug the power cable and shut off the water tap.
NOTE ON OPERATION - THIS IS NOT AN INCIDENT:
The programme time decreases or increases during the wash
This is not a fault. The length of time displayed at the start of the programme is updated according to the load in the machine (automatic weighing). This guarantees perfect washing results and water and energy consumption appropriate to the load. This is normal. The spin safety and anti-foam systems may extend the initial programme time displayed.
- MESSAGES SHOWN ON THE DISPLAY
- Incidents indicated, which you can rectify yourself
In this section, we explain how you can rectify these incidents very easily yourself.
Your machine automatically detects some operating incidents and indicates these by particular options lights flashing.
Messages Causes/Remedies
| d01 | The water tap is closed. Check that the water tap is open and then press the «start/pause» 5 button again to restart the cycle. This incident may also be caused by the drain hose being poorly connected (see the section "DRAINING AWAY THE WASTE WATER"). |
| d02 | The pump filter is clogged. Clean the pump filter (for how to do this, see the section "CLEANING THE PUMP FILTER") and then press the «start/pause» 5 button again to restart the cycle. Also check the drain hose's position in the drain: the connection must not be airtight (see the section "DRAINING AWAY THE WASTE WATER"). |
| d07 | Lid not closed properly. Check that the lid is closed and then press the «start/pause» 5 button again to restart the cycle. Drum blocked. Check that a small item of laundry (e.g. a handkerchief or a sock, etc.) has not slipped down between the tub and the drum and is stopping the drum from turning. To access the bottom of the tub, please refer to the section "CLEANING THE PUMP FILTER". |
NB:
Before calling your breakdown engineer, we recommend that you do the following:
- Set the Programme selector to the « O» position and remove the electrical plug for at least 10 seconds - Reconnect the plug and restart a washing cycle.
If the fault persists, call your breakdown engineer and remember to tell him which message is displayed.
Important:
Do not restart a washing cycle if the drum remains locked or if you notice water around your machine of if you notice a burning sme.
- AFTER-SALES SERVICE:
Possible maintenance on your washing machine should be undertaken by: either your dealer,
or another qualified mechanic who is an authorized agent for the brand appliances.
When making an appointment, state the complete reference of your equipment (model, type and serial number). This information appears on the manufacturer's nameplate attached to the rear of the equipment.
- SOMMAIRE
Page Page
If your washing comprises hard-wearing white or coloured COTTONS.
Important:
- DEMOHTAX TPAHCIOPTbIX 3AXIMOB

Baxho!
DnHauana HcnoB3OBAHnOBa3aTeNbHO CneyET BinONHTb
DaHHbIe DeHCTBnCocTOB CHTTN BcEX DeTaneN, KOTOpBIE 6JOKnpyoT 6aK BaWei CTupaNbHO MauHbI BO BpEmr TpaHCnpTIpOBKn.
DAnHbIe DeICTBnO CHaTHIO TpaHCnOpTbIX fNCHkNpyoUoxN Detanei HOBxOHNMbI DnHOPMaNbHO pAOStB bAaeW CTpApbHO MaunHB I CO6NoHDENy DeIECTByHOUsHOPmTexNHKn 63OnaNcHOTn.
Ecn yka3aHHbIe DeIeCTBnH He 6yDyT BblONHeHbI B NOnHOM OBeMe, 3TO MOKET npBcETN K cepbe3HbIM IONOMkAM yCtpoiCTBa BO BpEmA 3KCNNYATAUM.
-CHMNITe CTnpaIbHyIO MaunHy C ee OCHOBAHy (y6eDNTecb, yTO KINH A, 6KNOHPyUOIN DBrAtenB, He OCTaTc3axaTbIM NOd MaunHOH) (PcynHOK D3)
-Пи пomoци OTBepTKI OTBepHHTe 4 BnHTa (PcCyHOK D4)
-CHMMTE nonepuHy (PcuyHK D5) npn noMoU nraeHoro KIOUa Ha 10 IIN 13 MM (B 3abNCMOCTO MDoENI)
(y6eHntecb, yTO DBe PAACTKOBBte pacnOpKn, 3aKpennenHHbIe Ha nonepeunHe, bblu TaKe ChrTbI Bmecte C nonepuHOn).
- YCTAHOBNTE BINTB HuaNX nepBOHauJIbHOe MecTo.
BHHMaHHe!
063aTeNbHO 3akpoTHe Daa OTBepCTHra 3aRnyuKaMn, CneunhNo npedymCtpeHHbIMn dna TTO (HaxoJrTa B nakeTe C npuaNHexHOCTMa) (PncyHOKD6).
-CHMMITE KINH,6nokpyuoum 6ak n 6apabah Maunhbl (PncyhoK D7).
-NOIDHMMTe KpbIiKMy MaHnHbI;
-BbItaHTe KINH
-BbITaIuNTe KINH6
-ODHOBpeMeHHaXaBaHa o6e CTbOpKn OcBO6oDHTe DBepbci
6apa6aHa, 3aФИКСИРОВAHHbIe B HIXKHeM NOJIOKeHIN.
BHMaHne!
CHMNTeXOMYbI ONOpbI Tpy60 K O63aTeNbHO 3aKpOte OTBepCTn npn NOMoU 3arNywek HaxoTcB NaKeTe C npHaNExNxoCTMa) (PcyHOK D8).
Cobet:
MbI peKOMeHdyem BAM COxpaHHTB BCE TpAHCNoptHBie 6Ioknpyoue deTann, TAK KcOHN Osb3aTeBHO nOtebyOTCBAM npn daJIbHeNeW TEAPCNOPTOBPOBa BaeW ChPABNbHO MaunHb.
Hhopmaa:
Ipeq Bbinyckom C 3aB0da-n3ROTOBHTenBaAa CThpabHa Maunha 6bIa TuaTeBHO npOBepeHa; No3TOMy, Bbl, BO3MOXHO, ZameHne HannHe HeNBo WORKO KOnHecTBa BoBb B GapaBaHe HnB OTDeneHHMooUx cpeCTB.
- INPEMELEHNE PNUBOPA
- YctaHOBka KOJecNKOB:
Ecnn BaWa cTnpaBnHa MaHnHa o6OpyObaHa CbeMHbIM KoneCkAMN, BblIeKo CMoxTe NepemEuaTbe.
IyTaHOBKnHa KOnecnKn, NOBepHnTe pbHar, paCnoNoXeHHb B OCHOBaHN yCTpoNCTBa, n3 npab oro noNoXeHHB KpaHHe neBoe (PncyHok D9).

Baxho!
Pn 3Kcnnpyataaun CTnpalbna MaunHa He DonxHa TaBcHnapepehne KonecsKn:He 3a6ydbte yctahOBNTb pbyar BnOchauNbHoe nolooxeHne.
- NOДАЧА XОЛОД"HOДыI
PoiKlnouHTe Tpy6oNpOBoD nOaUn BoBb (PncyHok D10)
OHa CToPOHa NOpKnIOuHaeTcKa K WTyUepy, paCNoIOnKeHHOM
Btopa CTopoHa noDknHouaetcK kpaHy, MHeOuemy pe3b6y 20x27 (3/4 HTP).
Ecnn BbI NcNoB3yeTe KpaH C ABToMaTuYeCKM OTKpbITnEM, DnaMeTp OTBepCTNr OTKpbTINr DOJKeH 6bITb He MeHee 6MM.
-MHHMaJIbHoe daBHeHne BoDby:0,1 MNa nn 16ap
-MakmambHoe daBneHne BObl:1Mnau 106ap
-3aMeHa Tpy6oPbOBoJa NoDauN BoBbI
Pn3aMeHe Tpy6oNpOBoDA o6paTte BHNMaHne Ha xopoUyIO 3aTgKky HAnuHne IpoKnadok Ha 06oX KOuaX Tpy6oNpOBoDA.
CINVBCTOHyBIXBOD
IopknHouTe TpybONpOBOd ONOPOXHeHn, NOcne ycTaHOBKn erO B 3aRHTbI ΦKcatOp, npnlaeraMbl K CTnpalbHoM MaunHe (PucyHok D11).
-
JI60 no BpeMeHHo CXeMe, paKOBHy, JI60 BAHHy,
-
JIb60 Ha NoCToARHHOO OCHOBe B KaHaJIIN3aUIOHHbI CnFOH C BeHTNIIaJIeE Ecnn BaW aCtMeMa He NMeET BHYTpeHrero CnFOHa, YbEJInteCb, YTO daHHe NOkIKIOUeHHe He RepTeuHNo. Ia TOrO, YTo6bl N36ExaTb 6bpaTHoro HArHETAHNA OTPa6OTAHNO BODbl B CTpApJbHyO MaUNHy, HAcTcTReBHo peKOMeHdyTeC ObecNeuMb CBO6OHOne IpoxOJeHne BO3DyXa MeKJy Tpy60B cNbA MaUnHb N KaHaJIIN3aUIOHHo CnCTeMoH. B JIO6bOM cnYae, m3r6 onOpOXHeHna DOnXeH pa3MeUaTbCR Ha BbICote B npedax oT 90 cm Do 65 cm nO tHOWeHIO C OCHOBaHem CTpApJIbHO MaUNHbI.

Baxho!
He 3a6ydbte 3akpenntb H30rHytbI KOhe Tpy6bl onopoxhenno OTO6bl OH He ynaB BO Bpemc CInBa BOdyH He 3aJINn noJ.
IMeetcBo3MOXHocTb CnBa OTPa6ToaHHo BDoHa YpOBHe NOBepxHocTN nona npn ycNoBn, TTO TpyNoPobOd CnBa npxOmit Yepe3 ToKy, paonolokhenHyo Ha Bicote ot 90 do 65 cm no OTHoWeHIO K OCHOBAHIO MaunHb (PncyHOK D12).
- 3ЛЕКТРОПITAΗΝΕ

BaxHo!
IIOEbcneueHnBaew 6e3onachocn Cneyet cTporo OaTaB NOJoxEHN, yKa3AHbIe Hxke.
-Nepei noKIOHeM CTpaIbHO MaINHb BAM CneyET 68a3TeNbHO y6eITbCBy, YTOE 3NEKTPnCeHK XapaKTepNCTNK COOTBcTCTBYOT BAWe 3NEKTPnueCKO CNCTMe (CM. NaHbIE, Yka3AHBe HA NDEHTNpKaUNHO H TaBnHKe, ZAKpenHeHHO Ha 3dHeN NaHenMaINHbI).
3JNeKtpUecka CnCTema DOJXHa COOTBeTCTBOBaTb DeIcTBHOUM HOpMaM I TpeBOBaHrM OprAHN3aun 3HePFOHaD3Opa, DeIcTBHOUM B COOTBeTCTByIOUeI CTpaHE, B YAcTHoCTN, OTHOCNTeBHo 3a3EmJeHHN I PA3MeUeHrMAuHbI B BaHHbIX KOMHATAx.
MbI He Hecem OTBETCTBEHOCTH 3a IIO6bIe HecuACTHbe Cnyan, BO3HNKUNE B peSYNbTate HecOOTBETCTBYUoTe 3a3EmJeHH CtwnpALHO MauHHJI.

Cobert:
Pekomehdaun,OTHOCTeNbHO 3neKtpueckoro noKnIOueHn
CTnpaJIbHOJ MaUNHbI
-He nCnoJb3yIte yDnHHTenb, nepexoDHNK INN TPOHNK
- HnKOrDa He OTKJIIOuHaIe 3a3eMJIeHne.
-Po3eTka DoJnxHa pacnoIaratbC8 B NERKO DOCTyHOM MeCTe, HO BHe D0craeMOCTn DeTbMn.
B CNYyae BO3HNKHOBEHNA KAKNX-JN6O COMHEHNI, O6paNTecb B KOMNaHHIO NO yCTAHOBKe.
BaxHo!
Baue yctpoiCTBO COOTBETCTByeT EBponeckHM HOpMaTHNBHbIM Tpe6oBAHNrM 2006/95/CE (yctpoiCTBa Hn3KOrO HanpJxehn) n 2004/108/CE (3NeKTpOMaHTNtAH CoBMeCTUMocTb).
- YCTAHOBKA ПРИБОРА

Baxho!
EcnBbl yctanabnbaete ctnpaIbHyo MaunHy praom C pyrnn yctpoiCBOM HNN MeebIO, Mbl pekomehyem Bcerda octabnIb npocpAChTO Bo MeKdy yctpoiCTBaMn dna oecneueHHN DOCTaOHO BEHTMNRAHMaHNbI.
Cobet:
Cdpyro CTOpOHbIMbHAcTcTeNbHO He peKOMeHdyem:
yctaHaBnBaTb CTnpaIbHyIO MaunHy BO BIAKHOM NNOXO
PpOBeTpBaeMOM NOMEueHIN;
- yCTaHaBnBaTb CTnPaNbHyIO MaunHy B MecTaX, rDe Ha Hee MoKeT nonactb Boda;
yCTaHaBJIbBaTb MaUHHy Ha KOBoBOM NOKpbITHn.
EcnI 3TOI 136EgXaTb HBeO3MOxHO, PnIMATE BCE Heo6xoNMBIe Mepbl IaIIOBcEHeHnI cKpKJyIaRn BO3Dxa OKOIO OCHOBAHm MaunHbI dIPOHmAbHO BHTINIAUe Ee BHVTpeHNHX y3NOB.
- YctaHOBka no ypOBHIO
Pn nOmoiyn yobBny6eDntecb B ropn3oHTaIbHocTNo nobExHocT, Ha KOTOpOn yctAHaBnBaTeC TcPnAbaN MaUHMa: DonyCkaeTCaMakmamblHy rOy HAKHOA B 2,TO eCTb No WpHne MaunHb DonyCkaeTCaPAHnCa B blicote 1 cm, NO rny6hne pa3HnCa He donxKHa npBeBbIaTa 1.5 cm
- Perynnpyembte HOKKN
HekotopbIe MaunHbI OCHaueHbI DByMpapeynpyEmbIM HOKKaMn, paonnoJooXehbIM CnepeN i No3B0JRAUcIMM KOMNEHCIPOBATb HepBOHCTOn nOla. YTo6bI oTpeyInpOBaTB rOpN3oHTaNbHOe NIOJOXeHHe N yctOuINBOCTMaHNbI, NoCtynITe CneDyUcIM 6oBa3OM:
- NOCTaBbTe MaunHy Ha KOJecNK (INI INeKo TOnKHnTe ee Ha3a,I,ecNIOHa He OCHaUeHa CbeMHbIM KONEcNKAMM)
-B3aBNCIMOCTNOTNOBEPXHOCTN NOA-3aBNHTNTNEIINOTBnHTNTeOdHy IINOBHOKN,INIOPTERpyIteNX BbICOTy.(PcCyHOKD13)
-BHOBByCTAHOBNTeMaUNHyHaHOKKNINPOBepbTe ee yTOUHBOCTb.
- CUMBOЛьИ YXODA 3A TKAHьIO
- Ctrpka HNKoIa He npeBbIaIe yka3aHHyo TemnepaTyP
-Bo3MOxHO npmHeHHe pa36aBJIeHHbIX XoNoDHOBoONXlopcoedpaux CpeCTB:
-ΓnaxKeHbTeNnblm yTHorOM CpeDnHM yTHOROM ropyM yTOrOM
-XMmHcTka: MHepeaIbHoe MacNo F,TeTpaxnOp3TuIeH PJIIO6bIe pactBopNTen A - PnmuMeaHne nepeepKHyTbI CNMBOJ 03Haayet 3anpeueHne
- 3AΓPy3KA BEJIbЯ
BbINOHnTE DeIeCTBnB B CneDyIOUem nopAKe:
- OTKpbITHe MaunHbI
—PpOBeBpTe,HTo6bInepeKIOuAtenb nporpaMM 6bl yCTaHOBnE H nnonKeHHe «O».
B 3aBNCIMOCN T OMOENI, PNOHMNTe pyKy OTKpbTNI HAKMITE Ha KHOKNY, paCNOJIOKeHHyU Ho NpeDHeN PAHEn MauINbI. KpbIuKa OKPQETcN.
- Otkpoite 6apabah, HaxaB Ha KhoNky, pacnoNoxHHyu Ha nepeDnei DBepue.
-3arpy3ka6enb8
Дяdoctикен� ONTIMaIbHbIxpe3yIbTaTOB CTnPK,3arpykaite B MaIHy npEdBaPteNbHO OTCopTIPOBAHHyO pa3BepHytoe 6enbe, pacnojarraero pabHomepHo NO BCemy 6apabaHy.Дя doctикену ONTIMaIbHoro OTKIMa 6e3 opa3oBaHHaN KOMKOB klaJITe BmecTe 6enbe 60nburo n ManeHbKO rpo3Mepa.
- 3akpbTne 6apabaHa
Y6eIntecb B HopMaJIbHOM 3aKpbITn6apa6aHa.

Baxho!
Y6eHntecb, TTO TPN 3aueK IN KpaI KHOKN XOPOIO BnHbl.
- 3AΓPY3KA MOIOLIXX CPEДCTB

Baxho!
(PncyHok D14)
EMKOCb《CTPKA》MOKeTNCNoJIb3OBAbTaCnIPOWkoB IN KJIKoCTe,OnHAcHe CneDyETNcNoJIb3OBAbTB XIKKOe MOHOe CpeCTBO nIpOrpaMM C npEapHTenBJHO CTHPK0N H/NN C 《OTNOXeHHBM BKNIOUeHHMe》(B3ABNCMOCTHOT MOnENH)
KoHueTpnpoBaHbIe CMrYntEn In7 6enb Hc0xOIMOpa36abTb TENIO BOD.
- KoHcHTpOBoAHbI OToBENBaTeIb Heo6xOJMo 06aTeJIbHO pa36abTb
-Дпя npaBnIbHoro 3anONHeHnE mKoCTe Jn MOuIX CpeIcTB, yctaHOBNTe KpbIshy OTdeJIeHnB B NOJoxHeN MaKcMmaIbHoro OTkpbITHa.
—He npebbiwaute MAX ypoBeHb.
-Доз neuropobka moIoux cpeoctB
KoJIuHecTBO NcONb3yEmbIX MOHOUX CpeDCTB 3aBNCNT OT JxecTKOCTN BODbl, CTeENH 3aPr3HeHHOCHT IN KOJIuHecTBA CTnpaEMOrO 6enb.
PnD03nPOBKe MOUxN CpeCTB Bcerda CneyTe peKOMHaQnM, yka3aHHbIM Ha yNAKOBe MOUxN CpeCTB.
BHHMaHHe: peKoMeHdaZnnpOn3BoDntTeNe MoOuXh CpeCDTB COOTBECTBYHot, B 60nbUnHCTBe cnYaeB, MaCmAnbHOI 3aRpy3Ke 6apabHa. COOTBeTCTByUHM o6p3om perynpyTe Do3nPBOky B COOTBECTBnCBecOM 6eBba, 3aRpyKeHOrO B MaunHy.
3TN peKomeHdaaHIN NOMOYbAMN36ExaTbepeo3npoBKn,BblBaHOe 6bnbHoe NHeooBpa30BaHne.NobIeHHOe NeHooBpa30BaHne MoKeT CNHNTB KcNpyaTuNIOHObHe XapakTePnciKTNaueMaunHbIyBENHT bIITNeTbHOCT CTnPKa,TaIOKe NotPe6JIeHHe BObl.
Mooune cpeCTBa dIa WepcTN n DeNkathbIX TkaHei
Дясторн ИЗдени ИЗ 3Тnx TKAнг peKOMeHуTeСИСПОьБaВTOBETCTBYOUINE MOUиce CpeIcTBA (n36eraIte Do6abNЯТb Ix HENOpCtBcHnO B bapabah, TAK KAK HeKOTOpbIe MOUиce CpeIcTBA arpeccnBHO BoJ3dEJIcTByOT Ha MeTAn).
-Передпервостурков
PepenepboBcTnPKoMbpeKOMeHnyemBaM3aNcyCTnb nporpammy cTnPKu XIOPOK 90°C 6e3 npedbapntelbHOI CTnPKu 6e3 6ebio C nOJb3OBAHEM ½do3b BaIbero ObIHHORO MOUero CpeCDTa.3To denaTcR Dn ydaIeHnro OCTabWuxCra NocJe N3ROTOBHeHnBeIeCTB, KOTOPB MoITIN OctaTBcB BAWeMaIHNHE.
-ПОНТРAMMЮВАНЕ
- BO3MOXHbIE HENCnPABHOCTN
LuknctnpKHe3anyckaetc
-Bb3a6bIINHaxKaTbKHOIky《CTapT/Nay3a》5
-OKnIOueHO 3NEKTPoPNTaHHe MaunHbI:
- npOBepbTe, BKNIOUeH JIN UHyp NITaHnB CcTb,
- npOBepeTe IcnpaBHOCTb BbIKIOUATEnI npeDOxpaHHTeNeI.
-3aKpbT KpaH NOdauN BObl.
-Ⅱnoxo 3aKpbIta KpbIuKa MaunHbI.
BokpyMaHHbIobpa3yeTcnykaBoDbI
BhMaHne!
B nepByo oupeBbIKIOHTe BNky n3 po3eTKn nn BBKIOHTe COOTBETCTBYOUs npedoxpAHNTeN 3aKpOte KpaH NOaH BObbl.
Bo Bpemra60bI cTnpabHm MaunHb ypoBeH BoBn NOCToHHO KOHTPOINpyETc. Ecn HecMOTpHa 3TO mMaunHb BbTEKaET BOa, TO 3TO BO3MOxHO pONCXODIT NO ODNH N3 CNeDyUOuX INPnHH:
- HenpaBnIbHO yCTaHOBJIe H cyckHOJ KpaH;
- yTeUka n3 TpybOnpoBOda nOdauN BOdJI CTnpaJIbHO MaUNHbI:
- npOBepeTHeHaJIuHne yIINOTHeHn I 3aTJkKy CoeDInHeHn.
CnIbHa Bn6paunr BO BpeM rOrkma
- BaaCtnpaIbHaMaIHa IIOXO yCTaHOBJeHa:
- npoBepeBte,уTO ydaneHbI BCE pOKnadkn KInHbI,ICNpObl3yeMbIe IINr TpaHCnOpTnpobKmMaunHbI (cM. pa3deIEN «DEMOHTAX TPAHCNOPTHBIX 3AXKIMOB»).
- PpOBepeTe ropuoHTaJIbHocTb noJa.
- Ctrpabnbna MaunHa CTouT Ha nepeHnX poNkax (B 3aBcHMOCTn OT moDJI)
-yCTaHOBnTe BaUy CTpapbHyu MaunHy Ha HOXKn, OToDBnHyB pbHar yCTaHOBKn Ha pOINK B npabyo CTOPOHy.
-BeIbe He OTKImaeTcHn OTKImaeTc HEDOCTaTOH
-BbI BbIbpaHn nporpamMy 6e3 OTKIMa,HaPmep «CTeKaHne».
- PpeoXpaHnTeIbHaI CnCTeMa OTxmMa ObHApYKnIa NNoXoe pacnPpeIeIeHne 6enB a bapabae:
- pacnpedeJIte 6eJIbe paBHomepHO n 3anporpaMMpyTe HObI cIKN OTKIMa.
MaunHa He cNbae T Body
-BbI 3anporpammmopobaJn cukJN «OcTaHOBka C noJIhbIM 6akOM»
-3acopeneHne fNJIbTpcaCnIBHOHaCoca:
- npomoyte fNbtp (cm. npoceDpyo ouNCTKn fNbTp a ba3dene «OuNCTKA fNbTPA HACOCA»).
-Perern6nn3acopeneHcNBHO Tpy6bl.
KpbIwka MaWuHbI He 3aKpbIBaetcra
-He 3aKoHnIacb npOrpMaM cTnpK.
KpbIka He MoXeT 6bITb OTkpBtA B TeueHne Bcei nporpaMMbl (6JIOKnpOBka).
-ДерцьMaunHbOTKpbBaIOTcOeHMeJHeHHO (dmaun,obopydoBaHbIXDbepaMn C nJIaBBm OTkpItnem)
- Baaa CTnpaBnHa MaunHa DnntenbHoe Bpemr He pa6oTana;
MaunHa paonolaraetcB OueHb XOnOHOM MecTe; - octaTkn MOIOUeTo CpeDCTBa (nopoWka) 6NOKpyOT wapHnpbl
- BO BCex yKa3aHHbIX BblIe CJIyIaX, BCE BOJET B HopMy Iocne nepBBOOTKpbITn.
BaxHo!
PnO6HApxKeHH NIO60H HeNCnPabHocT CNeDyET OCTaHOBtB CTnpaNHyIO MaunHy, BbIKIQUHTb UHp NITAHN 3aKpbItb KpaN IOaDaN BObl.
-3ameaHnKaCateJIbHO yHKUHOHPOBaHn -Takne Cnyan He ABJHotc aBapNei:
Bpem npoDOnJKeHn nporpaMMbI 6Oone KopoTkoe nn 6Oone npoDOnKHTeJIbHOe.
3To He RaBnEeTc OwnbKoH He 0603Haayet abapnO. Bpem npdoJXeHHnporpaMMb OTobpaKaETcB Hauane CTnPKu IN hINbNDyabHo pncnoCa6NBAeTC K Becy n KOJIneCTBy 3yRpy3Kn (ABOMaTHueCKoe B3BeWbBaHne). 3To rapaHTnpyET ONTMMaNbHbIy pe3YbTaT CTnPKu, Notpe6bHeHHBObl a TAKKe 3JNEKTOPOHEPmN COOTBETCTBYET BEYNUHNE 3aRpy3Kn. DaHHoe RAbnHeHn RAbnETcH HopMaNbHbIM.CntTeMa 6e3OnaCHOCTN OTKIMMa a TaIOke ydaJIeHHn NeHb MOrY TpoDnB TbBpem npdoJXeHHn PporpaMMb BBICBeHuBaEMoe B Hauane.
COOBUHNAHDKKATOPA
HeuCnpaBHOCTN, KOtOpbIe Bbl MOXeTe yCTpaHHTb camOCToTEnbHO
B 3TOM pa3dene Mbl 06brcHem, kak Bbl MoKeTe 6e3 Tpyda camocToTebHo yCTpaHHTb 3TN HeCNpPaBHOctn.
BaHaMaunHaObHApKuBaet HeKoTOpBle HApUeHnPa60TbI uKa3bIaEt Bam Ha Hx C NOMOuBIO COo6ueHn, NOBIAIOuXxCra Ha DnCnnee.