
7FF2FPA - Digital photo frame PHILIPS - Free user manual and instructions
Find the device manual for free 7FF2FPA PHILIPS in PDF.
| Product Type | Digital Photo Frame |
| Brand | Philips |
| Model | 7FF2FPA |
| Screen Size | 7 inches (diagonal) |
| Display Resolution | 720 x 540 pixels |
| Supported Image Formats | JPEG |
| Internal Storage | Built-in flash memory (capacity not specified) |
| Memory Card Support | Yes (type not specified) |
| Connectivity | USB 2.0 for PC connection |
| Power Supply | AC adapter (included) or USB |
| Dimensions (L x H x D) | Approximately 20 x 15 x 3 cm |
| Weight | Approximately 500 g |
| Main Functions | Automatic slideshow, image rotation, cropping, copy from PC, date and time display |
| Included Software | Philips Photo Manager for Windows 2000/XP |
| Software Languages | Multilingual (including French) |
| Care and Cleaning | Wipe with a soft, dry cloth. Do not use liquid or abrasive products. |
| Safety | Do not expose to moisture or extreme temperatures. Unplug before cleaning. |
| Spare Parts and Repairability | AC adapter available as spare part. Repair by authorized center. |
| General Information | Digital photo frame designed to display photos simply and elegantly. Works with or without computer after image transfer. |
Frequently Asked Questions - 7FF2FPA PHILIPS
User questions about 7FF2FPA PHILIPS
0 question about this device. Answer the ones you know or ask your own.
Ask a new question about this device
Download the instructions for your Digital photo frame in PDF format for free! Find your manual 7FF2FPA - PHILIPS and take your electronic device back in hand. On this page are published all the documents necessary for the use of your device. 7FF2FPA by PHILIPS.
USER MANUAL 7FF2FPA PHILIPS
- Welcome to Photo Manager 2
- Photo Manager Features 2
- Getting Started 3
3.1 System Requirements 3
3.2 Installation 3
3.3 Start Philips Photo Manager 3 - Phillips Photo Manager Overview 4
- Using the Photo Manager 5
5.1 Setting up Photo Manager 5
5.2 Crop Photos 7
5.3 Cutting, Copying and Pasting Photos 8
5.4 Create New Albums 9
5.5 Renaming Albums 9
5.6 Deleting Albums and Photos 9
1. Welcome to Photo Manager
Philips Photo Manager for PhotoFrame is a Windows application for users to manage photos between the Philips PhotoFrame and a PC. It provides an easy to use user interface. It enables you to:
- Browse and preview the photos in both PC directories and PhotoFrame albums.
- Perform operations such as copying, moving and deleting photo(s).
2. Photo Manager Features
Philips Photo Manager for PhotoFrame has the following features for your convenience:
- Share photos between PC and the Philips PhotoFrame.
- Automatically resize the photos to match PhotoFrames resolution.
- Use drag and drop to copy photos between a PC and the Philips PhotoFrame.
- Retrieve removed photos from Auto Run Recycle Bin.
- Automatically detect Philips PhotoFrame.
3. Getting Started
3.1 System Requirements
- Computer Hardware Basic Requirements: Minimum: Pentium III 500MHz processor or equivalent or above, 128MB RAM, 100MB free HDD space, 16-bit High Color display adapter.
Supported PC Operating System: MS Windows XP, and MS Windows 2000.
Supported Languages: Chinese Simplified, Chinese Traditional, English, French, German, Italian, Japanese, and Spanish.
3.2 Installation
Follow the instructions below to install the Photo Manager Software on your computer:
1 Insert the CD into the CD-ROM of your computer and the CD will Auto play.
2 Follow the on screen instructions.
3 Click Finish to complete installation and launch Photo Manager.
3.3 Start Philips Photo Manager
Photo Manager automatically starts when you connect your PhotoFrame to your PC with the USB-cable.
To start Philips Auto Run manually:
1 Right-click the Auto Run icon in the Windows taskbar.

2 Select Show Photo Manager. The main window appears. To start using Photo Manager, refer to Section 5 Using Philips Photo Manager.
ENGLISH
To terminate the program, select Terminate Photo Manager.
Photo Manager will automatically launch when the PhotoFrame is connected to your PC through a USB cable. You may also double click the desktop shortcut to bring up this application. See Section 4 for further details.
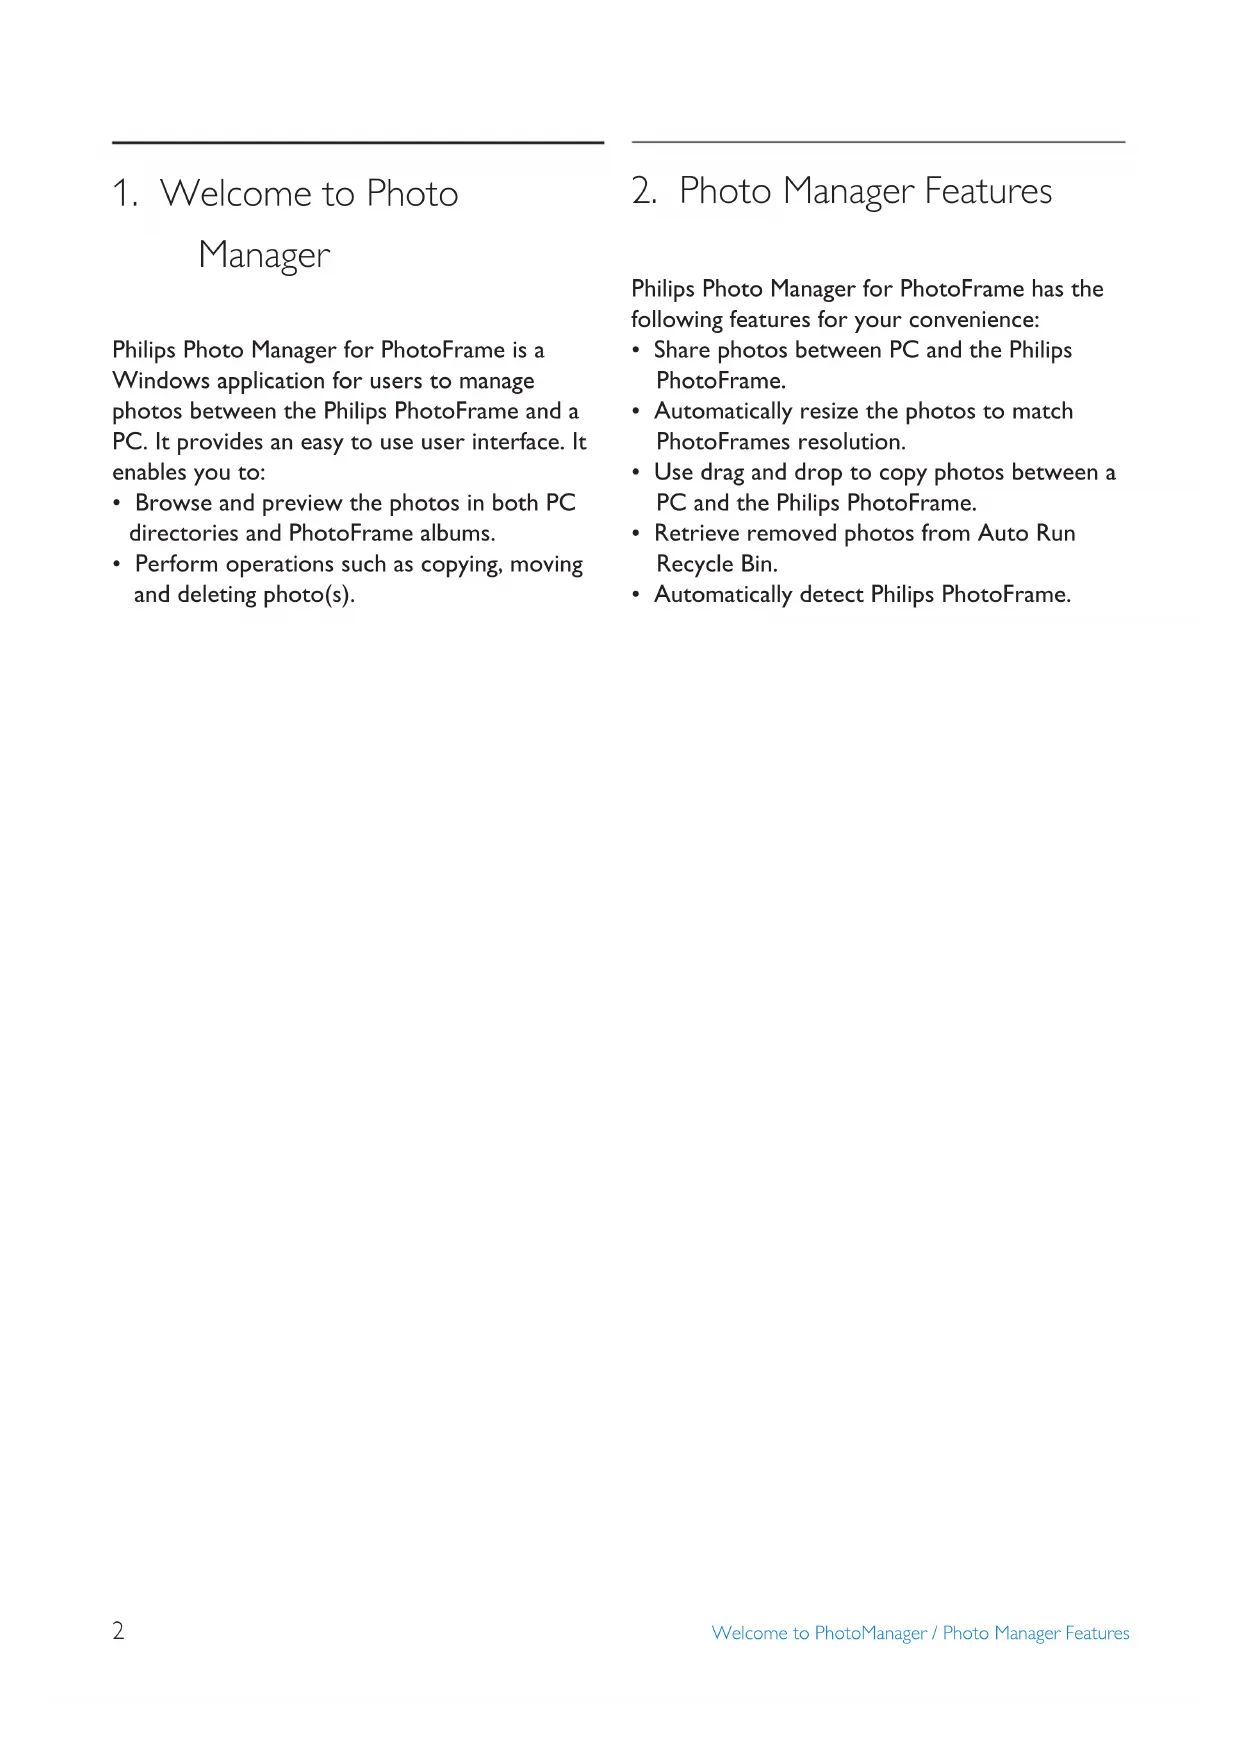
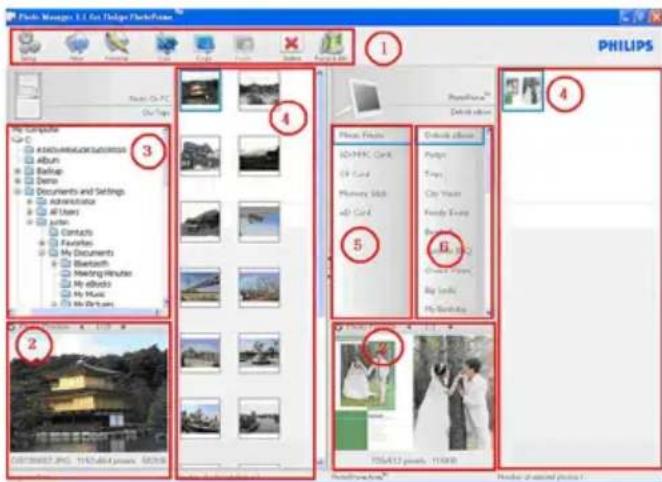
4. Phillips Photo Manager Overview
The screen below is the first one you will see when launching the Photo Manager. From here you control the functionality of the software. The screen is divided into the sections described below:
1 Photo Manager Toolbar Command Key Pane is just beneath PC/ PhotoFrame Panes and contains the functional button for Photo Copy, Cut, Past and Delete operations. Within the Command Key Pane, you may click the setup button to set the desired language, and use the recycle bin button to undelete photos.
Setup: The Setup button allows you to change such features as Photo Manager automatically running when the PC starts, and the language of the application.
New Album: The New Album button allows you to create new albums on a memory card or the PhotoFrame.
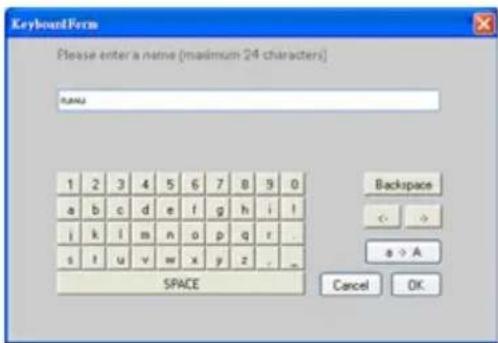
Rename Album: Click the Rename Album button to bring up a Keyboard Input Window.
Cut: You should select photos first and then click on the Cut button to cut the selected photos.
Copy: Select photos first and then click on the Copy button to copy the selected photos.
Paste: Immediately after you click on the Copy or Cut buttons, the Paste button will become available. You can select the target folder from the previous selected photos into the target folder (album).
× Delete: Select the photos or album that you want to remove and click on the Delete button to remove them.
Recycle Bin: Click the Recycle Bin button to switch the target folder to the recycle bin folder. You may browse those removed photos and move them back to desired folders.
Close: Clicking the Close button minimizes the application, which will be shown as a tray icon in the taskbar.
Your can always bring back this application by right-clicking on this tray icon and selecting the "Show Photo Manager" option. Alternatively, you may terminate this application by selecting "Terminate Photo Manager".

2 Photo Preview
Display the user selected picture with detail information, such as file name, file size and photo resolution.
3 The PC Frame
The PC Frame displays a folder tree structures similar to Windows Explorer, photos are shown as thumbnails. If no JPEG images are available "No Photo" will be displayed.
Warning:
Even if this view displays the "No Photo" message, this folder may contain other files and may not be empty.
Folder Tree View:
Displays all folders and the recycle bin in a tree structures similar to Windows Explorer. If the user clicks the desired folder, all photos in the folder will be shown in Photo Thumbnail View.
4 Thumbnail Previews
Display all photos in thumbnail view based on the user selected folder from folder tree view.
5 PhotoFrame Storage
Displays all of the storage devices on the PhotoFrame. The available devices are highlighted.
Note:
Philips PhotoFrame is not connected to your PC the "Disconnected" message will be shown.
Between the PhotoFrame storage (5) and the PC thumbnail Preview (4) is the Slide Bar: Click to move the Slide Bar left and increase the PhotoFrameTM Storage area and vice versa (you may click to increase the PC Thumbnail preview).
6 Album View
Displays the albums in the storage device.
5. Using the Photo Manager
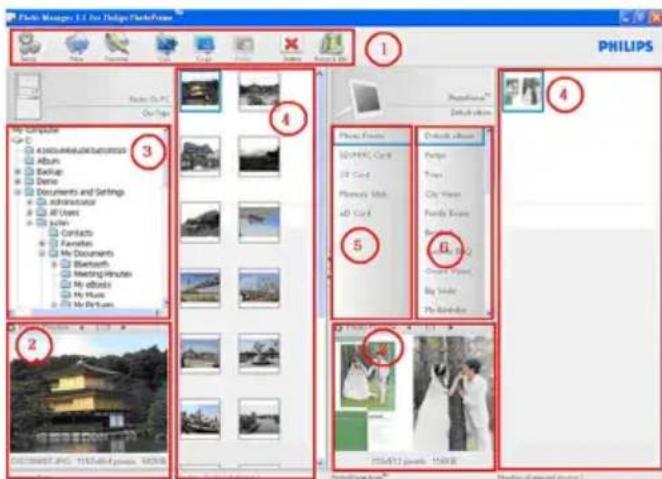
5.1 Setting up Photo Manager
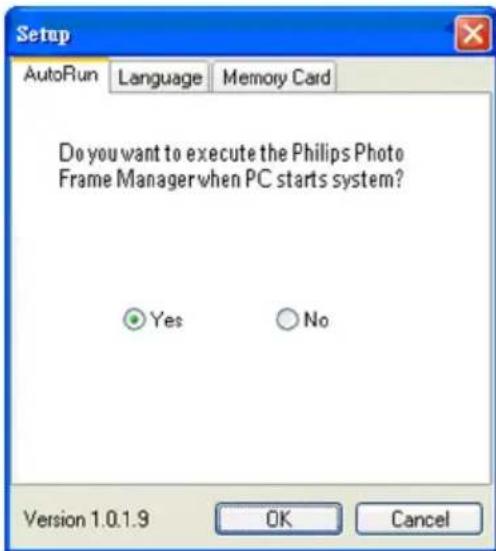
Setup Tool: You may setup application execution and language preferences from this window.
AutoRun Tab :
1 Select the "Yes" radio button to execute the Philips PhotoFrame Manager automatically, or select "No" to execute the Philips PhotoFrame Manager manually.
2 Click "OK" to confirm the change you have just made.
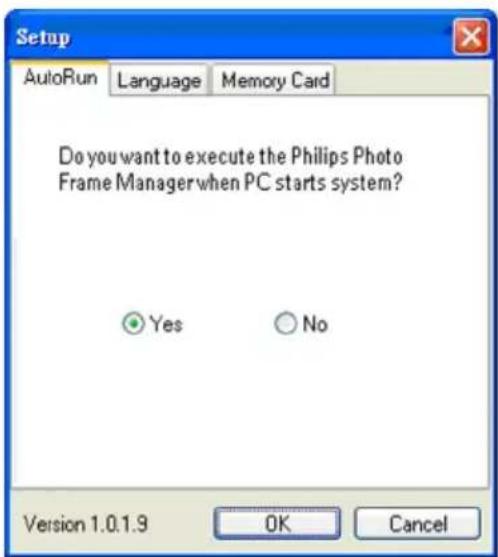
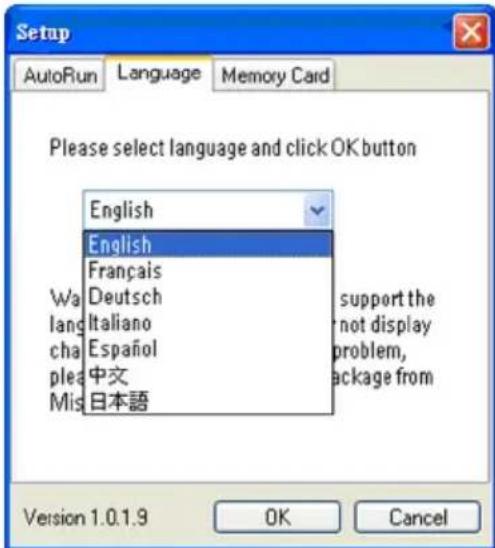
Language Tab:
1 Select the required application language from the list.
2 Click "OK" to confirm the change.
Warning:
If your computer doesn't support the selected language, the characters may not be displayed correctly. To solve this problem, update the language service packs from the Microsoft Website.
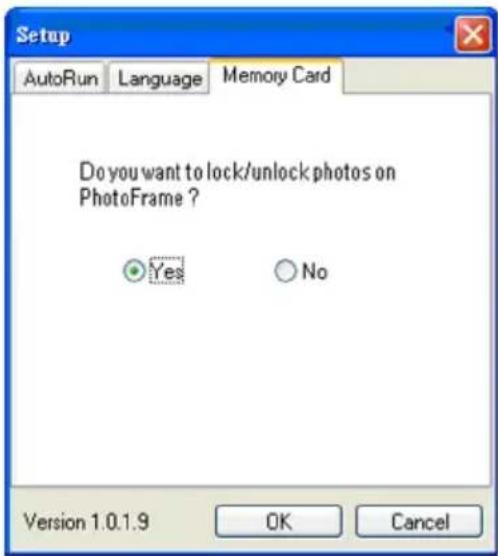
Memory Card Tab:
1 Select the "Yes" radio button to prevent users from deleting or making changes to photos in the PhotoFrame or select "No" to allow users to perform those operations on photos in the PhotoFrame.
2 Click "OK" to confirm the change you have just made.
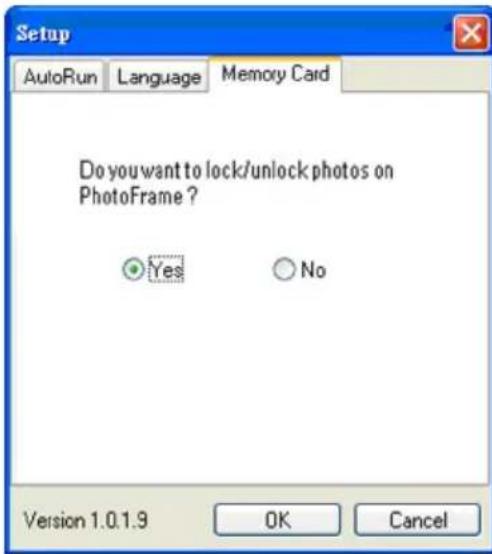
3 If users try to delete photos when the PhotoFrame has been locked, the following warning message will be displayed.

5.2 Crop Photos
- Photo Manager will automatically resize all photos copied to the PhotoFrame.
- Photos larger than 540 × 720 or 720 × 540 pixels can be manually cropped by double clicking the photos in the thumbnail view as shown below.
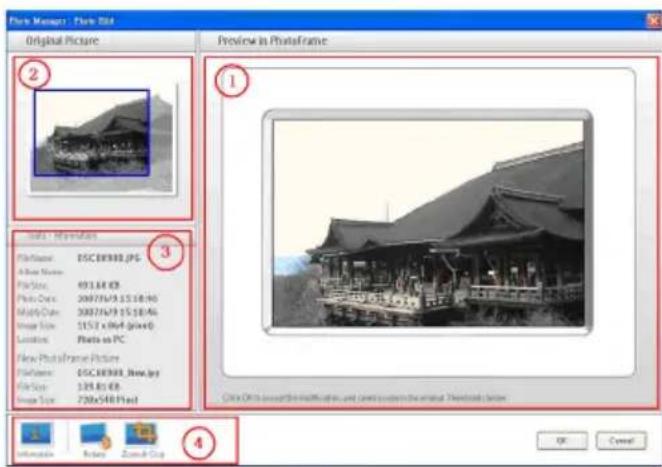
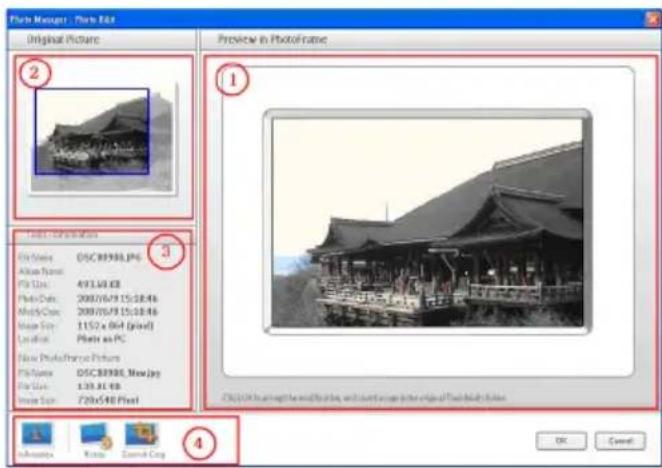
Preview in PhotoFrame
In this preview area, the cropped photo results are shown as it will be display in PhotoFrame.
2 Original Picture
- Displays the original photo in the thumbnail view and the area to be cropped in a blue rectangle, which presents the cropping area with 540x720 or 720x540 pixels.
- Use the mouse to drag this rectangle area to your desired area.
3 Tools Information Area
- Displays the Album Name, Date Time, and Photo Description information of the selected photo.
- Displays the submenu icons based on the selected command keys.
4 Tools
The Tools Pane is just located on the bottom of the Photo Edit Window, and contains the buttons for photo editing.
Information:
The Information button shows the Album Name, Date Time, and Photo Description information of the selected photo.
| Tools - Information | |
| File Name: | Phi_0001.JPG |
| Album Name: | Trips |
| File Size: | 98.11 KB |
| Photo Date: | 2007/1/12 14:18:04 |
| Modify Date: | 2007/1/12 14:18:04 |
| Image Size: | 720 x 424 (pixel) |
| Location: | Photo on PC |
| New PhotoFrame Picture | |
| File Name: | Phi_0001_New.jpg |
| File Size: | 100 KB |
| Image Size: | 720x540 Pixel |
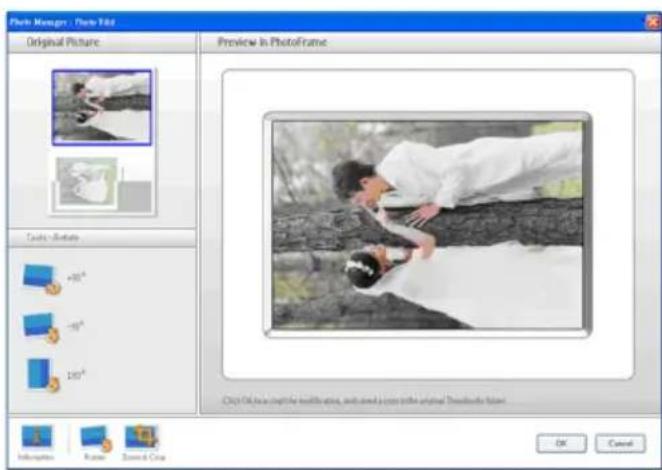
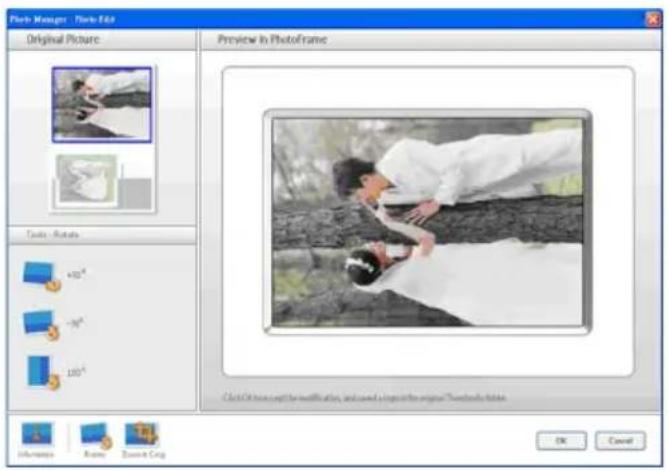
Rotate:
The Rotate button allows you to rotate the angle of the selected photo. Available angles are +90^ , -90^ and 180^ . Once the desired angle has been selected, both images in Original Picture and Preview in PhotoFrame will be automatically adjusted to the new angle.
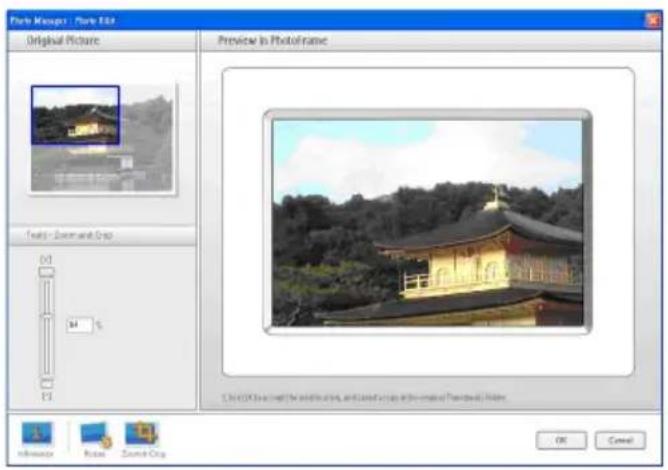
Zoom & Crop:
Click the Zoom & Crop button to bring up the scaling control bar into Tools information Area. Users can zoom in to the photo by dragging the control bar up, or zoom out by
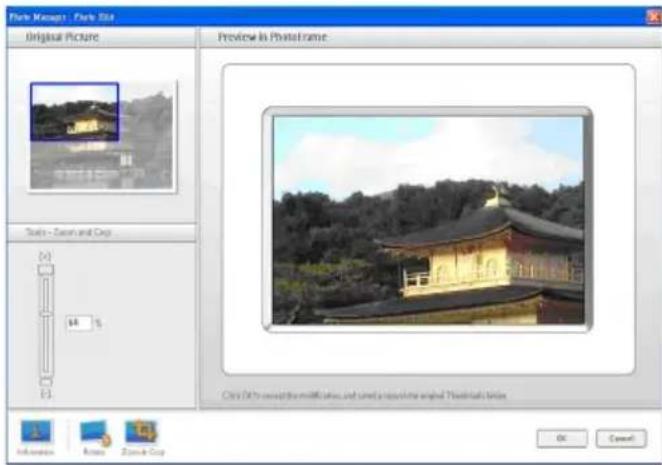
To confirm the crop operation simply click OK button. It will save the cropped file in the same folder. The saved file will carry the same filename plus an index number. For example, if the original filename is original.jpg, the saved file will be original(1).jpg
Note:
If the Photo size is less than 540× 720 or 720× 540 pixels, it will display the following warning message.

5.3 Cutting, Copying and Pasting Photos
Copy:
Select the photos first, and then click the Copy button to copy the selected photos. Copying leaves the selected photos in their original folder.
Cut:
Select the photos first, and then click the Cut button to cut the selected photos. Cutting removes the selected photos from their original folder.
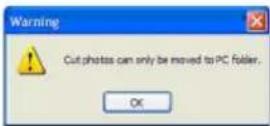
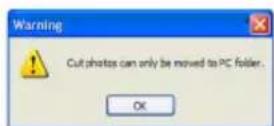
Warning:
Photos can be cut from a memory card to a PC, but cannot be cut from a PC to a storage device.
Warning:
Do not disconnect USB connection between the PC and the PhotoFrame when copying, moving or deleting photos in PhotoFrame as this may cause the loss of data or the photo.
Paste:
Once the photo has been cut or copied it needs to be pasted into the chosen folder.
1 Select the folder to paste into.
Either click the Paste icon or right click for the secondary menu and click Paste.
5.4 Create New Albums
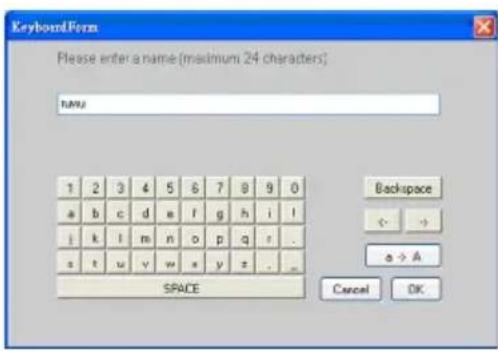
To create a new album
1 Select the PhotoFrame or target memory card
2 Click on the New Album icon to bring up Keyboard Form window. the album to bring up the secondary menu and click Rename.
3 Input the name for the album using either the computer keyboard or by clicking on the keyboard buttons.
4 Click OK to add the new name.
5.5 Renaming Albums
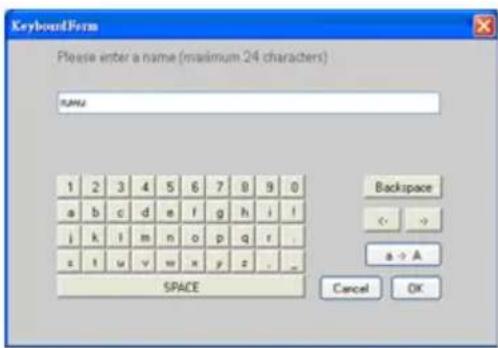
1 Select the album to rename.
Either click the rename icon or right click the album to bring up the secondary menu and click Rename.
3 Input the name for the album using either the computer keyboard or by clicking on the keyboard buttons.
4 Click OK to add the new name.
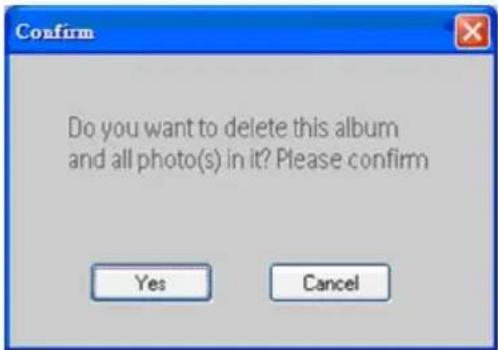
5.6 Deleting Albums and Photos
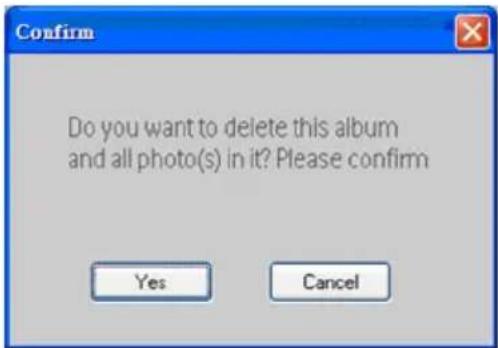
Albums and files are deleted in the same way:
1 Select albums / photo that you want to be removed.
Either click the Delete icon or right click for the secondary menu and click Delete Album/Delete.
3 A confirmation window similar to the one below will pop up and ask you to double confirm. Click Yes.

Note :
All deleted files will be moved into the Recycle Bin.
Warning:
If the HDD has minumim free memory space, it does not allow to backup.

Contenu
Displays the albums in the storage device.
5. Utiliser Photo Manager
5.1 Configurer Photo Manager
To start Philips Auto Run manually:
1 Vorschau in PhotoFrame (Preview in PhotoFrame)
1. Benvenuti in Photo Manager
Iporpamma Philips Photo Manager for PhotoFrame npednaraet cneyuoune BO3MOXHOCTn pa60TbIC fOTOCHIMKAMN:
- Переньoc Фоточимков с пь в поразу Philips PhotoFrame и образно.
- ABTOMaTnuecka noIroHka pa3Mepa
- FOToCHIMKA B COOTBeTCTBUN C pa3peUeHneM
- FOToPamKn PhotoFrame.
- KoninpoBaHne nepetacknBaHnem dIe npeHoCa
- phaIIOB fOToCHmKOB c IK b fOToPamKy
- Philips PhotoFrame nnn n3 fOToPamKn B
- KOMNbIoTeP.
BocctaHOBHeHne ydaJIeHHbIX paIIOB n3 Kop3nbl (Recycle Bin). - ABTomaTnueckoe obHapyKeHne foToPamKn Philips PhotoFrame.
3. Ппстураем к paбote
3.1 CnCTeMHbIe Tpe6oBaHnA
OchOBhIe Tpe6oBaHnK aannapaTHomy oEscneueHHIO: MInHmAlbHaN KOHpHpyaun: npoueccop Pentium III c TaKToBOn yacToToN 500 MTu nn 6oJee MoUHb; O3Y 128 M6aNT; 100 M6aNT cBo6oHOrO MeCTa Ha JecTKOM dNcKe; BnDeokOHtPoJIep, NODepXKBaUOuN 16-pa3PdHyU zBeTOByU naITpy High Color.
- ПовдерхиВаемье операционьe системы
ПК:MS Windows XP и MS Windows 2000.
- IopdepxnBaembIe 3bIKN: KNTaickN ynpoueHHbI, KNTaickN TpaHcNOHHbI, aHrlnckN, fpaHcy3ckN, HemeckN, nTaJIbHCKN, rnoHckN uNCaHCKN.
3.2 YcTaHOBka
2 BbIbePte KOMaHny "OTKpbItb Photo Manager (Show Photo Manager).
OTKPOETcraIaBHOe OKHO nporpaMMbl IopraOK pa6Otbl c nporpammo Photo Manager onncan B Pa3dene 5 "Pa6ota c nporpammo Philips Photo Manager".
YTo6bI 3aKpbITb nporpaMMy, BbIbepnTe KOMaHy 3aKpbITb Photo Manager (Terminate Photo Manager).
Прорра мma Photo Manager 3anycntcra abTomatnueckn npn noKJIuOeHn ФOTOPAMК PhotoFrame K Kombltepy c nOMou bIO USB-ka6eJ. 3anycntb 3Ty PpORpaMMy MOxHO TAKKe IBOHbIM UeJIyKOM NO 3Hauchy Ha pa6ooyem CToJe. ДононгTeььные CBedeHnЯ CM. B Pa3dene 4.
4. Kpatkoe onncaHne nporpaMMb Phillips Photo Manager
Ha pncyHke Bn3y noka3aH ekpaH, KOtOpbI OTKpbIbaTcra npn 3anycke nporpamMbI Photo Manager. B 3Tom ekpaHe ectb BCE heo6xOIMbIe nporpamMbIe cpeidCTBa ynpabNeHn. 3KpaH pa3delen Ha naHeJI, onncahne KOtOpbIX npINBOIDTCra HNXe:
1 Панель Иструментов порpaMMbl Photo Manager
PanaHb KhoNOK ynpaBJeHn, paCnoJIOKeHHa HEnocpeDCTBeHHo Ha naneJIaMn FOTo Ha PIK/PhotoFrame, coepxnt KhoNKn dJa BblOnHeHn TaKnx DeiCTBn C paJNaMn CHIMKOB, kak KonnpoBaTb (Copy), BbiPe3aTb (Cut), BCTaBtB (Paste) n YdaJIHTb (Delete). Haxkab KhoNky HAcTpOka (Setup) Ha PanaHn KhoNOK ynpaBJeHn, moXHO 3aDaTb HyXhbl J3bIK, a Haxkab KhoNky Kop3Ha (Recycle Bin), -BOcCTaHOBNTb ydaJIeHHbIe FOToCHIMKN.
Co3daTb anb6om (New Album): KHOIIKa
Co3daTb aIb6om (New Album) no3B0n8e T co3daBaTb HOBbl e aIb6ombi Ha KapTe nAmrTu INN B foToPamke PhotoFrame.
IpeenMeHOBaTb aIb6om (Rename Album): nocJe HaxaTnKHOJIpeENMeHOBaTb aIb6om (Rename Album) OTKpbBaetc OkHo KnaBnAtypa (Keyboard Form).
Bbipe3aTb (Cut): CHaHaJb BbIeJIte HUxHbIe FOToCHIMKn, a 3aTeM HaxMITE KHOkky Bbipe3aTb (Cut), YTO6bl Bbipe3aTb INX.
KonpoBaTb (Copy): ChaHaJa BbIeJIInTe HxHbIe fOToCHIMKn, a 3aTeM HaxMITE KHOKNy KonpoBaTb (Copy), YTO6bl CKoNpOBaTb nx.
BcTaBnTb (Paste): cpa3y noCne HaKaTnK HonKoNipOBaTb (Copy) nnn Bbipe3aTb(Cut) aKTNBpuyETcIЯ nCNoJIb3OBAHnK HonKaBcTaBnTb (Paste). YkaJnte ceJeByIO nAnKy(aJIb6OM), B KOTOpYIO CJIeDyeT BcTaBnTb paHee BbIeJIeHHbIe fOToCHIMKn.
YdaNTb (Delete): BblJeJIte FOOTCHIMKINaIb6om, KOToPbIE XOTNE ydaNTb, a 3aTeMHaXMITE KHOKNy YdaNTb (Delete).
Kop3Ha (Recycle Bin): NaKMITE KHOJky Kop3Ha (Recycle Bin), YTO6bI n3 ueJeBOI naKN nepeKIOHTbcB B naNKy KOp3HbI. 3deCb MOxHO npOCMOTpeB ydaJIeHHbIe FOToCHIMKn I npn Heo6XoDMOCTN BOCCTaHOBtB IN, NepeMeCTNB CHOBA B Ty naKy, n3 KOtopoON HbIN ydaJIeHbI.
3akpbItb(Close):HaXaTne KhoNKn 3akpbItb (Close) npINBOIDNT K CBOpauHBaHIO OKHa npOrpaMMbl B 3HaQOK B CnCTeMHoI ObIaCTn naHeJI 3aJaU.
YTO6bI CHOBA pa3BepHyTb OKHO npoRpaMMbl, npaBOI KHOKNH HAXMNTe 3HaQOK CnCTeMHo O6IaCTn NaHeN 3aJaU B KOHTeKCTHom MeHIO BbIbepnTe KOMaHdy "OTkpBTb Photo Manager (Show Photo Manager)". JIo6o MOxHO COBcEM 3aKpbITb 3Ty npoRpaMMy, BbIbpaB KOMaHdy "3aKpbITb Photo Manager (Terminate Photo Manager)".

2 IpocMToP oTOCHUMKOB
OTo6paXaETcBbIeJIeHHbI NOJb3OBaTeJIeM
POTOCHMOK BMeCTe C TaKIMN CBeJeHnA M,
kak mra paai na, pa3Mep paia n
pa3peWeHne CHIMka.
3ΦoToHaIIK
B nanei Photo Ha PIK noka3aHa ctpyKtypa
nanok B BVide DepeBa (Tak Ke, KaB
nporpamme PpoBoDnK Windows), a
fOTOCHMKn NOKa3aHbI B BVide 3CKn3OB.
Pn OTCytCTBn FaiNoB N3o6paXeHni
fOpMaTa JPEG oTo6paXaetc coo6ueHne
"OToCHMkOB Het (No Photo)".
PpeynpeKdHne:
daxe ecnno OTo6paXaETc coo6ueHne "ΦOTOCHMKOB Het (No Photo)”, 3ta nanka MOxet 6bITb He nyCTO, B Hei MOryTH haoDHTbc4 faaibl dpynx fOpMaTOB.
DpeBOuHa TaPyKTypa nanok:
Bce npKn, B TOM uHcJIe npKa Kop3nHbI, OTO6paKaIoTcR B BVdE DepeBa - TaK Je, KaK B npOrpAmME PpOBoDnK Windows. EcNn UeJKNHyTb NO ToN INN INHOIN PaKe, TO BCE HaxoJaUneCBA HeN FOToCHIMKn 6yDuT NOKa3aHbI B BVnde 3CKN3OB.
4 3cKn3bl
B 30TOn naneN Bce foTOCHIMKn B nAnKe, BbIeHnHO nONb3OBaTeJeM B dpeBOBnHO CTpykType, OTo6paXaIOCTc BnDe 3CKN3OB.
5 NamrTa PhotoFrame
B 3ToI nAHeNn noka3aHbI BCE yCTpoiCtBa XpaHeHn, KOTOpBle MOxHO NcNoJIb3OBAtB BΦOTopAmKe PhotoFrame. IOnKlUoyeHHbIe YCTPOIcTba XpaHeHn BbIeJeHbI cBeTOM.
Приимechи:
Korda foTopamka Philips PhotoFrame He nodknqueha K PIK, oTo6paKaetcra coo6eHne "Nodknquehne oTcyTCTByET (Disconnected)".
PanaHn PamaTb PhotoFrame (5) n 3ckn3bl (4) pa3depeHbI POBHXHO nnAHHo. HaxmamTe 3NaOOK ,YTO6bl CDBNHytB POBHXHYo PAnHKy BnEBO dIpaCunpeHnnaHEnn PamaTb PhotoFrame, nIi HaXmMaTe 3NaOok YTO6bl paCUnpntb naHeJb 3ckn3bl CHIMKOB Ha NK.
6 AJIb6oM
B 308 nanei OTO6paXaOTc aIb6ombl yctpoNCTBe xpanen.
5. Pa6ota c nporpammo Photo Manager
5.1 Hactpoika nporpammbi Photo Manager
HCTpymehT Hactpoika (Setup): B aTom okHe moXHO hAcTpOHTb pexnM 3ayncKa nporpaMMbI n 3bIK NOB3OBaTeNbckoro INHTepceia.
BknaIka ABTo3anyck (AutoRun):
1 Ecnn xotnte, yTo6bI nporpamma Philips PhotoFrame Manager 3anyckaIacb abTomatnueckn npn 3anycke KOMnbIoTepa, To Haxmnte KhONky "Da (Yes)"; ecnn xotnte BpyHyIO 3anyckaTb nporpammy Philips PhotoFrame Manager, To Haxmnte KhONky "Het (No)".
2ДяpoTBePKeHnCeHaHHOroBbI6opa HaxMITE"OK".
BknaIka Ra3bIK(Language):
1 N3 cnNcKa Bbl6epnte HxHbI Ra3bIK nHTeppeiCa nporpaMMbl.
2ДлгпоТВерждени ВьбogaнЖмITE"OK".
PpeynpekdeHne:
ecn BaW KOMNbOTep He noDepKINBaET BbIbpaHHbY3bIK,TO BO3MOXHO HEnpaBnHoe OTo6paXeHne CmBONOB.ДЯ pa3peSeHnE 3ToI npo6JIembl 3aRpy3nte NaKeTbI O6HOBJIeHn DnI BaWero Ra3bika C Be6-caTa KOMpAHn Microsoft.
Bknaika "KapTa namrTn (Memory Card)":
1 HaKMITE KONky "Ja (Yes) ", yTo6bl 3anpeTNTb ydaJIeHne nIu n3MeHHe cHMKOB B FOtOpamke PhotoFrame, IIN HAKMITE KONky "Het (No) ", yTo6bl pa3peWNTb NOnb3OBAteJIIO BbINOJIHrTb 3TN DeIcTBnA CO CHIMKaMn B FOtOpamke PhotoFrame.
2ДЯ noTBepeHnCeHaHHOro BbIbopa HaxMITE "OK".
3Пипьтke ydaNTbФOTOCHMnВ 3a6IOKINPOBaHNoIΦOTOpAMKe PhotoFrame nOBITcR cIeDyUoOee IpeDynpexKaIoUoe coo6uene.

5.2 O6pe3ka foTOCHmKOB
- Поррамma Photo Manager abTomatueckn
нзмehяет pa3mep BCex CHIMKOB,
скопованьхВ сфотамky PhotoFrame.
ΦOTOCHMKn c pa3Mepom 6oJee 540x720 nnn 720x540 nKcene MoXHo o6pe3aTb BpyHyo; IINr 3TOr DBaXdbI UeJIKNHTe Nc CHIMKy B NaHeNn 3CKn3OB, KAK NOKa3aHO Ha pncyHke BHn3y.
Ha naneHnHcTpymeHTbI, pacnoJoxeHHoB Bn3y OkHa "PeakTpoBaHne fOToCHMkoB (Photo Edit), haxoJrTcKHOKn KOMaHd peakTpoBaHnA fOToCHMkoB.
CbeHnna (Information):
Пи Нжати Кногк Сбеденя (Information) noka3bIBAIOrTa Ha3BaHne aIb6Oma (Album Name),ДаТa И ВрмЯ(Date Time)и OписTeЛьнБie Cбеденя O BыДeJIeHHOMФОTOCHIMKE.
| Tools - Information | |
| File Name: | Phi_0001.JPG |
| Album Name: | Trips |
| File Size: | 98.11 KB |
| Photo Date: | 2007/1/12 14:18:04 |
| Modify Date: | 2007/1/12 14:18:04 |
| Image Size: | 720 x 424 (pixel) |
| Location: | Photo on PC |
| New PhotoFrame Picture | |
| File Name: | Phi_0001_New.jpg |
| File Size: | 100 KB |
| Image Size: | 720x540 Pixel |
NobepHyTb (Rotate):
KhoNka NObepHyTb (Rotate) no3BOJnAeT NOBOpaUBAtB BbIeJIeHHbI fOToCHMOK. NOBOpaUBAtB MoXHO Ha +90^ -90^ n 180^ . Iocne Bbl6opa HxKHO rHa nOBopota o6a N3o6paXeHNA aBTOMaTHueCKN NOBepHyTcN IOd 3TNm yILOM IN B OKHe NcxOHDoe n3o6paXeHne (Original Picture), IN B OKHe PpeDvapntelhBi npocmotp B fOToPamke PhotoFrame (Preview in PhotoFrame).
Macwta6 n o6pe3ka (Zoom & Crop):
HaxMnte KhoNky MacuTa6 n o6pe3ka (Zoom & Crop), yTo6bI B INΦopMaUHOHOM nOJIe NHCtpymeHTb (Tools) nOKa3aTb IKAny macuTa6a c nOJ3yHKOBbIM peryJrTOpOM. IpeEbnraJnOJ3yHOK BBepx no IkaJe, MOXHO DeJaTb CHIMOK KpyJHee, a nepeDbirra nOJ3yHOK BHN3, - MeJbYe.
UTo6bI NOITBepdntb OpeaunO obpe3kn, HaxMnte KhoNkY OK. B pe3yIbTaTe paJIo 6ope3aHHoro CHIMKa 6yDet COXpAHen B Ty Xe npKy. PaJIo 6ope3aHHoro CHIMKa 6yDet COXpAHen IOd Tem Jxe IMHeM, YTO INCXoHbI paJn, HO C cHPOBbIM INDeKcOM. HanpImep, ecnn y nCxODHoro paJna 6blno mMa original.jpg, TO paJIo 6ope3aHHoro CHIMKa 6yDet COXpAHen IOd IMeHem original(1).jpg

PpimmeaHne:
ecn pa3Mep cHIMKa MeHbSe 540x720 nnn 720x540 nKcene,To noBtca cJeDyUoee npdynpeXdaOoee coo6eHne.

5.3 Bbipe3aHne, konnpoBaHne n BcTaBka foTOCHMkOB
KonnoPoBaTb (Copy):
ChauJa BbIeJIInTe HxKHbIe @OTCHIMKn, a 3aTeM HaKMITE KHOINky KonnpoBaTb (Copy), YTO6bl cKONnPoBaTb nx. PpN KOINpOBAHm BblJeHHbIe @OTCHIMKn OCTaHTcB CBOe INCXODHOI PaKe.
Bbipe3atb (Cut):
chauana BbIeJInte HxKHbIe foTOCHIMKn, a 3aTeM haxmnte KHOIIky BbIpe3aTb (Cut), yTo6bl BbIpe3aTb nx. PnBbIpe3aHnN BbIeJIeHHbIe foTOCHIMKn ydaJIraHTc n3 CBOe INCXoJHO nnKN.
PpeynpekdeHne:
MOxHO Bbipe3aTb foTOCHMKn Ha KapTe NaMaTn IV BCTabIaTb IN HA PIK, HO HeIb3a IN X Bblpe3aTb Ha PIK IN BCTabIaTb HA yCTpoIcTB XpaHeHna.
PpeynpekdeHne:
BO BpeM KOnnpoBaHn, NepMeueHn nn ydaIeHn CHmKOB BΦOTopamKe PhotoFrame He pa3pbBaIte USB-nodkIoueHne MeJdy PIK nΦOTopamKo PhotoFrame, Tak KaK 3TO MoKet npVBecTn K NOTepe DaHHbIX NNΦOTOCHMKOB.
BctaBntb (Paste):
Iocne konnpobAHn nn Bbipe3aHn
fTOCHIMKa ero HxKHO BCTaBNTb
B BbipahHyIO nanKy.
1 BbIbepeTe npKy, B KOTOpyHyXHO BCTaBNTb CHMOK.
2 HaxmTe 3HaOK KOMaHDbI BcTaBnTb (Paste) INI HaxaTNem npaBOi KHONK Mblu OTkpoIne KOHTeKCTHOe MeHIO N B HEM Bbl6epNTe KOMaHdy BcTaBnTb (Paste).
5.4 Co3aHHe HOBbIX aIb6OMOB
Iopraokco3dHnHOBOro anb6oma
1 Bb6epnte foToopamky PhotoFrame nnn KapTu naMRTN, IDe HxKHO co3daTb aIb60m
2 Haxmte 3HaoyoK KomaHbI Co3aTb aIb6om (New Album),TO6bl OTkpblb OKHO Knabnatypa (Keyboard Form). the album to bring up the secondary menu and click Rename.
3 C KnaBnataPbI KOMnbIOTepa IIN HaXaTneM KHONOK Ha 3KpaHHoN KnaBnataType BBeDNTe Ha3BaHHe aIb6oma.
4 3aKoHcYB BBOd NMeHN, HaxMnte OK.

5.5 IpeenMeHOBaHne aIb6oMoB
1 BbIeNITe aIb6om, KOtOpBIM XOTNTe nepenMeHOBaTb.
2 HaxMITE 3HaOK KOMaHdbI IepenMeHOBaTb (Rename)JI6o npaBoi KHOIKoHaxMITE no aJIb6OMy N B KOHTeKCTHom MeHIO Bbl6epnTe KOMaHdy IepenMeHOBaTb (Rename).
3 C KnaBnAtypbl KOMNbIOTepa HJIH HaxaTneM KHONOK Ha 3KpaHHoN KnaBnAtype BBeDNTe Ha3BaHHe aJb6oma.
4 3aKOHyB BBOID HOBOrO IMeHN, HaxMnTe OK
PnmeaHne: BCE ydaJIeHHbI epaJIbI 6ydyT nOMeUeHbI B npKOp3Ha (Recycle Bin).
PpeDynpexKdeneHne:
Pn MInHmAlbHom pa3Mepe CBO6oHOrO MeCTa Ha JeCTKOM DnCKe BOCCTaHOBJeHne YdaJIeHHbIX paIIOB HeBO3MOxHO.

5.6 ydaeneHne aIb6omOB n foTOCHMkoB
YdaenHe aIb6omOB n paJIOB npOncxOaNT OOnHaKOBO:
1 BbIeJIte aIb6OmbI / FOToCHIMKn, KOToPbIE XOTnte ydaJIITb.
2 HaxMITE 3HaQOK KOMaHDbI YdaNITb (Delete) nJn HaxKaTHe m npaBoi KhoNk MblSi N OTKpoIe KOHTeKCTHOe MeHIO N B HeM BbI6epNTe KOMaHdy YdaNITb aJIb6oM/YdaNITb (Delete Album/Delete).
3 OTKpoetcnaKa3aHHoe BnH3y OKHO c npednoxeHneM noDTBepntb onepauu ydaJIeHn. Haxmnte Da (Yes).
Contidente
- Bienvenido a Photo Manager 52
- Caracteristicas de Photo Manager 52
- Primeros pasos 53
3.1 Requisitos del problema 53
3.2 Instalación 53
3.3 Abrir Philips Photo Manager 53 - Vista general de Phillips Photo 54
Manager
2 Imagen original (Original Picture)
1 Photo Manager Taakbalk
4 Thumbnail Previews
Preview in PhotoFrame
5.4 Creer neue albums.
4. Phillips Photo Manager Overblick
Philips Photo Manager for PhotoFrame
3.3 启动Philips Photo Manager
2 选择显示Photo Manager(Show Photo
Photo Manager (Show Photo Manager)
4. Phillips Photo Manager
概要
Using the Photo Manager