USER MANUAL PowerTouch PT717 PHILIPS
Always here to help you
Register your product and get support at
www.philips.com/welcome


PT717
PT715
PT712
PT711
User manual
ENGLISH 6
DANSK 14
DEUTsCH 22
EAAHNIKA 30
ESPANOL 39
SUOMI 47
FRANÇAIS 55
ITALIANO 63
NEDERLANDS 71
NORSK 79
PORTUGUES 87
SVENSKA 95
TÜRKÇE 103
Introduction
Congratulations on your purchase and welcome to Philips! To fully benefit from the support that Philips offers, register your product at www.philips.com/welcome.
Please read this user manual, as it contains information about the wonderful features of this shaver as well as some tips to make shaving easier and more enjoyable.
General description (Fig. 1)
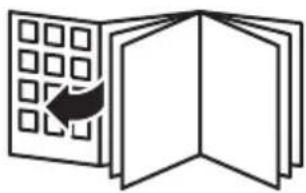
1 Protection cap
2. Shaving unit
3 Shaving unit release button
4 Shaver on/off button
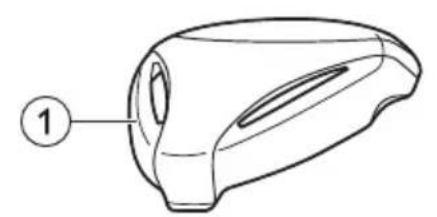
5 Adapter
6 Cleaning brush
Note: You can find the type number on the back of the shaver.
Important
Read this user manual carefully before you use the appliance and save it for future reference.
Danger
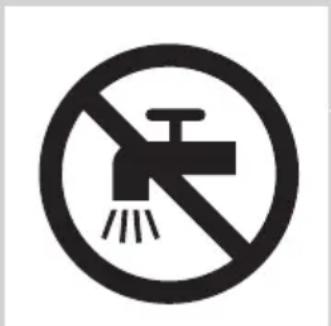
- Keep the adapter dry.
- Forbidden to clean the adapter under a running tap.
Warning
- The adapter contains a transformer. Do not cut off the adapter to replace it with another plug, as this causes a hazardous situation.
- The appliance is not intended for use by persons (including children) with reduced physical, sensory or mental capabilities, or lack of experience and knowledge, unless they have been given supervision or instruction concerning use of the appliance by a person responsible for their safety.
- Children should be supervised to ensure that they do not play with the appliance.
- Always unplug the shaver before you clean it under the tap.
- Forbidden to use in the shower.
- Do not use this appliance close to a bathtub, shower or other containers filled with water.
Caution
- Do not immerse the shaver in water or any other liquid.
- Do not use water hotter than 80^ to rinse the shaver.
- Be careful with hot water. Always check if the water is not too hot, to prevent your hands from getting burnt.
- The shaver is not dishwasher-proof.
- Warning: Remove the detachable cord from the handheld part before cleaning this part in water.
- Water may leak from the socket at the bottom of the shaver when you rinse it. This is normal and not dangerous because all electronics are enclosed in a sealed power unit inside the shaver.
- Do not use the shaver or the adapter if it is damaged, as this may cause injury. Always replace a damaged adapter with one of the original type.
- Use and store the appliance at a temperature between 10^ and 35^ .
- Always place and use the shaver on a surface that is fluid-resistant.
- Only use the adapter and accessories supplied.
- Always put the protection cap on the shaver to protect the shaving heads when you are travelling.
Compliance with standards
- This Philips appliance complies with all applicable standards and regulations regarding electromagnetic fields (EMF).
General
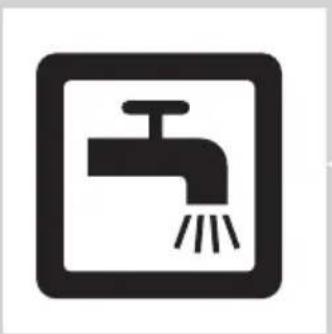
- This shaver is suitable to be cleaned under a running tap.
- The adapter is equipped with an automatic voltage selector and is suitable for mains voltages ranging from 100 to 240 volts.
- The adapter transforms 100-240 volts to a safe low voltage of less than 24 volts.
Using the shaver

Note: This shaver is not rechargeable and can only be used from the mains.
1 Put the small plug in the shaver.
Put the adapter in the wall socket.
3 Press the on/off button once to switch on the shaver.
4 Move the shaving heads over your skin. Make circular movements.
- Do not make straight movements.
- Your skin may need 2 or 3 weeks to get accustomed to the Philips shaving system.
Press the on/off button once to switch off the shaver.
6 Clean the shaver (see chapter 'Cleaning and maintenance').
Cleaning and maintenance
Remove the detachable cord from the handheld part before cleaning this part in water.
Never use compressed air, scouring pads, abrasive cleaning agents or aggressive liquids such as petrol or acetone to clean the appliance.
- Clean the shaver after every shave for optimal shaving performance.
- Regular cleaning guarantees better shaving performance.
- For the best cleaning results, we advise you to use the Philips Cleaning spray (HQ110).
- Be careful with hot water. Always check if the water is not too hot, to prevent your hands from getting burnt.
Note: Water may leak from the socket at the bottom of the shaver when you rinse it. This is normal and not dangerous because all electronics are enclosed in a sealed power unit inside the shaver.
Cleaning the shaving unit under the tap
1 Switch off the shaver and disconnect it from the mains.
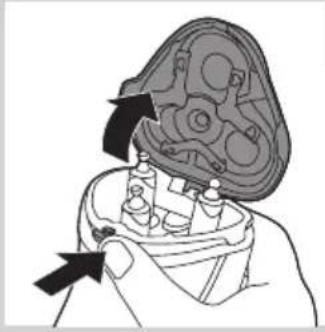
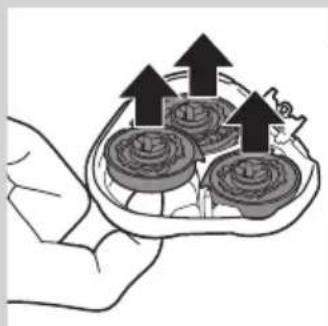
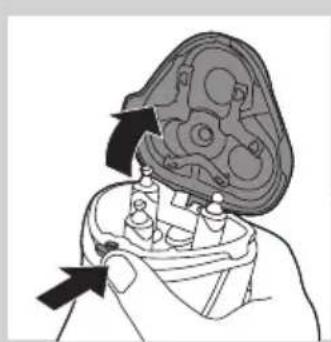
Press the release button to open the shaving unit.
3 Rinse the shaving unit and hair chamber under a hot tap for 30 seconds.
Be careful with hot water. Always check if the water is not too hot, to prevent your hands from getting burnt.
- Rinse the hair chamber and the inside of the shaving unit.
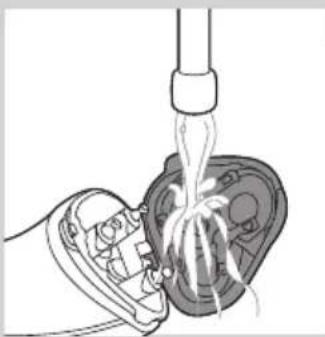
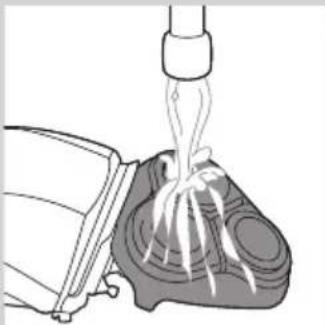
- Rinse the outside of the shaving unit.
4 Close the shaving unit and shake off excess water.
Be careful not to hit the shaving unit against anything while shaking off excess water.
Never dry the shaving unit and the hair chamber with a towel or tissue, as this may damage the shaving heads and the coupling spindles.
5 Open the shaving unit again and leave it open to let the shaver dry completely.
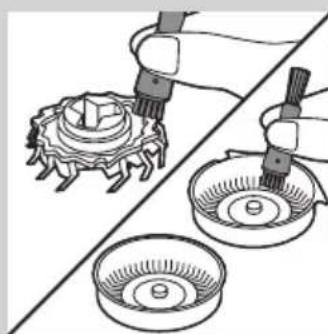
Cleaning the shaving unit with the cleaning brush
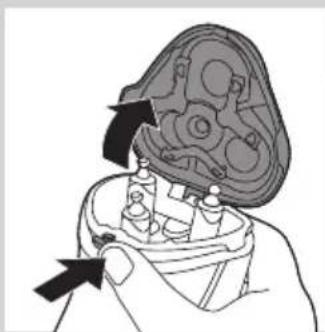
1 Switch off the shaver and disconnect it from the mains.
Press the release button to open the shaving unit.
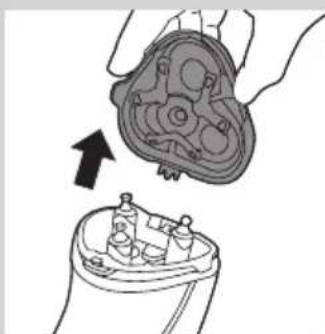
3 Pull the shaving unit off the shaver.
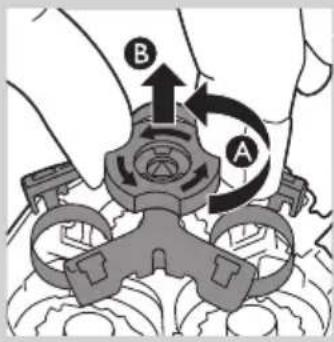
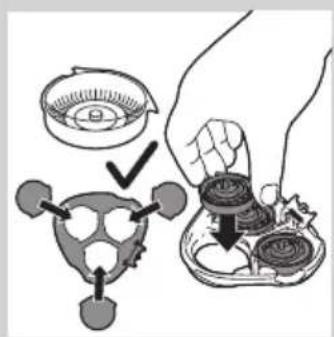
4 Turn the lock anticlockwise (A) and remove the retaining frame (B).
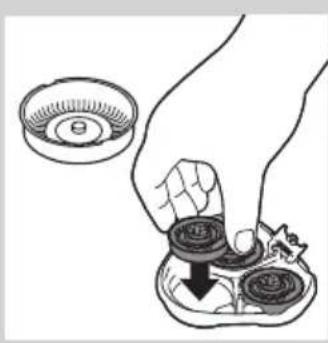
5 Remove and clean one shaving head at a time. Each shaving head consists of a cutter and a guard.
Note: Do not clean more than one cutter and guard at a time, since they are all matching sets. If you accidentally mix up the cutters and guards, it may take several weeks before optimal shaving performance is restored.
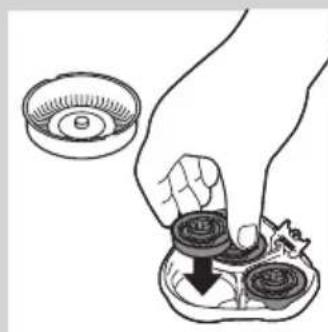
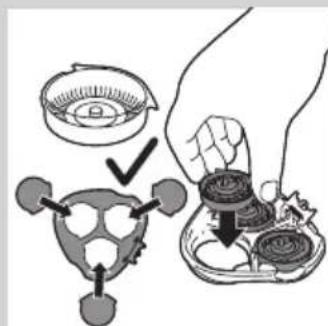
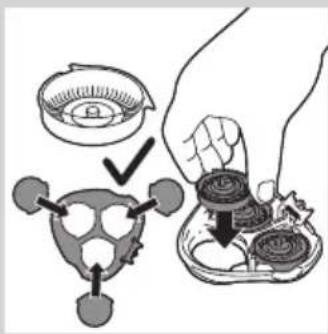
6 Put the shaving heads back into the shaving unit.
Note: Make sure that the projections of the shaving heads fit exactly into the recesses.
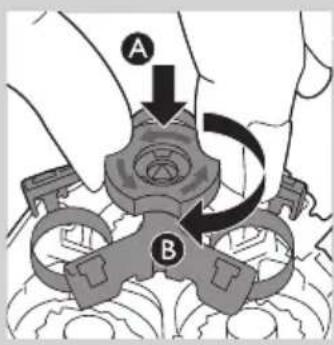
Put the retaining frame back into the shaving unit (A) and turn the lock clockwise (B).
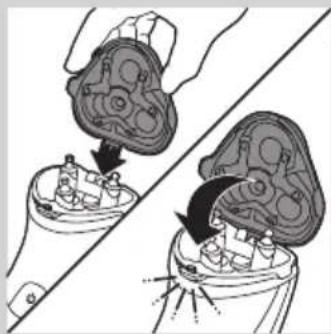
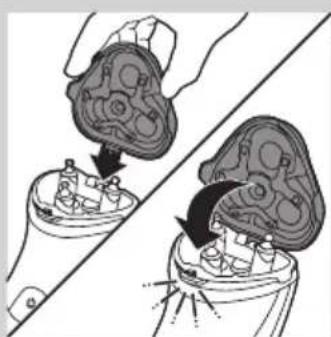
Insert the lug of the shaving unit into the slot in the top of the shaver. Then close the shaving unit.
Note: If the shaving unit does not close smoothly, check if you have inserted the shaving heads properly and if the retaining frame is locked.
Storage
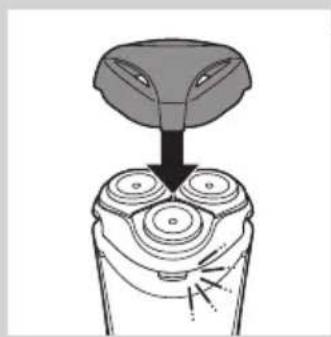
- Put the protection cap on the shaver every time you have used it, to prevent damage.
Replacement
For maximum shaving performance, we advise you to replace the shaving heads every two years. Only replace the shaving heads with original HQ8 Philips Shaving Heads.
Switch off the shaver. Disconnect the shaver from the mains.
Press the release button to open the shaving unit.
3 Pull the shaving unit off the shaver.
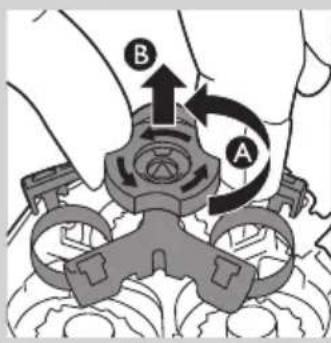
4 Turn the lock anticlockwise (A) and remove the retaining frame (B).
5 Remove the shaving heads and place new ones in the shaving unit.
Note: Make sure that the projections of the shaving heads fit exactly into the recesses.
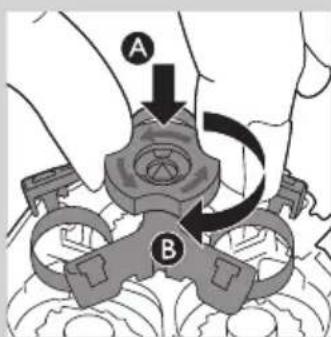
6 Put the retaining frame back into the shaving unit (A) and turn the lock clockwise (B).
7 Insert the lug of the new shaving unit into the slot in the top of the shaver. Then close the shaving unit.
Note: If the shaving unit does not close smoothly, check if you have inserted the shaving heads properly and if the retaining frame is locked.
Ordering accessories

To retain the top performance of your shaver, make sure you clean it regularly and replace its shaving heads at the recommended time.
Shaving heads
- We advise you to replace your shaving heads every two years. Always replace with HQ8 shaving heads.
Cleaning
- Use Cleaning spray (HQ110) to clean the shaving heads thoroughly.
Environment
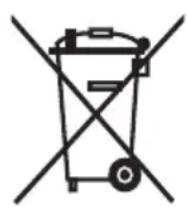
- Do not throw away the appliance with the normal household waste at the end of their life, but hand them in at an official collection point for recycling. By doing this, you help to preserve the environment.
Guarantee and support
If you need information or support, please visit www.philips.com/support or read the separate worldwide guarantee leaflet.
Guarantee restrictions
The shaving heads (cutters and guards) are not covered by the terms of the international guarantee because they are subject to wear.
Troubleshooting
This chapter summarises the most common problems you could encounter with the appliance. If you are unable to solve the problem with the information below, visit www.philips.com/support for a list of frequently asked questions or contact the Consumer Care Centre in your country.
| Problem Possible cause Solution |
| The shaver does not shave as well as it used to. | The shaving heads are damaged or worn. | Replace the shaving heads (see chapter ‘Replacement’). |
| Long hairs obstruct the shaving heads. | Clean the shaving heads one by one (see chapter ‘Cleaning and maintenance’). |
| You have not inserted the shaving heads properly. | Make sure that the projections of the shaving heads fit exactly into the recesses (see chapter ‘Replacement’). |
| The shaver does not work when I press the on/off button. | The temperature of the shaver is too high. In this case, the shaver does not work. | As soon as the temperature of the shaver has dropped sufficiently, you can switch on the shaver again. |
| You have not connected the shaver to the mains. This shaver can only be used directly from the mains. | Put the small plug in the shaver, put the adapter in the wall socket and press the on/off button again. |
Introduktion
Commanded accessoires

5 Retire as cabecas de corte e coloque as cabecas novas no acessario de corte.
Encomendar acessórios