
Series 3000 S3132 - Razor PHILIPS - Free user manual and instructions
Find the device manual for free Series 3000 S3132 PHILIPS in PDF.


| Product Type | Wet & Dry Electric Shaver |
| Model | Series 3000 S3132 |
| Brand | Philips |
| Dimensions (Approx.) | 145 x 70 x 250 mm (5.7 x 2.8 x 9.8 in) |
| Weight (Approx.) | 310 g (0.68 lbs) without travel case |
| Power Supply | Rechargeable battery, AC 100-240 V, 50-60 Hz |
| Charging Time | 1 hour for full charge |
| Battery Run Time | 40 minutes of cordless use |
| Shaving System | ComfortCut blade system with rounded blade tips |
| Trimmer | Pop-up trimmer for sideburns and moustache |
| Wet & Dry Use | Yes, can be used with foam/gel or dry for a comfortable shave |
| Cleaning | Rinse under running water; fully waterproof (IPX7) |
| LED Display | 3-level battery indicator with clean alert |
| Replacement Heads | Philips SH30 (replace every 2 years) |
| Comfort Features | Skin-friendly coating, rounded head for smooth shave |
| Safety | Automatic voltage adaptation, waterproof body |
| Warranty | 2 years global warranty |
| What's in the Box | Shaver, protective cap, charging cable, user manual |
Frequently Asked Questions - Series 3000 S3132 PHILIPS
User questions about Series 3000 S3132 PHILIPS
0 question about this device. Answer the ones you know or ask your own.
Ask a new question about this device
Download the instructions for your Razor in PDF format for free! Find your manual Series 3000 S3132 - PHILIPS and take your electronic device back in hand. On this page are published all the documents necessary for the use of your device. Series 3000 S3132 by PHILIPS.
USER MANUAL Series 3000 S3132 PHILIPS
Protective cap


Main unit

Guidance in English 20~39
● Warranty
Warranty and after-sales service 43
Specifications 44
Free repair provisions 46
Warranty certificate ...... last page
Be sure to observe
Safety precautions
Charging complete indicator
Low battery indicator
Charging indicator
Charging complete indicator
Low battery indicator
Charging indicator
Quick charge
Cheeks
Under the chin
From the cheeks down to the neck
Under the nose

[Important]


4 Make sure the inner and outer blades are thoroughly dry.
Attaching the blades
Attaching the protective cap
1 Protection cap 2 Shaving unit 3 Shaving unit release button 4 On/off button 5 1-Level battery status indicator (S3132 only) 6 3-Level battery status indicator (S3232 only) 7 Socket for small plug 8 Pop-up trimmer 9 Trimmer release slide 10 Supply unit 11 Small plug 12 Storage pouch (S3232 only)
Introduction
Congratulations on your purchase and welcome to Philips! To fully benefit from the support that Philips offers, register your product at www.philips.com/welcome.
Important safety information
Read this important information carefully before you use the appliance and save it for future reference.
Danger

Warning
Keep the supply unit dry.
- To charge the battery, only use the detachable supply unit (type HQ8505) provided with the appliance.
- The supply unit contains a transformer. Do not cut off the supply unit to replace it with another plug, as this causes a hazardous situation.
- This appliance can be used by children aged from 8 years and above and persons with reduced physical, sensory or mental capabilities or lack of experience and knowledge if they have been given supervision or instruction concerning use of the appliance in a safe way and understand the hazards involved. Children shall not play with the appliance. Cleaning and user maintenance shall not be made by children without supervision.
- Always unplug the shaver before you clean it under the tap.
- Always check the appliance before you use it. Do not use the appliance if it is damaged, as this may cause injury. Always replace a damaged part with one of the original type.
- Do not open the appliance to replace the rechargeable battery.
English
Caution

- This appliance contains batteries that are non-replaceable.
- Never immerse the charging stand in water and do not rinse it under the tap.
- Never use water hotter than 60°C to rinse the shaver.
- Only use this appliance for its intended purpose as shown in the user manual.
- For hygienic reasons, the appliance should only be used by one person.
- Never use compressed air, scouring pads, abrasive cleaning agents or aggressive liquids such as petrol or acetone to clean the appliance.
- Water may drip from the socket at the bottom of the shaver when you rinse it. This is normal and not dangerous because all electronics are enclosed in a sealed power unit inside the shaver.
- Do not use the supply unit in or near wall sockets that contain an electric air freshener to prevent irreparable damage to the supply unit.
Electromagnetic fields (EMF)
This Philips appliance complies with all applicable standards and regulations regarding exposure to electromagnetic fields.
General

- This shaver is waterproof. It is suitable for use in the bath or shower and for cleaning under the tap. For safety reasons, the shaver can therefore only be used without cord.
- The supply unit is suitable for mains voltages ranging from 100 to 240 volts.
- The supply unit transforms 100-240 volts to a safe low voltage of less than 24 volts.
The display
S3132

Battery fully charged
When the battery is fully charged, the charging light lights up white continuously.
Note: After approx. 30 minutes, the charging light goes out to save energy.

Battery low
When the battery is almost empty, the charging light flashes orange.
When you switch off the appliance, the charging light continues to flash orange for a few seconds.

Charging
When the shaver is charging, the charging light flashes white.
S3232
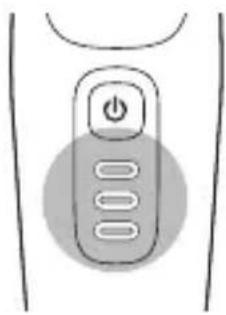


Charging
Battery fully charged
When the battery is fully charged, all charging lights light up white continuously.
Note: After approx. 30 minutes, the charging lights go out to save energy.
Battery low
When the battery is almost empty, the bottom charging light flashes orange.
When you switch off the appliance, the bottom charging light continues to flash orange for a few seconds.
Charging
When the appliance is charging, first the bottom light flashes, then the middle light, and so on until the appliance is fully charged.
Charge the shaver before you use it for the first time and when the display indicates that the battery is almost empty.
Charging takes approx. 1 hour. A fully charged shaver has a shaving time of up to 60 minutes.
This shaver is suitable for use in the bath or shower. For safety reasons, it is therefore not possible to use the shaver while it is connected to the power outlet for charging.
Note: Depending on your shaving/styling behavior and beard type, the operating time may vary over time.
Charging with the supply unit

1 Put the small plug in the appliance. 2 Put the supply unit in the wall socket. - The charging light shows the charging status of the appliance. 3 After charging, remove the supply unit from the wall socket and pull the small plug out of the appliance.
Quick charge
When you start charging the empty battery, the charging light flashes white quickly. After approx. 5 minutes the charging light flashes white slowly. The shaver now contains enough energy for a 5-minute shave.
Using the appliance

Note: This appliance is waterproof. It is suitable for use in the bath or shower and for cleaning under the tap. For safety reasons, this appliance can therefore only be used without cord.
This symbol indicates that the shaver can be used in the bath or shower.
Shaving tips and tricks
- Make circular movements during use. Circular movements provide better shaving results than straight movements.
- Your skin may need 2 or 3 weeks to get accustomed to the Philips shaving system.
Switching the appliance on and off

To switch the appliance on or off, press the on/off button once.
Shaving
Dry shaving
Note: For the best results on skin comfort, pre-trim your beard if you have not shaved for 3 days or longer.
1 Switch on the appliance.


2 Move the shaving heads over your skin in circular movements to catch all hairs growing in different directions.
3 Stretch your skin with your free hand so the blades can lift and cut hair. Gently press the shaver onto your skin so the floating heads can follow the contours of your face.
Note: Do not press too hard as too much pressure can cause shaving heads to pinch the skin.
4 Switch off and clean the appliance after each use.
5 Put the protective cap on the appliance to protect the shaving heads during storage and travel.
Wet shaving
For a more comfortable shave, you can also use this appliance on a wet face with shaving foam or shaving gel.

1 Apply some water to your skin.

2 Apply shaving foam or gel to your skin.

3 Rinse the shaving unit under the tap to ensure that it glides smoothly over your skin.
4 Switch on the appliance.
5 Move the shaving heads over your skin in circular movements to catch all hairs growing in different directions. Make sure each shaving head is fully in contact with the skin. Exert gentle pressure for a close, comfortable shave.
Note: Do not press too hard, this can cause skin irritation.
Note: Rinse the shaving unit regularly to ensure that it continues to glide smoothly over your skin.
6 Switch off and clean the appliance after each use.
7 Dry your face.
Note: Make sure that you rinse all foam or shaving gel off the appliance with warm water.
8 Put the protective cap on the appliance to protect the shaving heads during storage and travel.
Trimming

You can use the trimmer to groom your sideburns and moustache.
1 Push the trimmer release slide downwards to open the trimmer.
2 Switch on the appliance.
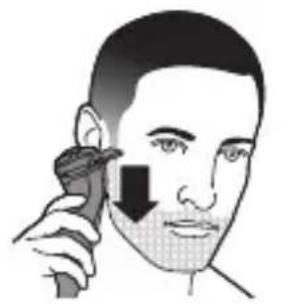
3 Hold the trimmer perpendicular to the skin and move the appliance downwards while you exert gentle pressure.
4 Switch off and clean the trimmer after each use.

5 Close the pop-up trimmer ('click').
Cleaning and maintenance
Cleaning the shaver
Caution: Never use compressed air, scouring pads, abrasive cleaning agents or aggressive liquids such as petrol or acetone to clean the appliance.
Clean the shaver after every use for optimal performance (see 'Cleaning and maintenance').
Caution: While rinsing the shaving heads, water may drip out of the base of the appliance. This is a normal occurrence. Internal electric parts are in a waterproof compartment so the appliance will be protected against water damage.

1 Switch off the appliance and make sure it is disconnected from the wall socket. 2 Press the release button to open the shaving unit. 3 Rinse the shaving unit and hair chamber with lukewarm water.

4 Rinse the outside of the shaving unit with lukewarm water.

Never dry the shaving unit with a towel or tissue, as this may damage the shaving heads.
5 Carefully shake off excess water and let air dry completely.
6 Close the shaving unit.
Cleaning the pop-up trimmer
Clean the pop-up trimmer after each use.
Never dry the trimmer teeth with a towel or tissue, as this may damage the trimmer teeth.

1 Switch off the appliance and make sure it is disconnected from the wall socket. 2 Push the trimmer release slide downwards to open the trimmer.
3 Switch on the appliance and rinse the pop-up trimmer with warm water. 4 After cleaning, switch off the appliance. 5 Carefully shake off excess water and let the pop-up trimmer air dry. 6 Close the pop-up trimmer ('click').
Tip: For optimal performance, lubricate the teeth of the pop-up trimmer with a drop of mineral oil every six months (oil not included).
Thorough cleaning
Clean the shaving heads thoroughly once a month for optimal performance.

1 Switch off the appliance and make sure it is disconnected from the wall socket.
2 Press the release button to open the shaving unit. Pull the shaving unit off the appliance.
3 Turn the lock anticlockwise (1) and remove the retaining frame (2). Place it aside in a safe place.
4 Remove and clean one shaving head at a time. Each shaving head consists of a cutter and a guard.
Note: Do not clean more than one cutter and guard at a time, since they are all matching sets. If you accidentally mix up the cutters and guards, it may take several weeks before optimal shaving performance is restored.
5 Remove the cutter from the shaving guard and clean both parts under the tap.

6 Put the cutter back into the guard.

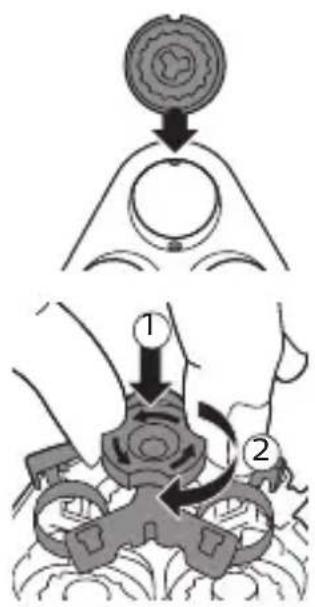
7 Put the shaving heads back into the shaving unit.
8 Put the retaining frame back into the shaving unit (1) and turn the lock clockwise (2).

9 Insert the hinge of the shaving unit into the slot in the top of the shaver. Then close the shaving unit.
Note: If the shaving unit does not close smoothly, check if you have inserted the shaving heads properly and if the retaining frame is locked.
Replacement
Replacing the shaving heads
For maximum shaving performance, we advise you to replace the shaving heads every two years.
Replace damaged shaving heads immediately. Always replace the shaving heads with original Philips shaving heads (see 'Ordering accessories').

1 Switch off the appliance and make sure it is disconnected from the wall socket.
2 Press the shaving unit release button to open the shaving unit. Pull the shaving unit off the appliance.
3 Turn the lock anticlockwise (1) and remove the retaining frame (2). Place it aside in a safe place.
4 Remove the shaving heads from the shaving unit.
Discard the used shaving heads immediately to avoid mixing them with the new shaving heads.

5 Place new shaving heads in the shaving unit.
Note: Make sure that the shaving heads with the projections fit exactly onto the hooks of the shaving head holder when placing them. The shaving heads supplied with the shaver either have notches or projections. Both shaving systems are the same.
6 Put the retaining frame back into the shaving unit (1) and turn the lock clockwise (2).
7 Insert the hinge of the shaving unit into the slot in the top of the shaver. Then close the shaving unit.
Note: If the shaving unit does not close smoothly, check if you have inserted the shaving heads properly and if the retaining frame is locked.
Storage

Put the protection cap on the shaver to prevent damage.
Note: Always let the shaver dry completely before you store it.
Storage in pouch (S3232 only)
- Store the product in the pouch supplied.
- Make sure the product is dry before you store it in the pouch.
Ordering accessories
To buy accessories or spare parts, visit www.philips.com/parts-and-accessories or go to your Philips dealer. You can also contact the Philips Consumer Care Center in your country (see the international warranty leaflet for contact details).
Recycling
- Do not throw away the product with the normal household waste at the end of its life, but hand it in at an official collection point for recycling. By doing this, you help to preserve the environment.
- This product contains a built-in rechargeable battery which shall not be disposed of with normal household waste. Please take your product to an official collection point or a Philips service center to have a professional remove the rechargeable battery.
- Follow your country's rules for the separate collection of electrical and electronic products and rechargeable batteries. Correct disposal helps prevent negative consequences for the environment and human health.
Removing the rechargeable shaver battery
Only remove the rechargeable batteries when you discard the appliance. Before you remove the batteries, make sure that the appliance is disconnected from the wall socket and that the batteries are completely empty.

Take any necessary safety precautions when you handle tools to open the appliance and when you dispose of the rechargeable battery.
Be careful, the battery strips are sharp.
1 Press the shaving unit release button to open the shaving unit. Pull the shaving unit off the shaver.
2 Remove the screw in the back of the shaver.
3 Remove the back panel by using a flathead screwdriver.
4 Remove two screws and then remove the hair chamber from the shaver.

5 Lift out the front panel.
6 Bend the eight snap hooks aside and remove the cover of the power unit.
7 Lift out the two parts of the power unit.
8 Break the battery tags with a pair of cutting pliers.
9 Remove the rechargeable battery.
English
Warranty and support
If you need information or support, please visit www.philips.com/support or read the international warranty leaflet.
Warranty restrictions
The shaving heads (cutters and guards) are not covered by the terms of the international warranty because they are subject to wear.
Warranty and after-sales service
MyPhilips registration information


- BE SURE TO OBSERVE
- SAFETY PRECAUTIONS
- CHARGING COMPLETE INDICATOR
- LOW BATTERY INDICATOR
- CHARGING INDICATOR
- QUICK CHARGE
- [IMPORTANT]
- ATTACHING THE BLADES
- ATTACHING THE PROTECTIVE CAP
- INTRODUCTION
- IMPORTANT SAFETY INFORMATION
- DANGER
- WARNING
- ENGLISH
- CAUTION
- ELECTROMAGNETIC FIELDS (EMF)
- GENERAL
- THE DISPLAY
- S
- BATTERY FULLY CHARGED
- BATTERY LOW
- CHARGING
- CHARGING WITH THE SUPPLY UNIT
- USING THE APPLIANCE
- SHAVING TIPS AND TRICKS
- SWITCHING THE APPLIANCE ON AND OFF
- SHAVING
- DRY SHAVING
- WET SHAVING
- TRIMMING
- CLEANING AND MAINTENANCE
- CLEANING THE SHAVER
- CLEANING THE POP-UP TRIMMER
- THOROUGH CLEANING
- REPLACEMENT
- REPLACING THE SHAVING HEADS
- STORAGE
- STORAGE IN POUCH (S3232 ONLY)
- ORDERING ACCESSORIES
- RECYCLING
- REMOVING THE RECHARGEABLE SHAVER BATTERY
- WARRANTY AND SUPPORT
- WARRANTY RESTRICTIONS
- WARRANTY AND AFTER-SALES SERVICE
- MYPHILIPS REGISTRATION INFORMATION
Brand : PHILIPS
Model : Series 3000 S3132
Category : Razor