
FR370 - Radio ETON - Free user manual and instructions
Find the device manual for free FR370 ETON in PDF.
| Product type | Portable multi-source radio |
| Brand | ETON |
| Model | FR370 |
| Radio bands | AM (520-1710 kHz), FM (87.5-108 MHz), NOAA Weather (7 channels) |
| Power source | 3 AAA batteries, dynamo, solar panel, 5V AC adapter (not included), USB |
| Rechargeable battery | Ni-MH (Nickel-Metal Hydride) |
| Battery life (after full charge) | Approximately 3-4 hours at low volume |
| Charging time (AC) | Approximately 5 hours |
| Charging time (solar) | Approximately 10 hours in direct sunlight |
| Manual charging (dynamo) | 90 seconds = 5-7 minutes of listening at low volume |
| Phone charger | USB port with crank (130 RPM minimum) |
| Flashlight | LED with ON, OFF, SOS positions |
| Display | Display with 8-second backlight |
| Clock | 12-hour with AM/PM |
| Alarm | Wake-up with snooze function (5 minutes) |
| Weather alerts | NOAA with SAME/CLC codes, siren or voice |
| Headphone jack | 3.5 mm stereo jack (mono sound) |
| Audio input | 3.5 mm jack for external source (e.g., iPod) |
| Antenna | Telescopic for FM, internal ferrite for AM |
| Cleaning | Dry cloth only, no solvents |
| Safety | Do not expose to water or moisture, unplug if liquid is spilled |
| Spare parts and repairability | Replacement battery available from Eton; repair under warranty or out of warranty via customer service |
| Customer service | USA: 1-800-872-2228, Canada: 1-800-637-1648, International: 650-903-3866 |
Frequently Asked Questions - FR370 ETON
User questions about FR370 ETON
0 question about this device. Answer the ones you know or ask your own.
Ask a new question about this device
Download the instructions for your Radio in PDF format for free! Find your manual FR370 - ETON and take your electronic device back in hand. On this page are published all the documents necessary for the use of your device. FR370 by ETON.
USER MANUAL FR370 ETON
Self-powered Digital AM/FM/NOAA Weather Alert Radio with Flashlight, Solar Power and USB Cell Phone Charger
NEED HELP? CONTACT US.
Etón Corporation, 1015 Corporation Way, Palo Alto, CA 94303, USA.
1-800-872-2228 (U.S.); 1-800-637-1648 (Canada); 650-903-3866 (worldwide); M-F, 8:00-4:30, Pacific Standard Time; www.etoncorp.com.
WARNING
- Do not expose this appliance to rain or moisture.
- Do not submerge or expose for extended period to water.
- Protect from high humidity and rain.
- Only operate within specified temperature range (0 °C to 40 °C).
- Unplug immediately if liquid has been spilled or any object has fallen into the apparatus
- Clean only with a dry cloth. Do not use detergents or chemical solvents as this might damage the finish.
- Unplug and disconnect external antennas during lightning storms.
- Do not remove cover [or back].
Refer servicing to qualified service personnel.
ENVIRONMENT
Disposal
According to the European Directive 2002/96/EC all electrical and electronic products must be collected separately by a local collection system. Please act according to your local rules and do not dispose of your old products with your normal household waste.
Please dispose of all types of batteries per your Government, State or Local rules and/or regulations. If you are unsure, please call theappropriate local authority to find out how to dispose of them safely and help protect the environment.
SOLARLINK FR370
Thank you for purchasing the SOLARLINK FR370. We want you to thoroughly enjoy the use of this product. To take advantage of its many excellent and unique features, we urge you to carefully read the user's manual.
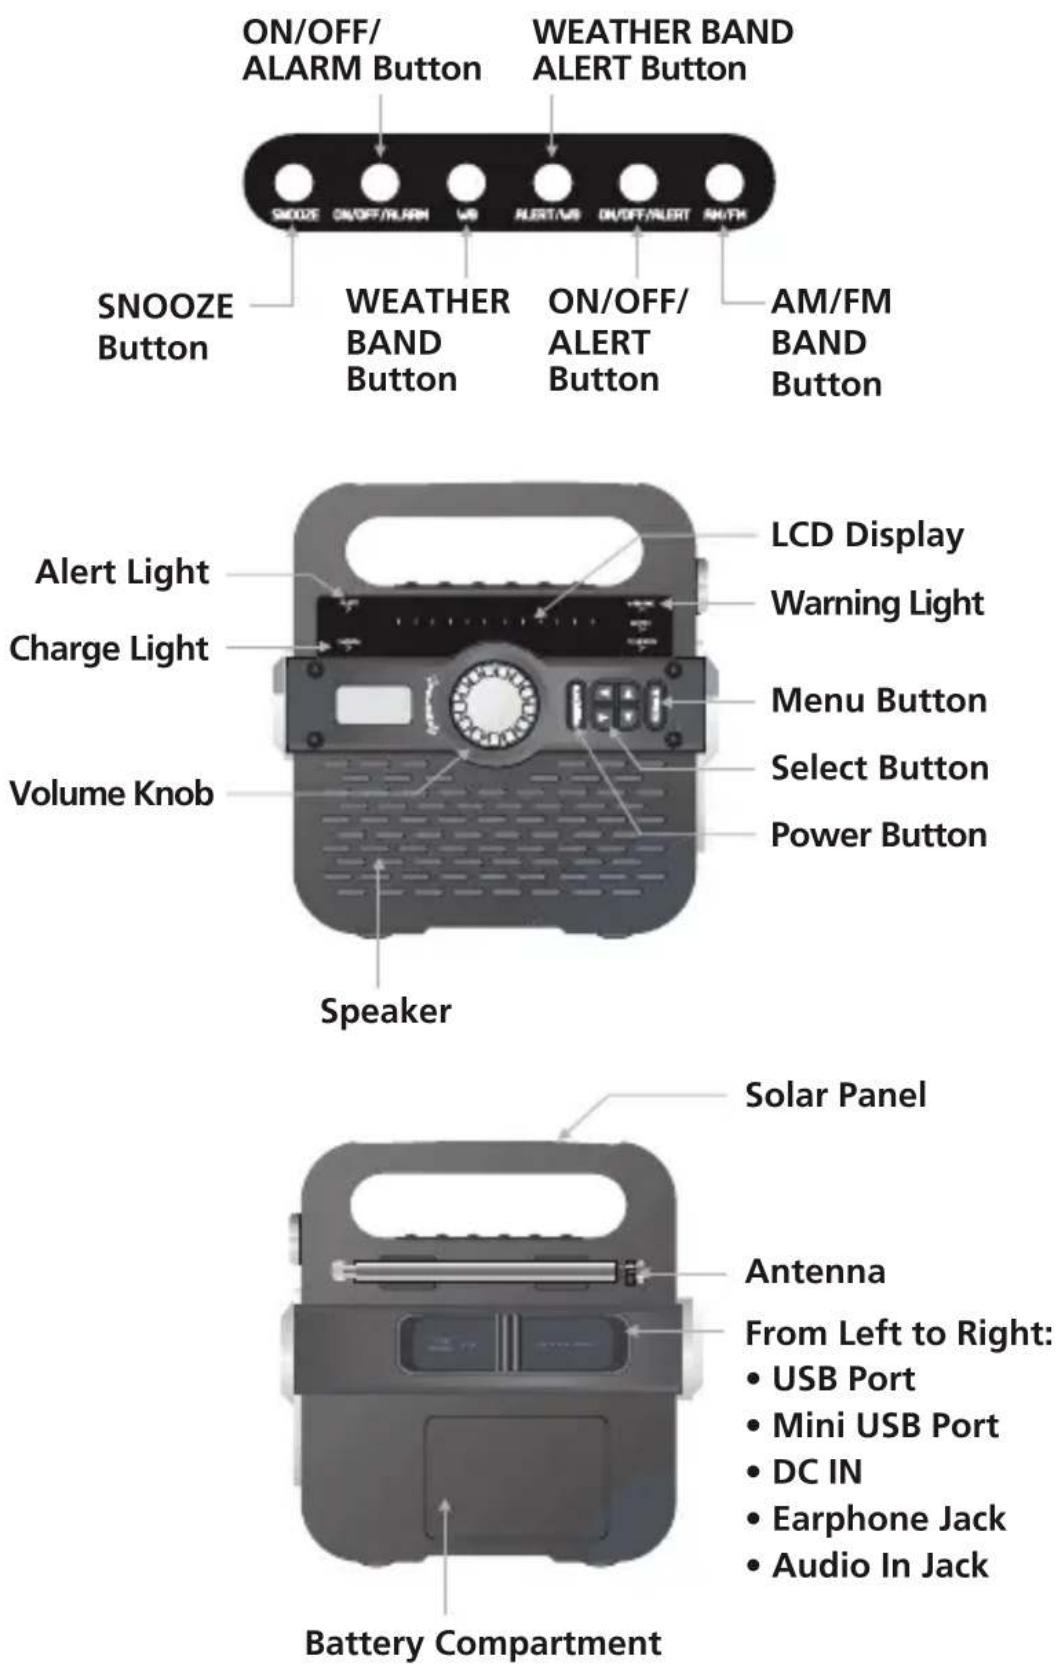
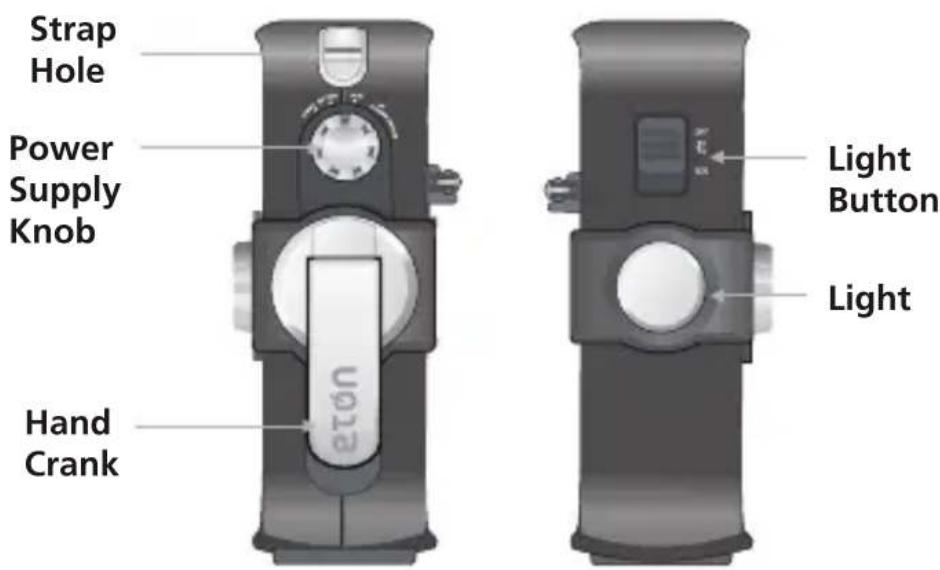
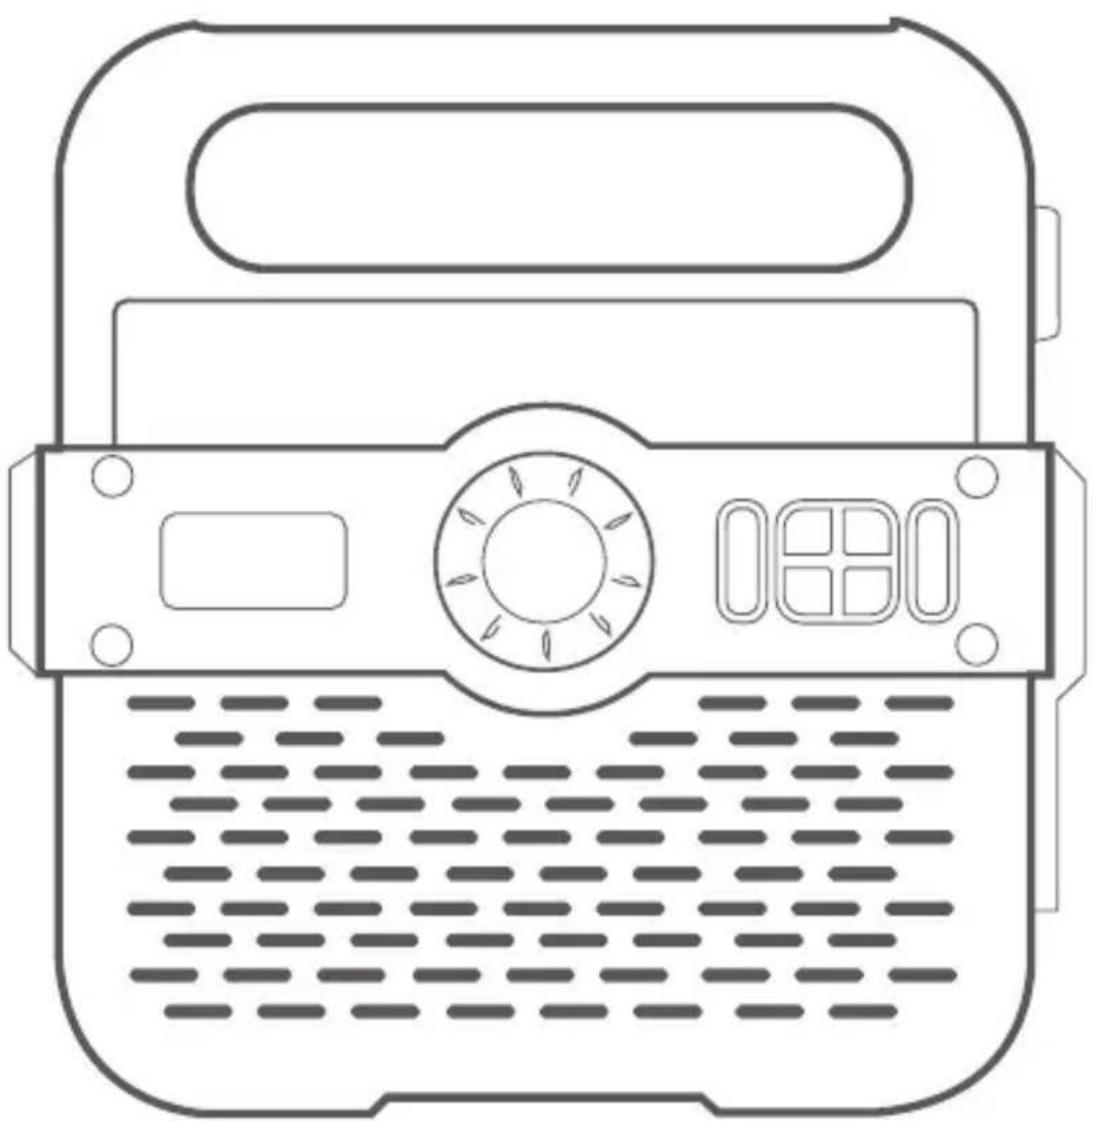
The FR370 is powered with 3 AAA batteries, the Dynamo and Solar cell and the AC adapter (not included). To turn the radio on, select DYNAMO, SOLAR, or BATTERY (located on the right side of the radio) and then press POWER.
NOTE: The radio can be played while it's charging. It is not advised to set the
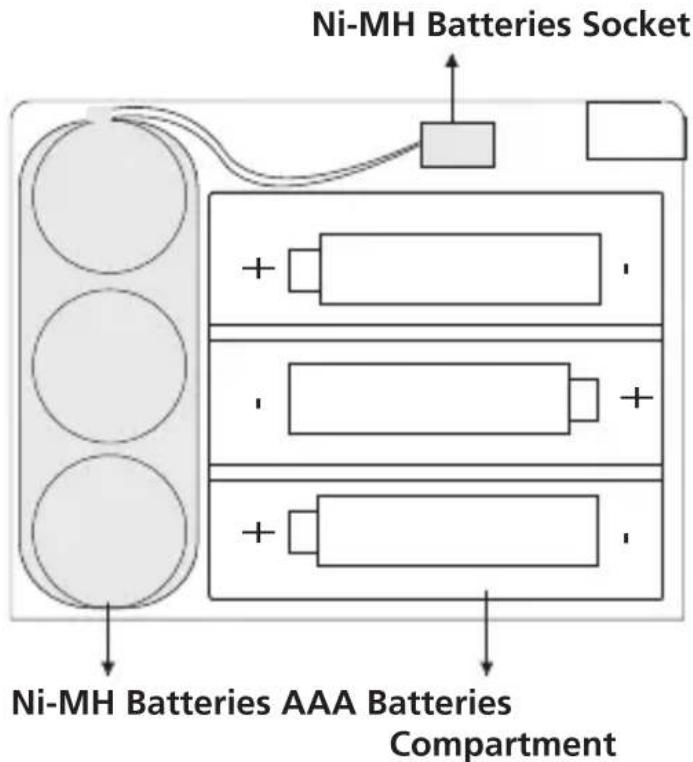
BATTERY POWER (3 AAA BATTERIES)
Install 3 AAA batteries using the polarity diagram inside the battery compartment (on the back of the radio). To turn on the radio using AAA batteries, set the
SOLAR POWER
When you're in direct sunlight (not through a window or in the shade) set the power switch to the SOLAR position. This position also recharges the Ni-MH rechargeable battery.
DYNAMO POWER (RECHARGEABLE Ni-MH BATTERIES)
The rechargeable Ni-MH (nickel-metal-hydride) battery is in the battery compartment. To use it plug the battery into the socket adjacent to it, then set the power switch to the DYNAMO position. You may have to charge the battery; to do this turn the crank for 90 seconds. The rechargeable battery will eventually lose its ability to hold a charge. Call Eton Corporation to order another one.
DC-IN 5V AC ADAPTER (not included)
Plug in the AC adapter (5 Volt, positive polarity, 300 milliampere, not included) to the DC IN 5 volt socket. To charge the Ni-MH battery, set the
USB CABLE POWER
To charge the Ni-MH battery via the USB port (DC-IN), set the
ANSWERS TO QUESTIONS REGARDING CHARGING
- How much operating time does 90 seconds of hand cranking provide for the radio to play? About 5 to 7 minutes, at low volume.
- How long does it take to fully charge the radio's battery with the AC adapter? About 5 hours.
- How long will the radio play when charged with the AC adapter? About 3 to 4 hours, at low volume.
- How long does it take to fully charge the radio's battery with the solar panel? About 10 hrs in direct sunlight. (not through a window or in the shade).
CHARGING CELL PHONES
If your cell phone has a USB charging cord, you can use it. If not, you can purchase one from www.iGo.com, or call 1-888-205-0093. To purchase a charging tip and cord for your cell phone, go to www.iGo.com, or call 1-888-205-0093. Purchase USB charging cable model# PS00271-0003 and have the brand and model of your cell phone ready to purchase the tip.
Set the
NOTE: When charging a cell phone via the USB cell phone charger, it is important to turn the crank at least 2 revolutions per second, or until you see the green or orange LED above the crank handle turn on. This is an indication that the phone is receiving enough power from the radio. Continue to crank at this rate until you are satisfied that an appropriate level of charge has been received by your cell phone. If you decide to stop cranking for whatever reason, please wait at least 5 seconds before beginning to crank again. Not following these instructions may cause damage to your cell phone for which Eton disclaims any liability and will not be held liable for any actual or consequential damages related to this matter.
VOLUME CONTROL
Turn the Volume Adjusting Knob (located in the front, below the display) clockwise to turn up the volume; counterclockwise turns down the volume. Always turn down the volume before using earphones.
LCD BACKLIGHT
To light the display for about 8 seconds, press the ANY button located on top of the display.
SETTING THE CLOCK
- With the FR370 off, press
- Press the or button shortly, when the hour flashes, press the or button shortly to adjust the hour.
- After adjusting the hour, press the or , when the minute flashes, press the or button to adjust the minute.
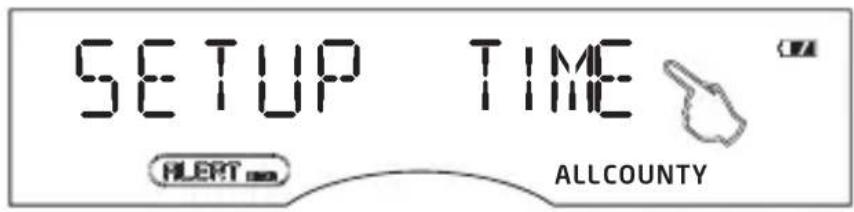
- Press
NOTE: The clock mode is 12 hour, "AM" displays in the morning and "PM" displays in the afternoon.
SETTING THE ALARM
- In radio off mode, press the
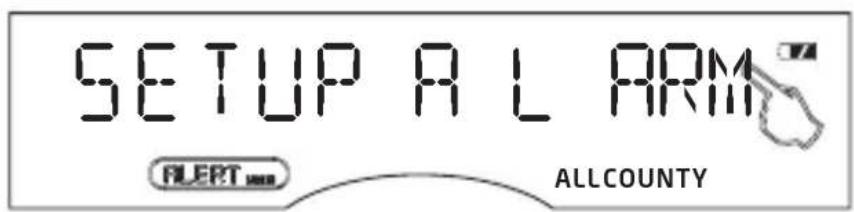
- In the "SET UP ALARM" mode, press the button or , when the hour flashes, press the button or to adjust the hour.
- After adjusting the hour, press the or when the minute flashes, press the or button to adjust the minute.
- Press
ACTIVATING AND DEACTIVATING THE ALARM TIME
Press
SNOOzE FUNCTION
When the alarm activates, press
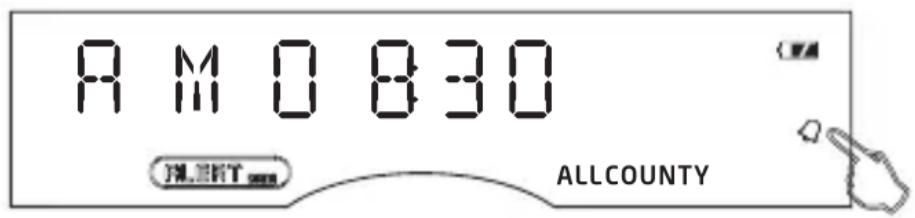
AM/FM BROADCAST RECEPTION
Turn on the radio. Press the AM/FM button, AM or FM will appear on the display with the frequency to the right of it, in KHz for AM and in MHz for FM. Press the buttons quickly to tune individual frequencies, hold to tune automatically to the next frequency. Pull up the telescopic antenna to hear FM frequencies.
The AM ferrite bar antenna is built-in to the radio, so no telescopic antenna is needed for AM reception.
FM tuning range: 87.5 to 108 MHz.
- AM tuning range: 520 to 1710 KHz.
RECEPTION OF NOAA WEATHER BAND FREQUENCIES
To hear your local weather station, pull up the antenna, turn on the radio and press the WB button located above the display. Turn up the volume and press the buttons to go through all 7 weather channels. WB and CH appear at the top of the display, with 1-7 next to CH. You'll probably only hear one channel, but if you hear a weather broadcast on more than one, select the strongest. The strongest one will usually be your local weather station. Below are the frequencies that correspond to the radio's channels:
The weather frequencies are on channels WB1 through WB7. Try all of them and find the one that's strongest; the strongest one is your weather station. The frequencies associated with them are:
WB1; Channel 1 162.400 MHz
WB2; Channel 2 162.425 MHz
WB3; Channel 3 162.450 MHz
WB4; Channel 4 162.475 MHz
WB5; Channel 5 162.500 MHz
WB6; Channel 6 162.525 MHz
WB7; Channel 7 162.550 MHz
SETTING WEATHER ALERTS
Tune to your local NOAA Weather frequency at a volume you wish to hear. Press the
NOAA false alert note: False NOAA alerts may occur at various times of day as the result of circumstances beyond the control of the manufacturer of this receiver. If you receive such alerts, we suggest that you turn the ALERT feature off.
ACTIVATE OR DEACTIVATE THE ALERT
When the alert function is on, "ALERT siren" or "ALERT voice" appears in the diaplay. In the radio off mode, press and hold the button
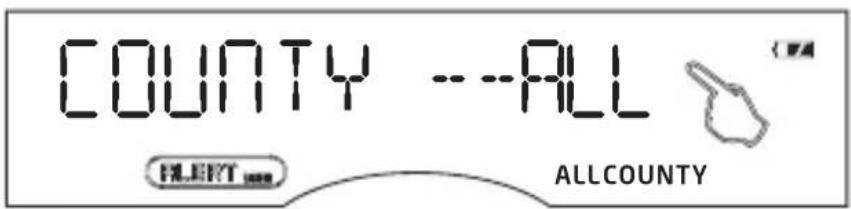
SETTING YOUR S.A.M.E. COUNTY
Codes in the US, CLC Codes in Canada
- S.A.M.E. = Specific Area Message Encoding
- CLC = Canadian Location Codes
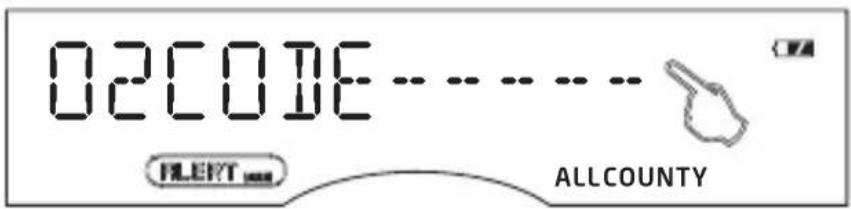
A six-digit code instructs the radio only to receive an ALERT when the code is programmed in. There are far too many S.A.M.E and CLC codes to include them all in this manual. We therefore provide the following to assist you in looking up the code for your area.
Look up a United States county code at the following web site:
http://www.nws.noaa.gov/nwr/indexnw.htm#sametable
Look up a Canadian CLC code at: http://www.msc-smc.ec.gc.ca/msb/ weatherradio/transmitter/index_e.cfm Your radio can be set for one (SINGL) to 23 (MULTI) codes, or can be set to receive ALL coded information sent from any transmitter, if you're within range. When you set codes, it will only pick up alerts when you're in that county or within reception distance of the signal. ALL, MULTI or SINGLE COUNTY will appear in the lower left side of the display, depending on how you have set it.
-
In the radio off mode, press
-
Press or button shortly with "ALL", "SINGL" or "MULTI" flashes, then press or button repeatedly to select from the three.
Select "SINGL" if you want to enter a code for a single area.
Select "MULTI" if you want to enter multiple codes for different areas.
- Press or to start inputting county code.
- Press or to set first code digit.
- Repeat step 3. 4. all the other digits are set.
- Press the
SETTING DEFEAT
- In radio off mode, press the

- Press or button shortly to make alert mode scroll in the display.
- Press or button shortly to go from one alert mode to another, carefully reading each other.
- Press or to select enable or disable.
- Press the button
TURNING THE ALARM ON AND OFF
With the radio on or off press the ALARM ON/OFF button. Notice that when it's on, ALARM appears in left of the LCD.
TURNING THE LIGHT AND BEACON ON AND OFF
Set the
If you are emergency, you can use the alarm light to get help. Set the
EARPHONE JACK
Located on the back of the radio, the fourth socket from the left. Plug in any stereo earphones. Audio is heard in mono only. Always turn down the volume when plugging in earphone/headphones, then turn it up.
AUDIO-IN JACK
Located on the back of the radio, the fifth socket from the left, it enables you to listen to other devices, such as an iPod, using a stereo 3.5 mm (1/8 inch) cord to connected to it.
WARRANTY REGISTRATION
To ensure full warranty coverage or product updates, registration of your product should be completed as soon as possible after purchase or receipt. You may use one of the following options to register your product:
- By visiting our website at http://www.etoncorp.com.
- Mail in enclosed warranty card.
- Mail your registration card or information to following address; include your name, full mailing address, phone number, email address, model purchased, date purchased, retail vendor name:
Etón Corporation
1015 Corporation Way
Palo Alto, CA 94303 USA
LIMITED WARRANTY
Retain the warranty information from your warranty card with your proof of purchase or the Limited Warranty information can also be viewed at www.etoncorp.com.
SERVICE FOR YOUR PRODUCT
To obtain service for your product, we recommend first contacting an Etón service representative at 1-800-872-2228 US, 1-800-637-1648 Canada, (650) 903-3866 US, customersvc@etoncorp.com or your respective country distributor in Europe (see enclosed list) for problem determination and trouble-shooting. If further service is required, the technical staff will instruct how to proceed based on whether the radio is still under warranty or needs non-warranty service.
WARRANTY – If your product is still in warranty and the Etón service representative determines warranty service is needed, a return authorization will be issued and instructions will be given. DO NOT ship your radio back without obtaining the return authorization.
NON-WARRANTY - If your product is no longer under warranty and requires service, the Etón service representative will refer you to the nearest repair facility that will best handle the repair.
For service outside North America, please refer to the distributor information included at time of purchase/receipt.
DAVEz-VOUS BESOIN D'AIDE?
N'HESITEz PAS A NOUS CONTACTER
Corporate Headquarters
1015 Corporation Way
Palo Alto, California 94303 USA
tel +1 650-903-3866
tel +1 800-872-2228
fax +1 650-903-3867
Etón Canada
1 Yonge Street, Suite 1801
Toronto, Ontario M5E 1W7 Canada
tel +1 416-214-6885


- NEED HELP? CONTACT US.
- WARNING
- ENVIRONMENT
- Disposal
- SOLARLINK FR370
- BATTERY POWER (3 AAA BATTERIES)
- SOLAR POWER
- DYNAMO POWER (RECHARGEABLE Ni-MH BATTERIES)
- DC-IN 5V AC ADAPTER (not included)
- USB CABLE POWER
- ANSWERS TO QUESTIONS REGARDING CHARGING
- CHARGING CELL PHONES
- VOLUME CONTROL
- LCD BACKLIGHT
- SETTING THE CLOCK
- SETTING THE ALARM
- ACTIVATING AND DEACTIVATING THE ALARM TIME
- SNOOzE FUNCTION
- AM/FM BROADCAST RECEPTION
- RECEPTION OF NOAA WEATHER BAND FREQUENCIES
- SETTING WEATHER ALERTS
- ACTIVATE OR DEACTIVATE THE ALERT
- SETTING YOUR S.A.M.E. COUNTY
- SETTING DEFEAT
- TURNING THE ALARM ON AND OFF
- TURNING THE LIGHT AND BEACON ON AND OFF
- EARPHONE JACK
- AUDIO-IN JACK
- WARRANTY REGISTRATION
- Etón Corporation
- LIMITED WARRANTY
- SERVICE FOR YOUR PRODUCT
- DAVEz-VOUS BESOIN D'AIDE?
- N'HESITEz PAS A NOUS CONTACTER
- Etón Canada
Brand : ETON
Model : FR370
Category : Radio