Elite Satellit - Radio ETON - Free user manual and instructions
Find the device manual for free Elite Satellit ETON in PDF.


| Product Type | Portable AM/FM/SW Radio |
| Dimensions (H x W x D) | 10.2 x 6.2 x 2.0 inches |
| Weight | 2 lbs (0.9 kg) |
| Power Source | 4 AA batteries or 6V DC adapter |
| Frequency Bands | AM, FM, Shortwave (SW) |
| Tuning System | Digital PLL with automatic scanning |
| Display | LCD with backlight |
| Antenna | Telescopic (FM/SW); Internal ferrite (AM) |
| Preset Memory | 100+ presets across bands |
| Special Features | Sleep timer, alarm, headphone jack, external antenna input |
| Audio Output | 3W built-in speaker |
| Battery Life | Approx. 30 hours (alkaline) |
| Care & Cleaning | Wipe with dry cloth; avoid moisture and extreme temperatures |
| Safety | Do not expose to rain or direct sunlight; keep away from heat sources |
| Spare Parts & Repairability | Available via Eton customer support; user-replaceable batteries |
| General Information | Ideal for emergency preparedness; rugged portable design |
Frequently Asked Questions - Elite Satellit ETON
User questions about Elite Satellit ETON
0 question about this device. Answer the ones you know or ask your own.
Ask a new question about this device
Download the instructions for your Radio in PDF format for free! Find your manual Elite Satellit - ETON and take your electronic device back in hand. On this page are published all the documents necessary for the use of your device. Elite Satellit by ETON.
USER MANUAL Elite Satellit ETON
Thank you for purchasing the Elite Satellit HD. We are confident that it will provide you with many years of trouble free service. To get the most enjoyment from the Elite Satellit HD, be sure to read this Getting Started Guide. If you have additional questions, please contact us, using the methods below:
Monday-Friday, 8:30 a.m. - 4:00 p.m., North American Pacific Time.
1-650-903-3866, worldwide FAX: 650-903-3867 customer_support@etoncorp.com www.etoncorp.com
Mailing Address: Etón Corporation 1015 Corporation Way Palo Alto, CA 94303 USA
1 MAJOR FEATURES OF THE ELITE SATELLIT HD 2
2 DIAGRAMS 3
3 GETTING STARTED 6
4 BASIC RECEIVER OPERATION 6
5 MEMORY FUNCTIONS 9
6 HD RADIO OPERATION 10
7 SEEK FUNCTION 12
8 T.SCAN FUNCTION 12
9 OLOCK & TIMER FUNCTIONS 13
10 MISCELLANEOUS FUNCTIONS 15
11 TROUBLESHOOTING 16
12 SUGGESTED REFERENCES 17
13 WARRANTY REGISTRATION 17
14 LIMITED WARRANTY TO THE ORIGINAL CUSTOMER 18
15 SERVICE INFORMATION 19
1 MAJOR FEATURES OF THE ELITE SATELLIT HD
- Frequency Coverage: 150-30,000 kHz, includes shortwave, medium wave AM broadcast band and longwave; 76 - 90 MHz or 87-108 MHz (selectable) FM broadcast band.
- Reception Modes: AM, FM-stereo, Single Sideban (selectable USB/LSB) and CW.
- Digital Display: large 5.7 inch square, 240 x 320 pixel, dot matrix display. Shows all modes and selected functions.
- Programmable Memories: 500 user programmable with alpha labeling plus 1200 user definable country memories, for a total of 1700. Memory Scan Function.
- Digital Phase Lock Loop (PLL) Synthesized Tuning with Direct Digital Synthesis (DDS) for drift free frequency stability and finest tuning resolution.
- Dual Conversion Super heterodyne Circuit: results in minimized interference through superior selectivity.
- Excellent Sensitivity: yielding a true high-performance receiver.
- High Dynamic Range: allowing for detection of weak signals
- in the presence of strong signals.
- Selectable Bandwidths: 1.0, 1.8, 2.0, 2.5, 3.0, 4.0, 6.0 kHz for excellent selectivity.
- Single Sideband Synchronous AM Detector: selectable USB/LSB or double sideband to minimize adjacent frequency interference and fading distortion of AM signals.
- IF Passband Tuning: an advanced tuning feature that functions in AM and SSB. Greatly helps reject interference.
-
Tuning Modes: variable-rate tuning knob, direct keypad frequency entry, up/down pushbuttons and auto-tuning.
-
Direct Shortwave Band Entry, allows instant access to the shortwave band of choice.
- Selectable AGC: ON/OFF.
- Display Backlighting: evenly lit tri-color backlight enables display viewing under all lighting conditions.
Dual Programmable Clocks with WWV or RDS Auto-Setting. - Dual-Event Programmable ON/OFF Timers: can be used for recording or 'alarm clock' function, plus separate Snooze and Sleep timers.
- Superior Audio Quality via a bridged type audio amplifier, providing high output power with battery operation.
- Separate, continuous bass and treble tone controls.
- Headphone Jack.
- Stereo Line-Level Output: for recording or routing the output to another device such as a home stereo.
- Calibrated LCD signal strength meter.
• Built-In Antenna: Telescopic antenna for long wave, shortwave and AM and FM broadcast band reception. - External Antenna Connection for the addition of auxiliary antennas, e.g. professionally engineered shortwave antennas; long-wire shortwave antennas; specialized AM broadcast band antennas for enthusiasts of AM DX'ing; FM broadcast band antennas.
- Power Sources: four internal "D" cell batteries (not included) or the included AC adaptor.

- External Level Equalizer
- Treble
- Bass
- Volume
- Battery Access Door
- Direct Key Input
- Function Soft Keys - LW/MW/SW
- Store Key
- Delete Key
- Tag Key
- TScan Key
- Seek Key
- Time
- Squekh
- DX Key
- Fast/Tuning Lock
- Tuning Knob
- Mode Soft Keys
- Power Key
- LCD Display
- Speaker
- Telescopic Antenna
- Line In Socket
- Line Out Socke
- HF Antenna Internal/External Switch
- FM Antenna Internal/ Switch
- External Antenna Socket
- External 5 VDC Power Socket
- External Speaker Socket
- Headphone Socket
- Snooze/Sleep key
- Light key

DIAGRAMS continuedDIAGRAMS continued
FIGURE 5: BASIC DISPLAY FIGURE 6: MEMOR6.8G0UNTRY DISPLAYS
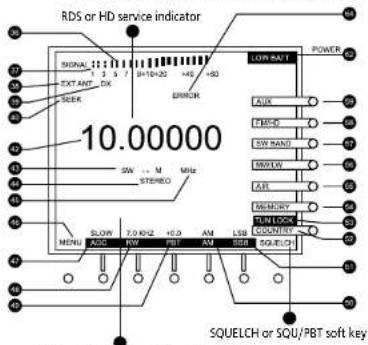
FM or FM HD mode display RDS or HD information
-
Squelch Level
-
Internal/External Antenna
-
DX (RF Preamplifier Active)
-
Seek Mode Indicator
-
Frequency Display
-
Meter Band Indicator
-
Stereo/Mono Indicator
-
MHz/kHz Indicator
-
Menu Soft Key Label
-
AGC Mode Indicator
-
IF Bandwidth Indicator
-
Passband Tuning Status
-
Selects AM or AM Sync Modes
-
Selects Upper or Lower Sideband
-
Country Mode Select Soft Key
-
Indicates Tune Lock Engaged
-
Memory Mode Select Soft Key
-
Air Mode Select Soft Key
-
MW (AM Broadcast)/LW (Longwave)
Select Soft Key
-
Selects Shortwave & Band Select Modes
-
Selects FM or FM HD Mode
-
Selects Aux input
-
Indicates Local (L) or Universal (U) Time
-
Battery Indicator
-
Indicates Various Errors
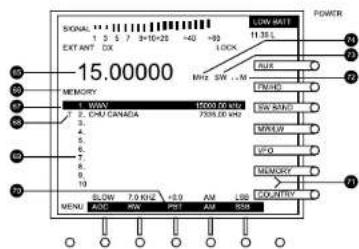
-
Frequency of Selected Channel
-
Memory or Country Mode
-
Cursor Showing Selected Channel
-
"T" Indicating Marked T-Scan Channel
-
Channel Numbers
-
Softkey Labels & Parameters
-
Memory & Country Mode Indicators
-
Meter Band Identifier
-
LW, MW, SW, AIR OR FM & FM HD Band
-
Indicates kHz or MHz
3 GETTING STARTED
WHAT THE ELITE SATTELIT INCLUDES
- AC adaptor
• Getting Started Guide
NOTE: In the instructions which follow, numbers in square brackets [] refer to the labels in the drawings in the "3 Diagrams" section.
EXTERNAL POWER SOURCES
Plug the AC adapter into the "DC IN 5V" socket on the right side of the Elite Satellit [Figure 2, # 29] and connect the adapter to an AC Power source.
If batteries are installed and external power is lost, the receiver will continue to operate on battery power even with the DC plug inserted. If this occurs, the receiver will alert the user with a POWER LOSS indication and with a POWER LOSS beep if the POWER LOSS beep feature is enabled.
BATTERY POWER
If portable operation is desired, the unit may be powered with four "D" cell batteries. Alkaline batteries are preferred, but are not required. To install the batteries, proceed as follows:
- Position the receiver with the front panel towards you.
- Open the battery access door located at the lower left corner of the front panel [Figure 1, # 5].
• Inside you will find an additional door. - Remove this door by pressing down and pulling outward on the "OPEN" tab.
- Insert the first of four "D" sized batteries into the battery opening with the plus end of the battery to your left.
- Slide the battery to the right and continue in this manner until all four batteries are installed. Replace the inner door and close the outer door.
Please refer to the front panel illustration on page 6, Figure 1 and set the controls as described below. This assumes that you have already installed batteries and/or have connected to external power, and that the desired antenna has been connected and selected as described in "Getting Started".
NOTE: Check the batteries periodically for leakage. IF UNIT IS TO BE STORED OR OTHERWISE NOT USED FOR AN EXTENDED PERIOD OF TIME, REMOVE THE BATTERIES TO PREVENT CORROSION AND POSSIBLE DAMAGE TO THE RECEIVER.
BATTERY CONDITION
Battery condition can be observed when the unit is turned on or if the 'LIGHT' button [Figure 3, # 32] is pressed if no external power source is connected to the receiver. When the 'POWER' key [Figure 1, # 20] is pressed, or when the 'LIGHT' button is pressed, a screen will be observed similar the signal strength bar [Figure 5, # 36] The further the bar extends toward the Left, the more charge remains in the batteries.
If a flashing "LO BATT" is observed in the upper right hand corner of the LCD display, the batteries are too low for satisfactory operation and should be replaced.
ANTENNAS
The Elite Satellit is equipped with an internal telescopic antenna [figures 2, 3, & 4 # 23] which should provide excellent reception on the SW, AM, and FM broadcast bands. A PAL type antenna connector, located on the left side panel, [Figure 2, # 28] is provided for external antennas. An optional adapter will adapt a female type F connection to the PAL-type connector on the Elite Satellit.
On the left side of the Elite Satellit, you will find two antenna selection switches [Figure 2, # 26 & 27]. The lower one is for FM, and upper one is for LW, MW, & SW. Make sure these switches are set for EXTERNAL if you are using an external antenna or INTERNAL if you are not. If you choose INTERNAL, be sure to extend the telescopic antenna to its full length.
Again referring to Figure 1, set the 'EQUIL' control [# 15], and the 'TREBLE' [# 2] and the 'BASS' [# 3] controls to the center of their ranges.
Press 'POWER' [Figure 1, # 20] and adjust 'VOLUME' [Figure 1, # 4] to a comfortable level.
BASIC RECEIVER OPERATION continued
Select the desired band by pressing the 'FM', 'SW', 'MW/LW' soft keys until the desired band is displayed on the front panel display.
The selected band will be indicated by reverse video on the display. For example, see [Figure 5, #57].
MANUAL TUNING
The 'TUNING' knob is used to fine tune through the frequencies on a selected band. The rate at which tuning occurs, and the number of digits displayed to the right of the decimal point in the display are controlled by the 'FAST / TUNING LOCK' key [Figure 1, #17].
For course manual tuning, pressing either end of the
- Press the 'MENU' key [Figure 5, # 46]. This brings up the RADIO SETTINGS menu on the LCD display.
- Press the '3' key to toggle between 9 kHz and 10 kHz.
- Press '9' to exit this menu.
In the USA, AMI broadcast stations are spaced at 10 kHz intervals, so the 10 kHz setting should be used. However in some other parts of the world, they are spaced at 9 kHz intervals, so if you are in one of these regions, use the 9 kHz setting.
DIRECT FREQUENCY ENTRY
Direct entry of a desired frequency is possible using the 'Direct-Key-Input' keys [Figure 1, # 6]. While entering a frequency, if an incorrect number is entered, pressing the 'CLEAR/LOCK' key will clear the entry in progress and return the receiver to its previous settings. The second depression of the decimal (.) key acts as an 'ENTER' and causes immediate response to the entered frequency. If you do not press the decimal (.) key a second time at the end, the receiver will automatically enter the fre-quency after a slight delay.
The SW band (1.8 - 30.0 MHz) frequencies are displayed and entered in kHz or MHz, depending upon the user's selection from item 4 of the RADIO SETTINGS menu. To make the menu selection, press the 'MENU' soft key twice. Then press 'Direct-Key-Input' key '4'. Repeatedly pressing the '4' key toggles between kHz and MHz as the display and entry method for the SW band. Leave the reverse video entry on the desired display method. For example, line 4 on the menu should appear as follows for entry in kHz:
"4 SW BAND ENTRY kHz / MHz".
After making this selection, press 'Direct-Key-Input' key '9' to exit the menu. Note that if kHz is selected from the menu, the display will show frequencies from 1.8 - 30.0 MHz in Kilohertz, and entries should be made in kHz.
SHORTWAVE 'METER' BAND DESIGNATOR ENTRY
To facilitate tuning to particular sections of the shortwave band, the Elite Satellit receiver permits entry of the 'METER' band designator. By entering this 'METER' band number, the receiver automatically tunes to the low frequency end of the corresponding 'METER' band. The search for the new station location is thus limited to a particular smaller section of the entire shortwave band spectrum.
Press the 'SW BAND' soft key [See Figure 5, # 57] to enter the shortwave band tuning mode. The SW portion of the display indicator will now be in reverse video. Now press the 'SW BAND' soft key a second time. The display indicator will now appear as "SW BAND", and the 'METER' number entry prompt on the display will be flashing. At this point, you have approximately 3 seconds to do one of the following:
You can scroll through the available meter bands using the 'TUNING' knob or the '< SELECT >' key, stopping on the desired 'METER' band. If you stop on a "METER" band for more than 3 seconds, the receiver will tune to that band, the "SW BAND" indicator will appear as "SW BAND", and the short-wave band "METER" prompt will quit flashing.
BASIC RECEIVER OPERATION continued
LISTENING TO SHORWAVE STATIONS AND CHOOSING THE BEST SHORTWAVE BAND
Absolutely no technical knowledge or prior experience is necessary to fully enjoy listening to shortwave stations from around the world. It's helpful to understand the meaning of the term 'bands'. For a more detailed introduction to shortwave listening refer to the section titled UNDERSTANDING SHORTWAVE BANDS in the USE AND CARE GUIDE'S APPENDIX.
Here are the most important bands with band name and frequency range: 13m, 21450-21850 KHz; 16m, 17480-17900 KHz; 19m, 15100-15800 KHz; 22m, 13570-13870 KHz; 25m, 11600-12200 KHz; 31m, 9200-10000 KHz; 41m, 7100-7600 KHz; 49m, 5800-6200 KHz; 60m, 4750-5060 KHz.
Following are the best bands for the various times of day. This information can be used worldwide. Note that some bands overlap several periods of the day and that it always pays to experiment.
SUNRISE AND EARLY MORNING:
25, 31, 41, and 49 meters are usually good.
MID DAY:
13, 16, 19, 22 and, in some areas, 25 meters. Sometimes these bands open up early, so test them in the morning too.
LATE AFTERNOON AND AROUND SUNSET: 19, 22, 25, 31, 41 and 49 meters.
NIGHT:
60, 49, 41, 31, 25 meters, with 49, 31 and 25 usually the best. In the summer months, the 16 and 19 meter day bands sometimes stay open at night.
TUNING AROUND IN THE SHORTWAVE BANDS
Refer to the previous section titled SHORTWAVE METER BAND DESIGNATOR ENTRY to get into a shortwave band appropriate for the time of day that you're listening. Using this method will place you at the beginning of the band's frequency range. Use the tuning knob described in the previous section titled MANUAL TUNING to search for stations, staying within the bands frequency range to optimize results. Alternately, use the SEEK feature described in a later section titled SEEK FUNCTION to have the Elite Satellit automatically scan and stop on shortwave stations.
AM OPERATION
For general tuning and listening on the LW, MW or SW bands, normal AMI mode is best. However, under less than ideal reception conditions, several options are available that can improve reception.
AM SYNC (Synchronous)
Selective fading is a condition that frequently occurs on the SW bands in which the carrier of the desired station momentarily fades away, making the remaining received information difficult or impossible to understand.
This condition can frequently be improved considerably by engaging AM SYNC mode. To do this, press the 'AM' soft key [Figure 5, # 50] when already in the AM mode. You will observe "AM SYNC" flashing briefly above the 'AM' soft key label until the desired station is locked in. Further improvement may be obtainable while in this mode by pressing the SSB soft key [Figure 5, # 51]. Repeatedly pressing this soft key will cycle through USB (upper sideband), LSB (lower sideband), and DSB (double sideband) one of which may reduce adjacent channel interference.
BW (Bandwidth)
Repeatedly pressing the 'BW' soft key [Figure 5, #48] will cycle through three IF bandwidths of 7kHz , 4.0kHz , and 2.3kHz . The narrower the bandwidth selected, the "muddier" the received signal will sound. While 6.0kHz is the preferred setting for best fidelity, narrower settings will sometimes improve reception under crowd-ed band conditions by filtering out nearby interference.
AGC (Automatic Gain Control)
In AM, SW or LW bands pressing the 'AGC' soft key [Figure 5, #47 will turn the AGC function On or Off.
SSB RECEPTION
SSB, single sideband, is needed to listen to certain types of signals, including amateur radio two-way communications and Morse code (often called CW)
GETTING STARTED continued
FM OPERATION
FM reception is perhaps the easiest mode to use on the Elite Satellit receiver.
The AGC and BANDWIDTH settings are not used in FM. In fact, all of the function soft keys along the bottom edge of the display except the 'MENU' soft key have no function on FM and the labels on the display for these soft keys disappear. Attempting to use one of these soft keys will result in an 'ERROR' beep.
All FM stations in the U.S. end in an odd 100 kHz, i.e. 97.7 MHz, and are spaced 200 kHz apart. The Elite Satellit receiver has the ability to tune in 100 kHz steps to allow tuning in between stations to help eliminate interference to weaker stations that could be covered up by stronger adjacent stations.
Additionally, when headphones are used, or if the LINE OUT jack is fed into an external stereo sound system, true stereo reception is possible. The 'STEREO' indicator [Figure 5, # 44] on the display will appear when a stereo station is tuned in. 'MONO' will appear
in this location if the transmitting station is not in stereo, if no signal is being received, or if MONO is selected from the AUDIO SETTINGS menu.
To select between STEREO and MONO from the AUDIO SETTINGS menu, proceed as follows:
- Press the 'MENU' soft key.
- Press the 'Direct-Key-Input' '2' key or press 'MENU' two more times. This will access the AUDIO SETTINGS menu.
- Press the 'Direct-Key-Input' '1' key to cycle between MONO and STEREO.
When STEREO is enabled, the receiver will automatically switch to stereo and provide left and right audio from the HEADPHONE and LINE OUT jacks when a stereo FM signal is being received. If the headphones are removed while listening to a stereo broadcast the receiver will provide monaural audio from the internal or an external speaker.
5 MEMORY FUNCTIONS
The Elite Satellit receiver contains 1700 memory channels that can be used to store and recall commonly monitored frequencies. The first 500 of these are referred to simply as MEMORY channels. The remaining 1200 are referred to as COUNTRY channels.
The 500 MEMORY channels are displayed in groups of 10 per screen and each saved frequency can be stored with an identifying name.
The 1200 COUNTRY memory channels are divided among 111 countries from Afghanistan to Yugoslavia with 10 memory channels assigned per country and with 90 memory channels remaining with no country assigned. These COUNTRY memory channels are numbered from 501 to 1700. They are displayed in groups of ten, and can be used to store and recall commonly non-itored frequencies. Unlike the MEMORY channels, COUNTRY channels cannot have names assigned to each channel.
Both MEMORY and COUNTRY channels can be scanned using the SEEK function which can stop, or they can be scanned selectively using the T.SCAN function. With MEMORY and/or COUNTRY channels programmed, you can use the T.SCAN function to selectively monitor desired frequencies. The following operating parameters may be stored in any MEMORY or country channel: Frequency, Mode, Bandwidth, AGC setting, PBT setting, Synchronous Detector setting.
STORING A CHANNEL
To store a channel from VFO mode proceed as follows: First select the mode and frequency that you wish to
(A.) store, as you normally would do in VFO mode. Make sure you have set all the function parameters to your preference.
Then press the 'STORE' key [Figure1, # 9], followed by
(B.) the 'MEMORY' or 'COUNTRY' soft key [Figure 5, #54 & #52 respectively]. This will take you to the MEMORY or COUNTRY screen similar to that shown in Figure 6. Use the 'TUNING' knob [Figure 1, #18] or the '< SELECT
(C.) >' key [Figure 1, #8] to select the desired blank MEMO-RY or COUNTRY number.
Press the 'STORE' key again. In 'COUNTRY' mode, the
(D.) selected frequency will appear at the selected COUNTRY channel in reverse video, a confirming beep will be
GETTING STARTED continued 6 HD RADIO OPERATION
heard and "COUNTRY STORED" will appear briefly on the display. In MEMORY mode, the chosen frequency will appear, in reverse video, and a flashing white curser will appear in front of the selected channel number.
(E.) Within 10 seconds, you must either begin to program a name for the desired channel, or press the 'STORE' key again to store the channel without a name or to use the previously stored name.
(F.) To name the channel, while the white curser is flashing, use the 'TUNING' knob to scroll through the alphanumeric characters until you find the one you want. Then press the right hand '
RECALLING A CHANNEL
To select a specific MEMORY or COUNTRY channel, press the 'MEMORY' or 'COUNTRY' soft key to enter MEMORY or COUNTRY mode. This will cause the selected soft key label to appear in reverse video. Then use the 'TUNING' knob or the '< SELECT>' key to scroll through the channel numbers.
If you know the number of the channel you want to receive, you can go to it directly by entering the number on the 'Direct-Key-Input' keypad. If less than a four digit number is entered, there may be a slight delay between the time you enter the number and the time the channel change actually takes place. However, if you enter a four digit number, the channel change will occur immediately upon entry of the fourth number.
DELETING A CHANNEL
Select the channel to be deleted as described in "RECALLING CHANNEL". Press and hold the 'DELETE' key [Figure 1, # 10] for 3 seconds. A high pitched beep will be heard to indicate that the contents stored in the selected memory channel number have been deleted, and you will see the frequency disappear from the selected MEMORY channel number.
HD RADIO MODE
The Elite Satellit radio will automatically detect and switch to HD Radio mode to provide the highest quality audio available. While the Elite Satellit will always be looking for HD Radio stations as you tune in the FM frequency band, you will not see any of these HD stations if the signal strength is not strong enough.
FINDING AVAILABLE HD RADIO STATIONS
If you know that there is an HD Radio station paired with one of your local FM radio stations simply key in that station's frequency when in FM mode. For example, type in "8800" to select 88.00 MHz. Once the audio is tuned to that frequency, if there are HD Radio stations associated, they will automatically appear.
If you do not know your local radio station frequency press and hold the "SELECT" button until the Elite Satellit begins to scan the FM frequencies either upward or downward. The radio will stop once it finds a frequency with content.
Once the Elite Satellit switches to HD Radio mode you will no longer see "FM" under the frequency, rather you will see the letters "HD".
FM RDS / HD RADIO DATA
HD Radio channels utilize radio data system (RDS) technology to display items such as the Artist, Music Genre, Song Name, etc. Depending on signal strength it may take up to 3 seconds for this data to appear on the screen and start scrolling.
MAIN AND SUPPLEMENTAL PROGRAM SERVICES
Some HD Radio stations will broadcast multiple channels across one frequency. If you see the letters "MP5+" or "SPS1+" it means that there are alternative channels available at this frequency. Once you see this text, simply turn the tuning knob on the right to select between the Main Program Service (MP5+) or Supplemental Program Services (SPS1+, SPS2+, SPS3+, etc.).
To find more information on the Radio Data System simply search for it in Google on your browser or visit Wikipedia and search for it. More information on HD Radio can be found at HDRadio.com.
7 SEEK FUNCTION
DESCRIPTION
The Elite Satellit incorporates a SEEK function which allows the user to search for signals in VFO, MEMORY or COUNTRY mode which have signal strengths that exceed a predetermined level which the user determines by the setting of the 'SQUELCH' knob [Figure 1, # 15].
VFO MODE
To use SEEK in VFO mode, proceed as follows:
- Select the frequency range you would like to scan. This can be FM, MW, LW, SW or AIR.
- Press the 'SEEK' key [Figure 1, # 13]. The receiver will scan through the selected band in 5 kHz steps on LW band, 9 or 10 kHz steps on MW band, 5 kHz steps on SW band, and 100 kHz steps on FM band. The receiver will remain on that signal until the 'SEEK' key is pressed again.
- If the receiver continues to SEEK but cannot find a signal, you may press 'SEEK' again to stop the SEEK.
MEMORY & COUNTRY MODE
To use SEEK in MEMORY and COUNTRY modes, selected frequencies must be programmed into several of the MEMORY and/or COUNTRY channels. Programming of MEMORY and COUNTRY channels is covered on page 11. Once MEMORY and/or COUNTRY channels are programmed as desired, proceed as follows:
- Press the 'MEMORY' or 'COUNTRY' soft key to enter the desired mode.
- Press the 'SEEK' key. The receiver will step through all programmed MEMORY or COUNTRY locations until it finds a signal that exceeds the squelch setting. It will stop on that signal and will stay there until the 'SEEK' key is pressed again.
Note: Search under MEMORY or COUNTRY operates according to the following rules:
- When currently listening to the SW/MW/LW band that is not AM SYNC or SSB, the radio will only search for stations that are not AM SYNC or SSB in the SW/MW/LW band
- When listening to AM SYNC or SSB mode in SW/MW/LW band, the radio will only search for AM SYNC or SSB station in SW/MW/LW band.
- When currently listening to the FM band, the radio will only search for stations in the FM band
- When listening to the AIR band, the radio will only search for stations in the AIR band
8 T-SCAN FUNCTION
The T.SCAN function of the Elite Satellit allows the user to mark numerous channels in the MEMORY, and/or COUNTRY, memories for selective scanning.
9 CLOCK & TIMER FUNCTIONS
TIME DISPLAY
The Elite Satellit incorporates dual time clocks allowing two 24 hour clocks to be set and maintained. The two-event timer functions are also derived from the displayed clock. Therefore the clocks must be set first for proper TIMER operation, and the clock selected for display must be the same one (GMT or Local) for which the timers are programmed.
TIMER settings are stored in non volatile memory and are maintained regardless of how long power has been removed.
When the receiver is in the ON state, the time is displayed in the upper right hand corner of the display, regardless of which menu or operating mode is selected. When the receiver is in the OFF state, the time is displayed prominently in the upper portion of the display, and if either timer is enabled, timer settings are displayed in the bottom portion of the display. The time on the display can also be turned off manually in the menu.
If the time in any menu or display is observed to be flashing on and off at one second intervals, it indicates that the selected clock is not set.
Selecting between Local time and GMT time is accomplished by pressing and releasing the 'TIME' key [Figure 1, #14] three times. This will bring up the CLOCKS menu, which allows the user to press the soft key along the right hand side of the display labeled "GMT" or "LOCAL". When the receiver is in the OFF state, pressing the 'TIME' key will toggle between Local and GMT.
- With the receiver turned on, press the 'MENU' soft key which will activate the MAIN MENU. Then press the '6' key on the 'Direct-Key-Input' keypad, to activate the SYSTEM SETTINGS menu.
- Item 3 on the SYSTEM SETTINGS menu reads: "3 AUTO CLOCKSET OFF / FROM RDS. You will note that either "OFF" or "FROM RDS" is shown in reverse video. Pressing '3' on the 'Direct-Key -input' keypad, will toggle the reverse video curser between "OFF" and "Auto set from rds". If necessary, press the '1' key to move the curser to "FROM RDS".
-
Item 3 on the menu reads: "LOCAL TIME OFFSET - /+". This refers to whether or not your Local time is less than or greater than GMT. For example, the Western hemisphere is less than GMT and the Eastern hemisphere is greater. Therefore, if you lived in the Western hemisphere, you would use the '3' key to toggle the curser to '-'
-
Item 4 on the menu reads "LOCAL TIME OFFSET 00:00 HOURS". This refers to how much your local time is offset from GMT. For example, in the Eastern Time Zone of the USA the offset is 5:00 hours.
(1) To change this setting, press '4' on the 'Direct-Key-Input' keypad. This will highlight the offset time. Use the 'Direct-Key-Input' keypad keys to enter the desired offset, ignoring the colon.
(2) Use the 'Direct-Key-Input' keys to enter the desired offset.
(3) Press the 'STORE' key to save, the offset will no longer be highlighted.
(4) Press the '9' key to exit and return to normal operation.
SETTING THE 24 HOUR CLOCKS MANUALLY If you are not in a location where adequate signal quality can be obtained on one of the RDS signals, the Local and GMT clocks will need to be set manually. This is accomplished using the SET CLOCKS menu. To reach this menu, the unit must be in the ON state. Then press the 'MENU' soft key. This will bring up the MAIN MENU. From the MAIN MENU, press the '3' key on the 'Direct-Key-Input' keypad. This will activate the SET CLOCKS menu. To use SEEK in VFO mode, proceed as follows:
Setting Local Time
- To set the Local time, press MENU, SET CLOCKS and then press the '1' key. This will highlight the 4 digits on the right side of the LOCAL TIME SET. Enter the current local time using the keypad and press STORE to save.
- Using the 'Direct-Key-Input' keypad, key in the desired time, ignoring the colon. (HINT: Key in a time about one minute ahead of the actual time and wait.)
• Example: For 16:05, press in sequence '1', '6', '0', '5'. The Local time set line on the display will now appear as: "LOCAL TIME SET 16:05" - When the actual time agrees with the displayed time, press the 'STORE' key. The entered time will now be shown, the menu numbers will return, and the clock will begin running.
- To exit the SET CLOCKS menu, press the '9' key on the 'Direct-Key-Input' keypad.
- Note that after setting the Local Time the GMT time will update accordingly per the offset "+" or "-" in menu item 3 and the hour offset in menu item 4.
CLOCK & TIMER FUNCTIONS continued CLOCK & TIMER FUNCTIONS continued
Setting GMT Time
- To set the GMT time, press MENU, SET CLOCKS and then press the '2' key. This will highlight the 4 digits on the right side of the GMT TIME. Enter the current local time using the keypad and press STORE to save.
- Using the 'Direct-Key-Input' keypad, key in the desired time, ignoring the colon. (HINT: Key in a time about one minute ahead of the actual time and wait.)
- Example: For 16:05, press in sequence '1', '6', '0', '5'. The Local time set line on the display will now appear as: "GMT TIME SET 16:05"
- When the actual time agrees with the displayed time, press the 'STORE' key. The entered time will now be shown, the menu numbers will return, and the clock will begin running.
- To exit the SET CLOCKS menu, press the '9' key on the 'Direct-Key-Input' keypad.
- Note that after setting the GMT the LOCAL time will update accordingly per the offset "+" or "-" in menu item 3 and the hour offset in menu item 4.
NOTE: If the AUTO CLOCK SET is left in the ON state, then manual setting of the clock may result in only a temporary change of the time settings.
TIMER OPERATION
The Elite Satellit includes two programmable event timers allowing the receivers to turn ON or OFF at preset times. The timers may be used separately or together and may recall a currently displayed frequency, MEMORY channel, COUNTRY channel, or a combination of those.
In addition, programming only an OFF time provides a Sleep timer, and programming only an ON time provides a Wake timer. Note that the timers, when activated, respond to the last displayed clock.
Programming the timers is a three step process. Step one is to set the ON time, and step 2 is to assign the OFF time. Step three is to assign a MEMORY, COUNTRY channel to a timer.
Setting Timer On/Off Times
Enter the TIMERS menu by pressing the 'MENU' key to reach MAIN MENU, and then pressing the '5' key on the 'Direct-Key-Input' keypad. This brings up the TIMERS menu.
- Press '1' on the 'Direct-Key-Input' keypad. This will cause the menu numbers on the left to disappear and the ON time entry for TIMER 1 will turn to reverse video, as shown here: "TIMER 1 ON TIME 11:30"
- Key in the desired ON time for TIMER 1, ignoring the colon. For example, for an ON time of 18:41, press the following keys: '1', '8', '4'1'. The TIMER 1 ON TIME curser will now show "18:41".
- Press 'STORE' to save the TIMER 1 ON time in memory. You will hear a beep, the reverse video window will change to normal video, and the menu numbers will return. To set the OFF time for TIMER 1, select item 2 from the menu by pressing '2' on the 'Direct-Key-Input' keypad and follow the same procedure as you used to set ON time.
Setting A Wake Or Sleep Timer
If you want a timer to act as a wake timer only, you would program an ON time and clear an OFF time. This will cause the receiver to turn on at the designated time and stay on until turned off manually.
If you want the timer to act as a sleep timer only, you would clear any existing ON time and program an OFF time. This will cause the receiver to turn off at a designated time and stay off until turned on manually.
To program only an off time, or only an on time, clear the unwanted time on the selected timer as follows:
- Select the timer ON time or OFF time to be cleared by pressing the 'Direct-Key-Input' keypad key corresponding to the menu number of the desired timer ON time or OFF time. This will cause the menu numbers to disappear and a reverse video curser to appear on the selected timer ON time or OFF time.
- Press the 'CLEAR/LOCK' key on the 'Direct-Key-Input' keypad. This will cause the numbers in the reverse video curser to disappear. Only the colon will remain.
- Press 'STORE'. This will cause the reverse video curser to disappear, a beep will be heard, the menu numbers will reappear, and the null time information will be stored in memory.
Setting Timer Memory Channels
To tie a timer to a stored channel press the number that relates to the Timer # MEM CH and select the memory channel to be associated with the timer.
Enabling/Disabling Timer Operation
Press the TIME' button. This will activate the TIMER 1 display. This display shows the start time and stop time set for TIMER 1 as well as the MEMORY or COUNTRY menu number, frequency, and name (if any) programmed in for the TIMER 1 MEM CH.
To enable TIMER 1, press the 'ENABLE' soft key. This will cause "TIMER 1" to appear in the upper right hand corner of this display (as well as all other displays and menus), indicating that TIMER 1 is enabled.
To disable TIMER 1, press the 'DISABLE' soft key. If TIMER 1 was the only one enabled, "TIMER 1" will disappear from the display. If TIMER 2 was also enabled, only the '1' will disappear. If both timers are enabled you will see "TIMER 1 2" in the upper right hand corner of this and all other displays and menus.
To enable or disable TIMER 2, press the 'TIME' key again. This will activate the TIMER 2 display. This display is identical to the TIMER 1 display except for its name. Follow exactly the same procedure to enable or disable TIMER 2.
To return to normal operation from the TIMER 2 dis-play, press the 'TIME' key twice. The first press will take you to the CLOCKS display, and the second will take you back to the VFO, MEMORY, COUNTRY display. Note that repeatedly pressing the 'TIME' key will cycle through the TIMER 1, TIMER 2, CLOCKS, and normal screens.
10 MISCELLANEOUS FUNCTIONS
SNOOZE
When the receiver is ON, or turned on by the timer, pressing the "SNOOZE" bar [Figure 3, #33] will activate the SNOOZE mode, causing the receiver to turn off. An internal counter will automatically count down the time for 5,10, 20 or 30 minutes later, after which the radio will turn back on.
To set the amount of time for the SNOOZE function press "MENU" key, then press '3' to enter the SET CLOCKS menu and then press '5' to select (highlight) the amount of time for the SNOOZE delay. Press '9' to exit. When the radio is in SNOOZE mode you can cancel the SNOOZE early by powering the radio OFF and back ON with the POWER button. When the SNOOZE feature is active the word SNOOZE will appear on the display with a countdown timer in the lower left corner.
SLEEP
When the receiver is OFF, and not in SNOOZE mode, a long press of the SNOOZE/SLEEP bar will activate the SLEEP timer. Upon activation the radio will turn ON for the default timing of 15 minutes prior to turning OFF. To change the amount of time for the SLEEP timer from the default to any other setting of minutes, between 1 and 99, turn the radio OFF, press and release the SNOOZE/SLEEP bar and then rotate the TUNING knob.
Once the desired number of minutes is shown on the screen press and release the SNOOZE/SLEEP bar again and / or wait for 15 seconds and the SLEEP time will automatically be entered. When the SLEEP feature is active a countdown timer will appear in the lower left hand corner of the display.
DISPLAY LIGHTING
Pressing the 'LIGHT' key [Figure 3, # 32] while the receiver is turned ON cycles the display illumination through four backlight states; Off, Orange, Green and Blue.
If the Elite Satellit is operating from batteries, the display will be lit only briefly when the unit is turned OFF. If, when OFF, the 'LIGHT' button is pressed once, the display will illuminate for 10 seconds and then go out. In the ON state, the display will be lit only briefly following control inputs. However, holding down the LIGHT key for 3 seconds will override the time out and allow the light to remain on continuously when the receiver is ON.
The user must keep in mind, however, that keeping the light on continuously when operating on batteries will considerably reduce battery life.
Advanced settings for the backlight can be found by pressing MENU and then the '5' key to enter the BACK-LIGHT SETTINGS menu.
- Pressing '1' when in the BACKLIGHT SETTING menu will cycle the backlight between each of the three colors.
- Pressing '2' when in the BACKLIGHT SETTING menu will set the amount of time that the backlight stays on, in minutes, when the radio is powered on, operating from battery power after the last button has been pressed. Note that longer time settings will drain the battery more quickly.
- Pressing '3' when in the BACKLIGHT SETTINGS menu will set the amount of time that the backlight stays on, in minutes, when the radio is powered on, operated from the AC/DC power adapter after the last button has been pressed.
The user must keep in mind, however, that keeping the light on continuously when operating on batteries will considerably reduce battery life.
MISCELLANEOUS FUNCTIONS continued
Additional System Settings
Pressing "MENU" and then the '6' key allows the user to enter the SYSTEM SETTINGS menu. Inside this menu the user can:
Press '1' to set whether the LCD stays on when the radio is in standby mode when powered by batteries. This allows the clock to be seen on the LCD display in standby mode. Note that this setting will cause the batteries to drain more rapidly.
LOCK ALL ENTRY TO KEYPAD
The receiver front panel keys with the exception of the 'CLEAR/LOCK' key may be locked or disabled by press-ing and holding the 'CLEAR/LOCK' key for 8 seconds. An acknowledging beep will be heard, and both "LOCK" and "TUN LOCK" will appear on the front panel display after 8 seconds to indicate that the front panel keys and 'TUNING' control are locked. Press the 'CLR/LOCK' again for 8 seconds to unlock the front panel keys and 'TUNING' control. The beep will again be heard when the key is pressed and the "LOCK" and "TUN LOCK" indications on the front panel display will disappear after 8 seconds, indicating that the 'TUNING' control and front panel keys have been released.
This control can also be used when the receiver is turned off. Press 'CLEAR/LOCK' for 8 seconds.
A message will appear confirming lock. If power is then pressed, a "Press CLEAR/LOCK for 8 seconds to unlock" message will appear. The user must perform this action before the 'POWER' key will allow the receiver to be turned on.
LINE IN
This 1/8" diameter stereo jack [Figure 2, # 24] is used to feed in audio from an external source such as a CD or cassette tape player. The input level should be approximately 300 mV, at an impedance of 47K ohm. This input is enabled when the AUX mode is selected by pressing the FM/AUX soft key twice [Figure 5, # 58]. When in this mode, the VOLUME, BASS and TRE-BLE controls are effective.
LINE OUT
This 1/8" diameter stereo jack [Figure 2, # 25] provides a constant low level audio source that is independent of the front panel 'VOLUME', 'TREBLE' and 'BASS' control settings. It is designed to interface to a tape recorder, CW / RTTY demodulators, stereo amplifiers, etc.
HEADPHONE
This connector [Figure 2 # 31] accepts a 1/8" (3.175 mm) stereo/mono headphone connector. Stereo reception is possible only in the FM Radio mode. All speaker outputs are automatically switched off when using the headphones.
11 TROUBLE SHOOTING
| Problem | Probable Cause | Solution |
| No front panel display or light. | (A) Power connection.(B) Defective AC ADAPTER unit.(C) Batteries are discharged or not installed for portable operation, no AC power.(D) Light turned off with 'LIGHT' key. | (A) Check power supply cables.(B) Check AC ADAPTER.(C) Check/install batteries for portable operation.(D) Turn light on with 'LIGHT' key. |
| No signals heard when antenna is connected or sensitivity is low. | (A) Incorrect antenna input selected. (B) Squech set too high. | (A) Select correct antenna input.(B) Set Squech to lower level. |
| Signal Strength indication but no sound heard. | (A) Improper mode selected.(B) External speaker connected but defective.(C) Squech set too high. | (A) Check mode selection.(B) Check external speaker.(C) Set Squech to lower level. |
| No front panel operation such as tuning, frequency entry, etc. | (A) Lock enabled. | (A) Press 'CLEAR/LOCK' and hold for 3 seconds to unlock front panel. |
| Timer does not operate. | (A) Clock(s) not set.(B) Timer not properly set.(C) Alternate clock selected.(D) Timer(s) not enabled. | (A) Set clock(s).(B) Set clock(s) and program timer ON/OFF times.(C) Check that last displayed clock is the desired one for timer event.(D) Enable timers. Observe TIMER 1 or 2 on display. |
12 SUGGESTED REFERENCES
Passport to World Band Radio
Published by:
International Broadcasting Services, Ltd.
P. O. Box 300
Penn's Park, Pennsylvania 18943
http://www.passband.com/
World Radio TV Handbook
Published by:
Billboard Publications Inc.
1515 Broadway
New York, NY 10036
http://www.wrth.com/
The ARRL Antenna Book
Published by:
The American Radio Relay League
225 Main Street
Newington, CT USA 06111
Copyright © 1988 by The American Radio Relay League
Library of Congress Catalog Card Number: 55-8966
http://www.arrl.org/catalog/?item=9043
The ARRL Handbook
Published by:
The American Radio Relay League
225 Main Street
Newington, CT USA 06111
Copyright © 1989 by The American Radio Relay League
Library of Congress Catalog Card Number: 41-3345
http://www.arrl.org/catalog/?item=1964
13 WARRANTY REGISTRATION
To ensure full warranty coverage or product updates, registration of your Etón product should be complete as soon as possible after purchase or receipt.
To register your radio, please select one of the following methods:
1) Register by visiting our website at http://www.etoncorp.com
2) Mail your registration information to the following address:
Etón Corporation
1015 Corporation Way
Palo Alto, CA 94303
PRODUCT REGISTRATION
Include your name, full mailing address, phone number, model purchased, date purchased, retail vendor name and product serial number (typically located in or near the battery compartment).
14 LIMITED WARRANTY TO THE ORIGINAL CUSTOMER 15 SERVICE INFORMATION
LOCK ALL ENTRY TO KEYPAD
This Etón brand product, as supplied and distributed by Etón Corporation (Etón) is warranted by Etón against manufacturing defects in material and workmanship for the following limited warranty period:
ONE (1) YEAR PARTS AND LABOR
This limited warranty begins on the original date of purchase, and is valid only on products purchased through an authorized Etón retailer and does not include transportation, installation, removal or reinstallation. Warranty repairs must be performed by Etón or Etón's authorized service center. To receive warranty service, the original dated bill of sale must be presented upon request as proof of purchase to Etón or Etón's authorized service center. Transportation to Etón or Etón's authorized service center is the responsibility of the purchaser.
Eton will repair or replace this product, at our option and at no charge with new or reconditioned parts, if found to be defective during the limited warranty period specified above. The product must be returned no later than 15 days beyond the expiration of the warranty period with transportation charges prepaid
to Etón or Etón's designated service center for warranty coverage. Prior to returning any product for warranty service, the purchaser must contact Etón for problem determination and service procedure. All replaced parts and products become the property of Etón. Replacement parts and products assume the remaining original warranty, or ninety (90) days, whichever is longer.
This limited warranty covers manufacturing defects in material and workmanship encountered in normal, noncommercial use of this product and shall not apply to the following, including, but not limited to: damage which occurs due to applications and uses for which the product was not intended; failures or problems which are caused by products or equipment not supplied by Etón; accidents, misuse, abuse, neglect, misapplication, fire, water, lightning, or other acts of nature; incorrect line voltage, fluctuations or surges; damage caused by improper or faulty installation (including batteries, which may create an acid leak with irreversible circuit damage); damage caused by acid leakage; product alteration or modification; or use of unauthorized parts, supplies, accessories, or equipment which damage this product or result in service problems.
SERVICE YOUR Etón PRODUCT
To obtain service for your Etón product we recommend first contacting an Etón service representative at 800-872-2228 US, 800-637-1648 Canada or (650) 903-3866 for problem determination and trouble-shooting. Many of the common questions can be resolved quickly over the phone.
There are two service types should your Etón or product need repair.
1) WARRANTY -
If your product is still in warranty and the Eton service representative determines that warranty service is needed, a return authorization will be issued and instructions for shipment to an authorized warranty repair facility. Do Not ship your radio back without obtaining the return authorization number.
2) NON-WARRANTY -
If your product is no longer under warranty and requires service our technical staff will refer you to the nearest repair facility that will be able to best handle the repair.
www.etoncorp.com
1-800-872-2228 from the U.S.
1-800-637-1648 from Canada
1-650-903-3866, worldwide
FAX: 650-903-3867
customer_service@etoncorp.com
www.etoncorp.com
Etón Corporation
1015 Corporation Way
Palo Alto, California 94303 USA
etón


- MAJOR FEATURES OF THE ELITE SATELLIT HD
- DIAGRAMS continuedDIAGRAMS continued
- GETTING STARTED
- WHAT THE ELITE SATTELIT INCLUDES
- EXTERNAL POWER SOURCES
- BATTERY POWER
- BATTERY CONDITION
- ANTENNAS
- BASIC RECEIVER OPERATION continued
- MANUAL TUNING
- DIRECT FREQUENCY ENTRY
- SHORTWAVE 'METER' BAND DESIGNATOR ENTRY
- LISTENING TO SHORWAVE STATIONS AND CHOOSING THE BEST SHORTWAVE BAND
- SUNRISE AND EARLY MORNING:
- MID DAY:
- NIGHT:
- TUNING AROUND IN THE SHORTWAVE BANDS
- AM OPERATION
- AM SYNC (Synchronous)
- BW (Bandwidth)
- AGC (Automatic Gain Control)
- SSB RECEPTION
- GETTING STARTED continued
- FM OPERATION
- MEMORY FUNCTIONS
- STORING A CHANNEL
- GETTING STARTED continued 6 HD RADIO OPERATION
- RECALLING A CHANNEL
- DELETING A CHANNEL
- HD RADIO MODE
- FINDING AVAILABLE HD RADIO STATIONS
- FM RDS / HD RADIO DATA
- MAIN AND SUPPLEMENTAL PROGRAM SERVICES
- SEEK FUNCTION
- DESCRIPTION
- VFO MODE
- MEMORY & COUNTRY MODE
- T-SCAN FUNCTION
- CLOCK & TIMER FUNCTIONS
- TIME DISPLAY
- Setting Local Time
- CLOCK & TIMER FUNCTIONS continued CLOCK & TIMER FUNCTIONS continued
- Setting GMT Time
- TIMER OPERATION
- Setting Timer On/Off Times
- Setting A Wake Or Sleep Timer
- Setting Timer Memory Channels
- Enabling/Disabling Timer Operation
- MISCELLANEOUS FUNCTIONS
- SNOOZE
- SLEEP
- DISPLAY LIGHTING
- MISCELLANEOUS FUNCTIONS continued
- Additional System Settings
- LOCK ALL ENTRY TO KEYPAD
- LINE IN
- LINE OUT
- HEADPHONE
- SUGGESTED REFERENCES
- Passport to World Band Radio
- World Radio TV Handbook
- The ARRL Antenna Book
- The ARRL Handbook
- WARRANTY REGISTRATION
- Etón Corporation
- Corporation Way
- Palo Alto, CA 94303
- PRODUCT REGISTRATION
- LIMITED WARRANTY TO THE ORIGINAL CUSTOMER 15 SERVICE INFORMATION
- ONE (1) YEAR PARTS AND LABOR
- SERVICE YOUR Etón PRODUCT
- 1) WARRANTY -
- 2) NON-WARRANTY -
Brand : ETON
Model : Elite Satellit
Category : Radio