
Sound 100 - Radio ETON - Free user manual and instructions
Find the device manual for free Sound 100 ETON in PDF.


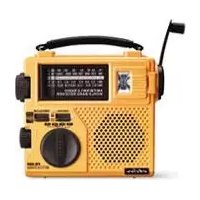
| Product Type | Portable Radio |
| Brand | Eton |
| Model | Sound 100 |
| Dimensions (L x H x D) | 20 x 12 x 5 cm |
| Weight | 300 g without batteries |
| Power Source | 3 AA batteries or AC adapter (not included) |
| Frequency Bands | AM, FM, NOAA Weather |
| Main Functions | AM/FM radio, weather alerts, flashlight, alarm |
| Antenna | FM telescopic antenna, built-in AM ferrite antenna |
| Battery Life | Approximately 20 hours of radio listening |
| Care and Cleaning | Clean with a soft, dry cloth. Do not use abrasive products. |
| Safety | Do not expose to moisture or rain. Do not open the case. |
| Spare Parts and Repairability | Contact Eton customer service for parts and repairs. |
| Included Accessories | Quick start guide, warranty card |
| General Information | Rugged travel radio with sensitive receiver. Suitable for emergency use. |
Frequently Asked Questions - Sound 100 ETON
User questions about Sound 100 ETON
0 question about this device. Answer the ones you know or ask your own.
Ask a new question about this device
Download the instructions for your Radio in PDF format for free! Find your manual Sound 100 - ETON and take your electronic device back in hand. On this page are published all the documents necessary for the use of your device. Sound 100 by ETON.
USER MANUAL Sound 100 ETON
AM/FM/RDS Digital Radio With Dock for iPod OWNER'S MANUAL

natural_image
Black and white photo of an electronic device set including a music player, a digital sound wave device, and a remote control unit (no visible text or symbols)Need Help? Contact Us.
Etón Corporation, 1015 Corporation Way, Palo Alto, CA 94303, USA. 1-800-872-2228 (U.S.); 1-800-637-1648 (Canada); 650-903-3866 (worldwide); M-F, 8:30-4:00, Pacific Standard Time; www.etoncorp.com.
WARNING
- Do not expose this appliance to rain or moisture.
- Do not submerge or expose for extended period to water.
- Protect from high humidity and rain.
- Only operate within specified temperature range (0 °C to 40 °C).
- Unplug immediately if liquid has been spilled or object have fallen into the apparatus.
- Clean only with a dry cloth. Do not use detergents or chemical solvents as this might damage the finish.
- Unplug and disconnect external antennas during lightning storms.
- Do not remove cover [or back].
• Refer servicing to qualified service personnel.
ENVIRONMENT
DISPOSAL
According to the European Directive 2002/96/EC all electrical and electronic products must be collected separately by a local collection system.
Please act according to your local rules and do not dispose of your old products with your normal household waste.
WHAT YOUR RADIO INCLUDES
Owner's manual, remote control, FM antenna wire, iPod dock.
PREPARING YOUR RADIO FOR USE
Plug the AC adapter into the 12 VAC socket on the back of the radio. If using the internal AM antenna, select INT AM switch position. If using the external AM antenna, select the EXT SWITCH position. The EXT SWITCH is not for FM antennas, simply attach your FM antenna to the socket.
PREPARING THE REMOTE FOR USE
Grip the plastic piece on the bottom of the remote unit and pull it out. If the battery drains replace it with a CR/DL2025. See installation diagram on reverse of remote.
POWERING THE RADIO
Plug the Power Cord into an AC (mains) outlet. When it is first plugged in, it will be in the standby mode. In standby mode, only the clock display is activated and the radio is off. To turn the radio on, use a quick, short press of the power button that's on the radio or the remote. To place it back into standby mode, use a quick, short press of the power button.
BACKUP BATTERIES
On the rear of the radio is a backup battery compartment that holds 2 AA alkaline batteries for backup of time in case of power failure. Use only new batteries of exactly the same brand and type. The batteries are not included.
VOLUME CONTROL
The volume is controlled with the volume knob or the VOL buttons on the remote. Turning the volume knob clockwise increases the volume; counterclockwise decreases volume. Pressing the remote's VOL + increases the volume; pressing the VOL - button decreases the volume.
MUTE BUTTON
Use the remote's mute button to mute the audio.
Before placing Earphone/Headphone in/on your ears, turn the volume all the way down. Use Headphone/Earphone with 1/8 inch (3.5 mm) stereo plug. Plug them into the earphone socket on the back of the radio
SELECTING AM/FM, AUX-IN OR iPOD
After turning on the radio, use sequential presses of the MODE button on the radio or the remote to select AM/FM, AUX-IN or iPod.
USING THE RDS BUTTON
Use this button to turn on RDS, Radio Data System, on FM stations. Select RDS OFF, RDS PTY or RDS Radio Text. RDS PTY means RDS program type. All stations do not use RDS. THose stations using it will display their call letters in the display and may also display the name of the group singing, the album's name and the title of the song. Such information is displayed between RDS PTY and RDS Radio Text selections.
MANUAL TUNING
Use quick, short presses of the TUNING/SET buttons to tune up or down frequency, or use the remote's TUNE +/- buttons.
AUTO TUNING
With auto-tuning the radio stops at the next station with good signal strength. Auto- tuning is engaged by a quick, short press of the remote's AUTO TUNE button for tuning up-frequency, and a two second press of the same button to auto tune down frequency.
USING AUX-IN
Use this feature to play other devices that have a line-out feature or earphone output. It accommodates a 1/8th inch stereo plug. Adjust earphone output to low level. Plug the cord into the other device's line-out or earphone socket first, then into the Etón Sound 100 AUX-IN socket on the back of the unit.
USING THE LINE OUT SOCKET
This provides input to another device's line-in socket. It accommodates a 1/8th inch stereo plug.
WORKING WITH THE iPOD
Use the MENU button to scroll through the menu. Use the 🎨️ 🎨️ buttons to scroll up/down the menu. Use the ENTER button to select the item and to play the song that you’ve selected. Use the 🎨️ button to play/pause the song that’s been selected. Use quick, short presses on the 🔊️ 🔊️ buttons to advance to the next song or skip back to the beginning of the playing song. Press 🔊 twice to go back to the beginning of the last song. Use continuous pressure on the 🔊️ 🔊 buttons to skip forward/reverse through the song that’s been selected.
WORKING WITH MEMORY PRESETS
There are 10 memory presets total, 5 each for AM, FM. Note that the procedures below will also overwrite what has been previously stored into the memory. That is, a memory cannot be 'erased', but can be overwritten.
Storing on the radio
- Using the procedures described previously, tune to the radio station the at you wish to store.
- Press the MEMORY button for 2 seconds; the memory number will flash in the LCD,
- Immediately select the desired memory number with TUNING/SET buttons.
- Press the MEMORY button again.
Storing with the remote
- Tune to the station that you wish to store.
- Press one of the remote's numeric buttons, 1-5, for two seconds.
ACCESSING MEMORY PRESETS
- Tune to the band of your choice, AM or FM.
- Use quick, short presses of the MEMORY button to choose the stored station of your choice, or use the remote's button 1-5.
SETTING THE CLOCK, ALARM, AND SLEEP TIMER
On the rear of the radio is a battery compartment allowing you to install two AA batteries to save these settings during power loss or when unplugging the radio. The clock, alarm, and sleep timer can be set in either 'standby' or 'on' mode
SETTING THE CLOCK
The clock is a 24-hour clock, showing AM and PM in the display.
- Press the radio's or the remote's TIME SET button for 3 seconds; note that the minutes flash.
- Use the radio's TUNING/SET buttons or the remote's TUNE +/- buttons to set the minutes.
- Give the radio's or the remote's TIME SET button a quick, short press; note that the hour flashes.
- Use the radio's TUNING/SET buttons or the remote's TUNE +/- buttons to set the correct hour.
- Press the radio's or the remote's TIME SET button to complete the new time setting and to exit the time set mode.
SETTING THE ALARM TIME
- Press the radio's or the remote's ALARM button for 3 seconds; note that the hour flashes.
- Use the radio's TUNING/SET buttons or the remote's TUNE +/- buttons to set the desired wake-up hour.
- Give the radio's or the remote's ALARM button a quick, short press; note that the minutes flash.
- Use the radio's TUNING/SET buttons or the remote's TUNE +/- buttons to set the correct minutes.
- Press the radio's or the remote's ALARM button; note that the speaker symbol flashes for 5 seconds and then disappears. The alarm time is now set; when activated it will function for one hour.
ACTIVATING THE ALARM
The alarm functions for one hour. For the alarm to function it must be activated. To do this, use quick, short presses of the radio's or the remote's ALARM button, causing the following to appear in the display:
- ALARM with speaker 🔊 symbol – wakes you up to a beeper sound.
- ALARM with musical note 📂 symbol – wakes you up to the last radio station selected by either tuning or by selecting a memory.
- ALARM, speaker symbol and musical note symbol all disappear from the display, thus deactivating the alarm completely.
NOTE: When using the alarm with the musical note symbol, be sure to turn the volume up to a level that will wake you.
WAKING TO A MEMORY PRESET
Tune to the memory preset of your choice, set the alarm time, activate the alarm and place the radio in standby mode.
USING THE SNOOZE FEATURE
Once the alarm activates, pressing the radio's or the remote's SNOOZE button allows cancellation of the alarm for 5 minutes; then the alarm resumes. Snooze can be activated 12 times. To completely cancel the snooze setting, press the radio's or the remote's ALARM button.
SETTING THE SLEEP TIMER
The sleep timer enables play for a specified amount of time (15-90 minutes) and then shuts off. When the SLEEP function is enabled, the main display shows the sleep symbol.
- To activate the sleep timer, turn on the radio and press the radio's or the remote's SLEEP button with successive, quick, short presses to select a sleep time of 15-90 minutes (15, 30, 45, 60, 75, or 90). This setup mode is automatically exited after about 4 seconds.
- Once activated, you can see the balance of time by pressing the SLEEP button for 2 seconds.
- To deactivate the sleep timer, press the radio's or the remote's SLEEP button with successive, quick, short presses to select OFF. This setup mode is automatically exited after about 4 seconds.
SPECIFICATIONS
• FM Frequency 87.5 - 108 mHz
• AM Frequency 522-1620 KHz
- Speaker Output Power 5W.
• Power Supply: input 230 VAC, 50 Hz; output 12 VAC, 1.6A.
- Specification and the design are subject to possible modifications without notice due to improvement.
NOTE: In case of electrical malfunction, perform a reset. To perform a reset, turn off the unit. Press the MUTE button for 5 seconds; the radio resets setting time back to 12:00. Turn it back on.
WARRANTY REGISTRATION
To ensure full warranty coverage or product updates, registration of your product should be completed as soon as possible after purchase or receipt. You may use one of the following options to register your product:
- By visiting our website at http://www.etoncorp.com
- Mail in enclosed warranty card.
- Mail your registration card or information to following address; include your name, full mailing address, phone number, email address, model purchased, date purchased, retail vendor name:
Etón Corporation
1015 Corporation Way
Palo Alto, CA 94303 USA
LIMITED WARRANTY
Retain the warranty information from your warranty card with your proof of purchase or the Limited Warranty information can also be viewed at www.etoncorp.com.
SERVICE FOR YOUR PRODUCT
To obtain service for your product, we recommend first contacting an Etón service representative at 1-800-872-2228 US, 1-800-637-1648 Canada, (650) 903-3866 or customersvc@etoncorp.com for problem determination and trouble-shooting. If further service is required, the technical staff will instruct how to proceed based on whether the radio is still under warranty or needs non-warranty service.
WARRANTY – If your product is still in warranty and the Etón service representative determines warranty service is needed, a return authorization will be issued and instructions will be given. DO NOT ship your radio back without obtaining the return authorization.
NON-WARRANTY – If your product is no longer under warranty and requires service, the Etón service representative will refer you to the nearest repair facility that will best handle the repair.
For service outside of North America, please refer to the distributor information included at time of purchase/receipt.
AVEZ-VOUS BESOIN D'AIDE ?
SÉLECTIONNER AM/FM, AUX-IN OU IPOD
15 person who is sick


-
电话:

Bud
in millions

Pul
2023

(No.)
公司简介 63.62

PSI
7.4张 6.5张

Post
0129 75215 35035

Pac
(五)公司年度财务报告
iPod is a trademark of Apple Computer, Inc., registered in the U.S. and other countries.
Etón Corporation
Corporate Headquarters 1015 Corporation Way Palo Alto, California 94303 USA tel +1 650-903-3866 tel +1 800-872-2228 fax +1 650-903-3867
Etón Europe/Lextronix Germany
Rosenstrasse 2 D-10178 Berlin, Germany tel +49 [0]30 243102142
Etón Canada
1 Yonge Street, Suite 1801 Toronto, Ontario M5E 1W7 Canada tel + 1 416-214-6885

- Need Help? Contact Us.
- WARNING
- ENVIRONMENT
- DISPOSAL
- WHAT YOUR RADIO INCLUDES
- PREPARING YOUR RADIO FOR USE
- PREPARING THE REMOTE FOR USE
- POWERING THE RADIO
- BACKUP BATTERIES
- VOLUME CONTROL
- MUTE BUTTON
- SELECTING AM/FM, AUX-IN OR iPOD
- USING THE RDS BUTTON
- MANUAL TUNING
- AUTO TUNING
- USING AUX-IN
- USING THE LINE OUT SOCKET
- WORKING WITH THE iPOD
- WORKING WITH MEMORY PRESETS
- Storing on the radio
- Storing with the remote
- ACCESSING MEMORY PRESETS
- SETTING THE CLOCK, ALARM, AND SLEEP TIMER
- SETTING THE CLOCK
- SETTING THE ALARM TIME
- ACTIVATING THE ALARM
- WAKING TO A MEMORY PRESET
- USING THE SNOOZE FEATURE
- SETTING THE SLEEP TIMER
- SPECIFICATIONS
- WARRANTY REGISTRATION
- LIMITED WARRANTY
- SERVICE FOR YOUR PRODUCT
- AVEZ-VOUS BESOIN D'AIDE ?
- SÉLECTIONNER AM/FM, AUX-IN OU IPOD
- Etón Corporation
- Etón Europe/Lextronix Germany
- Etón Canada
Brand : ETON
Model : Sound 100
Category : Radio