
FRX2 - Radio ETON - Free user manual and instructions
Find the device manual for free FRX2 ETON in PDF.


| Product Type | Portable Radio |
| Brand | Eton |
| Model | FRX2 |
| Dimensions | 130 x 70 x 35 mm |
| Weight | 200 g (with batteries) |
| Power Source | 3 AA batteries or built-in rechargeable battery via crank or solar panel |
| Main Functions | AM, FM, NOAA weather band, LED lamp, alarm, USB charging for external devices |
| Frequency Bands | AM 520-1710 kHz, FM 87.5-108 MHz, Weather 162.400-162.550 MHz |
| Battery Life | Up to 30 hours on FM radio (with new batteries) |
| Charging | Dynamo crank, built-in solar panel, micro-USB port |
| Audio Output | Built-in speaker, 3.5 mm headphone jack |
| Maintenance and Cleaning | Wipe with a soft, dry cloth. Do not use abrasive products. |
| Safety | Do not expose to water or moisture. Use only recommended batteries. |
| Spare Parts | Batteries, earphones (not included) |
| Repairability | Repairability index not provided. Contact Eton customer service. |
| Warranty | 2 years |
| Included Accessories | Micro-USB cable, wrist strap, user manual |
Frequently Asked Questions - FRX2 ETON
User questions about FRX2 ETON
0 question about this device. Answer the ones you know or ask your own.
Ask a new question about this device
Download the instructions for your Radio in PDF format for free! Find your manual FRX2 - ETON and take your electronic device back in hand. On this page are published all the documents necessary for the use of your device. FRX2 by ETON.
USER MANUAL FRX2 ETON
Hand Turbine AM/FM/NOAA Weather Radio with LED Flashlight

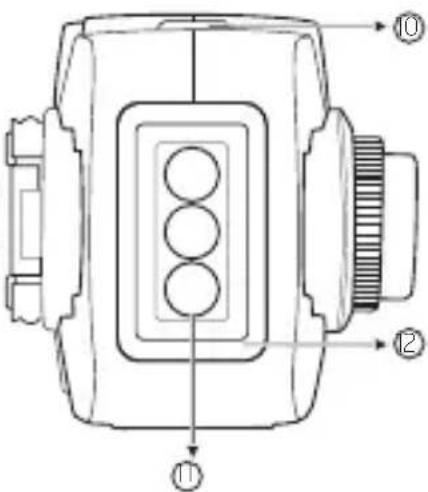
FUNCTION KEYS

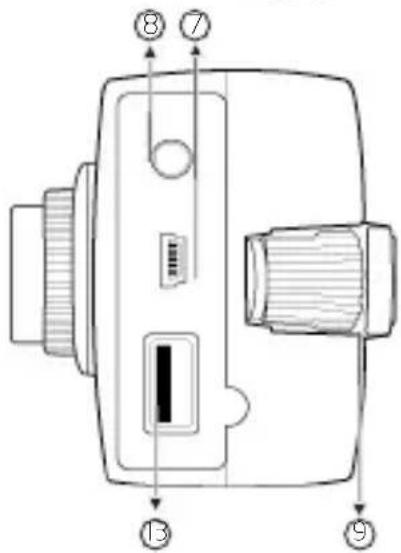

① Tuning Dial
②Power/Volume Dial
③Speaker
4 Radio Band Dial
⑤ WB Indicator
⑥ Charging Indicator
⑦ Mini USB Jack
(DC-in 5v)
⑧ Headphone Jack
⑨ Hand Turbine
⑩ Flashlight button
① LED Flashlight
⑫ Glow in Dark Locator
13 USB Charging Port
POWER SOURCES
- Rechargeable battery pack (included)
- Mini USB DC Input
- Built-in dynamo
- Solar Panel
CHARGING THE BATTERY PACK
Hand Turbine Charging
- Pull out the hand turbine in the back of the unit, then turn. The built-in dynamo will generate electricity and the unit will store the electric energy into the battery pack automatically.
- When charging, the charging indicator "will be on."
NOTE: 5 minutes of cranking will result in about 10 minutes of low volume play and 2 hours of flashlight use.
Adaptor Charging
-
Open the rubber cover on the side of the unit. Plug one end of the matching adaptor cable (included) into the AC electronic socket, plug the other end of the adaptor cable into the < mini USB jack >, the electric energy will store into the battery pack automatically.
-
When charging, the charging indicator "will be on. The battery will be full in about 3 hours.
USING THE LIGHT
Press the
TURNING THE RADIO ON AND OFF
Turn the Power/Volume dial clockwise to turn the radio on and increase the volume.
Turn the Power/Volume dial counter-clockwise to turn the volume down and turn off the radio.
ADJUSTING THE VOLUME
Set VOLUME control to the desired level.
TUNING IN RADIO STATIONS:
- Rotate band selector to select your desired band; AM, FM, then rotate the
to select your desired station(frequency); - The LCD display will read your desired band and station(frequency).
WEATHERBAND TUNING:
- Rotate band selector to select WB, then rotate the
select each WB station until you hear the strongest WB station for your area. - The LCD display will display 1ch,2ch,3ch...7ch.
SETTING THE CLOCK (with radio off)
Long press
SETTING THE ALARM (with radio off)
Long press
When alarm goes off, quick press the
SEEK FUNCTION (with radio on)
This operation only works with AM and FM band.
If you last rotated the
If you last rotated the
GLOW IN DARK LOCATOR
After absorbing light energy, the glow in the dark locator glows up to 8 hours allowing an easy locator.
EARPHONE JACK
Plug in earphones (not included). Sound is heard from both sides in mono audio format.
CHARGING WITH THE SOLAR PANEL
Place the radio with solar panel facing up in direct sunlight. It is best to angle the Solar panel so that it is pointed directly at the sun. Charging with the radio off will provide the fastest charging.
PHONE CHARGING JACK
Rotate band selector to CELL, the LCD display will show "USB". Plug in your phone's USB charging cable (not included) to USB charging port, connect the other end to your mobile phone. Your phone will start charging as soon as you plug it into the radio. You also can wind the dynamo to charge phone.
WARNING
- Do not expose this appliance to rain or moisture.
- Protect from high humidity and rain.
- Only operate within specified temperature range (0 °C to 40 °C).
- Clean only with a dry cloth. Do not use detergents or chemical solvents as this might damage the finish.
- Do not remove cover [or back].
• Refer servicing to qualified service personnel.
ENVIRONMENT
Disposal

According to the European Directive 2002/96/EC all electrical and electronic products must be collected separately by a local collection system.
Please act according to your local rules and do not dispose of your old products with your normal household waste.
Please dispose of all types of batteries per your Government, State or Local rules and/or regulations. If you are unsure, please call the appropriate local authority to find out how to dispose of them safely and help protect the environment.
WARRANTY REGISTRATION
To ensure full warranty coverage or product updates, registration of your product should be completed as soon as possible after purchase or receipt.
Visit our website at http://www.etoncorp.com. for product registration.
LIMITED WARRANTY
Retain your proof of purchase. Full Limited Warranty information can be viewed at www.etoncorp.com.
SERVICE FOR YOUR PRODUCT
To obtain service for your product, we recommend first contacting an Etón service representative via email at customer_support@etoncorp.com or calling 1-800-872-2228 in the USA or (650) 903-3866 worldwide for problem determination and trouble-shooting. If further service is required, the technical staff will instruct how to proceed
based on whether the radio is still under warranty or needs non-warranty service.
WARRANTY
If your product is still in warranty and the Etón service representative determines that warranty service is needed, a return authorization will be issued and instructions for shipment to an authorized warranty repair facility. Do not ship your radio back without obtaining the return authorization number.
NON-WARRANTY
If your product is no longer under warranty and requires service our technical staff will refer you to the nearest repair facility that will be able to best handle the repair.
For service outside of North America, please refer to the distributor information included at time of purchase/receipt.
NEED HELP? CONTACT US.
Customer_support@etoncorp.com or via send mail to: Etón Corporation, 1015 Corporation Way, Palo Alto, CA 94303, USA. 1-800-872-2228 (U.S.); 650-903-3866 (worldwide); M-F, 8:00-4:30, Pacific Standard Time; www.etoncorp.com.
(worldwide); M-F, 8:00-4:30, Pacific Standard Time; www.etoncorp.com.
AVERTISSEMENT

(worldwide); M-F, 8:00-4:30, Pacific Standard Time; www.etoncorp.com.
ATENCIÓN

- POWER SOURCES
- CHARGING THE BATTERY PACK
- Hand Turbine Charging
- Adaptor Charging
- USING THE LIGHT
- TURNING THE RADIO ON AND OFF
- ADJUSTING THE VOLUME
- TUNING IN RADIO STATIONS:
- WEATHERBAND TUNING:
- SETTING THE CLOCK (with radio off)
- SETTING THE ALARM (with radio off)
- SEEK FUNCTION (with radio on)
- GLOW IN DARK LOCATOR
- EARPHONE JACK
- CHARGING WITH THE SOLAR PANEL
- PHONE CHARGING JACK
- WARNING
- ENVIRONMENT
- Disposal
- WARRANTY REGISTRATION
- LIMITED WARRANTY
- SERVICE FOR YOUR PRODUCT
- WARRANTY
- NON-WARRANTY
- NEED HELP? CONTACT US.
- AVERTISSEMENT
- ATENCIÓN
Brand : ETON
Model : FRX2
Category : Radio