
KMX95 - Blender KENWOOD - Free user manual and instructions
Find the device manual for free KMX95 KENWOOD in PDF.
| Brand | Kenwood |
| Model | KMX95 |
| Product type | Food processor / Stand mixer |
| Color | Not specified (typically white or gray) |
| Bowl material | Stainless steel |
| Bowl capacity | Not specified (estimated 4.5 L) |
| Power supply | 220-240 V, 50/60 Hz (estimated) |
| Power | Not specified (estimated 800-1000 W) |
| Weight | Approximately 8 kg (estimated) |
| Dimensions (L x W x H) | Not specified (estimated 40 x 25 x 35 cm) |
| Main functions | Mixing, whisking, kneading, folding |
| Included accessories | K-beater, whisk, dough hook, spatula, anti-splash lid, tightening key |
| Speeds | Electronic speed control with 'fold' position (slow incorporation) |
| Special function | Soft start, automatic stop when raising the head |
| Maximum capacity (firm bread dough) | 1.35 kg of flour |
| Maximum capacity (soft bread dough) | 1.3 kg of flour |
| Maximum capacity (fruit cake) | 2.72 kg of total mixture |
| Maximum capacity (egg whites) | 12 whites |
| Safety | Automatic stop when raising the head, overload protection (estimated) |
| Maintenance and cleaning | Bowl and accessories hand washable (some dishwasher safe), body wiped with a damp cloth |
| Spare parts and repairability | Accessories available, repairs by Kenwood or authorized repairer |
| Warranty | Not specified (typically 2 years) |
| General information | Designed in the UK, manufactured in China. Compliant with directive 2004/108/EC and regulation 1935/2004 |
Frequently Asked Questions - KMX95 KENWOOD
User questions about KMX95 KENWOOD
0 question about this device. Answer the ones you know or ask your own.
Ask a new question about this device
Download the instructions for your Blender in PDF format for free! Find your manual KMX95 - KENWOOD and take your electronic device back in hand. On this page are published all the documents necessary for the use of your device. KMX95 by KENWOOD.
USER MANUAL KMX95 KENWOOD
know your Kenwood kitchen machine
before using your Kenwood appliance
- Read these instructions carefully and retain for future reference.
- Remove all packaging and any labels.
safety
- Switch off and unplug before fitting or removing tools/attachments, after use and before cleaning.
- Keep your fingers away from moving parts and fitted attachments.
- Never leave the machine on unattended.
- Never use a damaged machine. Get it checked or repaired: see 'service and customer care'.
- Never let the cord hang down where a child could grab it.
- Never let the power unit, cord or plug get wet.
- Never use an unauthorised attachment or both outlets at the same time
- Never exceed the maximum capacities.
- When using an attachment, read the safety instructions that come with it.
- Take care when lifting this appliance as it is heavy. Ensure the head is locked and that the bowl, tools, outlet cover and cord are secure before lifting.
- This appliance is not intended for use by persons (including children) with reduced physical, sensory or mental capabilities, or lack of experience and knowledge, unless they have been given supervision or instruction concerning use of the appliance by a person responsible for their safety.
- Children should be supervised to ensure that they do not play with the appliance.
- Only use the appliance for its intended domestic use. Kenwood will not accept any liability if the appliance is subject to improper use, or failure to comply with these instructions.
know your Kenwood kitchen machine
before plugging in
- Make sure your electricity supply is the same as the one shown on the underside of your machine.
- This appliance conforms to EC directive 2004/108/EC on Electromagnetic Compatibility and EC regulation no. 1935/2004 of 27/10/2004 on materials intended for contact with food.
know your Kenwood kitchen machine
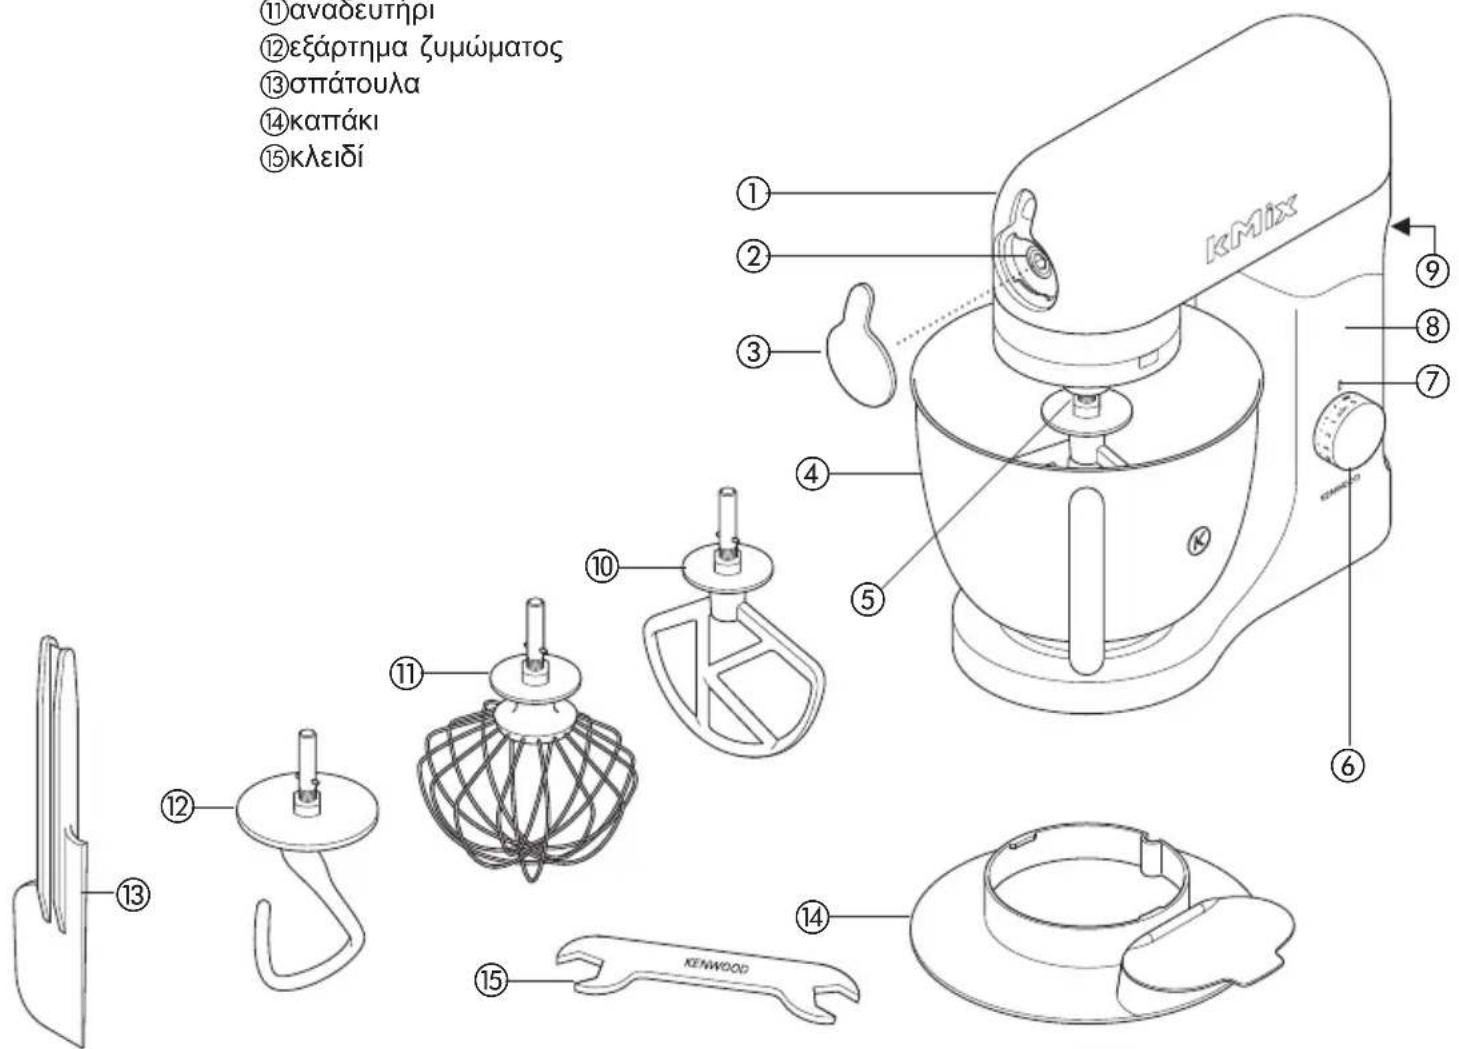
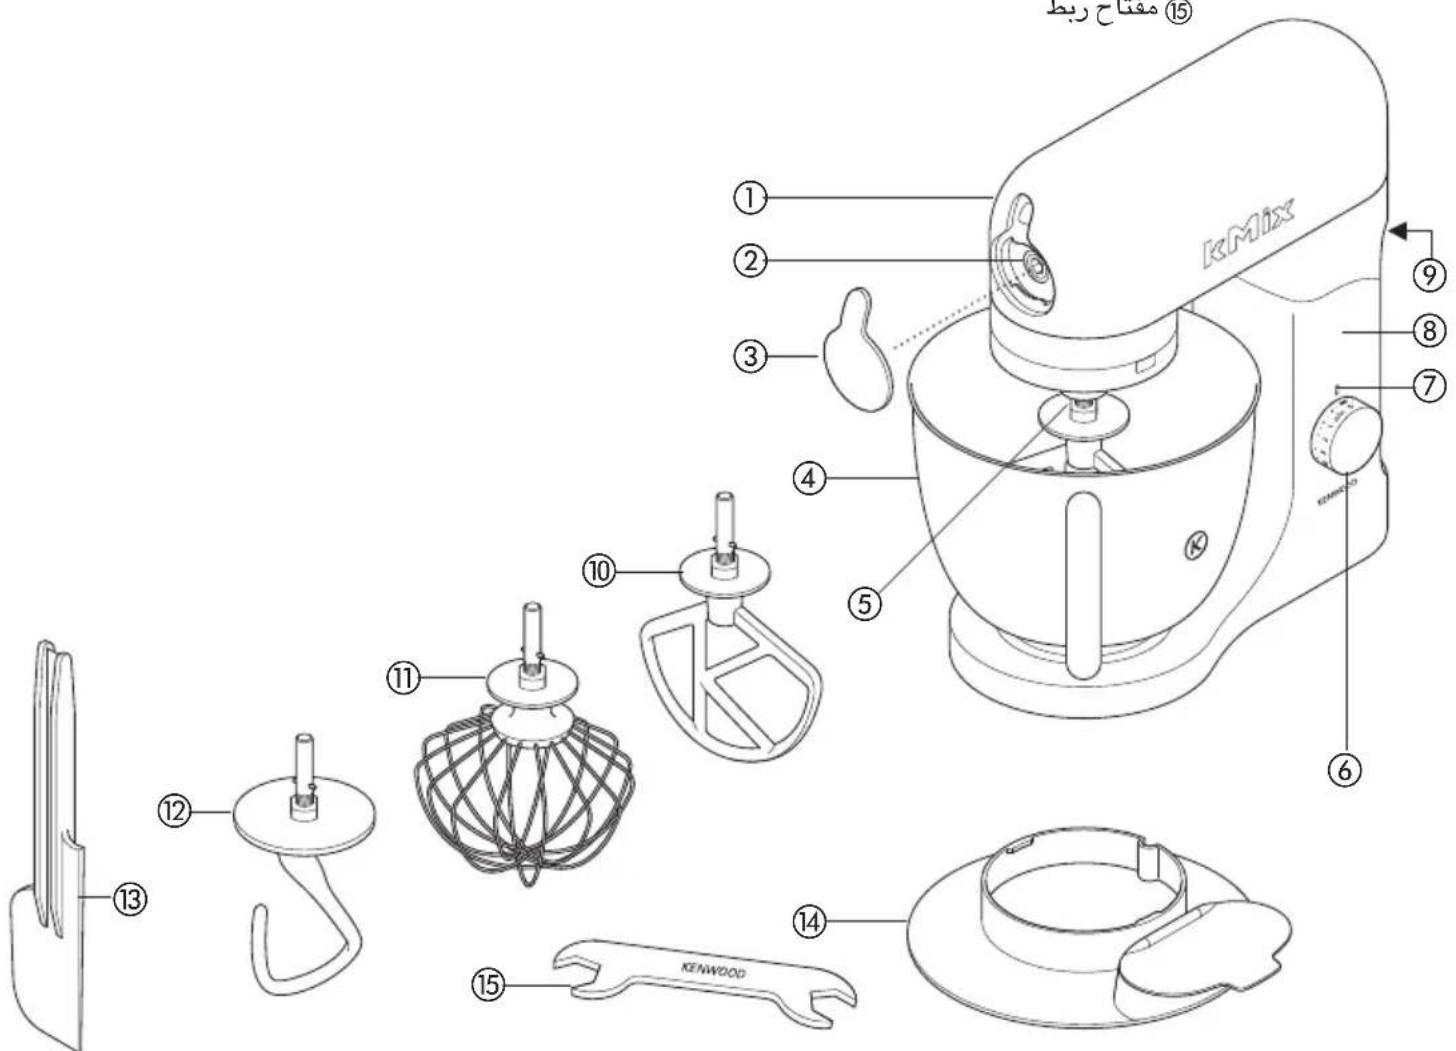
①mixer head
(2)attachment outlet
③ outlet cover
(4)bowl
⑤tool socket
⑥ on/off and speed switch
⑦mixer ready indicator light
⑧mixer body
head release lever
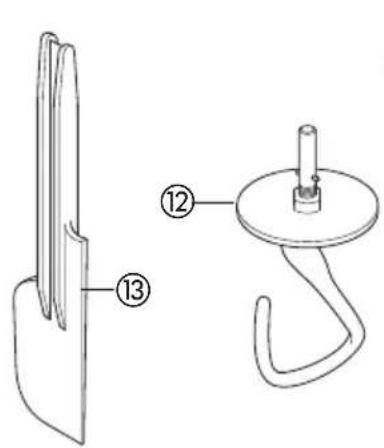
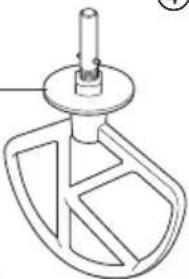
10K beater
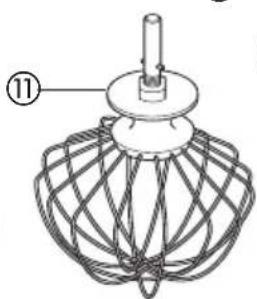
whisk
⑫ dough hook
③spatula
④plashguard
⑮spanner
(5)
the mixer
the mixing tools and some of their uses
K beater • For making cakes, biscuits, pastry, icing, fillings, éclairs and mashed potato.
whisk For eggs, cream, batters, fatless sponges, meringues, cheeses, moustes, souffles. Don't use the whisk for heavy mixtures (eg creaming fat and sugar) - you could damage it. h hook For yeast mixtures.
to use your mixer
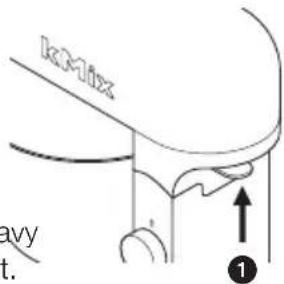
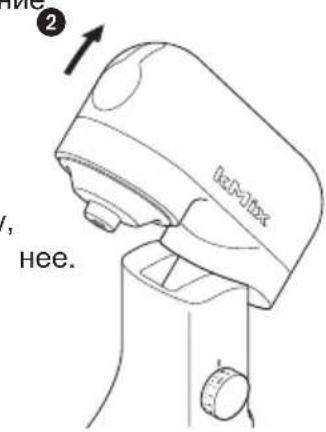
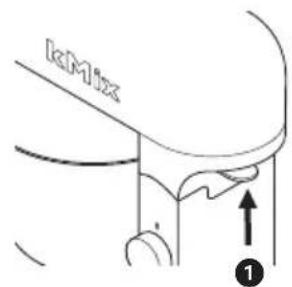
1 Lift the head release lever at the back of the appliance ① and at the same time lift the head until it locks in the raised position ②.
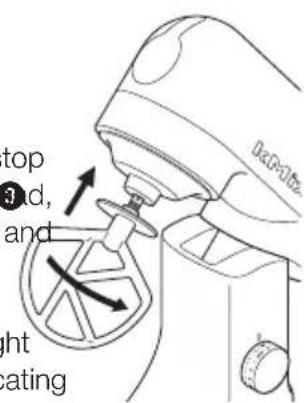
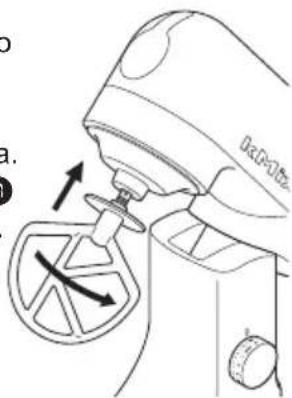
to insert a tool 2 Push up until it stops then turn 3.
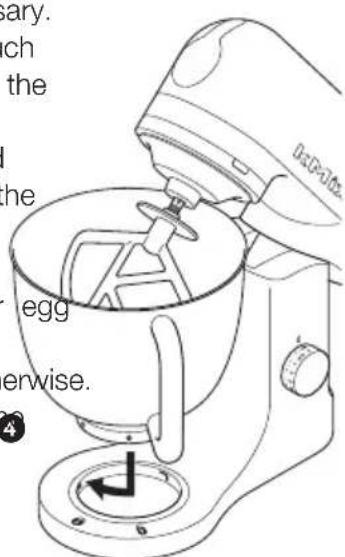
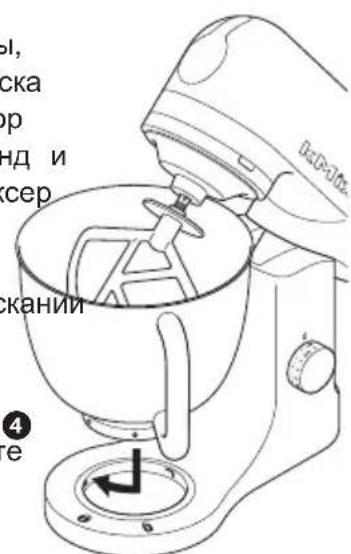
3 Fit the bowl onto the base. Place the handle directly over the unlock symbol then gently turn the bowl clockwise until the handle is directly above the lock symbol. DO NOT USE excessive force and DO NOT overtighten
4 Lift the head release lever at the back of the appliance and at the same time lower the mixer head .
5 Plug into the power supply and the mixer ready indicator light will glow.
6 Switch on by turning the speed switch to the desired setting. to remove a tool 7 Turn and remove.
important
-
If the mixer head is raised during operation, the machine will stop working straight away. To re-start the mixer, lower the mixer h d, turn the speed switch to the off position, wait a few seconds and then re-select the speed. The mixer should resume operating straight away.
-
Whenever the mixer head is raised the mixer ready indicator light will go out. When the head is lowered, the light will glow indicating the mixer is ready to use.
Hints - Switch off and scrape the bowl with a spatula when necessary.
-
Use the fold position for slow incorporation of ingredients such as when mixing flour and fruit into cake mixes. Simply turn the switch to The mixer will operate on slow speed for approximately 2 revolutions and then pause. This will be repeated for a further 20 operations and then stop after which time the switch should be returned to the off 'O' position.
-
Eggs at room temperature are best for whisking.
Before whisking egg whites, make sure there's no grease or egg.
volk on the whisk or bowl.
Use cold ingredients for pastry unless your recipe states otherwise.
- When creaming fat and sugar for cake mixes, always use the fat at room temperature or soften it first.
the mixer
- Your mixer has been fitted with a 'soft start' feature to minimise spillage. However if the machine is switched on with a heavy mixture in the bowl such as bread dough, you may notice that the mixer takes a few seconds to reach the selected speed.
points for bread making
important Never exceed the maximum capacities below - you will overload the machine.
- To protect the life of the machine always allow a rest of 20 minutes between loads.
- If you hear the machine labouring, switch off, remove half the dough and do each half separately.
- The ingredients mix best if you put the liquid in first.
- At intervals stop the machine and scrape the mixture off the dough hook.
- Different batches of flour vary considerably in the quantities of liquid required and the stickiness of the dough can have a marked effect on the load imposed on the machine. You are advised to keep the machine under observation whilst the dough is being mixed; the operation should take no longer than 5 minutes.
speed switch
These are a guide only and will vary depending upon the quantity of mix in the bowl and the ingredients being mixed.
K beater • creaming fat and sugar start on 'min', gradually increasing to a higher speed.
- beating eggs into creamed mixtures 4 - 'max'.
- folding in flour, fruit etc 'min - Nor fold .
- all in one cakes start on 'min', gradually increase to 'max'.
- rubbing fat into flour 'min - 2.
whiskGradually increase to 'max'.
dough hook • Start on 'min', gradually increasing to 1.
electronic speed sensor control
Your mixer is fitted with an electronic speed sensor control that is designed to maintain the speed under different load conditions, such as when kneading bread dough or when eggs are added to a cake mix. You may therefore hear some variation in speed during the operation as the mixer adjusts to the load and speed selected - this is normal.
maximum capacities
shortcrust pastry 680g flour
fruit cake mix 2.72 Kg total mix
stiff bread dough 1.35 Kg flour
soft bread dough 1.3 Kg flour
egg whites 12
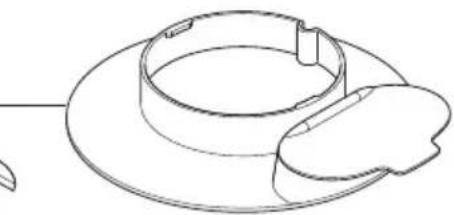
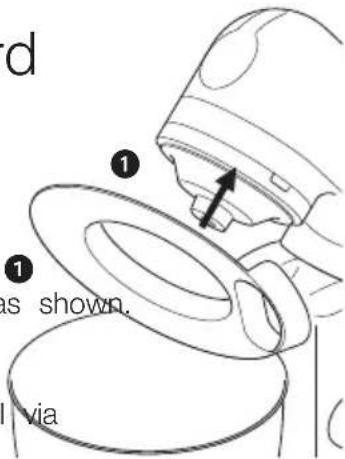
to fit and use your splashguard
- Raise the mixer head until it locks.
2 Fit the bowl onto the base.
3 Push the splashguard onto the underside of the mixer head 1 until fully located. The hinged section should be positioned as shown
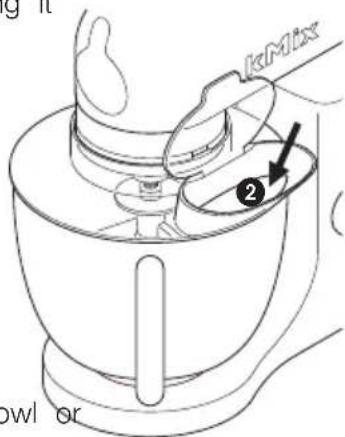
4 Insert required tool.
5 Lower the mixer head.
-
During mixing, ingredients can be added directly to the bowl via the hinged section of the splashguard 2.
-
You do not need to remove the splashguard to change tools.
6 Remove the splashguard by raising the mixer head and sliding it down.
troubleshooting
problem
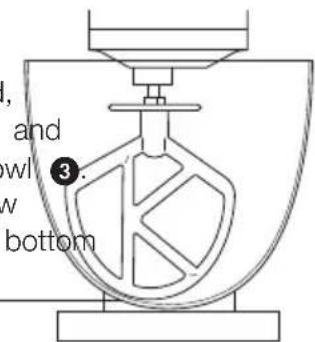
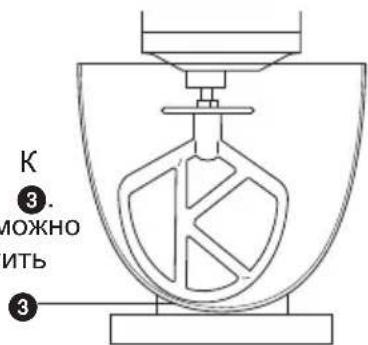
- The whisk or K beater knocks against the bottom of the bowl isn't reaching the ingredients in the bottom of the bowl.
solution · Adjust the height using the spanner provided. Here's how:
1 Unplug the appliance.
- Raise the mixer head and insert the whisk or beater.
3 Lower the mixer head. If the clearance needs to be adjusted, raise the mixer head and remove the tool. Ideally the whisk and K beater should be almost touching the bottom of the bowl.
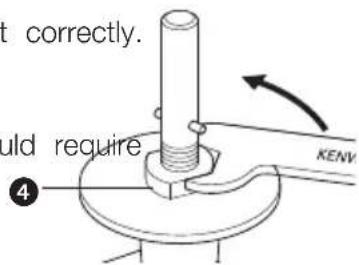
4 Using the spanner provided loosen the nut sufficiently to allow adjustment of the shaft 4. To lower the tool closer to the bottom of the bowl, turn the shaft anti-clockwise. To raise the tool away from the bottom of the bowl turn the shaft clockwise.
5 Re-tighten the nut.
6 Fit the tool to the mixer and lower the mixer head. (Check its position see points above).
7 Repeat the above steps as necessary until the tool is set correctly. Once this is achieved tighten the nut securely.
dough hook - this tool is set at the factory and should require no adjustment.
problem
The mixer stops during operation.
solution - If for any reason power to the mixer is interrupted and the machine stops working, turn the speed switch to the off position, wait a few seconds and then re-select the speed. The mixer should resume operating straight away.
cleaning and service
care and cleaning
Always switch off and unplug before cleaning.
mixer body, Wipe with a damp cloth, then dry.
outlet cover • Never use abrasives or immerse in water.
tools - Wash by hand, then dry thoroughly. Do not wash in the dishwasher.
bowl, Wash by hand, then dry thoroughly or wash in the dishwasher.
splashguard ● Never use a wire brush, steel wool or bleach to clean your stainless steel bowl. Use vinegar to remove limescale.
- Keep away from heat (cooker tops, ovens, microwaves).
service and customer care
- If the cord is damaged it must, for safety reasons, be replaced by KENWOOD or an authorised KENWOOD repairer.
If you need help with:
- using your machine
servicing or repairs
-
Contact the shop where you bought your appliance.
-
Designed and engineered by Kenwood in the UK.
Made in China.
IMPORTANT INFORMATION FOR CORRECT DISPOSAL OF THE PRODUCT IN ACCORDANCE WITH EC DIRECTIVE 2002/96/EC.
At the end of its working life, the product must not be disposed of as urban waste.
It must be taken to a special local authority differentiated waste collection centre or to a dealer providing this service.
Disposing of a household appliance separately avoids possible negative consequences for the environment and health deriving from inappropriate disposal and enables the constituent materials to be recovered to obtain significant savings in energy and resources. As a reminder of the need to dispose of household appliances separately, the product is marked with a crossed-out wheeled dustbin.
deeghaak Voor gistmengsels.
de mixer gebruiken
TO6bIMOXHO 6bINO BCTABNTb npncnoc6nHn
2 OToXmTe Do ynpa, 3aTem NOBepHnTe 3.
3 YcTaHOBnTe yawy Ha noCTaBky. NomeCTne pykCy aHHeNOCpeIcTBeHNO HAnpOTNB CmMBOJa pa36bNoKIpOBKn, a 3aTeM MeIeHNO NOBopauHBaIte yawy No YacOBoCtpeJIke, noka pyka He OKaXeTcH AnpOTNB CmMBOJa 6bOknpoHn》. HE IINPMEHYTE cnIy n HE 3akpyuBaIte cInsKOM CNJbHO 4.
4ПинОДнIMTe pIyAJOK OTCOeINHeHn RAJOBKn Ha 3aHHeN CTOpOHe npIbopa, n OJHOBpeMeHHO ONyCTnte RoJOBky MInKcepa.
5Подсоeннite npиборк сетиэлкtpoNTaHnna,noCne yero H3 MHKcepe 3arOpntcBcETOBOn HdNKaTOp rOTOBHOCTN K pa6ote.
6 BkHouHTe 6bITOBoN npnbop, nobepHyB peryIaTOp ckopoCTn B HxKHO E NOIOXKeHne.
ДяТOrOуTo6bI n3Bneyb npncno6JIeHnE7 nobepHnTe ero.
BhimaHne
- EcHn noHrTb roOBHyO qAcTb MUKcepa BO Bpempa60tbl, yCTpoIcTBO HEmeDHeHNO octAHOBITc. IInra NOBTOPO nYcKa MUKcepa onyCTnte rOBHyO qAcTb, nepEMecHTe peryIaTOp CKOPoCTN B NOIOXeHne BbIKI., NODOXINTE HeCKOJIbKO CeKHyN 3aTeM CHOBA yCTaHOBtE HxHoe 3HaueHne ckopocTN. MUKcep pOdoJnxT pa60Ty.
Kakdbpa3 npn noDbeme roOBmKcepa CBeTOBOH INdkaTOP roTOBHOCTN K pa6ote 6ydet rachyTB. Ppi onyckan HIOBKn CBeTOBOH INdNKaTOp 6ydet 3aropatbca, CBNDTeJIbCTBya O rTOBHOCTM MKNCEpa K pa6ote.
COBeTbI . PpH Heo6xOaIMOCn BblKnIOHTe 3JIeKTPoPnp6Op n OChCTnTe BHyTppeHHne CTeHN c NOMOuB IO NaTOUKN.
MVKcep
- Дя MeДиного Добавлени ИHRpeDneHToB, Hanpimep, npn CMeUWBaHm MyKn C ФpyKTamn Дя ПИROTOBJIeHЯ Tecta Дя ПИрora, ИСПОь3уITE NOLOXeHne «fold》 (uaDAJuee nepemeuBaHne)Дя 3TORO DoCTaTOUHO nepeDbHyTb peryIaTOp B NOLOXeHne. МИКсEp cdeJaET 2,5 O6opota Ha MeДингов ckopoCtN IOCTaHOBHTcR. МИКсEp bIInOHHT eIe 20 TaKnx UKNOB, a 3aTeM NOnHOCTbIO OCTaHOBHTcR, nocNe Yero peryIaTOp Heo6xOdImO nepeBecTn B NOLOXeHne 'O' (ВыIKIQUHTb).
- EcIn Bbl ycIbIwnte, yTo MaunHa pa6oTaET c HAnpJxHeHEm, BbIKIOUHTe ee, y6epnte NOIOBHy Tecta, n rTOOBtE KaJdyO IOIOBHy OTdJIbHO.
- IpeD B36BbAHnem RnHbIX 6eNkoB y6eINTEcB B TOM, YTO Ha B36BbAJIke N Ha CTeHKax YaIIN HeT CJIeIOB RnHOrO JeNTka.
-ДяЗamuBaHnCdo6HOrTeCTa CJeDyeT NcNoIb3OBA Tb oxnaXdEHHbIe INHpeJneHTbl npN yCNoBn, YTO B BaWe m peCNTe Ha 3OT cHET HeDpyrnx yka3AHn. - Пи В36иВаHи Macla c caxapom Дя пiroTOBHeHЯ Cmecen
Дя пpoXhIx, Bcerda ИспОьЗунTe MacNo, NOdOrpeToe Do
КOMHaTHo TEmnepaTpybl, Илп пeДВapИтELbHo pactOnITE erO.
Baw MmKcep cHa6xhen yHKcnei KMaRKO rYcKa》,KOTopaNo3BOJnEe CBeCTN K MNHmMy pa36pbI3rNaHne. Ondako ecnBbI BKIOHTe MaunHy,KOrDa B qAWe HaxOHTc RyCTaCMEcb,HaNPImep,TeCTo,Bbl 3aMeTnte,yTO MmKcep HaBnpaET3aDaHHyIO CKOpocTB TeYeHne HeCKOJIbKnX CeKYHd.
Yka3aHnno npnroTOBJeHHIO Xne6a
Baxhna HnkOrda He npebbwaTe yka3aHHbIe HIXe MaKcIMaJIbHbIe INΦopMaци 3HaueHn 3arpy3Kn INrpeDneHTOB, INhae MoXe TpOIN30ITn neperpy3ka 3JIeKTponpnp6opa.
Bo n36exaHne noIomKn npnbopa deNaTe 20-MnHyThbIn nepepbIB nepeD npiroTOBHeHem OuepeHDn nopun.
He6oIbIooe nepemEueHne roOBKn MmKcepa Bo BpeM erop a60tblraJIeTcHOpMaIbHbIM RAJIeHNEm. Ecnu Bbl ycIbIuNTe, yTO MaUNHa pa6Otaet c nepe6oAMn, BbIKIOUHTe ee, n3BJeKNTe N3 Yaun IIOOBHy TeCTa n 3aMeunBaIte KaJdyo IIOOBHy OTdJIbHO.
- INHrpEaENHTbI LyuWe nepemEuINBaOTcA, ecn nepBOu 3aJIHTb KUdKOCTb.
- Пернодунеckeи OCTанавлNBaIte MaшИну И удягTe TECTO c Hacadkn-KpOчka ДЯ 3amEшИВанЯ TECTa.
-Дя pa3JINHbIX copTOB MyK IN Tpe6yOTcR pa3JINHbIe KOJNUEcTba XnIKoCTN, a DnB BbIMeUINBaHnR 6OJee rYcTOrO Tecta Tpe6yeTcR 6OJIbuee ycInne. Bo Bpemr 3aMeuINBaHnR Tecta peKOMeHdyeTcR NOCToRHHo Ha6JIIODaTb 3a MaUNHO; Bpemr 3aMeuINBaHnR Tecta He DOJIKNHO PpeBbIaTb 5 MInHT.
MVKcep
IpekeJIIOUaTeIb ckOpocTei
IpeDCTaBHeHny HnKe HOpMaunCneJyET paccMaTpNBaTb TOJIbKO KaK COBeT, BbIbOp CKOpocTN NepeMeuBaHn 3aBNCIT OT KOJInuCeTBa N BnDa NepeMeuBaembIX INHpeDnEHTOB.
K Meuanka B36nBaHne MaprapHa c caxapom - NaHnte C noJoxeHnra «min》,3aTeM nlaBHO yBeJInuHbaIte ckopoCTb.
B6nBaHHe RnC BO B36NtBle Cmecn: 4 - «max».
- BBIMeunBaHne npn do6aBHeHH MyKn, ppyKToB n T. n.: 1 nn «fold» (c6nBaHne).
- KeKC «BCE B ODHOM» - NaHnTe C NOLOKeHn «min», 3aTem nlaBHO yBeJIuNBAIte CKOpocTb Do «max».
- pactuplene macna c caxapom: «min» - 2.
B36nBaJIka IocTepeHNO yBeJIuHBAIte cKOpocTb Do «max». TcTeOMeUaJIka HauHnte C nOJoxEHHA «min», 3aTeM nIaBHO yBeJIuHBAIte cKOpocTb Do «1».
3NeKtpoHbI DaTUnk n peyJrTop ckOpocTu
B Baшем микapestе имeelся злелкгоньп ретуларop, chабжehнь датчнkom ckopoctи, кOTOPьОБecneuBaet pa6oty микapestа саданнон ckopoctbIO npn pa3hblx Harpy3kax, Hanpimep, пи Изmeнни Harpy3KN Bnpocece 3ameshubnna Tecta nII npn DoabNeHnЯцВ CMEcBДЯ npriroTOBneHn npora.BoВрем pa60tBI MHKapesta Bbl MoKeTe 3aMeTHTb HeKOTOpoe IN3MeHHeNc CKopoCTN, TAK KAK B MHKapeste BblONHЯETcpe reryIpOBka MOUHOCTN B COOTBeTCTBnC IN3MeHЯEMOH HarpzkoI N BblpaHHOu CKopoCTbIO - 3TO HopMaJIbHoe RAJIeHne.
MaKcHMaJIbHbIe 3arpy3Kn HnHrpeDneHTOB
cdo6hoe Tecto Jn necouHorO
NeueHb680 r Mykn Cmecb dIy fpykTOBoro npora o6uN BeC cMecn 2,72 Kr Tecto dIy xIe6a c TBepdoi KopKo1 1,35 Kr Mykn Tecto dIy xIe6a c MraKo1 KpKo1 1,3 Kr Mykn AnuHbIe 6eKn 12
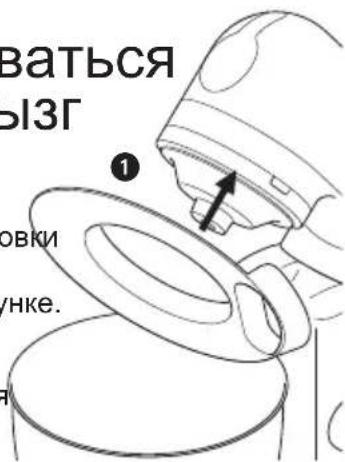
KaK yCTaHaBnBaTb I NOJIb3OBA TbC8 KpbIshKOДЯ 3auntbI OT 6pbI3r
1 POnHnMnte rONOBky Mnkcepa do ee qKcaun.
2 YctahOBInTe yawy Ha OCHOBAHne.
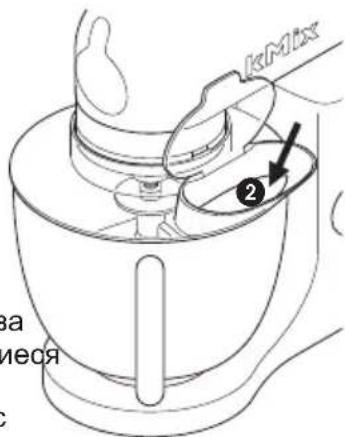
3 HaBnHbTe 6pbI3ro3aUHTbI UNTOK Ha HIXHIIO YacTb roJOBKmIKcepa 1 DoNBUnCb erO nonHO nocaKn. WapHnpHaCeKUN DaJxHa 6bITb pacNOJoxeHa, KAK NOKa3aHO Ha pncyHke.
4 BcTaBbTe HxKHyIO HacaIky.
5 Onyctnte roJIOBky MmKcepa.
Bo BpemnepemuBaHn HrpeHnENTbMoryTdoabnTbcB yauy uepe3 noBeHHyHa neTnx cekuio aHTnpa36pb13RnBaTeJ 2.
-Дя BBINONHeHn CMeHbI HacaDOK orpaHnHTenb pa36pb13rNBaHHn CHIMAtb He Tpe6yETc.
6 CHIMITE orpaHnHTeIb pa36pbI3rNaBaHna. IINr 3TOrO HxKHOIOHNrTb rIOBky MmKcepa n CdBnHyTb ee BHN3.
ПОИСК И YYSTРАЕНЕ HENСПAPВHOCTЕN
HencnpaBHOCTb
B36nBaOuJa HacaKa IIN K o6pa3Ha J HacaKa 3aDeBaOT 3a DHO EMKOCr INI He npOMEuBaHrPeDneHTbl, HaxoJxueocr Ha DHe EMKOCTn.
- Pn Heo6xOaMOCtN Bbl MoKTe OtperyJInpOBaTb BbICOTy C NOMOuTo RaeyHOrO KInOua, KOtOpBn BXODNT B KOMnNEKT np6opa. OChOBHbIe 3TaNbI:
1 OTKJIHouHTe npu6op oT cetn.
2IOnHIMnTe rOIOBky MmKcepa N BCTaBbTe BeHcN Knn B36nBaJIky.
3Onyctnte roIOBky MmKcepa.Ecnn Heo6xOIMO OTperynipOBaTb 3a3Op,NOHMMTe rOIOBky MmKcepa IN CHMNTe HacaIky.B nDeaIbHOM BapnaHTe BeHnK nN K Oba3HaHacadka DOnXHbI NOUTN KacaTbcra DHa Yauin 3
4 C NOMOJIbIraeHOro KInOHa OTKpyTHe raIKy, YTO6bl MoKHO 6blIO perynipOBaBb NonoXeHne Bana 4. YTO6bl ONyCTnTB HacAdKy 6blJKe K DHy ChaUn, NOBepHnte BaN npOTNB YACOBONCTpeKN. YTO6bl npINODHrTB HacaDky, NOBepHnte BaN NO YACOBONCTpeNKe.
5 3akpyTne raKy.
6 YcTaHOBnTe HacaIky Ha MeCTO n ONyCTnTe rONOBky MmKcepa. (PpOBepe Te IonoXeHne HacaIKN, CM. BbIe nepeuNCJIeHHbIe nyHKtbl).
7 NOBTOPRAIte BbIe ONHcAHHyN pOueDpy Do Tex nop, noka Hacadka He 6ydet yCTaHOBNeHa npaBnIbHo. KaK TOnbKO Hacadka 3aMomet Heo6xOdImoe NOJoxEHe, TuaTeJIbHO 3aKpyTnte raKy.
Kpokoo6pa3Ha HacaKa DnBbImuBaHn Tecta - nIOXeHne DaHHo HacaKn yCTaHaBnBaETc npOn3BOInTeIem He Tpe6yEt daJbHeiux nepeycTaH
3
YctpaHHeHne HEnCnpaBHOCTN
- Ecni no kaKIM-NI6o npuHnAM npeKpaTnacb noDaaya nHTAHHa MInkcep, MuAunHa OCTaHOBnla pa60Ty, nepemecnte peryIaTOp cKOpOCTN B NOIOXeHne BblKn., NDOxDITe HeCKOJIbKO CEkyHd I 3aTeM CHOBA yCTaHOBnTe HxHoe 3HaueHne CKOPoCTn. MInkcep npoDoJnxnT pa60Ty.
OuInCTka n O6cIyXINBaHne
yXoI n OuNCTka
- Pered ouhctkOJ o6a3aTeIbHO BbIKHouHTe 3JIeKTPoPn6Op n OTcoeHNHTe erO ot ceTn.
Kopnyc MUKCEpa IpoTpuTe BnaXHO TkaHbO, a 3aTeM BbcyWnte.
Kpbioka 3anpeaetcnaonb3oBaTb abpa3nBhie nctraune cpeCTBa N BblnyckHoro natpy6kalnorpykaTb 6nok 3neKtpoDBuratela B Body.
nprncno6neHna Mblb TOnbKO BpyHyIO N TuaTeNbHO BbCyuNBA Tb. He MbItb B nocydomoeyHo MaunHe.
Ua7a, BbIMoIe pykAmn, a 3aTeM BbICyUInTe NIN BBIMoIe B OrpaJdEHe dIpyocydomoeuHoi 3aunbl ot 6pbI3r MaunHe.
- Пи ВылОнHeHn OuNCTKn YaIi N3 HepKaBeIoUeI CtaIi He
- Пьь3yIeTecb npOBIoNoHoi UeTKoI, CtaIbHOm MoaJIkoI N
- OT6eJIINBaIOUzIMn CpeIcTBamN. ДЯ уДаJIeHnHaKInn ИСпОЛБ3yIte
- yKcyc.
He noDHocTe 3neKtpponpOp n ero DeTaJI N K HArpeBaTeJIbHbIM np6opam (KOHΦopKn I DuxOBKn KxOHHoI PINTbI, MKNPOBOJHOBBie neu).
06cnyxmbaHne n 3a6oTa o nokynataeJX
- Пи повржденишура в целях бezонаноctи OHdoлжeh 6bITb 3amHeH BпpeДТаВИтьСТBE KOMнани ИПВ cneцаллзированho мacrетскои no pemoHTy arperatob Kenwood. Ecni Bam hyЖнaNOMOць B:
- NOJb30BaHnnp6opom JIN
Texo6cnyxuBaHn nn peMOHTe O6paTntecb B mara3nH, B KOtOpom Bbl npno6peHn np6op.
CnpoeKtnpoBaHo npa3pa6oTaHo kOmnaHnei Kenwood, CoeDInHeHHoe KoponeBCTBO.
CdeJanaHO B Kntae.
BAKHAR INHOPMAUINI NO IPNABUNbHOY TUNN3AUIN N3DEJINCOJLACHO DnPEKTNBE EC 2002/96/EC.
No nCTeueHn cpoKa cnYk6bl n3dennne HEnb3a Bbl6paCbBaTb KaK 6bIToBbIe (roPOdckne) OTXoDbI.
I3dene cneyet nepeaB B cneuaJIbHbIK KOMMyHaJIbHbI NyKt pa3dJIbHO r c6opa OTXoOB MeCTHOe yPexJeHne IIN B npednpnTHe, OKa3bIBaOooe NOo6HbIe ycnyr. OTdJIbHaYtUN3aun 6bITOBbIX pN6OpOB N03BOJraT NpeDOrBpaTNTB BO3MOxHbIe HeratNBbIe NocNeDCTBnI DnI OKpyKaHOUe CpeDbI N 3doPoBB, KOToPBIM YpeBaTa HeHaJLExKaUaAey UTNIN3aun, IN03BOJraET BOCCTaHOBHTb MaTePnaJIbI, BXODaUe B COCTabe N3denn, ObecneuBa3NaHTeJIbHyO 3KOHOmIO 3Heprnn IpecypcoB. B KaueCTBe HAnOMInHaHry O HeoBXoDMocTNIOTdJIbHOYtUN3aun 6bITOBbIX pN6OpOB Ha N3denn HaHeceH 3NaK B VnDE nepeuepKHyTO MycOpHO r 6aka Ha KOJIecax.
γia va yvwpióετε Tnv kouζivouŋxavn Tns Kenwood
Tpiiv xpoiopoioeTe Tn oukeun Kenwood
yiayvayvv6pi0ETeyTnyk,2ziv,ynxavnytn/yKenwood
①Kεφαλή του μιξερ
②UINOOxN EApTnHaTOC
③kαλuμα UTROOXnS
④μτολ
⑤unodoxnεpyαλεiou
⑥ iakontnEvepytoinən/catEvpeyoToincKai Taxutntac
⑦ EvdeikTKn luxvia kataoatao n iep
⑧ωμα tou μiερ
⑨muXoC aToOuVδeAnc KεφaλnS
⑩ xTuTnTnpiK
① vαδειτήρι
⑫εαρημαζμωμαος
③σπατoula
(4)KATTAKI
15Kλειδi
TO μiερ
Tayepyaiaayavamgynykaiymupeiké/yanoyti/yyxnp0ei/yt,2/
K xTUTNTnpi - Tia va qTIaXVEt Kek, mTIOKOTa, zUm, yAso, YepiO, EKAp KaI Toupé TTATatac.
avadutni Tia auya, Kepua, Koupkouti, ataxo TavaTeoTavi,apeyka, tonzkeik, ouocouphi. Mn xpoioTOIEte To xtuTTnpi ia Tauxppeuota miyata (T.x. yia va xtuttate BoTuPo kai caxapn) -ptopei va tponkaeote oopao 0to epyaaleio.
εαρτημα
ZmuWpatoC Tia iiypaTa e paYia.
yiayvayxpn0iμ,π,i0εγt,yμεp
1 Avaonkwote To moXIo aTIOoUVdeOng KepaInc OTnv TioW TTLEupa Tns OuaKEUns 1kai, taTOxPOva, onKwTe Tny KepaIn MEXPI va aopaloei OTNV UyNAn Theon 2.
alolall by kai aaiial aiailll
huiy cai y gianl y 1s hui pi -n
a1k.
山
y
e 1
P 1
( x,y - 1) x + y = - 1
zj
J 1
aagaae aegaae eae
julal aolabai
sulj gdlu-olijgagall ggalllalglkali jj
jIg.11 Ie Juaill
J 1
oolalai jn jnnll 1jgljg jll g
1.15.2.3.4.5
Luljusuall uauaaiuuaal jullal 1000
i j 1
a 20 20
Culjwll C
gall gaggall
logal 1all
J (s) min sss
aillll aegell
-2e aal 1s y
()max
-()ming
(1) (2) (3) (4)
()min
(1) max 2
Xeall-()min
maxgaglllgeylljbjrjdeaeall y
Aeall lgyd aegell slyj gmin gagll ae yglc
gjx1y1 aysuill gpsuill juaa
100 100
aLz! iie g jiai juee juee Juaa aai bai aee
J 1
yub j1ag?Jauallgossssssbblllcysbsyessss
Sgulll
- 1.
15 15
15
15
17
zj
gololuljog
alglallgssll Sswll llallll alllll
a
J1K
pssll 111111111111111111111
jlll jll lal gall bll
b11 1
aallll lalal yolal 0yall yolal
LgJaaJIc aagy p8y 0 gllg aayacjy bIaill Jaa
jblll 1g jy jg jglac y. jal gblld s
"O" slalg 1 g 1 Jia 11111110
a a a a a a a a a a a a a a
l_( 1) = | y| - 12| y|
aill aag 111 111 111 111 111 111
alil 1 aaii Sall eol alis ie jill ola jnll
S OBC = S COD + S_ BOC
#
y
jlll jll lll lla aolal alalal alal alal alal
2004/108/EC aagaaagaaagaaagaaagaaagaaagaaagaaagaaagaaagaaagaaagaaagaaagaaagaaagaaagaaagaaagaaagaaagaaagaaagaaagaaagaaagaaagaaagaaagaaagaaagaaagaaagaaagaaagaaagaaagaaagaaagaaagaaagaaagaa
Kenwood jolssiall sball jg elixi
法一. 它可以写
Jadall ②
jáolulb ③
( 4)
( 5)
bì xiè lǐ shà jiān wǒ gǔ gǔ ⑦
bMy// = ( x) ⑧
b1b2·s b_n 且 j z ,j k ⑨
10
11
S OBC = S COD + S_ BOC
13
13.14.15. ④
法一:
a
Kenwood
Jauuallgjgejglbkaalgyaoulaia
alalo g aill 1g k
diolcal
女性疑
Lgssj pi glllalallgysaiial 1y jie Lai
y y y y
.
a j 1
aill llll
y 1
a aagall gaaal aal jj
a0s y1g jlo 1o laai oJoo lool
lllglalglgglgglglll gglgglgglgglgglg
jglsl Jg Lg
a 1
Jgss Jgss Jgss Jgss Jgss Jgss Jgss Jgss Jgss Jgss Jgss Jgss Jgss Jgss Jgss
pao 1
jIyIyIyIyIyIyIyIyIyIyIyIyIy
j4 j4 j4 j4 j4 j4 j4 j4 j4 j4 j4 j4 j4 j4 j4 j4 j4 j4 j4 j4

HEAD OFFICE: Kenwood Limited, 1-3 Kenwood Business Park, New Lane, Havant, Hampshire PO9 2NH
kenwoodworld.com

- know your Kenwood kitchen machine
- before using your Kenwood appliance
- safety
- before plugging in
- the mixer
- the mixing tools and some of their uses
- to use your mixer
- important
- points for bread making
- speed switch
- electronic speed sensor control
- maximum capacities
- to fit and use your splashguard
- troubleshooting
- problem
- cleaning and service
- care and cleaning
- service and customer care
- IMPORTANT INFORMATION FOR CORRECT DISPOSAL OF THE PRODUCT IN ACCORDANCE WITH EC DIRECTIVE 2002/96/EC.
- de mixer gebruiken
- BhimaHne
- MVKcep
- Yka3aHnno npnroTOBJeHHIO Xne6a
- IpekeJIIOUaTeIb ckOpocTei
- 3NeKtpoHbI DaTUnk n peyJrTop ckOpocTu
- MaKcHMaJIbHbIe 3arpy3Kn HnHrpeDneHTOB
- cdo6hoe Tecto Jn necouHorO
- KaK yCTaHaBnBaTb I NOJIb3OBA TbC8 KpbIshKOДЯ 3auntbI OT 6pbI3r
- ПОИСК И YYSTРАЕНЕ HENСПAPВHOCTЕN
- HencnpaBHOCTb
- OuInCTka n O6cIyXINBaHne
- yXoI n OuNCTka
- 06cnyxmbaHne n 3a6oTa o nokynataeJX
- BAKHAR INHOPMAUINI NO IPNABUNbHOY TUNN3AUIN N3DEJINCOJLACHO DnPEKTNBE EC 2002/96/EC.
- γia va yvwpióετε Tnv kouζivouŋxavn Tns Kenwood
- yiayvayvv6pi0ETeyTnyk,2ziv,ynxavnytn/yKenwood
- TO μiερ
- yiayvayxpn0iμ,π,i0εγt,yμεp
- zj
- gololuljog
- #
- a
Brand : KENWOOD
Model : KMX95
Category : Blender