
SF 58 - Flash LEICA - Free user manual and instructions
Find the device manual for free SF 58 LEICA in PDF.
| Product type | Electronic flash for Leica camera |
| Brand and model | Leica SF 58 |
| Dimensions (W x H x D) | 71 x 148 x 99 mm |
| Weight (without batteries) | 355 g |
| Power supply | 4 AA batteries/rechargeable batteries (LR6, HR6, KR6) 1.2 V or 1.5 V |
| Guide number (ISO 100/21°, 105 mm) | 58 m / 190 ft |
| Operating modes | TTL, TTL-HSS, automatic A, manual M, M-HSS, stroboscope, slave |
| Motorized zoom head | Positions 24, 28, 35, 50, 75, 90, 105 mm (auto or manual adjustment) |
| Wide-angle diffuser | Built-in, coverage up to 18 mm |
| Secondary reflector | Adjustable power (100%, 50%, 25%) |
| Orientation and tilt | Horizontal: ±30°/60°/90°/120°/150°/180°; Vertical: 7° down, 45°/60°/75°/90° up |
| Flash exposure compensation | From -3 EV to +3 EV in 1/3 EV steps |
| Partial light output | P 1/1 to P 1/256 in 1/3 EV steps |
| Stroboscope | Number of flashes: 2 to 50; frequency: 1 to 50 Hz |
| High-speed sync (HSS) | Yes, in TTL-HSS and M-HSS modes |
| Display | LCD screen with backlight |
| Indicator lights | Flash ready (button 1.16) and correct exposure (button 1.15) |
| Audible signal | Ready and exposure confirmation beep |
| Key lock | Yes, can be enabled/disabled |
| Auto power off | After 2 min, 10 min, or disabled |
| Wireless use (slave) | Triggered by photocell (slave sensor) |
| Maintenance | Clean with a soft dry cloth; do not use cleaning products |
| Safety | Do not fire near flammable gases; do not point at eyes; do not disassemble; use only recommended batteries/rechargeables |
| Included accessories | Pouch, stand, alkaline batteries, instruction manual, warranty card |
| Firmware update | Via USB port (micro-USB) |
| Color temperature | Approximately 5600 K |
| ISO sensitivity setting | From 6 to 6400 ISO |
Frequently Asked Questions - SF 58 LEICA
User questions about SF 58 LEICA
0 question about this device. Answer the ones you know or ask your own.
Ask a new question about this device
Download the instructions for your Flash in PDF format for free! Find your manual SF 58 - LEICA and take your electronic device back in hand. On this page are published all the documents necessary for the use of your device. SF 58 by LEICA.
USER MANUAL SF 58 LEICA
Description of parts
1 Flash unit
1.1 Flash shoe with
a Knurled nut
b Control contacts
c Locking pin
1.2 Metering cell
1.3 Battery compartment cover
1.4 Swivel and tilt zoom head with
a Release button
1.5 Main reflector with
a Wide-angle diffuser
b Reflector card
1.6 Slave Sensor
1.7 Secondary reflector
1.8 Auto-focus metering lamp
1.9 USB port
1.10 Socket for external power supply
1.11 Monitor
1.12 Angle information for tilt
1.13-1.14Setting buttons
1.15 Setting button, also serves as flash exposure control signal
1.16 Setting button, also serves as flash-ready indicator and (outside of the menu navigation) as test flash trigger
1.17 Main switch
Description of parts
(cont.)
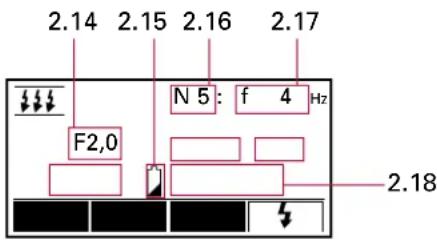
2 Monitor displays
a Starting Position
b Operating mode menu
c Exposure parameter menu
d Basic settings menu
2.1-2.4 Button functions / Keylock function
2.5 Range / distance for correct exposure
2.6 Symbol for activated automatic power off
2.7 Operating mode
2.8 Symbol for activated secondary reflector
2.9 Symbol for activated Beep mode
2.10 Aperture
2.11 Automatically or manually set focal length or symbol for activated Soft mode
2.12 Main reflector position
2.13 Sensitivity / flash exposure compensation value
2.14 Aperture in strobe mode
2.15 Battery warning indicator
2.16 Number of flashes in strobe mode
2.17 Flash frequency in strobe mode
2.18 Reduced output level
Table of contents
Description of parts 36,37
Disposal of electrical and electronic equipment ....39
Introduction ....40
Suitable cameras 40
Safety instructions ....41
Preparations
Power supply
Suitable disposable / rechargeable batteries ....42
Insertion and replacement of disposable / rechargeable batteries ....42
Disposal of batteries....43
Attaching / removing the LEICASF 58....44
Switching the LEICASF 58 on and off ....44
Automatic device shutdown 45
Monitor illumination....45
Menu navigation / setting the functions .....46
Operating mode menu 46
Exposure parameter menu 46
Basic settings menu 47
The reflectors / flash techniques .....48
Main reflector 48
Swiveling and tilting for bounce flash ....48
Motor zoom adjustment ....48
Automatic adjustment....49
Manual adjustment ....49
Softer illumination....49
18mm wide-angle diffuser....50
Reflector card for bounce flash 50
Secondary reflector for bounce flash 50
The displays on the monitor ....51
Flash-ready indication ....51
Exposure control indication....51
Range indication ....51
Automatic adjustment of the range indication .....52
Flash synchronization....52
Automatic flash sync speed control ....52
Normal synchronisation ....53
End of exposure synchronization ....53
Automatic / manual setting of flash exposure parameters .....54
Flash operating modes....56
TTL flash mode ....56
TTL flash mode with metering pre-flash .....56
Automatic TTL fill-in flash mode ....57
Automatic flash mode ....58
Flash exposure compensation 59
Manual flash mode....60
Strobe flash mode 61
Manual partial light output 62
HSS-High Speed Synchronization ....63
Basic settings ....64
Switching between metres/feet....64
Beep function 64
Keylock 65
TestLight 65
Using as secondary flash unit ....66
Accessories 67
Care and maintenance ....67
Firmware update ....67
Reset 67
Conditioning the flash capacitor 67
Troubleshooting 68
Technical data 70
Leica Academy 71
on the Internet 71
Information Service....71
Customer Service 71
Disposal of electrical and electronic equipment
(Applies within the EC, and for other European countries with segregated waste collection systems)


This device contains electrical and/or electronic components and should therefore not be disposed of in general household waste!
Instead it should be disposed of at a recycling collection point provided by the local authority. This costs you nothing.
If the device itself contains exchangeable (re-chargeable) batteries, these must be removed first and, if necessary, also be disposed of according to the relevant regulations.
Further information on this point is available at your local administration, your local waste collection company, or in the store where you purchased this device.
These instructions have been printed on 100% non-chlorinated paper that has been produced by an elaborate process to prevent water and, therefore, our environment from being polluted.
Introduction
Dear customer,
Leica would like to thank you for acquiring this LEICASF58 system flash unit and congratulate you on your choice.
By buying this flash, you have made the best choice for your Leica camera. We wish you a lot of enjoyment and success with your new flash.
In order to fully exploit the potential of your LEICASF58, you should first read this manual.
Suitable cameras
The LEICASF58 was designed for those Leica R- and M-series cameras equipped with
-
Through The Lens flash exposure metering, and
-
an SCA 3502 standard digital interface for the transmission of data and control signals between camera and flash unit.
The cameras that fulfil these requirements are: LEICAR8, LEICAR9, LEICAM6TTL, LEICAM7, LEICAM8, and LEICAM8. 2.
Of course, the LEICASF58 can also be used with other Leica R- and M-models.
For this purpose, it has its own metering cell and automatic control with six selectable f-stops. In addition, manual operation is available.
Note:
The descriptions in this manual apply only to use of the LEICASF58 on and with Leica cameras.
The use of the LEICASF58 on cameras from other manufacturers can only be recommended with reservations. Contacts in the accessory shoes of other cameras that are similarly positioned, but have differing electrical values e.g. can result in incompatible connections that adversely affect the performance of one or even both devices.
Leica therefore excludes any additional liability, especially for damage that does not occur on the flash unit itself.
Note:
Primarily, only the functions and settings of the flash unit itself are described in this manual.
In addition, there is a list of
a. the cameras with which these are available and
b. settings that are necessary or possible on the cameras used.
The information on the LEICAMP in this connection is representative of all cameras without any data transmission or control signals between flash unit and camera body, irrespective of whether the LEICA SF 58 is triggered by a flash hot-shoe contact or via cable connection.
Please refer the corresponding camera manuals for further details on the settings of the cameras in connection with flash mode.
Safety instructions
- The flash unit is exclusively designed and authorized for use in the photographic applications.
- The flash unit may only be used in combination with a camera-integrated flash if the flash can be folded out completely!
- The flash unit may under no circumstances be activated in the vicinity of inflammable gases or liquids (petroleum, solvents etc.). RISK OF EXPLOSIONS!
- Do not flash directly into the eyes from a close distance! Direct flashing into the eyes of persons or animals can cause damage to the retina and severe disruption of the vision – up to and including permanent blindness!
- Never use a flash unit to photograph car, bus, bicycle, motorbike or train drivers, etc. while they are driving. Blinding the driver can lead to an accident!
- Protect your flash unit from high temperatures and high air humidity! For example, do not keep it in the glove compartment of your car.
- Do not expose the flash unit to water drops and splashes (e.g. rain)!
- Rapid changes in temperature may lead to condensation. Allow time for the unit to become acclimatized!
- After repeated flashing, do not touch the diffuser. Risk of burns!
- When you activate the flash, there should be no opaque material directly in front of or on the reflector cover. The intense energy emissions can otherwise lead to scorching or spotting of the material and/or the reflector cover.
-
When taking flash shots at full light output and in rapid succession, especially when operating with NC-/NiMH rechargeable batteries, an interval of at least 10 minutes after 15flashes must be observed. In this way you will avoid overloading the unit.
-
When taking a series of flash shots at full light output and with rapid recycling times, and with zoom positions of 35mm and less, the diffuser heats up due to the high level of light energy. To protect itself from overheating, the flash unit will automatically increase the recycling time.
- Do not dismantle the flash unit! HIGH VOLTAGE! Repairs should only be performed by authorized service personnel.
- If the housing has been damaged in such a way that internal components are exposed, the flash unit may no longer be used. Remove the batteries!
- Do not touch the electrical contacts of the flash unit.
- Only use the disposable and rechargeable batteries designated and authorized in the operating manual.
- Do not open the batteries or short them!
- Under no circumstances expose the batteries to high temperatures like direct sunlight, fire or similar!
- Remove the used batteries immediately from the device! Chemicals can escape from used batteries (so-called "leaks") resulting in damage to the device!
- Do not use any defective disposable or rechargeable batteries!
- Disposable batteries ("primary cells") may not be recharged!
Preparations
Power supply
Suitable disposable / rechargeable batteries
The LEICASF58 can optionally be operated with:
- 4 NC rechargeable batteries 1.2V, type IEC KR6 (AA / mignon). They provide very fast recycling times and are economical in operation as they are rechargeable.
- 4 nickel metal hydride rechargeable batteries type IEC 1.2V (AA / mignon), significantly higher capacity than NC batteries and less harmful to the environment than the NC batteries as they are cadmium-free.
- 4 alkali manganese disposable batteries 1.5V type IEC LR6 (AA / mignon), non-rechargeable power source for moderate power requirements.
- 4 lithium batteries 1.5V, type IEC FR6 (AA / mignon), non-rechargeable power source with high capacity and low self-discharge rate.
Notes:
- New and used batteries or batteries of different capacities or from different manufacturers should not be used together.
- Cold reduces the power of disposable and rechargeable batteries. In the event of low temperatures, the flash unit should consequently be carried as close to the body as possible and used with fresh batteries.
-
The batteries are empty or dead if the recycling time (time from the triggering of a full-power flash, e.g. in the M mode, to the moment the flash-ready indicator (1.16) lights up again) exceeds 60 seconds.
-
If the batteries are partially discharged, the time for renewed readiness can be a little longer after a series of several flash exposures in a row. After a brief pause, once the batteries have "recovered", it is normally possible to continue shooting.
- If you do not use the flash unit for a prolonged period, remove the batteries from the device.
Insertion and replacement of disposable / rechargeable batteries
- Switch off flash unit with the main switch (1.17) (for this see "Switching the flash unit on and off", p. 44).
- Slide the battery compartment cover (1.3) downwards and fold open.
- Insert the batteries lengthwise according to the symbols on the inside of the battery compartment cover.
Important:
Incorrect polarity, i.e. incorrectly inserted batteries can result in the destruction of the device! Risk of explosion in the event of improper replacement of disposable / rechargeable batteries!
4. Close the battery compartment cover by folding it back and sliding it upwards.
Disposal of batteries
Used batteries should not be disposed of in the normal garbage, since they contain environmentally damaging substances. To have them returned to a recycling center, they should be brought back to the retailer or handed in as special waste (collecting point).
Please use any existing disposal systems for the return of used batteries in your respective country.
In Germany:
as a consumer, you are legally obliged to return used batteries.
You can return your used batteries free of charge where the batteries are sold.
The same applies at the public collection points provided in your town or by your local authority.
You will find this symbol on batteries that contain harmful substances:
Pb = battery / rechargeable battery contains lead
Cd = battery / rechargeable battery contains cadmium
Hg = battery / rechargeable battery contains mercury
Li = battery / rechargeable battery contains lithium
Attaching / removing the LEICA SF 58
Note:
In general, switch off the flash unit and the camera before attaching / removing the flash unit (see next Section).
- Turn the knurled nut (1.1a) upwards all the way towards the flash unit housing. The locking pin (1.1c) is now fully retracted in the adapter foot (1.1) of the flash unit.
- Slide the flash unit with its foot all the way into the flash shoe of the camera.
- Turn the knurled nut all the way downwards against the flash shoe of the camera body and thus clamp the flash unit in place.
Note:
In camera bodies with flash shoes lacking a hole, the spring-loaded locking pin retracts into the foot of the flash unit to avoid damage to the surface of the flash shoe.
Removal
- Turn the knurled nut (1.1a) upwards towards the flash unit housing all the way.
- Remove the flash unit from the flash shoe of the camera.
Switching the LEICA SF 58 on and off
The LEICASF58 is switched on and off with the main switch (1.17). To switch it on, the switch is pushed towards the right to the "ON"-position, to switch off, to the left position.
If the batteries have enough capacity, the ready indicator (1.16) will light up after about 5 seconds. At the same time – if the function is activated – an acoustic signal will sound (see "Beep function", p. 64). The proper functioning of the flash unit can then be checked by activating this button, which functions simultaneously as flash trigger. The following charging processes should be completed after about 0.5-3.5s.
If the flash-ready indicator only lights up much later or does not light up at all, the batteries must be replaced with new or recharged ones. If there is then still no reaction, this may be because the contacts of the power sources or those in the flash unit are soiled. In this case, they must be wiped clean with a clean, dry and lint-free cloth.
Notes:
- In the case of the LEICAR8/R9 and the LEICAM6TTL-, M7- and M8 models, a flash-ready indication is simultaneously shown in their viewfinder displays too.
- If there is no flash-ready indication (yet), the Leica models with TTL control will automatically switch to using the operating mode they are set to without an attached flash unit.
- If the SF 58 is not attached to the LEICAR8/R9, the LEICAM6TTL-, M7 or M8 models, or if the cameras mentioned are not switched on and powered up, the ready indicator of the flash unit (1.16) will only light up if the flash unit is set to A. M
- If the flash unit is not required for a lengthy period, it should always be switched off by the main switch and the power sources (batteries/rechargeable batteries) should be removed from the flash unit.
Automatic power off
The LEICASF58 can be set so that it switches to standby mode either after about two or ten minutes
• after being switched on,
• after a flash is fired,
- after the camera's shutter release button is actuated,
• after the exposure metering system of the camera is switched off,
to save battery power and prevent inadvertent battery drain. When the AUTO-off function is activated, the symbol appears in the display.
If the flash unit switches to the standby mode, the flash-ready indicator (1.16) and the displays on the monitor go out. The most recently used settings are retained after automatic power off and are immediately restored when the camera is switched on.
The flash unit can be turned on again by pressing any button or by pressing the camera's shutter release button (wake-up function).
Setting the function (see also "Menu navigation / setting the functions", p. 46)
- In the basic settings menu and
- act the menu item
Standby
- there the desired function 2 min, 10 min or OFF The factory setting of the flash unit is 10 min.
Monitor illumination
Whenever the buttons 1.13, 1.14 or 1.15 on the flash unit are pressed for the first time, the illumination of the monitor is switched on for about ten seconds. When a flash is fired via the camera or the hand release (1.16) on the flash unit, the illumination is switched off.
Menu navigation / setting the functions
All settings on the LEICASF58 are made via the menus and with help of the four buttons 1.13, 1.14, 1.15 and 1.16 below the monitor (1.11). These buttons assume different functions with different setting steps.
Their respective functions are always shown on the monitor, directly above the individual buttons. In the starting position, after switching on the flash unit, these are:
- Mode: Operating mode menu
- Set Exposure parameter menu
- Menu: Basic settings menu
- _n (1.16): Hand release (for test flash)
Operating mode menu
After calling the menu by pressing the Mode ^1 twice (first step), the list of flash operating modes available appears on the monitor, and the one activated is identified by a black bar.
Simultaneously, the buttons change their function:
(1.13), (1.14): to select the operating modes in the list (second step)
Note:
The list is not an "endless loop", i.e. at the highest item, only the ▼ ton can be used, at the lowest, only ▲
Set (1.15), (1-16): to confirm and activate the selected operating mode (third step, both buttons can be used) The display on the monitor returns to the starting position.
Exposure parameter menu
After calling the menu by pressing the Set twice (first step), the first of the changeable parameters appears on the monitor.
Simultaneously, the buttons change their function:
Set (1.14): for selecting the desired parameter by pressing several times if necessary (second step)
(1.15), + to reduce or increase the parameter values (third step)
(1.13): to confirm and activate the selected setting(s) (fourth step). The display on the monitor returns to the starting position.
Basic settings menu
After calling the menu by pressing the Menu ^1 twice (first step), the list of basic settings available appears on the monitor, and the one activated is identified by a black bar.
Simultaneously, the buttons change their function:
▲ (1.13), ▼: a. for selecting the basic settings in the list (second step), and b. to select the desired function version within the selected basic setting (fourth step).
Note:
Both the list of basic settings as well as the second function version with more than two settings are not „endless loops“, i.e. at the highest item only the
button can be used, at the lowest only
Set (1.15): by pressing the first time:
Calling the list of the function versions of the respective basic setting (third step)
by repeated pressing:
To confirm and activate the selected function versions (fifth step)
At the same time, the display on the monitor returns to the previous step.
(1.16): by pressing the first time:
To confirm and activate the selected function versions (fifth step)
The display on the monitor returns to the previous step. by repeated pressing:
Return to the starting position of the menu navigation and the display on the monitor (sixth step)
In general, the following applies:
Irrespective of whether you have confirmed your particular settings as described with a button, the menu navigation and the display on the monitor automatically return to their starting position three seconds after your last entry. In this case too, the last selected operating mode / setting is activated.
The reflectors / flash techniques
The LEICASF58 has two reflectors, the main reflector and the secondary reflector. The main reflector is designed as a motorized swivel and tilt zoom head. In addition, it is equipped with an 18mm diffuser and a reflector card.
The secondary reflector is optionally switchable, its output can be regulated.
Main reflector
Swiveling and tilting for bounce flash
In its resting position, the zoom head (1.4) is locked to prevent accidental settings. By pressing and holding the release button (1.4a), it can be swivelled and/or tilted by stages for bounce flash to various indexed positions:
Swivelling (horizontal):30°/60°/90°/120°/150°/180° anti-clockwise 30°/60°/90°/120° clockwise
Tilting (vertical): 7° downwards
45°/60°/75°/90° upwards
Bounce flash illuminates the subject more softly and reduces dense shadows. It also reduces the drop in light from foreground to background that occurs for physical reasons.
To avoid color casts in your shots, the reflective surface (e.g. ceiling or wall) should be color-neutral or white. For frontal fill-in lighting, the secondary reflector can be activated additionally (see "Secondary reflector for bounce flash", p. 50).
To prevent direct light from the reflector reaching the subject, the tilting angle should be at least 60^ .
In close-ups and macro shots, the parallax error between flash unit and lens may result in shadows on the lower edge of the image. To compensate for this, the main reflector can be tilted downwards by an angle of 7^ .
If the zoom head is tilted downwards, "TILT" is shown on the display as indication.
With the exception of this 7^ downwards position, flash ranges do not appear on the display when the zoom head is swiveled or tilted.
Notes on close-ups:
- Certain minimum lighting distances must be maintained for close-up shots to avoid over-exposure. The minimum lighting distance is about 10% of the range displayed on the monitor.
- For close-up shots, make sure that the flash light is not obscured by the lens, especially in the case of longer models such as telephoto- and telephoto-zoom lenses.
Motor zoom adjustment
24, 28, 35, 50, 75, 90 and 105 (focal length in mm*) are available as zoom positions.
* The focal length values shown refer to the 35mm format (24x36 mm). In the case of cameras with smaller formats as a result of their effectively smaller angle of view, exposures may also be made with shorter focal length settings of the main reflector than those shown on the monitor. Example: With a LEICAM 8/ M8.2 and a 21mm lens, the 24mm reflector position also produces flawless illumination.
Automatic adjustment
If the lens used has the corresponding identification and the respective information is transmitted to the LEICASF58 by the camera (see the corresponding instructions), the position of the main reflector adjusts automatically to the lens' focal length. In general, the flash unit is set to automatic adjustment every time it is switched on - and after the camera is activated by pressing the shutter release button.
This is equally true in the case of the Leica M8/M8. 2 models with their smaller image format compared to the 24x36mm format. This is incorporated with the automatic adjustment. Example: With a 21mm lens, the main reflector is set to its "28" position. „A-Zoom" and the reflector position are displayed on the monitor of the flash unit.
Manual adjustment
Irrespective of whether digital data transmission occurs between the camera and the flash unit or not (e.g. with lens without identification), the main reflector can also be set manually.
„MZoom“ and the reflector position set appear on the monitor of the flash unit.
Setting (see also "Menu navigation / setting the functions", p. 46)
- In the exposure parameter menu Set at the menu item "Zoom" and
- there the desired value. The setting will take effect immediately.
Softer illumination
In „SOFT ^♦ mode the focal length of the main reflector is reduced by one step compared to the focal length of the camera lens. The resulting wider illumination provides additional diffuse lighting (reflections) inside rooms and thus results in a softer flash illumination.
Example:
The focal length of the camera lens is 50mm. In „SOFT ^4 mode the flash unit sets the main reflector to 35mm.
50mm continues to be displayed on the monitor of the flash unit.
Setting the function (see also "Menu navigation / setting the functions", p. 46)
-
In the basic settings menu t the function on „SOFT “ and
-
there whether you wish to switch on the function on "SOFT ON" or off "SOFT OFF".
When the „SOFT mode is activated, apart from the focal length (2.12), “ASoft” or „MSoft“(2.11, depending on the set mode) is displayed on the monitor.
For system requirements, the „SOFT ^♦ mode is supported for lenses with nominal focal lengths as of 28mm.
18 mm Wide-angle diffuser
The LEICASF58 has an integrated wide-angle diffuser. Focal lengths as of 18mm can be illuminated with it.
In its resting position, the diffuser (1.5a) is retracted at the top in the head of the main reflector (1.5). If it is to be used, it is pulled out forwards up to the stopper and released. It then folds downwards automatically.
The main reflector is automatically set to the 24mm position. On the monitor, the zoom value (to 18[mm], 2.12) and the distance information (2.5) is correspondingly corrected.
If the diffuser is not going to be used any longer, it is folded upwards by 90^ and pushed back in completely.
Note:
When the diffuser is pushed back in, the main reflector is only set back to the correct focal length (the attached lens' focal length or the one it is set to) after data transmission between the camera and the flash unit is activated again by pressing the camera's shutter release button.
Correspondingly, it is only then possible for the flash unit monitor to display the correct focal length.
Reflector card for bounce flash
The LEICASF 58 has an integrated reflector card. With it, highlights can be produced in people's eyes when using bounce flash.
In its resting position, the reflector card (1.5b) is retracted at the top in the head of the main reflector (1.5). If it is to be used,
-
tilt the reflector head upwards by 90^ ,
-
pull out the reflector card together with the wide-angle diffuser (1.5a) forwards up to the stopper,
-
hold the reflector card and
-
push the diffuser back into the head.
Secondary reflector for bounce flash
The secondary reflector (1.7) is for frontal fill-in lighting of the main subject in the case of indirect lighting, i.e. when the main reflector (1.5) is swiveled to the side and/or tilted upwards. Using the secondary reflector is generally practical and feasible only in such cases. Consequently, it is not triggered even when the shot is taken if the function is switched on, but the main reflector is in its resting position. If the secondary reflector's output is too high, it can be reduced.
Setting the function (see also "Menu navigation / setting the functions", p. 46)
-
In the basic settings menu Menuct the menu item " "
-
there whether you wish to switch the function "N/OFF" on or off there and
-
the output you wish, "1" (full output), "1/2" (half output" or "1/4" (quarter output).
If the secondary reflector is activated, the symbol „” is displayed on the monitor.
Note:
Even when it is switched on, the secondary reflector does not flash if
- the flash modes Strobe, TestLight and Mave are used,
- the main reflector is tilted downwards.
Displays on the monitor
Flash-ready indication
When the flash capacitor is charged, the flash-ready symbol (1.16) lights up on the LEICASF58, indicating that the flash is ready to fire. This means that the flash light can be used for the next shot. The readiness of the flash unit is also transmitted to the camera models LEICAR8/9, LEICAM8/8. 2, LEICAM7 and LEICAM6TTL and ensures a corresponding signal in their viewfinder displays. If a shot is taken before the flash-ready indicator appears in the camera's viewfinder, then the flash unit will not be triggered, and if the camera has already switched to flash sync speed, the shot may have the wrong exposure.
Exposure control indication
The button 1.15 lights up in red as exposure control indication. It only appears in TTL or automatic flash mode, and only if the exposure was properly exposed*. If it does not appear after the shot, then the shot was underexposed. You will need to repeat the shot with the next larger aperture, i.e. the next smaller f-number (for example, f/8 instead of f/11) and/or the distance to the subject or reflecting surface (for example, with bounce flash) should be reduced. Therefore, always pay attention to the range indication on the monitor of the flash unit.
Range indication
On the monitor of the LEICASF58, either the value for the maximum flash range (in the TTL and A-flash modes) or the distance at which the flash will correctly illuminate the subject (in the case of the manual flash modes) is indicated. The range indicated relates to subjects with a reflection factor of 25%, which applies to most photographic situations. Strong deviations from this reflection factor, as in the case of highly or poorly reflective subjects, may affect the flash range. In TTL and automatic flash mode, the subject should be in the middle third of the indicated range. This will give the automatic exposure control sufficient margin for compensation. To avoid overexposure, the minimum distance to the subject should not be less than 10% of the indicated value!
Adjustment to the photographic situation at hand can be achieved by, for example, changing the f-stops.
In the manual flash mode M, adjustment to the respective photographic situation can be achieved, for example by changing the lens aperture and/or by choosing between full light output and partial lighting output "P".
The range/distance can be displayed optionally in meters or feet (see "Switching between meters/feet", p. 64). Flash ranges-/distances do not appear on the display when the main reflector is swiveled or tilted or in the slave mode. When the main reflector is tilted downwards by 7^ , the range/distance display is retained.
Automatic adjustment of the range indication
The cameras transmit the flash parameters (e.g. for ISO sensitivity, lens focal length, aperture, and ambient light exposure compensation) to the flash unit. As a result, the flash unit automatically adjusts its settings accordingly. The maximum flash range is calculated on the basis of the flash parameters and the guide number, and displayed on the monitor.
For this, data exchange must occur between the camera and flash unit, e.g. by pressing the camera's shutter release button!
Flash synchronization
Automatic flash sync speed control
Depending on the camera model and the exposure mode set on the camera, the shutter speed is switched to flash sync speed when readiness of flash is reached (see camera instr.).
Shutter speeds faster than the flash sync speed cannot be set (except with the flash modes TTL and -HS-Mee "HSS high speed synchronization",
p. 63) and/or are switched to the flash sync speed. In contrast, slower shutter speeds than the flash sync speed can be used depending on the illumination mode selected on the camera.
Notes:
- The LEICAR9 operates with variable shutter speeds in program exposure mode. They are automatically controlled by the camera depending on the ambient light and focal length of the lens used (see camera instr.).
- If you want to ensure that the LEICASF58 can use its full light output, you should not select shutter speeds faster than 1/125s.
- Cameras or lenses with central shutters have no sync speed, since with these lenses, any shutter speed can be also be used with flash. As a result, there is no automatic setting of any shutter speed in this case.
Normal synchronization
With normal synchronization, the LEICASF58 is fired at the beginning of the exposure, that is, immediately after the shutter opens. This synchronization is the standard mode and is carried out on all cameras. It is suitable for most flash shots.
The camera, depending on the illumination mode set, is switched to the flash sync speed.
There is no setting or display on the flash unit for this mode.
Note:
Following the focal plane shutters with their two curtains used in the majority of system cameras, in particular system cameras, this synchronization is usually called "with the first curtain."
However, in the case of the between-the-lens shutters used in most compact cameras and some interchangeable lenses, this designation is incorrect. Consequently, in this manual, the synchronization of the exposure applicable in both cases is mentioned in the beginning or at the end, see section below.
End of exposure synchronization
Several cameras offer the feature of synchronization with the end of the exposure (usually termed "second curtain synchronization"). This is particularly advantageous when used with slow shutter speeds (>1/30s) and moving subjects that have their own source of light or that reflect light. With second curtain synchronization, a moving light source will "trail a light streak" instead of "building one up ahead of itself", as it does when the flash is synchronized with the beginning of the exposure. This produces a „more natural" image of the photographic situation in the case of moving light sources.
The synchronization with the end of the exposure is set on the camera (see the camera's instr.)! Depending on the exposure mode set, the camera then sets shutter speeds slower than its sync speed, especially in the case of darker subjects.
Note:
Use a tripod when shooting with slow shutter speeds to avoid blurred images!
Automatic / manual setting of flash exposure parameters
The settings listed in the parameter menu Set decisive for the control of the flash exposure. Depending on the flash mode set (see p. 56), a varying number of the total of seven parameters will be displayed in this menu:
| III- HSSA | MM-HSS | ↓↓↓ | ||
| 1 | Sensitivity | ISO | ISO | ISO |
| 2 | Aperture | F | F | F |
| 3 | Focal length / reflector position | A/M/Zoom | A/M/Zoom | A/M/Zoom |
| 4 | Manual flash exposure correction | EV | - | - |
| 5 | Manual partial lighting | - | P | P |
| 6 | Stroboscopic-number of flashes | - | - | N |
| 7 | Stroboscopic-flash frequency | - | - | f |
Details on the flash parameters 4-7 are available in the corresponding sections on p. 59 (4), 62 (5), 61 (6) and (7).
Depending on the camera type, the flash parameters 1-3 are either set automatically or they have to be entered manually on the flash unit:
| ISO(Sensitivity) | Aperture(controlled automatically by the camera or preset manually on the lens) | Focal length | |
| LEICAR8/R9 | Automatic | Automatic ^1 | Automatic ^1,2 |
| LEICAM8/M8. 2 | Automatic | Manuel | Automatic ^3 |
| LEICAM7 | Automatic | Manuel | Manuel |
| LEICAM6 TTL | Automatic | Manuel | Manuel |
| LEICA MP | Manuel | Manuel | Manuel |
^1 Only with R-lenses, equipped with ROM memory and contact strip.
^2 Depending on features of the lens
^3 Only with M-lenses equipped with 6-bit coding.
Automatic transmission
For the automatic transmission of these flash parameters, the LEICASF58 must be attached to the camera and both devices switched on. In addition, a data exchange must take place between the camera and the flash unit. For this, briefly press the camera's shutter release button.
In the case of automatic transmission, the values for sensitivity (ISO) and aperture (F) can only be changed directly on the particular camera or lens, but not on the flash unit ^10 .
Manual setting (see also "Menu navigation / setting the functions", p. 46)
-
In the parameter menu Set at the desired item and
-
there the desired value.
The following is displayed on the monitor (1.11)
- The automatically transmitted or manually entered values for ISO and aperture*.
- AZoom or MZoom (for the automatic or manual setting) and the respective focal length value. The maximum range (in the TTL and A-modes) or the distance at which a subject is correctly exposed by the flash (in the M- and strobe modes) according to the set flash parameters (2.16/2.17).
* Aperture values set on the lens are not transmitted by the LEICAM8/M8.2. As a result, they must be entered manually on the flash unit.
Flash operating modes
The LEICASF58 has a total of six flash modes:
TTL TTL flash mode
HSS TTL flash mode with HSS-High Speed Synchronisation
A Automatic flash mode
Manual flash mode
M-HSS Manual flash mode with HSS-High Speed Synchronization
M-Slave Off-the-camera operation as secondary flash with wireless release
Strobe flash mode
Depending on the features of the camera, not all of these modes are available:
| LL | TL-HSS | A | M | M-HSS | M-Slave^1 | JJJ | |
| LEICAR8/R9 | x | x^2 | x | x | x^2 | x | |
| LEICAM8/M8. 2 | x^3 | - | x | x | - | x | |
| LEICAM7 | x | - | x | x | - | x | |
| LEICA MP | -12 | - | x | x | - | x | |
| LEICAM6TTL | x | - | x | x | - | x |
TTL flash mode
With TTL flash mode, you can achieve very good flash shots easily. In this mode, the exposure is measured by a sensor in the camera. It measures the light entering the camera through the lens (TTL = "Through The Lens"). The advantage of this flash mode is that all factors influencing the exposure (filters, aperture changes, and focal length changes with zoom lenses, extensions for close-ups, etc.) are automatically taken into account in controlling the flash output.
TTL flash mode with metering pre-flash
The TTL flash mode with metering pre-flash with the digital Leica M- models is a further development of the standard TTL flash mode of analog cameras. Immediately after the shutter button is pressed, and before the actual exposure, one or more almost invisible metering pre-flashes are executed by the flash unit. The reflected light of the metering pre-flash/es is evaluated by the camera. According to the evaluation, the subsequent flash exposure is adapted to the photographic situation by the camera.
Notes:
- Depending on the camera model, the metering pre-flashes precede the main flash by such a short interval that they cannot be practically distinguished from the main flash!
- The metering pre-flashes do not contribute to the exposure.
^1 Function is intended only for off-the-camera operation as secondary flash. With this function, the flash unit can only be triggered by another flash unit through its slave-sensor.
^2 Only with LEICAR9
^3 With metering pre-flash (see “TTL flash mode with metering pre-flash”, p. 56)
^4 The function is inicated on the monitor of the flash unit, but is not supported by cameras which only have one hot-shoe contact. It can therefore cause defective exposures with these cameras.
Automatic TTL fill-in flash mode
Within the TTL flash mode, a TTL fill-in flash mode is automatically activated in some cameras: In the LeicaR8/9 models with program mode P, in the Leica M8/M8.2 models, with aperture priority mode A, automatic snapshot mode S and also in manual exposure setting. Depending on the prevailing light situation, the metering system of the camera ensures the appropriate combination of shutter speed, aperture and flash output (see camera instr.).
The TTL fill-in flash control can avoid annoying shadows and achieve a balanced exposure between subject and background in backlight shots.
Notes:
- Ensure that the no secondary light sources shine directly into the lens – this could cause faulty exposures.
- An adjustment or display for the automatic TTL fill-in flash mode on the flash unit does not occur in this case.
Setting the function on the flash unit (see also "Menu navigation / setting the functions", p. 46)
- Choose Mode and
- select the list.
Settings on the camera
- TTL flash mode is supported by all exposure modes - program "P", aperture priority "A", speed priority "S" and manual "M".
- The sync speed (shutter speed for flash mode) is set automatically depending on the exposure mode and camera type or it must be manually preset, for this, see the respective camera instr. (see also "Flash synchronization", p. 52).
- The flash parameters for ISO, aperture and lens focal length or reflector position are set automatically depending on camera type or they must be entered manually on the flash unit (see "Automatic / manual setting of flash exposure parameters", p. 54).
Displays on the monitor of the flash unit/ in the viewfinder of the camera (see also "Displays on the monitor", p. 51)
- The range (2.5) on the monitor of the flash unit is indicated according to the flash parameters transmitted by the camera or manually entered on the flash unit (see "Automatic / manual setting of flash exposure parameters", p. 54).
- Flash readiness and the results of a flash exposure are indicated in the view-finders of all Leica cameras listed excluding the LEICA MP.
- A correctly exposed shot is indicated by the button 1.15 lighting up for about three seconds. (This is not indicated in the case of the LEICAM8/8. 2)
Automatic flash mode
In the automatic flash mode A, the photo sensor (1.2) of the LEICASF58 measures the light reflected by the subject. The sensor has a coverage of about 25^ and measures the light only while the unit's own flash is fired. For correct exposure, the flash is cut off as soon as sufficient light has been emitted.
The photo sensor must be directed at the subject.
The maximum range is shown on the monitor. The shortest shooing distance is approximately 10% of the maximum range. The subject should be located within the middle third of the indicated distance range to give the automatic exposure control sufficient margin for compensation.
Setting the function on the flash unit (see also "Menu navigation / setting the functions", p. 46)
- Choose Mode and
- select A in the list.
Settings on the camera
- The automatic flash mode requires the aperture on the lens to be set manually. Consequently, it can only be used with the aperture priority A manual exposure modes.
- The sync speed (shutter speed for flash mode) is set automatically depending on the exposure mode and camera type or it must be manually preset, for this, see the respective camera instr. (see also „Flash synchronization“, p. 52).
- The flash parameters for ISO and lens focal length or reflector position are set automatically depending on camera type or they must be entered manually on the flash unit (see "Automatic / manual setting of flash exposure parameters", p. 54).
Displays on the monitor of the flash unit / in the viewfinder of the camera (see also "Displays on the monitor", p. 51)
- The range (2.5) on the monitor of the flash unit is indicated according to the flash parameters transmitted by the camera or manually entered on the flash unit (see "Automatic / manual setting of flash exposure parameters", p. 54).
- Flash readiness and the results of a flash exposure are indicated in the view-finders of all Leica cameras listed excluding the LEICA MP.
- A correctly exposed shot is indicated by the button 1.15 lighting up for about three seconds.
Flash exposure compensation
In the case of major differences in brightness and/or distance between the subject parts in the image field (especially between the main subject and the background), a manual flash exposure compensation may be advised to ensure the correct exposure of your main subject. Explanation:
The TTL control of the cameras (excluding LEICA MP) as well as the automatic flash exposure system of flash units is adjusted to a reflection factor of 25% (the average reflection factor of flash subjects). A dark background, which absorbs too much light, or a bright background, which reflects strongly (e.g. backlit shots) can lead to over or under exposure of the subject.
To counteract this effect, the flash exposure can be manually adjusted to the photographic situation with a compensation value. On the LEICASF58, in the TTL and automatic flash mode, manual compensation factors for the flash exposure from -3 EV (f-stops) to +3 EV (f-stops) can be set in 1/3 step increments.
The level of the compensation value depends on the contrast between the subject and the image background:
Dark subject in front of a bright background:
Positive compensation value
Bright subject in front of a dark background:
Negative compensation value
Setting the function (see also "Menu navigation / setting the functions", p. 46)
- In the exposure parameter menu Set at the menu item "EV" (EV= exposure value; f-stops) and
- there the desired value.
Note:
When setting the flash exposure compensation, the range indication (2.5) on the monitor of the flash unit can change (the more powerful illumination occurring with a plus compensation can only be produced up to a shorter distance; conversely, the weaker with a minus compensation also at a greater distance).
Manual flash mode
In the manual flash mode the LEICASF58 is not controlled and therefore emits its total energy, or the reduced amount determined by a partial light output setting (see p. 66). Therefore, manual flash exposures can always only be correct at a particular distance to the main subject. Consequently, the adjustment of the exposure must occur for every shot: Through the selection of the aperture and/or changing the distance to the subject and/or setting a suitable partial light output.
Setting the function on the flash unit (see also "Menu navigation / setting the functions", p. 46)
- Choose the Mode and
- select Wm the list.
Settings on the camera
- The automatic flash mode requires the aperture on the lens to be set manually. Consequently, it can only be used with the aperture priority A manual exposure modes.
- The sync speed (shutter speed for flash mode) is set automatically depending on the exposure mode and camera type, or it must be manually preset, for this, see the respective camera instr. (see also „Flash synchronization“, p. 52).
- The flash parameters for ISO and lens focal length or reflector position are set automatically depending on camera type or they must be entered manually on the flash unit (see "Automatic / manual setting of flash exposure parameters", p. 54).
Displays on the monitor of the flash unit/ in the viewfinder of the camera (see also "Displays on the monitor", p. 45)
- The range (2.5) on the monitor of the flash unit is indicated according to the flash parameters transmitted by the camera or manually entered on the flash unit (see "Automatic / manual setting of flash exposure parameters", p. 54).
- Flash readiness and the results of a flash exposure are indicated in the view-finders of all Leica cameras listed excluding the LEICA MP.
Strobe flash mode
In strobe flash mode, several flashes are emitted in quick succession while the shutter of the camera is open. As a result, those parts of the subject which moved during the shot and were primarily illuminated by the flash appear in the picture several times. This is particularly interesting in movement studies and effect shots.
Note:
To support the effectiveness of the technique, we recommend shooting the main subject against the darkest possible background (which the flash does not illuminate).
Since the overall output available for strobe mode has to be divided between several flashes, this function can only be realized with a partial light output of a max. of 1/4 or less. Consequently, the possible distances to the main subject are correspondingly shorter. For this reason, and because the output of the individual flashes cannot be/is not further changed, the exposure must be determined here as in the manual mode (see p. 60).
The output of the individual flashes themselves is determined by the two possible settings – number and frequency of flashes. Both the frequency of the flashes (flashes per second) as well as the number of flashes can be selected.
Setting the function on the flash unit (see also "Menu navigation / setting the functions", p. 46)
-
Choose the Mode and
-
select from the list.
Strobe flash number and frequency
The flash number (N) can be set from 2 to 50, the flash frequency (f) from 1 to 50 in increments of one. The maximum possible manual partial light output is automatically adjusted at the same time. It depends on ISO and aperture value. If you desire short flashes, you can manually reduce the partial light output to the minimum value of 1/256 (see p. 62).
The valid distance for the set parameters is displayed on the monitor. However, if you wish to photograph your main subject from a different distance (e.g. for compositional reasons or because the expansion of the sequence of movements requires this), the distance value displayed can be adjusted by changing the f-stop or the partial light output.
Setting of flash frequency and number (see also "Menu navigation / setting the functions", p. 46)
- In the exposure parameter menu Set ct the menu item N or f and
- the desired respective value.
Note:
The secondary reflector is not supported in strobe flash mode. Even if it is switched on, it does not flash in strobe flash mode! The symbol for the secondary reflector is not displayed on the monitor!
Settings on the camera
- The strobe flash mode assumes the manual setting of an aperture on the lens. Consequently, it can only be used with the aperture priority A and manual exposure modes.
- The sync speed (shutter speed during flash mode) is set automatically depending on the exposure mode and camera type or it must be manually preset, for this see the respective camera instr. (see also „Flash synchronization“, p. 52).
- The flash parameters for ISO and lens focal length or reflector position are set automatically depending on camera type or they must be entered manually on the flash unit (see "Automatic / manual setting of flash exposure parameters", p. 54).
- The range (2.5) on the monitor of the flash unit is indicated according to the flash parameters transmitted by the camera or manually entered on the flash unit (see "Automatic / manual setting of flash exposure parameters", p. 54).
- Flash readiness and the results of a flash exposure are indicated in the view-finders of all Leica cameras listed excluding the LEICA MP.
Displays on the monitor of the flash unit/ in the viewfinder of the camera (see also "Displays on the monitor", p. 45)
Manual partial light output
In the manual and strobe flash modes, the light output of the LEICASF58 can be adjusted to the photographic situation by the setting of a manual partial light output (P). The setting range in the manual flash mode from P 1/1 (maximum light output) to P 1/256 in one-third steps.
Setting the function (see also "Menu navigation / setting the functions", p. 46)
-
In the exposure parameter menu Set at the menu item "P" and
-
there the desired value.
Notes on partial light output in combination with strobe mode:
- The maximum partial light output that can be set is automatically adjusted to the set flash parameters.
- The reduction of the manual partial light output is only possible in full steps!
- Resetting the number of flashes (N) and the flash frequency (f) does not lead to the partial light output being reset.
HSS-High Speed Synchronization
Some cameras support HSS-High Speed Synchronization (see camera instr.). This flash mode allows using a flash unit even with shutter speeds faster than the sync speed.
The mode is helpful, for example in the case of portrait shots when a wide open aperture (e.g. F/2.0) is to be used in spite of very bright ambient light in order to limit the depth of field! The LEICASF58 supports high speed synchronization in TTLS and -HSSM odes.
For physical reasons, HSS-High Speed Synchronization significantly reduces the guide number and as a result also the range of the flash unit! This also depends on the shutter speed used – the faster the shutter speed, the lower the guide number! Therefore, always pay attention to the range indication on the monitor of the flash unit
HSS-High Speed Synchronization is activated automatically if a shutter speed faster than the flash sync speed is manually set or automatically adjusted on the camera.
Setting the function on the flash unit (see also "Menu navigation / setting the functions", p. 46, and "Flash modes", p. 56)
-
Choose the Mode and
-
select 📊 or -HSSMbm the list.
Settings on the camera
See operating instructions of the camera.
Displays on the monitor of the flash unit/ in the viewfinder of the camera (see also "Displays on the monitor", p. 45)
- The range (2.5) on the monitor of the flash unit is indicated according to the flash parameters transmitted by the camera or manually entered on the flash unit (see "Automatic / manual setting of flash exposure parameters", p. 54).
- Flash readiness and the results of a flash exposure are indicated in the view-finders of all Leica cameras listed excluding the LEICA MP.
Basic settings
Depending on the flash mode set, various special functions can be selected.
Switching over between meters / feet
The range or distance indication on the monitor of the LEICASF58 can be optionally shown in meters or feet.
Setting the function (see also "Menu navigation / setting the functions", p. 46)
-
In the basic settings menu Menuct the item "m/ft" and
-
there the desired unit.
Beep function
The beep function allows the user to receive an acoustic signal for certain functions of the flash unit. This allows the photographer to concentrate fully on the subject and taking the picture, and not worry about any optical status indicators! The beep function signals acoustically when the flash is ready, when the correct flash exposure has been achieved or when an error occurs.
Acoustic signal after the flash unit has been turned on
A short (about two seconds) uninterrupted beep signal after turning the flash unit on indicates that it is ready.
Beep signals after taking a photograph
- A short (about two seconds) uninterrupted beep signal directly after a picture is taken indicates that the shot was exposed correctly and the flash is ready again. If no beep signal sounds, then the shot was underexposed.
- An intermittent (--) beep signal directly after a shot indicates that it was correctly exposed. However, the flash is only ready after a second (about two seconds) continuous beep.
Notes :
- The beep signal indicating renewed flash readiness after a picture is taken occurs only after a full capacity output. This means it always occurs with flash mode M (with the exception of a partial capacity output due to a respective setting), and with the A and TTL flash modes only if even a maximum output was not sufficient for a correct exposure.
- In the case of the LeicaM8/M8. 2 models and TTL mode, the beep signal occurs only after a full capacity output, indicating only the renewed flash readiness, not a successful exposure.
Setting the function (see also "Menu navigation / setting the functions", p. 46)
-
In the basic settings menu Menuct the item "Beep" and
-
there the desired setting.
When the beep function is turned on, the symbol is also displayed on the monitor.
Keylock
The KEYLOCK function enables the user to lock the buttons on the flash unit to prevent any accidental settings. When the KEYLOCK function is activated, a symbol appears above the buttons 1.13, 1.14 and 1.15.
Setting the function (see also "Menu navigation / setting the functions", p. 46)
- In the basic settings menu Menut the item "KeyLock" and
- there whether you wish to activate the function - "KeyLock ? YES?" or switch it off "KeyLock ? NO?".
Deactivating the KEYLOCK function
When a button is pressed, "UNLOCK? Press these keys." is displayed on the monitor. The symbol is displayed to indicate that the buttons are locked.
To deactivate the KEYLOCK function, press the buttons 1.14 and 1.15 for about three seconds. As soon as the KEYLOCK function has been switched off, the normal displays reappear on the monitor.
TestLight
This function involves a series of several flashes at a high frequency. During the series of flashes lasting about three seconds, the impression of permanent light is created. In this way, it is possible to assess light distribution and the formation of shadows before taking pictures.
Setting the function (see also "Menu navigation / setting the functions", p. 46)
- In the basic settings menu Wenuct the item "TestLight" and
- there whether you wish to switch the function on "TestLight ON" or off "TestLight OFF".
Notes:
- The TestLigh function is not available with the wireless M-Slave mode (see p. 66.
- The secondary reflector is not available with the TestLight function.
Using as secondary flash unit
Sometimes the desired illumination can only be achieved with the use of several light sources. Apart from the main light source, usually employed for frontal illumination, additional light sources are required e.g. in the case of portraits to avoid hard shadows, to produce highlights in the eyes, etc.
For this purpose, the LEICASF58 has a photocell (1.2), so that it can not only be used directly on the camera as main flash source, but also as a wirelessly-fired (i.e. solely by the flash of the main flash unit) secondary flash unit. The mounting base included in delivery permits easy and secure setting up of the device used as secondary flash unit on any even surface.
Setting the function (see also "Menu navigation / setting the functions", p. 46) In the Mode, select the menu item "-Slave"
The following display appears on the monitor of the flash unit:
- Wave for the mode
- "MZoom" and the currently set focal length/position of the zoom head
– the currently set partial light output level
The last two displays indicate the only other settings possible with slave mode.
Note:
- Upon reaching the readiness to flash state, in addition to the readiness to flash indicator (1.16), the lower auto-focus metering light (1.8) also lights up.
- In the case of the Leica M8/M8. 2 models, the flash unit being used as the main unit should be set to A mo M but not to TTL mode.
Reason: Since the slave sensor (1.6) of the flash unit being used as a secondary unit is sensitive even to weaker signals, it would already be triggered by TTL pre flashes of the main flash unit. In turn, the secondary unit would not be ready again for the main flash following immediately afterwards.
Setting of partial light outputs and the focal length/reflector position
- Press the Set n (1.14) twice to select the first of the two points "P1/x" and
- there the desired value with the - or (1.16) + ns. Output levels between 1/1 and 1/256 are possible, including intermediate values in one-third f-stops. In each case, the output level and any intermediate value is displayed as "-1/3" or "-2/3". After adjusting the setting, the display now only shows "-" for the intermediate value "-1/3" and/or "-" for the intermediate value "-2/3".
Note:
At full output ("P1/1"), the output can only be reduced, and in this case, only the -n (1.15) is available.
- Press the Set n (1.14) again to select the second of the two points "MZoom 50 ^※ " and
- there desired focal length/reflector position with the (1.16) buttons.
Both settings take effect immediately.
Accessories
Important:
We accept no liability for malfunctions of or damage to the flash unit caused by the use of accessories of other manufacturers!
Diffuser (Order no. 14 489)
With this diffuser, soft lighting can be achieved very simply. Skin tones are reproduced more naturally. In addition, as a result of the wider diffusion of the light, the angle of view of 16mm lenses is also covered.
Corresponding to the light loss, the maximum working ranges are reduced by about a half.
Care and maintenance
- Remove any dirt and dust with a soft, dry cloth.
- Do not use any cleaning agents – plastic components could be damaged.
Firmware update
The flash unit firmware can be updated through the USB socket (1.9) and adapted to the functions of future cameras as far as is technically possible (firmware update)
More information is available on the Internet at the Leica Camera AG homepage: www.leica-camera.com
Reset
The flash unit can be reset to the factory settings implemented when delivered. To do so, press and hold the Moden (1.13) for about three seconds.
"RESET" will then appear on the monitor. After about three seconds, the display switches to the state when it was delivered.
This will not affect firmware updates for the flash unit!
Conditioning the flash capacitor
The flash capacitor built into the flash unit is subject to a physical change when the device has not been used for a long time. For this reason, it is necessary to switch on the device every three months for approximately ten minutes. The battery must deliver enough power so that the flash ready indication (1.16) lights up no later than one minute after switching on.
Troubleshooting
Should the flash unit fail to function properly, switch the flash unit off with the main switch (1.17) for about ten seconds.
Check the camera settings and make sure the foot of the flash unit is mounted correctly in the camera's accessory shoe.
Replace the disposable or rechargeable batteries with new or freshly charged batteries!
After that, the flash unit should function normally when it is switched on. If this is not the case, contact your dealer.
Below is a list of some problems that may occur when using the flash unit. For each one, possible causes and remedies are listed.
No range indication appears on the monitor.
- The main reflector is not in normal position.
- The flash unit has been set to Mave operation.
"TILT" appears on the monitor
- The main reflector is tilted downwards for close-up or macro shots.
A battery warning appears on the monitor
When the battery warning appears on the monitor, there is still enough power left for a few flashes. See also "Replacing batteries", p. 42.
There are, however, battery batches in which the battery warning appears relatively early, even though there may still be up to 50 % of the flashes still available. In the M-Slave mode, it is not possible to provide a battery warning for system-related reasons.
The reflector position is not automatically adjusted to the current zoom position of the lens.
- The specific camera cannot transmit any digital data to the flash unit.
- There is no exchange of data between the flash unit and the camera. Press the shutter release button of the camera!
The secondary reflector cannot be activated or no flash is triggered
- The secondary reflector does not support the flash modes stroboscopic, M-Slave and test light. In these modes, the secondary reflector cannot be activated, or the secondary reflector does not trigger a flash.
- The main reflector is in its normal position or tilted downwards.
The flash sync speed is not automatically set
- The camera is operating with HSS-High Speed Synchronization (camera setting). In this case, automatic sync speed setting is not accessible.
- The camera is operating with shutter speeds that are slower than the flash sync speed. Depending on the camera exposure mode, automatic sync speed setting is not accessible (see camera's instr.).
The images are dark at the bottom.
Due to parallax error between lens and flash unit, close-up shots, depending on the focal length, cannot be completely illuminated at the bottom of the image. Tilt the main reflector downwards or place turn the wide-angle diffuser in front of the reflector.
The shots are too dark.
- The subject is beyond the range of the flash unit. Note: Using bounce flash reduces the range of the flash unit.
- The subject contains very bright or highly reflective areas. The metering system of the camera or flash unit is deceived as a result. Set a positive manual flash exposure compensation, e.g. +1EV.
The shots are too bright.
In close-up shots, overexposure (shots that are too bright) may result if a flash duration is necessary that is shorter than the flash can deliver. The minimum distance from the subject should be at least 10% of the maximum range indicated on the monitor.
The flash parameters for ISO film speed and the aperture (f-stop) cannot be adjusted on the flash unit.
Digital data exchange takes place between flash unit and camera. Thus the ISO and aperture (f) values are automatically adjusted on the flash unit. In such cases, manual setting of ISO and aperture is not possible!
Technical data
Guide number (at ISO 100/21°, full output, in m/ft)
| 18 mm | 24 mm | 28 mm | 35 mm | 50 mm | 75 mm | 90 mm | 105 mm |
| 25 / 82 | 29 / 95 | 31 / 101 | 35 / 114 | 42 / 137 | 46 / 150 | 52 / 170 | 58 / 190 |
Automatic aperture adjustment (at ISO 100/21°) F0.95 to F45 including intermediate values
Manual partial light output levels P1/1 - P1/256 in one-third increments.
Flash duration 1/125s (at full output) to 1/33000s (at 1/256 output)
Sensor metering angle approx. 25°
Color temperature approx. 5600K
Sensitivity settings ISO 6 to 6400
Synchronisation low voltage IGBT ignition
Number of flashes (at full light output, approx.) 180 with NiMH batteries 1600mAh / 180 with high capacity alkaline manganese batteries
Flash recycle time (at full output, approx.) 5s with NiMH batteries / 5s with high capacity alkaline manganese batteries
Light coverage (based on 35 mm format 24 x 36 mm) Main reflector from 24mm, main reflector with wide-angle diffuser from 18mm, secondary reflector from 35mm, with the diffuser available as accessory up to 16 mm
Swivelling ranges and locking positions of the reflector vertical 7°/45°/60°/75°/90°, horizontal anti-clockwise 30°/60°/90°/120°/150°/180°, horizontal clockwise 30°/60°/90°/120°
Dimensions (WxHxD) 71x148x99mm
Weight (without power sources) 355g
Included in delivery Flash with integrated wide-angle diffuser, bag, mounting base, alkaline manganese batteries, instructions, Warranty Card.
Leica Academy
As well as outstanding high-performance products for taking, reproducing and viewing photographs, for many years we have also been offering the special services of the Leica Academy, with practical seminars and training courses, which are intended to share our knowledge about the world of photography, projection and magnification with both beginners and advanced photographic enthusiasts.
The contents of the courses, which are run by a trained team of experts in the modern, well-equipped training suite at our Solms factory and in the nearby Gut Altenberg, vary from general photography to areas of special interest and offer a range of suggestions, information and advice for your own work. More detailed information and the current Leica Academy brochure are available from:
Leica Camera AG
Leica Akademie
Current information about products, news, events and the Leica company is available on our homepage on the Internet at:
http://www.leica-camera.us
http://www.leica-camera.co.uk
Leica information service
The Leica information service can provide you with an answer to any technical questions relating to the Leica range either in writing, on the telephone or by e-mail.
Leica Camera AG
Leica Customer Service
Leica AG's Customer Service center, or the repair service of the Leica national offices (see the Warranty Card for an address list), is available to assist you in maintaining your Leica equipment or in case of damage. Please contact your nearest authorised Leica dealer.
Leica Camera AG
Customer Service
Troubleshooting....140
Dimensioni (L x A x P) 71x148x99mm
1.17 Interruptor principal
Trademark of the Leica Camera Group
^① = Registered Trademark
Design subject to alterations without notice.
© 2009 Leica Camera AG
2.a. Ausgangslage
Starting position
Menu initial
Fabrieksinstelling
Posizione iniziale
Posición inicial


- Description of parts
- Flash unit
- Monitor displays
- Table of contents
- Disposal of electrical and electronic equipment
- Introduction
- Suitable cameras
- Note:
- Safety instructions
- Preparations
- Power supply
- Suitable disposable / rechargeable batteries
- Notes:
- Insertion and replacement of disposable / rechargeable batteries
- Important:
- Disposal of batteries
- Attaching / removing the LEICA SF 58
- Removal
- Switching the LEICA SF 58 on and off
- Automatic power off
- Monitor illumination
- Menu navigation / setting the functions
- Operating mode menu
- Exposure parameter menu
- Basic settings menu
- The reflectors / flash techniques
- Main reflector
- Swiveling and tilting for bounce flash
- Notes on close-ups:
- Motor zoom adjustment
- Automatic adjustment
- Manual adjustment
- Softer illumination
- Example:
- mm Wide-angle diffuser
- Reflector card for bounce flash
- Secondary reflector for bounce flash
- Displays on the monitor
- Flash-ready indication
- Exposure control indication
- Range indication
- Automatic adjustment of the range indication
- Flash synchronization
- Automatic flash sync speed control
- Normal synchronization
- End of exposure synchronization
- Automatic / manual setting of flash exposure parameters
- Automatic transmission
- Flash operating modes
- TTL flash mode
- TTL flash mode with metering pre-flash
- Automatic TTL fill-in flash mode
- Settings on the camera
- Automatic flash mode
- Displays on the monitor of the flash unit / in the viewfinder of the camera (see also "Displays on the monitor", p. 51)
- Flash exposure compensation
- Dark subject in front of a bright background:
- Bright subject in front of a dark background:
- Manual flash mode
- Strobe flash mode
- Strobe flash number and frequency
- Displays on the monitor of the flash unit/ in the viewfinder of the camera (see also "Displays on the monitor", p. 45)
- Manual partial light output
- Notes on partial light output in combination with strobe mode:
- HSS-High Speed Synchronization
- Basic settings
- Switching over between meters / feet
- Beep function
- Acoustic signal after the flash unit has been turned on
- Beep signals after taking a photograph
- Notes :
- Keylock
- Deactivating the KEYLOCK function
- TestLight
- Using as secondary flash unit
- Setting of partial light outputs and the focal length/reflector position
- Accessories
- Diffuser (Order no. 14 489)
- Care and maintenance
- Firmware update
- Reset
- Conditioning the flash capacitor
- Troubleshooting
- No range indication appears on the monitor.
- "TILT" appears on the monitor
- A battery warning appears on the monitor
- The reflector position is not automatically adjusted to the current zoom position of the lens.
- The secondary reflector cannot be activated or no flash is triggered
- The flash sync speed is not automatically set
- The images are dark at the bottom.
- The shots are too dark.
- The shots are too bright.
- The flash parameters for ISO film speed and the aperture (f-stop) cannot be adjusted on the flash unit.
- Technical data
- Leica Academy
- Leica information service
- Leica Customer Service
- 2.a. Ausgangslage
Brand : LEICA
Model : SF 58
Category : Flash