
HR1367 - Blender PHILIPS - Free user manual and instructions
Find the device manual for free HR1367 PHILIPS in PDF.
| Brand | Philips |
| Model | HR1367 |
| Product type | Multifunction immersion blender |
| Main functions | Blend, chop, slice, grate, whisk |
| Speeds | Normal and Turbo |
| Bowl capacity | Up to 1,000 ml (liquids) |
| Maximum food temperature | 80 °C |
| Overheat protection | Automatic shut-off, 5 min cooling |
| Power supply | 220-240 V (European standard) |
| Care and cleaning | Blades and accessories washable with water; motor block wiped with a damp cloth |
| Safety | Very sharp blades, do not immerse motor block, use pusher |
| Spare parts | Available via Philips or authorized centers |
| Repairability | Repair by Philips or qualified technician |
| Warranty | International warranty, see leaflet |
| Use | Household use only |
Frequently Asked Questions - HR1367 PHILIPS
User questions about HR1367 PHILIPS
0 question about this device. Answer the ones you know or ask your own.
Ask a new question about this device
Download the instructions for your Blender in PDF format for free! Find your manual HR1367 - PHILIPS and take your electronic device back in hand. On this page are published all the documents necessary for the use of your device. HR1367 by PHILIPS.
USER MANUAL HR1367 PHILIPS
natural_image
Product photo of a Philips stand mixer with kitchen utensils and a blender (no visible text or symbols)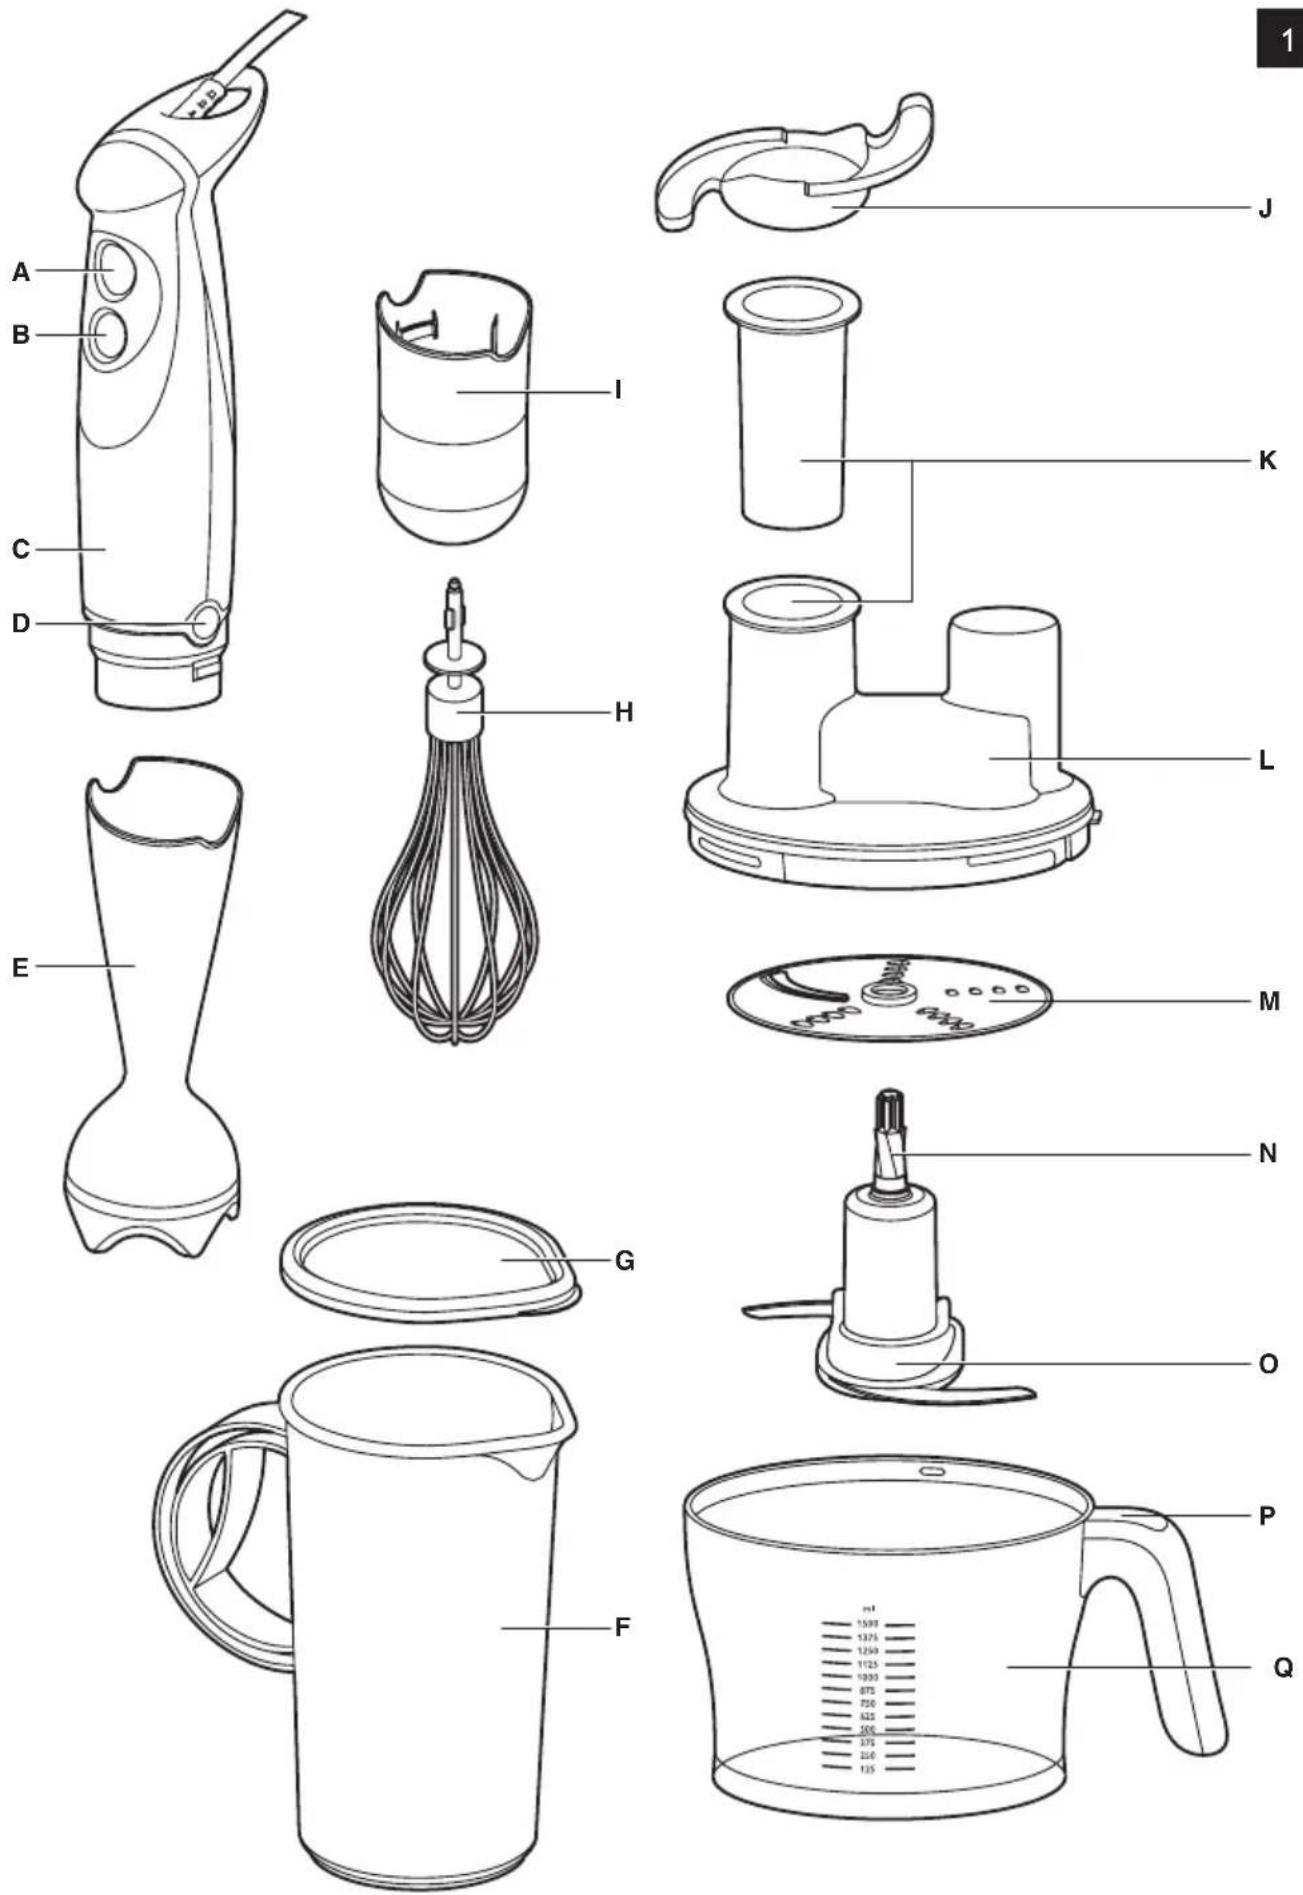
ENGLISH 6
ESPAÑOL 12
FRANÇAIS 18
INDONESIA 24
한국어 30
BAHASA MELAYU 36
PORTUGUÊS 43
ภาษาไทย 49
TIÊNG VIÊT 54
繁體中文 60
简体中文 66
77 العربية
۸۳ فارسی
Introduction
Congratulations on your purchase and welcome to Philips! To fully benefit from the support that Philips offers, register your product at www.philips.com/welcome.
General description (Fig. 1)
A Normal speed button
B Turbo speed button
C Motor unit
D Release buttons
E Blender bar
F Beaker
G Beaker lid
H Whisk
I Whisk coupling unit
J Protective cover of blade unit
K Pusher
L Lid of bowl
M Combination disc (slicing/shredding)
N Tool holder
- Blade unit
P Lid release button
Q Bowl
Important
Read this user manual carefully before you use the appliance and save it for future reference.
Danger
- Never immerse the motor unit in water or any other liquid, nor rinse it under the tap. Only use a moist cloth to clean the motor unit.
Warning
- Check if the voltage indicated on the appliance corresponds to the local mains voltage before you connect the appliance.
- Do not use the appliance if the plug, the mains cord or other parts are damaged.
- If the mains cord is damaged, you must have it replaced by Philips, a service centre authorised by Philips or similarly qualified persons in order to avoid a hazard.
- This appliance is not intended for use by persons (including children) with reduced physical, sensory or mental capabilities, or lack of experience and knowledge, unless they have been given supervision or instruction concerning use of the appliance by a person responsible for their safety.
- Children should be supervised to ensure that they do not play with the appliance.
- Never use your fingers or an object (e.g. a spatula) to push ingredients down the feeding tube while the appliance is running. Only use the pusher for this purpose.
- Do not touch the blades of the blender bar, especially when the appliance is plugged in. The blades are very sharp.
- If the blades get stuck, unplug the appliance before you remove the ingredients that block the blades.
- Be very careful when you handle or clean the blade unit or the combination disc. Their cutting edges are very sharp. Be especially careful when you clean them and when you empty the bowl.
Caution
- Always unplug the appliance after use, before you change accessories or before you approach parts that move during use.
- This appliance is intended for household use only.
- Do not exceed the quantities and processing times indicated in the tables.
- Do not exceed the maximum level indication on the bowl.
- Do not process more than three batches without interruption. Let the appliance cool down to room temperature before you continue processing.
- Never use any accessories or parts from other manufacturers or that Philips does not specifically recommend. If you use such accessories or parts, your guarantee becomes invalid.
- The bowl is not suitable for use in microwave ovens.
Electromagnetic fields (EMF)
This Philips appliance complies with all standards regarding electromagnetic fields (EMF). If handled properly and according to the instructions in this user manual, the appliance is safe to use based on scientific evidence available today.
Overheat protection
This appliance is equipped with overheat protection. If the appliance overheats, it switches off automatically. Unplug the appliance and let it cool down for 5 minutes. Then put the mains plug back into the wall socket and switch on the appliance again. Please contact your Philips dealer or an authorised Philips service centre if the overheat protection is activated too often.
Before first use
Thoroughly clean the parts that come into contact with food before you use the appliance for the first time (see chapter 'Cleaning').
Preparing for use
1 Assemble the appliance properly before you put the plug in the wall socket.
2 Cut large ingredients into pieces of approximately 2cm before you process them.
3 Let hot ingredients cool down before you chop them or pour them into the beaker (max. temperature 80^ C).
Using the appliance
Hand blender
The hand blender is intended for:
- blending fluids, e.g. dairy products, sauces, fruit juices, soups, mixed drinks and shakes.
- mixing soft ingredients, e.g. pancake batter or mayonnaise.
- pureeing cooked ingredients, e.g. for making baby food.
1 Attach the blender bar to the motor unit ('click') (Fig. 2).
2 Put the ingredients in the beaker.
See the table below for the recommended quantities and processing times.
Blending quantities and preparation times
Ingredients Blending quantity Time
Fruits & vegetables 100-200g 30sec.
Baby food, soups & sauces 100-400ml 60sec.
Batters 100-500ml 60sec.
Shakes & mixed drinks 100-1000ml
60sec.
3 Immerse the blade guard completely in the ingredients to avoid splashing (Fig. 3).
4 Press and hold the normal or turbo speed button to switch on the appliance (Fig. 4).
Note: When you use the turbo speed button, the appliance operates at maximum speed.
5 Blend the ingredients by moving the appliance slowly up and down and in circles (Fig. 5).
Food processor
Blade unit
The blade unit is intended for chopping ingredients such as nuts, meat, onions, hard cheese, boiled eggs, garlic, herbs, dry bread etc.
The blades are very sharp! Be very careful when you handle the blade unit, especially when you remove it from the bowl, when you empty the bowl and during cleaning.
1 Place the tool holder in the bowl (Fig. 6).
2 Remove the protective cover from the blade unit.
3 Put the blade unit on the tool holder (Fig. 7).
4 Put the ingredients in the bowl.
See the table below for the recommended quantities and processing times.
Chopping quantities and processing times
Ingredients Quantity Time
Parsley 100g 30sec.
Onions & eggs 500g 7 × 1sec.(pulse)
Meat 300g 30sec.
Parmesan 300g \~ 60sec.
Nuts 500g \~ 30sec.
Dark chocolate 200g \~ 45-60sec.
5 Put the lid on the bowl (1). Turn the lid anticlockwise (2) to fix it ('click') (Fig. 8).
6 Fasten the motor unit onto the lid of the bowl ('click') (Fig. 9).
7 Put the pusher in the feeding tube.
Note: The pusher prevents spillage.
8 Press and hold the normal or turbo speed button to switch on the appliance (Fig. 4).
Note: If the ingredients stick to the wall of the bowl, release the button to switch off the appliance and loosen the ingredients with a spatula or add some liquid.
Note: Always let the appliance cool down after chopping meat with the blade unit.
9 After processing, press the lid release button on the bowl (1) and then turn the lid clockwise to remove it (2). (Fig. 10)
Tips
- The appliance chops very quickly. Use the normal speed button or the turbo speed button. If you use the turbo speed button, use it briefly to prevent the food from becoming too finely chopped.
- Do not let the appliance run too long when you chop (hard) cheese or chocolate. Otherwise these ingredients become too hot, start to melt and turn lumpy.
- Do not use the blade unit to chop very hard ingredients like coffee beans, turmeric, nutmeg and ice cubes, as this may cause the blade to get blunt.
Combination disc
The combination disc is intended for slicing and shredding vegetables like cucumber, carrots, potatoes, leek and onions and certain kinds of cheese. One side is intended for slicing and the other side for shredding. You can switch from slicing to shredding and the other way round by simply turning the disc.
Never process hard ingredients like ice cubes with the disc.
The cutting edges of the disc are very sharp. Do not touch them.
1 Place the tool holder in the bowl (Fig. 6).
2 Place the combination disc on the tool holder with the slicing or shredding side facing up, depending on the result you want (Fig. 11).
3 Put the lid on the bowl (1). Turn the lid anticlockwise (2) to fix it ('click') (Fig. 8).
4 Put the ingredients in the feeding tube.
- Pre-cut large ingredients into chunks that fit in the feeding tube.
- Fill the feeding tube evenly for the best results.
- When you have to process a large amount of ingredients, process small batches and empty the bowl between batches.
- To shred cheese, e.g. Parmesan, Gouda or Emmentaler, the cheese should be at refrigerator temperature.
5 Fasten the motor unit onto the lid of the bowl ('click') (Fig. 9).
6 Press and hold the normal or turbo speed button to switch on the appliance (Fig. 4).
7 Press the pusher lightly onto the ingredients in the feeding tube.
Whisk
The whisk is intended for whipping cream, whisking egg whites, desserts etc.
1 Connect the whisk to the coupling unit (Fig. 12).
2 Connect the coupling unit to the motor unit ('click') (Fig. 13).
3 Put the ingredients in a bowl.
Whisking quantities and processing times
Ingredients Quantity Time
Cream 250ml 70-90sec.
Egg white 4 eggs 120sec.
Note: Do not process more than 1 batch without interruption. Let the appliance cool down to room temperature before you continue processing.
4 Immerse the whisk completely in the ingredients. To avoid splashing, start processing at normal speed by pressing the normal speed button. (Fig. 14)
5 Continue with turbo speed after approx. 1 minute by pressing the turbo speed button.
Cleaning (Fig. 15)
Do not immerse the motor unit, the whisk coupling unit or the lid of the bowl in water. Clean these parts with a moist cloth.
Never use scouring pads, abrasive cleaning agents or aggressive liquids such as petrol or acetone to clean the appliance.
Clean the blender bar blades, the blade unit and the combination disc very carefully. Their cutting edges are very sharp.
1 Unplug the appliance.
2 Press the release buttons on the motor unit to remove the blender bar, the whisk coupling unit or to detach the motor unit from the lid of the bowl.
3 Remove the detachable parts, if any.
4 See the separate cleaning table for further instructions.
5 Put the protective cover on the blade unit after cleaning.
Environment
- Do not throw away the appliance with the normal household waste at the end of its life, but hand it in at an official collection point for recycling. By doing this you help to preserve the environment (Fig. 16).
Guarantee and service
If you need service or information or if you have a problem, please visit the Philips website at www.philips.com or contact the Philips Consumer Care Centre in your country (you find its phone number in the worldwide guarantee leaflet). If there is no Consumer Care Centre in your country, go to your local Philips dealer.
Storage
1 Put the blade unit and the combination disc on the tool holder and store them in the bowl.
2 Place the lid on the bowl.
Troubleshooting
This chapter summarises the most common problems you could encounter with the appliance. If you are unable to solve the problem with the information below, contact the Consumer Care Centre in your country.
Problem Solution
| The appliance does not work. | This appliance is equipped with overheat protection. If the appliance overheats, it switches off automatically. Unplug the appliance and let it cool down for 5 minutes. Then put the mains plug back into the wall socket and switch on the appliance again. Please contact your Philips dealer or an authorised Philips service centre if the overheat protection is activated too often |
| The motor unit gives off an unpleasant smell the first few times the appliance is used. | This is not unusual. If the appliance continues to give off this smell after a few times, check the quantities you are processing and the processing time. |
Problem Solution
The appliance makes a lot of noise, gives off an unpleasant smell, is too hot to touch, gives off smoke etc.
Stop using the appliance and unplug it. Go to the nearest Philips service centre or your dealer for assistance.
Recipes
Fruit bread recipe
- 150g dates
- 225g prunes
- 50g almonds
- 50g walnuts
- 100g raisins
- 200g whole rye flour
- 100g wheat flour
- 100g brown sugar
- 1 dash salt
- 1 sachet baking powder
- 300ml buttermilk
1 Put the ingredients, except the buttermilk, in the bowl in the following order: dates, prunes, almonds, walnuts, raisins, whole rye flour, wheat flour, brown sugar, salt and baking powder.
2 Carefully flatten the mass with your hands.
3 Add the buttermilk.
4 Mix the ingredients at the turbo setting for max. 5 seconds.
5 Put the mixed dough into a rectangular baking tin and bake it for 40 minutes at 170^ .
Introducción
Ramuan: Kuantiti membancuh Tempoh
Buah-buahan & sayur-sayuran 100-200g 30saat
Makanan bayi, sup & sos 100-400ml 60saat
Adunan tepung 100-500ml 60saat
Minuman kocak & minuman 100-1000ml 60saat campur
Ramuan: Kuantiti Tempoh
| Parsli 100g | 30saat | |
| Bawang & telur | 500g | 7 × 1saat (denyut) |
| Daging | 300g | 30saat |
| Parmesan | 300g | ~ 60saat |
| Kacang | 500g | ~ 30saat |
| Coklat tanpa susu | 200g | ~ 45-60saat |
Ramuan: Kuantiti Tempoh
Krim 250ml 70-90saat
Putih telur 4 biji telur. 120saat
3 public school in the United States is a college of 1980. The public school has been a college of 1980, and it is a college of 1980.
Cách sử dụng máy
The image is too blurry to recognize any text content.
The image is too blurry to recognize any text content.
مقدمة

- Introduction
- General description (Fig. 1)
- Important
- Danger
- Warning
- Caution
- Electromagnetic fields (EMF)
- Overheat protection
- Before first use
- Preparing for use
- Using the appliance
- Hand blender
- Blending quantities and preparation times
- Ingredients Blending quantity Time
- Food processor
- Blade unit
- Chopping quantities and processing times
- Ingredients Quantity Time
- Tips
- Combination disc
- Whisk
- Whisking quantities and processing times
- Cleaning (Fig. 15)
- Environment
- Guarantee and service
- Storage
- Troubleshooting
- Problem Solution
- Recipes
- Fruit bread recipe
- Introducción
- Ramuan: Kuantiti membancuh Tempoh
- Ramuan: Kuantiti Tempoh
- Cách sử dụng máy
- مقدمة
Brand : PHILIPS
Model : HR1367
Category : Blender