
Daily Collection HR2011 - Blender PHILIPS - Free user manual and instructions
Find the device manual for free Daily Collection HR2011 PHILIPS in PDF.
| Product type | Blender |
| Brand | Philips |
| Model | Daily Collection HR2011 |
| Maximum capacity (cold liquids) | 1.25 L |
| Maximum capacity (hot liquids) | 1 L |
| Bowl material | Glass |
| Number of speeds | 2 + Pulse |
| Pulse function | Yes |
| Mill function | Yes (models HR2011/HR2001) |
| Filter function | No (optional) |
| Sound level | 86 dB(A) |
| Safety | Integrated safety lock |
| Max operating time (blender) | 3 minutes |
| Max operating time (mill) | 30 seconds |
| Cleaning of removable parts | Dishwasher |
| Cleaning the motor block | Damp cloth (do not immerse) |
| Blade material | Stainless steel |
| Control type | Rotary knob |
| Level indicator | Yes (on the bowl) |
| Included accessories | Blender jug, lid, graduated measuring cup, blade set, sealing ring, mill |
| Warranty | International (see leaflet) |
Frequently Asked Questions - Daily Collection HR2011 PHILIPS
User questions about Daily Collection HR2011 PHILIPS
0 question about this device. Answer the ones you know or ask your own.
Ask a new question about this device
Download the instructions for your Blender in PDF format for free! Find your manual Daily Collection HR2011 - PHILIPS and take your electronic device back in hand. On this page are published all the documents necessary for the use of your device. Daily Collection HR2011 by PHILIPS.
USER MANUAL Daily Collection HR2011 PHILIPS
Congratulations on your purchase and welcome to Philips! To fully benefit from the support that Philips offers, register your product at www.philips.com/welcome.
Important
Read this user manual carefully before you use the appliance and save it for future reference.
General
Danger
- Never immerse the motor unit in water or any other liquid, nor rinse it under the tap. Use only a moist cloth to clean the motor unit.
Warning
- Check if the voltage indicated on the appliance corresponds to the local mains voltage before you connect the appliance.
- If the mains cord is damaged, you must have it replaced by Philips, a service centre authorised by Philips or similarly qualified persons in order to avoid a hazard.
- Do not use the appliance if the plug, the mains cord or other parts are damaged.
- Never use the blender jar or mill beaker to switch the appliance on and off.
- Never let the appliance run unattended.
- This appliance is not intended for use by persons (including children) with reduced physical, sensory or metal capabilities, or lack of experience and knowledge, unless they have been given supervision or instruction concerning use of the appliance by a person responsible for their safety.
- Children should be supervised to ensure that they do not play with the appliance.
- Do not touch the blades, especially when the appliance is plugged in. The blades are very sharp.
- If the blades get stuck, unplug the appliance before you remove the ingredients that block the blades.
- Never place the blade unit onto the motor unit if the blender jar or mill beaker (specific types only) is not or not properly attached to it.
Caution
- Always unplug the appliance before you assemble, disassemble or make adjustments to any of the parts.
- Never use any accessories or parts from other manufacturers or that Philips does not specifically recommend. If you use such accessories or parts, your guarantee becomes invalid.
- Always let the appliance cool down to room temperature after each batch you process.
- Noise level: Lc = 86 dB( A)
Blender
Warning
- Never reach into the blender jar with your fingers or an object while the appliance is running.
- Make sure the blade unit is securely fastened to the blender jar before you assemble the blender jar onto the motor unit.
Caution
- Never fill the blender jar with ingredients hotter than 80^ C .
- To prevent spillage, do not put more than 1.25 litres of liquid in the blender jar, especially when you process at a high speed. Do not put more than 1 litre in the blender jar when you process hot liquids or ingredients that tend to foam.
- If food sticks to the wall of the blender jar, switch off the appliance and unplug it. Then use a spatula to remove the food from the wall.
ENGLISH14
- Always make sure the lid is properly closed/assembled on the jar and the measuring cup is inserted properly in the lid before you switch on the appliance.
- Never forget to place the sealing ring on the blade unit before you connect the blade unit to the blender jar, otherwise leakage will occur.
- Do not let the appliance run for more than 3 minutes at a time.
- Always let the appliance cool down to room temperature after each batch you process.
Mill (HR2011/HR2001 only)
Warning
- Never use the mill to grind very hard ingredients such as nutmeg, Chinese rock sugar and ice cubes.
- Do not touch the cutting edges of the mill blade unit when you clean it. They are very sharp and you could easily cut your fingers on them.
Caution
- Never use the mill for more than 30 seconds without interruption. Let the mill cool down for at least 1 minute between processing cycles.
- Never forget to place the sealing ring in the blade unit before you assemble the mill jar, otherwise leakage occurs.
- Always process cloves, star anise and aniseed together. If processed separately, these ingredients may attack the plastic materials of the appliance.
- The mill beaker may become discoloured when you use the mill to process ingredients such as cloves, anise and cinnamon.
- The mill is not suitable for chopping raw meat. Use the blender instead.
- Do not use the mill to process liquids such as fruit juice.
Filter (HR2004 only)
Caution
- Never use the filter to process ingredients hotter than 80^ .
- Never overload the filter. Do not put more than 60g dried soy beans or 120g fruit in the filter at the same time.
- Always make sure the lid is closed/assembled properly and the measuring cup is inserted properly in the lid before you switch on the appliance.
- Cut fruit into smaller pieces before you put it in the filter.
- Soak dried ingredients, such as soy beans, before you put them in the filter.
Electromagnetic fields (EMF)
This Philips appliance complies with all standards regarding electromagnetic fields (EMF). If handled properly and according to the instructions in this user manual, the appliance is safe to use based on scientific evidence available today.
Built-in safety lock
This feature ensures that you can only switch on the appliance if you have properly assembled the blender jar or mill beaker on the motor unit. If the blender jar or mill beaker is correctly assembled, the built-in safety lock will be unlocked.
General description (Fig. 1)
A Motor unit
B Control knob with pulse setting and speed settings
Blender with plastic jar (HR2004/HR2001/HR2000 only):
C Blender blade unit
D Sealing ring
E Plastic blender jar
F Level indication
G Hinged lid of plastic blender jar
H Opening in lid
Fruit filter (HR2004 only)
J Measuring cup
Mill (HR2011/HR2001 only):
K Mill blade unit
L Mill sealing ring
M Mill beaker
Blender with glass jar (HR2011/HR2010 only):
N Blender blade unit
Sealing ring
P Level indication
Glass blender jar
R Lid of glass blender jar
S Opening in lid
T Measuring cup
Getting started
Thoroughly clean the parts that come into contact with food before you use the appliance for the first time (see chapter 'Cleaning').
Using the appliance
Blender
The blender is intended for fine pureeing, chopping and blending. With the blender you can prepare soups, sauces and milk shakes. You can also use it to process vegetables, fruit, meat, pancake batter etc.
Preparing the blender for use
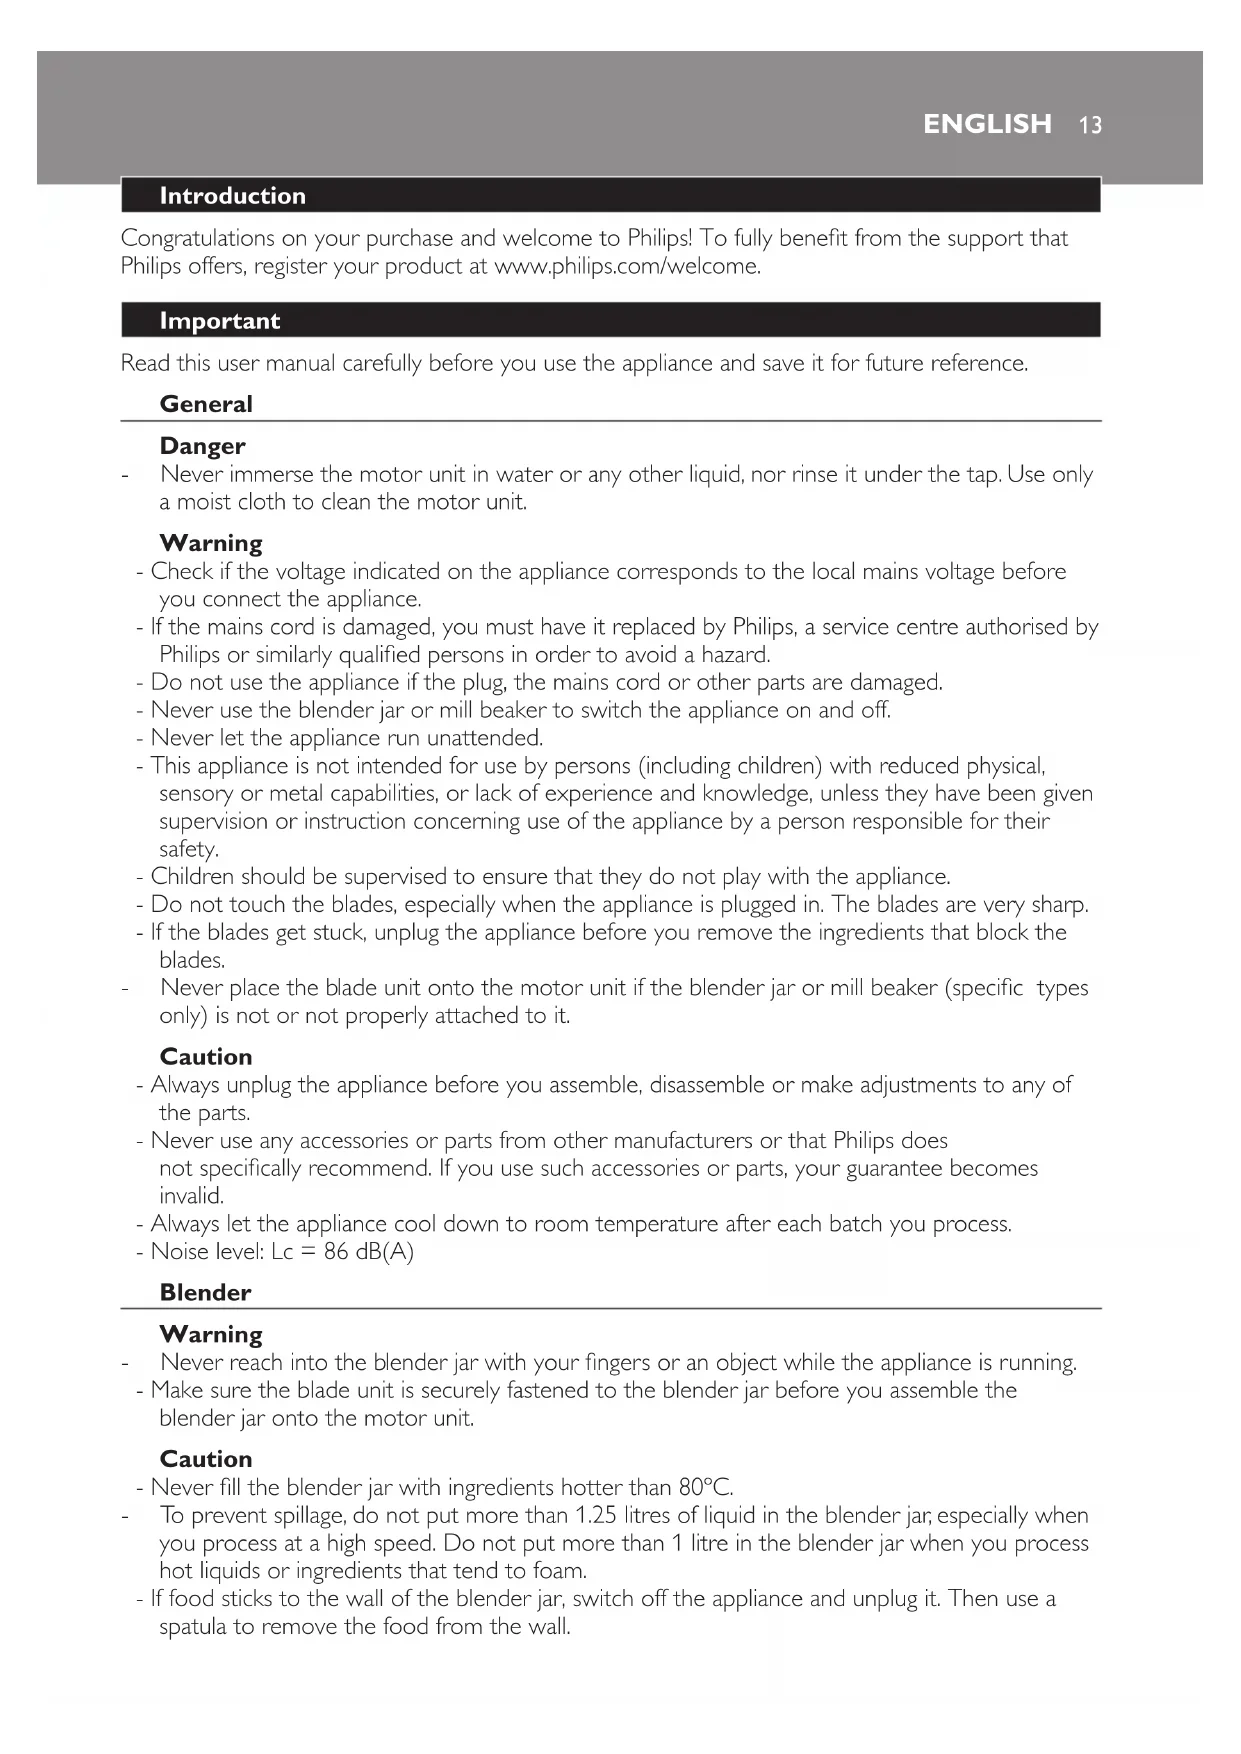
1 Assemble the sealing ring on the blender blade unit (Fig. 2).
Screw the blade unit onto the bottom of the blender jar until the blade unit it is fixed properly. (Fig. 3)
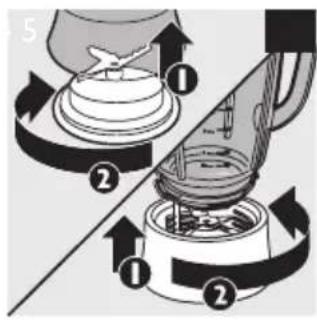
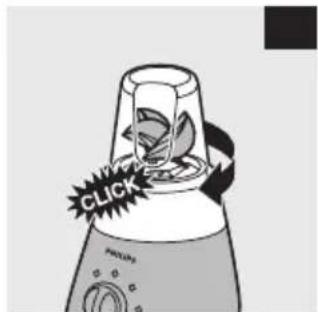
3 Put the blender jar with the blade unit attached on the motor unit and fix it by turning it clockwise ('click'). (Fig. 4)
The blender jar can be mounted in two positions: with the handle on the right side or on the left side.
Put the mains plug in the wall socket.
Using the blender
Put the ingredients in the blender jar.
2 Close the lid.
HR2011/HR2010: Place the lid on the blender jar, push it down and turn the lid clockwise ('click').
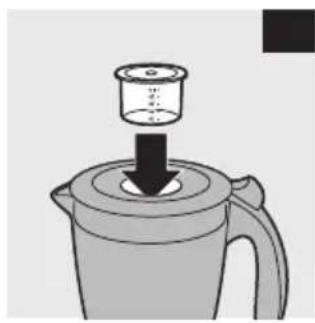
3 Insert the measuring cup into the opening in the lid. (Fig. 5)
ENGLISH16
4 Turn the control knob to speed 1 or 2.
Turn the control knob to the pulse setting if you want to process ingredients very briefly.
Tips
- If you want to crush ice cubes, put not more than 6 ice cubes (of approx. 25 × 35 × 25 ~mm ) in the blender jar and turn the control knob to pulse position a few times.
- Cut meat or other solid ingredients into smaller pieces before putting them in the blender jar.
- Do not process a large quantity of solid ingredients at the same time. To get good results, we advise you to process these ingredients in a series of small batches.
- To make tomato juice, cut the tomatoes in four and drop the pieces through the opening in the lid onto the rotating blades.
Disassembling the blender
1 Remove the mains plug from the wall socket.
2 Remove the lid with the measuring cup from the blender jar.
3 Turn the blender jar with the blade unit attached to remove it from the motor unit.
4 Clean all removable parts immediately after use (see chapter 'Cleaning').
Filter (HR2004 only)
With the filter you can make delicious fresh fruit juices, cocktails or soy milk. The filter prevents pips and skins from ending up in your drink.
You can order the filter for the HR2000 as an extra accessory from your Philips dealer.
Never overload the filter. Do not put more than 60g of soy beans (unsoaked weight) or 120g of fruit in the filter at the same time.
Preparing the filter for use
1 Mount the blender jar with the blade unit attached on the motor unit and fix it by turning it clockwise ('click') (Fig. 4).
The blender jar can be mounted in two positions: with the handle on the right side or on the left side.
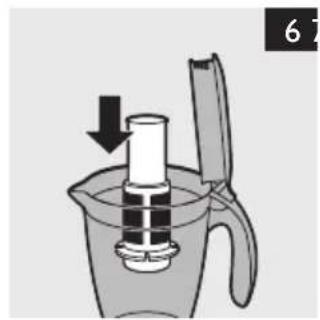
Put the filter in the blender jar (Fig. 6).
Make sure that the grooves of the filter fit exactly onto the ribs inside the blender jar.
3 Put the mains plug in the wall socket.
Using the filter
1 Place the lid on the blender jar.
2 Put the ingredients in the filter. (Fig. 7)
Do not exceed the MAX indication on the sieve mesh.
Pour water or another liquid (milk, juice, etc.) into the blender jar.
4 Insert the measuring cup into the hole in the lid.
5 Let the appliance run for approx. 40 seconds.
Switch off the appliance and remove the blender jar with the blade unit attached from the motor unit.
Do not open/remove the lid. Leave the measuring cup and the filter in the jar.
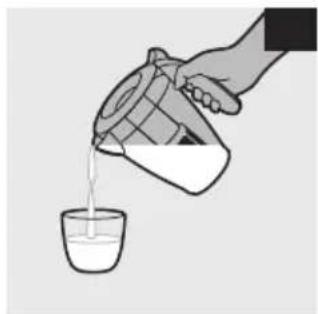
Pour out the drink through the pouring lip of the blender jar. (Fig. 8)
Tip: For optimal results, put the jar with the remaining ingredients back onto the appliance and let it run for a few more seconds.
Note: When you process a large quantity, we advise you not to put all the ingredients in the filter at the same time. Start to process a small quantity and let the appliance run for a few seconds. Then switch off the appliance and add another small quantity. Repeat this procedure until you have processed all the ingredients. Always keep the lid on the blender jar during processing.
8 Clean all removable parts immediately after use (see chapter 'Cleaning').
Mill (HR2011/HR2001 only)
Using the mill
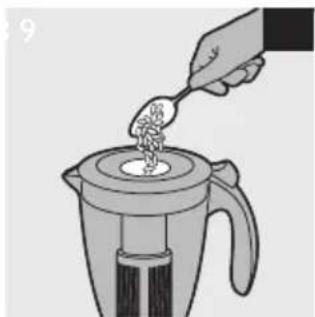
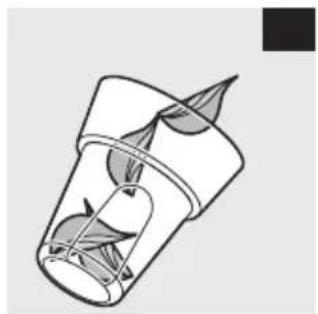
Put the ingredients in the mill beaker (Fig. 9).
You can process wet and dry ingredients.
Do not fill the mill beaker beyond the MAX indication.
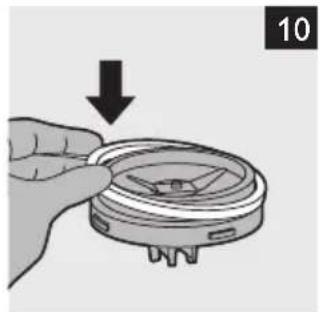
2 Place the sealing ring on the mill blade unit. (Fig. 10)
Make sure that the rubber sealing ring is placed correctly.
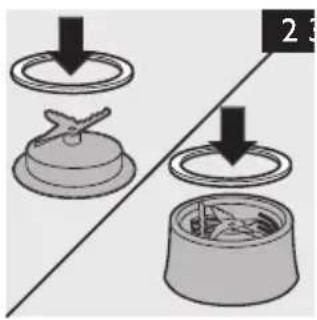
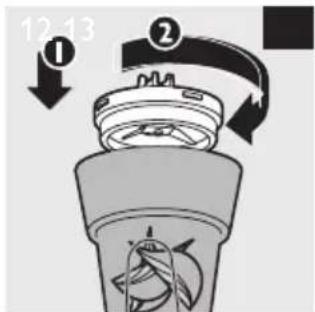
3 Put the mill blade unit on the mill beaker (1) and screw the blade unit anticlockwise (2) until it is fixed properly. (Fig. 11)
4 Turn the assembled mill upside down and screw it clockwise onto the motor unit ('click') (Fig. 12).
Put the mains plug in the wall socket.
Switch on the appliance and let it run until the ingredients are fine enough.
This takes approx. 10-30 seconds.
Disassembling the mill
Unplug the appliance.
Screw the mill anticlockwise off the motor unit.
3 Turn the mill upside down and screw the blade unit clockwise off the mill beaker.
4 Clean all removable parts immediately after use (see chapter 'Cleaning').
Cleaning
Always unplug the appliance before you clean it.
Never immerse the motor unit in water, nor rinse it under the tap. Do not clean the motor unit in the dishwasher.
Never use scouring pads, abrasive cleaning agents or aggressive liquids such as petrol or acetone to clean the appliance.
Tip: Cleaning the appliance and its parts is easiest immediately after use.
1 Make sure the appliance is unplugged.
2 Disassemble all removable parts.
Do not forget to remove the blender sealing ring and the mill sealing ring (HR2011/HR2001 only).
Do not touch the blades. The blades are very sharp.
3 Clean the motor unit with a moist cloth.
ENGLISH18
4 Clean the removable parts in hot water with some washing-up liquid.
Note: All parts except for the motor unit can be cleaned in the dishwasher.
Storage
1 To store the mains cord, wind it round the base of the motor unit.
Disposal
- Do not throw away the appliance with the normal household waste at the end of its life, but hand it in at an official collection point for recycling. By doing this, you help to preserve the environment (Fig. 13).
Guarantee and service
If you need information or if you have a problem, please visit the Philips website at www.philips.com or contact the Philips Customer Care Centre in your country (you find its phone number in the worldwide guarantee leaflet). If there is no Customer Care Centre in your country, go to your local Philips dealer or contact the Service Department of Philips Domestic Appliances and Personal Care BV.
Recipes
Soy milk
Note: This recipe can only be prepared with the filter (HR2006/HR2004 only). You can order the filter for the HR2000 as an extra accessory from your Philips dealer.
Always let the appliance cool down to room temperature after each batch you process. Do not process more than two batches without interruption.
Ingredients
Soak the soy beans for 4 hours before you process them. Then let them drain.
2 Put the soaked soy beans in the filter and pour the water into the blender jar. Blend for 30 seconds.
Pour the soy milk into a pan and bring to the boil. Then add some sugar and let the soy milk simmer until all sugar has dissolved.
4 Serve hot or cold.
Nourishing vegetable soup from Budapest
Ingredients
- 100g kohlrabi
- 150g potatoes
- 150g celery
- 50g carrots
- 100g smoked pork
- 0.55ltr water
- 100g lentils (canned)
- 125g crème fraîche
- 10g parsley
- salt, freshly ground pepper, 1 stock cube, 1 bay leaf
1 Precut the ingredients into pieces of 2 × 2 × 2 ~cm .
2 Put the kohlrabi, potatoes, celery, carrots and 0.35ltr water in the blender jar in this order. Then blend for 30 seconds.
3 Put the blended ingredients in a pan and bring them to boil. Add the rest of the water (0.2ltr), crème fraîche, lentils, meat, herbs, stock cube and seasonings.
4 Let the soup simmer for 30 minutes. Stir the soup regularly.
Introduction
cui 00000000000000000000000000000000000000
go gao jyie jyjgigo aegj ydi yd dai jyogaj j, oj gj yj yj gj wj
sialgcu
aaii jia jia jia jia jia jia jia jia jia jia jia jia jia jia jia jia jia jia jia jia jia jia jia jia jia jia jia jia jia
a 1 a
jll jai jn jnnl lto jg g abuill aabill lgo gl dall agi
.01pplxixw2l 1j jgj gjgjjgjjgjjgjjgjjgjjgjjgjjgjjgjjgjjgjjgjjgjjgjjgjjgjjgjjgjjgjjgjjgjjgjjgjjgjjgjjgjjgjjgjjgjjgjjgjjgjjgjjgjjgjjgjjgjjgjjgjjgjjgjjgjjgjjgjjgjjgjjgjjgjjgjjg
1
.
HR2001/HR2011 jbb) aabll bals yswill gio adbgs bksll aolsll gio ad
( b + a) ( a^2 - bx + c) = 0
.
.
a bll lsw no a pluwl y slw cll g dall alll jx abi
gagll clttw: glbX allwie g aebill alloe eaoa: abdo
#
gagd g aclggey
jIqill no calssll
aay aai abai jai yaoi oaiy ioluiai jiaie ayell adjiall alssal ge jai 00
(17)
#
Jc Philips aIy jy gagall aJj y alCio sclgloal Jd
(1)
aip aip paaip gai apalllnll Philips ego jggi dsiocdo sgs gac all
BV aaxll aIcJg aJjaiiPhilips
#
gall
ab dSag. (baa HR2004/HR2006 jball) aolll plsiw go x! aogll diaa:
. d. oll Philips a j 1 e g0 no f l aol HR2000 j, bll
Lg 10000000000000000000000000000000000000000000000000
g jagnol Jgogll crjgialg 451
. Philips aegg ego gao a! gnS HR2000 jbl daaa b
j0 p1j. g1 (gaii li jgi) lgall jg no plj 7. no jil x. glaill aew nc duij clus
.
plssuusll jaaaljq
a 10000000000000000000000000000000000000000000
(J)(”a)
y 1
(7 J5w) bslll ceg a dlaall
.
.
alaaall plssii
. bslsl clg Jc 1b2ll
(VJ) aolll goll
.aaall aW Jc gagall (MAX) wai jwgo sbu
. bslll clog g (aLw lo gJ rcaell g J clall) jI JlW g I clll
aalaae aae aeall
L
gall aag no clll llo bssll clg s jglj
.
(1)
aag aegg jglll g aaiall agioll go cagll gao yio jolao
aaiy iayi ayolg oyo elaooll gcligoll jg po: dauu, clogfoll no ays siae: ab
1 1
Jusill bslil ceg Jc bll gog Jc lau oJ. 1soll jns
"abill" 155
(bio HR2001/HR2011 jyall) aolll
aibball plsi
(9 J) aioball clog aoligcal
a.bjglg all cigfoll jai ball plxilol
. aai ball 1iagoll gog iic (MAX) wai I Iwio hsiu
.(1.)aiboll aJg 1e yswill gao
aal llll aal ball gao aol no
()aclllbocolcglsagalbsallggsj(1)aballcloglacbball
(11)
.(rJ)piall Jcill bclll ceg e aol laoa
R
.(εJ)("aai)ac[
y
.
boll plsi
.bslllcoggcligoll
.
("a) aclll bacn ag gaggagagagagagagagagagagagagagagagagagagagagagagagagagagagagagagagagagagagagagagagagagagagagagagagagagagagagagagag
(0)
.1g1 aeyll 1e! Je pssll ciao s
J 1
zai
p bslll ceg j (yra po roxroxro slej) 7 no 28,dll ofo rssu
yall gddgddgagdlaia
. 1
aegcagccg cagccg daaagaaagaaagaaagaaagaaagaaagaaagaaagaaagaaagaaagaaagaaagaaagaaagaaagaaagaaagaaagaaagaaagaaagaaagaaagaaagaaagaaagaaagaaagaaagaaagaaagaaagaaagaaagaa
j
a 1
bollld 4yj
.1
. bslll clg no ayleall wls g lbsll
gagd g no dal aol bssll ceg
"abill Jg jbil) 1pplxwl 1dall alll 1jx
y
. 111111111111111111111111111111111111111111111111111111111
(baHR2004jybl) jiaoll
aagao aonn n 1g jyj yj clogsoyn j glacall gssx
g aolll no p1r7 g aolll gno p1j 7. no jy jy jy aolll neo n c djl jyosnnx
jglal jall jdall
jglal jall jglal jglal jglal jglal jglal jglal jglal jglal jglal jglal jglal jglal jglal jglal jglal jglal jglal jglal jglal jglal jglal jglal jglal jglal jglal jglal jglal jglal jglal jglal jglal jglal jglal jglal
(EMF) awwbliogyglgssll
Li Li JIJI LIO plxu (EMF) aui bieogyll jaoaiaeaiall aeis go golgo Philips oJepal li .pall agial qalell xll cllig dia puaill lglgll claeell nnnn nn
Jll Joo
Jllgall g Jiaiball ceg g balsll ceg yy plo jall Jw poc ao aol jaiall add
(1J)plll
gigall aag
acjll lgl g yll lcxly lgjo pcll ciao
HR2000/HR2001/HR2004 jbll) clwll cegll gjbls
bokol oljao aag
yuniill gao dia
b_sll all SssScc
sgnall zuo
all elegy 1234567890
cdef
(bss HR2004jbl) aqslal alco
ai a ai 的最小值为 k .
HR2001/HR2011jbl)
aiball jia xing 2ally wail gao
S OBC = S BOC + S_ BOC
#
Jc djiu jnPhilipsdoai gill pcll no aolll daiaawll !Philips pIe c y bjogjglld jy Jc gno .www.philips.com/welcome
pLo
aall aagll blaal gjgl plaii jaiie li paae
#
jlaeabg ywul ba .yall giall cfo aai abai xgi jilw gl clall g l jggal dag jao 2 X
#
aIgll jglj glaal lglal glgall gagl algo go y 1
abwlg g Ieio aieo dgl s o g Philips gbrn c agdll u bgyll lllll ll alld 1
bllg gdlg jol n g 1234567890123456789012345678901234567890123456789012345678901234567890123456789012345678901234567890123456789
#
Jia caiiwl l. Philips aI y g i 150 o jg 150 150 150 150 150 150 150 150 150 150 150 150 150 150 150 150 150 150 150 150 150 150 150 150 150 15
4
jglll jieiie bslll ceg g syl alg lgl eao gog jglx 1
#
aagto aynn e gjz ybjcog sbllclg jai x 10000000000000000000000000000000000000000000000000000000000000000000000000000000000000000000


- Important
- General
- Danger
- Warning
- Caution
- Blender
- ENGLISH14
- Mill (HR2011/HR2001 only)
- Filter (HR2004 only)
- Electromagnetic fields (EMF)
- Built-in safety lock
- General description (Fig. 1)
- Mill (HR2011/HR2001 only):
- Blender with glass jar (HR2011/HR2010 only):
- Getting started
- Using the appliance
- Preparing the blender for use
- Using the blender
- ENGLISH16
- Tips
- Disassembling the blender
- Preparing the filter for use
- Using the filter
- Using the mill
- Disassembling the mill
- Cleaning
- ENGLISH18
- Storage
- Disposal
- Guarantee and service
- Recipes
- Soy milk
- Ingredients
- Nourishing vegetable soup from Budapest
- Introduction
- #
- jIqill no calssll
- gall
- plssuusll jaaaljq
- alaaall plssii
- (bio HR2001/HR2011 jyall) aolll
- aibball plsi
- boll plsi
- zai
- bollld 4yj
- (baHR2004jybl) jiaoll
- (EMF) awwbliogyglgssll
- Jll Joo
- (1J)plll
- pLo
- 4
Brand : PHILIPS
Model : Daily Collection HR2011
Category : Blender