
Pure Essentials Collection HD4409 - Barbecue PHILIPS - Free user manual and instructions
Find the device manual for free Pure Essentials Collection HD4409 PHILIPS in PDF.
| Product type | Electric barbecue with reversible plates |
| Brand | Philips |
| Model | Pure Essentials Collection HD4409 |
| Power supply | 230 V, 50-60 Hz (estimated) |
| Power | 2000 W (estimated) |
| Dimensions (L x W x H) | Approximately 45 x 30 x 20 cm (estimated) |
| Plate material | Non-stick coating |
| Number of plates | 2 reversible plates (ridged side and smooth side) |
| Cooking positions | Contact grill, gratin grill, party grill (horizontal and inclined) |
| Thermostat | Adjustable with heating indicator and ready-to-cook light |
| Timer | Digital, up to 99 minutes, with audible signal |
| Grease tray capacity | 2 removable trays |
| Included accessories | Two-in-one spatula/tongs, grease trays (2) |
| Storage | Cord wrap, tray hook, vertical storage |
| Cleaning | Plates and accessories dishwasher-safe |
| Safety | Automatic shut-off not mentioned; do not immerse; cord replaceable by professional |
| Timer battery | Lithium type L1131, 1.55 V |
| Warranty | International Philips warranty (see leaflet) |
Frequently Asked Questions - Pure Essentials Collection HD4409 PHILIPS
User questions about Pure Essentials Collection HD4409 PHILIPS
0 question about this device. Answer the ones you know or ask your own.
Ask a new question about this device
Download the instructions for your Barbecue in PDF format for free! Find your manual Pure Essentials Collection HD4409 - PHILIPS and take your electronic device back in hand. On this page are published all the documents necessary for the use of your device. Pure Essentials Collection HD4409 by PHILIPS.
USER MANUAL Pure Essentials Collection HD4409 PHILIPS
natural_image
Black and white photo of a Philips electric shaver with visible internal components (no text or symbols)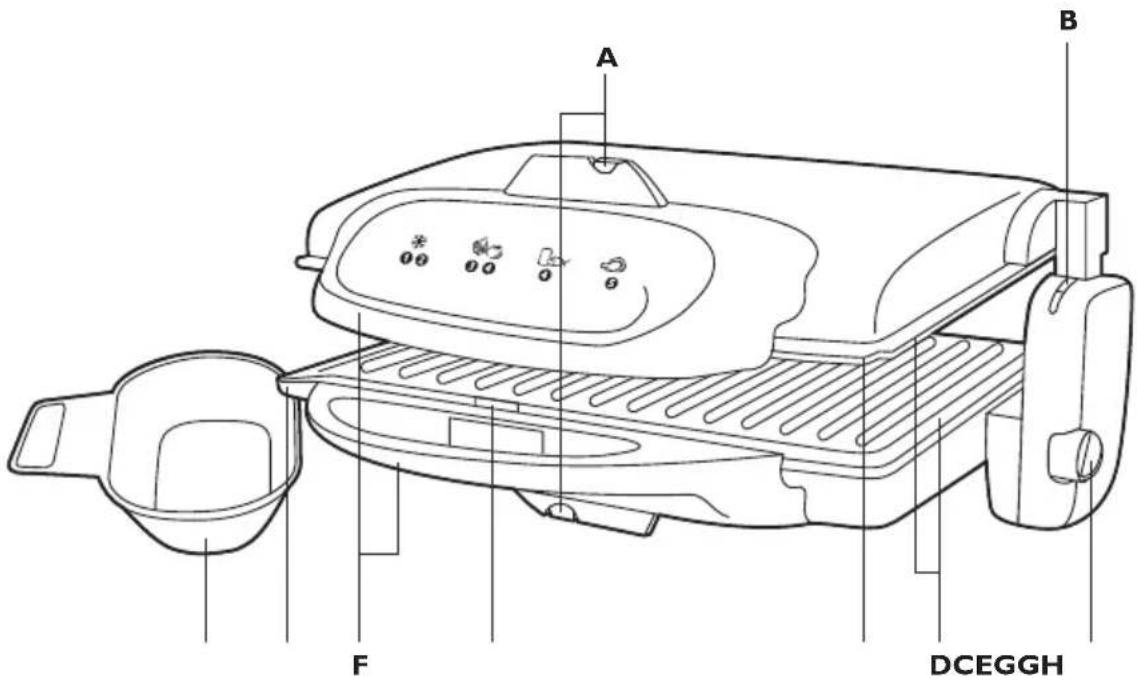
ENGLISH 6
DANSK 14
DEUTSCH 22
ΕΛΛΗΝΙΚΑ 30
ESPAÑOL 39
SUOMI 47
FRANÇAIS 54
ITALIANO 63
한국어 71
NEDERLANDS 79
NORSK 87
PORTUGUÊS 95
SVENSKA 103
TÜRKÇE 111
繁體中文 119
简体中文 126
139 فارسی
150 العربية
Introduction
Congratulations on your purchase and welcome to Philips! To fully benefit from the support that Philips offers, register your product at www.philips.com/welcome.
General description (Fig. 1)
A Fold-out feet
C Temperature control
D Reversible grilling plates
E Fixing clips of grilling plates
F Cool-touch handgrips
G Drainage grooves
H Grease tray (2 pcs)
Storage hook for grease trays
J Cord storage facility
K Timer display
L Timer button
M Two-in-one spatula and tongs
B Red power-on light & green ready-to-cook light
Important
Read this user manual carefully before you use the appliance and save it for future reference.
Danger
- Do not immerse the appliance or the mains cord in water or any other liquid.
Warning
- Check if the voltage indicated on the appliance corresponds to the local mains voltage before you connect the appliance.
- If the mains cord is damaged, you must have it replaced by Philips, a service centre authorised by Philips or similarly qualified persons in order to avoid a hazard.
- This appliance is not intended for use by persons (including children) with reduced physical, sensory or mental capabilities, or lack of experience and knowledge, unless they have been given supervision or instruction concerning use of the appliance by a person responsible for their safety.
- Children should be supervised to ensure that they do not play with the appliance.
- Do not let the mains cord hang over the edge of the table or worktop on which the appliance stands.
- Keep the mains cord away from hot surfaces.
- Do not let the appliance operate unattended.
- Never leave the spatula/tongs on the grilling plate when it is hot.
Caution
- Only connect the appliance to an earthed wall socket.
- Put the appliance on a flat, stable surface with sufficient free space around it.
- Always preheat the grilling plates before you put any food between them.
- The accessible surfaces may become hot when the appliance is operating.
- Be careful of spattering fat when you grill fatty meat or sausages.
- Always unplug the appliance after use.
- Always clean the appliance after use.
- Only turn the plates when they are cold and clean.
-
Let the appliance cool down completely before you remove the grilling plates, clean the appliance or put it away.
-
Never touch the grilling plates with sharp or abrasive items, as this damages the non-stick surface.
- Make sure you reassemble the grilling plates properly after you have removed them.
- This appliance is intended for normal household use only. It is not intended for use in environments such as staff kitchens of shops, offices, farms or other work environments. Nor is it intended to be used by clients in hotels, motels, bed and breakfasts and other residential environments.
- Never connect this appliance to an external timer switch or remote control system in order to avoid a hazardous situation.
- If the appliance is used improperly or for professional or semi-professional purposes or if it is not used according to the instructions in the user manual, the guarantee becomes invalid and Philips refuses any liability for damage caused.
Electromagnetic field (EMF)
This Philips appliance complies with all standards regarding electromagnetic fields (EMF). If handled properly and according to the instructions in this user manual, the appliance is safe to use based on scientific evidence available today.
Before first use
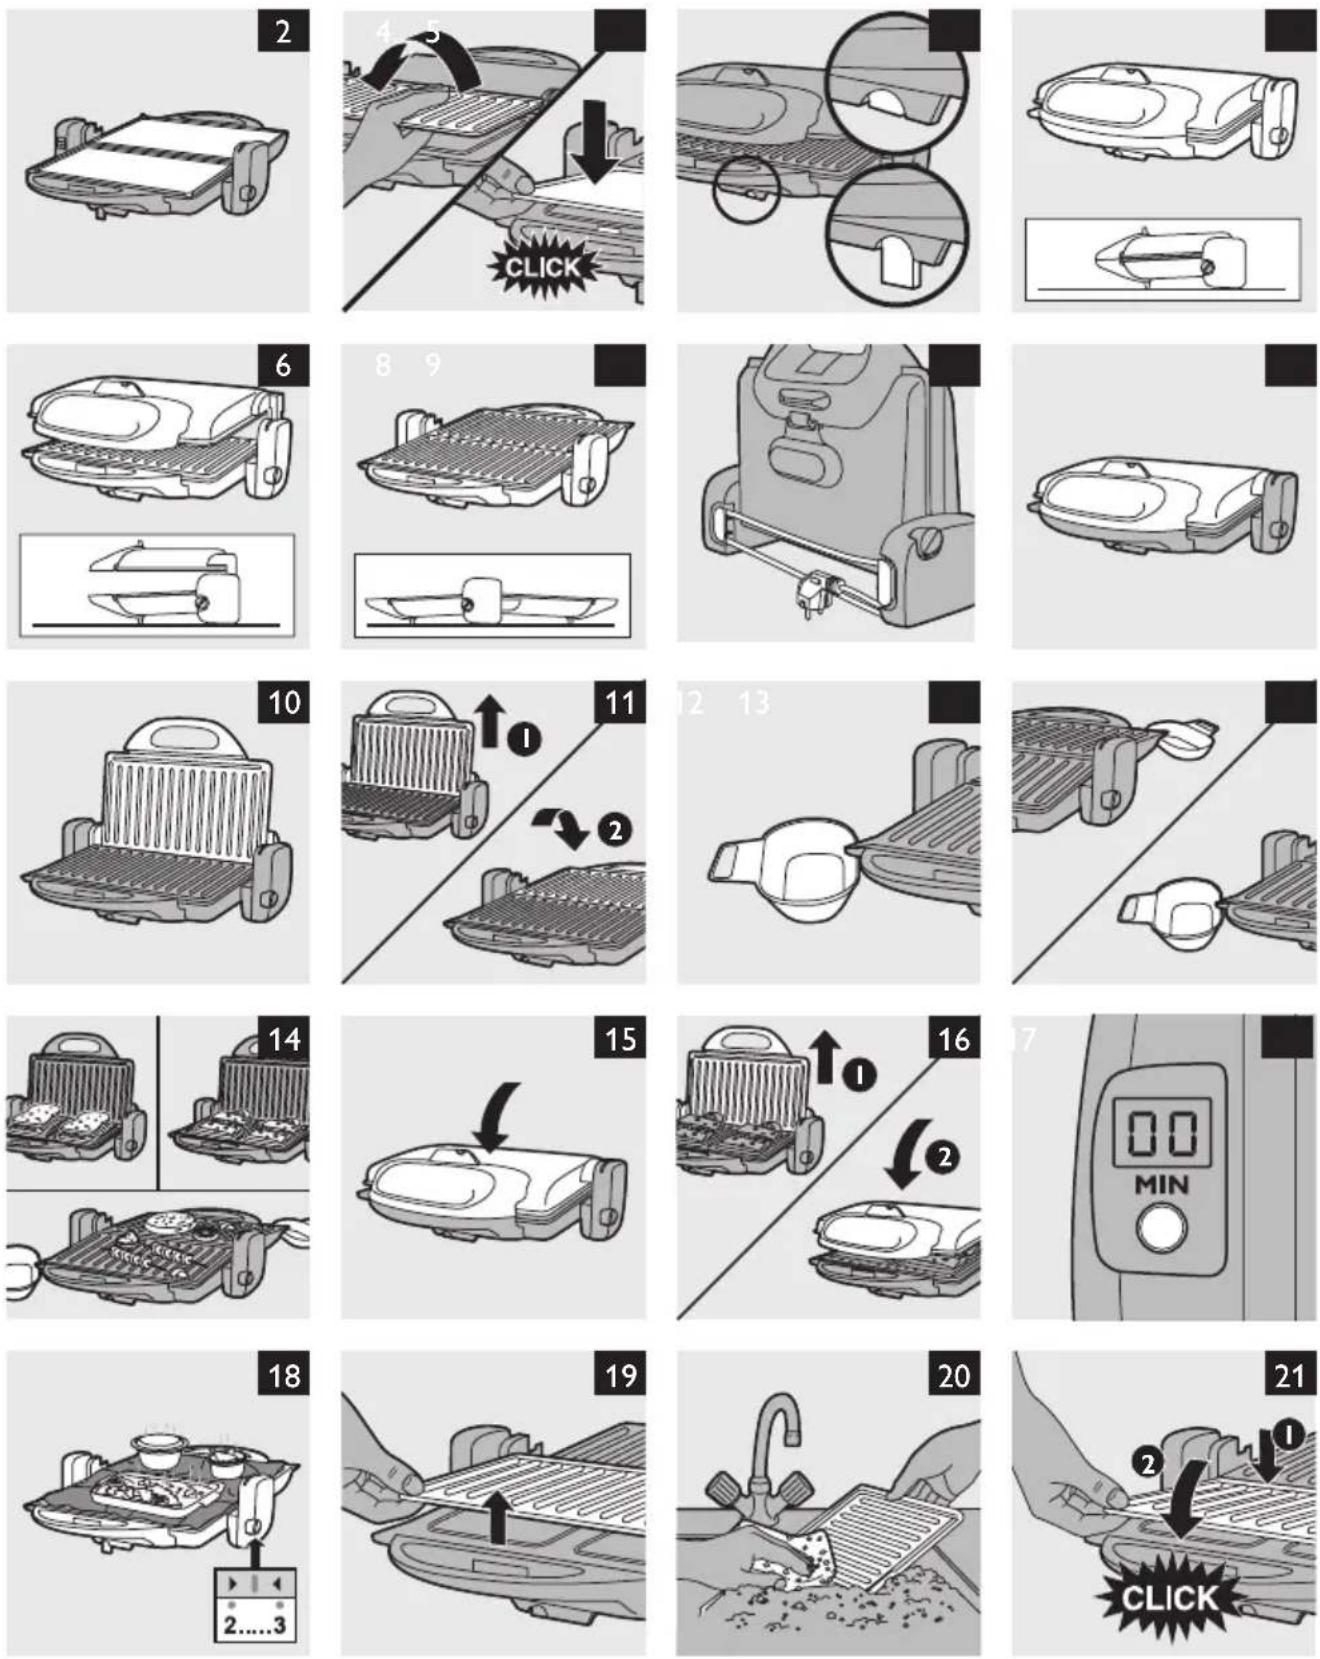
1 Remove the insert between the grilling plates and remove any stickers.
2 Wipe the outside of the appliance with a damp cloth.
3 Clean the plates thoroughly (see chapter 'Cleaning').
Note: The appliance may produce some smoke when you use it for the first time. This is normal.
Using the appliance
Reversible grilling plates
This grill is supplied with reversible grilling plates with a normal ribbed side and a flat side. You can use both sides of the grilling plates in the three different positions described below. The flat side of the grilling plates is particularly suitable for stir-frying, baking eggs and pancakes and cooking marinated ingredients.
Note: Do not cook ingredients with a lot of fat on the flat side of the grilling plates. The flat side does not have a drainage groove, so the extra fat cannot drain away.
Note: When you use the flat side of the grilling plates, always put the appliance in horizontal position (Fig. 2).
Only turn the plates when they are cold and clean. (Fig. 3)
Sloped and horizontal use
- The grilling surface can be used both sloped and horizontally.
- The standard grilling position for the ribbed side of the grilling plates is the sloped position. In this position, the fat or juice that comes out of the food runs off the plates into the grease tray or trays.
- The appliance is fitted with fold-out feet. When you fold out these feet, you can put the grilling plates in horizontal position. Use this position to prepare low-fat ingredients such as fruit and vegetables that slide down the ribbed plates easily when the plates are in sloped position (Fig. 4).
- The horizontal position is the standard grilling position for the flat side of the grilling plates, as this side does not have a drainage groove.
Three grilling positions
- Contact grill position (Fig. 5)
This position is especially suitable for quick high-temperature grilling on both sides (rump steaks, hamburgers etc.) and for making toasted sandwiches or paninis.
ENGLISH8
Note: Both grilling plates are in contact with the food.
- Gratin grill position (Fig. 6)
This is the ideal position to grill and cook au gratin at the same time. The gratin grill position is also suitable for the preparation of all kinds of 'open' toasts, e.g. with egg, tomato, peppers and/or onion rings, covered with cheese.
Note: The upper grilling plate must not touch the food.
- Party grill position (Fig. 7)
In this position, the health grill offers a large grilling surface for the preparation of all kinds of snacks, such as shashlik, satay, vegetables, fruits etc.
With the health grill in party grill position and the flat side of the grilling plates pointing upwards, you can use the grilling surface to stir-fry ingredients and bake eggs or pancakes.
1 Fully unwind the cord from the storage facility in the hinges of the appliance (Fig. 8).
2 If necessary, turn the plates so that the side you wish to use is pointing upwards.
3 Make sure the grill is closed (Fig. 9).
4 Put the plug in the wall socket.
5 Turn the temperature control to the temperature setting that is appropriate for the ingredients to be grilled. See the table at the end of this booklet.
The red power-on light goes on to indicate that the grill is heating up.
Never let the appliance operate unattended.
6 Wait until the green ready-to-cook light goes on and then open the grill to put the ingredients on the grilling plate or plates.
Be careful: the grilling plates are hot.
- Contact grill and gratin grill positions: open the grill halfway (Fig. 10).
- Party grill position: open the grill halfway and pull the upper grilling plate up to its highest position (1). Then put the grill in open position (2) (Fig. 11).
7 If the grill is in sloped position, place the grease tray or trays under the drainage groove or grooves to collect fat or juice.
Note: When you use the flat side of the grilling plates, do not put the appliance in sloped position.
- Contact grill and gratin grill positions: place one grease tray underneath the drainage groove of the bottom grilling plate (Fig. 12).
- When you grill ingredients that contain a lot of fat or juice on the ribbed side of the grilling plates and with the grill in horizontal position, you may also need to place the grease tray/trays in order to prevent fat or juice from dripping on the worktop.
Note: Do not cook ingredients with a lot of fat on the flat side of the grilling plates. The flat side does not have a drainage groove, so the extra fat cannot drain away.
- Party grill position with the ribbed sides of the grilling plates pointing upwards: use both grease trays. Place one tray underneath the drainage groove of each grilling plate (Fig. 13).
8 Use the spatula/tongs provided to place the ingredients on the grilling plate or plates (Fig. 14).
For an optimal result, place the ingredients in the centre of the grilling plate or plates.
The grilling time depends on the type of ingredients, their thickness and your personal taste. See the table at the end of this booklet for recommended grilling times.
Note: During the grilling process, the green ready-to-cook light goes out from time to time to indicate that the health grill is heating up to the preset temperature setting.
- Contact grill position: put the food in the middle of the lower grilling plate.
- Gratin grill position: put the food in the middle of the lower grilling plate.
- Party grill position: spread the food on top of the grilling surface. Turn the food from time to time with spatula/tongs provided.
9 Close the grill (only for contact grill and gratin grill positions).
- Contact grill position: lower the upper grilling plate carefully onto the ingredients. The upper grilling plate now rests on the food. In this way, the food is grilled evenly on both sides (Fig. 15).
- Gratin grill position: pull the upper grilling plate up to its highest position (1) and then put it in horizontal position (2). The upper grilling plate must not touch the food (Fig. 16).
10 Open the appliance when the required grilling time has elapsed (only for contact grill and gratin grill positions).
11 Remove the food.
Use the spatula/tongs provided to remove the food from the appliance. Do not use metal, sharp or abrasive kitchen utensils.
12 If you want to grill another batch of food, remove excess oil from the plates with a piece of kitchen paper.
Loosen any caked food or grease carefully with the spatula/tongs provided and remove it from the plates. Use the spatula with the serrated end for the ribbed section of the plates.
13 Wait until the green ready-to-cook light goes on before you put the food on the grilling plate or plates.
Timer
The timer indicates the end of the grilling time, but does NOT switch off the appliance.
Note: You can also use the health grill without setting the timer.
1 Press the timer button to set the grilling time in minutes. (Fig. 17)
The set time becomes visible on the display.
2 Keep the button pressed to put the minutes forward quickly. Release the button once the required grilling time has been reached.
The maximum time that can be set is 99 minutes.
Three seconds after you have set the grilling time, the timer starts to count down.
While the timer counts down, the remaining grilling time flashes on the display. The last minute is displayed in seconds.
Note: You can erase the timer setting by pressing the timer button for 3 seconds (at the moment the time flashes) until '00' appears.
3 When the preset time has elapsed, you hear an audible signal. After 10 seconds, the audible signal is repeated. Press the timer button to stop the audible signal.
Grilling times
At the end of this booklet, you find a table with ingredients you can prepare with the health grill. The table shows which temperature to select, how long the food has to be grilled and the appropriate position of the grill. The time necessary to preheat the appliance is not included in the indicated grilling time.
The grilling time and temperature depend on the type of food that is prepared (e.g. meat), its thickness and its temperature and also on your own taste. See also the indications on the health grill.
Note: During the grilling process, the green ready-to-cook light goes on and off from time to time. This means that the health grill is heating up to the preset temperature setting. When this happens, you can simply continue grilling.
Tips
- With the health grill in horizontal party grill position and the flat side of the grilling plates pointing up, the grill is extremely suitable for stir-frying, baking eggs and small pancakes and for cooking marinated ingredients.
- Lightly grease the food to be grilled with a little butter or oil. This prevents excess butter or oil from smoking.
- The health grill is unsuitable for grilling breadcrumb food.
- Sausages tend to burst when you grill them. To prevent this, punch a few holes in them with a fork.
- For the best result, make sure the pieces of meat you use are not too thick (approx. 1.5cm).
- Fresh meat gives better grilling results than frozen or defrosted meat.
- When you prepare satay, chicken, pork or veal, first sear the meat at a high temperature (position 5). Then set the temperature control one position lower and grill the food until it is done.
- You can also use the health grill as a thermostatically controlled hotplate, which automatically keeps your dishes at the required temperature. Put the appliance in the party grill position and set the temperature control to position 2 or 3. Cover the grilling plates with aluminium foil with the shiny side facing upwards. (Fig. 18)
- If you want to defrost frozen food, put the appliance in the gratin grill position, wrap the frozen food in aluminium foil. Set the temperature control to position 1 or 2. The defrosting time depends on the weight of the food.
Cleaning
Never use abrasive cleaning agents and materials, as this damages the non-stick coating of the plates.
Never immerse the appliance in water.
1 Unplug the appliance and let it cool down.
2 Remove excess oil from the plates with a piece of kitchen paper before you remove the plates.
3 Remove the grilling plates (Fig. 19).
To remove the plates, press on the fixing clips on the appliance and then lift the plates out of the appliance.
4 Clean the grilling plates, grease trays and spatula/tongs with a soft cloth or sponge in hot water with some washing-up liquid or in the dishwasher (Fig. 20).
Soak the grilling plates in hot water for five minutes with some washing-up liquid to remove residues. This loosens any caked food or grease.
5 Dry the grilling plates and reassemble them (Fig. 21).
- Put the appliance in the party grill position.
- Place the rear edge of the grilling plates on the appliance (1). Lower the grilling plates onto the appliance and press them down under the fixing clip (2).
6 Close the grill.
7 Clean the outside of the appliance with a damp cloth.
Replacement
Replacing the battery
The battery lasts approximately two years in case of normal domestic use. This timer runs on 1 button-type L1131 (1.55V) lithium battery, which is generally available.
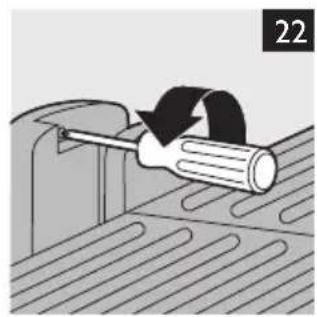
1 Put the appliance in party grill position and remove the screw from the hinge (Fig. 22).
2 Close the appliance, turn it around, put it in upright position and remove the two screws from the hinge (Fig. 23).
3 Remove the hinge cover from the hinge and take the timer out of the hinge cover (Fig. 24).
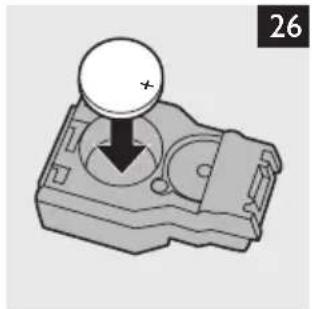
4 Open the battery compartment cover of the timer with a coin and remove the old battery. Dispose of the old battery (see chapter 'Environment') (Fig. 25).
5 Place the new battery in the battery compartment with the + pole facing the battery compartment cover (Fig. 26).
6 Place the battery compartment cover back onto the timer. Use a coin to fasten it again.
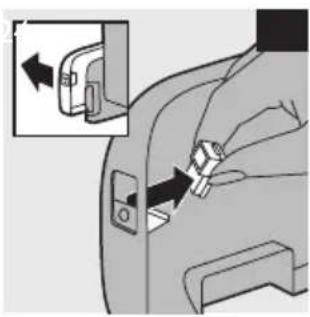
7 Insert the timer into the hinge cover and reattach the hinge cover to the hinge.
8 Insert and tighten the screws in reverse order. Start with the appliance in upright position and then put it in party grill position.
Environment
- Non-rechargeable batteries contain substances that may pollute the environment. Do not throw away non-rechargeable batteries with the normal household waste, but dispose of them at an official collection point for batteries. Always remove the non-rechargeable battery before you discard and hand in the appliance at an official collection point.
- Do not throw away the appliance with the normal household waste at the end of its life, but hand it in at an official collection point for recycling. By doing this, you help to preserve the environment (Fig. 27).
Storage
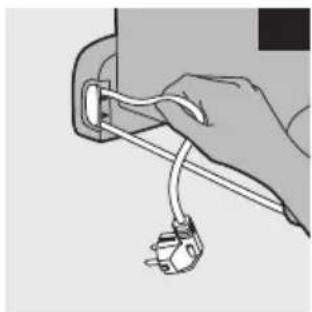
1 Wind the cord around the storage facility in the hinges of the appliance. (Fig. 28)
2 Nest the grease trays and attach them to the storage hook on the bottom of the appliance. (Fig. 29)
3 Store the appliance in upright position in a safe and dry place.
Guarantee & service
If you need service or information or if you have a problem, please visit the Philips website at www.philips.com or contact the Philips Consumer Care Centre in your country (you find its phone number in the worldwide guarantee leaflet). If there is no Consumer Care Centre in your country, go to your local Philips dealer.
Troubleshooting
This chapter summarises the most common problems you could encounter with the appliance. If you are unable to solve the problem with the information below, contact the Consumer Care Centre in your country or online at www.philips.com.
Problem Possible cause Solution
| The appliance does not work. | The plug is not properly inserted in the wall socket. | Put the plug properly in the wall socket. |
| The socket to which the appliance is connected is not live. | Check if the power supply works. If it works, plug in another appliance to check if the socket is live. | |
| The mains cord is damaged. If the mains cord is damaged, you must have it replaced by Philips, a service centre authorised by Philips or similarly qualified persons in order to avoid a hazard. | ||
| The appliance produces some smoke. | The first few times you use the appliance, it may produce some smoke. | This is normal. After you have used the appliance a few times, the appliance stops producing smoke. |
| The set grilling temperature is too high for the ingredients you are grilling. | See the table at the end of this booklet for the recommended temperature setting for various types of food. | |
| Food or grease has caked onto the grilling plates. | Carefully clean the grilling plates after each use. | |
| The appliance produces heavy smoke | You turned the grilling plates without cleaning them first. Food caked on the other side of the plates drips onto the heating elements and scorches during grilling. This may cause heavy smoke. | Make sure that you clean the plates thoroughly before turning them. |
| The food is not properly grilled. | You have set a too low temperature setting or you have not grilled the food long enough. | Turn the temperature control to a higher temperature setting and/or grill the food for a longer time. See the table at the end of this booklet for the recommended temperature setting and grilling time for various types of food. |
| The food is grilled too darkly. | You have set a too high temperature setting or you have grilled the food too long. | Turn the temperature control to a lower temperature setting and/or grill the food for a shorter time. See the table at the end of this booklet for the recommended temperature setting and grilling time for various types of food. |
| During grilling, fat or juice drips onto the worktop. | You have not put the grease tray/trays under the drainage groove/grooves. | Place the grease tray/trays under the drainage groove/grooves. |
Problem Possible cause Solution
| You have grilled ingredients that contain a lot of fat or juice with the grill in horizontal position without putting the grease tray/trays under the drainage groove/grooves. | Place the grease tray/trays under the drainage groove/grooves. | |
| Ingredients (e.g. cheese) stick to the upper grilling plate. | You have prepared au gratin dishes or open toasts with the appliance in contact grill position. | Only prepare au gratin dishes and open toasts at the gratin grill position. |
| During grilling, fat or juice remains on the grilling plate. | You grill ingredients that contain a lot of fat on the ribbed side of the grilling plates with the grill in horizontal position. | When you grill ingredients that contain a lot of fat on the ribbed side of the grilling plates, always make sure you place the grill in sloped position so that the fat can run into the grease trays. |
| You grill ingredients on the flat side of the grilling plate and this side does not have a drainage groove. | Let the grilling plates cool down sufficiently and then clean them thoroughly before you turn them. Fold in the fold-out feet and place the drip trays under the drainage grooves before you continue to grill your food. |
Food table (Fig. 30)
1 Food table
Introduktion
- Gratineerstand (fig. 6)
The image is too blurry to recognize any text content.
The image is too blurry to recognize any text content.
The image is too blurry to recognize any text content.
The image is too blurry to recognize any text content.
m = 311
ب sidewalks Guatemala Markets Management Policy for the United States, and the United States is a national policy for the United States.
- airport ticket parking because everyone's shopping saucnne.
A  | J |  Min. Min. | 30[HZZW] °C | |
B  | ||||
C  | ||||
 | B | J | 4-6 | 4-5 |
 | A B | J K | 3-4 | 4-5 |
 | A | J K | 4-6 | 4 |
   | A B | J K | 5-8 | 4-5 |
 | A B | J | 6-9 | 4-5 |
 | B | J | 6-8 | 4-5 |
  | B | J K | 4-6 | 4-5 |
  | A B | J K | 4-8 | 5 |
   | A B | J K | 3-5 | 3-4 |
 | C | J K | 3-5 | 3-4 |
 | A B | J K | 3-5 | 3-4 |
 | B C | J K | 2-3 | 4 |
 | A B | J K | 7-9 | 5 |
  | B | J K | 3-4 | 4 |
  | A | K | 3-5 | 4-5 |
 [TC22] [TC22]  | A | K | 5-10 | 4-5 |
natural_image
Diagram of a screwdriver pressing down on a textured surface (no text or symbols)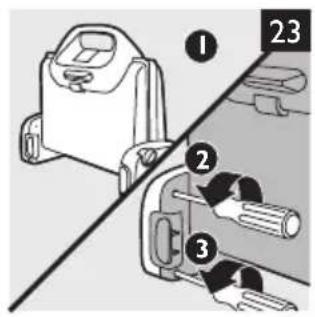
natural_image
Diagram showing a hand inserting a plug into a door panel, with an inset close-up of the component (no text or symbols)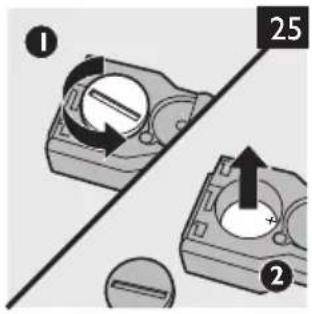
natural_image
Mechanical component diagram showing a dial indicator with a plus sign and downward arrow (no text or symbols)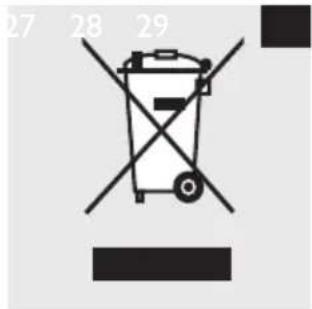
natural_image
Illustration of a hand connecting a cable to a plug (no text or symbols present)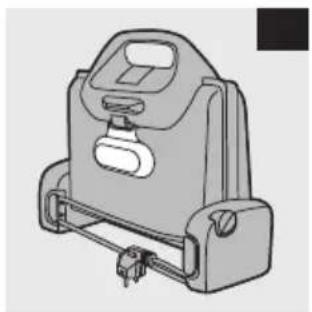
natural_image
Technical illustration of a mechanical device with handle and mounting bracket (no text or symbols)
- Introduction
- General description (Fig. 1)
- Important
- Danger
- Warning
- Caution
- Electromagnetic field (EMF)
- Before first use
- Using the appliance
- Reversible grilling plates
- Sloped and horizontal use
- Three grilling positions
- ENGLISH8
- Timer
- Grilling times
- Tips
- Cleaning
- Replacement
- Replacing the battery
- Environment
- Storage
- Guarantee & service
- Troubleshooting
- Food table
- Introduktion
- m = 311
Brand : PHILIPS
Model : Pure Essentials Collection HD4409
Category : Barbecue