
MiniVac FC6132 - Vacuum Cleaner PHILIPS - Free user manual and instructions
Find the device manual for free MiniVac FC6132 PHILIPS in PDF.

User questions about MiniVac FC6132 PHILIPS
0 question about this device. Answer the ones you know or ask your own.
Ask a new question about this device
Download the instructions for your Vacuum Cleaner in PDF format for free! Find your manual MiniVac FC6132 - PHILIPS and take your electronic device back in hand. On this page are published all the documents necessary for the use of your device. MiniVac FC6132 by PHILIPS.
USER MANUAL MiniVac FC6132 PHILIPS
Register your product and get support at www.philips.com/welcome
FC6132, FC6130
PHILIPS
1
ENGLISH 6
ESPÁNOL 15
FRANÇAIS 25
INDONESIA 35
韓国兒 44
BAHASA MELAYU 53
PORTUGUES DO BRASIL 63
73
TIÊNG VIÊT 80
繁體中文 89
简体中文 97
15 × 13
120
Introduction
Congratulations on your purchase and welcome to Philips! To fully benefit from the support that Philips offers, register your product at www.philips.com/welcome.
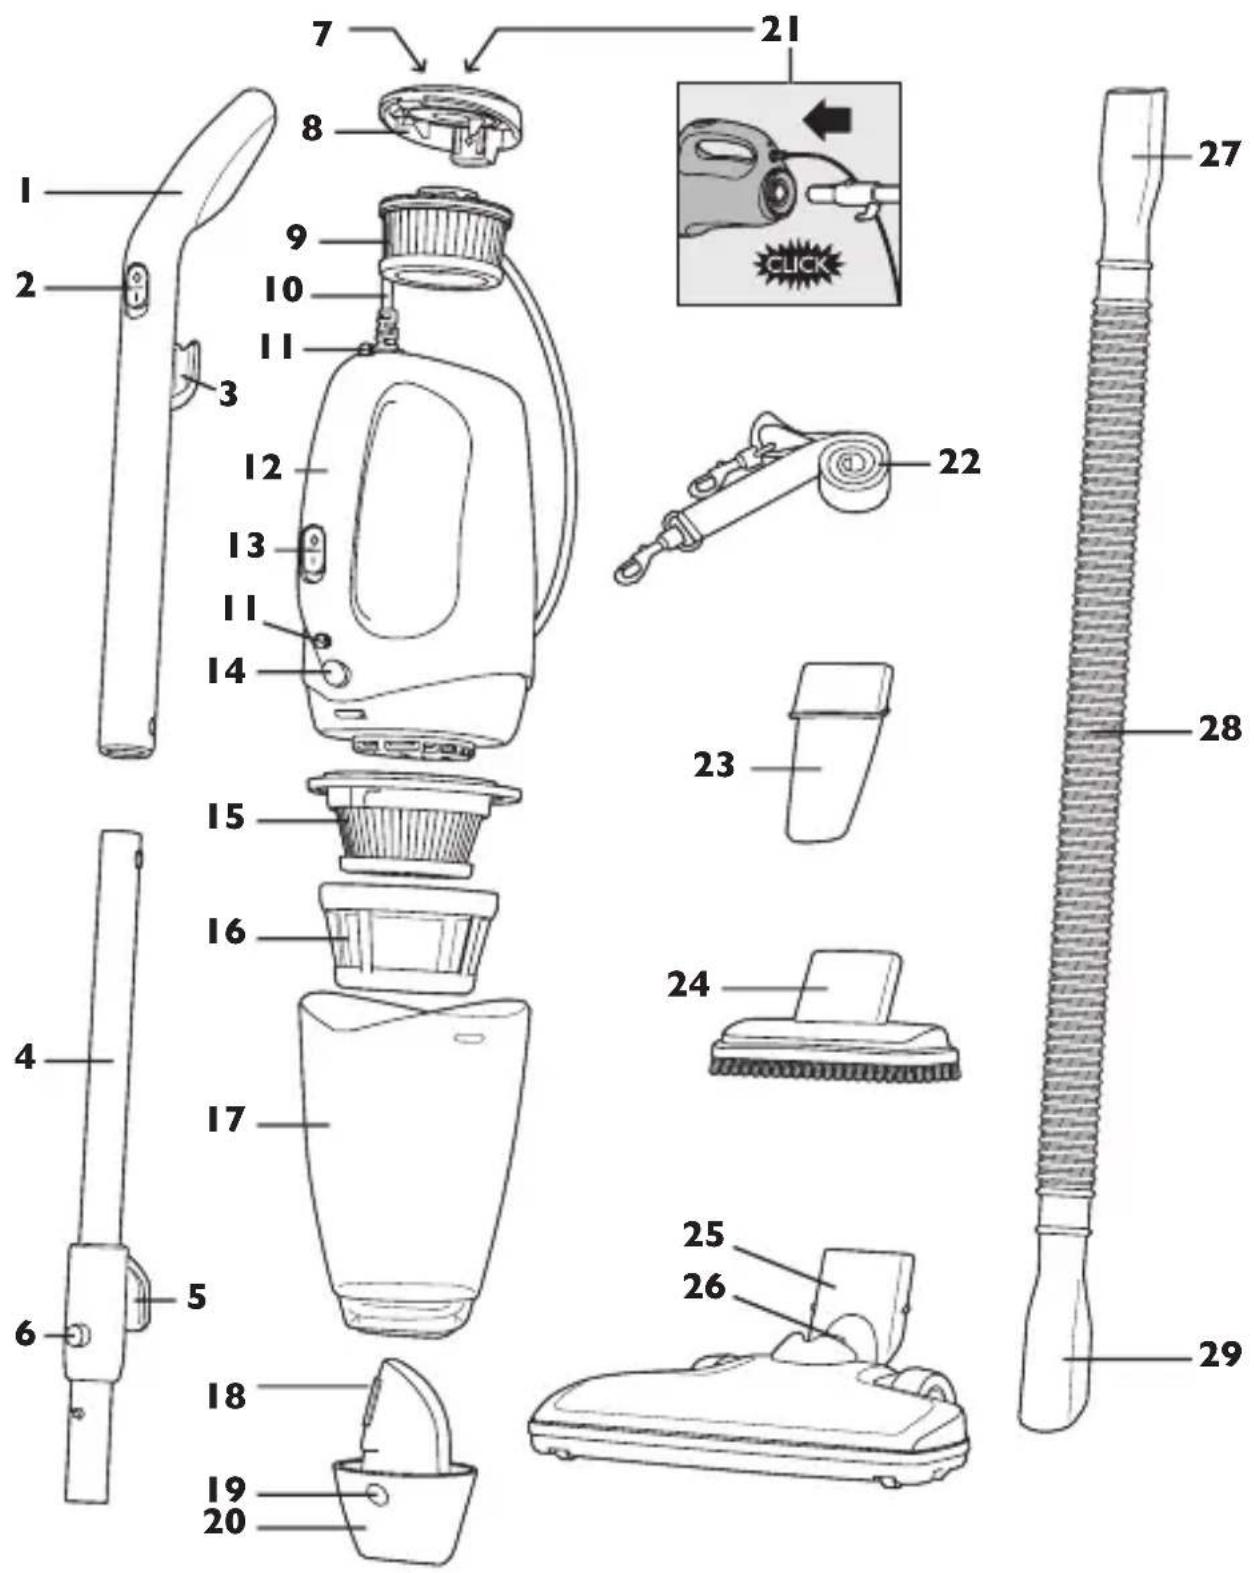
General description (Fig. 1)
1 Upper stick part with handle (FC6132)
2 On/off slide on stick (FC6132)
3 Cord winding hook (FC6132)
4 Lower stick part (FC6132)
5 Cord winding hook (FC6132)
6 Stick release button (FC6132)
7 Clean Air HEPA filter cover
8 Exhaust air openings
9 Clean Air HEPA filter
10 Mains cord
11 Shoulder strap attachment points
12 Handle
13 On/off slide on vacuum cleaner
14 Dust compartment release button
15 Inner filter
16 Outer filter
17 Dust compartment
18 Internal air inlet unit
19 Nosepiece release button
20 Detachable nosepiece
21 Attachment point for stick (FC6132)
22 Shoulder strap + clasps
23 Crevice tool
24 Brush tool
25 Floor nozzle (FC6132)
26Ridges on the floor nozzle (FC6132)
27 Appliance end of hose (FC6130)
28 Hose (FC6130)
29 Attachment end of hose (FC6130)
Important
Read this user manual carefully before you use the appliance and save it for future reference.
Danger
- Never immerse the appliance in water or any other liquid, nor rinse it under the tap.
- Never suck up water or any other liquid. Never suck up flammable substances and do not suck up ashes until they are cold.
Warning
- Check if the voltage indicated on the appliance corresponds to the local mains voltage before you connect the appliance.
- Do not use the appliance if the plug, the mains cord or other parts are damaged.
- This appliance is not intended for use by persons (including children) with reduced physical, sensory or mental capabilities, or lack of experience and knowledge, unless they have been given supervision or instruction concerning use of the appliance by a person responsible for their safety.
- Children should be supervised to ensure that they do not play with the appliance.
- If the mains cord is damaged, you must have it replaced by Philips, a service centre authorised by Philips or similarly qualified persons in order to avoid a hazard.
Caution
- Remove the plug from the wall socket before you clean the appliance.
- Always switch off the appliance after use.
- Never block the exhaust air openings during vacuuming.
- Always use the vacuum cleaner with the filter unit, the dust compartment and the Clean Air HEPA filter assembled.
- Always switch off the appliance before you connect or disconnect accessories.
ENGLISH8
Electromagnetic fields (EMF)
This Philips appliance complies with all standards regarding electromagnetic fields (EMF). If handled properly and according to the instructions in this user manual, the appliance is safe to use based on scientific evidence available today.
Preparing for use
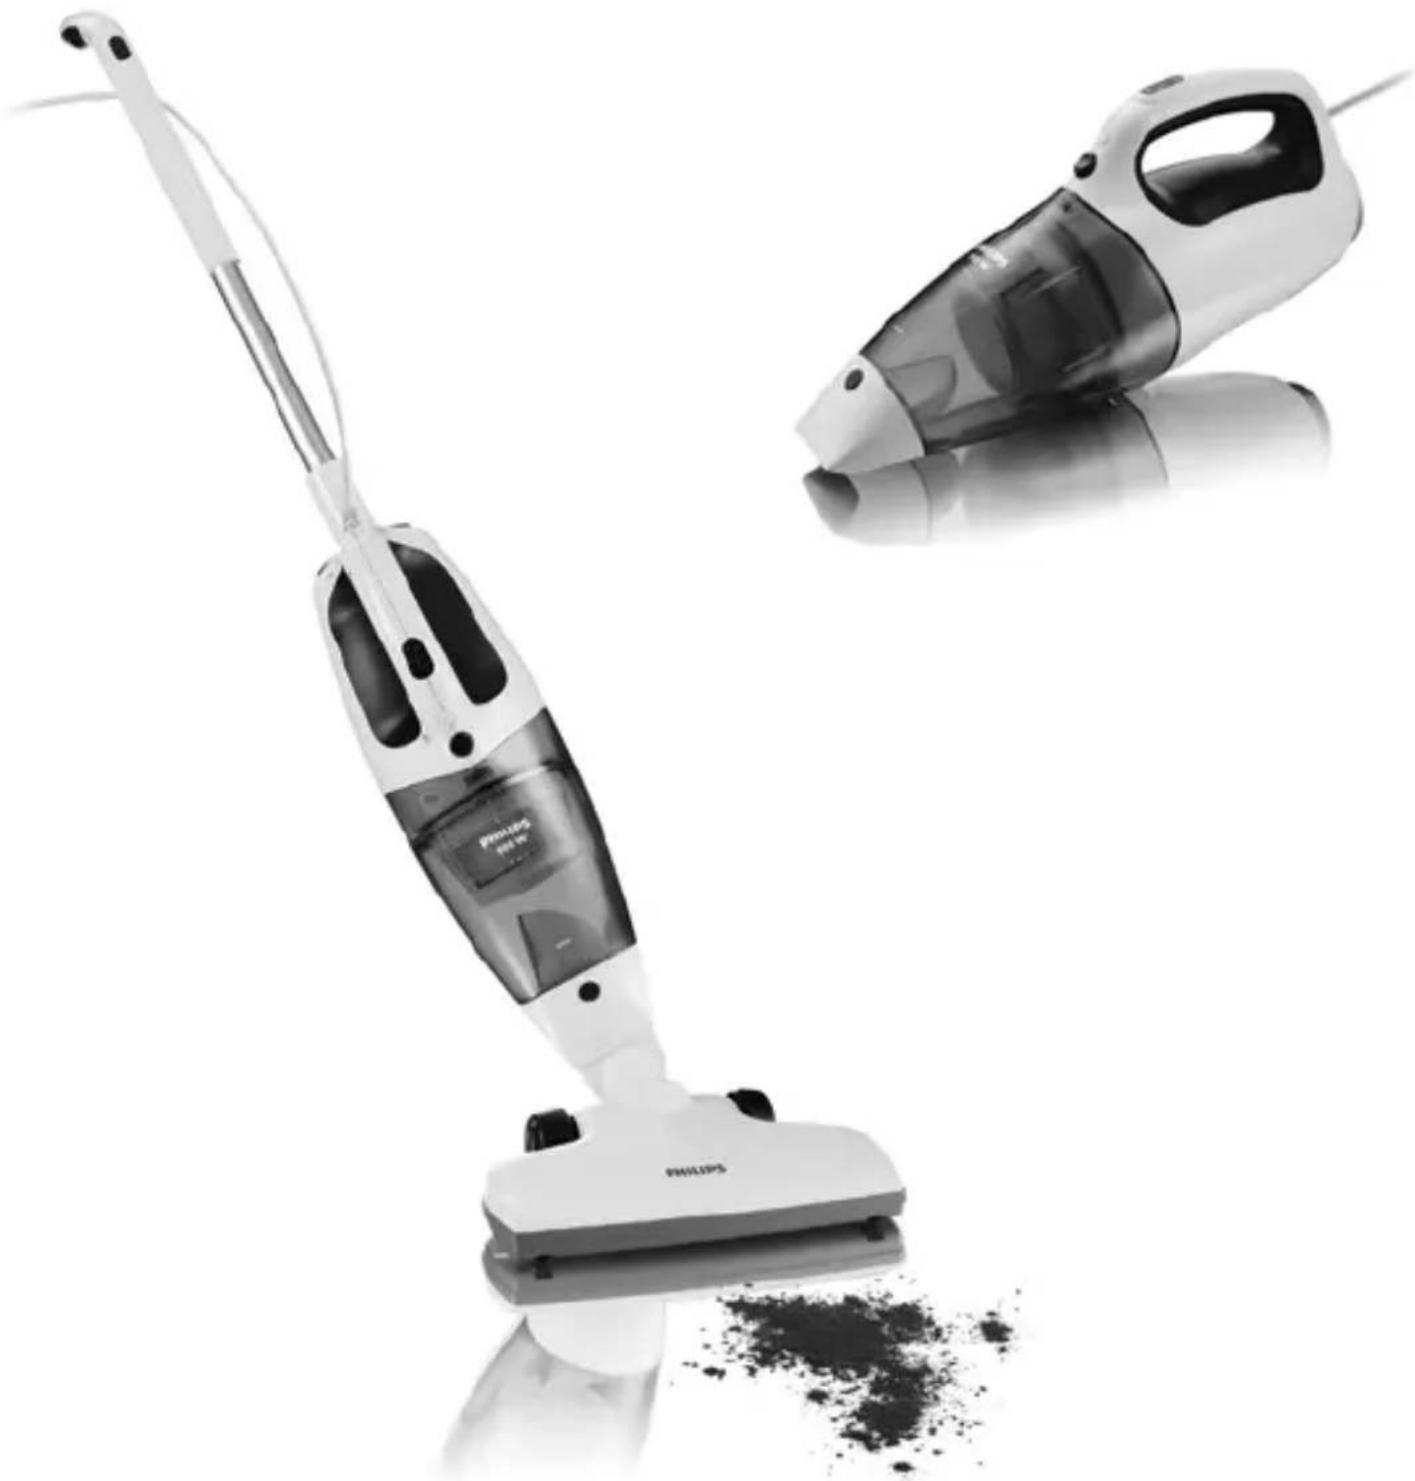
The appliance comes with a shoulder strap and flexible hose (FC6130) or with a stick and floor nozzle (FC6132) for extra convenience during vacuum cleaning.
The appliance also comes with a brush tool to clean delicate surfaces and a crevice tool to clean the hard-to-reach places.
Attaching the shoulder strap (FC6130 only)
Attaching the stick and the floor nozzle (FC6132 only)
1 To attach the shoulder strap, connect the clasps to the attachment points on the appliance.
1 To assemble the stick, connect the lower stick part to the upper stick part ('click') (Fig. 2).
Note: You cannot disassemble the stick once you have assembled it.
2 Insert the stick into the attachment point for the stick at the back of the appliance ('click') (Fig. 3).
- Make sure the ridge on the stick aligns with the attachment point on the appliance when the stick is inserted.
- Make sure the on/off slide on the stick is in 'off' position.
3 To detach the stick from the appliance, press the stick release button with one hand (1) and pull the stick out of the appliance with the other hand (2) (Fig. 4).
4 Attach the floor nozzle to the nosepiece (Fig. 5).
You can use the floor nozzle to clean hard floors and carpets.
The floor nozzle is equipped with a fluff collector that removes hair and fluff.
5 To place the appliance in upright position, align the ridges on the floor nozzle with each other (Fig. 6).
6 Put the plug in the wall socket.
Brush tool and crevice tool
You can use the brush tool to clean delicate surfaces.
With the crevice tool, you can quickly and conveniently clean hard-to-reach places.
1 Attach the brush tool or the crevice tool to the nosepiece of the appliance (Fig. 7).
Hose (FC6130 only)
This appliance comes with a hose for extended reach during vacuum cleaning.
1 Insert the appliance end of the hose into the nosepiece of the appliance (Fig. 8).
2 Attach the brush tool or the crevice tool to the attachment end of the hose for extended reach during vacuum cleaning (Fig. 9).
Using the appliance
Always switch off the appliance before you connect or disconnect accessories.
Put the plug in the wall socket.
2 Push the on/off slide on the vacuum cleaner or on the stick (FC6132 only) forwards to switch on the appliance (Fig. 10).
3 Push the on/off slide on the vacuum cleaner or on the stick (FC6132 only) backwards to switch off the appliance (Fig. 11).
Cleaning
Never immerse the appliance in water or any other liquid, nor rinse it under the tap.
ENGLISH10
1 Remove the plug from the wall socket before you clean the appliance.
2 Clean the appliance with a damp cloth.
Emptying the dust compartment quickly
Make sure you empty the dust compartment regularly to optimise the performance of the appliance.
Always unplug the appliance before you empty the dust compartment.
1 Press the nosepiece release button (1) and remove the nosepiece from the appliance (2) (Fig. 12).
2 Empty the contents of the dust compartment into a dustbin (Fig. 13).
Tip: Alternatively, you can use a normal vacuum cleaner to suck the contents out of the dust compartment.
3 Push the nosepiece back onto the appliance ('click'). (Fig. 14)
Cleaning the dust compartment thoroughly
1 Press the dust compartment release button (1) and remove the dust compartment from the appliance (2) (Fig. 15).
2 Pull the filter unit out of the dust compartment (Fig. 16).
3 If necessary, clean the filter unit. See section 'Cleaning the filter unit'.
4 Empty the dust compartment over a dustbin (Fig. 17).
5 If necessary, clean the dust compartment with a damp cloth.
6 Place the filter unit back into the dust compartment (Fig. 18).
7 To reattach the dust compartment, align the slot on the dust compartment with the projection on the appliance. First attach the bottom of the dust compartment. Then push the top of the dust compartment towards the appliance until it locks into place ('click') (Fig. 19).
Cleaning the filter unit
1 Press the dust compartment release button (1) and remove the dust compartment from the appliance (2) (Fig. 15).
2 Pull the filter unit out of the dust compartment (Fig. 16).
3 To detach the outer filter from the inner filter, turn the filter outer filter anticlockwise (1) and pull it off the inner filter (2) (Fig. 20).
4 Clean the inner filter and the outer filter with a brush. If the filters are very dirty, clean them with a normal vacuum cleaner (Fig. 21).
5 Put the outer filter back onto the inner filter (1) and turn the outer filter clockwise to lock it (2) (Fig. 22).
6 Place the filter unit back into the dust compartment (Fig. 18).
7 To reattach the dust compartment, align the slot on the dust compartment with the projection on the appliance. First attach the bottom of the dust compartment. Then push the top of the dust compartment towards the appliance until it locks into place ('click') (Fig. 19).
Storage
1 Wind the cord round the body of the appliance (Fig. 23).
Fix the cord with the cord clip.
Upright storage (FC6132 only)
1 You can store the appliance in upright position with the floor nozzle and stick attached on a flat hard floor (Fig. 6).
2 Put the floor nozzle in the position in which the ridges are aligned with each other.
If you store the appliance this way, do not store it near fragile valuables.
3 Wind the cord round the cord winding hooks on the stick.
Replacement
Clean Air HEPA filter
The appliance is equipped with the special Clean Air HEPA filter. This filter removes small particles from the outlet air. This not only includes normal house dust, but also harmful microscopic vermin such as house dust mites and their excrements, which are well-known causes of respiratory allergies.
Press the button to release the Clean Air HEPA filter cover (1) and remove the cover (2) (Fig. 24).
2 Remove the old Clean Air HEPA filter and dispose of it (Fig. 25).
3 Put a new Clean Air HEPA filter in the HEPA filter compartment (Fig. 26).
4 Reattach the Clean Air HEPA filter cover ('click') (Fig. 27)
Replacement filters
New inner filters are available under service code: 4222 459 45354.
Contact your Philips dealer or the Philips Consumer Care Centre in your country.
New Clean Air HEPA outlet filters are available under service code: 4222459 45355. Contact your Philips dealer or the Philips Consumer Care Centre in your country.
Environment
- Do not throw away the appliance with the normal household waste at the end of its life, but hand it in at an official collection point for recycling. By doing this, you help to preserve the environment (Fig. 28).
Guarantee and service
If you need service or information or if you have a problem, please visit the Philips website at www.philips.com or contact the Philips Consumer Care Centre in your country (you find its phone number in the
worldwide guarantee leaflet). If there is no Consumer Care Centre in your country, go to your local Philips dealer.
Troubleshooting
This chapter summarises the most common problems you could encounter with the appliance. If you are unable to solve the problem with the information below, contact the Consumer Care Centre in your country.
| Problem Solution | |
| The vacuum cleaner does not work. | Make sure that you have inserted the plug properly into the wall socket and have switched on the appliance. |
| Take the appliance to your dealer or a service centre authorised by Philips for examination. | |
| The vacuum cleaner does not vacuum properly. | Make sure that the dust compartment is attached properly to the appliance (see chapter ‘Cleaning”). |
| Check if the dust compartment is full. If it is full, empty it (see chapter ‘Cleaning’). | |
| Check if the filter unit is clogged. If it is clogged, remove the filter unit and clean the inner and outer filter (see chapter ‘Cleaning’). | |
| Dust escapes from the vacuum cleaner. | Check if the dust compartment is full. If it is full, empty it (see chapter ‘Cleaning’). |
| Make sure that the filter unit is placed properly in the dust compartment (see chapter ‘Cleaning’). | |
| Make sure that the dust compartment is attached properly to the appliance (see chapter ‘Cleaning’). | |
| The vacuum cleaner does not work properly when the floor nozzle (FC6132), the hose (FC6130), the brush tool or the crevice tool is attached. | Check if the floor nozzle, the hose, the brush tool or the crevice tool is blocked. If this is the case, remove the obstruction. |
| Check if the dust compartment is full. If it is full, empty it (see chapter ‘Cleaning’). | |
| Check if the filter unit is clogged. If it is clogged, remove the filter unit and clean the inner and outer filter (see chapter ‘Cleaning’). | |
| I cannot store the appliance upright (FC6132). | Make sure that the floor nozzle is attached. The appliance can only stand upright when the floor nozzle is attached. |
| Check if dirt is stuck to the bottom of the floor nozzle. If there is, remove the dirt. | |
| Check if the floor is hard, flat and stable. When you store the appliance upright, always put it on a hard, stable and flat surface. | |
| Check if the ridges on the floor nozzle are aligned properly with each other. If not, align the ridges properly. | |
Introduccion
Tuyau (FC6130 uniquely)
1 BrarSi NolIiN a Tae NolIe to h sio's of Ns bue an engelahn da (grr 7).
HoS(FC6130man)
i 36
1 1 8).
2 2
試吾
ACKSETRItoeJHcHgNnBRIHgIeHgHgHgHgHgHgHgHgHgHgHgHgHgHgHgHgHgHgHgHgHgHgHgHgHgHgHgHgHgHgHgHgHgHgHgHgHgHgHgHgHgHgHgHgHgHgHgHgHgHgH
ceilter'JKTJHKJHJIKJJKJJKJJKJJKJJKJJKJJKJJKJJKJJKJJKJJKJJKJJKJJKJJKJJKJJKJJKJJKJJKJJKJJKJJKJJKJJKJJKJJKJJKJJKJJKJJKJJKJJKJJKJJKJJKJJKJJKJJKJJKJJKJJKJJKJJKJJKJJKJJKJJKJJKJDK
1 mssnaa nanaananaananaananaananaananaananaananaananaananaananaananaananaananaananaananaananaananaananaananaananaananaananaananaananaananaananaananaananaananaananaananaananaananaananaananaananaananaananaananaananaananaananaananaananaananaananaananaananaananaanana anaaannnna
y
2 1
- 3 nssnnaananaananaananaananaananaananaananaananaananaananaananaananaananaananaananaananaananaananaananaananaananaananaananaananaananaananaananaananaananaananaananaananaananaananaananaananaananaananaananaananaananaananaananaananaananaananaananaananaananaananaanara (2) (4)
4
y
y
5 5
6
11
nannnnnnnnnnnnnnnnnnnnnnnnnnnnnnnnnnnnnnnnnnnnnnnnnnnnnnnnnnnnnnnnnnnnnnnnnnnnnnnnnnnnnnnnnnnnnnnnnnnnnnnnnnnn
1
1 17
na (FC6130 nnu)
1
1 1
2
1667200000 (3)
n
1
1
2 1
10)
n76
3 11)
nnnnnnnnnnn
1 nnnn nn nnnn nn nnnn nn nnnn nn nnnn nn nnnn nn nnnn nn
2
nnaananaaunuun
nnaa nnnnnaanannnnaan anananaananaananaananaananaananaananaananaananaananaananaananaananaananaananaananaananaananaananaananaananaananaananaananaananaananaananaananaananaananaananaananaananaananaananaananaananaananaananaananaananaananaananaananaananaananaananaananaananaananaan
yannnnnnaaunnaaunnaananaananaananaananaananaananaananaananaananaananaananaananaananaananaananaananaananaananaananaananaananaananaananaananaananaananaananaananaananaananaananaananaananaananaananaananaananaananaananaananaananaananaananaananaananaananaananaananaananaananaan
3 Ww
nnaa
n nnnnnnnnnnnnn Clean Air HEPA
nnaaannnnnnaan anananaan anananaan anananaan
1 nJwWaaanrnnnau uunur Clean Air HEPA (1) 24
2 Clean Air HEPA (5) 25
Clean Air HEPA 26
4 Clean Air HEPA nnnn (n) 27
wnravnul
uunnnaaannnnnnaanennn 4222 459 45354 nne ane ane ane Philips
nannnnnnaeauanee Clean Air HEPA nnnnnaaennnne 4222 459 45355 nnnnnae nnn n Philips nnnnnnnae Philips
a
1 2
m
wnnnnne nnnnne nnnnne nnnnne nnnnne nnnnne nnnnne nnnnne nnnnne nnnnne nnnnne nnnnne nnnnne nnnnne nnnnne nnnnne nnnnne nnnnne nnnnne nnnnne nnnnne nnnnne nnnnne nnnnne nnnnne nnnnne
mnnn
y
10nn mnnn
H 10000000000000000000000000000000000000000000000000
()
nannnnnaaee
nannnnnnnnnnnnnnnnnnnnnnnnnnnnnnnnnnnnnnnnnnnnnnnnnnnnnnnnnnnnnnnnnnnnnnnnnnnnnnnnnnnnnnnnnnnnnnnnnnnnnnnnnnnnnnnnnnnn
yannnnn
Giói thieu
Chuc mùng bàn dā mua duoc san pham Philips moi va chao mùng bànden voci Philips! De có duoc lgi ich day du tu su hó tro do Philips cungcap, hay dang ký san pham tai www.philips.com/welcome.
| اللهُّد | اللهُّد | |
| مَعَلْهُّةُ لَبِيرِّةُ بَعْرِّةُ بَعْرِّةُ بَعْرِّةُ بَعْرِّةُ بَعْرِّةُ بَعْرِّةُ بَعْرِّةُ بَعْرِّةُ بَعْرِّةُ بَعْرِّةُ بَعْرِّةُ بَعْرْتَّةُ بَعْرِّةُ بَعْرِّةُ بَعْرِّةُ بَعْرِّةُ بَعْرِّةُ بَعْرِّةُ بَعْرِّةُ بَعْرِّةُ بَعْرِّةُ بَعْرِّةُ بَعْرِ' | مَعَلْهُّةُ لَبِيرِّةُ بَعْرِّةُ بَعْرِّةُ بَعْرِ' | |
| اللهُّد | اللهُّد | |
| مَعَلْهُّةُ لَبِيرِّةُ بَعْرِ' | مَعَلْهُّةُ l'اللهُّد | |
| مَعَلْهُّةُ l'اللهُّد | مَعَلْهُّةُ l'اللهُّد | |
| مَعَلْهُّةُ l'اللهُّد | مَعَلْهُّةُ l'اللهُّد | |
| مَعَلْهُّةُ l'اللهُّd | مَعَلْهُّةُ l'اللهُّd | |
| مَعَلْهُّةُ l'اللهُّd | m\(\text{且}\)l\(\text{且}\)l\(\text{且}\)l\(\text{且}\)l\(\text{且}\)l\(\text{且}\)l\(\text{且}\)l\(\text{且}\)l\(\text{且}\)l\(\text{且}\)l\(\text{且}\)l\(\text{且}\)l\(\text{且}\)l\(\text{\text{且}}\)l\(\text{且}\)l\(\text{且}\)l\(\text{且}\)l\(\text{且}\)l\(\text{且}\)l\(\text{且}\)l\(\text{且}\)l\(\text{且}\)l\(\text{且}\)l\(\text{且}\)l\(\text{且}\)l\(\text{且}\)l\(\begin{array}{c} \end{array}\) | m\(\text{且}\)l\(\text{且}\)l\(\text{且}\)l\(\text{且}\)l\(\text{且}\)l\(\text{且}\)l\(\text{且}\)l\(\text{且}\)l\(\text{且}\)l\(\text{且}\)l\(\text{且}\)l\(\text{且}\)l\({\text{且}}\)l\(\text{且}\)l\(\text{且}\)l\(\text{且}\)l\(\text{且}\)l\(\text{且}\)l\(\text{且}\)l\(\text{且}\)l\(\text{且}\)l\(\text{且}\)l\(\text{且}\)l\(\text{且}\)l\(\text{且}}\) |
| m\(\text{且}\)l\(\text{且}\)l\(\text{且}\)l\(\text{且}\)l\(\text{且}\)l\(\text{且}\)l\(\text{且}\)l\(\text{且}\)l\(\text{且}\)l\(\text{且}\)l\(\text{且}\)l\(\text{且}\)l\{\text{且}\} | m\(\text{且}\)l\(\text{且}\)l\(\text{且}\)l\(\text{且}\)l\(\text{且}\)l\(\text{且}\)l\(\text{且}\)l\(\text{且}\)l\(\text{且}\)l\(\text{且}\)l\(\text{且}\)l\(\text{且}\)l\)\(\text{且}\)l\(\text{且}\)l\(\text{且}\)l\(\text{且}\)l\(\text{且}\)l\(\text{且}\)l\(\text{且}\)l\(\text{且}\)l\(\text{且}\)l\(\text{且}\)l\(\text{且}\)l\(\text{且}\)l\(\text{及}\)l\(\text{及}\)l\(\text{及}\)l\(\text{及}\)l\(\text{及}\)l\(\text{及}\)l\(\text{及}\)l\(\text{及}\)l\(\text{及}\)l\(\text{及}\)l\(\text{及}\)l\(\text{及}\)l\(\text{及}\)l \(\begin{array}{c} \end{array}\) | m\(\text{及}\)l\(\text{及}\)l\(\text{及}\)l\(\text{及}\)l\(\text{及}\)l\(\text{及}\)l\(\text{及}\)l\(\text{及}\)l\(\text{及}\)l\(\text{及}\)l\(\text{及}\)l\(\text{及}\)l\(\text{\text{及}}\) |
| m\(\text{及}\)l\(\text{及}\)l\(\text{及}\)l\(\text{及}\)l\(\text{及}\)l\(\text{及}\)l\(\text{及}\)l\(\text{及}\)l\(\text{及}\)l\(\text{及}\)l\(\text{及}\)l\(\text{及}\)l\{\text{及}\} | m\(\text{及}\)l\(\text{及}\)l\(\text{及}\)l\(\text{及}\)l\(\text{及}\)l\(\text{及}\)l\(\text{及}\)l\(\text{及}\)l\(\text{及}\)l\(\text{及}\)l\(\text{及}\)l\(\text{及}\)l\)\(\text{及}\)l\(\text{及}\)l\(\text{及}\)l\(\text{及}\)l\(\text{及}\)l\(\text{及}\)l\(\text{及}\)l\(\text{及}\)l\(\text{及}\)l\(\text{及}\)l\(\text{及}\)l\(\text{及}\)l\(\text{及其}\) |
#
J 1
yssg cil
Philips Jil 11.
#
x 1 y
aalalalalalalalalalalalalalalalal
y
Philips
. www.philips.com/welcome .Philips
()
(FC6132)
(FC6132)
(FC6132) 3
(FC6132) 4
(FC6132) 5
(FC6132)
HEPA 7
8
HEPA 9
10
1
12
13
14
15
16
17
18
19
20
(FC6132) 21
+22
23
24
(FC6132) 25
(FC6132) 26
(FC6130) 27
(FC6130) 28
(FC6130) 29
(A)j4jLjLjLjLjLjLjLjLjLjLjLj
J 1
(9)
[\text{,}A]
J 1
1
bi jybljgljgai y. jilw golll bi j4j
1y
J 1
14
1
i 1
pI jI 10, aieeall y biai i (Jlabll lai L) aiaa
x 1
jllppeo no slll jilfo
i Philips 10
jll jblalss
1
biil 1y jx pall alg cia g y
jlll jll l jll l jll jll jll jll jll jll jll jll jll jll jll jll jll jll jll jll jll jll jll jll jll jll jll jll jll jll jll jll jll jll jll jll jll jll jll jll jll jll jll
HEPA
a
(EMF) 1
EMF) 1
1 1
y
#
(FC6132) (FC6130)
aiisallpisiwljkiill jyixlalnoi
L
i 1
. www.philips.com/welcome
(1)
(FC6132)
(FC6132) 1
(FC6132) 3
(FC6132)
(FC6132) 5
(FC6132) 6
HEPA 7
8
HEPA 9
10
i<11p>
12
13
14
15
16
17
18
19
20
(FC6132) 21
山+22
23
24
(FC6132) 25
(FC6132) 26


