NL — Cooker — Mode d'emploi PDF")
KN6C61A(X)NL - Cooker INDESIT - Free user manual and instructions
Find the device manual for free KN6C61A(X)NL INDESIT in PDF.
User questions about KN6C61A(X)NL INDESIT
0 question about this device. Answer the ones you know or ask your own.
Ask a new question about this device
Download the instructions for your Cooker in PDF format for free! Find your manual KN6C61A(X)NL - INDESIT and take your electronic device back in hand. On this page are published all the documents necessary for the use of your device. KN6C61A(X)NL by INDESIT.
USER MANUAL KN6C61A(X)NL INDESIT
Positioning and levelling
Electrical connection
Table of characteristics
Description of the appliance, 15
Overall view
Control panel
Start-up and use, 16-18
Starting the oven
Cooking modes
Practical cooking advice
Oven cooking advice table
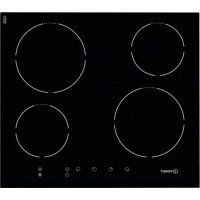
Using the glass ceramic hob, 19
Switching the cooking zones on and off
Cooking zones
KN6C61A/NL
Precautions and tips, 20
General safety
Disposal
Respecting and conserving the environment
Care and maintenance, 21
Switching the appliance off
Cleaning the appliance
Replacing the oven light bulb
Cleaning the glass ceramic hob
Assistance
! Before operating your new appliance please read this instruction booklet carefully. It contains important information concerning the safe installation and operation of the appliance.
! Please keep these operating instructions for future reference. Make sure that the instructions are kept with the appliance if it is sold, given away or moved.
! The appliance must be installed by a qualified professional in accordance with the instructions provided.
! Any necessary adjustment or maintenance must be performed after the cooker has been disconnected from the electricity supply.
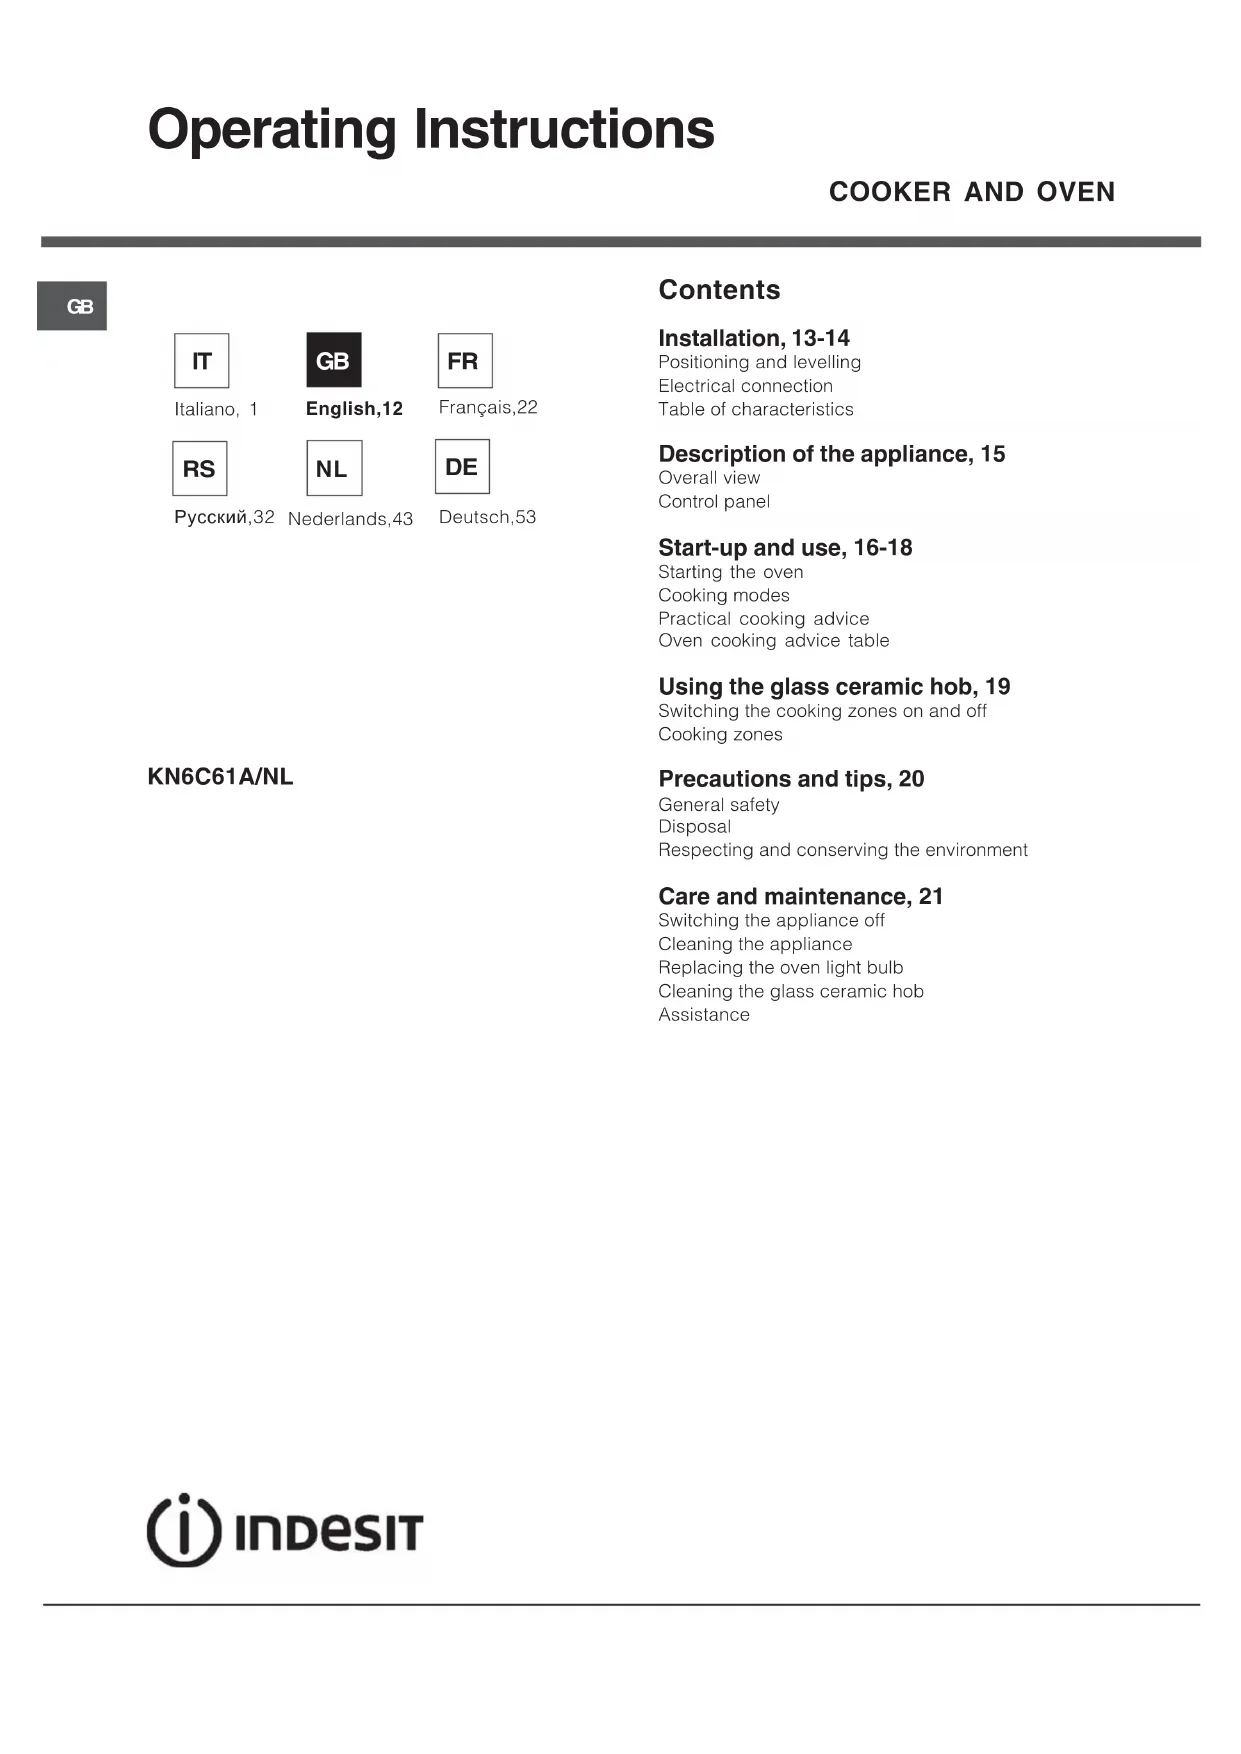
Positioning and levelling
! It is possible to install the appliance alongside cupboards whose height does not exceed that of the hob surface.
! Make sure that the wall in contact with the back of the appliance is made from a non-flammable, heat-resistant material (T 90^
To install the appliance correctly:
- Place it in the kitchen, the dining room or the bedsit (not in the bathroom).
cabinet and the top of the hob.
This distance should be increased to 700~mm if the wall cabinets are flammable (see figure).
- Do not position blinds behind the cooker or less than 200mm away from its sides.
- Any hoods must be installed according to the instructions listed in the relevant operating manual.
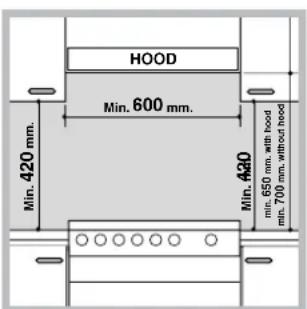
Levelling
If it is necessary to level the appliance, screw the adjustable feet into the places provided on each corner of the base of the cooker (see figure).
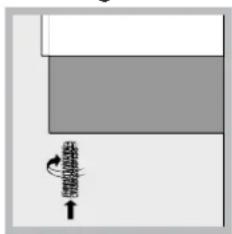
The legs* fit into the slots on the underside of the base of the cooker.
Electrical connection
Fitting the power supply cable
To open the terminal board:
- Insert a screwdriver into the side tabs of the terminal board cover.
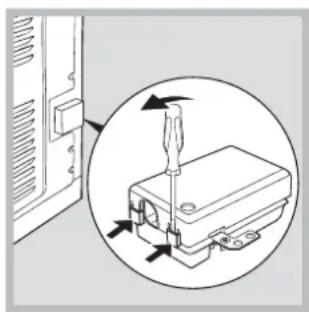
- Pull the cover to open it.
To install the cable, follow the instructions below:
- Loosen the cable clamp screw and the wire contact screws.
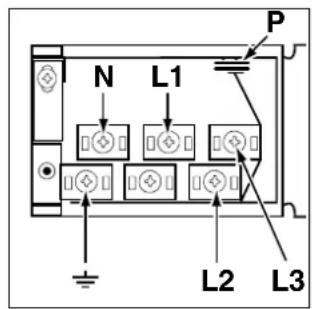
! The jumpers are pre-set at the Factory for 230V single-phase connection (see figure).
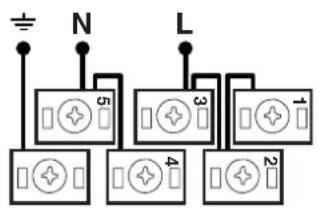
230V~ H05RR-F 3x4 CEI-UNEL 35363
To carry out the electrical connections as shown in the figures, use the two jumpers inside the box (see figure - labelled "P").
- Only available in certain models.
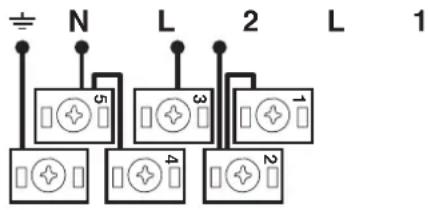
400V 2N~ H05RR-F 4x4 CEI-UNEL 35363
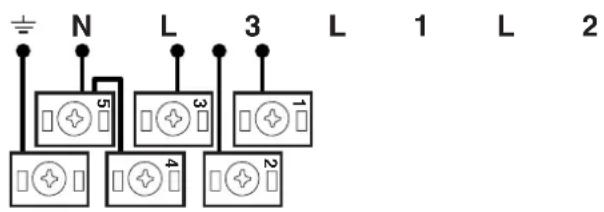
400V 3N~ H05RR-F 5x2.5 CEI-UNEL 35363
- Secure the power supply cable by fastening the cable clamp screw then put the cover back on.
Connecting the supply cable to the electricity mains
Install a standardised plug corresponding to the load indicated on the appliance data plate (see Technical data table).
The appliance must be directly connected to the mains using an omnipolar switch with a minimum contact opening of 3mm installed between the appliance and the mains. The switch must be suitable for the charge indicated and must comply with current electrical regulations (the earthing wire must not be interrupted by the switch). The supply cable must be positioned so that it does not come into contact with temperatures higher than 50^ at any point.
Before connecting the appliance to the power supply, make sure that:
- The appliance is earthed and the plug is compliant with the law.
- The socket can withstand the maximum power of the appliance, which is indicated by the data plate.
The voltage is in the range between the values indicated on the data plate. - The socket is compatible with the plug of the appliance. If the socket is incompatible with the plug, ask an authorised technician to replace it. Do not use extension cords or multiple sockets.
! Once the appliance has been installed, the power supply cable and the electrical socket must be easily accessible.
The cable must not be bent or compressed.
! The cable must be checked regularly and replaced by authorised technicians only.
! The manufacturer declines any liability should these safety measures not be observed.
| TABLE OF CHARACTERISTICS | |
| Oven dimensions (HxWxD) | 32x43.5x40 cm |
| Volume | 56 l |
| Useful measurements relating to the oven compartment | width 42 cm depth 44 cm height 8.5 cm |
| Voltage and frequency | see data plate |
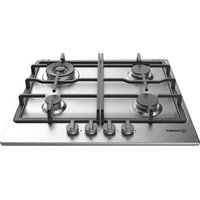
| Ceramic hob | |
| Front Left | 1700 W |
| Back Left | 1200 W |
| Back Right | 2100 W |
| Front Right | 1200 W |
| Max. ceramic hob consumption | 6200 W |
| ENERGY LABEL | Directive 2002/40/EC on the label of electric ovens. Standard EN 50304 Energy consumption for Natural convection - heating mode: Traditional mode Declared energy consumption for Forced convection Class - heating mode: Baking. |
| This appliance conforms | to the following European Economic Community directives: 2006/95/EC dated 12/12/06 (Low Voltage) and subsequent amendments - 2004/108/EC dated 15/12/04 (Electromagnetic Compatibility) and subsequent amendments - 93/68/EEC dated 22/07/93 and subsequent amendments. 2002/96/EC 1275/2008 (Stand-by/Off mode) |
Overall view
GB
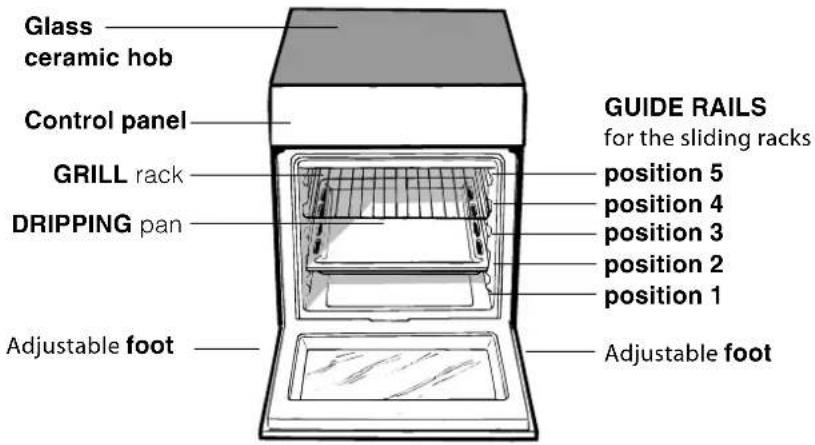
Control panel

GB
The first time you use your appliance, heat the empty oven with its door closed at its maximum temperature for at least half an hour. Ensure that the room is well ventilated before switching the oven off and opening the oven door. The appliance may emit a slightly unpleasant odour caused by protective substances used during the manufacturing process burning away.
Before operating the product, remove all plastic film from the sides of the appliance.
Starting the oven
- Select the desired cooking mode by turning the SELECTOR knob.
- Select the recommended temperature for the cooking mode or the desired temperature by turning the THERMOSTAT knob.
A list detailing cooking modes and suggested cooking temperatures can be found in the relevant table (see Oven cooking advice table).
During cooking it is always possible to:
- Change the cooking mode by turning the SELECTOR knob.
- Change the temperature by turning the THERMOSTAT knob.
- Set the total cooking time and the cooking end time (see below).
- Stop cooking by turning the SELECTOR knob to the "0" position.
! Never put objects directly on the bottom of the oven; this will prevent the enamel coating from being damaged. Only use position 1 in the oven when cooking with the rotisserie spit.
! Always place cookware on the rack(s) provided.
THERMOSTAT indicator light
When this is illuminated, the oven is generating heat. It switches off when the inside of the oven reaches the selected temperature. At this point the light illuminates and switches off alternately, indicating that the thermostat is working and is maintaining the temperature at a constant level.
Oven light
This is switched on by turning the SELECTOR knob to any position other than "0". It remains lit as long as the oven is operating. By selecting with the knob, the light is switched on without any of the heating elements being activated.
Cooking modes
A temperature value between 50^ and MAX can be set for all cooking modes except the following:
- GRILL (recommended: set only to MAX power level)
- GRATIN (recommended: do not exceed 200^ ).

TRADITIONAL OVEN mode
Both the top and bottom heating elements will be activated. When using this traditional cooking mode, it is best to use one cooking rack only. If more than one rack is used, the heat will be distributed in an uneven manner.

OVEN BAKING mode
The rear heating element and the fan are switched on, thus guaranteeing the distribution of heat in a delicate and uniform manner throughout the entire oven. This mode is ideal for baking and cooking temperature sensitive foods (such as cakes that need to rise) and for the preparation of pastries on 3 shelves simultaneously.

MULTILEVEL mode
All the heating elements (top, bottom and circular), as well as the fan, will be activated. Since the heat remains constant throughout the oven, the air cooks and browns food in a uniform manner. A maximum of two racks may be used at the same time.

PIZZAOVENmode
The circular heating elements and the elements at the bottom of the oven are switched on and the fan is activated. This combination heats the oven rapidly by producing a considerable amount of heat, particularly from the element at the bottom. If you use more than one rack at a time, switch the position of the dishes halfway through the cooking process.

GRILL mode
The central part of the top heating element and the rotisserie spit (where present) are activated. The high and direct temperature of the grill is recommended for food that requires a high surface temperature (veal and beef steaks, fillet steak and entrecôte). This cooking mode uses a limited amount of energy and is ideal for grilling small dishes. Place the food in the centre of the rack, as it will not be cooked properly if it is placed in the corners.

GRATIN mode
The top heating element and the rotisserie (where present) are activated and the fan begins to operate. This combination of features increases the effectiveness of the unidirectional thermal radiation provided by the heating elements through forced circulation of the air throughout the oven. This helps prevent food from burning on the surface and allows the heat to penetrate right into the food.
! The GRILL and GRATIN cooking modes must be performed with the oven door shut.
Spit roast (only available in certain models)
To operate the spit roast function (see diagram) proceed as follows:
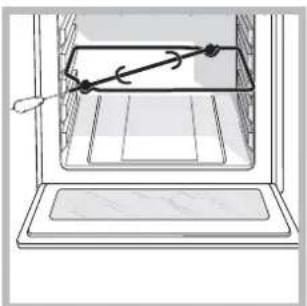
- Place the dripping pan in position 1.
- Place the rotisserie support in position 3
and insert the spit in the hole provided on the back panel of the oven.
- Start the rotisserie using the knob to select MODE

! When the mode is activated, the spit will stop if the door is opened.
Practical cooking advice
! Do not place racks in position 1 or 5 during fan-assisted cooking. Excessive direct heat can burn temperature sensitive foods.
MULTILEVEL
- Use positions 2 and 4, placing the food which requires more heat on the rack in position 2.
- Place the dripping pan on the bottom and the rack on top.
GRILL
- When using the GRILL cooking mode, place the rack in position 5 and the dripping pan in position 1 to collect cooking residues (fat and/or grease). When using the GRATIN cooking mode, place the rack in position 2 or 3 and the dripping pan in position 1 to collect cooking residues.
- We recommend that the power level is set to maximum. The top heating element is regulated by a thermostat and may not always operate constantly.
PIZZAOVEN
- Use a light aluminium pizza pan. Place it on the rack provided.
For a crispy crust, do not use the dripping pan as it prevents the crust from forming by extending the total cooking time. - If the pizza has a lot of toppings, we recommend adding the mozzarella cheese on top of the pizza halfway through the cooking process.
Timer
To activate the Timer proceed as follows:
- Turn the TIMER knob in a clockwise direction for almost one complete revolution to set the buzzer.
- Turn the TIMER knob in an anticlockwise direction to set the desired length of time.
GB
Oven cooking advice table
| Cooking modes | Foods | Weight (in kg) | Rack Position | Pre-heating time (minutes) | Recommended temperature | Cooking time (minutes) |
| Traditional Oven | Duck | 1 | 3 | 15 | 200 | 65-75 |
| Roast veal or beef | 1 | 3 | 15 | 200 | 70-75 | |
| Pork roast | 1 | 3 | 15 | 200 | 70-80 | |
| Biscuits (short pastry) | - | 3 | 15 | 180 | 15-20 | |
| Tarts | 1 | 3 | 15 | 180 | 30-35 | |
| Baking Mode | Tarts | 0.5 | 3 | 15 | 180 | 20-30 |
| Fruit cakes | 1 | 2 or 3 | 15 | 180 | 40-45 | |
| Plum cake | 0.7 | 3 | 15 | 180 | 40-50 | |
| Sponge cake | 0.5 | 3 | 15 | 160 | 25-30 | |
| Stuffed pancakes (on 2 racks) | 1.2 | 2 and 4 | 15 | 200 | 30-35 | |
| Small cakes (on 2 racks) | 0.6 | 2 and 4 | 15 | 190 | 20-25 | |
| Cheese puffs (on 2 racks) | 0.4 | 2 and 4 | 15 | 210 | 15-20 | |
| Cream puffs (on 3 racks) | 0.7 | 1 and 3 and 5 | 15 | 180 | 20-25 | |
| Biscuits (on 3 racks) | 0.7 | 1 and 3 and 5 | 15 | 180 | 20-25 | |
| Meringues (on 3 racks) | 0.5 | 1 and 3 and 5 | 15 | 90 | 180 | |
| Multi-cooking | Pizza (on 2 racks) | 1 | 2 and 4 | 15 | 230 | 15-20 |
| Lasagne | 1 | 3 | 10 | 180 | 30-35 | |
| Lamb | 1 | 2 | 10 | 180 | 40-45 | |
| Roast chicken + potatoes | 1+1 | 2 and 4 | 15 | 200 | 60-70 | |
| Mackerel | 1 | 2 | 10 | 180 | 30-35 | |
| Plum cake | 1 | 2 | 10 | 170 | 40-50 | |
| Cream puffs (on 2 racks) | 0.5 | 2 and 4 | 10 | 190 | 20-25 | |
| Biscuits (on 2 racks) | 0.5 | 2 and 4 | 10 | 180 | 10-15 | |
| Sponge cake (on 1 rack) | 0.5 | 2 | 10 | 170 | 15-20 | |
| Sponge cake (on 2 racks) | 1 | 2 and 4 | 10 | 170 | 20-25 | |
| Savoury pies | 1.5 | 3 | 15 | 200 | 25-30 | |
| Pizza Mode | Pizza | 0.5 | 3 | 15 | 220 | 15-20 |
| Roast veal or beef | 1 | 2 | 10 | 220 | 25-30 | |
| Chicken | 1 | 2 or 3 | 10 | 180 | 60-70 | |
| Barbecue | Soles and cuttlefish | 0.7 | 4 | - | Max | 10-12 |
| Squid and prawn kebabs | 0.6 | 4 | - | Max | 8-10 | |
| Cuttlefish | 0.6 | 4 | - | Max | 10-15 | |
| Cod filet | 0.8 | 4 | - | Max | 10-15 | |
| Grilled vegetables | 0.4 | 3 or 4 | - | Max | 15-20 | |
| Veal steak | 0.8 | 4 | - | Max | 15-20 | |
| Sausages | 0.6 | 4 | - | Max | 15-20 | |
| Hamburgers | 0.6 | 4 | - | Max | 10-12 | |
| Mackerels | 1 | 4 | - | Max | 15-20 | |
| Toasted sandwiches (or toast) | 4 and 6 | 4 | - | Max | 3-5 | |
| With rotisserie(where present) | ||||||
| Veal on the spit | 1.0 | - | 5 | Max | 80-90 | |
| Chicken on the spit | 1.5 | - | 5 | Max | 70-80 | |
| Lamb on the spit | 1.0 | - | 5 | Max | 70-80 | |
| Gratin | Grilled chicken | 1.5 | 2 | 10 | 200 | 55-60 |
| Cuttlefish | 1.5 | 2 | 10 | 200 | 30-35 | |
| With rotisserie(where present) | ||||||
| Veal on the spit | 1.5 | - | 5 | 200 | 70-80 | |
| Lamb on the spit | 1.5 | 2 | 5 | 200 | 70-80 | |
| Chicken (on the spit) + potatoes (roasted) | 1.5 | 2 | 5 | 200 | 70-75 | |
| - | 2 | 5 | 200 | 70-75 |
! The glue applied on the gaskets leaves traces of grease on the glass. Before using the appliance, we recommend you remove these with a special non-abrasive cleaning product. During the first few hours of use there may be a smell of rubber which will disappear very quickly.
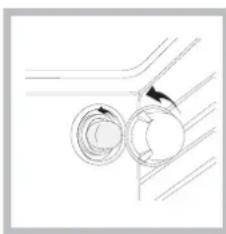
Switching the cooking zones on and off
To switch on a cooking zone, turn the corresponding knob in a clockwise direction.
To switch it off again, turn the knob in an anticlockwise direction until it is in the "0" position. If the COOKING ZONE ON indicator light is lit, this shows that at least one pf the cooking zones on the hob is switched on.
Cooking zones
The hob is equipped with electric hilite heating elements. When they are in use the following items on the hob become red.
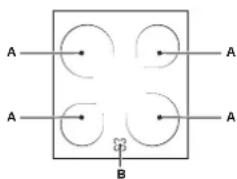
A. The cooking zone with radiant heating elements.
B. The residual heat indicator light: this indicates that the temperature of the corresponding cooking zone
is greater than 60^ even when the heating element has been switched off but is still hot.
Description of the heating elements
The circular radiant heating elements become red 10 - 20 seconds after they have been switched on.
The circular hilite heating elements guarantee even heat distribution in addition to the usual advantages that hilite heating elements bring.
Hilite elements emit high levels of heat and light as soon as they are switched on, offering the following practical advantages:
rapid heating (in relation to a gas burner)
rapid cooling
- even temperature across the whole surface (due to the circular heating elements)
| Setting | Normal or Fast Plate |
| 0 | Off |
| 1 Cooking vegetables, fish | |
| 2 | Cooking potatoes (using steam) soups, chickpeas, beans. |
| 3 | Continuing the cooking of large quantities of food, minestrone |
| 4 | For roasting (average) |
| 5 ForRoasting (above average) | |
| 6 | Forbrowning and reaching a boil in a short time. |
Practical advice on using the hob
- Use pans with a thick, flat base to ensure that they adhere perfectly to the cooking zone.
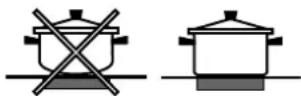
Always use pans with a diameter that is large enough to cover the hotplate fully, in order to use all the heat produced.
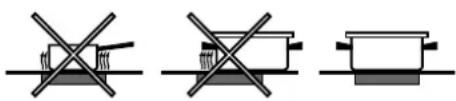
- Always make sure that the base of the pan is completely clean and dry: this ensures that the pans adhere perfectly to the cooking zones and that both the pans and the hob remain effective for a longer period of time.
- Avoid using the same cookware that is used on gas burners: the heat concentration on gas burners may have warped the base of the pan, causing it not to adhere to the surface correctly.
- Never leave a cooking zone switched on without a pan on top of it, as doing so may cause the zone to become damaged.
GB
! This appliance has been designed and manufactured in compliance with international safety standards. The following warnings are provided for safety reasons and must be read carefully.
General safety
- These instructions are only valid for the countries whose symbols appear in the manual and on the serial number plate located on the appliance.
- The appliance was designed for domestic use inside the home and is not intended for commercial or industrial use.
- The appliance must not be installed outdoors, even in covered areas. It is extremely dangerous to leave the appliance exposed to rain and storms.
- Do not touch the appliance with bare feet or with wet or damp hands and feet.
- The appliance must be used by adults only for the preparation of food, in accordance with the instructions outlined in this booklet. Any other use of the appliance (e.g. for heating the room) constitutes improper use and is dangerous. The manufacturer may not be held liable for any damage resulting from improper, incorrect and unreasonable use of the appliance.
- The instruction booklet accompanies a class 1 (insulated) or class 2 -subclass 1 (recessed between 2 cupboards) appliance.
- Do not touch the heating elements or certain parts of the oven door when the appliance is in use; these parts become extremely hot. Keep children well away from the appliance.
- Make sure that the power supply cables of other electrical appliances do not come into contact with the hot parts of the oven.
- The openings used for the ventilation and dispersion of heat must never be covered.
- Do not use unstable or misshapen pans on the cooking zones; this will help to avoid accidental spills. Make sure pan handles are turned towards the centre of the hob in order to avoid accidental burns.
Always use oven gloves when placing cookware in the oven or when removing it. - Do not use flammable liquids (alcohol, petrol, etc...) near the appliance while it is in use.
- Do not place flammable material in the lower storage compartment or in the oven itself. If the appliance is switched on accidentally, it could catch fire.
Always make sure the knobs are in the position when the appliance is not in use. - When unplugging the appliance, always pull the plug from the mains socket; do not pull on the cable.
- Never perform any cleaning or maintenance work without having disconnected the appliance from the electricity mains.
- If the appliance breaks down, under no circumstances should you attempt to perform the repairs yourself. Repairs carried out by inexperienced persons may cause injury or further malfunctioning of the appliance. Contact Assistance.
- Do not rest heavy objects on the open oven door.
-
The internal surfaces of the compartment (where present) may become hot.
-
The glass ceramic hob is resistant to mechanical shocks, but it may crack (or even break) if hit with a sharp object such as a tool. If this happens, disconnect the appliance from the electricity mains immediately and contact a Service Centre.
- If the surface of the hob is cracked, switch off the appliance to prevent electric shocks from occurring.
- Remember that the cooking zones remain relatively hot for at least thirty minutes after they have been switched off.
- Keep any object which could melt away from the hob, for example plastic and aluminium objects, or products with a high sugar content. Be especially careful when using plastic film and aluminium foil or packaging: if placed on surfaces that are still hot, they may cause serious damage to the hob.
- Do not place metal objects (knives, spoons, pan lids, etc.) on the hob as they may become hot.
- The appliance should not be operated by people (including children) with reduced physical, sensory or mental capacities, by inexperienced individuals or by anyone who is not familiar with the product. These individuals should, at the very least, be supervised by someone who assumes responsibility for their safety or receive preliminary instructions relating to the operation of the appliance.
- Do not let children play with the appliance.
Disposal
- When disposing of packaging material: observe local legislation so that the packaging may be reused.
- The European Directive 2002/96/EC relating to Waste Electrical and Electronic Equipment (WEEE) states that household appliances should not be disposed of using the normal solid urban waste cycle. Exhausted appliances should be collected separately in order to optimise the cost of re-using and recycling the materials inside the machine, while preventing potential damage to the atmosphere and to public health. The crossed-out dustbin is marked on all products to remind the owner of their obligations regarding separated waste collection.
For further information relating to the correct disposal of exhausted household appliances, owners may contact the public service provided or their local dealer.
Respecting and conserving the environment
- You can help to reduce the peak load of the electricity supply network companies by using the oven in the hours between late afternoon and the early hours of the morning.
Always keep the oven door closed when using the GRILL and GRATIN modes: This will achieve improved results while saving energy (approximately 10% ). - Check the door seals regularly and wipe them clean to ensure they are free of debris so that they adhere properly to the door, thus avoiding heat dispersion.
Switching the appliance off
Disconnect your appliance from the electricity supply before carrying out any work on it.
Cleaning the oven
! Never use steam cleaners or pressure cleaners on the appliance.
- Clean the glass part of the oven door using a sponge and a non-abrasive cleaning product, then dry thoroughly with a soft cloth. Do not use rough abrasive material or sharp metal scrapers as these could scratch the surface and cause the glass to crack.
- The stainless steel or enamel-coated external parts and the rubber seals may be cleaned using a sponge which has been soaked in lukewarm water and neutral soap. Use specialised products for the removal of stubborn stains. After cleaning, rinse and dry thoroughly. Do not use abrasive powders or corrosive substances.
- The inside of the oven should ideally be cleaned after each use, while it is still lukewarm. Use hot water and detergent, then rinse well and dry with a soft cloth. Do not use abrasive products.
- The accessories can be washed like everyday crockery, and are even dishwasher safe.
- Dirt and grease should be removed from the control panel using a non-abrasive sponge or a soft cloth.
- Stainless steel can be marked by hard water that has been left on the surface for a long time, or by aggressive detergents that contain phosphorus. We recommend that the steel surfaces are rinsed well then dried thoroughly.
Inspecting the oven seals
Check the door seals around the oven regularly. If the seals are damaged, please contact your nearest After-sales Service Centre. We recommend that the oven is not used until the seals have been replaced.
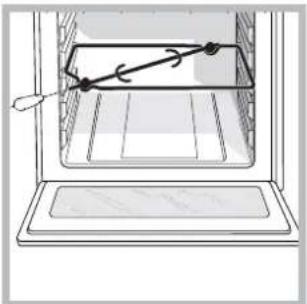
Replacing the oven light bulb
- After disconnecting the oven from the electricity mains, remove the glass lid covering the lamp socket (see figure).
- Unscrew the light bulb and replace it with a similar one: voltage 230V , wattage 25W , cap E 14.
- Replace the lid and reconnect
the oven to the electricity supply.
Cleaning the glass ceramic hob
! Do not use abrasive or corrosive detergents (for example, products in spray cans for cleaning barbecues and ovens), stain removers, anti-rust products, powder detergents or sponges with abrasive surfaces: these may scratch the surface beyond repair.
- It is usually sufficient simply to wash the hob using a damp sponge and dry it with absorbent kitchen roll.
- If the hob is particularly dirty, rub it with a special glass ceramic cleaning product, then rinse well and dry thoroughly.
- To remove more stubborn dirt, use a suitable scraper (this is not supplied with the appliance). Remove spills as soon as possible, without waiting for the appliance to cool, to avoid residues forming crusty deposits. You can obtain excellent results by using a rustproof steel wire sponge - specifically designed for glass ceramic surfaces - soaked in soapy water.
- If plastic or sugary substances have accidentally been melted on the hob, remove them immediately with the scraper, while the surface is still hot.
- Once it is clean, the hob may be treated with a special protective maintenance product: the invisible film left by this product protects the surface from drips during cooking. This maintenance should be carried out while the appliance is warm (not hot) or cold.
- Always remember to rinse the appliance well with clean water and dry it thoroughly: residues can become encrusted during subsequent cooking processes.
| Glass ceramic hob cleaners | Available from |
| Window scraper Razor blade scrapers | DIY Stores |
| Replacement blades | DIY Stores, supermarkets, chemists |
| COLLO lunetaHOB BRITEHob CleanSWISSCLEANER | Boots, Co-op stores,department stores, Regional Electricity Company shops,supermarkets |
Assistance
! Never use the services of an unauthorised technician.
Please have the following information to hand:
- The type of problem encountered.
The appliance model (Mod.).
The serial number (S/N).
The latter two pieces of information can be found on the data plate located on the appliance.

Italiano, 1

English, 12

Francais, 22

Pycckn,32

DE
Deutsch, 53Nederlands,43
Sommaire
Installation, 23-24
- IN3MeHHTb nporpaMMy npriroTOBHeHn pyn nOmoUny pkoTkn PPOrPAMMbI;
- IN3MeHInb TempepaTpy npu NMOU peryIaTopa TEPMOCTAT;
- npepBaTb npiroTOBHeHne, NOBepHyB pyKoTky PPOrPAMMbI b noToKeHne 0;
!Bcerda ctabbte nocyuHa npinaraioyucpewetky.
HdkaTop TEPMOCTATA
BkHouHeH 3TOI INHdkaTopo O3Haayet,TO DxyBOON kkaΦ BkHouEn. INHdkaTOp rachet, KOrda BHyTpIn dYXBOrO WkaΦa 6ydet DocnHryTa 3aDaHHaTeMnepaTypa.Ha daHHOM 3Tane INHdkaTOp TO 3aropaETc,TO rachet, NOKa3bIBaR,TO TepMOCTAT BkHouEn H NOdEpeKNaBaET Temnepatypy Hen3MeHHOn.
OcBeueHne DyXOBoro WkaΦa
OcbeseHne DxyoBoro 6kaΦa BkIIOuHaTc npn nobopoTe pykoTkn PPOrPAMMbI B IIObOE noIOxKeHne Kpome 0 .OcbeseHne oCTaETcB kIIOueHHbIM Do Tex nop, noka bYdET BkIOUeH dyXOBON KaΦ. Pn BbIbope nIOxKeHn npn NOMOu pyKOaTKn OCBeSeHne BkIOUaTc8 Be3 NOdkIOUeHn HArpeBaTeNbHbIX 3JIemEHTOB.
Tanmep\*
Iopraok BkIIOueHn Taumepa (acob):
- NOBepHnte no yacOBon cTpeNke O pyKoRtky TANMEP NOHT Ha OIN NOnHbIn NOBOPOT dN3BODa 3BOHka;
- NOBepHnte npOTNB YacOBON CTpeKNI OpyKoRTKy TANMEP, BbI6paB HxKHOE Bpemr.
PporpaMbI npnroTOBJeHna
!IgBCEx nporpAMM MoXHO 3aDaTb TemnepaTy pO 50^ do MAKC kPome:
- PnIb (peKOMeHnyETcYyCTaHaBnBaTb TOnbKO MAKC. Temnepatypy);
ПОДРУМЯНИBAHAЕ (pekOMeHdyeTcH HeпрБышТь Tempepatу 200°C).

Tporpamma TPAINUHOHAJIbHARdYXOBKA
BknIOaIOTcIbHaHarpBeAteIbHbIX 3JIeMeHTa: HxHHN I BepxHn. B pexime TpaDnUHOHaBHoro npiroTOBHeHn peKOMeHdyETcNcNOb3OBA TbToJbKO OINuH yPOBeHb: npnCNOJb3OBAHN HeCKOJIbKnx yPOBHei pacpeJeHHe TeMnePaTpybl Byet HEONTMaJIbHBIM..

Iporpamma KOHdTEPCKA BbINEyKA
BkHouaTeTc3aHnHarpeBaTeIbHbI 3IeMeHT n BENTnAToTOp,ObecneuHBaYMepeHHbI N ODHopoNbH JAp BHyTpN dYxOBKn. DaHnaFyHKUra peKOMeHdyETc Tn npiroTOBHeHn DeNkATbIX 61IOd (HaNPmep, KOHntepcknx H3dEInn, Tpe6yUoxn NObema Tecta) n MeNKo BBineKOn ODHOBpeMeHHo Ha Tpex yPobhX.

Pporpamma ODHOBPEMEHHOE
PNIFOTOBJEHNE
BkHIOaIOTc BCE HArpeBaTeIbHbIe 3IeMeHTbl (BepxHn, HxHn n KpyIb) n BeHTnIaTOp. TaK kak JAp RbIaTeCnOCToHHbIM BO BCem dYxOBOM WKaCy, BO3dYx ObecneuBaET ODHOPoHHe npiroTOBnEHe n NpOpyMaHnBaHne npOdyKaTa. OHOBpeMeHNO MoXHo NCNoIb30BaTb He 6Oone DByx ypoBHe dYxOBoro WkaFa.

Pporpma NUCA
BknHouaIOTc HnKnn n Kpyrbln HarpeBaTeNbHbIe 3JIeMeHTb I BENTINJATOp. TaKoe COyETAHne N03BOJnRE T6bICTro pa3oRpeTb DxyOBky C6Oone CnIbHbIM BblJeHHeM Xapa CNH3y.EcnN nCNoIb3yIOTc HECKONbKO yPOBHeN ODNHOBPeMeHHO, Heo6XoDmO MeHArTb MecTaMn 6nIOda BcepeDInHe IN npuroTOBHeHra.

Pporpamma PnJb
BknIOaETcB epxHn HArpeBaTeNbHbI 3JeMeHT n BepTeN (ecn OH ImeEeTc). BbcOka TEmnpaTpyu n Xap npMOrO DeCTBnR grnpeKoMeHdyETcD nprnoTOBJIeHN IPOdYkTOB, HyKaJIoUxCBA B bICOKoN IOBePxAocTHoT TemnpaType (TeJrHu N ROBaxnx 6nΦwTeKcoB, BbIe3Kn, aHTpeKoTOB). 3To npOrpamMa He tpe6yEt BoIbWo ropXoJa 3Heprn, ndeAJIbHO NOxDOnIT DnI npriOTOBIIeHN Ha rpnIe He6oJIbWnx Nopui. IomeCTnTe npOdyKT B ueHTp peWeTKu, TaK kak Xap He paCnpocTpAnreTcNo yIam.

;PporpaMMAIPODPYMRAHNAHNE
BkIIOuHaETcBepxHnHarpeBaTeNbHbIeJIeMeHT,Bepten nBEHTnJrTOp (ecn OH nmeTc).Coyetae OndHOHaNPaBPHeHHoe BblJeJIeHne Xapa C npHydnteHbOn cnpKyIaueN Bo3dyxa BHYtpn DxyoBoro 1ka.3To npenTCTByet ObropaHIO nobepxHoctn npOdyKTO,NObIIaA npOHKaIOUyO CNOC6HOCTb kapa.
!IpnpuroToBneHnBpeKmMaxTPINbIPOPymHBAHNEDbepaDyXOBOrokaΦaDoJxHa6bIt3akpbita.
BepTeN (mEeTcTOnbKO B HekOTOpbIX MoEdJAX)
ДяВКЛIOUeHЯВЕтela (CM.pncyHOK) ebINOJIHume cneDyIouue onepaquu:
1.yctaHOBtne npOTnbHb Ha 1-bi yPOBeHb;
2.yctahOBNTe DepkateB BepTeHa 3-by ypoBeHb IN BCTaBBTE BPeTENB CneuaNBHOE OTBepCTNE B 3aDHeN CTehKe dYXoBOrO uKada;
3. BKIOHnTe BepTeI, NOBepHyb pykoTky IPOrPAMMbI
HaIIM
!Nocne Hauana BbINOHHeHn nporpaMMbl ;npnOTKpbBaHHn DBePcBdyXOBKn BepTeN octaHaBnBaEeTcra.
Ppaktnueckne coBeMb no npnroTOBHeHIO
I B pexmme BeHTnnpemyoro npurotoBneHnre HNCIOJIb3yIte 1-bi n 5-bi yPOBHN: OHN IODBepraOTcnpMOMY BO3dEInCTBnIO rOpAero BO3dyXa, KOtOpbMOKeT CKeey DeJINKaTHbIe npOdyKTbl.
ODHOBPEMEHHOE PIPNTOBOJEHNE
- IcnoIb3yHOTcA 2-0n 4-bu npOBHN,Ha 2-0n NOMeUaHOTcNpoDyKtB, Tpe6yIOuNe 6Oone HHTeHCNBHOJxapa.
- YctaHOBInTe npoNTBeHb CHN3y, a peWteKv CBepxv.
TINb
- Ppi nCnOJIb3OBaHnI rPNIJI yCTaHOBIne peWTeKy Ha 5-bi I yPOBeH b nI pOTuBEH dIg c6Op a COKOB (Xnpa) Ha 1-bi. Ppi nCnOJIb3OBaHnI pEXIMMa GRATIN (IOpymraHbAHne) yCTaHOBIne peWTeKy Ha 2-oi nn 3-nI yPOBeH, a npOTuBEH ha 1-bi dIg c6Op a COKOB.
- PekomeHdyetyc Bb6paTb MaKcImaJIbHyIO MoUHOCb dYXOBKn. He 6ecnOKoITecb, ecnBepxHm 3JemeHT He octaETc NOCTOHH BkIIOueHHbIM: erp a6oTa ynpabJIeTcA TepMOCTaTOM.
NIIUCA
IcnoJb3yIe npOTnBeH n3 IerKOro aIOMHHy, yCTaHaBnBaI erO Ha npNarAioUyIOcpeWETky. Ppi nCNoB3oBaHN npOTnBEH BpEmy BblneKn yDInnHReTc, YTO 3aTpynHre TOnyueHHe xpyCTaIe Nnucbl.
B Cnyae BbIneukn Nucu b c 6nbHoh HauHHKo peKOMeHNyEtca NOOKNb Ha NcUcY cbp Moaapenna B cepEnHe BIneHKN.
RS
Ta6nla npuroTOBHeN B dyXOBOM ukafo