
PhotoActor - Digital photo frame INTENSO - Free user manual and instructions
Find the device manual for free PhotoActor INTENSO in PDF.

| Product type | Digital photo frame |
| Brand | Intenso |
| Model | PhotoActor |
| Display | 8-inch TFT LCD (20.32 cm), 4:3 format, 800x600 pixels resolution |
| Power supply | AC adapter 100-240 V AC, 50/60 Hz, output 5 V, 1 A DC |
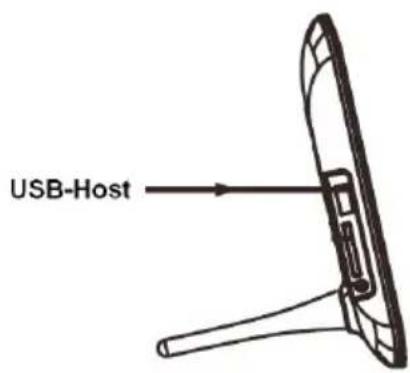
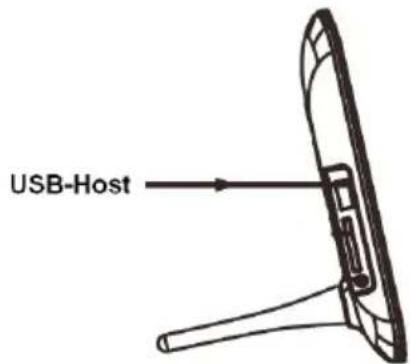
| Ports | USB Host 2.0, SD/SDHC/MMC card reader |
| Supported image formats | JPEG, max resolution 9000 x 9000 pixels |
| Dimensions | 217 x 172 x 22 mm |
| Weight | Approximately 420 g |
| Main functions | Slideshow, calendar, clock, custom settings |
| Features | On/off timer, brightness adjustment, transition effects, zoom |
| Included accessories | Remote control (battery included), stand, AC adapter, multilingual user manual |
| Cleaning | Use a soft, lint-free cloth, without chemicals |
| Safety | Do not open the casing, avoid water and heat sources, do not use near water |
| Repairability | Do not repair yourself; consult a professional |
| Operating temperature | 0 °C to +40 °C |
| Compatibility | SD/SDHC/MMC memory cards, USB 2.0 drives (max 100 mA) |
| Menu languages | Multilingual (French, German, English, etc.) |
| Firmware update | Possible via www.intenso.de |
| Power supply | Included AC adapter, input 100-240 V AC, output 5 V DC |
Frequently Asked Questions - PhotoActor INTENSO
User questions about PhotoActor INTENSO
0 question about this device. Answer the ones you know or ask your own.
Ask a new question about this device
Download the instructions for your Digital photo frame in PDF format for free! Find your manual PhotoActor - INTENSO and take your electronic device back in hand. On this page are published all the documents necessary for the use of your device. PhotoActor by INTENSO.
USER MANUAL PhotoActor INTENSO
Intenso 8“ PHOTOACTOR
- Secure Digital Card (SD™)
- Secure Digital High Capacity (SDHC™)
Multimedia Card (MMC™)
Operating instructions for 8" Intenso Digital Photo Frame
Please comply with the following instructions to be informed about the different functions of the Intenso digital photo frame.
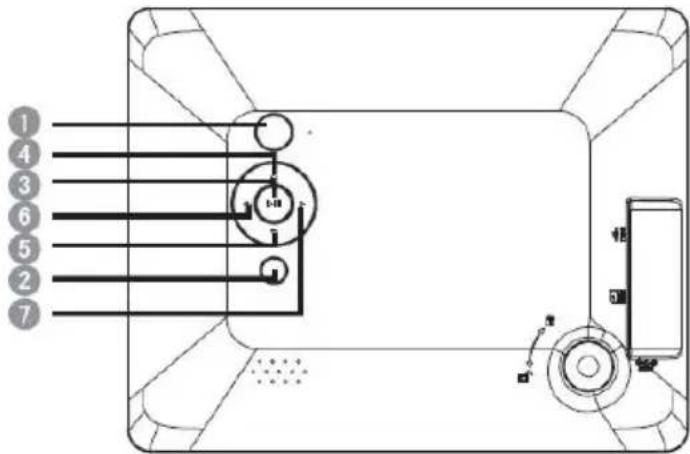
1 Power On/Off
2 Exit [S] Button
3 Play/Pause [ ] Button
4 Up [▲] Button
5 Down [▼] Button
6 Left [<] Button
7 Right [▶] Button
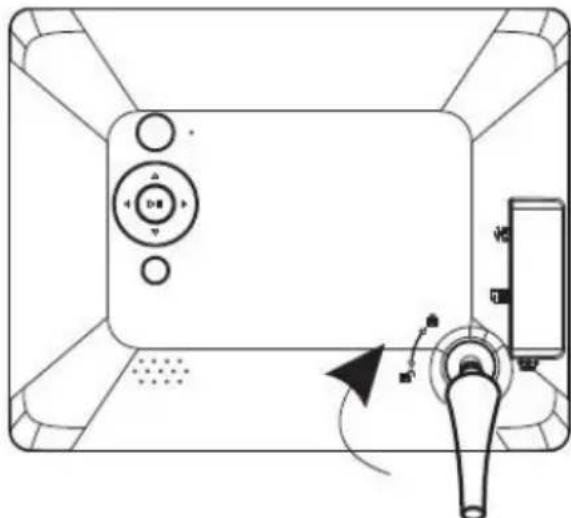
Rotate the Foot clockwise, to connect it to the photo frame.
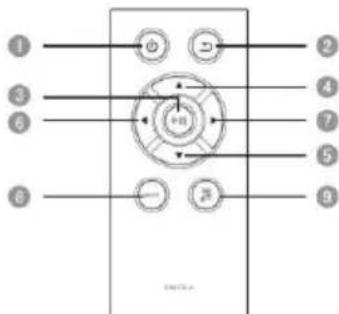
| 1 | Power On/ Off | |
| 2 | Leaps back to the previous menu | |
| 3 | Play / Pause button | |
| 4 | Moves the cursor upwards | |
| 5 | Moves the cursor downwards | |
| 6 | Moves the cursor to the left | |
| 7 | Moves the cursor to the right | |
| 8 | MODE | Selection of display screen |
| 9 | OSD | Displays the On-Screen-Display (OSD) |
1) Connect and switch on the digital photo frame
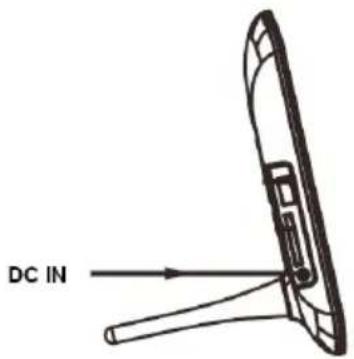
Connect the Power Adapter supplied with the frame (DC-IN). Plug the other end of the Adapter into the Socket. The photo frame will now start automatically. Hold down the Power button briefly to turn it off or on again.
Please note:
The plug must be placed next to the device so to be easily accessible.
Do not open the box of the line adapter. If the box is open, there is danger of life caused by electric shock. The product does not contain parts to be maintained.
Actuate the line adapter only with earthed plugs of AC 100-240V\~, 50 / 60Hz If you are not sure about the provision of electricity at the installation point, ask your energy provider.
Use the included line adapter and line connection cable only.
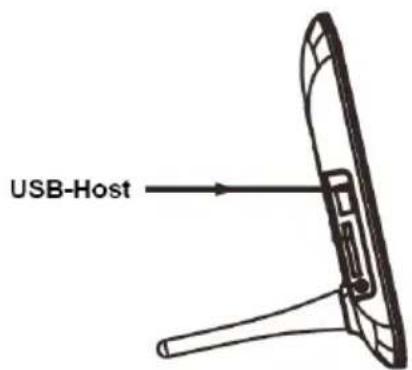
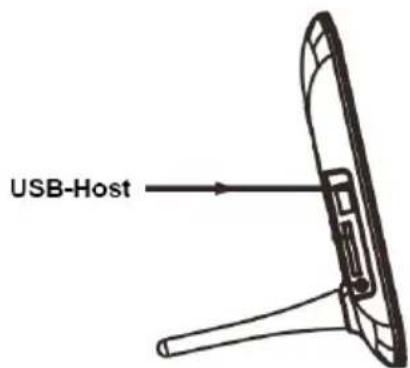
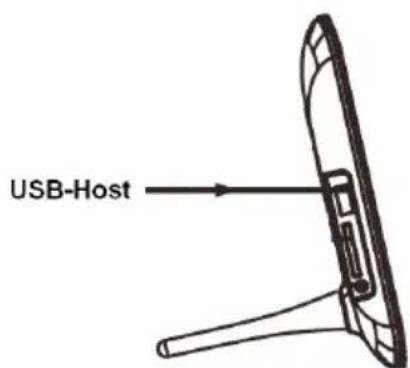
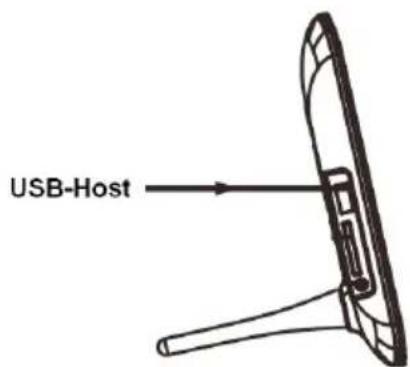
2) Insert memory cards | connect USB data carriers
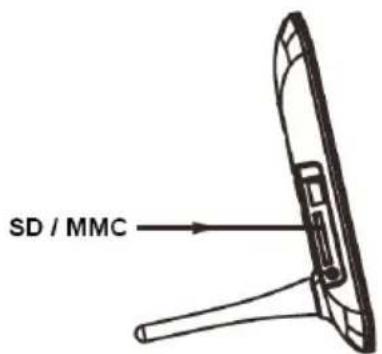
Insert the Memory Card with the Logo towards the Display into the card reader slot.
Please note: Never insert cards by use of force!
The following memory card formats can be used with your digital photo frame:
- Secure Digital Card (SD™)
- Secure Digital High Capacity (SDHC™)
Multimedia Card (MMC™)
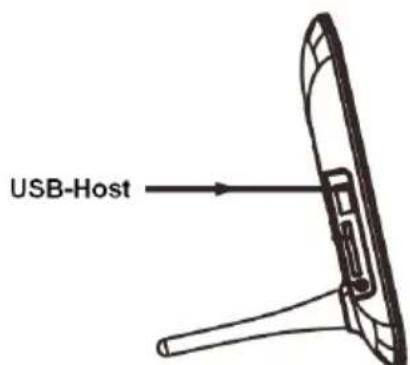
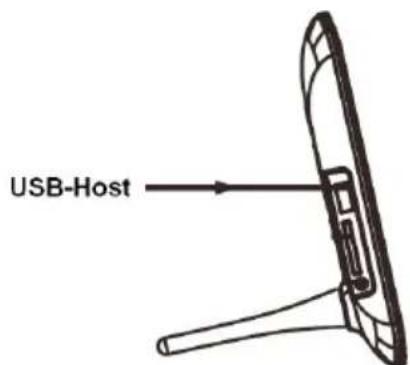
USB data carriers can only be plugged into the USB slot in one direction.
Please note: Never insert USB data carriers by use of force!
Note: The digital photo frame is exclusively designed for the use with compatible memory cards and 2.0 data media (100 mA).
3) General Operation
a) Main Menu
After powering on, the Main Menu appears.
In the Main Menu you have the choice between the Different Functions of the Digital Photo Frame and the Setup Menu. Tap the key , (arrow keys) on the photo frame or on the remote control to select the menu points. By taping the keys , (arrow keys) on the photo frame or on the remote control you browse in the respective under-menus. Confirm your selection by taping the key Play/Pause [▶] on the photo frame or on the remote control.
b) Viewing Photos
Navigate in the Main Menu to the function Photo. It will display the Connected Storage Devices. Depending on which storage device is connected, you will have the Choice between SD, MMC and USB. Confirm your selection with the Play/Pause [▶] button.
It will now display to you All the Folders with supported Images. Choose your desired Folder to reach the Image Preview Menu. Navigate now to a Photo and confirm with the Play/Pause [▶] button to start the Slideshow from here.
In case you have already started a slide show using the storage medium selected, the digital photo frame will automatically continue with this slide show. If required, you need to manually adjust the view of the folders available and the picture preview menu. Please press the Back [D] button to leave the slide show and to start the preview menu.
Functions during the slideshow:
- By pressing the Arrow Keys either Left or Right you can jump one picture Back or Forward.
- Pressing the Play/Pause [▶i] button will Stop the Slideshow and display Detailed Information superimposed on the photo. Press the button again to continue the Slideshow.
- Hold down the Play/Pause [▶] button to open the OSD Menu. Here you can choose the File Playback Options, to Zoom or Rotate the image, to adjust the Brightness, to choose the Transition Effects, and to adjust the Display Time for Images and the Scale of the Images.
c) Calendar:
In the Calendar Mode the Set Date, Weekday, Time and Monthly View is Displayed. In the Background (if there is an inserted storage device loaded with photos) a Slideshow will be played. With the Arrow Keys Navigate through the monthly view.
d)Clock:
In the Clock Mode the Set Time and a Calender Page with Month, Day and Day of the Week is displayed. Hold down the Play/Pause [▶] button to open the OSD Menu. Here you can Set the Date, 12/24h Mode and the Time, as well as Activate or Deactivate the Timer.
e) Changing the Settings
Choose in the Main Menu the function Setup to individually set up your device. Navigate with the , buttons to the desired menu item. General, Display, Multimedia and Time | Date | Timer are available. Confirm your selection with the Play/Pause [▶i] button.
| Settings | Description | ||
| General Setup | Language | Select the desired language. | |
| Product Information | Displays the current firmware version. | ||
| Firmware Update | Should a firmware update be available at www.intenso.de the update can be installed through here. | ||
| Factory Settings | Reset the device to the factory settings. | ||
| Auto Run | Pick the mode your photo frame will begin on after turning on. (Photo, Calendar, Last used function). | ||
| ECO | Brightness | Adjust the brightness of the TFT Display. | |
| Display Off | Set the amount of time of inactivity which will turn off the display. | ||
| Turn Off | Set the amount of time of inactivity which will turn off the photo frame. | ||
| Photo | File | Selection of list for the photo reproduction | |
| Diashow | Setting up of the passage effect | ||
| Duration of visualisation | Setting up of the duration of visualisation | ||
| Scaling | Setting up oft he display fort he photo mode | ||
| Clock | Date | Timer | Date | Set the current date. | |
| Time Format | Set the time format: 12 Hours (AM / PM) or 24 hours. | ||
| Time | Set the current time. | ||
| Timer | On / Off | Activate / Deactivate the automatic switching on / off. | |
| Turn On | Set the time for an automatic power on. | ||
| Turn Off | Set the time for an automatic power off. | ||
| Frequency | Set the frequency of the automatic power on / off. (Daily, Mon.-Fri., Weekends, Once) | ||
4) Product Specifications
| Display | Digital TFT LCD Display size: 8 inch (20,32 cm diagonal viewable image) Display modus: 4:3 Resolution: 800*600 pixels |
| Power supply | Input: 100~240V AC, 50/60Hz Output: 5V 1A DC |
| USB port | USB Host 2.0 (High Speed) Supports USB storage mediums |
| Memory cards supported | SD/SDHC™ (Secure Digital Card), MMC™ (Multi Media Card) |
| Picture size supported | JPEG, max. resolution: 9000*9000 pixels |
| Operating temperature | 0°C ~ +40°C |
| Dimensions | 217*172*22 mm |
| Weight | ~420 gr. |
| Accessory | Remote control (incl. battery), Foot, Power supply, multi-lingual operating instruction |
You need help? Simply call our Technical Service Hotline at: +49 (0) 900 1 50 40 30 for 0.39 €/Min. with calls from the German telephone network. Different rates may apply to calls from mobile phones.
Enjoy Intenso's digital photo frame!
Service and Maintenance
Care
- In order to prevent danger from electric current do neither remove screws nor the case of the weather station.
- Do not operate this device near water. Do not expose the device to rain and moisture. Do not put any objects which store water or other fluids near the device.
- Do not install the picture near heaters, ovens or other heat issuing devices.
- Do not open the case. Do not try to repair the device yourself but have it repaired by qualified personnel only.
- Avoid using the device on sandy areas.
- Fully insert the power supply plug into the opening of the Intenso weather station. This will prevent electrostatic charge.
- Correctly and safely connect all ports.
- Do not push onto the display. Protect the display from direct sunlight.
- The picture frame only plays compatible data formats.
- Images may be protected by the rights of third persons. The play back without licence may infringe copyrights.
- When in operation, do not touch the Intenso weather station with metal objects.
- Avoid operating the device on pillows, sofas or other objects which support the development of heat as there is danger of overheating of the device.
- Do not remove memory cards during read operation. This may cause system crash or data loss.
- Do not switch off the device during an ongoing slide show.
- Do not wrap up the device directly after longer use. Ensure sufficient enough cooling. Otherwise, there is danger of overheating.
- In order to ensure a better service, changes of the operating instructions may be necessary.
Maintenance of the device
The device must be switched off.
Never spray or apply a fluid directly onto the display or case.
Cleaning the displays / case / frame
Carefully wipe the case, frame and LCD display with a soft cloth free from lint and chemicals. Only use cleaning agents which are specifically designed for LCD displays.
Disposal of electrical waste

Devices marked with this symbol are subject to the EG Directive 2002/96/EG.
All electrical appliances and old appliances must be disposed off separately from the household waste and are to be returned to the state authorities designed for that purpose.
By correctly disposing of electrical old appliances environmental damage may be prevented.
- Secure Digital Card (SD™)
- Secure Digital High Capacity (SDHC™)
Multimedia Card (MMC™)
- Secure Digital Card (SD™)
- Secure Digital High Capacity (SDHC™)
Multimedia Card (MMC™)
- Secure Digital Card (SD™)
- Secure Digital High Capacity (SDHC™)
Multimedia Card (MMC™)
- Secure Digital Card (SD™)
- Secure Digital High Capacity (SDHC™)
Multimedia Card (MMC™)
- Secure Digital Card (SD™)
- Secure Digital High Capacity (SDHC™)
Multimedia Card (MMC™)
- Secure Digital Card (SD™)
- Secure Digital High Capacity (SDHCTM)
Multimedia Card (MMC™)
Hocntenb namrtn USB moKeT BCTABnTbcraB rHe3do USB toIbKO oHOM HappaBHeHH.
BHumaHue: He npimeHnTe cnny npn BCTabHeHn HocnteJn namrTn USB!
BHumHue: Lucpoea qomopamka npedycmopeHa molko dna uonb3oahu c coemecmumbmu Kapmau naamu u Hocumnmu narnmu USB 2 (100mA).
3) O6üee ynpaBneHne
a) TnaBHOe MeHIO
Pocne BkIoueHn np6opa nOBJareTcra TaBHOe MeHo.
B ΓλaBHOM MeH y Bac ecTb BbIbOp MExdy pa3HbIMN φyHKUmaM ΣΦpOBoN ΦOTopAMKn mEH NO HAcTPOKn. HaXMMTE Ha KHOKN , NaΦpOBoN ΦOTopAMKn, YTObBbIbPaTB NHyKT MeHIO. NODTBePdTe BaW BbIbOp, Haxab Ha KHOKN Play/Pause [▶] Ha ΣΦpOBoN ΦOTopAMKn. HaxMMTE Ha KHOKN , (CTpeJIKN) Ha ΣΦpOBoN ΦOTopAMKn NII HA DnCTaHcUHOHOM UnpaBHeHm MOxHO (CTpeJIKN) Ha ΣΦpOBoN ΦOTopAMKn NII HA DnCTaHcUHOHOM UnpaBHeHm MOxHO NpeDbNtA bCB A COOTBeTCTBeHHbIX NODMeHIO. NODTBePdTe BaW BbIbOp KHOKN Play/Pause [▶] Ha ΣΦpOBoN ΦOTopAMKn NII DnCTaHcUHOHOM UnpaBHeHm.
b) PpocMoTp pOToTorpapn
BbIbepnte B TJIaBHOM MeHIO cyHKUHO FOTorpaqna. Ha 3KpaHe NOBRTc NOCDoeHNHeHHbIE HocHTeINn pAMrN. B 3aBNCIMOCtN OT TO, KaKo HocNTeJb NAMrTn NOCDoeHNHe, MOXHO BbIbpaTb SD, MMC n USB. NODTBepDnTe BaW BbIbOp c NOMOuH KhoNk Play/Pause [▶]. Ha 3KpaH BbIBoJrTcB Ce nAnK C FOTorpaqma, fOpMaT KOtOpBX NODepKNaBAeTc npIbopom. BbIbepnte Heo6xOdmyu nAnky, YTO6bl BOITN B MeHIO npEdBapNTeNBHoro npocmToPa FOTorpaqnn. BbIbepnte FOTorpaqno I NOdTBePnTe BaW BbIbOp KhoNko Play/Pause [▶], YTO6bl NaHaTb CnAld-woy C daHOrO MeCTa.
B cnyuae ecn cnaid-woy yke 6bIIO 3anyueHO C BbIbpaHHo KApTbI, OHO aBTOMaTHeCKN npoDOnJxAeTcra LcHpOBoi FOToPamKo. Pn Heo6XoDMOCtN BbIBoH Na 3kpan nepeuHr DOctynhIX napanK mEHIO npedBapnteHoro npocMOTpa N3OpaXeHm OcyueCTBJIeTcR BpyHyIO. HaxMMTe KNONky «Ha3aD» [°], YTO6bl BbIHTn I3 peXIMa CnaID-woy IN BbI3BaTb MeHIO npedBapnteHoro npocMOTpa.
B pexime yacob Ha 3kpaH BbIOaTc HAcTpoeHHbIe Yacbl N KaJIeHApHbI JNCT MeCAza, DeHb I DeHb HeDenn. DepXnTe KhoNky Play/Pause [▶] HaxaToi, YTO6bl OTKpbITb MeHIO OSD Menü. 3decb MoXHO IPOBOaNTb HAcTpoiKy DaTbl, pexim 12/24 YacOB, IN BpeMeHN, a TaKke aKTbUPOBaT bIIN DeakTNBUPoBaT TaMep.
UTo6bI n36eKaTb IIMnYnbCoB TOka,Ha ydaIaIte Ha BnHTbI HN Kopnyc.
He nCnoJIb3yIte daHbI np6op B6Jln3n BObl. He noJaBaIe np6op BInaHIO doKJn BInaXHOCTn. He cTAbTe B6Jln3n np6opa npedMeTb, KOTOpBie hakApJIbAHT BoDy IIN dpYrIe BNDbK JxIDKOCTeN.
He ycTaHaBnBaIte daHnyo foToPamky B6nn3n OToPnIeHna, neeey nn Dpynx np6opOB, n3JyauOxuX tenNo.
He otKpbIbAaTe KOpnyc. He nbTaIaTecb peMoHTnpoBaTb np6op cam. IpeOCTaBbTe 3To npoPeccuHaJam.
N36eAaTe NcNOJIb3OBAHnHa MeCTax C neCKOM.
BCTaBbTe BnIky Iny noKnHcyHn 6Noka nTahn B OTBepctne LΦ noJIHOcTBIO. TOnbKO TaK MoXHO n36exKaT bNeKTPOcTaTuYeCKoro 3apra.
BbnoJIHnTe Bce nOcEINHeNpyaBnBHO nHaedJxHO.
He HanaBnBaIte Ha dncnne. 3aunuaeOT cInbHbIX COJHeuHbIX Jyuei
ΦOTOpAMKa BOCnPOn3BOoNT TOJbKO COBMeCTmMbIe φOpMaTbl.
ΦOTOrpaФmMOrγT 6bITb 3aUHHeHbI npabAM TpeTBx JnC. BocnpOn3BeHne ΦOTorpaФm 6e3 JnueH3nn MoKET 6bITb HapUHeHem ABTOPCKNX npab.
He npikacaiTecsb K LΦ BO Bpempa6oTbI MeTaIIuHecKIMM ppeMeTaMI.
I36eaiTe nCnoJb3OBAHnHa Na noDyuKax, DnBaHax nIn dpynx nped MeTax 6bIta, KOTOpblie noDpeXnBAiOt pa3Bntne Tennla, Tak KaK cyueCTBye ONaCHOCTb neperpeBaHn npi60pa
He n3BJIeKaIte KapTbI NaMRTN BO BpEMa YTeHnA KapT. 3TO MOKET npNBecTN B C6oAM B CnCTeMe I NOTepe DaHHbIX.
He BbIKIouaHTe np6Op BO BpemBocnpOn3BeDenHn.
He ynaKOBbIbAte np6op HnocpeCTBeHHo nocJe dHtBHorO nCNoB3OBAHn. O6ecneYbTe DOCTaTOHoe OxJaXeHne.B INOM cnyae cyueCTBye ONaCHOCTb neperpeBaHn.
IЯ obecneueHn IyUwero cepBnca BO3MOxHbI n3MeHeHn IHCTpyKmN IO O6CJyXnBaHIO.
PpOΦnlaKTnueckn ocmToT np6opa
PINBOP DOJXEN BbITb BbIKIOUYEH.
HINKOrDAHE BpB3rAaTE HHE HAHOCTE KIOKOCTb PRAMO HA DnCJIEN NIN KOPNyc.
Ynctka nncnpej /kopnyca /pamkn
PpOtpnTe Kopnyc, pAMky n Dncnnnei LCD ocToPOxHNO mRkoH, HEBOPCnCToN CBO6oHOn OT XmMkaTob TKAHbU. NcNoB3ayte OuchnteIbHbIe CpeCTBa, CneuaNbHO npEHa3HaueHHbe dna DnCnner LCD.
YtunnaaCtapbix 3JekTpnp6opOB
0603HaueHHbIe DaHHbIM CmBOLOM pnp6pbl DoJXHbI COOTBeTCTBOBaTb EBPOneICKO dIpeKTNBE 2002/96/EC. Bce 3NeKTPponp6bpbl n CTapbIE 3NeKTPponp6bpbl DoJXHbI yTnIn3nPoBaTbcra OTdJIbHO OT DomaHero Mycopa chepe3 npedymotpeHHbIe DnIg 3TOrO rocydapCTBOM nyHkTbI. HndJexkaaayytnin3aunr 3NeKTPponp6pobn cTapbx 3NeKTPponp6opob cnjxnt npedotbpauneHIO haneHnaBepa Okpykaoue cpee.