
MediaStylist - Digital photo frame INTENSO - Free user manual and instructions
Find the device manual for free MediaStylist INTENSO in PDF.
User questions about MediaStylist INTENSO
0 question about this device. Answer the ones you know or ask your own.
Ask a new question about this device
Download the instructions for your Digital photo frame in PDF format for free! Find your manual MediaStylist - INTENSO and take your electronic device back in hand. On this page are published all the documents necessary for the use of your device. MediaStylist by INTENSO.
USER MANUAL MediaStylist INTENSO
Intenso 12“ MEDIASTYLIST
- Secure Digital Card (SD™)
- Secure Digital High Capacity (SDHC™)
Multimedia Card (MMC™) - Memory Stick (MS™)
- xD Picture Card™

Please follow this quick guide to be informed about the most important functions of the Intenso Digital Photo Frame. A detailed instruction manual with a description of all settings for the Intenso Digital Photo Frame can be found on our Homepage:www.intenso.de

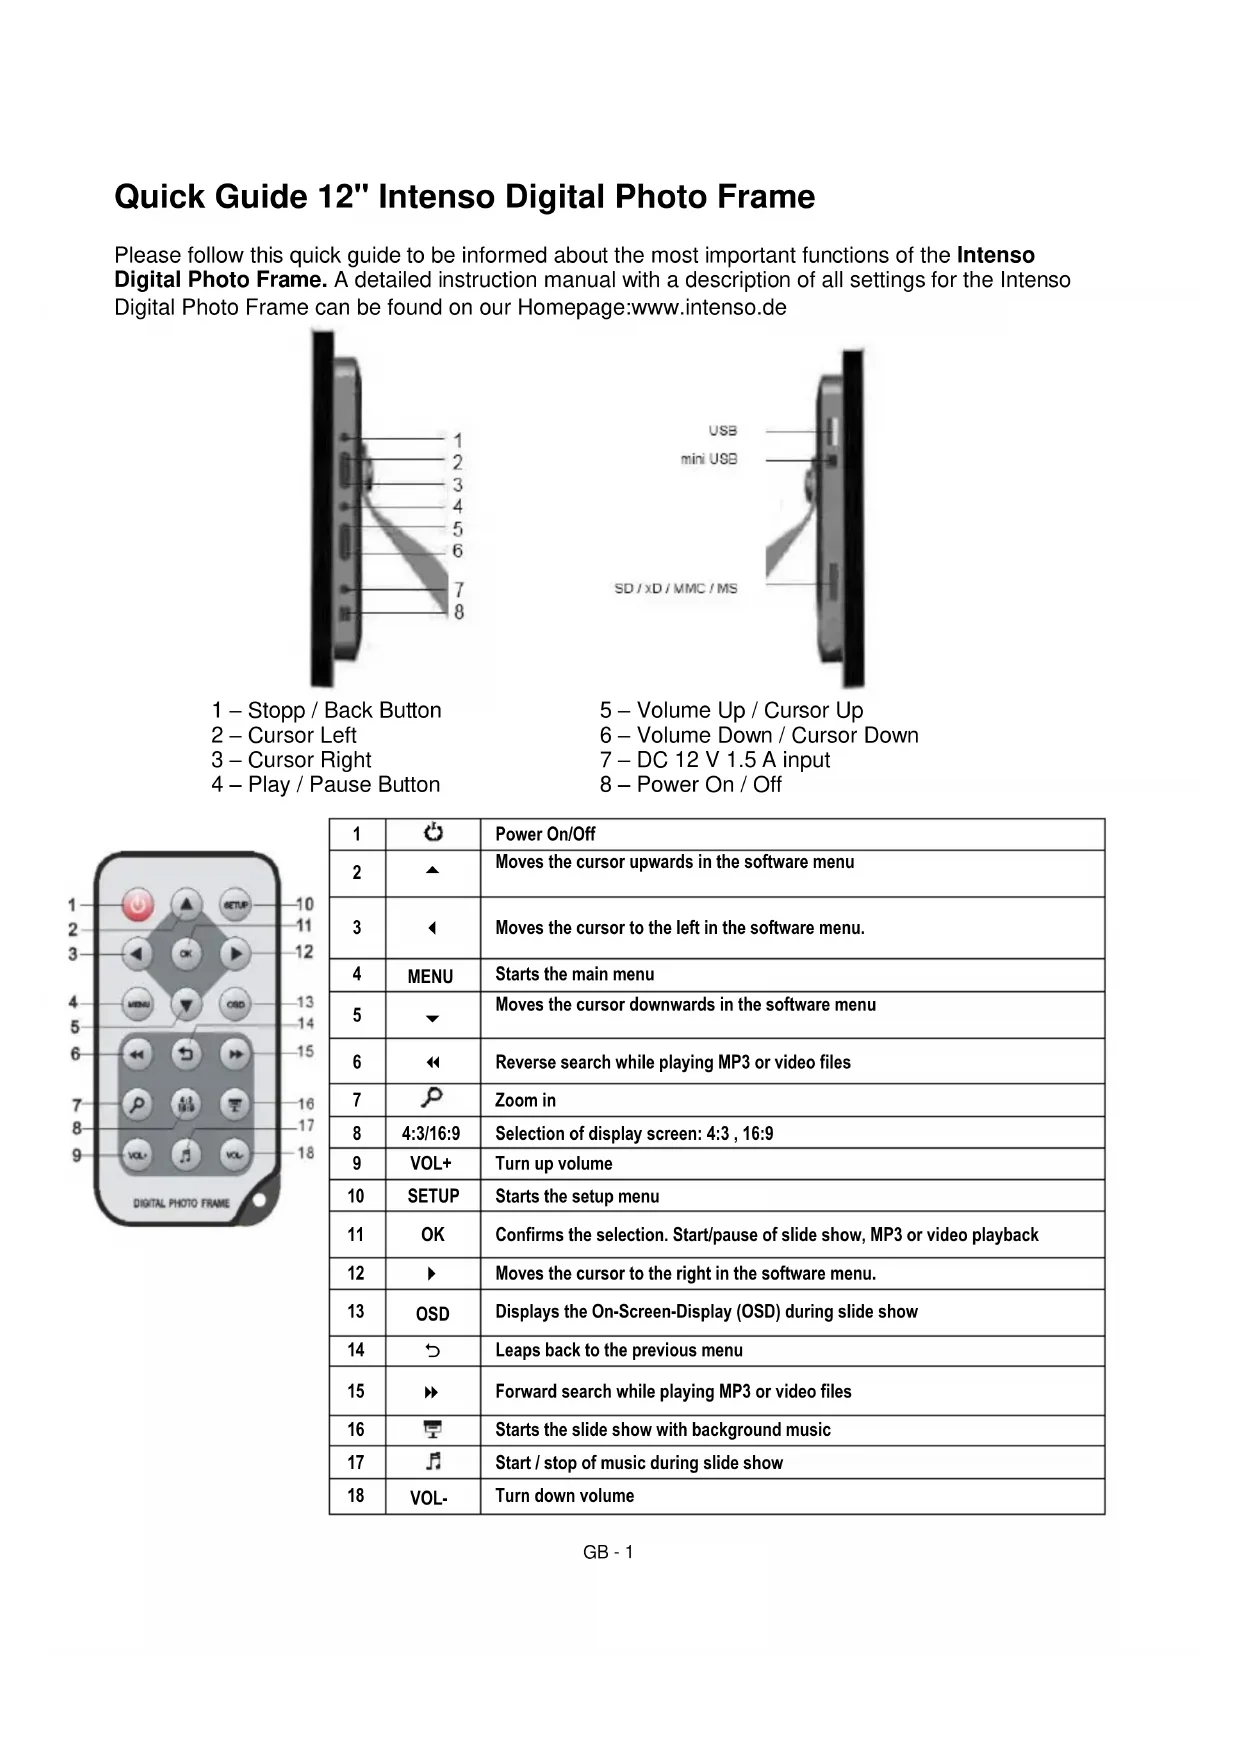
1-Stopp/BackButton
2-Cursor Left
3 - Cursor Right
4-Play/PauseButton

5 - Volume Up / Cursor Up
6 - Volume Down / Cursor Down
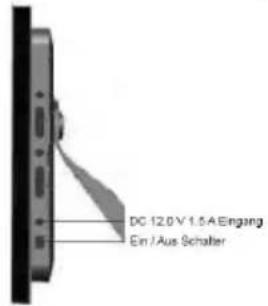
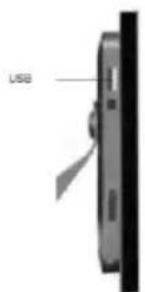
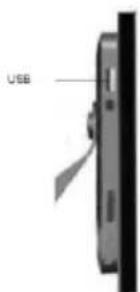
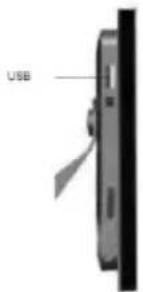
7-DC12V1.5A input
8-Power On/Off
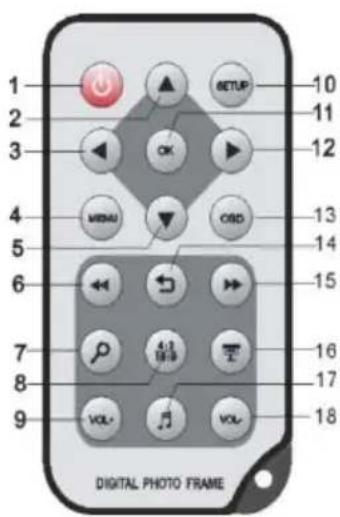
| 1 | Power On/Off | |
| 2 | ▲ | Moves the cursor upwards in the software menu |
| 3 | ← | Moves the cursor to the left in the software menu. |
| 4 | MENU | Starts the main menu |
| 5 | ▼ | Moves the cursor downwards in the software menu |
| 6 | ← | Reverse search while playing MP3 or video files |
| 7 | Zoom in | |
| 8 | 4:3/16:9 | Selection of display screen: 4:3, 16:9 |
| 9 | VOL+ | Turn up volume |
| 10 | SETUP | Starts the setup menu |
| 11 | OK | Confirms the selection. Start/pause of slide show, MP3 or video playback |
| 12 | Moves the cursor to the right in the software menu. | |
| 13 | OSD | Displays the On-Screen-Display (OSD) during slide show |
| 14 | Leaps back to the previous menu | |
| 15 | Forward search while playing MP3 or video files | |
| 16 | Starts the slide show with background music | |
| 17 | Start / stop of music during slide show | |
| 18 | VOL- | Turn down volume |
1) Connect and switch on the digital photo frame
Connect the mains adapter provided with the digital photo frame. Plug the other end of the mains adaptor into the power outlet. Now slide the controller of the digital photo frame into "On" position to switch on the photo frame.
Please note:
The plug must be placed next to the device so to be easily accessible.
Do not open the box of the line adapter. If the box is open, there is danger of life caused by electric shock. The product does not contain parts to be maintained.
Actuate the line adapter only with earthed plugs of AC 100-240V\~, 50 / 60Hz If you are not sure about the provision of electricity at the installation point, ask your energy provider.
- Use the included line adapter and line connection cable only.
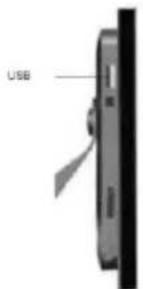
2) Insert memory cards | connect USB data carriers

Insert the Memory Card with the Logo towards the Display
into the card reader slot.
Please note: Never insert cards by use of force!
The following memory card formats can be used with your digital photo frame:
- Secure Digital Card (SD™)
- Secure Digital High Capacity (SDHC™)
Multimedia Card (MMC™) - Memory Stick (MS™)
- xD Picture Card™
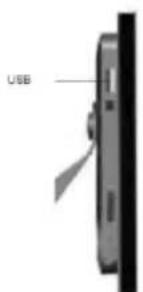
USB data carriers can only be plugged into the USB slot in one direction.
Please note: Never insert USB data carriers by use of force!
Note: The digital photo frame is exclusively designed for the use with compatible memory cards and 2.0 data media (100 mA).
3) General Operation
a) Menu Language Selection
After power-on you will be guided directly to the language selection menu. After you have made your decision (or even without selecting a language - in this case the photo frame automatically uses the last language after a few seconds), the photo frame changes into the main menu.
b) Main Menu
In the Main Menu you can select the Storage Media Available (the relevant icon will appear with the storage medium inserted), the Setup-Menu or the Calendar. Using the Arrow Keys please access the relevant symbol in order to select the desired Menu Item. Confirm your selection using the OK-button on the remote control or the Play/Pause-button on the photo frame.
If you have already inserted a Storage Medium with photos on it or there are photos on the Internal Memory, the Slide Show will start automatically after a few seconds. In case the storage medium contains also music / songs, they are played back as background music.
With the Slide Show Playing you can leave the slide show using the Back [D] button on the remote control or the Stop / Back button on the rear panel of the photo frame. The Picture Preview Menu appears on the screen. By repeatedly pressing this Button you can enter the Selection Menu of the storage medium selected. By pressing this button once you can enter the Main Menu. Alternatively, you can press the Menu-button on the remote control or keep the Menu-button on the photo frame pressed
c) Viewing Photos
In the Main Menu please choose one of the Storage Media Available and, subsequently, the Photo feature. In this way you can access the Picture Preview Menu. Using the Arrow Keys please select a photo and confirm your selection using the OK-button on the remote control or the Play/Pause-button on the photo frame. Now the slide show starts with the photo selected. In each menu you can use the [T] button on the remote control to start the slide show, starting with the first photo. Music existing on the storage medium is automatically played back in the background.
- To stop the slide show and to display individual photos please press the Play/Pause-button on the photo frame or the [OK] button on the remote control.
To turn up or down the volume please press the [VOL+] or [VOL-] button on the remote control. - To start or stop the background music please press the [ ] button on the remote control.
- Press the [S] button to leave the slide show and to access the picture preview menu.
- Please press the MENU-button on the remote control or keep the MENU-button on the photo frame pressed to directly access the main menu.
d) Playing Music Files
In the Main Menu please choose one of the Storage Media Available and, subsequently, the Music feature. Now you see All Songs of the storage medium selected. Using the Arrow Keys please select a Song and confirm your selection using the OK-button on the remote control or the Play/Pause-button on the photo frame. Now this Song is being Played.
- To pause the playback, please press the OK-button on the remote control. To continue playback, please press this button once again.
- To turn up or down the volume please press the [VOL + ] or [VOL - ] button on the remote control.
- To rewind and/or fast-forward a song, please use the or button on the remote control. By repeatedly pressing the button you can change the speed of the search [2x, 4x, 8x]. To continue the playback, please press the OK-button on the remote control.
- To end playback please press the [?] button.
e) Playing Video Files
In the Main Menu please choose one of the Storage Media Available and, subsequently, the Video feature. Now you see All Video Files of the storage medium selected as a list. On the right side of the list you can see a preview of the video file selected. Using the Arrow Keys please select a Video File and confirm your selection using the OK-button on the remote control or the Play/Pause-button on the photo frame. The Video is now played in Full Screen Mode.
- To pause the playback, please press the OK-button on the remote control. To continue playback, please press this button once again.
- To turn up or down the volume please press the [VOL+] or [VOL-] button on the remote control.
- To rewind and/or fast-forward a video, please use the or button on the remote control. By repeatedly pressing this button the search speed increases [2x, 3x, 4xX]. To continue to playback please press the OK button on the remote control.
- To end playback please press the [?] button.
f) File Menu
In the Main Menu please choose one of the Storage Media Available and, subsequently, the File feature. Now you see All Directories and files of the Storage Medium selected as a list. Using the Arrow Keys please select a Directory and confirm your selection using the OK-button on the remote control. Now you see All Files of the Directory. Using the Arrow Keys please select a File and confirm your selection using the OK-button on the remote control. Now, the desired File is being displayed / played back.
g) Calendar Display
In the Main Menu select Calendar to display the set Time, the Date, a Month View and (with an inserted storage device) a Slideshowhow. In case there is music on the storage medium, it will automatically play in the background.
h) Connecting with Computer
It is possible to connect this photo frame with a computer. Using the following procedure you can store files on the internal memory or on a storage medium connected to the photo frame.
(a) Remove all USB-storage mediums connected to the photo frame.
(b) Connect the thin end of the provided USB cable with the mini-USB-Port of the photo frame and the other end of the USB cable with your computer.
(c) The computer will detect this "New Device" and automatically install the driver. Please wait until driver installation is completed. Your computer will now show further drives/removable mediums.
(d) Copy your data as usual. (Drag and drop)
(e) Upon completion of the copy process please remove the photo frame by use of the Windows-function "Remove hardware disc safely".
Please note: Prior to connecting the photo frame to the computer, the photo frame must have been started. While the photo frame is exchanging data with the computer it is not possible to use any USB storage mediums with the digital photo frame.
i) Copying Files
(a) Using the , buttons on the remote control please select a file and, subsequently, press the button on the remote control. A checkmark appears besides the file. To select more than one file please repeat these steps.
(b) Press the OSD button on the remote control. Now, the options Copy and Delete are displayed on the right side of the display.
(c) Using the , buttons on the remote control please select the Copy feature and press the OK-button on the remote control. Now, you can see all storage media available in the display.
(d) Use the , buttons on the remote control to select the relevant storage medium and press the button on the remote control to select the desired storage medium and subdirectory.
(e) Using the OK-button you can start to copy the files.
(f) Please press the OK-button once again to confirm the "Complete" message.
Please note: If your desired storage medium does not appear in the list, it might be a read-only medium. Please remove the write protection and re-try copying the files.
j) Deleting Files
(a) Using the , buttons on the remote control please select a file and, subsequently, press the button on the remote control. A checkmark appears besides the file. To select more than one file please repeat these steps.
(b) Press the OSD button on the remote control. Now, the options Copy and Delete are displayed on the right side of the display.
(c) Using the , buttons on the remote control please select the Delete feature and press the OK-button on the remote control.
(d) Using the , buttons on the remote control you can select “☑” in order to delete your files or “☑” in order to leave the menu without changes.
(e) Using the OK-button on the remote control you can delete all files marked.
(f) Please press the OK-button once again to confirm the "Complete" message.
k) Changing the Settings
In the Main Menu select Setup to individually set up your device. Navigate with the Arrow Keys to the desired menu item. Confirm your selection with the OK button on the remote control or the Play/Pause [ ] button on the photo frame.
| Settings | Description |
| Language | Select your preferred language. |
| Slideshow Time | Select how long a picture is displayed during a slide show. Options: 3 sec., 5 sec., 10sec., 15 sec., 1 min., 15 min., 1 hour |
| Slideshow Mode | Select the transition modus from one picture to another during a slide show. Options: Off, Bottom To Top, Top To Bottom, Left To Right, Right To Left, Door Close, Door Open, Hori Cross, Verti Cross, Random, Fading, Vexpand Top, Vexpand Bottom, Vexpand Middle |
| Music Repeat Mode | Select the repeat function for playing music: Repeat off: Plays all tracks on the storage medium selected once Repeat one: Repeats the selected track Repeat all: Repeats all tracks on the storage medium selected |
| Movie Repeat Mode | Select the repeat function for playing videos: Repeat off: Plays all videos on the storage medium selected once Repeat one: Repeats the selected video Repeat all: Repeats all videos on the storage medium selected |
| Display Modus | Please select the display mode. Full screen: Photos are displayed as full screen. Original: Photos are displayed with their original size. |
| Time | Adjusts the calendar and time. |
| Alarm | Adjusts the alarm, alarm tone and time. |
| Brightness | Brightness settings for display from 0 – 16. |
| Contrast | Contrast settings for display from 0 – 16. |
| Saturation | Saturation settings for display from 0 – 16. |
| Turn-on time | Enables automatic power-on. |
| Turn-off time | Enables automatic power-off. |
| Auto Run Modus | Please select the desired function to be automatically used with switch on. You can select from the main menu, photo, music, video, slide show with music and calendar. |
| Slideshow Option | Please decide whether the photos are displayed in a row or in random mode. |
| Default | Reset the device to the factory settings. |
4) Product Specifications
| Display | Digital TFT LCD Display size: 12 inch (30,73 cm diagonal viewable image) Display modus: 4:3 Resolution: 800*600 pixels |
| Mains adapter | Input: 100~240V AC, 50/60Hz Output: 12V 1.5A DC |
| USB port | USB Host 2.0 & USB Device 2.0 Supports USB storage mediums |
| Memory cards supported | SD/SDHCTM (Secure Digital Card), MMC™ (MultiMedia Card), MSTM(Memory Stick), xD Picture CardTM |
| Picture size supported | JPEG, max. resolution:8000*8000 pixels |
| Options | 2 GB internal memory |
| Operating temperature | -20°C ~ +45°C |
| Dimensions | 340*273*40 mm |
| Weight (g) | ~ 2.75 kg |
| Accessory | Remote control (incl. battery), foot, mains adapter, quick guides in more languages |
You need help?
Simply call our Technical Service Hotline at:
+49 (0) 900 1 50 40 30 for 0.39 €/Min. with calls from the German telephone network. Different rates may apply to calls from mobile phones.
Enjoy Intenso's digital photo frame!
Service
- To avoid risks of electric shocks please do not remove screws or the housing.
- Do not use the device in the vicinity of water. Do not expose the device to rain or moisture. Do not place any objects in the vicinity of the device that store water or any other liquids.
- Do not install this picture frame in the vicinity of heating systems, ovens or other heat emitting devices.
- Do not open the housing. Do not try to repair the device yourself. Leave any repairs to specialised personnel only.
- Avoid using your device on sandy places.
- Please do properly connect the plug of the mains adaptor to the existing opening of the DF. Thus, you can avoid electro-static charge.
- Plug in all connections correctly and safely.
- Please do not touch the display. Do not expose the display to direct sunlight.
- The picture frame only plays compatible file formats.
Pictures might be protected by copyright law of third parties. Playing such pictures without licences might represent an infringement of such copyright laws. - Please do not touch the DF with metallic object during operation.
- Please avoid operation on pillows, sofas or any other heat emitting home appliances since the device might overheat in such cases.
- Please do not remove memory cards while the device is reading. Otherwise this might result in abnormal system ends or loss of data.
- Please do not switch off the device with the slide show running.
- Please do not directly wrap the device after longer operating hours. Please make sure the device has cooled down properly. Otherwise the device might overheat.
- To guarantee better service this operating instruction is subject to alterations.
Device Maintenance
The Device must be switched off.
Never spray or apply liquid substances directly onto the display or the housing.
Cleaning the display / housing / frame
Clean the housing, frame and LCD display carefully with a soft cloth which is free of lint and chemicals.
Only use cleaning agents which are suitable for cleaning LCD displays.
Disposal of WEEE (Waste Electrical and Electronic Equipment)

Devices marked with the WEEE logo are subject to the European Community Directive 2002/96/EC.
Waste Electrical and Electronic Equipment must be separated from household rubbish and disposed at sites that collect WEEE.
By orderly disposing WEEE you will avoid damage caused to the environment.
- Secure Digital Card (SD™)
- Secure Digital High Capacity (SDHC™)
Multimedia Card (MMC™)
Memory Stick (MS™) - xD Picture Card™

- Secure Digital Card (SD™)
- Secure Digital High Capacity (SDHC™)
Multimedia Card (MMC™)
Memory Stick (MS™) - xD Picture Card™
You've asked des questions?
- Secure Digital Card (SD™)
- Secure Digital High Capacity (SDHC™)
Multimedia Card (MMC™) - Memory Stick (MS™)
- xD Picture Card™
- Secure Digital Card (SD™)
- Secure Digital High Capacity (SDHC™)
Multimedia Card (MMC™)
Memory Stick (MS™) - xD Picture Card™
- Secure Digital Card (SD™)
- Secure Digital High Capacity (SDHC™)
Multimedia Card (MMC™)
Memory Stick (MS™) - xD Picture Card™
Bhumaue: He npimehnTe npn BCTabJeHH KapTb cnJy!
Unpobaa oToopamka noDepknae TcJeDuOnne oopMaTb KaP TaMnT:
- Secure Digital Card (SD™)
- Secure Digital High Capacity (SDHC™)
Multimedia Card (MMC™)
Memory Stick (MS™) - xD Picture Card™

HocnteIb namrtn USB moKet BCTaBnTbcra B rHe3do USB ToJbKO ODNOM HanpaBneHN.
BHumaHue:He npimeHnTe cnny npn BCTaBneHN HocnteJnaTn USB!
Bhumaue: Lufpoa omopamka npedycmompeha monbko dna uonb3oeaHua c oemecmummu kapmau narnmu u hocumenmu narnmu USB 2 (100mA).
3) O6üee ynpaBneHne
a) MeHIO BbI6opa 3bika
Iocne BkHoueHn BbI nepeXoHte cpa3y B MeHIO Bb6opa a3bika. KOrda 6bl cdeJahn Bb6op nnn, KOrda Bb6op He deJaetcra (B TakOM cnUyae foTOpamKa yepe3 HeckOJIbKO cekHyd ABtOMaTHueCKN CNOJb3yeT Bb6paHHbIB NocJeHN pa3 a3bIK), foTOpAMKa nepeXoDHT B rnaBHOe MeHIO.
b) TnaBHOe MeHIO
B rIaBHOM MeHIO MoKHO BbIbpaTb MHeOuNecr HocHTeIN NaMRTn (COOTBeCTBeHHbIM CmBOJ NOBJIETCRA, KOrDa IcNoJIb3yETcR HOCHTeIN NaMRTn), MeHIO HaCTpOJKN INNI KAJIeHdApB. BbIbepNTe c NOMOUsbIO KHONOK CO CTpeKNkAMN COOTBeTCTBEHHbIM CmBOJ, YTO6bIBbIbPaTB Heo6XODMbI INYKT MeHIO. POnTBePdnte BaW BbIbop KHOKNoIK OK Ha dNtCAHcNOHHOM ynpabJIeHN ININ KHOKNi Play/Pause Ha foTopaMKe.
EcHn HocHTeNb nAMrN C 3aHncaHHbIMn fOTOrpaqHn BCTaBHeH, INI ECnN BO BHyTpHHeN
nAmrN mEOTcra fOTOrpaqHn, Upe3 HeCKoJIbKO CeKHyD cnaJd-woy 3aNyCKaETcra
ABTomATuYeCKn. EcHn Ha HocHTeNe nAMrN TaKKe IMeOTcR My3bIkaJIbHbIe 3aPiNCn, OHN
BOcPOn3BOJrTcKa Kc foHOBaMy3bIka.
Korda HaayaoB cnaI-woy, HaxaTneH a KONky Ha3ad (Zuruck) [ ] Ha dNCTaHIOHHOM ynpabNeHN nn Ha KONky Cton / Ha3ad (Stopp / Zuruck) Ha o6paTHo CTopoHE pOToPAMKn MOxHO BbIITn n3 cnaI-woy. Ha ekpaHe nOBnEeTcR MeHIO npedBapHTeBHorO npocMOTpa. IOBTOpHBIM HaxaTneH a KONky MoXHO nonactb B MeHIO BbIbopa BblpaHoro HOcHTeJn PAmrTn. Ppr cNeDyUoSeH aXaTmN OTkpbBaETcR rNaBHOe MeHIO. AInbTePhATNBHO MOxHO HaxaTb Ha KONky MeHIO Ha dNCTaHcUNOHHm YnpabNeHN nn KONky MeHIO Ha pOToPAMKe.
c) PpocMToP pOToTpaΦn
BbIbepnte B rIaBHOM MeHIO OJIN H3 IMeOuxxC HocHTeNe namrN I NOcTe 3TOrO
fYHKUHO FOTo. Bbl nonaTeE B MeHIO ppeBapNTbHoro npocMOTpa foTOpraΦn.
BbIbepnte C nOMOuBIO KHOONK CO CTpeKNAMn foTOrpaΦnIO nOJTBePdNte BaW bIbOp
KHOKo OK Ha dIcTAHcUNOHOM ynpabLeHn IIN KHOKNo Play/Pause Ha foTOpamKe. CnaID-
HOy hauHaeTcA TOlbKO C BblpaHHo fOToRpaΦn. B KaXDom N3 MeHIO c NOMOuBIO KHOKNi
Ha dIcTAHcUNOHOM ynpabHeHm MOxHO hauAtb cNaID-LOy, hauHaNc nepBOI foTOrpaΦn.
3aIncAHHa HA HOCHTe Ne nAMrTH My3bIka npOnrpbBaETcA ABTomATnueckn kak fOHOBA
My3bIka.
Iy3aepKn cnaH-woy nIpy npocMToPa OTdeNbHbIX fOToRpaΦn HaxMnte Ha KHOkny Play/Pause Ha ufoBooN foTOpAmKe Nn KHOky [OK] Ha dNCTaHcUOHHom ynpabJeHN.
-Для NOBblseня Ип NOHIXeHЯ ГOMKocTи,нжмTe KhoNkY [VOL+] Ип [VOL-]Ha nyIbTe ynpabNeHЯ.
-ДяakTbauCnIINOCtAHOBKnMy3bIKNHa3aHEmfoHe,HaxMITEKHOJIky[]Ha yJbTe ynpabLeHn.
- Haxmte KhoNky [], YTObI BbiTN n3 NOKa3a CnaIDOB I NOnactb B MeHOppeDbapnteBHorO npocmotpa foTOrpaΦn.
HaKmTe Ha KONky MeHIO Ha NCTaHcUHOHOM ynpabHeHn IIN DepeKHTe KONky MeHIO Ha 0ToTopaMKe HaxaToI, YTObI nonactb nprMo B rnaBHOe MeHIO.
d) PpOurpbIbAHne My3bIKaJIbHbIX paINOB
BbIbepnTe B rIaBHOM MeHIO OIN H3 IMeIoUxC HocHTeJe NaMrtu N nocTe 3TOro
fynKcNIO My3bika. Ha ekpaHe nOraBraTc Bce My3bikalbHbIe 3aNNcB bI6paHHoro HocHTeJIa
PamrTu. BbIbepnTe C nOmoUbKO KHOJOK CO cTpeJIkAMn 3aNNcB I NOITBePdnte Bbl6Op KHOJKO
OK Ha dNCTaHcUOHHom ynpabLeHIn UIn KHOJKOi Play/Pause Ha foTOpAmKe.
BocIpOn3BeDeHne 3aNNc NaHHaETc.
- YTo6bI npepBaTb BocnpOn3BeJeHne, HaxMnTe Ha KHOk Ky OK Ha NCTaHcNoHHOM ynpabLeHIn. YTo6bI npoJOnKnTb, CHOba HaxMnTe Ha KHOkKy.
-Дя NOBbiIeHnIиI NOHIXeHnI rPOMKocTn,HaXmTe KHONky [VOL+]ИI [VOL-] Ha nyIbTe ynpabNeHnI.
-Дябсгро npokpyuBaHnЯпсн BnepeД ИИн Ha3aI Na HaxMnte Ha KhoNkу ɪnɪ Na DuctaHcnoHOM ynpabLeHn. Пи КжdOm HaxaTn N CkopoCt b NoncKa n3MeHЯETcR [2x, 4x, 8x].Чтбbl npodJnxMb BocpOu3BeDeHne, HaxMnte Ha KhoNky OK Na DnCTaHcNoHHom ynpabLeHn. - TTo6bI 3aBepuNTb BocnpOn3BeDeHne, HaxMnTe KhoNkY [].
e) PpOurpbBaHne BnDeoopaJIOB
BbIbepnte B rnaBHOM MeHIO OIN H3 NOkNoyeHbIX HocNteJe NaMrtu N nocne 3TOrO
fynKcHIO Bndeo. Bce Bndeoopaanbl BbIbpaHoro HocnteJa naMrtu BblBOaTcHa 3KpaH B
BnDE cnpscA. Cnpaba pAnOM co cncKom NoBnEaTc npedBaPntbHbI npocmotp
BbIbpaHoro BndeoopaJNa. BbIbepnte C nOmoCbIO KhONOK CO cTpeLkAmn BndeoopaJn
NOtBepdnte Bbl6op KhoNKoI OK Ha dNCTaHcuOHHom ynpabHeHH IN IN KHONKO Play/Pause Ha
ΦOTOpamKe. Bndeo BOCpOn3BOaNTcR B noH03KpaHOM peKmme.
- YTo6bI npepBaTb Bocnpoun3BeJeHne, HaxMnTe Ha KhoNkY OK Ha NcTaHcNoHHom ynpabHeHm. YTo6bI npoDoJnxHTb, ChOba HaxMnTe Ha KhoNkY.
-Дя NOBbiSeHnIиnoHxKeHnI rpoMkoCTn,HaXmTe KhONky [VOL+]Ии [VOL-] Ha nyIbTe ynpabNeHnI.
-Дябсгро npokpyuBaHnBnDeo BnpeD nHn Ha3ad HaxMnTe Ha KhoNk YnHn >Ha nctaHcnoHHom ynpabJeHn. C kaxDbim HaxKaTneM n3MeHЯETcKcOpOCTb nONcKa [2X, 3X, 4X].Дя npodOnJxEHHa BOCpOu3BeDEHHa HaxMnTe KhoNk [▶] Ha IMS nHn KhoNk OK Na nyIbTe ynpabJeHHa. - 4To6bI 3aBepuNTb BocnpOn3BeDeHne, HaxMnTe KhONkY [].
f) MeHIO qaIIOB
BbIbepnte B rIaBHOM MeHIO OIN H3 NOkHoueHHbIX HOCHTeJe NAMrN I NOcNe 3TOrO
fYHKUIO Fain. Bce nankn u paJIbI BbIbpaHoro HocHTeJNaMrtu BBIOJrTcR Ha 3KpaH B
BnDE cnpcca. BbIbepnte C nOMoUbIO KHOJOK CO CTpeKNaMn NaKy I NOdTBePdTe BaW bIbOp
KHOJKOIK OK Ha nCTaHcNOHOM ynpabLeHn. Ha 3KpaHe nOraBtC R Ce paJIbI,
coDePkaUncEca B nAnke. BbIbepnte C nOMoUbIO KHOJOK CO CTpeKNaMn PaJN I NOdTBePdNTe
BaW bIbOp KHOJKOIK OK Ha nCTaHcNOHOM ynpabLeHn. HeobxOIMbI paJN NOBnAETcR
Ha 3KpaHe / npOnrpblBaETcR.
g) INHnKaun KaJeHdapr
BbIbepnte B ΓIaBHOM MeHIO nyHKT KaIeHdapb, yTo6bI Ha 3KpaHe NOKa3bIBaINCb BpeMra, daTa, 063Op Mecya n (ecn BCTaBneH HocHTeJIb NaMRTN) cnaI-woy. Ecn Ha HocTeJIe NaMRTN TaKKe 3aIncAHa My3bIka, OHa aBTOMaTNUeCKN BOCpON3BOIDTCa KAc fOHOBAr My3bIka.