USER MANUAL MediaDesigner INTENSO
V 1.0
Bedienungsanleitung
Inhaltsverzeichnis
ALLGEMEINE PRODUKT MERKMALE
Operating Instructions
Table of Contents
INTRODUCTION 1
GENERAL PRODUCT CHARACTERISTICS 2
OVERVIEW 3
REMOTE CONTROL 4
INSERTING BATTERIES INTO REMOTE CONTROL 5
FIRST STEPS. 6
USING MEMORY CARDS 7
WATCHING A SLIDE SHOW 8
MAIN MENU 9
WATCHING PHOTOS 10
Starting a Slide Show. 10
Displaying Individual Pictures / a Slide Show. 13
Changing the Display Mode. 14
Using the OSD Menu 15
LISTENING TO MUSIC 17
PLAYING VIDEOS 19
DIRECTORY files 21
Copying Files 22
Deleting Data 23
Setup Date and Time 27
Alarm Setup. 28
Activating Automatic Power On/Off 29
Clock Display 30
Calendar Display 31
FAQs. 32
PRODUCT SPECIFICATIONS 35
SERVICE AND MAINTENANCE 36
INTRODUCTION
Thank you for buying the Intenso's DIGITAL PHOTO FRAME (DF).
Before using this device please carefully read these operating instructions and observe all safety notes. Please store these instructions at a safe place to have an answer at hand whenever you have questions. These instructions have been compiled with great care to enable you to safely use all functions of the DF.
The DF allows you watching digital photos directly from your camera's memory card. You can watch your photos in a slide show mode provided by the photo frame. The DF is compatible with the following card formats: SD™ (Secure Digital), SDHCTM (Secure Digital High Capacity), MMC™ (Multimedia Card), MS™ (Memory Stick) and USB flash drive.
We are not liable for any damages or loss of data in the case of malfunction, maloperation or if you repair the device yourself. Please do not disassemble the device into individual parts and do not try to repair it yourself; in such a case guarantee will expire. Software, hardware and the operating instructions can be all subject to change. We will not inform you hereof and reserve all rights in this matter.
GENERAL PRODUCT CHARACTERISTICS
- Decorative appearance, excellent quality
- Shows pictures (JPEG) without requiring a computer
Automatic slide show with various transition effects and individual display duration
Plays MP3 / WMA music via integrated speakers
- Digital slide show with MP3 background music
- Plays video files as MPEG-4 and M-JPEG
Supports various playback modes for music and video
Calendar function
- Alarm function
- Timer function
- Compatible with SD / SDHC / MMC and MS cards
2 GB internal memory
- USB slot to connect USB flash drives
2-way control: 7 buttons on the digital photo frame, infrared remote control
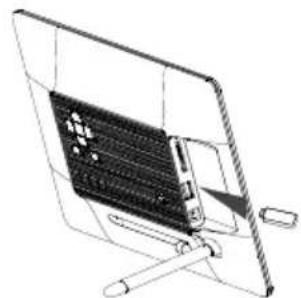
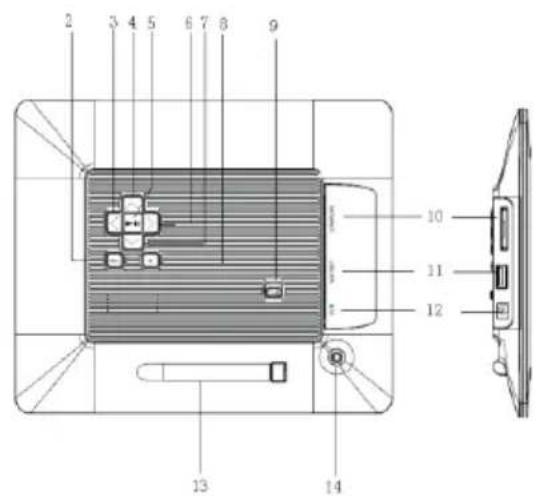
OVERVIEW
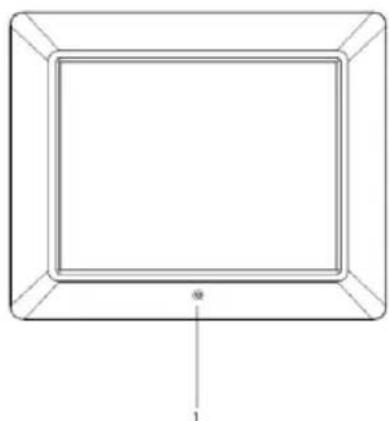
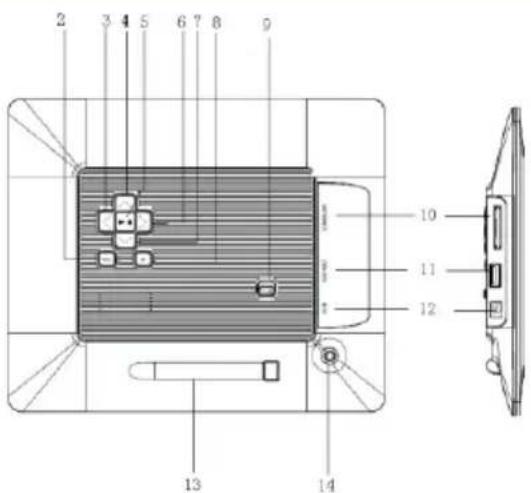
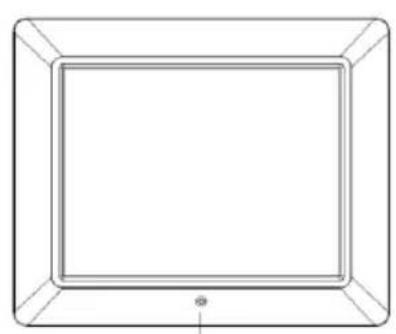
1 Infrared sensor
2 Menu button, opening the OSD menu
3 Left 4 button
4 Up [按钮
5 Play/Pause button
6 Right [ ] button
7 Down [Y] button
8 Exit [b] button
9 Power On/Off
10 SD/MMC/MS - card slot
11 USB host slot
12 DC 5V 2A input
13 Frame base
14 Threaded opening for stand
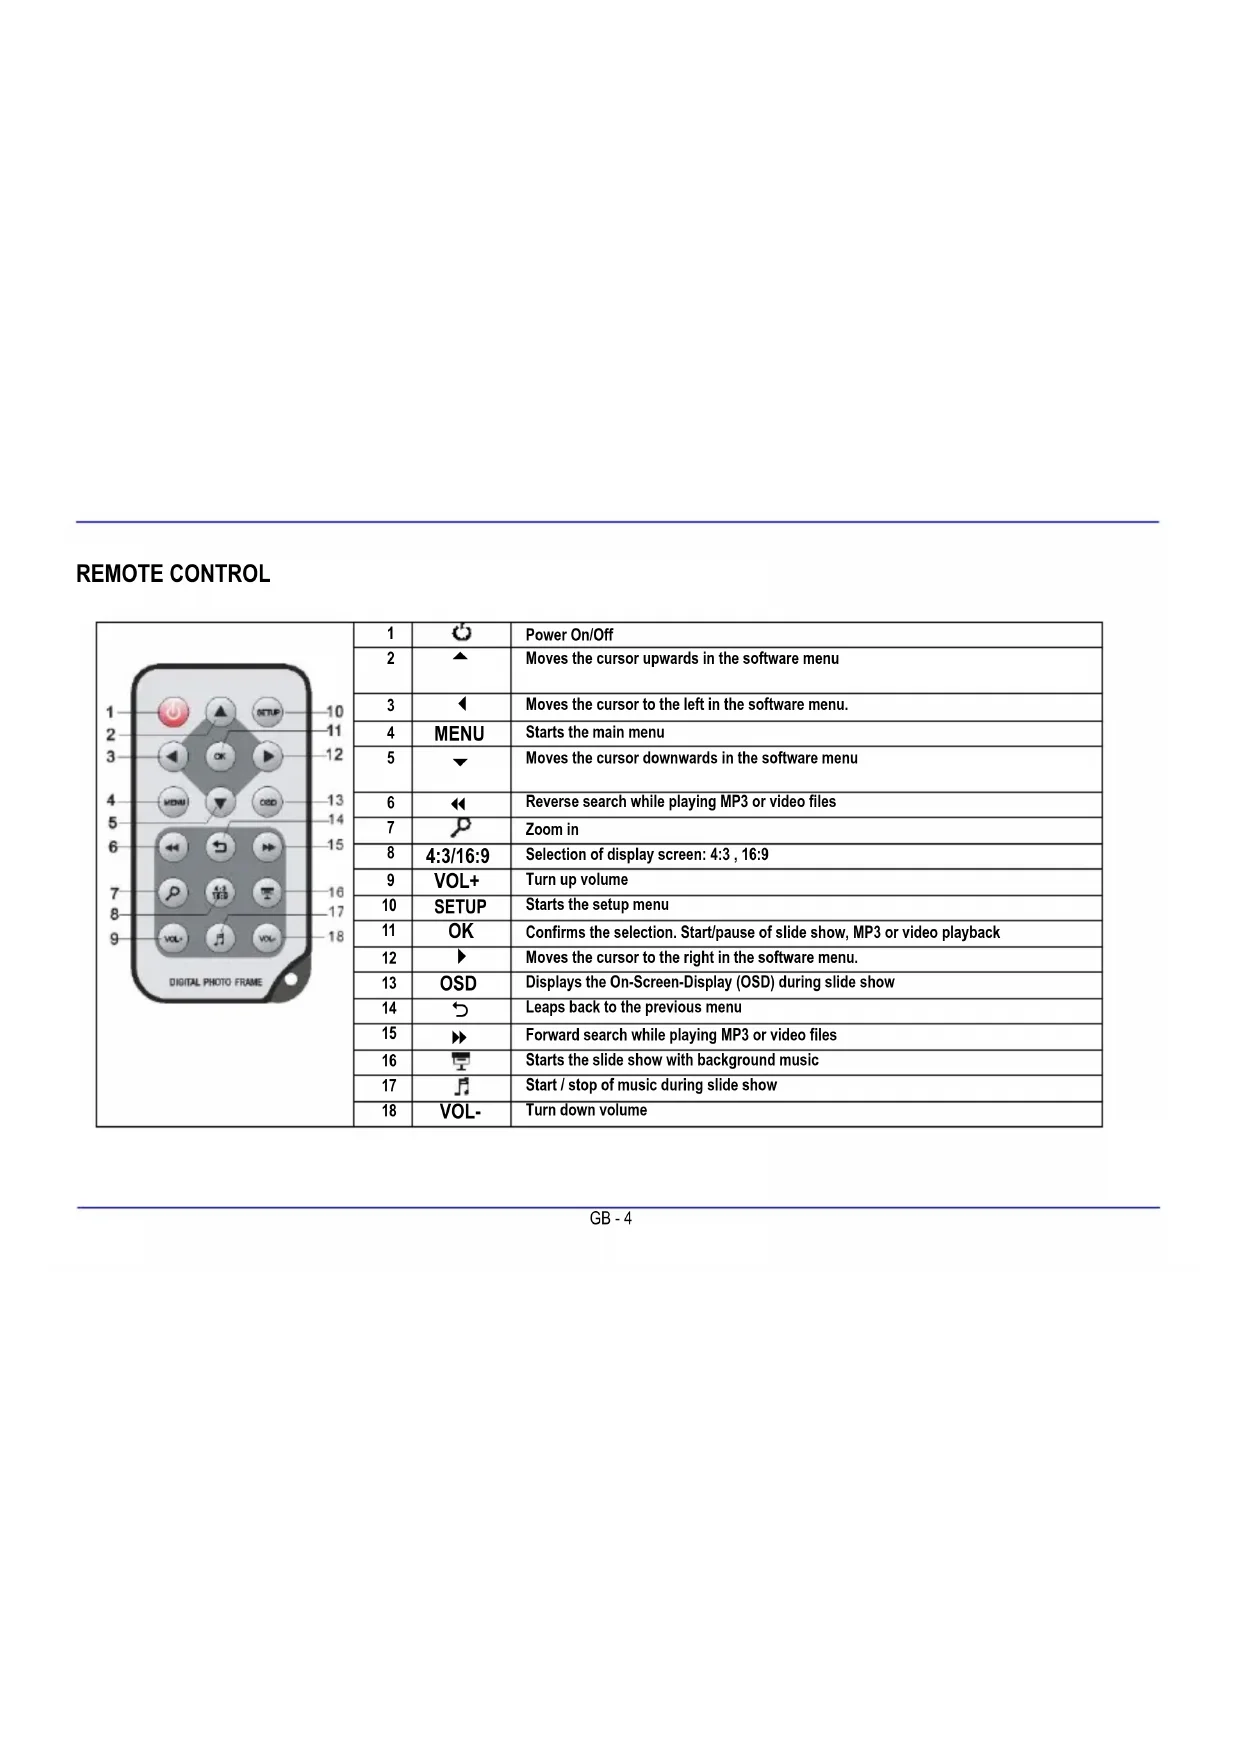
REMOTE CONTROL
| 1 | | Power On/Off |
| 2 | | Moves the cursor upwards in the software menu |
| 3 | | Moves the cursor to the left in the software menu. |
| 4 | MENU | Starts the main menu |
| 5 | | Moves the cursor downwards in the software menu |
| 6 | | Reverse search while playing MP3 or video files |
| 7 | | Zoom in |
| 8 | 4:3/16:9 | Selection of display screen: 4:3, 16:9 |
| 9 | VOL+ | Turn up volume |
| 10 | SETUP | Starts the setup menu |
| 11 | OK | Confirms the selection. Start/pause of slide show, MP3 or video playback |
| 12 | | Moves the cursor to the right in the software menu. |
| 13 | OSD | Displays the On-Screen-Display (OSD) during slide show |
| 14 | | Leaps back to the previous menu |
| 15 | | Forward search while playing MP3 or video files |
| 16 | | Starts the slide show with background music |
| 17 | | Start / stop of music during slide show |
| 18 | VOL- | Turn down volume |
INSERTING BATTERIES INTO REMOTE CONTROL
- Turn your remote control upside down with the buttons facing down.
There is a spring on the left side of the battery compartment. Hold it to the right and simultaneously pull out the battery compartment.
- Insert a CR2025 Lithium battery to the battery compartment with the Plus symbol facing upwards.
- Reinsert the battery compartment into the housing of the remote control.
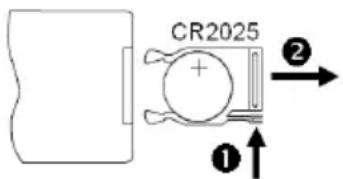
Please note: Please dispose batteries according to legal regulations.
FIRST STEPS
- Connect the frame base to the DIGITAL PHOOTE FRAME (DF).
Connect the mains adapter provided with the DF. Plug the other end of the provided mains adapter into the power outlet.
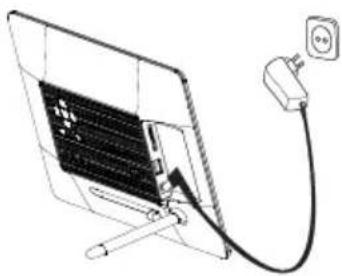
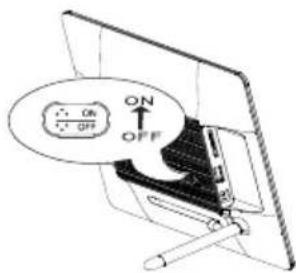
- Move the slider of the DF into "ON" position.
- Using the device for the first time please select the Language in the appearing window by use of the keys on the rear side or the remote control. Confirm your selection with the [▶] button on the rear side or the OK -button on the remote control.
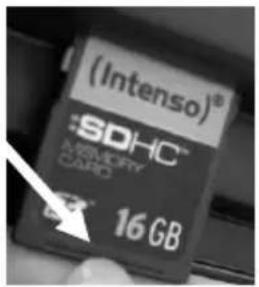
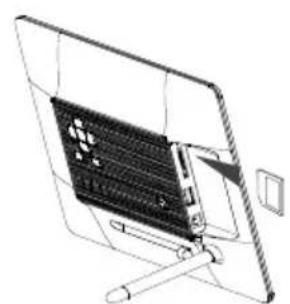
USING MEMORY CARDS
Insert SD / SDHC / MMC / MS cards into the 3-in-1 card slot with the contacts facing the display. USB storage mediums can be connected with the DIGITAL PHOTO FRAME by inserting these mediums into the USB port (USB host).
Please note:
- Please do not insert memory cards by use of force.
The 3-in-1 card reader can only read one card at a time. Thus, please connect only one SD / SDHC / MMC or MS card with the photo frame at a time.
To disconnect inserted cards from the DIGITAL PHOTO FRAME remove them carefully from the card slot. (Please note: SD/SDHC and MMC cards have a small notch in cross direction. By use of your finger nail you can remove the card from the slot)
WATCHING A SLIDE SHOW
After power-on you will be guided directly to the main menu.
If a memory card or a USB memory stick is connected to the DF, the slide show will start directly after power on.
Press the [M] button on the rear side of the DF or the Menu button on the remote control and then the [],[] buttons on the rear side of the DF or the , buttons on the remote control to start the storage medium connected, the setup menu, the clock or the calendar.
Please note:
If a storage medium is connected to the DF, the slide show will start automatically after power on.
If more than one storage medium is connected with the photo frame, after power on the DF will at first read the pictures from the SD / SDHC / MMC or MS cards.
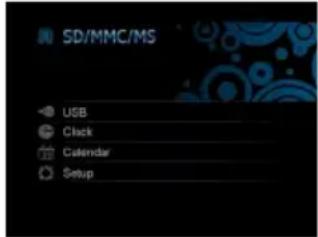
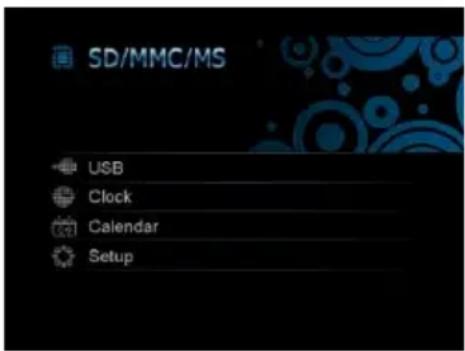
MAIN MENU
In the main menu you can select the storage mediums connected, the clock, the setup menu and the calendar.
- Press the [M] -button on the DF or the MENU button on the remote control to access the main menu.
| Menu | Description |
| USB | Displayed if a USB medium is connected. |
| SD/MMC/MS | Displayed if a SD, MS or MMC card is connected. |
| Clock | Displays the clock |
| Calendar | Displays the calendar |
| Setup | Menu to make individual settings. |
- Press the [ ],[ ] buttons on the DF or the , buttons on the remote control to select a storage medium or a menu item.
- Confirm your selection by pressing the [▶] button on the DF or the OK -button on the remote control.
WATCHING PHOTOS
Starting a Slide Show
To start the slide show you can use the [ ] button on the remote control in each menu. It then starts with first photo. To stop the slide show and display individual photos please press the [▶] button on the DF or the OK-button on the remote control. By repeatedly pressing the [▶] button on the DF or the OK-button on the remote control you can proceed with the slide show.
Press the [D] button on the remote control or the on the DF to leave the slide show and to access the picture preview menu.
- Press the MENU-button on the remote control to access the main menu.
Please note:
- If an additional storage medium is inserted when watching a slide show, the slide show will automatically leap to the first picture of the new storage medium and the slide show will start with this picture.
If a SD/SDHC/MMC/MS-card and a USB drive are connected to the DF at the same time, only the pictures selected on the relevant medium will be continuously played during the slide show. The individual storage mediums are not automatically played one after the other in the slide show.
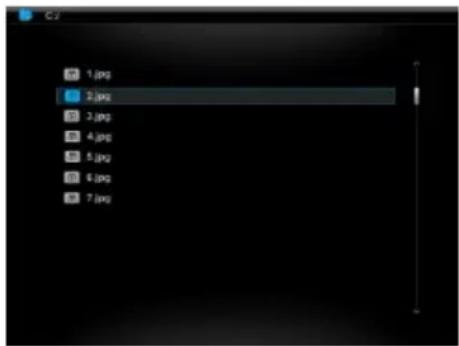
The pictures on the storage medium selected are depicted as thumbnails. It is possible to display up to 15 pictures at a time.
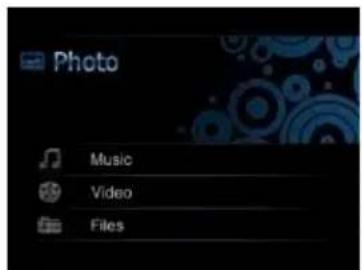
- In the main menu please select a storage medium (USB, SD/MMC/MS) and press the [▶] button on the DF or the OK-button on the remote control.
- Now please select the button Photo using the [], [] buttons on the DF or the , buttons on the remote control and confirm it using the [] button on the DF or the OK-button on the remote control.
- To navigate within the thumbnails please use the [ ],[ ],[ ],[ ] buttons on the DF or the , , , buttons on the remote control. To directly access the next preview page please use the or button on the remote control.
Please note:

- During a slide show or the picture single view mode you can also access the picture preview menu by pressing the [ ] button on the remote control or on the DF if you have started the show from the Photo directory. If you have started the slide show using a file, you can return to the last directory from where the slide show has been started.
Select Pictures from File
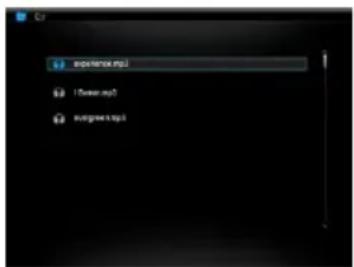
The files and pictures on the storage medium selected will be shown with their name. If there are pictures in a sub-directory, this can directly be accessed.
- In the main menu please select a storage medium (USB, SD/MMC/MS) and press the [▶] button on the DF or the OK-button on the remote control.
- Now please select the button File using the [] , [] buttons on the DF or the , buttons on the remote control and confirm it using the [] button on the DF or the OK-button on the remote control.
- To navigate between the files please use [], [] buttons on the DF or the , buttons on the remote control and confirm it using the [] button on the DF or the OK-button on the remote control.


Please note:
- During a slide show or the picture single view mode you can access the last directory by pressing the [ ] button on the remote control or on the DF.
Displaying Individual Pictures / a Slide Show
You can select individual pictures without starting a slide show.
-
In the picture preview menu please select a picture and press the [▶] button on the DF or the OK-button on the remote control. The picture is now displayed in full screen mode. Now you will see the II symbol in the screen's upper left corner. Now please press the [▶] button on the DF or the OK-button on the remote control to start the slide show.
-
To display previous or following pictures please press the [] , [] buttons on the DF or the , buttons on the remote control.
-
To display a picture with a magnification, please repeatedly press the button on the remote control. If the picture is displayed as a magnified version, you can vary the depicted display window by using the ([\langle ], [>], ([\Delta], [\nabla]) buttons on the DF or the (\triangle), (\triangledown), (\triangleleft), (\triangleright) buttons on the remote control.
-
To return to the picture preview menu please press the [ ] button.
- Press the [▶] button on the DF or die OK-button on the remote control to start the slide show, starting with the selected photo.
Please note:
- Please mind that, if you have started the single picture mode from a directory, only the pictures of this directory will be continuously displayed during the slide show.
Changing the Display Mode
While watching a picture or during the slide show you can change the display mode by repeatedly pressing the [4:3/16:9] button on the remote control.
4:3: With this selection a picture which is saved in the 16:9 or a larger format is stretched and displayed as full screen picture.
16:9: With this selection a picture which is saved in the 16:9 or a larger format is displayed in its original format with a black bar at the upper and lower margin.
Please note:
- A photo which is saved in the 4:3 format can only be depicted in the format 4:3.
This function is not available with photos whose resolution is lower than 1024 X 768 pixels.
You can use the OSD menu carry out the following functions.
- Press the [OSD] button on the remote control or the [M] button on the DF when watching a picture or a slide show. The OSD menu will appear on the display and the slide show will be stopped.

-
Press the [], [] buttons on the DF or the , buttons on the remote control to navigate between the functions.
-
To stop or continue the slide show please select the symbol and press [] on the DF or OK on the remote control. The (Play) symbol in the OSD-menu will be replaced by the II (Pause) symbol.
- By selecting the [ ] symbol and pressing the [ ] button on the DF or OK on the remote control you can start the music playback. Using the [▲], [▼] buttons on the DF or the ▲, ▼ buttons on the remote control you can change the volume.
-
To enlarge the picture please select the symbol and press the [] button on the DF or OK on the remote control. If the picture is displayed as magnified version, you can vary the depicted display window using the [ ], [], [], [] buttons on the DF or the , , , buttons on the remote control.
-
To rotate the picture by 90 degrees in clockwise direction please select the symbol and press the [▶] button on the DF or OK on the remote control.
- By selecting the [ ] symbol and pressing [ ] on the DF or OK on the remote control you can start the slide show with background music starting with the first picture and first title.
- By selecting the [ ] symbol and pressing [ ] on the DF or OK on the remote control the DF will continue with the slide show.
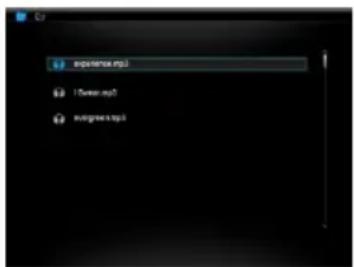
LISTENING TO MUSIC
If MP3 / WMA files are available on a storage medium, you can play them on the DF.
- In the main menu please select the relevant storage medium (USB, SD/MMC/MS) and press the [▶] button on the DF or the OK-button on the remote control.
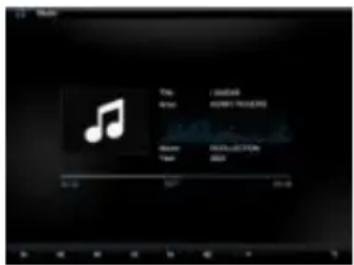
- Press the [], [] buttons on the DF or the , buttons on the remote control to start the Music menu. Press the [] button on the DF or the OK-button on the remote control to confirm your selection. Now the music title bar appears.
- To select the desired song please use the [] , [] buttons on the DF or the , buttons on the remote control and confirm your selection using the [] button on the DF or the OK-button on the remote control.

-
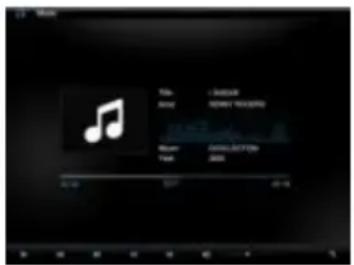
Use the [], [] buttons on the DF or the , buttons on the remote control to navigate within the OSD menu.
-
Select or and press the [] button to pause or continue music playback.
Using the [ ],[ ] buttons on the DF or the [VOL + ] or [VOL-] buttons on the remote control you can change the volume.
- By selecting and pressing the [▶] button the DF leaps tot he previous or next title
- By selecting / and pressing the [▶] button you can activate the Fast Forward or Rewind mode to fast forward or rewind the current title. By repeatedly pressing the button you can change the speed of the search [2X, 3X, 4X, 1X]
To end playback please press the [D] button.
PLAYING VIDEOS
If video files are available on a storage medium, you can play them on the DF.
- In the main menu please select the relevant storage medium (USB, SD/MMC/MS) and press the [▶] button on the DF or the OK-button on the remote control.
- Press the [], [] buttons on the DF or the , buttons on the remote control to start the Video menu. Press the [] button on the DF or the OK-button on the remote control to confirm your selection. Now the video title bar appears.
- To select the desired video please use the [] , [] buttons on the DF or the , buttons on the remote control and confirm your selection using the [] button on the DF or the OK-button on the remote control.
- Please press the [OSD] button on the remote control
-
Use the [], [] buttons on the DF or the , buttons on the remote control to navigate within the OSD menu.
-
Please select or II and press the [▶] button on the DF or the OK按钮 on the remote control to pause or continue video playback
Using the [ ],[ ] buttons on the DF or the [VOL ^+ ] or [VOL-] buttons on the remote control you can change the volume.
- By selecting and pressing the [▶] button the DF leaps to the previous or next video
- By selecting / and pressing the [▶] button you can activate the Fast Forward or Rewind mode to fast forward or rewind the current title. By repeatedly pressing the button you can change the speed of the search [2X, 3X, 4X, 1X]
To end playback please press the [O] button.

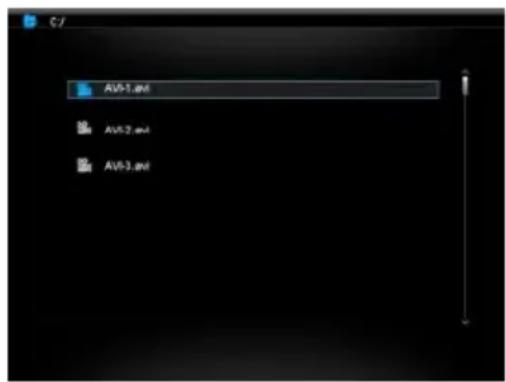
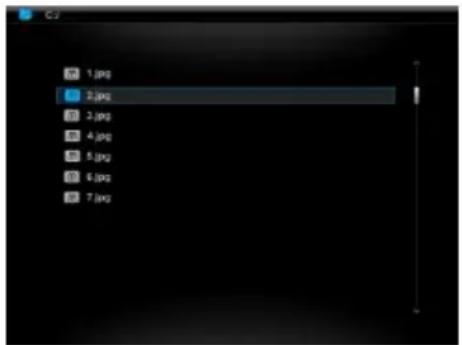
DIRECTORY files
In the file directory you can see all existing files and directories on the storage medium selected. You can also copy data from one storage medium to another. It is also possible to delete existing files on a storage medium.
- In the main menu please select a storage medium (USB, SD/MMC) and press the [▶] button on the DF or the OK-button on the remote control.
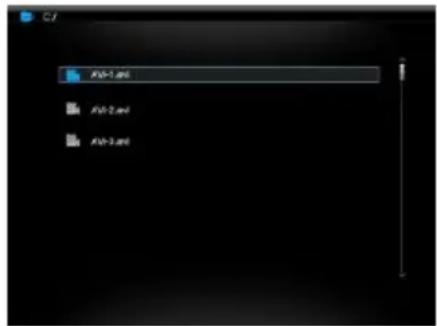
- Please press the [], [] buttons on the DF or the [], [] buttons on the remote control to select the File-menu. Please confirm your selection by pressing the [] button on the DF or the OK-button on the remote control. Now the file list with the directories and files available will be shown.
- Use the [A] , [V] buttons on the DF or the , buttons on the remote control to navigate between the files and directories.
- To open a directory please press the [▶] button on the DF or the OK-button on the remote control. To return to a parent directory please press the [⊤] button on the DF or on the remote control. To play a file please select it and press the [▶] button on the DF or the OK-button on the remote control. To return to the file list please press the [⊤] button.
Copying Files
- Now please select the file using the [], [] buttons on the DF or the , buttons on the remote control and press the [] button on the DF or the button on the remote control. A checkmark appears next to the file. To select more than one file, please repeat these steps.
- Please press the OSD-button on the remote control. Now the display shows the options Copy and Delete.
- Please use the [],[] buttons on the DF or the , buttons on the remote control to select Copy and press the [] button on the DF or the OK-button on the remote control. Additional storage mediums available are shown in the display.
- Please use the [ ],[ ],[ ],[ ] buttons on the DF or the , , , buttons on the remote control to select the relevant storage medium and press the [ ] button on the DF or the button on the remote control to select the desired storage medium and sub-directory.
- Press the [▶] button on the DF or the OK-button on the remote control to start the copy process.
- Repeatedly press the [▶] button on the DF or the OK-button on the remote control to confirm the "Complete" message.
Please note:
If your desired storage medium does not appear in the list, this may be due to the fact that this medium is read-only. Please remove the read-only mode and try restarting the copy process.
Deleting Data
- Now please select a file using the [], [] buttons on the DF or the , buttons on the remote control and press the [] button on the DF or the button on the remote control. A checkmark appears next to the file. To select more than one file, please repeat these steps.
- Please press the OSD-button on the remote control. Now the display shows the options Copy and Delete.
- Please use the [] , [] buttons on the DF or the , buttons on the remote control to select Delete and press the [] button on the DF or the OK-button on the remote control.
- Using the [ ],[ ] buttons on the DF or the , buttons on the remote control you can select YES to delete the files, or No to leave the menu without any changes.
- Press the [▶] button on the DF or the OK-button on the remote control to delete the selected files.
- Repeatedly press the [▶] button on the DF or the OK-button on the remote control to confirm the "Complete" message.
You can individually adjust the configuration of the DIGITAL PHOTOFRAME (DF).
- In the main menu please select the menu item SETUP and confirm your selection with the [▶] button on the DF or the OK-button on the remote control. You can also access this menu by pressing the [SETUP] button on the remote control.
- To select settings please use [], [] buttons on the DF or the , buttons on the remote control and confirm your selection using the [] button on the DF or the OK按钮 on the remote control.
- To change settings please confirm your selection by pressing the [▶] button on the DF or the OK-button on the remote control. To reach the next higher selection menu please use the [<] button on the DF or, alternatively, the < button on the remote control.
- To leave the menu please press the [] button on the DF or on the remote control.
| Settings | Description |
| Photo setup | Sliding show time | Select how long a picture is displayed during a slide show.
Options: 3 sec., 5 sec., 15 sec., 1 min., 15 min. |
| Photo mode | Please decide whether the picture is shown as Full Screen Picture or with its original ratio using the Standart screen function. |
| Transition effect | Select from random and continuous transition modes |
| Date stamp | In full screen mode and during a slide show this function shows the picture's creation date |
| Music setup | Music repeat mode | Repeat mode Off: Plays all songs in the selected directory
Repeat mode On: Repeats the selected song
Repeat mode All: Plays all songs on the selected storage medium |
| Video setup | Movie repeat mode | Repeat mode Off: Plays all videos in the selected directory
Repeat mode On: Repeats the selected video
Repeat mode All: Plays all videos on the selected storage medium |
| Clock / calendar setup | Time mode | Please select the digital or analogous clock |
| Show photo | Adjusting the time. |
| Clock Wallpaper | Adjusts the time format to 12 hours (AM / PM) or 24 hours |
| Set time | Adjusts the date |
| Set time format | Please select the display format for your calendar, e.g. DD/MM/YYYY |
| Alarm setup | Alarm 1 | Adjusts alarm, alarm tone and time |
| Alarm 2 | Adjusts alarm, alarm tone and time |
| Alarm 3 | Adjusts alarm, alarm tone and time |
| Alarm 4 | Adjusts alarm, alarm tone and time |
| Ringtone volume | Adjusts the alarm volume. Options: 1,2,3,4,5,6 |
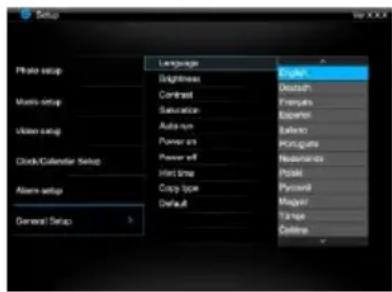
| General setup | Language | Select your preferred language. |
| Brightness | Adjusts the brightness of the TFT display. Options: -3, -2, -1, 0, 1, 2, 3. |
| Contrast | Adjusts the contrast of the TFT display. Options: -3, -2, -1, 0, 1, 2, 3. |
| Saturation | Adjusts the colour saturation of the TFT display. Options: -3, -2, -1, 0, 1, 2, 3. |
| Auto-run | Here you can select the mode your photo frame starts in after power on.
( Photo, main menu, clock, calendar ) |
| Power-on | Enables automatic power-on. Off / once / daily |
| Power-off | Enables automatic power-off. Off / once / daily |
| Hint time | Specify how long the notification window of the key's functions is displayed in the slide show mode and the status II (pause) or ▷ (play) in the picture. Options: 0 sec., 5 sec., 10 sec., 20 sec. |
| Default | Device is reset to factory settings. |
Setup Date and Time
How to adjust date and time on the Intenso DF:
- In the main menu select the menu item SETUP.
- Press the [], [] buttons on the DF or the , buttons on the remote control to select the menu item Time settings.
- Press the [], [] buttons on the DF or the , buttons on the remote control to select the next or previous element (hour, minute). Press the [\▲], [\▼] buttons on the DF or the , buttons on the remote control to adjust the desired values.
- To confirm your entries please press the button [▶] on the rear side of the DF or the OK-button on the remote control.
How to adjust the date on the Intenso DF:
- Press the [] , [] buttons on the DF or the , buttons on the remote control to select the menu item Date.
- Press the [], [] buttons on the DF or the , buttons on the remote control to select the next or previous element (month, day, year). Press the [], [] buttons on the DF or the , buttons on the remote control to adjust the desired values.
- To confirm your entries please press the button [▶] on the rear side of the DF or the OK-button on the remote control.
Alarm Setup
- In the main menu select the menu item SETUP.
- Press the [],[] buttons on the DF or the , buttons on the remote control to select the menu item Alarm Setup and confirm your setting by pressing the [] button on the DF or the OK-button on the remote control.
- Press the [], [] buttons on the DF or the , buttons on the remote control to select an alarm and confirm your setting by pressing the [] button on the DF or the OK-button on the remote control.
-
Press the [], [] buttons on the DF or the , buttons on the remote control to select the next or previous element (hour, minute, time, alarm tone). Press the [], [] buttons on the DF or the , buttons on the remote control to adjust the desired values.
-
Off: Deactivates the alarm function.
-
Daily: The alarm is set for every day.
Once: The alarm is set for one time only.
-
To confirm your entries please press the button [▶] on the DF or the OK-button on the remote control.
Please note:
It is possible to define 4 different alarm times and tones independent of each other
Activating Automatic Power On/Off
You can have Intenso's DIGITAL PHOTO FRAME switch on/off automatically at a preset time.
Please note: This function requires setting the correct time in advance.
- In the main menu select the menu item SETUP and then General Setup.
- Press the [], [] buttons on the DF or the , buttons on the remote control to select the menu item autom. power-on or autom. power-off.
-
Press the [], [] buttons on the DF or the , buttons on the remote control to select the next or previous element (hour, minute). Press the [], [] buttons on the DF or the , buttons on the remote control to adjust the desired values and the time.
-
Off: Deactivating Automatic Power On/Off
Once: The DIGITAL PHOTO FRAME switches on and/or off at the preset time for one time.
Daily The DIGITAL PHOTO FRAME switches on and/or off at the preset time every day.
-
To confirm your entries please press the button [▶] on the DF or the OK-button on the remote control.
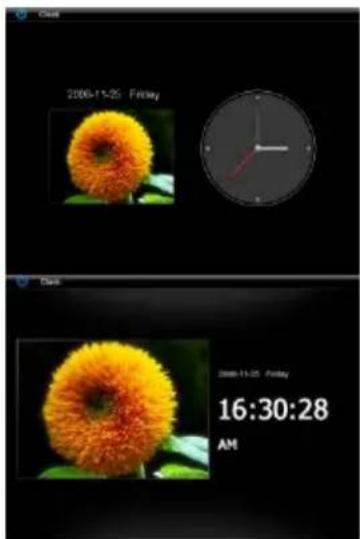
Clock Display
The clock mode displays the current date, the current time and a slide show with thumbnails in the background.
- In the main menu select the menu item CLOCK.
- To leave the clock mode please press the [D] button.
Please note:
- Date and time as well as the desired clock representation can only be adjusted in the menu Clock/Calendar Setup.
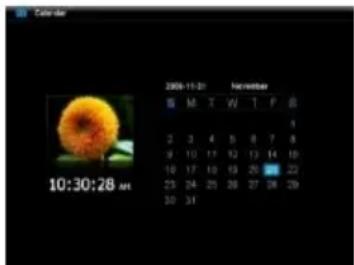
Calendar Display
The calendar mode displays the current date, the current time and a slide show with thumbnails in the background.
- In the main menu select the menu item Calendar.
- To leave the calendar mode please press the [ ] button.
Please note:
- Date and time can only be set in the Clock/Calendar Setup menu.
- By pressing the [], [] buttons on the DF or the , buttons on the remote control the calendar can leap back or forth by the month.
- By pressing the [], [] buttons on the rear side of the DF or , the buttons on the remote control the calendar can show the next years or leap back to the previous one.
FAQs
Why is the actual capacity of a memory card less than specified on the packaging?
The storage capacity of a flash storage medium is specified according to capacity specifications for hard drives and is subject to the SI regulations (International System of Units). This system does not use the binary system, which converts 1024 MB into one GB. The SI standard uses the powers of 1000, where 1000 Megabyte make 1 Gigabyte. Due to this different way of calculation, capacity specification might be different.
Why does the DF not display some pictures of my memory card?
Some not so widespread storage mediums are not compatible with the DF. Please use a compatible card. Please bear in mind that this photo frame can only play photos with the file format "JPEG".
A memory card is inserted but the DF cannot read this card. What can I do?
At first please check if this card is actually compatible with Intenso's DIGITAL PHOTOFRAME.
Then, please check if the card is properly inserted into the card slot. Please bear in mind that only the file format "JPEG" is supported.
Please note: Some digital cameras do not save pictures by use of the standard format JPEG. In such a case please refer to the operating manual of your camera.
Why are some pictures loaded faster than others?
Pictures with a high resolution need longer times to be displayed. To increase the loading speed please use pictures with a lower resolution.
Please note: The photo frame supports a resolution of up to 8000*8000 pixels.
Why does the software not start although power supply is ensured and the power switch is in "On" position?
This might be a system error. Please reset the software by cutting off power supply for a few seconds.
Why is the main menu not displayed?
Please check if the DF is properly connected to the power outlet and the power switch is in "On" position.
Can I rotate pictures on the display?
Yes, please use the OSD menu. Press the [OSD] button on the remote control or the [M] button on the DF when watching a picture or a slide show. The OSD menu appears on the display.
Please note: With a new start the rotated picture will be displayed in normal mode again.
Can I adjust the colours of pictures?
No. All colours are set when the picture is being taken. However, you can adjust the brightness and the contrast of the display. However, you can adjust the brightness and the contrast of the display.
What is the ideal resolution to display pictures on the DF?
The ideal resolution for this DF is 1024^*768 pixels.
Why do the functions: Automatic power-on / off not work although I have enabled them?
Please make sure your time settings are correct. If the set time is in the past, the function will be enabled on the next calendar day for the first time.
Please do not move the slider on the rear side of the DF into POWER OFF position. Only change the status of the DF into standby.
PRODUCT SPECIFICATIONS
| Display | Digital TFT LCD
Display size: 10 inch (25,4 cm diagonal viewable image)
Display modus: 4:3
Resolution: 1024*768 pixels |
| Mains adapter | Input: 100~240V AC, 50/60Hz
Output: 5V 2A DC |
| USB port | USB Host 2.0 & USB Device 2.0
Supports USB storage mediums |
| Memory cards supported | SD/SDHC™ (Secure Digital Card), MMC™ (MultiMedia Card), MS™ (Memory Stick) |
| Picture size supported | JPEG, max. resolution:8000*8000 pixels |
| Options | 2 GB internal memory |
| Operating temperature | 0°C ~ +45°C |
| Dimensions | 265.5*215*23 mm |
| Weight | ~ 638.6g |
| Accessory | Remote control (incl. battery), foot, mains adapter, quick guides in more languages |
SERVICE AND MAINTENANCE
Service
- To avoid risks of electric shocks please do not remove screws or the housing.
Do not use the device in the vicinity of water. Do not expose the device to rain or moisture. Do not place any objects in the vicinity of the device that store water or any other liquids.
Do not install this picture frame in the vicinity of heating systems, ovens or other heat emitting devices.
Do not open the housing. Do not try to repair the device yourself. Leave any repairs to specialised personnel only.
- Avoid using your device on sandy places.
- Please do properly connect the plug of the mains adaptor to the existing opening of the DF. Thus, you can avoid electro-static charge.
- Plug in all connections correctly and safely.
- Please do not touch the display. Do not expose the display to direct sunlight.
- The picture frame only plays compatible file formats.
Pictures might be protected by copyright law of third parties. Playing such pictures without licences might represent an infringement of such copyright laws.
- Please do not touch the DF with metallic object during operation.
Please avoid operation on pillows, sofas or any other heat emitting home appliances since the device might overheat in such cases.
- Please do not remove memory cards while the device is reading. Otherwise this might result in abnormal system ends or loss of data.
- Please do not switch off the device with the slide show running.
- Please do not directly wrap the device after longer operating hours. Please make sure the device has cooled down properly. Otherwise the device might overheat.
- To guarantee better service this operating instruction is subject to alterations.
Device Maintenance
The Device must be switched off.
Never spray or apply liquid substances directly onto the display or the housing.
Cleaning the display / housing / frame
Clean the housing, frame and LCD display carefully with a soft cloth which is free of lint and chemicals. Only use cleaning agents which are suitable for cleaning LCD displays.
Disposal of WEEE (Waste Electrical and Electronic Equipment)
Devices marked with the WEEE logo are subject to the European Community Directive 2002/96/EC.
Waste Electrical and Electronic Equipment must be separated from household rubbish and disposed at sites that collect WEEE.
By orderly disposing WEEE you will avoid damage caused to the environment.
Istruzioni d'uso
Indices
QUESTIONS FREQUEMMENT POSEES 32
SPECIFICATIONS DU PRODUIT 34
SOIN ET ENTRETIEN 35
INTRODUCTION
QUESTIONS FREQUEMENT POSEES
CUIDADO E MANUTENCAO 35
CUIDADO 35
INTRODUÇÃO
AgradecemosPGAelaMOLDURADEFOTOS DIGITAIS(MFD)daIntenso.
8 Tecla Stop [3]
9 Power On/Off
Posso rotar as imagens no visor?
OBUHEXAPAKTEPNCINIPODYKTA
- EkopaTnBHOe oOpMneHne, XopoOee KaueCTBO
- PioocMToP foToIpaФn (JPEG) 6e3 KOMNbIOTepa
- ABTomatnueckoe cnaI-d-woy c pa3JIuHbIMn nepExoHbIMn 3ΦΦeKTaMn INHINBnDyaJIbHOJ dINHOJ npocMOtpa
- PoinpibAHne My3bIK MP3/WMA c BCPOeHHbIMr pOMKOrOBOpTeJIaMn
LcnpoBoe cnaI-woy cmy3bikabHbIM fOHOM MP3
- Ipnirpbibahne BndeofoaioB bopmatax MPEG-4 m-M-JPEG
- IopndepxKnBaet pa3HbIe peXmbl BOCpOIN3BeHeHMy3bIKN BVIDeo
- KaJIeHdApHaŋ ΦyHKuŋ
-ФункштетьгИ
-ФункцяТаIMepa
- POndepKINBaET POnkIHyeHne HayuHnIKOB
CobmecTmca KapTaMn SD/SDHC/MMC n MS
2GBBHTpeHHe namrtn
- THe3do USBДЯ NOДКЛЮЧЕNY NAMrTи 60JIbWoJ EMcKocTn USB
2 cnoc6a ynpablenHn: 7 KHOJOK Ha UΦpOBOI ΦOTopamKe, INΦpaKpaCHOe IINCTAHUONHOE o6CnyKBAHne
OB3OP
1 HΦpaKaPacHbI ceHcOp
2 MeHIO KhoNka, OTKpbBaet MeHIO OSD
3 BnpaBO KhoNka [
4BbepxKhoNka[
5 PpocMOTp KHOHa [
6 BneBO KhoNka [
7 BHn3 KhoNka [
8 CToN KHonka [b]
9 Bknou./Bbikn.
10 He3do nra Kapr SD/MMC/MS
11 THe3I0 USB Host
12 DC 5B 1A BxoD
13 Hoxkka
14 Pe3b6OBoE OTBepCTne IIN HOKKN
DINCTAHUOHHOYYPABJEHNE
IcnoB3OBAHHe MeHIO INHdNkaUN Ha 3KpaHe OSD
MeHIOOSDMOXHOINCIOJIb3OBAtBJNBAIBOINHeHnCNeMyUxNDeiCTBn.
- Haxmte Ha KhoNky [OSD] Ha DnctaHcnoHHom ynpabneHnn nn Ha KhoNky [M] Ha LΦ BO Bpemr npocmoTpa foToRaΦnn nnn cnaI-d-woy. MeHIO OSD noBnEeTcHa dncnnee n cnaI-d-woy octaHabnBaetc.

2.ДЯ HabuRauM MExkDyФyHKUmaM NOnb3yTeCb KHOKNaMn [<], [>] Na LΦ UIn KHOKNaMn △, ▶Ha nUcTaHUnOHOM ynpabHeHm.
-
Yto6bI OCTaHOBnTB nnn npoDoJNKnTB cnaHd-woy, Bbl6epnte CmBOJ ▷ n HaxMnte Ha KhoNky [▶] ha LΦ nnn Ha OK ha DCCTaHcIOOHOM ynpabHeHH. BMeCTo CmBOJa (BocPOn3BeDeHne) B MeHIO OSD noRbJIeTcra CmBOJ II (nay3a).
HaKaTHnEM Ha CmB0JI [J] n noTBePxxDeHnEM Bb6opa KHOKoN [▶] Ha LΦ nn KHOKoN OK Ha DnCTaHcNOHOM ynpabJIeHNn HauHnAeTcB OcIpon3BeDeHnE My3bIK. KHOKamn [A],[V] Ha LΦ nn KHOKamn ▲, ▼ Ha DnCTaHcIOHOM ynpabJIeHNn MOxH0 N3MeHrTb 3ByK.
-
YTo6bl yBéIuHbT bΦoTpaΦnO, BbIepeTe cIMBOJ N haxMITE Ha KHOKy [▶] Ha LΦ nIi Ha OK Ha DnCTaHcUHOM ynpabHeH. EcII ΦoTpaΦnI3O6paxJaETcB yBéIuHcHOM BIne, C I NOMIoBIO KHOK [<], [>, [A], [V] Ha LΦ nIi KHOK ▲, ▼, ▶, ▷Ha DnCTaHcUHOM ynpabHeHm MOXHo I3MeHЯr Tb φpaarmENT I3O6paxKeHn.
- UTo6bl nOBepHyb foTOrpaΦnHO Ha 90 rpaDycob B HAnpabLeHn YacBOB cTpeKN, BbIbepnte CMBoN Onn HaxMITE Ha KhoNkY [▶] Ha LΦ nII HA OK Ha nCTaHcNoHHOM ynpabNeHn.
HaKaTHeMa CmBOn [ ] n OndTBepKdEHNem BbIbopa KHOIpKoN [ ] Ha LΦ nII N KHOIpKoN OK Ha DnCTaHcUHOM ynpaBHeHH 3anyckaeTc npocMToP fOtorpaΦn Ha fOHe My3bIKn, NaHnHaC nepBoo fOtorpaΦn n nepBoo fOHOrpAMbl.
- После нажатая символа [ ] и Кноги [ ] на LФ Или Кноги OK на достацною упавли NGл поховп орарнос предварпелову посмOTу садов.
ПОСЛУSHINBAHNE MY3bIKN
EcHnHa HocnteI naTn ImeoTc paJIb MP3/WMA, INMOxHO npOnpRpbBaTb Ha LΦ.
- BbIbePteB rIaBHOM MeHIO COOTBeTCTBeHHbI HOCHTeJIb NaMrtn (USB, SD/MMC) n Haxmnte Ha KhoNkY [▶] Ha LΦ IIN Ha KhoNkY OK Ha dIcTaHcUHOHOM ynpabJIeHIM.
2.ИспоьзуITE KнОКN [A], [V] Ha LΦ ИИ N KнОКN ▲, ▼HaДиСТаHцИОнHOM ynpaBHeHn,ЧTOБы BbI3BaTb MeHIO My3bIka.HaxMITE KнОКY [▶] Ha LΦ ИИ N KнОКу OK Ha ДИСТаHцИОнHOM ynpaBHeHn,ЧTOБы NOДТВeрДИТь Bbl6op.Ha DИСТПЕЕ NOЯВITcRc CПСОК ФОНогРамM.
- Испобзейу Te KhoTN [A], [Y] Ha LΦ nIи KhoTN ▲, ▼ Ha ДИСТаHцИОнHOM ynpaВлeHIMДЯ BbIbopa HuxHoi ФоHOrpaMMbI И NOДТВердTe Bbl6op KhoTko [ ] Ha LΦ nIи KhoTN OK Ha ДИСТаHцИОнHOM ynpaВлeHIM.

4.ИспьзуITE KHONKn [<], [>]Ha LΦ nIe KHONKn <, ▷HaДиСТаHцINOHOM ynpaBHeHn IЯн HabNraCm B MeH OSD
HaxmTe HnI I n noTBePdTe KhoNko [▶], YTO6bIOCTaHOBtBnnI npoJKNtB BOCpOu3BeDeHne My3bIKN
- TpOMKocTb perynipyeTcKhONkAMn [A], [Y] Ha LΦ n KhONkAMn [VOL+] NIN [VOL-] Na dNCTaHNoHHoM ynpabJIeHN
- Ipn Haxatnn KhoNKn / N noTBepeXdeHn BbIbopa KhoKoN [ ] LΦ npexoNT K npebdyuee nn K cneDyUoe ΦOHorpaMMe
- Пи Нжати Ha KONky / > И поТьрждени Вьбopa Kногко [ ]akTNBnpyeTcЯпетмOTka BnepeДиИи Ha3ad.Пи KaKdOM HaxatniH3MeHЯETcя ckopoCTb noncKa [2X, 3X, 4X, 1X]
TO6bI 3aKOHHTb BOCnpon3BedeHne, HaxMnTe Ha KHONky [5].
BOCnPON3BEdHNE BnDEO
Ecn Ha HocnteJe namrtn mHeTc BnDeofoaIbI, IN MOKHO npOnpRpbIbTaHa LΦ.
- BbI6epHTe B rIaBHOM MeHIO COOTBeTCTBeHHbI HocHTeJIb NaMRTn (USB, SD/MMC) n HaxmTe Ha KhoNky [▶] Ha LΦ IJIn Ha KhoNky OK Ha DnCTaHcNoHHom ynpabNeHH.
- IcnoIb3yIte KhoNk [A], [V] Ha LΦ nII KhoNk ▲, ▼ Ha dIscTaHIOHOHOM ynpabNeHH, YTO6bl BbI3BaTb MeHIO BnDeo. HaxMITE KhoNkY [▶] Ha LΦ nII KhoNkY OK Ha dIscTaHIOHOHOM ynpabNeHH, YTO6bl NOITBepdntb Bbl6op. Ha dIscNpEE NOBNTCA CnICOK BnDeOrpAMM.
- IcnoIb3yIte KhoNkn [A], [V] Ha LΦ nnn KhoNkN ▲, ▼ Ha nuctaHIOHOHOM ynpabHeHn dIy BbI6opa HxKHOBnDeOgPamMbI n noTBePdnte BbI6op KhoNko [▶] Ha LΦ nnn KhoNko OK Ha nctaHIOHOHOM ynpabHeHn.
- HaxMMTe Ha KhoNky [OsD] Ha nIcTaHcUHOHOM ynpabJIeHN
5.Испοлбayte KhoNKn [<], [>]Ha LΦ mnn KhoNKn , ▶HaДиctaHNoHHOM ynpabIeHnДЯ HabnrauB MeHIO OSD
HaXMMTe Ha KONky IIN II N NOITBepDte BbI6op KONKoI [▶] Ha LΦ IIN KONKOI OK Ha DnCTaHIOHOM ynpabNeHN, YTO6bl npepBaTb IIN npoDoJKNtB BOCpOu3BeDeHne BVdeOrpaMMbl.
- TpOMKocTb perynipyeTcKhONkAMn [A], [Y] Ha LΦ n KhONkAMn [VOL+] mN [VOL-] Ha dncTaHNoHHom ynpabJIeHN
- Pn HaxkTm KhONKn /H n noTBePxDeHm BbIbopa KhoKoN [B] LΦ npexoNT K npdeBdyueynn K cneDyUOe BNDeOrpamme
- Пи Нжати Ha KONky / >> n noTbePkeHn Bb6opa KhonKoI [▶]akTNBupyetc nepeMOTka BnepeД nII Ha3ad. Пи KaJdOM HaxatniN3MeHreTc ckopocTB noncka [2X, 3X, 4X, 1X]
- UTo6bI 3aKOHHTb BOCnpon3BeDeHne, HaxMITE Ha KhoNky [°].

ФАЛы ПАКИ
HnHaXmTe Ha KOnKy [ ] Ha LΦ nInn Ha KOnKy OK Ha nucTaHcNoHOM ynpabIeHIM.
- IcnoIb3yIe KhoNk [A], [V] Ha LΦnI N KhoNk [A], [V] Ha
ДиCTAHUNOHUM ynpabJIeHIM, YTO6bI Bbl6paTb MeHIO AaJIbI. ПОДТВЕРДITE Bbl6op HaxkATnEM Ha KhONky [▶]Ha LΦ ИЛIN Ha KhONky OK Ha ДИСТАнCUHOM ynpabJIeHIM. Ha DnCPIEE NOBtCnICOK paIIOB C IMEJOUIMNcR nankamN I paJAmN.
- IcnoIb3yIe KhoIKN [A], [V] ha LΦ nII KhoIKN ▲ n ▼ Ha nIcTaHIOHOM ynpabNeHn dIraM mExdy paIamn nnpankamn.
- YtobI OTKpbITb NaKy HaxMITE Ha KhoNky [▶] Ha LΦ iJIN Ha KhoNky OK Ha DnCTaHcUHOHOM ynpabNeHH. YtobI BO3BpaNTbCS Ha3aD K OCHOBHON NaIKe, HaxMITE Ha [▶] Ha LΦ iJIN Ha DnCTaHcUHOHOM ynpabNeHH. IJN BOCpOu3BeDeHnfa, BblJeTIte erO n HaxMITE Ha KhoNky [▶] Ha LΦ iJIN Ha KhoNky OK Ha DnCTaHcUHOHOM ynpabNeHH. YtobI BepHyTbCS K CnCKy faJIOB, HaxMITE Ha KhoNky [▶].
KoInpoBaHne faJIOB
- BbIeJIInTe aJn C nOMoBIO KHOJOK [A], [V] Ha LΦ uIN KHOJOK ▲, Na DnCTaHcNOHOM ynpabJeHHN HnKaMnTe Ha KHOJky [>] Ha LΦ uIN Ha KHOJky ▷ Ha DnCTaHcNOHOM ynpabJeHHN. PraDom C paJlom NoaBntc TnUHa . NobTopuTe daHHbIe 8arn, YTO6bl BB6paTb HeckOJIbKO paJlOB.
- Haxmte Ha KOnky OSD Ha dntaHOnHom ynpabHeHn. Ha dncnee noBRTc onn KOnnpoBaTb uDaNTb.
3.ИспοльзуITE KhoIGN [A],[V]Ha LΦиин KhoIGN ▲,▼HaДиCTaHцIOHHOM ynpabNeHIN,чTO6bl BbIbpaTb KonHpoBaTb n HaxMnTe Ha KhoIGNy [▶]Ha LΦиин Ha KhoIGNy OK HaДиCTaHцIOHHOM ynpabNeHIN. HaДиcNlee noRbTc npyrne IMeEOUncsE HOCHTeYn NaMyTn.
- IcnoIb3yIte KhoNkI [ ],[ ],[ ],[ ] Ha LΦ nIIN KhoNkI ▲,▼,▲,Ha IInCTaHIOHOM ynpabNeHIM,HTo6bl BbIpaTb COOTBETCTByIOUm HOCITeJI naMTI, n HaxMNTe Ha [>] LΦ nIIN HA KhoNky Ha IInCTaHIOHOM ynpabNeHIM,HTo6bl BBipTaB Heo6xoDImbI HOCITeJI naMTI.
- Haxmte KhONky [ ] Ha LΦ Φ JIN KhONky OK Ha DnCTaHcNoHHOM ynpaBneHN, YTO6bI Haayt bKoNipOBaHne.
- Haxmte KhoKy [▶] ha LΦ nnn KhoKy OK ha nctaHnOHm ynpabneHn CHoBa, YTObI noTBePdntb cooBueHne «ΓOTOBO».
3ameyahue:
- Ecnu Heo6xodmbu Hocumnb daHbix omycmeyem 8 cnucke, npuuhou 3mo20 moKem 6bim bo, ymo daHHbH Hocumnb naMru 3auiueH ha 3anucb. Chumme 3auumy u nonpobyume eue pa3 zanycmumb konupoeaHue.
YdaJIeHne paIbI
- BbIeJIte aII KhoNkAMn [A], [V] Ha LΦ IIN KhoNkAMn ▲, ▼ Ha IINCTaHcUHOHOM ynpabNeHm n HAKMITE Ha KhoNky [>] Ha LΦ IIN HA KhoNky ▷ Ha IINCTaHcUHOHOM ynpabNeHm. PAnOM c aIIOM IONBNTcR nTnUka . NOBTOPrTe daHHble sArn, YTObbl BbIpaTb HeCKOJIbKO aIINoB.
- Haxmte Ha KONky OSD Ha dctaHOnHHom ynpabHeHn. Ha dncnnee noBRTcOnnKoNpoBaTb u Daanntb.
- IcnoIb3yIte KhoNk [A], [V] Ha LΦ nII N KhoNk ▲, ▼ Ha nCTaHIOHOM ynpabJeHH, YTO6bl BbIbpaTb YdaNTb n HaxMITE Ha KhoNky [B] Ha LΦ nII HA KhoNk OK Ha nCTaHIOHOM ynpabJeHH.
- IcnoIb3yIe KhoNk [<], [>] Ha LΦ nII N KhoNk <, ▷ Ha dIcTaHIOHHOM ynpaBHeHn, YTO6bl BbIbpaTb DA nIy ydaJIeHn paJIOB nIi Het dIra BixOda n3 MeHIO 6e3 n3MeHeHn.
5.HaKMMTe KHOKNy [ ]Ha LΦ Φ Φ Φ Φ Φ Φ Φ Φ Φ Φ Φ Φ Φ Φ Φ Φ Φ Φ Φ Φ Φ Φ Φ Φ Φ Φ Φ Φ Φ Φ Φ Φ Φ Φ Φ Φ Φ Φ Φ Φ Φ Φ Φ Φ Φ Φ Φ Φ Φ Φ Ψ Ψ Ψ Ψ Ψ Ψ Ψ Ψ Ψ Ψ Ψ Ψ Ψ Ψ Ψ Ψ Ψ Ψ Ψ Ψ Ψ Ψ Ψ Ψ Ψ Ψ Ψ Ψ Ψ Ψ Ψ Ψ Ψ Ψ Ψ Ψ Ψ Ψ Ψ Ψ Ψ Ψ Ψ Ψ Ψ Ψ Ψ Ψ Ψ Ψ Χηηηηηηηηηηηηηηηηηηηηηηηηηηηηηηηηηηηηηηηηηηηηηηηηηηηηηηηηηηηηηηηηηηηηηηηηηηηηηηηηηηηηηηηηηηηηηηηηηηηη
- Haxmte KhoKy [ ] Ha LΦ nI N KhoKy OK Ha nctaHnOHHom ynpabHeHH CHOBa, yTo6bI noTBePdntb CoO6eHne《「ToTOBO》
MEHIO HACTPOIKI
HacpoKy cncTeMbI LlΦPOBOI ΦOTOPAMKII (LΦ) MoXHO npoBoiNb HnDnBnDaYanbHo.
- BbIbePteB rnaBHOM MeHIO pYHKT MeHIO HACTPOKKA n IOaTBepDITe BaW bI6Op KhoNko [▶] Ha LΦ uJIn KhoNko OK Ha dNCTaHcUOHHo ynpabNeHN. B daHoe MeHIO MOxH0 nonactb npABym IyTeM, HaxkAB KhoNky [SETUP] Ha dNCTaHcUOHHo ynpabNeHN.
2.ДЯВыбopaHacTpoKINNoIb3yItecBKHONKaMn[▲],[V]HaLΦИNKNHONKaMn▲,▼HaДиCTaHцIOHHOMуnpaBneHmNnoTBePdnteBb6OpKHOKnOIK[▶]HaLΦИNKNHONKOHKaHДиCTaHцIOHHOMуnpaBneHmN.
3.ДЯИЗМЕHENI COOTBeTCTBeHNoI HAcTpoKn IOnTBepDInTe BbI6Op KHOKNOI [▶]Ha LΦИN KHOKNOK OK Ha DnCTaHcNOHOM UnpaBHeHIM. YTo6bl BoITN B MeHIO BbI6opa, HaxoJaUeEeHa NopraDok BbIe, INcONb3yIte KHOKNY [<], Ha LΦИN KHOKNY △Ha DnCTaHcNoHOM UnpaBHeHIN.
- To6bI BbIITn I3 MeHIO, HaxMITE KhoNkY [O] Ha LΦ IIN HA DnCTaHcUHOHOM ynpabNeHm.

Noemy Ha dncnnee He noBraetc rnaBHOe MeHIO?
PpOBepbTe, npaBnIbHo IIN pOKnIyHe NaK pOzEKe HaxoDITc IIN BkNIOuATEJIb B no3nIIN "On".
Moxho Jn Bpaatab oToTporpaan Ha dncnnee?
Ipoemy He pa6oTaOT fynKcHn: ABToMaTHueCKoe BkJIoueHne / ABToMaTHueCKoe BbIKIOUeHne, HecMOTpHa To, YTO OHN aKTUBnpOBAhbl?
Y6eHNTecb, YTO HAcTpoKa BpeMeH npaBnJIbHa. EcH BpeM HaCTpoKn OTHocHTcK K IpOuIOMy, DaHHa FyHKUra BnepBbIe AKTNBPuyETcToIbKO Ha cNeDyUoI KaneHdApHbI DeHb.
He cTabbTe BbIKIIOuateJIb Ha o6paTHoH CTOpOHe LΦ B nO3nUPO POWER OFF. NocTabbTe LΦ TOnIbKO B pexKIM OxKJaHaN.
ONICAHNE IPODYKTA