 — Cooker — Mode d'emploi PDF")
K 3C55 (X) - Cooker INDESIT - Free user manual and instructions
Find the device manual for free K 3C55 (X) INDESIT in PDF.
User questions about K 3C55 (X) INDESIT
0 question about this device. Answer the ones you know or ask your own.
Ask a new question about this device
Download the instructions for your Cooker in PDF format for free! Find your manual K 3C55 (X) - INDESIT and take your electronic device back in hand. On this page are published all the documents necessary for the use of your device. K 3C55 (X) by INDESIT.
USER MANUAL K 3C55 (X) INDESIT
Installation and use
Herd
In order to guarantee that your appliance operates in a safe and efficient manner:
- seek help only from authorised technical assistance centres;
- always insist on the use of original spare parts.
1 This appliance was designed for domestic use inside the home.
2 These instructions are only valid for the countries whose symbols appear in the manual and on the serial number plate located on the appliance.
3 This is a class 1 (insulated) or class 2 - subclass 1 (recessed between 2 cabinets) appliance.
4 Before using the appliance, please read this instruction booklet carefully as it contains important information regarding the safe installation, use and maintenance of the cooker. Keep this booklet in a safe place so that, if necessary, it may be consulted at a later date.
5 After the packaging has been removed, ensure that the appliance is intact and not damaged in any way. If there is any doubt, contact a professionally qualified technician and do not use the appliance. All packaging (plastic bags, polystyrene foam, staples, etc.) should be kept out of reach of children as it is potentially dangerous.
6 The appliance must be installed by a qualified person in compliance with the instructions provided. The manufacturer shall not be held responsible for any harm caused to persons or animals or for any damage to personal property resulting from incorrect installation.
7 The electrical safety of this appliance is only guaranteed when it has been correctly connected to an efficient earthed electricity supply in compliance with current electrical safety regulations. This is a fundamental safety requirement that must be checked and, if there is any doubt, you should ask a professionally qualified technician to carry out a thorough check of the supply system. The manufacturer may not be held responsible for any damage caused by a mains supply that has not been earthed correctly.
8 Before connecting the appliance, make sure its rating (which can be found on the appliance itself and/or on the packaging) corresponds to the power supply.
9 Make sure that the mains supply and the electrical sockets can withstand the maximum power of the appliance, which is indicated on the serial number plate. If there is any doubt, contact a professionally qualified technician.
10 The appliance must be connected to the mains by means of an omnipolar switch with a minimum contact opening of 3 mm.
11 If the socket is incompatible with the plug, ask a professionally qualified technician to replace it with a suitable one. The technician should also make sure that the power cables attached to the socket can withstand the maximum power of the appliance. In general, it is not advisable to use adaptors, multiple sockets and/or extension cords. If this cannot be avoided, only use single or multiple adaptors and extension cords that comply with current safety regulations. Never exceed the maximum current capacity indicated on the single adaptor or extension cord, or the maximum power level indicated on the multiple adaptor.
12 Do not leave the appliance plugged in if it is not in use. Shut off the main switch for the appliance when it is not being used.
13 The openings used for ventilation and dispersion of heat must never be covered.
14 Do not attempt to replace the power supply cable yourself. If the cable is damaged or needs replacing, contact a technical assistance centre that has been authorised by the manufacturer.
15 This appliance should only be used for the purpose for which it was designed. Any other purpose (for example, heating the room) constitutes improper use of the oven and is dangerous. The manufacturer may not be held responsible for any damage caused as a result of improper, incorrect and unreasonable use of the appliance.
16 All users of electrical appliances should observe several basic rules. These include:
- Do not touch the appliance with wet or damp hands or feet.
- Do not use the appliance when barefoot.
- Do not use extension cords. If this cannot be avoided, be especially careful.
- When unplugging the appliance always pull the plug from the mains socket, do not pull on the cable.
- Do not leave the appliance exposed to atmospheric agents (rain, sunlight, etc.)
- Do not allow children or disabled individuals to operate the appliance without supervision.
17 Always disconnect the appliance from the mains supply (either by unplugging it or by shutting off the switch) before cleaning it or carrying out any maintenance work.
18 Before disposing of the appliance, make it unusable by unplugging it and cutting off the power supply cable. It is also advisable to remove any potentially hazardous parts, especially with regard to children who may use the old appliance as a toy.
19 Do not use unstable or misshapen pans on the electric cooking zones; this will help to avoid accidental spills. Make sure pan handles are turned towards the centre of the hob in order to avoid accidental burns.
20 Do not use flammable liquids (alcohol, petrol, etc...) near the appliance while it is in use.
21 If you are using small domestic appliances near the hob, ensure that their power supply cables do not come into contact with the hot parts of the surface.
22 Always make sure that the knobs are in the . < B > · ^/u · /^u position when the appliance is not in use.
23 The heating elements and certain parts of the oven door become extremely hot when the appliance is in use. Do not touch these parts yourself and keep children well away from the appliance.
24 If the cooker is placed on a pedestal, take all necessary precautions to ensure that the appliance does not slide off this pedestal.
25 If the surface of the glass cracks, unplug the appliance immediately. For any repairs, contact only an authorised after-sales service centre and demand original spare parts. Failure to comply with the above may compromise the safety appliance.
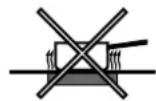
26 The glass ceramic hob is resistant to thermal and mechanical shocks. However, it may break due to a shock caused by a sharp object, such as tool for example. In this case, unplug the appliance immediately and contact an authorised after-sales service centre to have it repaired.
27 Remember that the heating area stays hot for at least half an hour after being turned off; please refrain from placing any cookware or other items on the cooking zone while still hot
The following instructions should be carried out by a qualified technician to ensure that the appliance is installed, adjusted and technically serviced correctly in compliance with current regulations.
Important: always disconnect the cooker from the power supply cable before carrying out any maintenance operations or adjustments, etc.
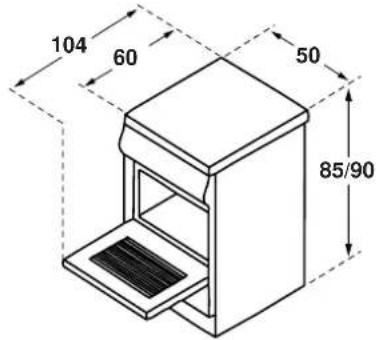
Positioning
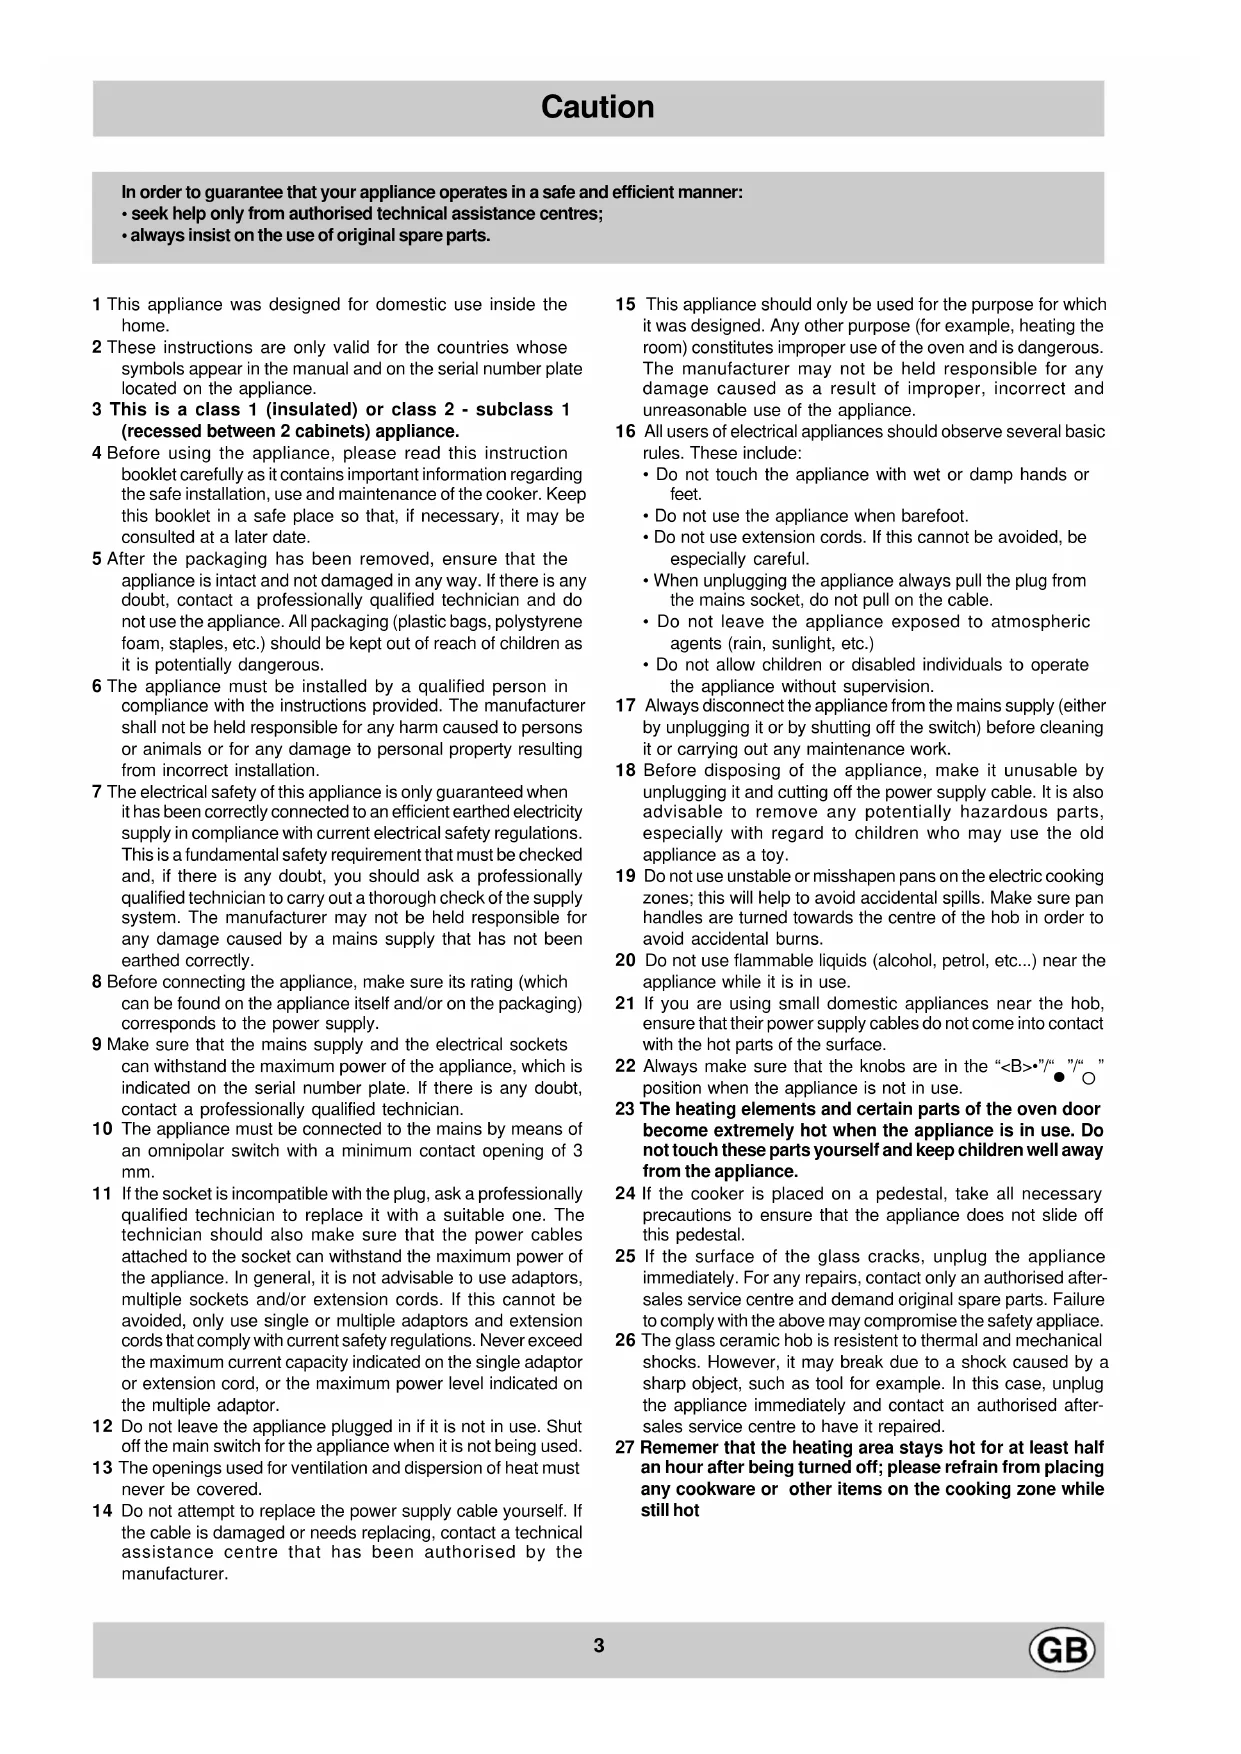
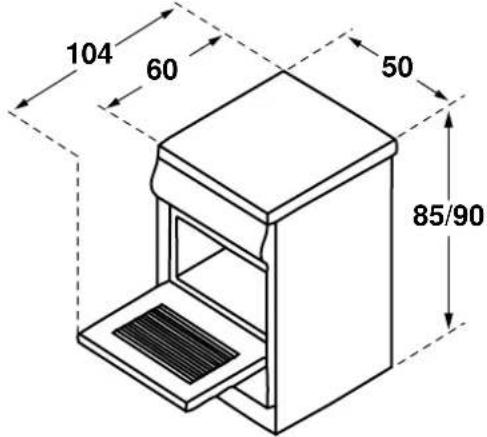
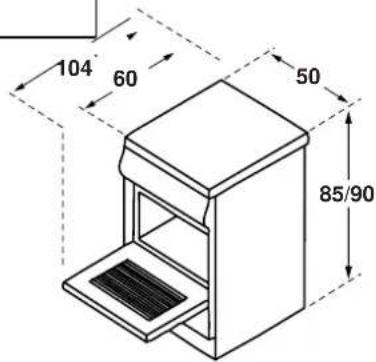
The appliance may be installed next to cabinets that are not taller than the worktop. The following precautions must be taken when installing the cooker:
a) Kitchen cabinets adjacent to the appliance and taller than the worktop must be at least 200~mm from the edge of the top.
b) Hoods must be installed according to their relative installation instruction manuals and at a minimum distance of 650~mm from the worktop.
c) Position the wall cabinets adjacent to the hood at a minimum height of 420~mm from the worktop (see figure).
d) If the hob is installed beneath a wall cabinet, the latter must be situated at a minimum of 700mm (millimetres) above the worktop as shown in the figure.
e) The installation cavity should have the dimensions indicated in the figure.
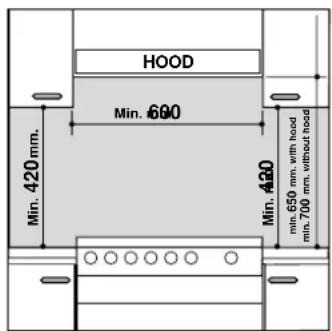
Levelling
Adjustable feet (see fig. 1) are supplied with the cooker in order to ensure it is perfectly level. These may be screwed into the holes provided on each corner of the base of the cooker.
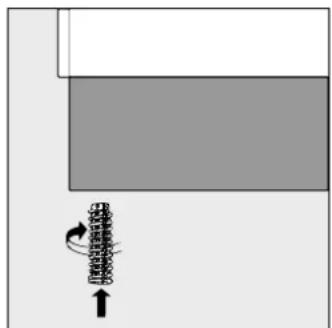
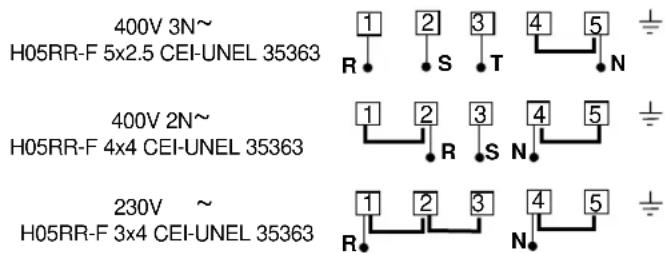
Electrical connection
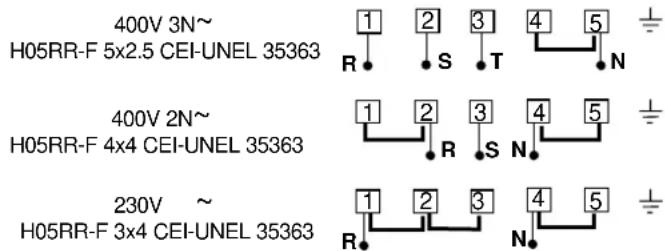
The cable should be suited to the type of electrical connection used (see connection diagram below).
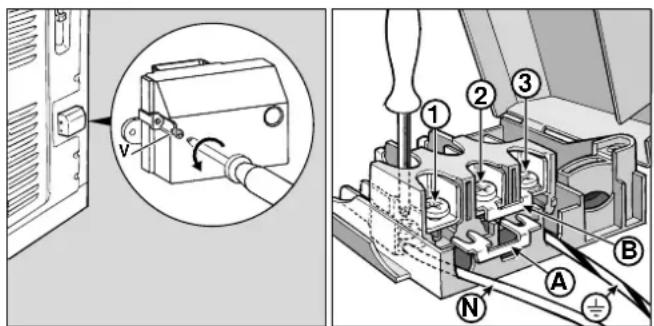
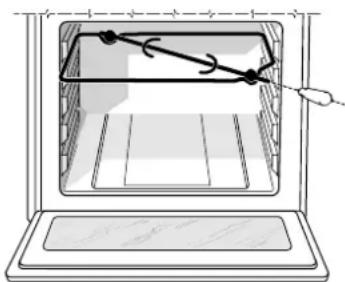
Installing the power supply cable
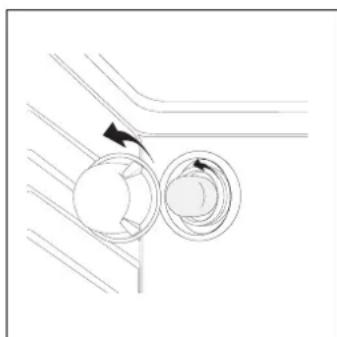
To open the terminal board:
Loosen the screw "V".
- Remove the junction block cover by pulling it.
To install the power supply cable, follow the instructions below:
- position the small A-B connection according to the type of connection you wish to carry out, following the diagram in figure 3.
Note: the Factory prepares small connections for 230V single-phase connection (contacts 1-2-3 are connected to each other). The 4-5 jumper is located on the lower area of the terminal board.
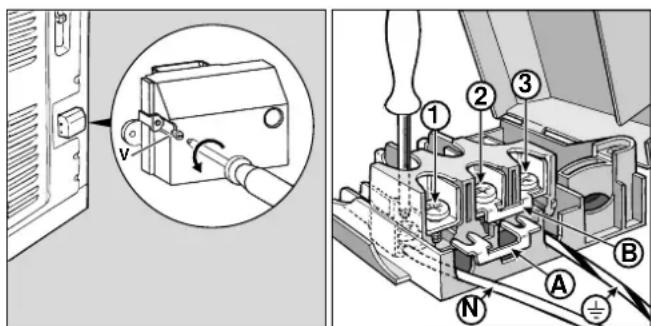
- Position the cables (N and + ) as demonstrated in the figure and tighten the corresponding screws.
- Fasten the remaining cables to terminals 1-2-3.
- Secure the power supply cable by fastening the cable clamp screw then replace the cover using the screw "V".
Connecting the supply cable to the mains
Install a standardised plug corresponding to the load indicated on the data plate. If the appliance is directly connected to the mains supply, an omnipolar circuit-breaker (switch) should be fitted, with a minimum contact opening of 3mm . This switch must be able to withstand the maximum load of the appliance and must conform to all current safety regulations (the earth wire should not be interrupted by the switch). The power supply cable should be positioned in such a way that it does not reach temperatures of more than 50^ over the temperature of the room, along its whole length. Before connecting the appliance to the power supply, make sure that:
- The modulating valve and the electricity supply can withstand the maximum power of the appliance (see data plate for details).
- The power supply has an efficient earthing system that conforms to current regulations.
- the socket or the switch is easily accessible once the cooker has been installed.
Technical characteristics
Oven
Measurements (LxDxH) 39x41x34 cm
Volume 54 I
Max. oven consumption 2100 W
Ceramic hob
Front Left 1200 W
Back Left 1700W
Back Right 1200 W
Front Right 1700 W
Max. ceramic hob consumption 5800 W
ENERGY LABEL
Directive 2002/40/EC on the label of electric ovens
Standard EN 50304
Forced convection energy consumption
heating mode: Fan-assisted
Declared natural convection energy consumption
heating mode: Static
Voltage and Frequency
see data plate
Useful measurements relating to the oven compartment:
Width: 42 cm
Depth: 44 cm
Height: 23 cm


This appliance conforms to the following European Economic Community directives:
-06/95/EC of 12/12/06 (Low Voltage) and subsequent modifications;
-04/108/EC of 15/12/04 (Electromagnetic Compatibility) and subsequent modifications;
93/68/EEC of 22/07/93 and subsequent modifications.
Disposal of old electrical appliances
The European Directive 2002/96/EC on Waste Electrical and Electronic Equipment (WEEE), requires that old household electrical appliances must not be disposed of in the normal unsorted municipal waste stream. Old appliances must be collected separately in order to optimise the recovery and recycling of the materials they contain and reduce the impact on human health and the environment. The crossed out "wheeled bin" symbol on the product reminds you of your obligation, that when you dispose of the appliance it must be separately collected.
Consumers may take their old appliance to public waste collection areas, other communal collection areas, or if national legislation allows return it to a retailer when purchasing a similar new product.
All major household appliance manufacturers are active in the creation of systems to manage the collection and disposal of old appliances.
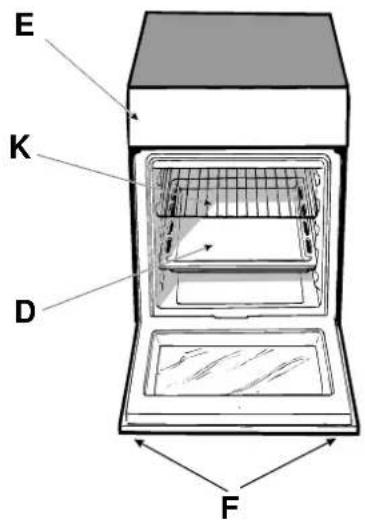
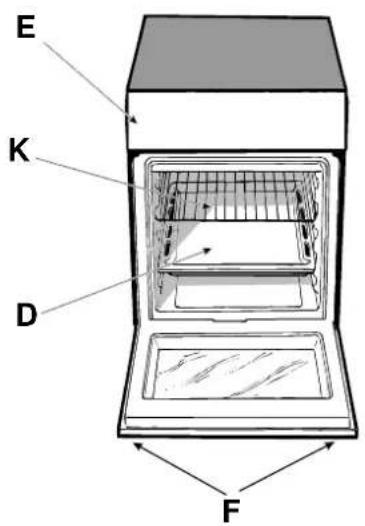
Cooker with multifunctional oven and glass ceramic hob
D. Dripping pan or baking sheet
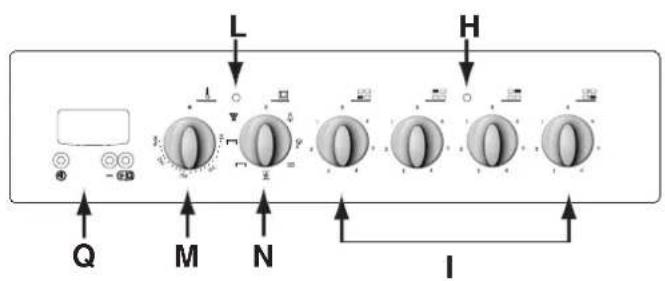
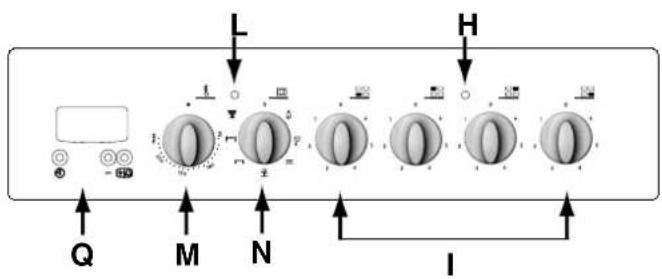
E. Control panel
F. Adjustable feet or legs
H. Cooking zone indicator light
1. Control knobs for cooking zones
K. Oven grill rack
L. Thermostat indicator light
M. Thermostat knob
N. Selector knob
Q. Clock with timer function
Using the cooker
The various features of cooker may be controlled using the knobs and buttons located on the control panel.
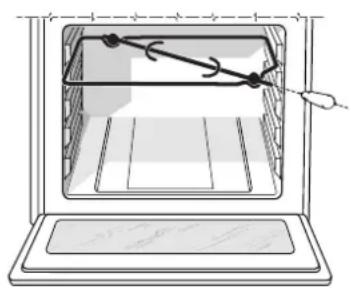
Warning: before using the oven and grill for the first time, leave it to heat up for approximately 30 minutes. Check that the oven is empty, the thermostat is set to maximum, the door is shut and that the room is well-ventilated. The oven may emit a slightly unpleasant odour during this time due to the evaporation of the protective substances applied to the oven and grill at the end of the manufacturing process.
Warning: Only use the lowest shelf when cooking with the turnspit (if provided). Never use the lowest shelf for any other type of cooking, and never place any objects on the bottom of the oven while it is operating, as this could damage the enamel coating. Always place cookware (dishes, aluminium trays, etc.) on the rack provided, ensuring the rack is correctly positioned using the guide rails inside the oven.
Oven control knobs
The "5-programme" oven combines the advantages of a traditional "static" oven with those of a modern "fan-assisted" oven.
The "5-programme" oven is extremely versatile and offers 5 different cooking modes that are both simple and safe. Use the knobs to select the different cooking functions offered by the "5-programme" oven.
N - Programme selector knob
M - Thermostat knob
If the selector knob is in any other position than the off position (marked with "o"), the oven light will illuminate; if the knob is turned to the position the light may be switched on without any of the heating elements being activated. The position marked with the 8 symbol enables the light to be switched on without any of the heating elements being activated. When the oven light is on, this shows that the oven is in use; the light will remain on until the oven is switched off.
"Defrosting"programme
Turn the thermostat knob "M": to any position
The fan at the bottom of the oven circulates room-temperature air around the food. This programme is suitable for defrosting any type of food, especially delicate items that should not be heated, for example: ice-cream cakes or cakes made with custard, cream or fruit. The defrosting time will be approximately halved. When defrosting meat, fish or bread, the process may be accelerated by using the "multi-cooking" mode and setting a temperature between 80^ and 100^ .
Static oven
Position the thermostat knob "M": Between 50^ and Max.
This position activates both the top and bottom heating elements. This is the classic traditional oven that has been modified to ensure an exceptional level of heat distribution while limiting the amount of energy consumed. The static oven remains unsurpassed in the cooking of dishes with ingredients consisting of two or more elements, which are combined to make a single dish, for example: cabbage with pork ribs, Spanish-style dried cod, Ancona-style stockfish, tender veal with rice, etc... This cooking mode is the best way of cooking beef or veal-based dishes, for example: braised meat, stews, goulash, game meat, pork leg and loin, etc... as these must be cooked slowly, with liquid added regularly. It is also the best way of cooking deserts, fruit and dishes that require covered recipients designed for use in the oven. When using the oven in static mode, use only one shelf (using more than one shelf may adversely affect heat distribution).
By using the different shelves available, the heat distribution between the top and bottom of the oven may be balanced as desired. If a dish requires more heat at the top or bottom of the oven, use the lower or upper shelves respectively.
Fan-assisted oven
Turn the thermostat knob "M": Between 50^ and Max.
The heating elements and the fan are activated. Because the heat is distributed evenly throughout the oven, the air cooks and browns food in a uniform manner. You may also cook different dishes at the same time, provided that the cooking temperatures are similar. It is possible to use a maximum of 2 racks at the same time, following the instructions given in the paragraph entitled "Cooking on several shelves simultaneously".
This function is particularly suitable for cooking dishes "au gratin", or for dishes requiring a reasonably long cooking time, for example: lasagne, pasta bake dishes, roast chicken and potatoes, etc... There are substantial advantages to this mode when cooking roast meats, as the improved temperature distribution enables lower temperatures to be set, thus reducing the amount of juices that escape from the meat, making it less likely to shrink in the oven and more tender to eat. The fan-assisted mode is particularly useful when cooking fish, which can be cooked in this way with a minimal amount of liquid added, therefore maintaining its original taste and appearance.
Dessert: this mode is completely safe to use when cooking leavened cakes.
The "fan-assisted" function may also be used for defrosting red or white meat or bread quickly, by setting the temperature to 80^ . To defrost more delicate foods, set the temperature to 60^ or use the cold air circulation by setting the temperature knob to 0^ .
"Top" oven
Turn the thermostat knob "M": Between 50^ and Max.
The top heating element comes on.
This mode can be used to brown food at the end of cooking.
Grill
Position the thermostat knob "M": Between 50^ and Max. The central top heating element and the turnspit will be activated.
The extremely high and direct temperature of the grill makes it possible to brown the surface of meats and roasts while locking in the juices to keep them tender. The grill is also highly recommended for dishes that require a high surface temperature: such as beef steaks, veal, rib steak, fillets, hamburgers etc...
Some grilling examples are included in the "Practical cooking advice" section.
Fan-assisted Grill
Position the thermostat knob "M": Between 50^ and Max. The central top heating element and the fan will be activated. This combination of features increases the effectiveness of the unidirectional thermal radiation of the heating elements through forced circulation of the air throughout the oven. This helps prevent food from burning on the surface, allowing the heat to penetrate right into the food. Excellent results are obtained by using the fan-assisted grill to cook mixed meat and vegetable kebabs, sausages, pork ribs, lamb cutlets, spicy chicken, sage-dressed quail, pork fillet etc...
Cook dishes "au gratin" in this mode with the oven door
closed.
"Gratin" is the best way of cooking sliced perch, tuna, swordfish, stuffed squid, etc...
The turnspit
To activate the turnspit, follow the instructions below:
a) Place the dripping pan on the 1st rack.
b) Position the rotisserie support on the 3rd rack and insert the spit towards the rear, threading it through the hole provided.
c) Start the rotisserie by turning knob "N" to the position.
Oven light
This is switched on by turning knob "N" to the symbol. The oven lights up and remains lit as long as any of the electric heating elements of the oven are in operation.
Thermostat indicator light (L)
This indicates the heating-up phase of the oven; as soon as the inside of the oven reaches the set temperature the light switches off. At this point the indicator light will switch on and off intermittently; this shows that the thermostat is operating correctly in order to maintain a constant temperature inside the oven.
The electronic timer (Q)
Warning
Keep children away from the oven door as it can become extremely hot when the oven is in operation.
This function displays the time and works as a timer which counts down to zero.
Note: all functions will be implemented approximately 7 seconds after they have been set.
Resetting the clock
After the appliance has been connected to the power supply, or after a power cut, the clock display will automatically reset to 0:00 and begin to blink.
- Press button and then buttons and to set the exact time. Press and hold the buttons to quicken the count upwards.
Any necessary modifications can be made by repeating the above process.
Timer feature
This function may be accessed by pressing the button, after which the display will show the symbol “.” Every time the button is pressed it corresponds to a time increase of 10 seconds, until it reaches 99 minutes and 50 seconds.
After this point, each press of the button represents an increase of one minute, up to a maximum of 10 hours.
Pressing the button reduces the time.
After the time period has been set, the timer will begin to count down. When the timer reaches zero, the buzzer will sound (this may be stopped by pressing any button).
The time may be displayed by pressing the button, and the “” symbol indicates that the timer function has been set. After approximately 7 seconds, the display will automatically revert to the timer.
Cancelling a time that has already been set
Press the _ button until the display shows 0.00.
Adjusting the buzzer volume
After selecting and confirming the clock settings, use the button to adjust the volume of the alarm buzzer.
Practical cooking advice
The oven offers a wide range of options, enabling each food to be cooked in the most suitable way. It takes time to understand how to get the best out of this versatile appliance, therefore the notes below are only intended as a set of guidelines, which may then be expanded as you gain more personal experience.
Baking cakes
The oven must be preheated when a cake is placed inside; wait for the preheating phase to finish (approximately 10-15 minutes). Cooking temperatures for cakes vary between 160^ and 200^ . Do not open the door while you are baking a cake as this could cause it to collapse.
Cake is too dry
Next time you bake a cake, set the temperature 10^ higher and reduce the cooking time.
Cake collapses
Use less liquid or lower the temperature by 10^
Cake is burnt on to
Place it on a lower rack, set a lower temperature and extend the cooking time.
Cooked well on the outside, but sticky in the centre
Use less liquid, reduce the temperature and increase the cooking time.
Cake sticks to the mould
Grease the mould well and dust with a little flour, or use baking paper.
Having used several rack positions (in the "fan-assisted" mode), not all the cakes are cooking at the same rate
Set a lower temperature.
Racks inserted at the same time should not necessarily be taken out at the same time.
Cooking fish and meat
Use low temperatures when cooking white meat, game and fish. (150^ - 175^) . If you wish red meat to be cooked well on the outside but juicy on the inside, start with a high temperature (200 - 220^) for a short time and then reduce it. As a general rule, the more meat there is, the lower the temperature and the longer the cooking time should be. Place the meat in the centre of the rack and position a container underneath to collect drops of fat. Place the rack in the centre of the oven. If the cooking method requires more heat coming from below the meat, use the lowest shelf.
Cooking on several shelves simultaneously
Whenever it is necessary to use two racks, only use the "fan-assisted oven" function, which is really the only option available when cooking in this manner.
- The oven has 5 different rack positions. Only use the two central positions when cooking in the fan-assisted mode:
the outer rack positions (higher and lower) receive more direct heat and more delicate foods may burn.
In general, use the second and fourth rack positions (when counting from the bottom of the oven upwards), placing the food that needs more heat on the second rack position. For example: if you wish to cook a roast with another type of food, put the roast on the second rack position and the more delicate food on the fourth.
- When cooking foods that require different cooking times and temperatures, set the temperature to a value halfway between the two recommended values and place the more delicate food on the fourth rack position. Remove the food that needs less cooking time first.
- Place the dripping pan on the lowest rack position and the grill on the highest.
- When cooking pizzas on more than one rack with the temperature set to 220^ , remember to preheat the oven for at least 15 minutes. Generally, cooking on the fourth rack takes longer; for this reason it is advisable to remove the pizza on the lower shelf first, leaving the other pizza inside for a few minutes.
Using the grill
The oven offers two different grilling methods: Use the "top oven" function for small items. The energy consumption for this mode is only 1200 W. It is therefore ideal for grilling smaller dishes: for example toast, hot dogs, etc.
Position the food in the centre of the grill, as only the central part of the top heating element will be switched on in this mode. Food placed at the corners of the grill will not be cooked.
The "grill" position enables the whole surface of the grill to be used. Use this mode when there is a uniform distribution of food and you wish to brown the top of the food evenly.
Important: To obtain the best results and to save energy (approximately 10% ), always keep the oven door closed when using the grill function.
When using the grill function, we recommend that you set the thermostat to its maximum value. However, this does not mean that you cannot use lower temperatures.
When using the grill function, position the grill on the highest shelf (see cooking advice table) and place the dripping pan underneath it to collect any drips of fat.
The "Fan-assisted grill" position is extremely useful for grilling foods quickly as it distributes the heat emitted by the grill, allowing the surface of the food to brown while the inside is actually being cooked. It enables large pieces of meat or poultry to be grilled without using the turnspit. It can also be used in the final part of the cooking process for dishes that require a little browning on the surface, for example it is an ideal way of browning the top of a baked pasta dish after it has been cooked.
When cooking in this mode place the grill on the 2nd or 3rd rack position from the bottom of the oven (see cooking advice table), then position a dripping pan on the lowest shelf to collect drips of fat and avoid the formation of smoke. By using this mode in conjunction with the spit (selected models only) it is possible to cook dishes in the dripping pan on the lowest shelf, for example: potatoes, etc...
Instructions for using glass ceramic hobs
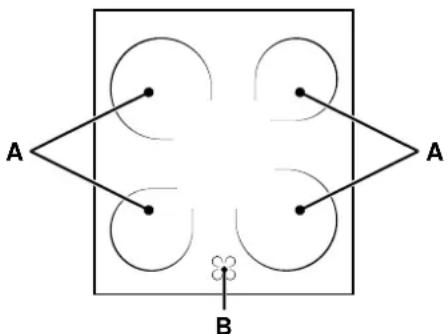
Description
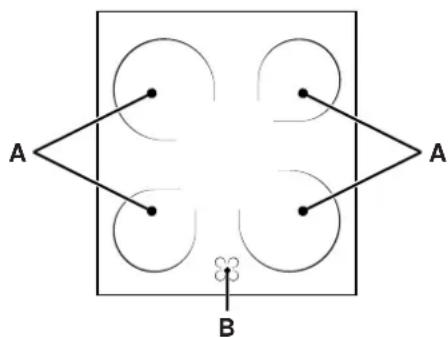
The hob is fitted with electric heating elements located just under the surface of the hob (in the areas that become red when the elements are switched on).
A. Cooking zone (A).
B. Lights indicating that the temperature of the corresponding elements have exceeded 60^ ; these remain lit even if the hob has been switched off.
Description of the heating elements
The radiant heating elements are circular and become red 10 - 20 seconds after they have been switched on.
Instructions for using glass ceramic hobs
To obtain the best possible results from your hob, follow a few simple rules when preparing or cooking food.
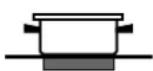
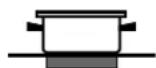
- All types of saucepan or frying pan can be used on glass ceramic hobs. However, the base of the pan must be perfectly flat. Of course, the thicker the base of the saucepan or frying pan, the more evenly heat will be distributed.
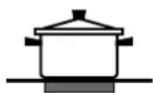
- Make sure that the base of the pan completely covers the ring: this enables all the emitted heat to be used.
- Always make sure that the base of the pan is clean and dry: this not only guarantees optimal contact between the base of the pan and the hob, but also means they will suffer less wear and tear and ultimately last longer.
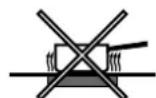
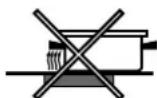
- Do not use pans that have been used on gas burners, as the heat from this type of burner can distort the base of the pan, which, if then used on a glass ceramic hob, will be less effective than a pan with a completely flat base.
Practical advice on using the cooking zones
Control knobs for the cooking zones on the hob (I)
Cookers may be fitted with a series of rapid and automatic cooking zones in various combinations (rapid cooking zones may be distinguished from the others by a red spot in the centre while the automatic zones have an aluminium disc in the centre).
To avoid heat loss and damage to the cooking zones, use cookware with a flat base, whose diameter is no smaller than that of the cooking zone itself.
The table shows the relationship between the position of the knobs and the type of cooking recommended for cooking zones.
| Pos. | Normal or rapid cooking zone |
| 0 | Off |
| 1 | Cooking fish and vegetables |
| 2 | Cooking potatoes (steaming), soups, pulses |
| 3 | Continuing to cook large quantities of food, chunky soups |
| 4 | Roasting (medium) |
| 5 | Roasting (well done) |
| 6 | Browning or reaching boiling point in a short period of time |
Cooking zone indicator light
This light illuminates when a cooking zone has been activated.
Practical cooking advice
| Selector knob position | Food to be cooked | Weight (in kg) | Rack position to be used (counting up from the bottom) | Preheating time (minutes) | Thermostat knob position | Cooking time (minutes) |
| Defrosting | All frozen foods | |||||
| Static | Duck | 1 | 3 | 15 | 200 | 65-75 |
| Roast veal or beef | 1 | 3 | 15 | 200 | 70-75 | |
| Roast pork | 1 | 3 | 15 | 200 | 70-80 | |
| Biscuits (shortcrust pastry) | - | 3 | 15 | 180 | 15-20 | |
| Tarts | 1 | 3 | 15 | 180 | 30-35 | |
| Fan-assisted | Pizza (on 2 racks) | 1 | 2-4 | 15 | 220 | 15-20 |
| Lasagne | 1 | 3 | 10 | 200 | 30-35 | |
| Lamb | 1 | 2 | 10 | 180 | 50-60 | |
| Roast chicken + potatoes | 1 | 2-4 | 10 | 180 | 60-75 | |
| Mackerel | 1 | 2 | 10 | 180 | 30-35 | |
| Sponge cake made with yoghurt | 1 | 2 | 10 | 170 | 40-50 | |
| Cream puffs (on 2 racks) | 0.5 | 2-4 | 10 | 190 | 20-25 | |
| Biscuits (on 2 racks) | 0.5 | 2-4 | 10 | 180 | 10-15 | |
| Sponge cake (on 1 rack) | 0.5 | 2 | 10 | 170 | 15-20 | |
| Sponge cake (on 2 racks) | 1.0 | 2-4 | 10 | 170 | 20-25 | |
| Savoury pies | 1.5 | 3 | 15 | 200 | 25-30 | |
| Top oven | Browning food as a finishing touch - | 3/4 | 15 220 | - | ||
| |—| | ||||||
| Grill | Sole and cuttlefish | 1 | 4 | 5 | Max | 8-10 |
| Squid and prawn kebabs | 1 | 4 | 5 | Max | 6-8 | |
| Cod fillet | 1 | 4 | 5 | Max | 10 | |
| Grilled vegetables | 1 | 3/4 | 5 | Max | 10-15 | |
| Veal steak | 1 | 4 | 5 | Max | 15-20 | |
| Cutlets | 1 | 4 | 5 | Max | 15-20 | |
| Hamburgers | 1 | 4 | 5 | Max | 7-10 | |
| Mackerel | 1 | 4 | 5 | Max | 15-20 | |
| Toast | n.° 4 | 4 | 5 | Max | 2-3 | |
| With the turnspit | ||||||
| Spit-roast veal | 1.0 | - | 5 | Max | 80-90 | |
| Spit-roast chicken | 1.5 | - | 5 | Max | 70-80 | |
| Spit-roast lamb | 1.0 | - | 5 | Max | 70-80 | |
| Fan-assisted grill | Grilled chicken | 1.5 | 3 | 5 | 200 | 55-60 |
| Cuttlefish | 1.5 | 3 | 5 | 200 | 30-35 |
N.B.: The cooking times listed above are intended as guidelines only and may be modified according to personal tastes. When cooking with the grill or the fan-assisted grill, the dripping pan should be placed on the lowest shelf.
Routine maintenance and cleaning
Disconnect the oven from the electricity supply before cleaning it or carrying out any maintenance work. Clean the oven thoroughly and regularly in order to increase its durability, following the instructions below:
- Do not use steam cleaners on the appliance.
- The enamel-coated parts and self-cleaning panels should be washed in hot water. Do not use abrasive powder detergents or corrosive substances as these could damage the finish.
- The inside of the oven should be cleaned at regular intervals while it is still warm, using hot water and detergent then rinsing and drying it thoroughly.
- Stainless steel can be marked by hard water that has been left on the surface for a long time, or by aggressive detergents containing phosphorus. After cleaning, rinse well and dry thoroughly. Any water spills should also be dried.
- Prevent a build-up of dirt and grease on the control panel by cleaning it frequently. Use a non-abrasive sponge or a soft cloth to avoid scratching the shiny steel or enamel-coated parts.
Cleaning the surface of the hob
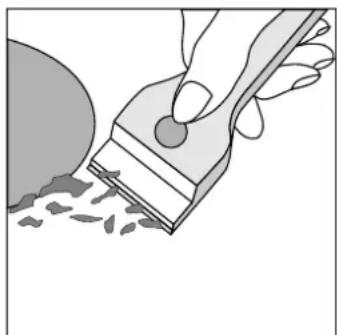
The surface of the hob should be cleaned with a damp cloth before cooking to remove dust or food residues. The surface of the hob should be cleaned regularly with a solution of warm water and light detergent. It may occasionally be necessary to use a special glass ceramic cleaning product. First remove all food and grease spills using a window scraper, preferably a razor blade-type scraper (not supplied) or, failing that, a fixed razor blade type scraper. Then clean the hob with a paper towel and a suitable detergent while it is still hot to touch. Lastly, rinse the hob thoroughly and dry it with a clean cloth. If a piece of plastic or aluminium
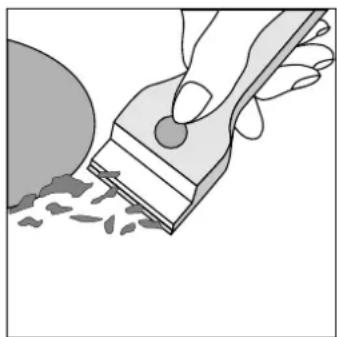
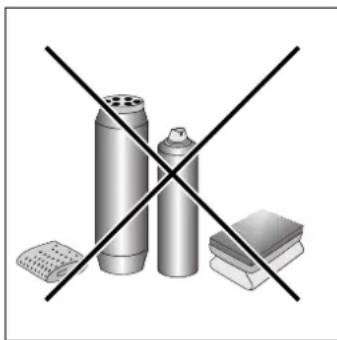
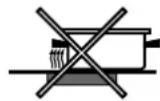
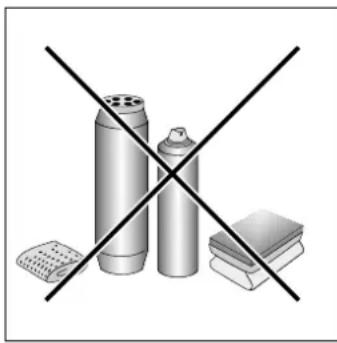
foil accidentally melts on the surface of the hob, remove it from the hot cooking zone immediately using a scraper in order to avoid damaging the surface. If any sugar (or sugary food) is spilt on the hob, follow the above instructions. Do not use steel wool or any type of abrasive sponge. Do not use corrosive cleaning products such as oven cleaning sprays or stain removers.
| Special glass ceramic cleaning products | Where to buy them |
| Razor blade scraper and replacement blades | Art & Craft shops and Hardware stores |
| Stahl-Fix SWISSCLEANER WK TOP Other special glass ceramic products | Home shops DIY stores Hardware stores Supermarkets |
Changing the oven light bulb
- Remove the plug from the mains socket (if accessible) or disconnect the appliance from the electricity supply by shutting off the multipolar switch connecting the two.
- Remove the glass lid covering the lamp socket.
-
Unscrew the bulb and replace it with a new one that can withstand high temperatures (up to 300^ ) and that has the following characteristics:
-
Voltage: 230/240 V
- Power 25 W
-
E14 attachment
-
Replace the glass cover and reconnect the oven to the power supply.
3NeKtpnueckoe noDcoeHHeHne
PpOBoD 3JNEKTPoNTaHnPaCHTbIBAeTcO COOTBeTCTBHeH0 TIny 3JNEKTPuYeCKOro CoeHNHeHn (CMOTpnte 3JNEKTPuYeCKyIO cxemy, pnpBedeHHyIO HxKe).
MOHTAX IPOBODa 3NeKTpOnnTaHn
TopaOK OTKpbBaHn3axmHnKopo6Kn:
OTBnHTNTe BnHT "V
- IOTAHNTe 3a KpbIuKy coeHNHTeJbHOn KOIOdkn N OTKpoTKeKopo6Ky.
IopraOKMOHTaxa npoOda 3JeKtpOnnTaHnA:
yCTaHOBNTeMaIOe CoEINHeHne A-B B COOTBeTCTBnC TINOM IcIb3yEMoTO CoEINHeHnC CcblNKoHa 3JeKtpueckyIO CXemy, npBteEHHyIO Ha pncyHke 3.
PnmeaHne:MaIbIe COeINHeHnnoIroTaBnBaIOCTHa 0a6pKe IJMy MOHOpa3HOrO CoeINHeHn 230 B (KoHTaKTb1- 2-3 coeINHeHb OOnN Kpyromy).IpeMbUka 4-5 paCNOJOKeHa B HIXHe YacTn 3axmHoi Kopo6Kn.
BCTaBbTe npoBoDa (N n 12 ) KaK noKa3aHo Ha CXeMe N 3aKpyTtE COOTBeTCTByIOUIIe BnHTbl.
- npnKpeHne ocTaIbHbIe npoBOda K 3aJIMam 1-2-3.
3aФнсрOBaTb Ka6eNb 3JIeKTPoINrTaHnB CNEuJaHbHom Ka6eNbHOM 3aXIMe N 3aKpbITb KpbIiKy.
IopdoeHHeHne npoBoda n3deJnK cetu 3JeKTPoNTaHH
ДляnpoBOda Heo6xOIMMo IcNoIb3OBaTb cTaHdapTHyU 8TeNceBHyIO BnIKy,paCHTaHHyO Ha Harpy3Ky,yKa3aHHyO Ha 3aBOdCKo Ta6NIuKe C daHHbIM. B cnyae npraMOrO 10dCoEINHeHn HA3DeJIa K CeTN 3JeKTPoNITAHn YcTaHOBnTE MExdy N3DeJIeM n CeTbIO MHOROnJOpHbI pa3beDInHtJIb CMinHMaJIbHbIM paccToHnEM MeXdy KOHTaKTAMn 3MM.3TOT pa3beDInHtJIb DOJIxKe H 6bITb paCHTaHn Ha Harpy3Ky n DOJIxKe COOTBeTCTBOBaT DeIcTBYIOUM HopMaTbAM (npoBoD 3a3EmHeHn He DoJIxKe H npepbIBaTbcr pa3beDInHtJIeM).PpOBoD 3JeKTPoNITAHn DOJIxKe 6bITb paCNOJIOKeH TAKIM O6pa3OM, Yo6bl NO BceI erO dINIHe TempePaTypa npoBOda He npebBiUana TeMnepePaTypy NOMEseHnHa 50^ .PepeI npocEINHeHmnpoBOda npOBepbTe cNeDuOuee:
- orpaHHTenbHbI KnaHn I DomaHra CeTb DOJKHbI 6bITb paCHTaHbHa Harpy3Ky PNTbI (CMOTpnte 3aBOIDCKyIO TaBnKcY C TexHnueckmN DaHHbIM);
Cetb 3nEeKPTponTahn DOnXHa 6bITb OChAeHa HaJeXhbIM 3a3EmJleHHeM COOTBETCTByIOUIm DeiCTBYIOUHM HOpMaTHNBam.
3NEKtpnuecka po3eTka Hnn MHORONJpHbI pa3beDHHTeNb DOnKHB6bTB NERKOIOCTynHbI NO 3aBepWeHm MOHTaka KxyOHHOI NTbl.
DyXOBoW uKaΦ
a 6 apnTHbIe pa3Mepbl(xXΓxB)39x41x34cm
EMKoCTb 54J
MaKc. noIIOuaemma MoHoctb 2100 BT
Kepamuecka BapouhnaHelb
IpeednnaeBaa 1200 Bt
3aHnraIeBa1700BT
3aHn npab8 1200Bt
Pepednna npaba 1700 Bt
MaKc. nOrloaemar MOUHocTB KepaMuecko BapOuHoI NaHeJI 5800Bt
TABJIYKA C 3NEKTPNUECKIMI DAHHbIMI
IInpeKtNbA 2002/40/CE KacaTeJIbHO 3TNKeTOK 3JIeKtpnuecknx DxyOBbIX WkaΦOB.
HopmatNB EN 50304
Pacxo3neKtpo3Hepn npnpHynteHoh KOHBeKmI ΦyHKuHaRpeBaHn: BeHTnIpObaHHoe Iotpe6NeHHe 3neKtpo3Hepn npHaTpaHbOH KOHBeKmI.
Функша HarpeBaHnA: CtAnuYeckoe
HanpxkHe n yactota
CM. Ta6JIuKy C TexHnueCKIMN XapaKTePncTnKaMn
Pa6ooye pa3MepbI yuNka dny pa3orpeBaHn rnu:
UINPINA:42cm
Tny6nHa:44cm
BbICota:23cm

DahHoe 6OpuyoBaHne OTBeueaTe Tpe6oBaHnA HnKeyka3aHHbIX DnpeKtNB Ebponeckoro Co06eCTBa:
06/95/EC or12/12/06 (Hn3Koe HapRjXeHne) nocneDyUOuJe MoDnΦkaun;
04/108ECOT 15/12/04(3NeKtpomarHHTaCobMeCTIMOCTb) INOCNEyUOUIe MOINΦNKAUIN;
-90/396/EEC or 29/06/90 (Fa3) n nopclnyuue meoindnkaun;
-93/68/EECOT22/07/93nnoocneyuoumeMoNΦkaun.
Kyxohna ПЛNTa C MHOroФункциОнаьныIM ДУХOBвIM 斯kaфOM nCTeКLOKepaMnueckoВарочHoПаHeЛьЮ
D. pOToHBeHb Hn XapoOHybI JnCT
E. NaHéNb ynpaBneHn
F. PerynpyeMbIe HOKKn Nn ONopbl
H. CBeTOB0 INHnKAtOp 3NeKtpuYeCKnx KOHΦoPOK.
I. PykoTkn 3neKtpnuecknx KOHopok
K. PeuTeKa dYxOBoRo uKaΦa
L. CBetOBOINHnDKaTOP TepMOCTaTa
M. PyKoRtKa TepMoCTaT
N. RykoTka nporpaMMnpOBaHn
Q. YacbIc TaHMePOM
IHctpyKuIN IO 3KcnyaTaUIN KxOHHOIJIHTbI
Bb6op pa3nHbix fynKcui KxOHHOI pNTbI npO3BOuNTc npi NMOU pyKOaTOK IN peryJrATOPOB, paCNOIOKeHHbIX Ha naHeJIynpaBHeHna KxOHHOI pNTbl.
BnMaHHe: nepaHaJOM 3KcNpIyatauIN dyXOBOrO uKaFa a Irpna CneUyET BKNIOHTb IN pIIMepHO Ha 30 MNHyT. PnoBepBe, YTO6bI dYxOBo WkaΦ bIL NycTBIM, yCTAHOBInTe TepMOCTaHa MaKcImaJIbHyIO TempepaTyO,OTKpoITe DBepydyXOBKn O6ecneByTe HADJIeKaUyIO BEHTnJIaCNUO NOMEueHry. 3anax, KOtOpBI MOKeT NOBtCBsR B npOceCE 3ToI Onpaun, O6pa3yETcB pe3yNbTaTe NCnapeHry BeIeCTB,NCNoJIb3OBAHHbIX DnI pPeDOxpaHEHry DYXOBKn I npII B nepNOd OT IpON3BODCTBa DO yCTAHOBKn.
BhImaHHe: IVcnoIb3yIte npBbI HIXHNI yOBoEh ToIbKO DnI pNiroTOBNeHn 6JIIOd Ha BepTeNe (TaM, Ie OH NMeTc). DnI dpyrIx cyHKUH NIKoRJa He nCNoJIb3yIte cambl HIXHNI yOBoEh NIKoRJa He NOMEuaIte HNKaKIN PpeIMeTOB Ha dHO dYXOBKn B IpOceCE PniroTOBNeHn, TAK KAc 3TO MOKeT NOBpeIDt b 3MaJInpOBAHHoe NOKpbITne. Bcerda cTabBe BAuY Nocdy dIra pNiroTOBNeHn 6JIIOd (KapOBHN, aJIOMMHNEBbIE JInCTbI N.T.D.) Ha pNIIraIaOHUcpeWEtky, yCTaHOBLeHHHyIO HA ONOpHbIe HAnpABJIOUe dYXOBKn.
PerynTopbI dyxOBoro ukaΦa
DyXOBOu 5cuocho" coeTaet Bce6 npemmyecTba TpaIuHOHaJIbHOJ CTaTmueckOu DyXOBKn COBpeMeHHoB BEHTnIINPOBaHHOH.
DyXOBoI WkaΦ "5 cuoChi yHnBepcaJeH n npednaeraT 5 pa3NHybIX npocbIX n HadeKhbIX peKIMOB npiroTOBJIeHn 6JIIO.ДЯ Bb6Opa pa3NHybIX cyHKcI INpIROTOBJIeHn, IMeHOxxCB B DxyOBke "5 cuoChi, nCnoJb3yIte pyKoTKn.
N-pykoTka Bbl6opa nporpamM
M-pykoRTka Tepmoctata
Ecnn Bby ycTaHOBnTe pyKoTky Bbl6opa nporpamM B IIO6oe NOIOXeHne KpOME NCXODHOrO "0", BKJIIOuHTcR OCBeUeHne DyXOBORO uKaΦa. PyKoTka B NOIOXeHn, OTMeueHOM CmBOJOM , N03BOJIeR BKNIOUHTb OCBeUeHne DyXOBORO uKaΦa, He BKJIQUaY HnKaNX HarpeBaTeNbHbIx 3JIeMeHTOB.
EcnBbYcTaHOBnTe pyKoRTky BIOJIOKeHNV, O6O3HaueHHOM CmBOJLOM , Bbl CMOKeTe BKJIIOHTb OCBeUeHHe dyXOBORO uKaΦa, He BKJIIOUyA HnKaNX HarpeBaTeIbHbIX 3JIEMeHTOB.
BkHoueHHoe OcBeueHne DxyoBOr okaΦa 03Haayet, yTo dxyoBOI uKaΦ BkHoueH. OcBeueHne 6ydt ropeTb do tex nop, noka 6ydt pa6oTaB dyxOBOI uKaΦ.
DecepT:OTINHbIe pe3yNbTaBtBI NOJyauTcR npn BbIneueKe KOHNTEPCKNX N3dEINN N3 TcTeA, 3aMeUaHHOrO Ha NINBbIX INN XIMNUeCKNX DPOKkax.
Функяг «ВЕHTUNIPOBAHьМ» MOжET TAKKE ИСПОЛБ3OBaTbСАДЯбICTpo pa3MOPO3KN 6ENORI N Kpachoro MЯса, XNe6a, yCTaHOBnB TemNepaTpy 80^ .ДЯ pa3MOpO3Kn 6OJee DeJIKAthbIX npOyKTOB yCTaHOBnTB TemNepaTpy 60^ ININ BKHQUHTb TOJIbKO UINPKyJRAUIO XOJODHOrO BO3dYxa, yCTaHOBnB pyKoTky TepMOcTaT ha 0^
Harpeb cbepxy
IonoKeHne pyKoRTKn TepMoCTata "M": MekNy 50°C n MaKc. BkIIOaETcB EpxHn HArpeBaTeJbHbI 3JeMeHT.
3TaФyHKUma MoKET 6bITb NcNoJIb3OBAHa IJRA DOBOdKn roTOBbIX 6nIOJ.
PnMb
IonoKeHne pyKoRTN TepMoCTaTa "M": Meky 50°C n MaKc. BKnOuaeTcyeHtpaJIbHbI BepXnH HarpeBaTeJIbHbI 3JeMeHT n BeHTnJIrTop.
3HaHTeJbHajTeMnepaTpy npMOro DeiCTBna rpnI na03BOJnE TNOyHt 6bICTpe o6pa3OBAHne KOpOuKn Ha NOBepxHOCTn IPOdyKT, KOToPAI PpenrTCTByET BbIXOy COKOB n CoXpAHReT npOyKT HeXhblm NcoHybl. NcNoIb3OBAHne fYHKunI rPnIB B OOC6EHOCHTn peKOMHeHyEtCnIg 6nIOd, IINrPiROTOBnEHn KOTopbIX Tpe6yETc BbICOKa J NOBepxHOCTHa TEMnpaTypa: TeJIyBuN X IOB8KbNX 6nΦwTEKCOB, aHTpeKOToB, BbIpe3Kn, ram6yprepOB n T.D. B NaparpaFe «IpaKaTHueckne CoBeTb no nprirotOBnHIO» npINBOJrTa HekOTOpbIe npIMepbI NCOnlb3OBAHn DxyXOBoro ShkaFa.
BeHTnIupoBaHHbI rpnIb
IonoKeHne pyKoRTKn TepMoCTata "M": Mekdy 50°C n MaKc. BknOuaeTcra CEHTpaJIbHbI BepXHn HarpeBaTeJIbHbI 3JemeHT n BeHTnJIrTOp.
Coyetae oJHOHaPabHeHoe BbIeJeHne Japa c npHydtteBHOU pKpyJIauee BO3dyxA BHytpn DxyOBoro 1kaΦa. 3To npenTCTByET O6ropaHIO NOBepxHOCTn npOyKTOB, NOBbIaA npOHKaIOUcNOCo6HOCTb Japa. OTnnuHbIe pe3yIbTaIb IOnyauOTc npu NcONb3OBAHIN BEHTnIpOBaHHORO rpnI dI nproTOBJeHn Mca n OBOse Ha WAMypax, KOJbAcOK, CBNbIXpe6pbIwek, 6apahbIX OTbIBIX, KpuiIcOCTpo npnPpABOI, nepenEOK C caIbBNe, CBHOB bIpe3KN T.D.
TOrOBbTe 6IIOa BpeXnme «rpaTeH» C 3aKpbITOn DBepuei DyXOBoro WkaFa
Функцу "gratin"ЯВлгетсн HeNPeB30IeHHoNДпя nprirotOBHeHnRAkNX BIDOBpbIbI KAKФиNe YepHnTHyUa, pbIbI-MeU,фapшИрОваHHbIX KapakTuC N.T.D.
Bepten
BknHcHnBepTea BbINHnTb CneyUeone onepaun:
a) yCTaHOBInTe npOTnBEh Ha 1-bi ypOBeHb;
b) BCTaBbTe CnEuaJIbHbI DePkaTeNb BepTeNa Ha 3-em ypoBHe N BCTaBbTe CTEpKeHb B CnEuaJIbHOe OTBepCTne, pacNoIOXeHHoe B 3aDHe CTeHke DyXOBKn;
c) BKNHOnTeBepTeI, yCTaHOBNpyKoRTky "N" B nONoXeHne
OcBeueHne dYxOBoro wkafa
BkIIOUHTe OCBSeHHe, NOBepHyb pyKoTky "N" Ha CmBON. OcBeuaet dyXOBoi uKaΦ u OCTaETcB KJIIOUeHHbIM, KOrDa BkIIOUaETcKaKoJ-Ni6o HarpeBaTeNbHbI 3JeKtpuYeckn 3JemeH TdyXOBKn.
HdkaTop Tepmoctata (L)
Ioka3b1Baet a3y HArpeBaHnry, KOrJa INHdkaTOp TepMoCTata rachET, 3TO O3HaayeT, yTO BHyTpN dYXOBoro WkaFa 6blna DoCTnHyTa TEMnepaTpya, 3daaHHa pyKoRTKOJ TepMOCTaT. Ha daHHOM 3tane MmraHHe 3TOr INHdkaTOp o3HaayeT, yTO TepMOCTat FyHKUOnHpye TcnpaBHO nI JnoDepKaHn HEN3MeHHORO 3HaueHnra TEMpePaTypbI B dYxOBke
3NeKtpoHHbI TaMep (Q)
BHHMaHne
He pa3pewaTe DeTAM npKacatbC K DBepue duXBOTo WkaF, TaK KaOHa CnIbHo HArpeBaETcB NpoUceCe npiroTOBneHra.
Ioka3bBaetBpemnBbINHReTpyHKuTO TaMepa C o6paTHbIMOTcHETOM.
PnmueyaHne:Bce cyHKun BKNIOUaHO Tc npMepHo uepe3 7 cekyHn nocne ux BbIbopa.
Peylaa yacob
Iocne ocuueCTBHeHn noDCoeHNHeHn K cetn 3JeKtpoNTaHn NIN NOcNE OTKnIOUeHn HAnpJKeHn Ha DCNJIee MIRaeT 3HaueHne:000
HaxmTe KhoNky 3aTeM KHONKn - +dnycTaHOBKn ToHOro BpeMeHN.ДЯ 6bICTpoI pyyraUN nepxHTE KhoNKn HaxKaTbIMN.
Pn Heo6xOAnMoCTN OTKOppeKtnpoBaTb BpemBbIOJHInTe BblweonncAHhIe Oepaun.
Функця таймера
3TaФyHKUBAKINOMOuKNHONKnNHa HnDCJIIE NOKa3bIbAEcCIMBOJ“.Pn KaJDOM HaxKaTNI KONK+3HAueHHe BpemeHN yBeJIuHbAETcHn 10 cekyHn Bnnotbdo99mHyt n50cekyHd.EcJn Bbl6yndeTe npoDOJIxAtb HaxMeTe Ha 3Ty KONKy,3HAueHne BpemeHN 6ydet yBeJIuHbAcbraH a ONDy MInHyTb BNIOb do 10 MNHyT.
Pn NOMOUKNKONK 3HaueHne yMeHBwaetc.
Iocne yctaHOBKn HxKHO Otpe3Ka BpeMeHN,HaHHaetcR o6paTHbI OTCyET. NIO nCTeueHN 3aJaHHoB BpeMeHN pa3daeTc3ByKOBoi CnHaj, Noracntb KOTOpbl Bbl MoKeTe, Haxkab IIO6yIO KOnKy.
BbMOKeTe BbIECTn Ha DnCnIe TeKyuIe BpeM, HaxaB Ha KhoNky CmBOJ "O3Haayet, YTO Ha TaIMepe 6bln BKIOUeyo6paTHbI OTCyET BpeMeH. PpIMepHO uepe3 7 CEkyHd Ha DnCnIe ABTomATnueckn BepHeTcBn3yaIIN3auNra TaIMepa.
Popraok 6bhylen TaMepa
HaKMITE KHOIky -BnIOt b 0-00
Perynra npomkoctn 3BykoBOro cnHa
Iocne OcyuceTBLeHn H NOITBepKdEHHapeyJauu YacOB npNOMOUI KNONKMOXHO OTpeYlnpOBAb rPOMKOCt bByKOBOrO CnHaJa.
IpaKTnueckne coBeTbI no npnroTOBJIeHnO 6JIou
DyXOBKa DaaT B03MOxHOCtB NcONb3OBAHnI WnPOKoI rAMMb fYHKuN, N03BOJIOUx PnIROTOBHT IIO6bIe 6NHOa ONTMaNbHBIM O6pa3OM. Co BpEmHeM BbI HayNTecb ONTMaNbHO NCNOJb3OBAbT 3TO MHOfOyHKUHOHaJIbHOe N3JeINE, NO3TOMy PnIBeDEHHBe HIXe COBeTb IABNHTcra TOlbKO 6ObmmYkAsaHnHm, KOtOpBle BbIMoKeTe DoNoHNbTa BaUMCo6CTBeHHbIM OnblTom.
KoHdntepcka Bbineyka
DyXOBka DOnJxHa 6bItb XopoOo pa3orpeta nepei NOMEeHnem B Hee BblneuKn. DoxNITecb 3aBepueHn HArpeBaHnra (npimepno 10-15 MInHyT). TemnepaTpa dIra npiroTOBHeHnRA BblneuKn Bapbnpuyet O 160^ do 200^ .He OTKpbIbaiTe DBepUy DxyOBKn B npoucece PpiroTOBHeHn BblneuKn BO n36exAHnE ee ocedaHn.
CnHsKOM 3acyeHHa BbineyKa
B cneyuioi pa3 3aiaTe tempeatypy Ha 10^ Bblwe n COKPATte Bpem BIneKn.
Bbineka ocedaet
ДeJaITe TecTo MeHee KnIckm IIn NOnH3bTe TempepaTy pHa 10^
Bbineka noDropaet cBepxy
IomeCTNe BbIneKy Ha 60nee Hn3Kn yPoBeHb, yCTaHOBnTe 60nee Hn3KyIO Tempepatypu yBebinuBte Bpemr BblneKn.
XopoO nponeueh chapyKn, Ho cbipoi BHyTpN
JeJaTe TECTo MEHee KUdKIM, YcTaHOBnTe 6OJIe Hn3KyIO TEMpepaTyu yBeINyIbTe BpemY BblneKN.
BbineyKa He BbIHMaTeCn3ΦOpMbI
ObIbHO npOTnTe cOpMy MaclOM, a TaKke Cnerka nocbIbTe ee Mykoi IIN NcIOJIb3yIe nepramENTHyO 6ymary dnydXOBK
PnOJHOBpeMeHHOM NcNOJIb3OBaHHN HeCKOJIbKHX yPOBHeN dYXOBKn (B pexmme «BeHTnIpOBAHHbI») pa3MeueHHbIe Ha HIX npOdyKTbl IMeJI pa3HyIO CTeneHb roTOBHOCTN.
Bb6paTb 6oJee Hn3kyo TemnepaTypy.
IpoTNBEHN, NOMEeHHe B DxyOBKY B OJHO I TO Xe BpEmra,
MOrYt 6bITb BbHYtbl B pa3Hoe BpEmra.
PpuroToBJIeHne pbl6bIMcA
Benoe mro, ptnu y npb6y cneyu3aneKaTb npn Hn3KoI Tempeatype (150°C-175°C).ДЯ npiroTOBNeHry KpacHO rMa, XopoUO npoxapenHOrO chaykN u coHOrO BHyTpN, cneyuET B HaueJe yCTaHOBtB bICOKyIO Tempeatype (200°C 220°C)В TeueHHe KopoTKOrO BpEmHn, 3aTeM nOnH3NTb Tempeatype. KaK npabNIO Yem KpyHHee KyCk MCA, TEm NHXe DOJXHa 6blb Tempeatypeu IdoJIbSe BpEmr erpoiroTOBNeHry. NomeCTnte MRCB U ceHTp peWetKu IN OndCTaBBte CH3y npOTNBHe JdRc6opa XIPA.BCTaBTE peWetKY B ceHTp DxXOBKn. EcnnpiroTOBNeHne Tpe6yET BoJIbUero JkaPa Cn3y, yCTaHOBtPeWetKu Ha nepBbI CN3y yPOBeHb.
OndOBpeMeHHoe npnroTOBneHne Ha HeckoJIbKnx ypoBHx
Pn HeoXoHmocTn IcNoIb3OBaTb OHOBpeMeHHO DBe
peWetKn BKNIOHTe TOnbKO yHKNUIO
"BEHTNINPOBaHHa DyXOBka", KOtOpa YBnareTcEeINHCTBeHHbIM pexmOM dIra TAKORO TIna npiroTOBneHna.
B Duxobom ukafty Meetc 5 ypOBHe. NcnoB3yTe ToIbko Dba CEHTpaJIbHbIX ypOBH B pexmE BeHTnnpoBaHHa

DyXOBKa. Ha KpaHnE, BepxHn HnKHN, YpOBn HnPaBHe npAmoJ Kap, CneDoBaTeNbHO He CneDyET NOMEaTb Ha HNX DeJIHKaTHbIe 6JIOJa.
Kap npabnIO nCOnb3yIOTc BTOPOI uYETBepTbI CN3y ypoBH, NOMEaI npOdyKT, Tpe6yuIN 60JIbweO kapa Ha ypoBeHb 2. HanpImep: ecn Bbl 3aneKaete Mco OndOBpeMeHHo C nprirotobneHmE B DuyXBKe dpyrOro npOdykTA, NOMeCTnte MRCo HA BTOPOI ypoBeHb, a 6Oone DeNikatHBI npOdyKT-Ha YETBepTbI.
- Ecnn Bbl roTOBnTe npOdykTbI, Tpe6yUoune pa3HOH TemnepaTpyb IN BpeMeHN pNiroTOBnEHHa 3aDaHTe cpeDHIO TeMnepaTpyu n3 DByx peKomeHdyembIX N NOMeCTnTe 60nee DeNkAThIbe npOdykTbHa YcTBePbTI yPoBeHb. NepBbIM BblMaIte n3 DxyOBKn npOdyKT, Tpe6yUoun 60nee 6bICTpO npiroTOBHeHH.
- YctaHOBnTe npOTnBEH Ha cambHnKn ypoBeHb, apeWETky Ha cambH BbICOKn.
- Pnp nproTOBHeHn nUcBi Ha HeckoJIbKx ypoBHx npi TemepaType 220°C, pa3orpeIte nepeI 3Tm DxyOBky B TeeHne 15 MNHT. ObuHNo npiroTOBHeHne HcUcBi Ha YeTBepTom ypoBHe 3aHnMaet 6OJbWe BpeMeHN. No 3ToI npuHne peKomeHdyETcBAuHane BBHyb N3 DxyOBKn HcNKeHero ypoBHe, OCTaBnDpyrIyO B DxyOBKe eue Ha HeckoJIbKO MNHT.
Функцягрль
DyXOBka Daet Bo3MOxHocTb NcNoJIb3OBAbI rPnIb B DByX pa3HbIX pexmMax. IcnoJIb3yIte fHyHKuIIO |—|“HarpeB CBepxy”ДЯ He6oJIbIwIX nopUIN. NpTepe6neHne 3JNEKtpO3HeprIn 3ToI fHyHKuIe coCTaJIraET BCero 1200 BT.
I0aTOMy OHa IeaeJbHO NOxOuNT DnA npiroTOBJeHnHa rPnIe He6oJIbUHX NOpuH. HApnPmep, TOCTOB, COCnCOK nT.D. IomecHTne npOdyKT B ceHTp peWteKn, TAK KAK BKIOUHeHa ToJIbKO CEHTpaJIbHaa Yactb BepXHero HarpeBaTeJIbHoro 3JeMeHrta.B yrrax dyXOBKn Japa Het.
B noJIOKeHn | "rPnIb" Bbl MoKTe rTOBHTb Ha Bcei NOBepxHocTn peWetKn. NcNoJIb3yIte 3Ty fYHKUHO npN paBHOMePHo pacnpedeHHeHn IPOdYKTOB Ha peWetke nDn INx OndopOHorO NoDPymAHnBaHn. BaxHo: DnA ONtMaJIbHbI pe3yJIbTaTOB pNfROTOBJeHn I DnA 3KOHOMn 3NeKtpo3Hepn (npMepHO Ha 10% ), npN cNoJIb3OBAHn rPnI), Bcerda DePxxNTe DBepy dXyOBKn 3aKpbItOn. PnN cNoJIb3OBAHn FyHKuN rPnIpeKOMeHdyETcYcTAHOBt TepMOCTaT Ha MaKcIMaJIbHyIO TempepaTy. 3To, OJHaKO, He O3HaayE, YTO HeJIb3aNCNoJIb3OBA Tb 6Oone Hn3KyIO TeMnepaTy.
PnncnoB3OBaHm yHKu npna yctahOBITE peueKty Ha cambI BepxHn ypoBeH (cmOpTe Ta6nUy nprirotobHeHn) nOCTaBtce CH3y npOTnBeH dna c6opa Jnpa n Coka.
Функия "BeHTnI npOBaHHbI rPnIb" ABJIeTcR 4pe3BvauHNO yO6HOJ dN8 6bICTpOro 6xapuBaHnra, pacnpedeJIeR T bIDeJIeMbl rpnemXap, n03BOJRA OdHOBPemHoo 6xapNBaTB NOBepXHOCTb npOyKTA N OCyUecTBnTb pNROTOBHeHn 6JIoD TaKKe B HmKHe Yactn DxyOBoro WkaFa P03BOJAre 6xapNBaTB KpyHbIe Kyckn Mra cnn Ptncbl 6e3 BepTeNa. Bbl MoKeTe NcNoB3ObaTb 3Ty FyHKUIO TaKKe B KOHcE pNiroTOBHeHn 6JIoD, Tpe6yUoxN IOBepXHOCTHO NOpymrHBAHn, HAnpIMep, INdeaIbHo NOxODIT dNra 3aBepWauOJe ONDpymrHBAHn 3aneKaHN mMAkApOH.
PnncnoB3OBAHm 3ToI cyHKUy uCTaHOBtpeWtky Ha 2- Onn 3-n yPOBeHb CHN3y (CMOTpeTb Ta6nUy nprirotOBneHna), nocne yero ycTaHOBt npOTuBeHb Ha 1-bi yPOBeHb CHN3y dna c6opa Xnpa N BO n36exaHne o6pa3OBAHna Dbima. DaHHa YHKUra BMeTe C BePeTlOM (ImeETcB H HeKOTOpbIX MoDeJAX) PO3BOJRAET RTOBt npOdyKTb TaKKe Ha npOTuBeHe, ycTAHOBJIeHHom Ha 1-OM yPOBHe, HAnpMep: KapTOUkY n T.D.
IHCtpyKznn no 3KcPlyaTaZnn CTeKIOKepaMnuecko BapOuHoi NaHeJI
OnncanHe
Bapouhhe naHenn ochaueHbI 3neKtpnueckmncnpaIbHbIM KOHOpKaMn, BCTpoEHbIM NODIOBepxHOCTbIO BapouHoi naHelen (3OHbI, HAKaINBaIOUneCpnpfHKUHOHPoBaHN).
A.KoHΦopKa HakaJIuBaHnA(A).
B.CBeTOBbIe INHnKaTOpbl, NOKa3bIbAIOUuue, YTO TEMNepaTypa COOTBeTCTByIOxHarpeBaTeJIbHbIX 3JIeMeHTOB ppeBbIuaet 60^ ,daJce ecnn daHHa 3OHa Ha BapOCHo nanei 6bIina BBIKIOUcHa.
OnncahHe HArpeBaTeJbHbIX 3JeMeHTOB
CnnpaBbIbe HArpeBaTeIbHbIe 3IeMeHTbI COCToT N3 KpyIbIX cOnpOTnIBneHni, KOtOpBle packaJIHOcTc Do KpaCha 3a 10-20 cekyHd nocNe Ix BkHoueHn.
Hnctpykun no 3KcnIyaTaun CTeKIOKepaMueckoBapouHOn nanei
IgraOnTnMaJIbHOrO nCNoJIb3OBAHnB BApOoN nAHeIN He0xOIMO CNeIOBaTb HEKOTOpbIM OCHOBHbIM npaBnJAM NO pa3JeJIke IIN No pnpiroTOBJIeHnIO npOdyKTOB.

Ha CTeKIOkepaMnueckne BapOHyIe NaHeIIMoXHO CTaBtB BCE BnDbl KacTpOJb I CKOBOpod. Tem He MeHec HnUse
NcnoJb3yEmoNocuBbBCerdaDolXHo6bTbNdeaHbNO pIIOCKM.Pa3yMeETc,HTOYEMToIeDHOKAcTpOINnCKOBOpObl,TeM6oeeOnHOpOHO npOnCxOINTpacnpedeJeHne TENla.
- Пороверп, утоб осоване посды NonHocTb3aKpbIbANO KOHΦOPky: 3TO NO3BOJNT Bam ONTMAJIbHO INOJIb3OBaT bIДENREMOE TENJO
- PnOBePbTe, YTO6bI dH0 Nocybl 6bIIO BcERda CyxIM uNCTbIM: 3TO HE TOJIbKO cNOco6CTByeT ONTImaJIbHOMy KOHTaKTy C KOHΦopKO, HO TAKKe IpoJNeBaET cPOK ClyX6bl BaUeI Nocybl I BapOHHo NaHeJI.
He nCIOJIb3yIe T Ty Je NocUy, KOTOpO Bbl NOnb3yeTecB dI npriroTOBnHn IINu HA ra3OBbIX KOHΦopKax, TAK KaK CnIa TeNIIra3OBbIX KOHΦopOK MOKeT DeΦopMnPOBaTb DHO NocUdbI Hr rapaHTnpuyET Te Xe pe3yIbTaTbI, ecIn 3Ta NocUda NOTOM 6yJed T nCIOJIb3OBaTcR Ha CTeKJIoKEpaMnuecko BapOCHNo IaHEJI.
IpaKTHueckne peKOMeHdaUIM NO 3KcNpyaTauN 3JeKTPnuecknx KOHΦopOK
PyKoTKn BkHNoeHnnaKeKtpuYecknx KaHΦopok BapouHo nHaHeJn (I)
KyxOHHbIe NNITbI MOrY 6bITb OChaUeHbI CTaHApTHbIMN 3JIeKTPnueckmK KaHΦOpKaMn, 6bICTpbIMn I aBTOMaTnueckmB PaaJIuHbIX CoYeTaHnx (6bICTpbIE KaHΦOpKn OTJNuAOTcR OT dpyrNX HaNUnHem KpaCHOrO KpykKa B CEHTpe; aBTOMaTnueckne - HaNUnHem B CEHTpe aJIOMMHNEBOrO DnCKa).
Bo n36ekahne paccenBaHnra tenna n noBpeKdeHnra KOHOpok peKomeHdyetcna cnoJb30BaTb KAcTpOJN C nIOCKM dHOM dNaMeTpom He MeHbJe dNaMeTp aKOHOpKn.
B Ta6nue noka3aHbI noJoxeHHa peryIaTOpOB npekOMeHdyemoe Ha3NaueHne KOHcOpok.
Cpok cIyHc6bl 10 JeT co H3rToBJIeHHa

INDESIT
Pon3BOOnTeNbOCTaBnEeT3aCob0 npabo 6e3 npdeynpeKdHnB HOCNTb N3MeHeHn B KOHCTpyKuH, He yXyDuaOuHne 3ΦΦeKTHBHOCTpbapBoI o6OpydoBaHn.
HeKoTOpbIe npaMeTpbl, npBBeHHeB B 3ToHnCTpyKUIM, RBAJIOrCpN6JIIN3NTeJIbHbIM.
Pon3BOOnTeH He HecET OTBcTBeHHoCTn 3a He3NaHTeHbIe OTKIOHeHnOYka3aHHbIX BeINuH.
Pergnepoe texnueckoe o6cnykBaHne n uCtka dYXOBoro shkaΦa
OTcoeHNHTe DyXOBo WkaΦ OT cETn 3JIeKTPoNTaHnna nepe Haayanom KaKnx-No6o onepaun no o6cnykBaHHo HnN YnCTke. JIra 60Jee dIITeJIbHOro cPoka CnykbBaWero DxyOBoro WkaΦa peryIpaHPO YnCTnte erO, CneDy npBedeHHbIM Hxke peKOMHeHaUNM:
-HeIcnoIb3yIte npoBble arperaTbI DnI YIcTkn
3MaHnPoBaHHbIe qactn n caMoUcNCTaunecraNaHeBbIMoTe ropayen BDOon 6e3 abpa3uHBx uCtTauxNPOoSKOBnn Koppo3nHbIX cpeCTB, KOtOpBie MoYrNOBpeNTb NOKpbHTne;
BHyTpN dyXOBo WkaΦ CneDyeT MbITpeYJpHNO, KOrDa OH eUe TeNbI, npn NOMOuN rOpAeW BoDbI MOnIOUero cpeDCTBa, KOtOpoe 3aTeM ydaNTb BnaXHo TprKnOu N BblCyuNTb.
HaTeTAnxN3HepKabeUoSeI CTANMOryT O6pa3ObaTbCnTHa, ECIN OHN OCTaOTcB TeueHne IInTEbHoro BpeMeHN B KOHTAKTe C BOOn IOBbIeHHo JKeCTKOCTn INn C arpeccNBbIM MOIOUMCpeCDTBAMn (CoedePkaUNM focOp).Pocne YNCTK peKOMeHnyETcraTaeJIbHO ydaNTb OCTaTKMOUero CpeCDBA BlaxHO TpRknOB N BbICyWNTb DxyOBky.KpOME TORO CNeDyET He3aMeIDNtEblHO ydaNATb BO3MOXHbIyeTuKN BObl;
-36eTaTe 06pa3OBAHnJxnpHbIX HaJeTOB Ha naHeynynpaBHeHn, perynpHo npouHsauTe ee. Ira YnCTKNICNoJIb3yIte MRAKNE rY6Kn UIN cyKHO BO n36ExJaHneUAPAHN Ha 3MaInpoBaHHbIX qactyx INI DeTaJAX N3HepKaBeIOSe CTAnN.
Ynctka noBepxHocTn BapOuHo nHaJIi
Ipeed NaHApOM npiroTOBHeHRA BcERda CneDyET npOTnpaTb NOBepxHOCTb BapOCHNO NaHEIN BnAaXHO TpRKnO dNra ydaneHn bInn nnn octaTKOB nns. CneDyET perynrpho MblTb NOBepxHOCTb BapOCHNO NaHEIN pactBOPOM TeNIOB OdbIC HeITpaJIbHbIM MOUoM cpeCTBOM. Bpemr oT BpemeH MoKet NoHaO6ntbcr npmHeHne CneuNaJbHorO YnCTaJeero CpeCTBa dNra CTekNokepaMnueckn BapOHybIX naHeeN. PpeXDe BCERO Heo6xOIMO ydaJIntb BCE OCTaTKI Nns I Knpa IIPOMOUs CKpe6ka dner CTekna, IO Bo3MOXHOCTn C TOHKIM Je3BnEM CERA (He npinaraeTcR) INN B erO OTCYTCBNE, C TOHKIM qNKcnpoBAHHbIM ne3BnEM.
IpoTnpaIte BapOCHyIO nAHeJIb, NOKa OHa eUe TeNJa, 6ymaxHO canΦeTKo I npriOndHbIM MOIOUIM cpeCDTBOM. 3aTeM ydaIInTe ocTAtKN MOUSeIcopeCTBa N BbITpNTe Hacyxo YnCTOn TpRnKO. 3aTeM ydaIInTe ocTAtKN MOIOUero cpeCTBa N BbITpTE Hacyxo YnCTOn TpRnKO. Ecn K BaWei BapOchNo NaHeJIcnyaHIO pRnBapINcKycOK PnAcTMacCbI INn AnIOHMHeBO FOJbRn, He3aMeDNIte JbHO ydaIInTe INC rOparye BapOCH NoHbI npn NOMoUIN Ckpe6ka BO n36EkaHne NobPexDeHHN NOBepXHoCTN BblONHtE Te Je ONepaun, ecN Bbl npocbinaCaxap INn DpyrNe pOdoKyTbIC BbICOKM COePekaHmecaxapa.He nCnoNb3yIte HnKaKnx
Consommation energie convection forcee
modifications successives. 2002/96/EEC
Four "Décongélation"
Position du bouton thermostat "M":quelconque
