R HA — Cooker — Mode d'emploi PDF")
PC 640 T (AN) R HA - Cooker HOTPOINT-ARISTON - Free user manual and instructions
Find the device manual for free PC 640 T (AN) R HA HOTPOINT-ARISTON in PDF.
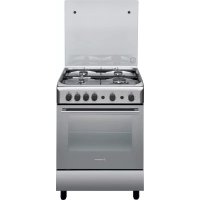
| Product Type | Gas cooker with electric plate |
| Brand | HOTPOINT-ARISTON |
| Model | PC 640 T (AN) R HA |
| Category | Cooker |
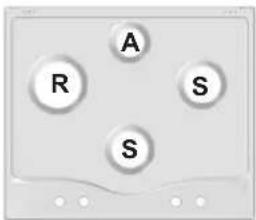
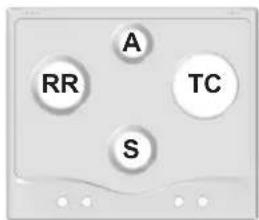
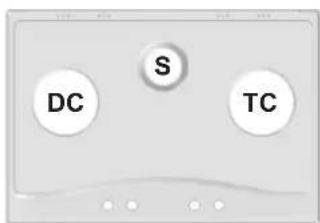
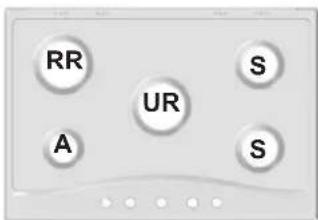
| Number of gas burners | 4 (types: Rapid, Semi-Rapid, Auxiliary, Triple Crown depending on configuration) |
| Number of electric plates | 1 |
| Maximum power Rapid burner (R) | 3.00 kW |
| Maximum power Semi-Rapid burner (S) | 1.65 kW |
| Maximum power Auxiliary burner (A) | 1.00 kW |
| Maximum power Triple Crown burner (TC) | 3.30 kW |
| Electrical supply | 230 V ~ 50/60 Hz |
| Compatible gas type | Natural gas (G20/G25) or LPG (butane/propane) – adaptable via injectors |
| Gas supply pressure (France) | Natural: 20 mbar (nominal); LPG: 28-30 mbar (nominal) |
| Appliance class | Class 3 (built-in) |
| Safety devices | Flame safety thermocouple on gas burners, electric plate operation indicator light |
| Ignition | Automatic electronic ignition by pressing control knob |
| Hob dimensions (W x D) | 60 cm x 50 cm (estimated) |
| Surface material | Stainless steel (depending on model) |
| Approximate weight | 15-20 kg |
| Included accessories | Pan supports, additional injectors, fixing brackets, sealing gasket |
| Maintenance | Clean with a damp sponge; do not use steam cleaner |
Frequently Asked Questions - PC 640 T (AN) R HA HOTPOINT-ARISTON
User questions about PC 640 T (AN) R HA HOTPOINT-ARISTON
0 question about this device. Answer the ones you know or ask your own.
Ask a new question about this device
Download the instructions for your Cooker in PDF format for free! Find your manual PC 640 T (AN) R HA - HOTPOINT-ARISTON and take your electronic device back in hand. On this page are published all the documents necessary for the use of your device. PC 640 T (AN) R HA by HOTPOINT-ARISTON.
USER MANUAL PC 640 T (AN) R HA HOTPOINT-ARISTON
PC 631 X /HA
PC 640 X /HA
PC 640 /HA
PC 640 TX /HA
PC 640 T GH /HA
PC 640 TR /HA
FR
François
Mode d'emploi
TABLE DE CUISSON
Sommaire
Mode d'emploi,1
Avertissements,4
Assistance,8
Operating Instructions HOB
Contents
Operating Instructions,1
Warnings,3
Assistance,8
Description of the appliance,10
Installation,23
Start-up and use,28
Precautions and tips,29
Maintenance and care,30
Troubleshooting,30
PT
Portuges
WARNING: The appliance and its accessible parts become hot during use. Care should be taken to avoid touching heating elements. Children less than 8 years of age shall be kept away unless continuously supervised. This appliance can be used by children aged from 8 years and above and persons with reduced physical, sensory or mental capabilities or lack of experience and knowledge if they have been given supervision or instruction concerning use of the appliance in a safe way and understand the hazards involved. Children shall not play with the appliance. Cleaning and user maintenance shall not be made by children without supervision.
WARNING: Unattended cooking on a hob with fat or oil can be dangerous and may result in fire. NEVER try to extinguish a fire with water, but switch off the appliance and then cover flame e.g. with a lid or a fire blanket.
WARNING: Danger of fire: do not store items on the cooking surfaces.
Never use steam cleaners or pressure cleaners on the appliance.
Remove any liquid from the lid before opening it. Do not close the glass cover (if present) when the gas burners or electric hotplates are still hot.
The appliance is not intended to be operated by means of an external timer or separate remote control system.
CAUTION: the use of inappropriate hob guards can cause accidents.
FR
Avertissements
- appliance model (Mod.)
- serial number (S/N)
This information is found on the data plate located on the appliance and/or on the packaging.
! Never use unauthorised technicians and never accept replacement parts which are not original.
FR
Assistance
Indiquez-lui:
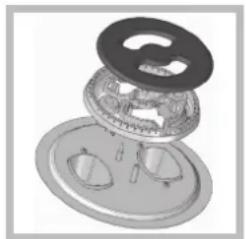
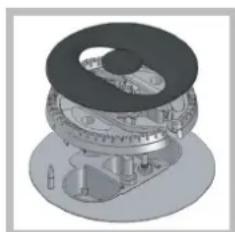
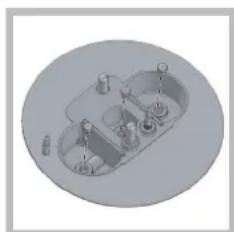
Description of the appliance
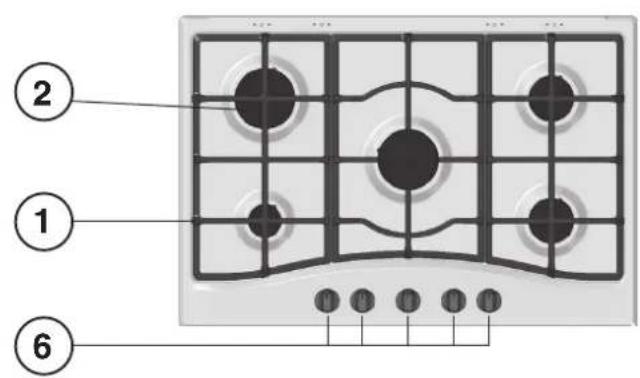
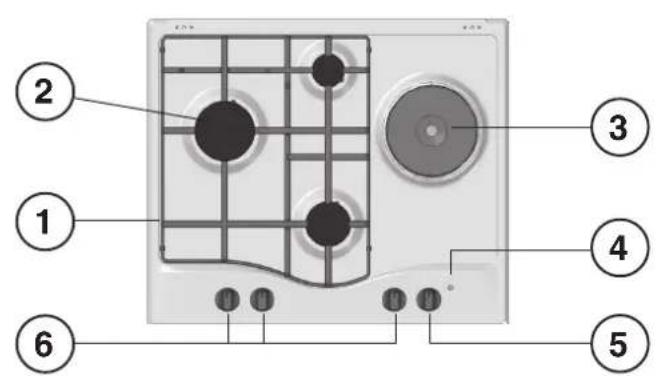
Overall view
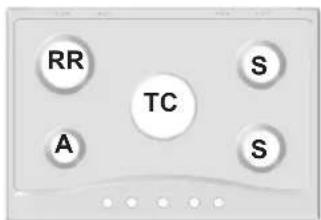
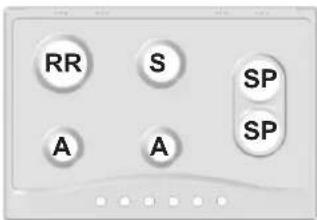
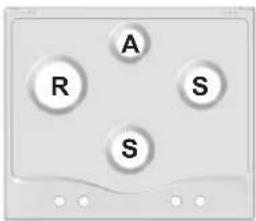
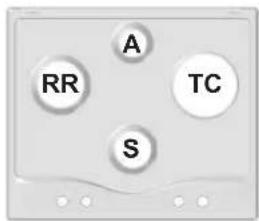
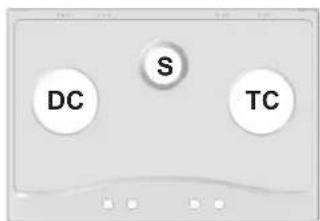
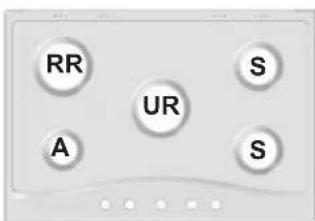
1 Support Grid for COOKWARE
2 GAS BURNERS
3 ELECTRIC HOTPLATE
4 Indicator light for ELECTRIC HOTPLATE
5 Control Knobs for ELECTRIC HOTPLATE
6 Control Knobs for GAS BURNERS
7 Ignition for GAS BURNERS
8 SAFETY DEVICES*
- ELECTRIC HOTPLATES may have different diameters and operate at different power levels.
- The INDICATOR LIGHT FOR ELECTRIC HOTPLATE* switches on whenever the selector knob is moved from the 'off' position.
- GAS BURNERS differ in size and power. Use the diameter of the cookware to choose the most appropriate burner to cook with.
Control Knobs for GAS BURNERS and ELECTRIC HOTPLATE* adjust the power or the size of the flame. - GAS BURNER IGNITION* enables a specific burner to be lit automatically.
- SAFETY DEVICE* stops the gas flow if the flame is accidentally extinguished.
- Only available on certain models.
FR
! Before operating your new appliance please read this instruction booklet carefully. It contains important information for safe use, installation and care of the appliance.
Please keep these operating instructions for future reference. Pass them on to possible new owners of the appliance.
Positioning
! Keep packaging material out of the reach of children. It can become a choking or suffocation hazard (see Precautions and tips).
! The appliance must be installed by a qualified professional according to the instructions provided. Incorrect installation may cause harm to people and animals or may damage property.
This unit may be installed and used only in permanently ventilated rooms in accordance with British Standard Codes Of Practice: B.S. 6172 / B.S. 5440, Par. 2 and B.S. 6891 Current Editions. The following requirements must be observed:
- The room must be equipped with an air extraction system that expels any combustion fumes. This may consist of a hood or an electric fan that automatically starts each time the appliance is switched on.
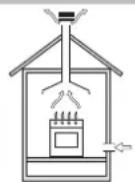
In a chimney slack or branchled flue, exclusively for cooking appliances
Directly to the Outside
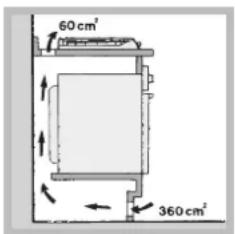
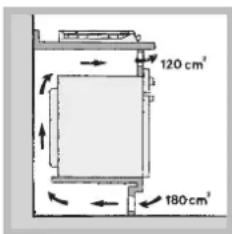
- The room must also allow proper air circulation, as air is needed for combustion to occur normally. The flow of air must not be less than 2m^3 /h per kW of installed power.
Examples of ventilation holes for combustant air.
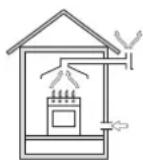
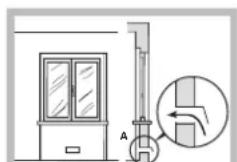
The air circulation system may take air directly from the outside by means of a pipe with an inner cross section of at least 100~cm^2 ; the opening must not be vulnerable to any type of blockages.
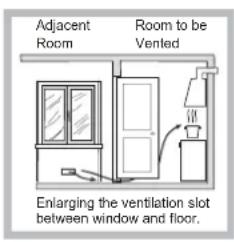
The system can also provide the air needed for combustion indirectly, i.e. from adjacent rooms fitted with air circulation tubes as described above. However, these rooms must not be communal rooms, bedrooms or rooms that may present a fire hazard.
- Liquid petroleum gas sinks to the floor as it is heavier than air. Therefore, rooms containing LPG cylinders must also be equipped with vents to allow gas to escape in the event of a leak. As a result LPG cylinders, whether partially or completely full, must not be installed or stored in rooms or storage areas that are below ground level (cellars, etc.). It is advisable to keep only the cylinder being used in the room, positioned so that it is not subject to heat produced by external sources (ovens, fireplaces, stoves, etc.) which could raise the temperature of the cylinder above 50^ .
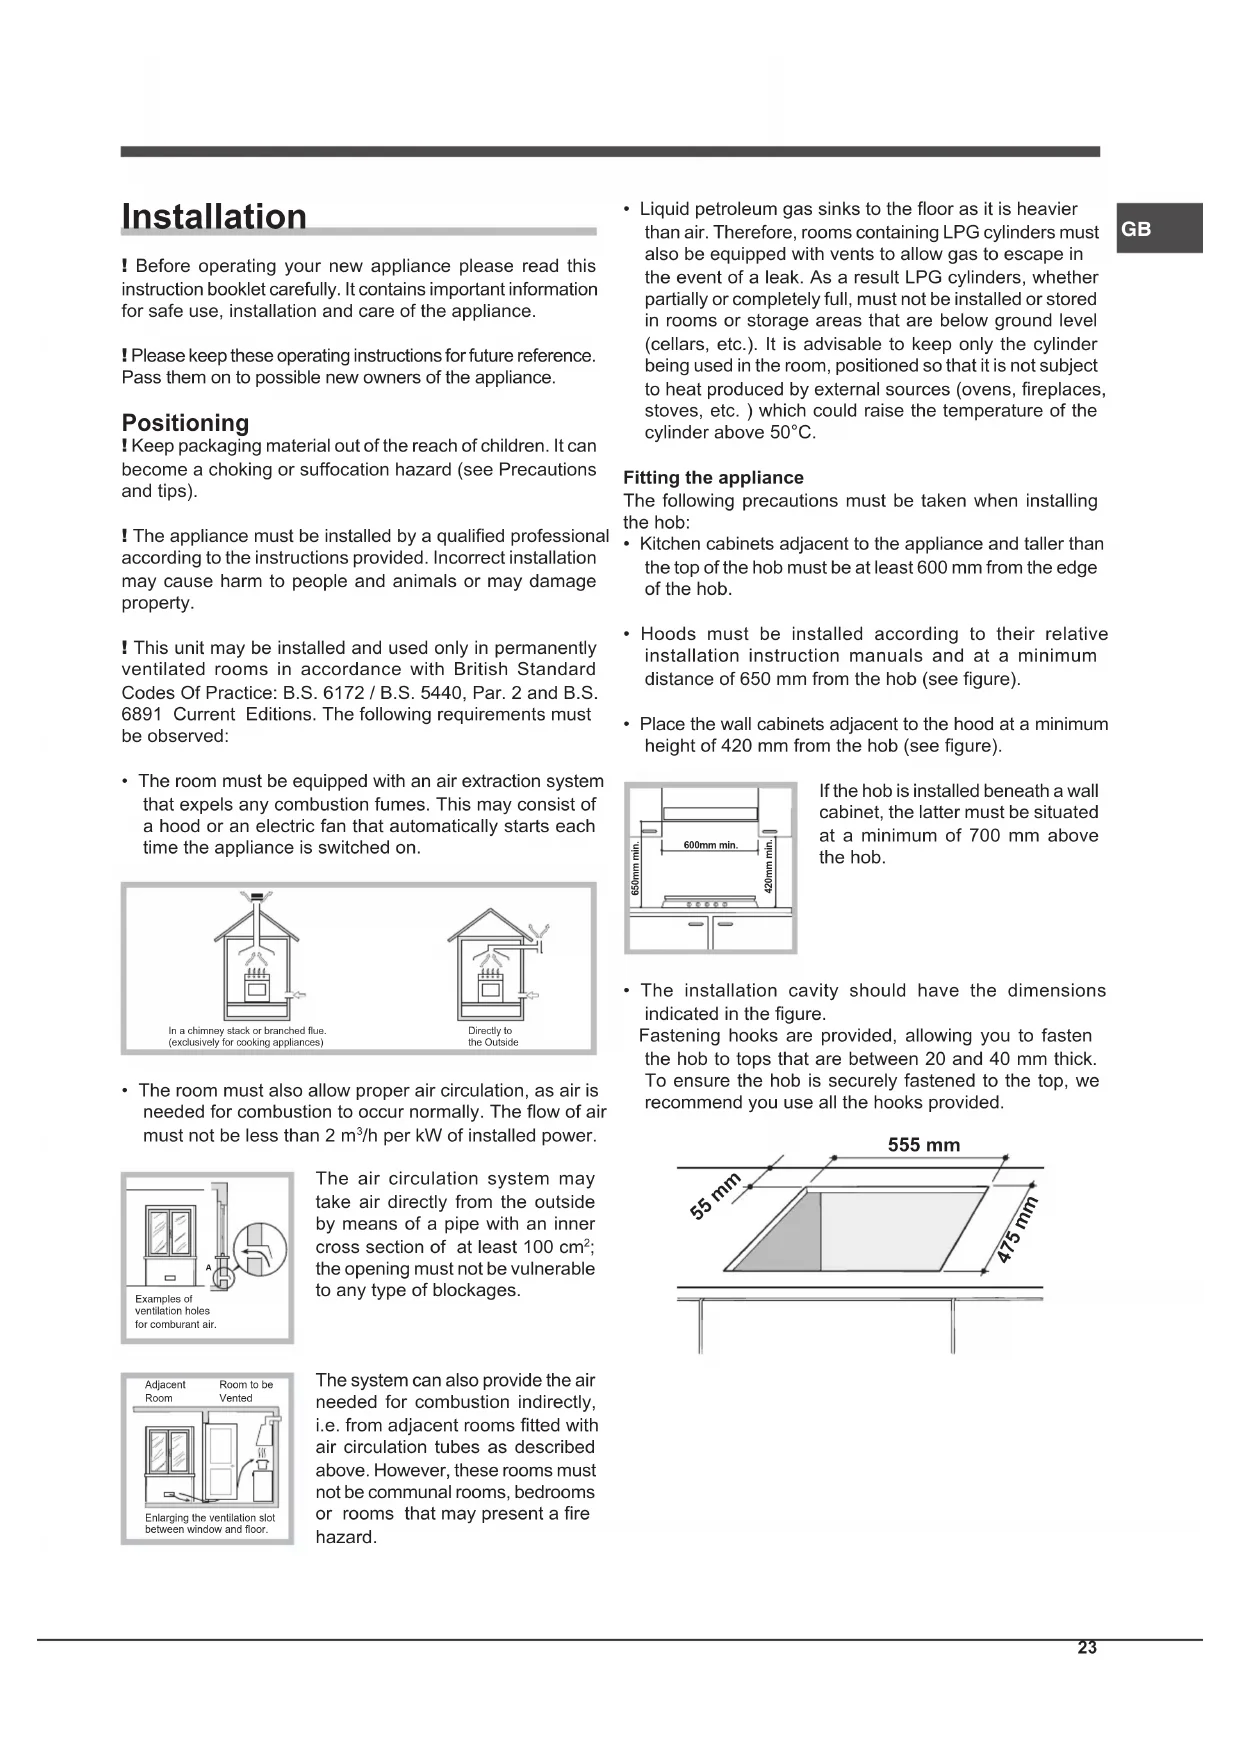
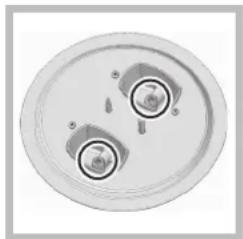
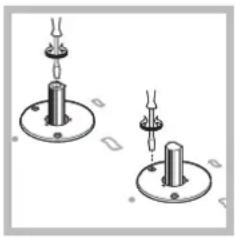
Fitting the appliance
The following precautions must be taken when installing the hob:
- Kitchen cabinets adjacent to the appliance and taller than the top of the hob must be at least 600mm from the edge of the hob.
- Hoods must be installed according to their relative installation instruction manuals and at a minimum distance of 650~mm from the hob (see figure).
- Place the wall cabinets adjacent to the hood at a minimum height of 420mm from the hob (see figure).
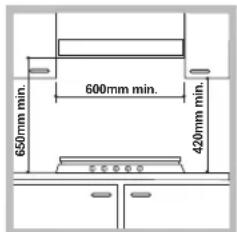
If the hob is installed beneath a wall cabinet, the latter must be situated at a minimum of 700mm above the hob.
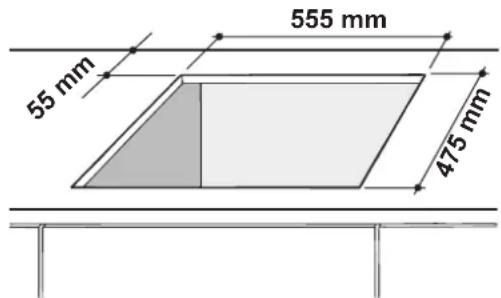
- The installation cavity should have the dimensions indicated in the figure.
Fastening hooks are provided, allowing you to fasten the hob to tops that are between 20 and 40mm thick. To ensure the hob is securely fastened to the top, we recommend you use all the hooks provided.
GB
Hook fastening diagram
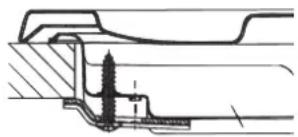
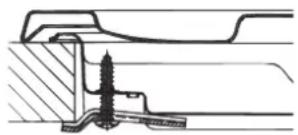
Hooking position Hooking position for top H=20mm for top H=30mm
Front
Hooking position Back for top H=40mm
! Use the hooks contained in the "accessory pack".
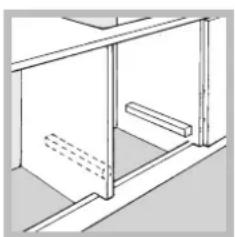
- Where the hob is not installed over a built-in oven, a wooden panel must be installed as insulation. This must be placed at a minimum distance of 20mm from the lower part of the hob.
Ventilation
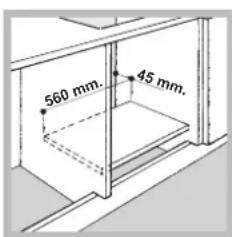
To ensure adequate ventilation, the back panel of the cabinet must be removed. It is advisable to install the oven so that it rests on two strips of wood, or on a completely flat surface with an opening of at least 45 × 560 ~mm (see diagrams).
Where a hob is installed above an oven without a forced ventilation cooling system, adequate ventilation must be provided inside the cabinet by means of air holes through which air can pass (see figure).
Electrical connection
Hobs equipped with a three-pole power supply cable are designed to operate with alternating current at the voltage and frequency indicated on the data plate (this is located on the lower part of the appliance). The earth wire in the cable has a green and yellow cover. If the appliance is to be installed above a built-in electric oven, the electrical connection of the hob and the oven must be carried out separately, both for electrical safety purposes and to make extracting the oven easier.
Connecting the supply cable to the mains
Install a standardised plug corresponding to the load indicated on the data plate.
The appliance must be directly connected to the mains using an omnipolar circuit-breaker with a minimum contact opening of 3mm installed between the appliance and the mains. The circuit-breaker must be suitable for the charge indicated and must comply with current electrical regulations (the earthing wire must not be interrupted by the circuit-breaker). The supply cable must not come into contact with surfaces with temperatures higher than 50^ .
! The installer must ensure that the correct electrical connection has been made and that it is compliant with safety regulations.
Before connecting to the power supply, make sure that:
- The appliance is earthed and the plug is compliant with the law.
- The socket can withstand the maximum power of the appliance, which is indicated on the data plate.
- The voltage is in the range between the values indicated on the data plate.
- The socket is compatible with the plug of the appliance. If the socket is incompatible with the plug, ask an authorised technician to replace it. Do not use extension cords or multiple sockets.
Once the appliance has been installed, the power supply cable and the electrical socket must be easily accessible.
! The cable must not be bent or compressed.
! The cable must be checked regularly and replaced by authorised technicians only (see Assistance).
! The manufacturer declines any liability should these safety measures not be observed.
Gas connection
The appliance should be connected to the main gas supply or to a gas cylinder in compliance with current national regulations. Before carrying out the connection, make sure the cooker is compatible with the gas supply you wish to use. If this is not the case, follow the instructions indicated in the paragraph "Adapting to different types of gas." When using liquid gas from a cylinder, install a pressure regulator which complies with current national regulations.
! Check that the pressure of the gas supply is consistent with the values indicated in Table 1 ("Burner and nozzle specifications"). This will ensure the safe operation and longevity of your appliance while maintaining efficient energy consumption.
Connection with a rigid pipe (copper or steel)
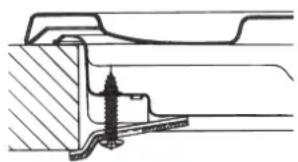
! Connection to the gas system must be carried out in such a way as not to place any strain of any kind on the appliance. There is an adjustable L-shaped pipe fitting on the appliance supply ramp and this is fitted with a seal in order to prevent leaks. The seal must always be replaced after rotating the pipe fitting (seal provided with appliance). The gas supply pipe fitting is a threaded 1/2 gas cylindrical male attachment.
Connecting a flexible jointless stainless steel pipe to a threaded attachment
The gas supply pipe fitting is a threaded 1/2 gas cylindrical male attachment.
These pipes must be installed so that they are never longer than 2000mm when fully extended. Once connection has been carried out, make sure that the flexible metal pipe does not touch any moving parts and is not compressed.
! Only use pipes and seals that comply with current national regulations.
Checking the tightness of the connection
! When the installation process is complete, check the pipe fittings for leaks using a soapy solution. Never use a flame.
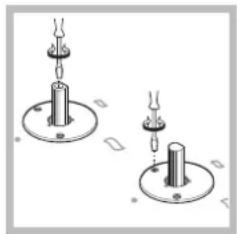
Adapting to different types of gas
To adapt the hob to a different type of gas other than default type (indicated on the rating plate at the base of the hob or on the packaging), the burner nozzles should be replaced as follows:
- Remove the hob grids and slide the burners off their seats.
- Unscrew the nozzles using a 7mm socket spanner, and replace them with nozzles for the new type of gas (see table 1 "Burner and nozzle characteristics").
- Reassemble the parts following the above procedure in the reverse order.
- Once this procedure is finished, replace the old rating sticker with one indicating the new type of gas used. Sticker are available from any of our Service Centres.
Replacing the nozzles on separate "double flame" burners
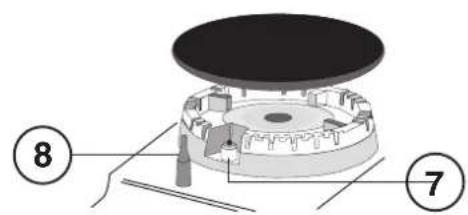
- Remove the grids and slide the burners from their housings. The burner consists of 2 separate parts (see figure);
- Unscrew the burers with a 7mm wrench spanner. The internal burner has a nozzle, the external burner has two (of the same size). Replace the nozzle with models suited to the new type of gas (see table 1).
- Replace all the components by repeating the steps in reverse order.
Replacing the Triple ring burner nozzles
- Remove the pan supports and lift the burners out of their housing. The burner consists of two separate parts (see pictures).
- Unscrew the nozzles using a 7mm socket spanner. Replace the nozzles with models that are configured for use with the new type of gas (see Table 1). The two nozzles have the same hole diameter.
- Replace all the components by completing the above operations in reverse order.
- Adjusting the burners' primary air Does not require adjusting.
-
Setting the burners to minimum
-
Turn the tap to the low flame position;
-
Remove the knob and adjust the adjustment screw, which is positioned in or next to the tap pin, until the flame is small but steady.
-
Having adjusted the flame to the required low setting, while the burner is alight, quickly change the position of the knob from minimum to maximum and vice versa several times, checking that the flame does not go out.
- Some appliances have a safety device (thermocouple) fitted. If the device fails to work when the burners are set to the low flame setting, increase this low flame setting using the adjusting screw.
- Once the adjustment has been made, replace the seals on the by-passes using sealing wax or a similar substance.
! If the appliance is connected to liquid gas, the regulation screw must be fastened as tightly as possible.
! Once this procedure is finished, replace the old rating sticker with one indicating the new type of gas used. Stickers are available from any of our Service Centres.
! Should the gas pressure used be different (or vary slightly) from the recommended pressure, a suitable pressure regulator must be fitted to the inlet pipe (in order to comply with current national regulations).
| DATA PLATE | |
| Electrical connections | see data plate |
| CE | This appliance conforms to the following European Economic Community directives: - 2006/95/EEC dated 12/12/06 (Low Voltage) and subsequent amendments - 2004/108/EEC dated 15/12/04 (Electromagnetic Compatibility) and subsequent amendments - 93/68/EEC dated 22/07/93 and subsequent amendments. - 2009/142/EEC dated 30/11/09 (Gas) and subsequent amendments. - 2012/19/EC and subsequent amendments. |
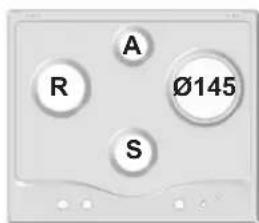
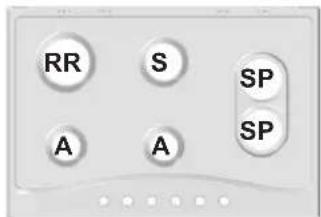
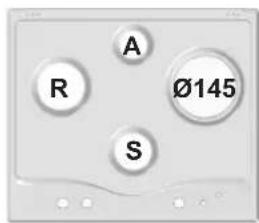
Burner and nozzle specifications
| Table 1 | Liquid Gas | Natural Gas | ||||||||
| Burner | Diameter (mm) | Thermal power kW (p.c.s.* ) Reduced | Thermal power kW (p.c.s.* ) Nominal | By-pass 1/100 (mm) | Nozzle 1/100 (mm) | Flow* (g/h) | Thermal power kW (p.c.s.* ) Nominal | Nozzle 1/100 (mm) | Flow* (l/h) | |
| *** | ** | |||||||||
| Fast (R) | 100 | 0.70 | 3.00 | 39 | 86 | 218 | 214 | 3.00 | 132 (H) | 286 |
| Reduced Fast (RR) | 100 | 0.70 | 2.60 | 39 | 80 | 189 | 186 | 2.60 | 122 (H) | 248 |
| Semi Fast (S) | 75 | 0.40 | 1.65 | 28 | 64 | 120 | 118 | 1.65 | 96 (Z) | 157 |
| Auxiliary (A) | 55 | 0.40 | 1.00 | 28 | 50 | 73 | 71 | 1.00 | 79 (6) | 95 |
| Triple Crown (TC) | 130 | 1.50 | 3.30 | 61 | 65x2 | 240 | 236 | 3.60 | 103x2 | 343 |
| Ultrarapid (UR) | 100 | 0.70 | 3.40 | 39 | 91 | 247 | 243 | 3.40 | 138 (H) | 324 |
| Semi-Fishburner (SP) | - | 0.70 | 1.50 | 39 | 60 | 109 | 107 | 1.50 | 88 | 143 |
| Double Flame (DCDR Internal) | 30 | 0.40 | 0.90 | 28 | 44 | 65 | 64 | 0.90 | 74 | 86 |
| Double Flame (DCDR External) 2 nozzle | 130 | 1.50 | 4.10 | 61 | 70x2 | 298 | 293 | 4.10 | 110x2 | 390 |
| Supply pressures | Nominal (mbar) | 28-30 | 37 | 20 | ||||||
| Minimum (mbar) | 20 | 25 | 17 | |||||||
| Maximum (mbar) | 35 | 45 | 25 | |||||||
- At 15°C and 1013,25 mbar - dry gas
** Propane P.C.S. = 50.37 MJ/Kg
*** Butane P.C.S. = 49.47 MJ/Kg
Natural P.C.S. = 37.78 MJ/m³
PC 631 X/HA
PC 631/HA
PC 640 X/HA
PC 640 R/HA
PC 640/HA
PC 640 TX/HA
PC 640 T GH/HA
PC 640 T AX/HA
PC 640 T R/HA
PC 640T GH R/HA
PC 640 TEX/HA
PC 730 RT GH /HA
PC 730 RTX/HA
PC 750 X/HA
PC750AX/HA
PC750TX/HA
PC 750 T AX /HA
PC 750 T GH /HA
PC 750 T XX /HA
PC 750TR/HA
PC 750 T/HA
PC 750 T E X/HA
PC 760 FX /HA
PC 760 FR/HA
GB
GB
Start-up and use
The position of the corresponding gas burner or electric hotplate* is shown on every knob.
Gas burners
Each burner can be adjusted to one of the following settings using the corresponding control knob:
- Off
Maximum
Minimum
To light one of the burners, hold a lit match or lighter near the burner and, at the same time, press down and turn the corresponding knob anti-clockwise to the maximum setting. Since the burner is fitted with a safety device, the knob should be pressed for approximately 2-3 seconds to allow the automatic device keeping the flame alight to heat up. When using models with an gas burner ignition, to light the selected burner press down and turn the corresponding knob anticlockwise to maximum position, keeping it pressed until the burner has ignited.
If a flame is accidentally extinguished, turn off the control knob and wait for at least 1 minute before trying to relight it.
To switch off the burner, turn the knob in a clockwise direction until it stops (when reaches the "●" position).
The "separate double flame" burner*
This burner consists of two concentric burners which can operate either together or separately.
Use of the double flame on the maximum setting gives a very high power which reduces cooking times with respect to conventional burners.
Moreover the double flame crown provides a more uniform distribution of heat on the bottom of the pan, when using both burners on minimum.
To ensure that the double-flame burner is used to its full potential, never set the inside ring to minimum and the outside ring to maximum at the same time.
Pots and pans of all sizes can be used. In the case of the smaller pots and pans we recommend the use of only the internal burner.
There is a separate control knob for each of the "separate double flame" burners.
The knob marked by the symbol operates the external burner,
The knob marked by the symbol operates the internal burner.
To turn on one of the rings, press the relative knob in all
the way and turn it anti-clockwise to the high setting.
The burner is fitted with an electronic igniter that automatically starts when the knob is pressed in.
Since the burner is equipped with a safety device, after lighting the burner keep the knob pressed in for about 2-3 seconds to allow the device which keeps the flame lit automatically to heat up.
- Only available on certain models.
The selected burner can be regulated using the corresponding knob, as follows:
- Off
Maximum
Minimum
To switch off the burner, turn the knob in a clockwise direction until it stops (when reaches the "●" position).
Electric hotplates*
The corresponding knob may be turned clockwise or anticlockwise and set to six different positions:
| Setting | Normal o Fast Plate |
| 0 Off | |
| 1 | Low |
| 2-5 | Medium |
| 6 High |
When the selector knob is in any position other than the off position, the 'on' light comes on.
Practical advice on using the electric hotplates*
To avoid heat loss and damage to the hotplates, use pans with a flat base, whose diameter is no less than that of the hotplate itself.
| Setting | Setting |
| 0 | Off |
| 1 | Cooking vegetables, fish |
| 2 | Cooking potatoes (using steam) soups, chickpeas, beans. |
| 3 | Continuing the cooking of large quantities of food, minestrone. |
| 4 | For roasting (average) |
| 5 | For roasting (above average) |
| 6 | For browning and reaching a boil in a short time |
! Before using the hotplates for the first time, you should heat them at maximum temperature for approximately 4 minutes, without placing any pans on them. During this initial stage, their protective coating hardens and reaches its maximum resistance.
Practical advice on using the burners
To ensure the burners operate efficiently:
- Use appropriate cookware for each burner (see table) so that the flames do not extend beyond the bottom of the cookware.
Always use cookware with a flat base and a cover. - When the contents of the pan reach boiling point, turn the knob to minimum.
Pans to be used on 60 cm hobs
| Burner | Ø Cookware Diameter (cm) |
| Rapid (R) | 24 - 26 |
| Reduced Rapid (RR) | 24 - 26 |
| Semi-Rapid (S) | 16 - 20 |
| Auxiliary (A) | 10 - 14 |
| Triple Crown (TC) | 24 - 26 |
| Burner | Ø Cookware Diameter (cm) |
| Reduced Rapid (RR) | 24 - 26 |
| Semi-Rapid (S) | 16 - 20 |
| Auxiliary (A) | 10 - 14 |
| Semi-Fishburner (SP) | 16 - 20 |
| Triple Crown (TC) | 24 - 26 |
| Ultra Rapid (UR) | 24 - 26 |
| Double Flame (DCDR internal) | 10 - 14 |
| Double Flame (DCDR external) | 26 - 28 |
Pans to be used on 75 cm hobs
! On the models supplied with a reducer shelf, remember that this should be used only for the Double flame internal (DCDR internal) burner when you use casserole dishes with a diameter under 12 cm.
To identify the type of burner, refer to the designs in the section entitled, "Burner and Nozzle Specifications".
Practical Advice on Using the Half Fish-Kettle Burner*
The two "Half Fish-Kettle" burners, are elliptic in form and can be turned up to 90^ . This makes the cooktop more flexible in terms of how it can be used.
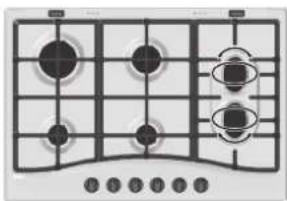
To turn the two burners 90^ , proceed as follows:
Make sure that the burners are cool;
- Lift the burner completely out of its housing;
- Replace it in its housing in the position desired;
- Make sure that the burners are positioned correctly before use.
In addition, the two burners can be used in tandem or speartely with cookware of different shapes and sizes:
- Double burner for a fish-kettle or oval cookware (Fig. A).
-
Double burner for a griddle or rectangular/square cookware with minimum dimensions of 28 × 28 cm (Fig. B)
-
Single burner for medium size cookware (diameter of 16 - 20cm ) (Fig. C).
- NEVER use the double burner in the configuration represented in figure D.
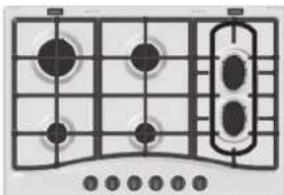
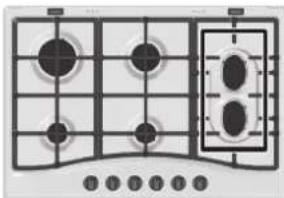
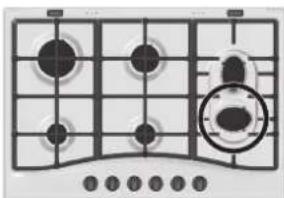
Fig.A Fig.B
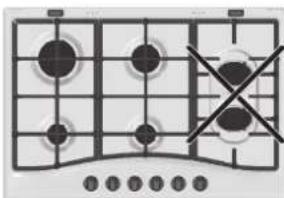
Fig.C Fig.D
Precautions and tips
! This appliance has been designed and manufactured in compliance with international safety standards. The following warnings are provided for safety reasons and must be read carefully.
General safety
- This is a class 3 built-in appliance.
Gas appliances require regular air exchange to maintain efficient operation. When installing the hob, follow the instructions provided in the paragraph on "Positioning" the appliance.
These instructions are only valid for the countries whose symbols appear in the manual and on the serial number plate. - The appliance was designed for domestic use inside the home and is not intended for commercial or industrial use.
- The appliance must not be installed outdoors, even in covered areas. It is extremely dangerous to leave the appliance exposed to rain and storms.
- Do not touch the appliance with bare feet or with wet or damp hands and feet.
- The appliance must be used by adults only for the preparation of food, in accordance with the instructions outlined in this booklet. Any other use of the appliance (e.g. for heating the room) constitutes improper use and is dangerous. The manufacturer may not be held liable for any damage resulting from improper, incorrect and unreasonable use of the appliance.
- Ensure that the power supply cables of other electrical appliances do not come into contact with the hot parts of the oven.
-
The openings used for ventilation and dispersion of heat must never be covered.
Always make sure the knobs are in the / position -
Only available on certain models.
GB
when the appliance is not in use.
- When unplugging the appliance always pull the plug from the mains socket, do not pull on the cable.
- Never carry out any cleaning or maintenance work without having detached the plug from the mains.
- In case of malfunction, under no circumstances should you attempt to repair the appliance yourself. Repairs carried out by inexperienced persons may cause injury or further malfunctioning of the appliance. Contact a Service Centre (see Assistance).
- Always make sure that pan handles are turned towards the centre of the hob in order to avoid accidental burns.
- Do not close the glass cover (if present) when the gas burners or electric hotplates are still hot.
- Do not leave the electric hotplate switched on without a pan placed on it.
- Do not use unstable or deformed pans.
- The appliance should not be operated by people (including children) with reduced physical, sensory or mental capacities, by inexperienced individuals or by anyone who is not familiar with the product. These individuals should, at the very least, be supervised by someone who assumes responsibility for their safety or receive preliminary instructions relating to the operation of the appliance.
- Do not let children play with the appliance.
- The appliance is not intended to be operated by means of an external timer or separate remote-control system.
Disposal
- When disposing of packaging material: observe local legislation so that the packaging may be reused.
- The European Directive 2012/19/EC on Waste Electrical and Electronic Equipment (WEEE), requires that old household electrical appliances must not be disposed of in the normal unsorted municipal waste stream. Old appliances must be collected separately in order to optimise the recovery and recycling of the materials they contain and reduce the impact on human health and the environment. The crossed out "wheeled bin" symbol on the product reminds you of your obligation, that when you dispose of the appliance it must be separately collected.
Consumers should contact their local authority or retailer for information concerning the correct disposal of their old appliance.
Maintenance and care
Switching the appliance off
Disconnect your appliance from the electricity supply before carrying out any work on it.
Cleaning the appliance
! Do not use abrasive or corrosive detergents such as stain removers, anti-rust products, powder detergents or sponges with abrasive surfaces: these may scratch the surface beyond repair.
! Never use steam cleaners or pressure cleaners on the appliance.
- It is usually enough to wash the hob with a damp sponge and dry it with absorbent kitchen roll.
- The removable parts of the burners should be washed frequently with warm water and soap and any burnt-on substances removed.
- For hobs which ligth automatically, the terminal part of the electronic instant lighting devices should be cleaned frequently and the gas outlet holes should be checked for blockages.
- The electric hotplates should be cleaned with a damp cloth and lubricated with a little oil while still warm.
- Stainless steel can be marked by hard water that has been left on the surface for a long time, or by aggressive detergents containing phosphorus. After cleaning, rinse and dry any remaining drops of water.
Gas tap maintenance
Over time, the taps may become jammed or difficult to turn. If this happens, the tap must be replaced.
! This procedure must be performed by a qualified technician authorised by the manufacturer.
Troubleshooting
It may happen that the appliance does not function properly or at all. Before calling the service centre for assistance, check if anything can be done. First, check to see that there are no interruptions in the gas and electrical supplies, and, in particular, that the gas valves for the mains are open.
The burner does not light or the flame is not even around the burner.
Check whether:
- The gas holes on the burner are clogged.
- All the movable parts that make up the burner are mounted correctly.
- There are draughts near the appliance.
The flame dies in models with a safety device.
Check to make sure that:
- You pressed the knob all the way in.
- You keep the knob pressed in long enough to activate the safety device.
- The gas holes are not blocked in the area corresponding to the safety device.
The burner does not remain lit when set to minimum.
Check to make sure that:
- The gas holes are not blocked.
- There are no draughts near the appliance.
- The minimum setting has been adjusted properly.
The cookware is unstable.
Check to make sure that:
- The bottom of the cookware is perfectly flat.
- The cookware is positioned correctly at the centre of the burner.
- The pan support grids have been positioned correctly.
GB
Installation
PC760FX/HA PC760FR/HA
Starten en gebruik
!OoCoeHHeHKe Ra3OpBoMy He DoJHKHO OKa3bIBaTb KaKx-Ni6o Harpy30K Ha n3JeJIe.
Ha natapy6ke noaun ra3a B n3dennn ImeetcBpaauooueeec Koneho "L" cynnoTHnteJbHOn npoknaqKoI. Pn Heo6xoDnMoCtN nobepHyTB koneHo o8a3aTeJbHO 3ameHnTe ynnOHTneJbHyIO npoknaKy (npunaRaiouTeCk n3deNIO). NaTPy6ok noaun ra3a B n3dennn ImeetUINHHpueckyo HApxKHyIO pe3b6y 1/2 ra3.
IopcoeHHeHne npn nOmoOn r6KoTpy6Kn N3 HepXaBeouen cTaJInc CO CnIOuHbIMN CTeHKamn Cp3b6OBbIMn CoeHNHeHnAMN.
Natpy6ok nodaun ra3a B n3deJne NMeET cIINHdpueckyO HapyKHyOp pe3b6y 1/2 ra3.
NoCoeHHeHn TaKx UHaROB DOnJHo npOn3BOuNTbcra TAKIM 6pa30M, YTo6bI INX DInHa npN MaKcMaJIbHOM pactJxHn He npeBbIaJa 2000 MM. No 3abepJHn NoCoEHHn npOBepbTe, YTo6bI MeTaIINuYeCKn r6Kn UHaHr He KacAICn NOBnKhBix qactEn Nn Hn He 6bl cKaT.
NcnoIb3ObaTb NCKHIOHTeJIbHO Tpy6Kn, COOTBeCTBByIOUne HopmatnBy, n ynpoTHnteJIbHbIe npoknaKn, COOTBeCTBByIOUne DeNCTBByIOUm rocyapCTBeHHbIM HopmatnBaM.
PpOBepka ynnotHeHn
!No3aBepweHnnoCoeHHeHn npoBepbTe npouHoCTb yNtOHeHnBaCe nx natpy6KOB npn NMOUmMbIbHOp pactbopa,HO HNKOrDa He pNaMeHem.
IoprotobKa K pa3JnHbIM Tnam Ra3a
InepeocheHnBapOHN naHei Ira3a OTJUauHOeMycrOTra3a,HaKOTOpbB BApOHa nAHeIb paCHTaHa 3NaUaNBO (yKa3aHa 3TNKeTke Ha BepXHeu Actn BapOHN naHeIN nnHa yNakOBKe), Heo6xOnMo 3ameHnB fOpcyHKn KOHOpok CNeDyUoImm O6pa3OM:
- CHIMITE C BAPOCHI NaHeJIOn ONOpHbIe peWetKn N BbIHbTe KOHΦOPKn I3 CBOIX THe3Д.
- OTBnHTnte fopcyHKn npn NOMOUI NOJON OTBepTKN 7 MM n 3aMeHNTe INx Ha fopcyHKn, paCHNTaHHbIe HA HObIn TIN rA3a (CMOTpNTe Ta6JIuY 1 "XapakTePncTNIK KOHΦOpOK n fopcyHOK").
- BocctaHOBntb DeTaHn Ha CBOI MeCTa, BblONHra onepaunB o6paTHOM npRdKe.
- No 3aBepWeHn Onepaun 3aMeHnte CTapyio 3TKeTky TaupoBaHn Ha HOByO, COOTBeTCTByIOUyIO HOBOMy Tnny nCNoJb3yEmoro rata. 3TKeTky MoXHO 3aKa3aTb B HauNX LcHTpax TexHnueckoro O6cIyKnBaHn.
3aMeHaΦopcyHOKropeJIKN C OTdJIbHbIM DBOINHbIM nnameHem.
- CHIMNE peWetKn N BbHbTe rOpEnKn n3 CBOUX rHe3d. TOpEnKa COCTONT n3 DByx OTDeNbHbIX Yacten (cm. pncyKn);
- OTBnHTnTe φopcyHKn npn NOMOuN NOON OTBeptK 7 MM. BHyTpeHHra rOpEknA mMeet Ondy φopcyHKy, BHeuHra rOpEknA mMeert DBe φopcyHKn (ODINHaKOBOro pa3mepa). 3aMeHnTe φopcyHKn Ha HOBbIe, npnroDhbIe dIra HOBOrTO TnPa ra3a (CM. Ta6NuCy 1).
- BocctaHOBnTe Ha MeCTO BCE KOMJIeKTyIOUne, BbINOJIHRe BBWeONuCaHHBe OepaunB O6paTHOM NoprKe.
3aMeHaΦopcyHOK TpoHoi KOHΦOpKn
- CHIMITE peWEtK IN BbIHbTe KOHΦopKn 3CBONX rHE3I. KOHΦopKa COCTONT IN3 DByx OTdJIbHbIX YacteN (CM.CXEMbl).
- OTBnHTnte fopcyHKn npn NOMOu nnoo OTBepTK 7 MM. 3aMeHnte fopcyHKn Ha HOBbIe, npurohble dna HOBORO Tnna ra3a (cM. Ta6nUy 1). OBe fopcyHKn HmEOT OINHaKOBoe OTBepCTne.
- BocctaHOBnTe Ha MeCTO BCE KOMJIeKTyIOUne, BBINOHNr Oepaun B o6paTHOM NopraDKe NO OTHOSeHnO K ONCAHHbIM Bblue


RS
- Perynza nepBnuHoro Bo3dyxa KoHopok
KoHopKn He HjkaTcB KaKoI-n6o perynzmu nepBnuHoro Bo3dyxa. -
Perylaцma MNHImaJIbHoro nJaMaHeH
-
Nobeprnte pykortky-pernytOp B noJoxHe MHHMaBHorO nnameH;
-
Chmnte pykortky n NOBepHnTe peryIaIOHHbIN BnHT, paCNoIooKeHHbIN BHyTpN NII IN PdOM CO cTePxHem KpaHa, BnIOTb Do NoIyehn Cta6NbHoro Manoro nnameHn.
-
Поберпг, Ртбл пи pe3kom nobopoTe pyKoTkn n3 ПОLOЖЕнmaKcIMaJIbHOrO ПЯmeHn Ha MInHIMaJIbHoe, КOHфOPKN He racn.
4.Bn3dennx,ochaeeHHbIX 3auHTbIM yctponctBOM (Tepmonapoun),B cnyuae HeucnpabHoctn 3T0RO yctponctBa npn MInHMamlbHom PnAmEH KOHΦopOK yBeJInuyTe pacXoJ ra3a MNHMamlbHOrO PnAmEH npn nomou nperyIaunOHHO BnHTa. - NIO 3aBepueHn peyIaUN BOCCTaHOBHTe cyprHybIe nnnoobhie nOmbiHa oBODHom raOtonpOBOJe.
!Bcnyae nCnoJb3ObaHn CxKxehHoro ra3apeRyIaUNOHbIN BHT DoJKeH 6bITb 3aBHHeH do yNopa.
!No3aBepueHnOnepaunn 3aMeHnte cTapyIO 3TNKeTKy TauppoBaHHa HOBYIO, COOTBeTCTByIOUyIO HOBOMy TINy IcNOJb3yEmoRr43a. 3TNKeTKy MOxHO 3aKa3aTb B HaUNX LcHTpax TexHnueckoro O6cnyKuBaHHa.
!Ecnn daBnHeHne nCnoB3yEmoro ra3a otJnuaetcra OT npedymOTpeHHoro daBnEHNr (nNn BapbnpyeT), Heo6xOIMO yCTaHOBntb Ha NtAIOUeM ra30npOBoDe COOTBeTCTByIOuNN peryIaTOP daBnEHNr (cornaCHO Hopmatby "PeryIaTOpbI drr KaHaJIIN3npOBaHHbx rA3OB").

AIO 77
3ABOДСКАТБЛИЧА
3neKtponntaHne
CM.3aBOcKyTO Ta6NHy

Данhoe Идени COOTBETCTBYET CNeDyUOuIM DnpeKtNBAM Ebponeckoro Coo6ueCTBa: 2006/95/CEE ot 12/12/06 (Hn3koe HanpjaKeHne) c nocJeDyUOuIMN n3MeHeHnMn - 2004/108/CEE ot 15/12/04 (JNeKtpomarHnTHaR coBmecTUMocTb) c nocJeDyUOuIMN n3MeHeHnMn - 93/68/CEE ot 22/07/93 c nocJeDyUOuIMN n3MeHeHnMn. - 2009/142/CEE ot 30/11/09 (Fa3) c nocJeDyUOuIMN n3MeHeHnMn; - 2012/19CEE c nocJeDyUOuIMN n3MeHeHnMn
XapaKTepeNCTnKN KOHΦopOK nΦopcyHOK
| Таблиca 1 | Сжиненьий ra3 | Приroduнный ra3 | ||||||||
| Горелka | Диаметр | Теловая мошонькВТ (p.c.s.*) Сокрашения | Теловая мошонькВТ (p.c.s.*) Номиналынay | Байzac 1/100 (MM) | Форсунка 1/100 (MM) | Расхов' (р/чac) | Теловая мошонькВТ (p.c.s.*) Номиналынay | Форсунka 1/100 (MM) | Расхов' (п/чac) | |
| БыICTра(R) | 100 | 0.70 | 3.00 | 39 | 86 | 218 | 214 | 3.00 | 132 (H) | 286 |
| БыICTра сокрашения(RR) | 100 | 0.70 | 2.60 | 39 | 80 | 189 | 186 | 2.60 | 122 (H) | 248 |
| Срешия(SR) | 75 | 0.40 | 1.65 | 28 | 64 | 120 | 118 | 1.65 | 96 (Z) | 157 |
| Малая(A) | 55 | 0.40 | 1.00 | 28 | 50 | 73 | 71 | 1.00 | 79 (6) | 95 |
| Тюйная(TC) | 130 | 1.50 | 3.30 | 61 | 65x2 | 240 | 236 | 3.60 | 103x2 | 343 |
| Сөрх-быICTра(UR) | 100 | 0.70 | 3.40 | 39 | 91 | 247 | 243 | 3.40 | 138 (H) | 324 |
| Семен рыблы чайник(SP) | - | 0.70 | 1.50 | 39 | 60 | 109 | 107 | 1.50 | 88 | 143 |
| Двийнай вnettейнай(DCDR) | 30 | 0.40 | 0.90 | 28 | 44 | 65 | 64 | 0.90 | 74 | 86 |
| Двийнай вnettейнай(DCDR) | 130 | 1.50 | 4.10 | 61 | 70x2 | 298 | 293 | 4.10 | 110x2 | 390 |
| Давлие поадун | Номинальhoe (мбар) Minimальhoe (мбар) Мakсимальhoe (мбар) | 28-30 20 35 | 37 25 45 | 20 17 25 | ||||||
* Pn TEmpepaType 15^ n daBneHn 1013,25 M6ap-cxon ra3
ПponанТелnotворная снобовс = 50,37 MДж/к
* ByTaH TennotBopHa cNoCo6HocTb = 49,47 Mdk/Kr
PnpnoHbIra3 TEnIOBOPHa cNoco6HoCTb = 37,78 Mx/M
PC 631 X/HA
PC 631/HA
PC 640 X/HA
PC 640 R/HA
PC 640 /HA
PC 640 TX/HA
PC 640 TGH/HA
PC 640 T AX/HA
PC 640 T R/HA
PC 640TGHR/HA
PC 640 TEX/HA
PC 730 RT GH/HA
PC 730 RT X/HA
PC 750 X/HA
PC 750 AX /HA
PC750TX/HA
PC 750 T AX /HA
PC 750 T GH /HA
PC 750 T XX /HA
PC 750 TR/HA
PC 750 T/HA
PC 750 TEX/HA
PC 760FX/HA
PC 760 F R /HA
RS
RS
BkIIOUeHne n 3KcPlyaTaCnA
!HaKaJdomperyIaTope noka3aHo nonoKeHne ra3oBOnnnn3eKtpueckO KOhOpKn (ecn nmeetc),KOTOpOn daHHa pyKOraYnpabnreT.
Ta30BbE KOHΦOpKn
Pn nmooun COOTBETCTBYUoero perytnaTOp MOxHO Bb6paTb OINH N3 CneDyUOuXPEKMOB KOHΦopKn:
- BbIKnHoueHo
MakcmaJIbHaMaUHocTb
MHHIMaHbHm
ДяЗЖИганя ODHONI3 KOHΦOPOK NOДнecITE K HEN 3axKeHHyO CnHcy NIN 3axJrAŋky, HaxMNTe Do yNopa INOBepHnte npOTnB YacBOBn CTpeJIKN COOTBeTCTByUcYOp pyKoRTy B NOJoxKeHne MAKCImaNbHOrO PnAmEHn.
B MoTeJx, OChaSeHHbIX 3aUHTHbIM yCTponCTBOM, Heo6XoDnMo DePkaTb pyKoRrKy KOHΦopKn HaxaToN npimepeHo 2-3 cekyHdbI Do Tex nop, noka He Harpeetc yCTponCTBO, ABTomAtuYeCKn NOpDePknBaIOUoe RopeHne nnameHn.
B MoDJIeX, OCHaUeHHbIX CBeOH 3axnraHnI, DnB KBIIOUeHnI HxHON KOHOpKn IOCTaTOUHO HxKaTb DOynopa COOTBETCTByOuIyO pyKoRtKy I NOBepHyTb ee npOTNBacOBON CTpeJIKN B INOJOKeHne MAKCmAlbHorO IIaMeHn, yDepJINBaE eH HxKATOn BNIOTB Do 3axnraHnI IIaMeHn.
!Pn cnuyanHom raweHn nnameHn KOHOpKn NOBepHnte pyKOaTKy ynpabHeHn B NoLoXeHne BblKlIOyeHo N nonbTaNTecb BHOb 3aXeYb KOHOpKy TOnbKO n npOweCTBn1 MNHyTbI.
Дя Выкноуеня KOHфорк NOВернite pyKoTky NO YacOBON CTpeJKe BnNotb Do rAweHry ПламEHN (noIoxKeHne,об3haueHHeCmBOnOM“).
ДВОИнэй KOHФоркα*
3Ta ra3OBa KaOHΦOpKa CoCToNT N3 DByX KOHcHTpUHbIX RopeJOK, KOTOpBle MOYt 6bITb BKNIOUeHb IM BmecTe INN NO OTDeIbHocTn. IcNoJIb3ObaHHe OBeNX RopeJOK DaET BoIbSyu MoUHocTb, COKpaAa JPOdoJXitJeBHOCTb PnroTOBLeHnI NO cpaBHeHHo C obHybIMN KOHΦOpKaMn. DBoHna KoHΦOpKa TAKKe 6OJee ODHopOdHo paCnpdeJenrT EINo No dHy KAcTpIoN, B OcObeHHocTn B CInyae IcNoJIb3ObaHnI ObEx RopeJOK B MINHMaJIbHOM pEXKIME.
Для onTImaIbHOrO nCNoJIb3OBAHnЯ DBOHHoKOHΦopKn HNKOrda He yCTaHaBnBaIte ODHOBpeMeHHO BHyTpEHHO ropeKy Ha MmHMaIbHbI pexM, a BHeuHIO Ha MaKcMaIbHbI.
Ha3Toi KOHΦopKe MOXHO IcNoIb3OBA Tb NocyDy pa3hIx pa3MepOB,ДЯ MaNEHbKx KAcTpOJb BKNIOUaETCr ToJIbKO BHyTpEHnRA RopeJIka. KaXdA OTeJIbHnA KoHΦopKa, COCTaBnIaUoJg DBOHyO KOHΦopKy C DByMa He3aBNCmMbIMn ROpeJIkAMn, IMeet Co6CTBeHHyO pyKoRtKy-peryJrTOP:
peryIaTOp,06o3HaueHHbI CnMBONOM npabIaTe BHeuHcKOHΦopKo;
- VIMeeTcToJbKO B HeKOTOpbIX MoDeJIaX.
peryIaTOp, 6o3HaueHbI CNMBOJOM npabJeT BHyTpENHeKoHΦopKoI.
Дя Bкнючени hyхно KoHΦopkn Haxmnte Do ynpa n NOBepHnTe npOTnв YacOBON CTpeJKN B noLoXeHne
MAKcIMaJIbHO rIJaMeHNOOTBETCTByUOuN pEryJrTOp.
KoHΦopka OCHaSeHa 3NeKtpoHHbIM 3aKnraHneM, BKJIOUHOUIUMcABTOMaTHueCKN pN HaxaTHu Ha pyKoRTy. Tak KAK KOHΦopka OCHaSeHa 3aUNTHbIM yCTpOiCTBOM, Heo6XoDIMO depKaTb peryIaTOp KOHΦopKn HaxaTbIM npImepHo 2-3 cekHyDbI Do Tex nop, noka He HarpeeTCyCTpOiCTBO, ABTOMaTHueCKN POndepxNBAIOUeE ropHe nPiameHn.
Pn NOMOu CoOTBeTCTByUoIero peryIaTopa MoKHO Bb6paTb OINH n3 CJeDyUoIuxpeKIMOB KOHOpKN:
BbIKIOyeHO
Makmamha MOnHocTb
MHHHMaBbHbN
Bce Bedyuine npoun3bOaHTeiN 6bIToBbIX 3NeKtpnpn6OpOB CODenCTByIO T CO3dAnHIO uYnpAIBeHIO CnCTemAMM IO c6Opy uYtunnaCm CTapbIX 3NeKtpnpn6OpOB.
TexHnueckoe o6cnyxNbaHne
nyxoad
ObecToUbaHne n3dJIIna
Ipeed hauanom kaon-Jnbo onepaun no 06cnyknBaHIO nnnnCTKe OTcoeHNHTe n3deJIne ot cTe NekponTahna.
UncTka n3dJIIna
!He cneyet noIb3OBaTbcra 6pa3nBbIMn nn Koppo3NBbIMN uCTaUMN CpeCTBaMn TAKIMN KAK BbIOHNTeNN PATEH NnCpeCTBa DnA ydaJeHHaPxAuHbI, NopoWKOBbIMN uCTaUMN CpeCTBaMn NN a6pa3NBbIMn ry6kAMn: OHN MOrY T Heo6paTMNoUAPAanTa nobepxHOctb n3dJIIN.
!Hikorda He nCnoJb3ynte napOBbIe YnCTaIue arperaTbI nn arperaTbI NOB BbICOKIM DaBJIeHNEM IIN YnCTKn 13JeJIra.
B KaueCTBe peryIaPHorO yXoJa DoCTaTOH BbIMbITb BapOCHyIO NaHeJIb BnAaxHON rY6KOn I 3aTeM IpOTepETb HAcyxo KxOHHbIM 6yMaXHbIM NOJToEHcEM.
- Heo6xOIMo peryIaRHO MbITb cbeMHbIe YactN KOHΦopOK TOpAhen BOOn C MOIOUm CpeIcTBOM, TuaTeNbHO ydaJIaB BCE BO3MOXHbIe HaIeTbI.
HaBapOHHbIXnAHeJIaX,OChaIeHHbIXABTOMaTHueCKIM 3axnraHnEM,CneIyETperIyIpaHOuCTNTb HAKoHEuHNKU yCTponCTBMRHOBeHHoro3JeKtpOHHO3axnraHnN npOBepaTb,YTObIOTBepCTnRA30bIx KOHΦopOK He 6blnn3acopeHbl.
HaTeTAnxN3HepKabeUoienCTaNNMOyTobpa3ObaTbcn
PHTHA,ecNIOHOCTAOCTB TeueHne DInTeNbHO
BpeMeHN B KOHTAKTE C BOON IOBbIeHHON JcEeTKoCTN NNN
C arpeccNBbIMM MOUUMCpeDCTBaMn (CoedePKaUMN
ΦocΦop).PiocNe YnCTKN peKOMeHdyETc TuaTeNbHO
ydaNTb OCTaTKN MOUeero CpeDCTBA BnaXHON
TpRknON N BbCyuNTb dyXOBky.Kpome TOrO cNe dyET
He3aMeDNlTeNbHO ydaNTb BO3MOXHbIe yTeKn BObl.
YxOД 3a pyKoTkaMn ra3OBon BapOCHON naHeJIi
Co BpeMeHem pyKoTKn BapOchON nAHeN MOryT 3a6bIOKnPOBaTbcra nnBpaUaTbcra C TpyDom, NO3OMy NOTpe6yeTc npOn3BecTN INx BHyTpEHIOU YnCTKy n 3aMeHy BCen pyKoTKn.
!DaHHa onepauzaIOnKHa BbINOJIHrTbcraTexHnKOM, yNONHMOUeHHbIM npoN3BOuTeJeM.
HencnpaBHOCTN MeToDbI INX
yctpaheHn
Ecnn Baw xoIooJIbHnK He pa6oTaet. PpeJxde yem
O6paTntbcra B LcHTp CepBnCHoro 06cnyKnbAHna,
npOBepbTe, MoXHO JIn yc7paHnTB HeNCnPabHOCTb,
HCNoIb3yra peKomeHdaun, npNBedeHHbte B cNe dyUoem
nepeuhe.
EcnHncnpaBHOCTb He MoXeT 6bITb ycTaPaHeHa, Bbl3OBtE TexHnka n3 yNOnHOMOeHHoro CepBnca: EInHbIn HaunOHaHbHbIn Homep: 199.199.199 (MaKcmaJIbHaA CTOnMOCTb 3BOHKOB C DomauHero TeJefoHa 0,1426 EBpo).
KoHOpka He 3aXnraetc, nI I IaM ropnt HepaBHomepHo.
ΦopcyHku 2a3080 KoHΦopku 3acopuNucb.
Bce cbeMHbI yactn KOHOpKn DoXhbl 6bItb yctaHOBJIeHbI npabNJbHO.
CKBO3HKn pIaOM c rA3OBn BapOuHOn naneJIbIO.
B MoDenX BapOuHON NaHeN, OChaUeHHbIX 3aUnTHbIM yCTponCTBOM, KOHOpka 3aropaeTc n cpa3y rachet.
PykoMa KaHopku Haxama He do ynpa.
PykoTka 6bIa haxata B TeueHne BpeMeHN, HeoCTaTOHOrO dIra BkIOUeHn 3auHTHO yCTPONCBA.
3acopehfopcyHKnra3OBON KOHopKn,pacnoIoxeHHbI HappoTINB 3aunTHORO yCTPONCBa.
KoHpOka rachET B noJoxKeHH Manoro nJaMeHH.
3acopeHb omepcmu nodaqu 2a3e KOHqopke.
CKBO3HRAKINpaDOMcra3OBONBapOCHNnaHeJIbIO.
- HenpaBnBHO OtperynipoBaHO MINHmAbHoE nJaMa.
Hecta6nJIbHbIe KacTpOJn
HnKacmpJnu donxNHO 6bmb udeanbHo nNoCKUM.
Kactpionla OJnxHa 6bItb yctaHOBneHa no ceHTpy ra3OBONnN 3NeKtpnuecko KOnOpKn.
- OnopHbIe peWeTkn Ha BapOuHoi naHeJIy yCTaHOBneHbI HENpaBnJIbHo.
RS