Wireless LAN USB Stick - Network card / adapter HAMA - Free user manual and instructions
Find the device manual for free Wireless LAN USB Stick HAMA in PDF.
| Product type | WiFi USB stick (wireless network adapter) |
| Brand | Hama |
| Model | Wireless LAN USB Stick |
| Dimensions (approx.) | 7.5 x 2.5 x 1.0 cm |
| Weight (approx.) | 20 g |
| Interface | USB 2.0 |
| Network standards | IEEE 802.11b/g |
| Frequency | 2.4 GHz |
| Maximum data rate | 54 Mbit/s |
| Wireless security | WEP 64/128 bit, WPA-PSK (TKIP), WPA2-PSK (AES) |
| Supported operating systems | Windows 98SE/ME/2000/XP/XP-x64, Mac OS X 10.3.x/10.4.x |
| Power supply | Via USB port (5V) |
| Power consumption | Approx. 2.5 W (max) |
| Package contents | USB stick, USB extension cable, driver CD-ROM, user manual |
| Operating temperature | 0 °C to 40 °C |
| Operating humidity | 10% to 90% (non-condensing) |
| Protection rating | IP20 (indoor use) |
| Main functions | WiFi connection, infrastructure and ad-hoc modes, profile creation, power saving |
| Care and cleaning | Disconnect before cleaning, wipe with a dry, lint-free cloth |
| Safety | Do not use in humid or dusty environment, protect from shocks, do not open |
| Spare parts and repairability | Not user repairable, contact Hama customer service in case of defects |
Frequently Asked Questions - Wireless LAN USB Stick HAMA
User questions about Wireless LAN USB Stick HAMA
0 question about this device. Answer the ones you know or ask your own.
Ask a new question about this device
Download the instructions for your Network card / adapter in PDF format for free! Find your manual Wireless LAN USB Stick - HAMA and take your electronic device back in hand. On this page are published all the documents necessary for the use of your device. Wireless LAN USB Stick by HAMA.
USER MANUAL Wireless LAN USB Stick HAMA
86651 Monheim/Germany
Tel. +49 (0)9091/502-0
Fax +49 (0)9091/502-274
hama@hama.de
www.hama.com
Wireless LAN USB Stick 54 Mbps
Bedienungsanleitung Wireless LAN USB Stick, 54Mbps
Inhaltsverzeichnis:
- Installing the driver and configuration program on Windows® Page 02
- The configuration program - introduction and operation on Windows®.. Page 03
2.1 Quick configuration.. Page 04
2.2 Detailed configuration.. Page 04
2.2.1 Creating a new profile Page 05
2.2.1.1 Infrastructure mode.. Page 05
2.2.1.2 Ad-hoc mode.. Page 06
2.2.2 Setting the wireless LAN encryption.. Page 06
2.2.2.1 WEP encryption.. Page 07
2.2.2.2WPA/WPA2 encryption.. Page 08
- Configuring the operating system and computer (Windows®) Page 09
- Uninstalling the driver and configuration program on Windows® Page 10
- Installing the driver and configuration program on MAC OS X.. Page 10
- Configuring the operating system and computer (MAC OS X) Page 11
- The configuration program - introduction and operation on MAC OS X.. Page 12
7.1 Quick configuration.. Page 13
7.2 Detailed configuration.. Page 13
7.2.1 Creating a new profile Page 14
7.2.2 Setting the wireless LAN encryption.. Page 14
7.2.2.1 WEP encryption.. Page 15
7.2.2.2 WPA/WPA2 encryption.. Page 16
- Support and contact information.. Page 17
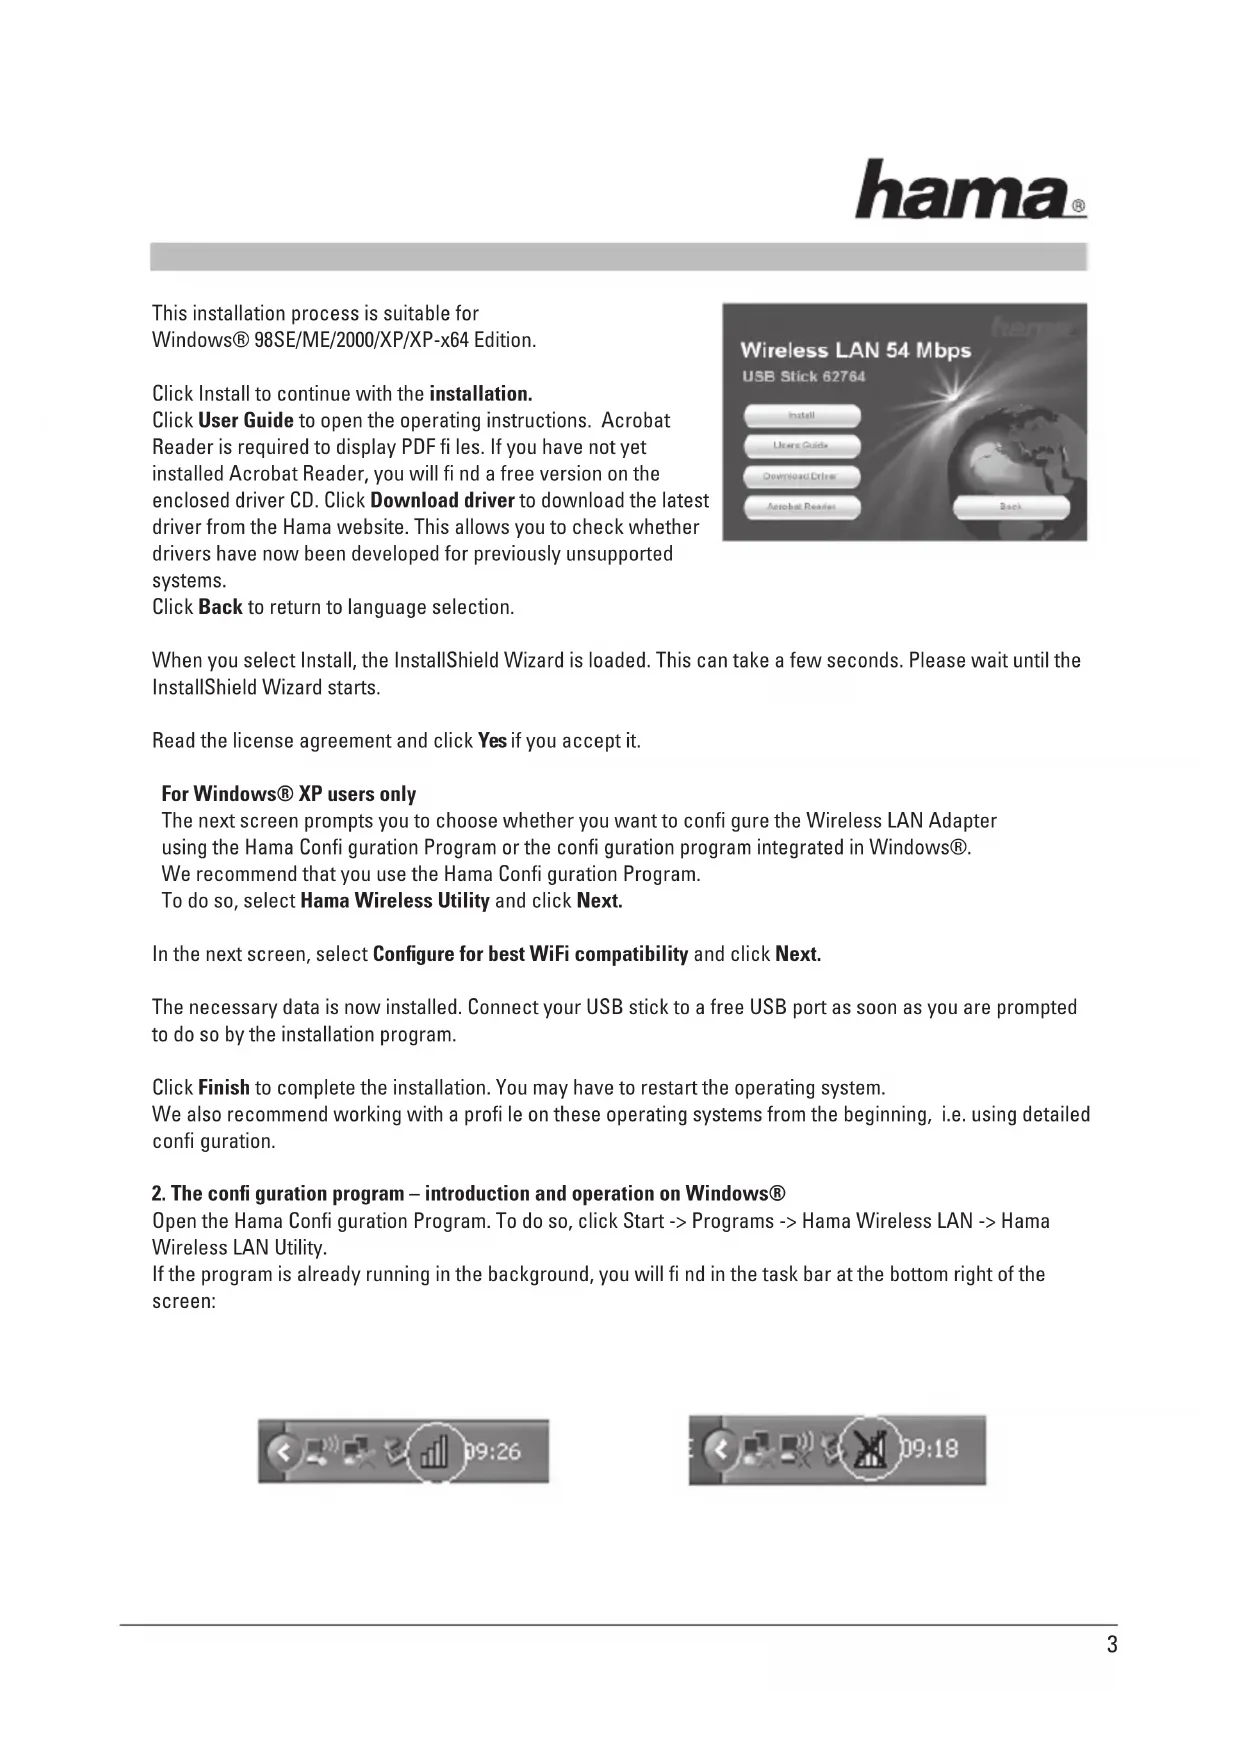
Package contents:
1x Wireless LAN USB Stick 54 Mbps
1x USB connection cable
1x driver CD-ROM
1x printed operating instructions
System requirements:
PC or laptop with free USB port
- Operating system Windows® 98SE/ME/2000/XP/XP-x64 Edition or MAC OS X 10.3.x/10.4.x
Safety instructions:
Do not operate the device in damp or extremely dusty environments. Protect the device from pressure and impact. The device may not be opened or moved during operation.
1. Installing the driver and configuration program on Windows®
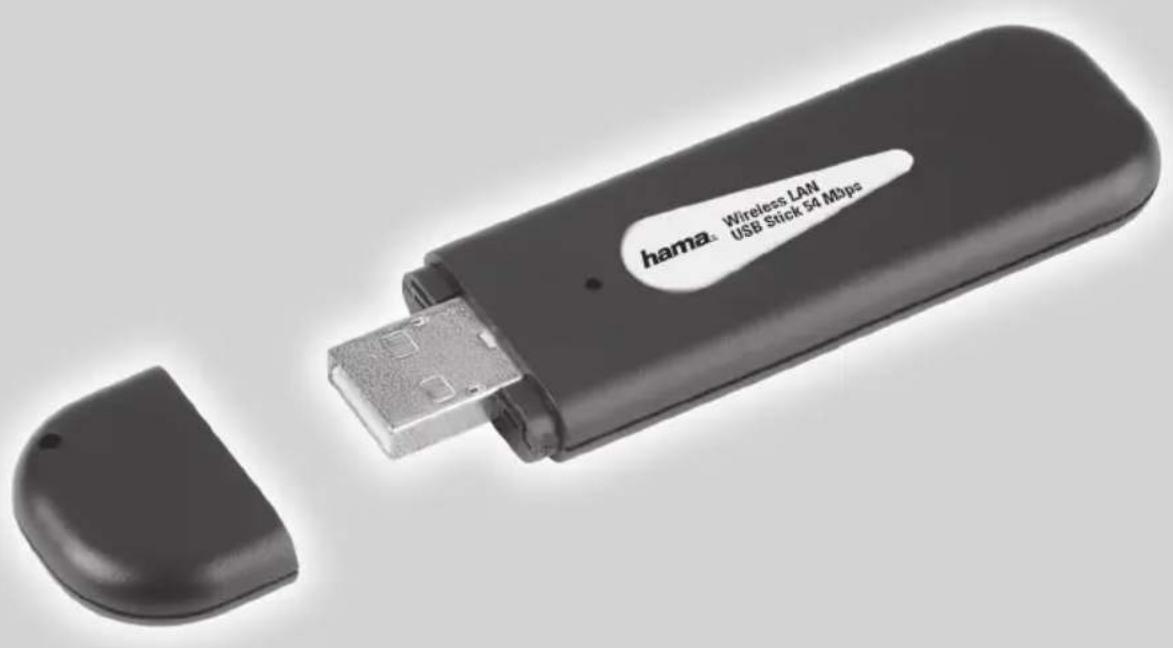
Before installation, please save any open documents you may be working on. Then close all running programs. Insert the CD-ROM provided in the drive. Usually, the CD starts automatically. If the menu does not start automatically, double-click the corresponding CD-ROM drive icon in My Computer. The following window opens after the program starts: Select the required language. The following window is displayed when you select the language.
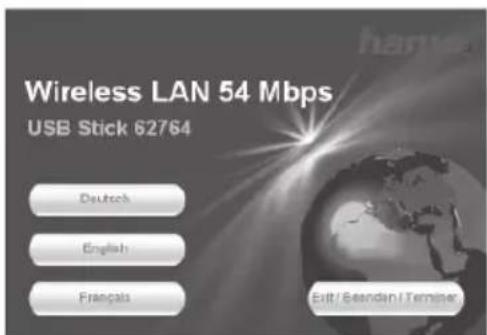
This installation process is suitable for Windows® 98SE/ME/2000/XP/XP-x64 Edition.
Click Install to continue with the installation. Click User Guide to open the operating instructions. Acrobat Reader is required to display PDF fi les. If you have not yet installed Acrobat Reader, you will find a free version on the enclosed driver CD. Click Download driver to download the latest driver from the Hama website. This allows you to check whether drivers have now been developed for previously unsupported systems.
Click Back to return to language selection.

When you select Install, the InstallShield Wizard is loaded. This can take a few seconds. Please wait until the InstallShield Wizard starts.
Read the license agreement and click Yes if you accept it.
For Windows® XP users only
The next screen prompts you to choose whether you want to configure the Wireless LAN Adapter using the Hama Confi guration Program or the configuration program integrated in Windows®. We recommend that you use the Hama Confi guration Program. To do so, select Hama Wireless Utility and click Next.
In the next screen, select Configure for best WiFi compatibility and click Next.
The necessary data is now installed. Connect your USB stick to a free USB port as soon as you are prompted to do so by the installation program.
Click Finish to complete the installation. You may have to restart the operating system.
We also recommend working with a profi le on these operating systems from the beginning, i.e. using detailed configuration.
2. The configuration program - introduction and operation on Windows®
Open the Hama Configuration Program. To do so, click Start -> Programs -> Hama Wireless LAN -> Hama Wireless LAN Utility.
If the program is already running in the background, you will find in the task bar at the bottom right of the screen:


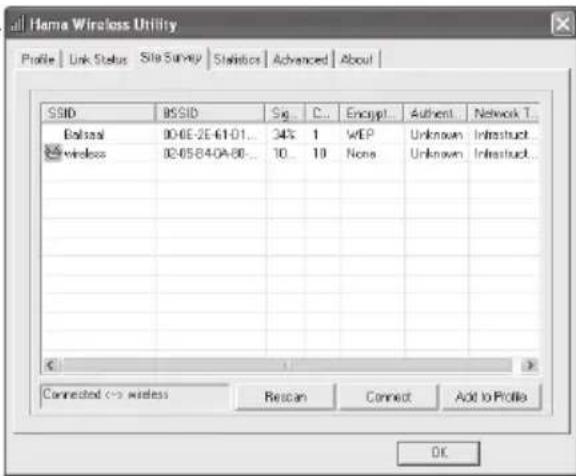
Click the circled symbol to open the utility from the task bar. The Hama Wireless LAN Utility starts with the following screen, whereby the values in the columns may be different.
This screen shows all available wireless networks. The SSID, which is used to identify WLAN devices in the respective wireless LAN, the router MAC address (BSSID), the signal strength, the channel used, the encryption algorithm and the authentication and the type of network are displayed.
The lower section of this window shows the connection status (Connected / Disconnected). Click Update to search for wireless networks again.
2.1 Quick configuration
First, select the required network by clicking the corresponding line in the list. The network selected is highlighted in blue in the list. Now click the Connect button.
You are connected to the network if the selected network is run without encryption and the signal is strong enough. This is indicated by the green symbol and Connected is shown in the status window.
If the network you selected is encrypted, another window opens in which you can enter the encryption data. The data must be identical to the router or access point settings. The authentication type and encryption are generally already selected in accordance with the target network. Enter the code which must correspond exactly with the code used by the router or access point.
Click Ok to confirm after you make your entries.
If you do not have this code yourself, please contact the person responsible for configuring the router on access point.
For detailed information on setting encryption, please see Page 6, under the heading:
Setting the wireless LAN encryption.
If you have made these entries successfully, a green symbol is also displayed to indicate the successfully connection in the network overview.
For further information on the connection made, open the Status tab. It contains information on the Connection quality, Signal strength or Interference level.
2.2 Detailed configuration
When configuring your USB stick, it is useful to create a profile. A profile serves to save various settings for a connection under a certain name. For example, if you want to connect to various wireless networks, you can save the settings for the networks in prof les, which allows you to change the configuration quickly.
2.2.1 Creating a new profile
You need the following information to create a profile:
- SSID (network ID): This is the name of the required network.
- Encryption used in the target network
Network type (type of network): Infrastructure or ad-hoc
There are two basic ways to create a profile:
Version 1: Change to the Profile tab and click Add. or
Version 2: Open the Site Survey tab. All networks are listed in this tab. Select the required network in the list and click Add to profi le.
For hidden networks only:
If the SSID fi eld is empty, the router or access point is set to hide the network. The SSID cannot therefore be copied automatically.
In both cases, the following window is displayed on the screen:
This USB stick allows you to set up two different network types.
Infrastructure: Select this type if you want to connect this wireless LAN device to a wireless LAN router or access point.
Ad-hoc: Select this type if you want to connect directly to another wireless LAN client device, e.g. another USB stick or a WLAN PCI card without a wireless LAN router or access point. Two WLAN client devices are required for this.
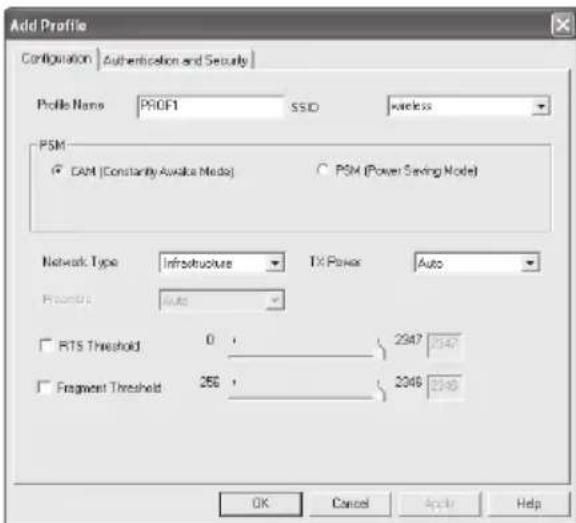
2.2.1.1 Infrastructure mode
First enter a name for your profile (Profile name), e.g. "PROF1".
If you have selected version 1 to create the new profile, you must enter the network ID (SSID) of the target network in the SSID fi eld. This is in the wireless LAN settings in your router or access point or you can ask the person in charge. If you have selected version 2, the SSID has already been copied automatically from the network overview.
To reduce the energy consumption, you can run the stick in Power saving mode. In this mode, certain functions are deactivated or run at a lower setting if they are not fully used. Select Constantly Awake Mode if you want to work at full power all the time.
Select Infrastructure under network type. This mode facilitates connection to a wireless LAN router or access point. The settings for TX Power, RTS Threshold and Fragment Threshold can be left at the default settings.
If your network uses encryption, switch to the Authentication and Security tab and continue configuration under Setting wireless LAN encryption.
If your network is not encrypted, click OK to accept the settings. To activate the profile created, switch to the Profiles tab, select the profile and then click Activate.
2.2.1.2 Ad-hoc mode
First enter a name for your profile (Profile name), e.g. "PROF1".
If you have selected version 1 to create the profile, you must enter the network ID (SSID) of the target network in the SSID field. This is in the wireless LAN settings in your router or access point or you can ask the person in charge. If you have selected version 2, the SSID has already been copied automatically from the network overview.
To reduce the energy consumption, you can run the stick in Power saving mode. In this mode, certain functions are deactivated or run at a lower setting if they are not fully used. Select Constantly Awake Mode if you want to work at full power all the time.
Select Ad-hoc under network type. This mode allows you to connect to other wireless LAN client devices, e.g. USB sticks, PCI cards or cardbus.
The settings for TX Power, Preamble, RTS Threshold and Fragment Threshold can be left at the default settings. Ad-hoc WLAN mode allows you to set the standard to be used. This depends on the other devices used in your network. You can then select either 802.11b (11Mbps) only: Then this standard only is used; 802.11g (54Mbps) only: Then this standard only is used; or 802.11b/g: If this is selected, both standards are supported. If you are unsure which standards your devices support, you should use the mixed mode. You must also set the wireless LAN channel used under Channel. In Europe, there are 13 channels in the 2.4 GHz frequency range.
If your network uses encryption, switch to the Authentication and Security tab and continue configuration under Setting wireless LAN encryption.
If your network is not encrypted, click OK to accept the settings. To activate the profile created, switch to the Profi les tab, select the profi le and then click Activate.
2.2.2 Setting the wireless LAN encryption
First, it is important to understand a range of terms. The next section will explain the main terms used here:
Authentication: Authentication is a process in which the identity, e.g. of a person is determined based on a certain characteristic. This can be done by fingerprint, password or any other proof of authorisation.
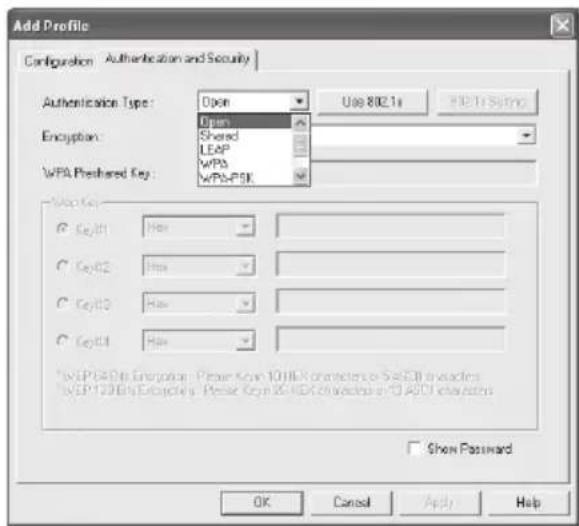
Encryption: Encryption is a process in which a plain text is transformed into a coded text via an encryption process (algorithm). One or more codes can be used for this. It must also be mentioned that each individual encryption process offers one or more authentication options. Please switch to the Authentication and Security tab.
This device can be used with the following encryption types:
64 and 128 bit WEP encryption
WPA and WPA2 encryption
Note!!! Encryption is deactivated by default. However, for security reasons, we recommend that you always use encryption.
2.2.2.1 WEP encryption
Wired Equivalent Privacy (WEP) is a standard encryption algorithm for WLAN. It both controls the access to the network and guarantees the integrity of the data. This method is considered vulnerable due to a range of weaknesses.
If you want to use WEP encryption, select WEP under encryption.
Two options are available for the Authentication type under WEP.
Select Open if all clients are to be enabled for WLAN. Now there is virtually no other authentication.
Select Shared if you want to use authentication with the challenge response process. A shared code is used for authentication in this method. All WLAN users must know this code.
All other selection options under Authentication type are meaningless under WEP.
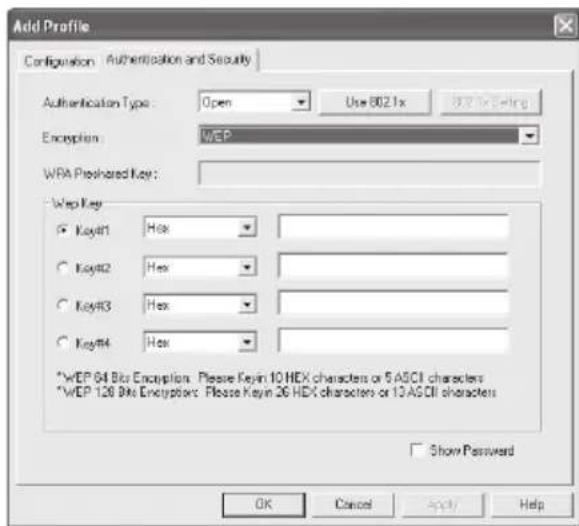
You can now store four codes in the lower section of the window. The selected code is always used. 64 bit or 128 bit encryption is supported. 128 bit encryption is more secure. First select whether you want to use Hex (allows characters from 0-9 and a-f to be used) or ASCII characters (You can use any characters). The setting and the selection of either 64 or 128 bit encryption determines the length of the code to be entered.
WEP 64 bit ASCII requires 5 characters
WEP 64 bit HEX requires 10 characters
WEP 128 bit ASCII requires 13 characters
WEP 128 bit HEX requires 26 characters
Examples: 64 bit Hex (10 characters) = 231074a6ef 64 bit ASCII (5 characters) = j31n.
128 bit Hex (26 characters) = 231074a6b9773ce43f91a5bef3
128 bit ASCII (13 characters) = urlaub2006.+0
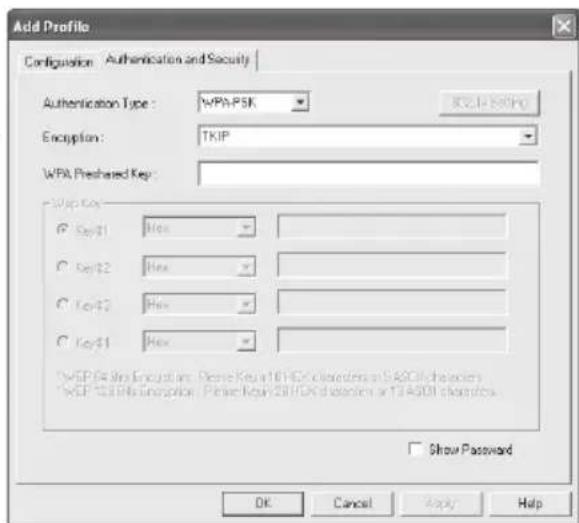
2.2.2.2 WPA/WPA2 encryption
Wi-Fi Protected Access (WPA) is an encryption method for WLAN. WPA contains the WEP architecture, but offers additional protection via dynamic codes, which are based on the Temporal Key Integrity Protocol (TKIP), and also offers pre-shared keys (PSK) or extensible authentication protocol (EAP) for user authentication. However, a radius server is required for this. WPA2 is a development of WPA and uses a different encryption algorithm, advanced encryption standard (AES).
WPA offers two types of authentication, either pre-shared key or authentication via special authentication protocols, which are generally variations of EAP (Extensible Authentication Protocol). An authentication server (RADIUS server) is used for the latter authentication method, which is rarely used for private applications. Your administrator can give you the information you require to confi gure this authentication method.
The pre-shared key method is more common and offers a high degree of security.
To use WPA encryption, select WPA-PSK under Authentication type and TKIP under Encryption.
Now enter the code used in the WPA preshared key fi eld. The code entered must be absolutely identical with that used in the network. It must be min. 8 and max. 63 random characters for ASCII. Letters (A-Z), numbers and punctuation marks can be used. 64 characters are required for HEX, whereby only characters from 0-9 and a-f can be used. If you do not have this code, it can be found in your router/access point or you can ask the person responsible for these devices.
Save the settings and click OK.
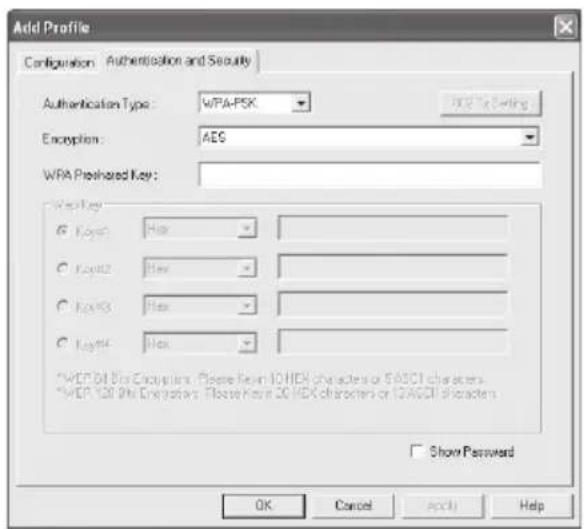
To use WPA2 encryption, select WPA2-PSK under Authentication type and AES under Encryption.
Now enter the code used in the WPA preshared key fi eld.
The code entered must be absolutely identical with that used in the network. It must be min. 8 and max. 63 random characters for ASCII.Letters (A-Z), numbers and punctuation marks can be used. 64 characters are required for HEX, whereby only characters from 0-9 and a-f can be used. If you do not have this code, it can be found in your router/access point or you can ask the person responsible for these devices.
Save the settings and click OK.
To activate the profile created, switch to the Profiles tab, select the profile and then click Activate.
3. Confi guring the operating system and computer (Windows®)
After you have successfully installed the network adapter, you still have to install or config a protocol. This protocol governs the data exchange between the computer and the network. TCP/IP is most common. Each computer has to be assigned its own address for the protocol. Automatic address assignment is only reliable if a DHCP server exists in the network, e.g. a router or access point. If you have one of these devices with a DHCP function, you should leave the setting on "Get automatically".
Proceed as follows to check the settings on your PC:
Start -> Settings -> Control panel -> Network connections
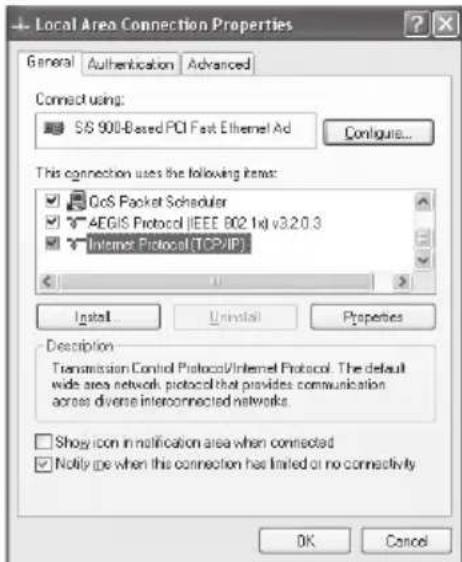
Select the connection (network adapter) via which your PC is connected to the router, e.g. "LAN connection". When you right-click the corresponding connection, the following screen is displayed when you select Properties.
Select the Internet Protocol (TCP/IP) entry in the list and click Properties.
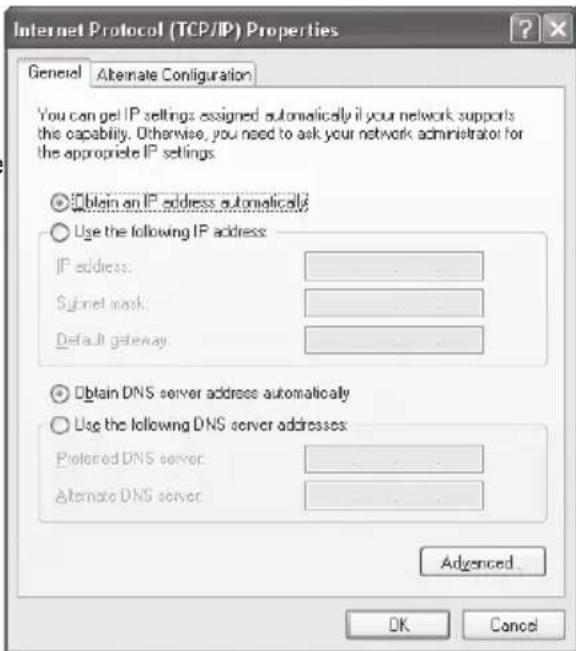
Select Optain an IP address automatically and Optain DNS server address automatically, if there is a DHCP
server in your network. Confirm by clicking OK, and again in the subsequent window.
Your PC is now configured such that the router assigns the IP address automatically.
If you do not have a device with an integrated DHCP server, you must assign the IP addresses manually. The following example describes basic setup using manual address assignment. For local networks, special address ranges are provided which are not transmitted over the internet. As an example, a range that you can use for your network is 192.168.1.1 to 192.168.1.254. The first PC is assigned the address 192.168.1.1, the second 192.168.1.2, the third 192.168.1.3, etc.
Select Use the following IP address and enter your IP address in accordance with the sample.
1.PC = IP address 192.168.1.1 Subnet mask 255.255.255.0
2.PC = IP address 192.168.1.2 Subnet mask 255.255.255.0
Click Ok to confirm your entries.
4. Uninstalling the driver and configuration program on Windows®
Select Start Settings Control Panel Software
To do so, select Hama Wireless Utility and click Remove. At the next prompt, click Remove completely. Remove the device from your computer when prompted to do so. Afterwards click OK.
The program is now deleted from your computer.
After the software is removed, you may have to restart the system. Save all open documents and close all programs before restarting the PC.
5. Installing the driver and configuration program on MAC OS X
Before installation, please save any open documents you may be working on. Then close all running programs. Ensure that you have administrator authorisations to enable you to install the driver correctly.
Connect the Hama WLAN USB stick to a free USB 2.0 port. Then start your Apple computer.
After the operating system has loaded completely and the desktop is complete, insert the enclosed driver CD-ROM in your drive. An icon with the CD-ROM then appears on your desktop. Double-click the icon and select the MAC driver directory in the Finder window. This directory contains the DMG file required for installation. Double click the DMG file to activate the image.
After you activate the image, select the correct directory for your installed MAC OS X Version and then double click the corresponding PKG file. Installation is now started. Select your hard drive on which you want to install the driver and the configuration program. You must then restart the system.
6. Confi guring the operating system and computer on MAC OS X
After you have installed the driver, you must confi gure the network environment in accordance with the new situation. To do so, proceed as follows.
Click the Apple symbol in the upper menu bar and select the Environment menu item.
Select the "Network" setting menu item. The following window opens. Click OK to confirm the message.
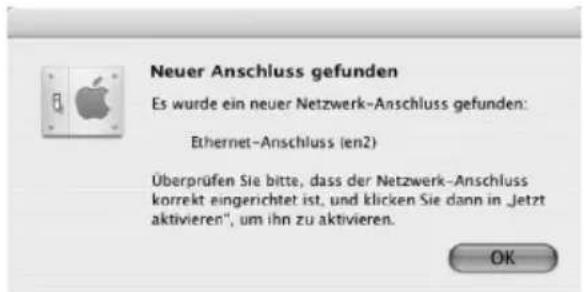
Note: If the message shown above is not displayed, the Hama WLAN USB Stick was not correctly identified by your PowerMac. Ensure that the stick is correctly connected to a USB 2.0 port and that the USB 2.0 interface card was correctly installed in your system.
After the Hama WLAN USB Stick has been properly detected, the following window opens.
Select the New environment... option under Environment. Name the new environment e.g. WLAN and click the OK button.
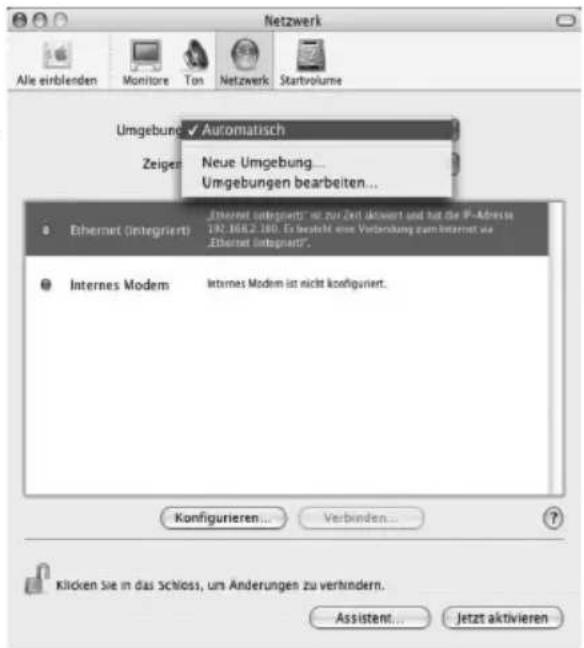
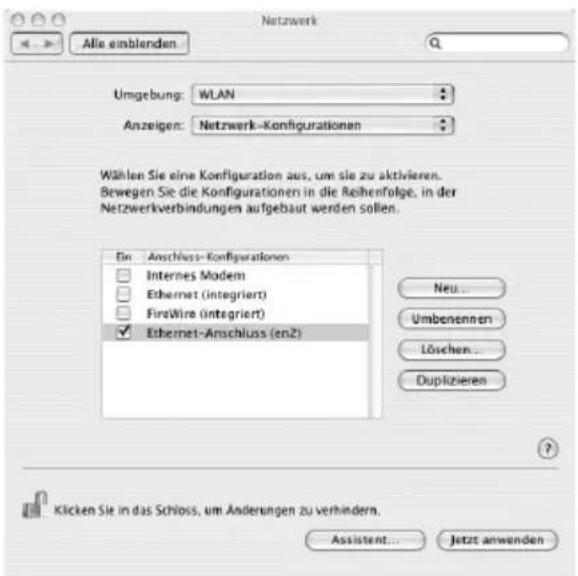
Select the Environment menu item again in the Network window and select the New environment which has also been selected, WLAN in our case. Next, select the Show/Display menu item in the Network window and select the Network configurations option.
Note: The process for selecting the connections can vary depending on the MAC model and features.
In our case, remove the tick for all connections except the Ethernet connection (en2).
Then click the Activate button.
The configuration process is now complete for your system.
7. The configuration program - introduction and operation on MAC OS X
As the Hama WLAN USB Stick is not an offcial Apple Airport product, you cannot use the Airport software integrated in the system. To configure the Hama WLAN USB Stick, you must open the enclosed utility. Open the fi nder and select the hard drive where you installed the driver and the utility earlier. The utility is installed in the Programs directory by default. Double-click the WirelessUtilityRT73USB icon.
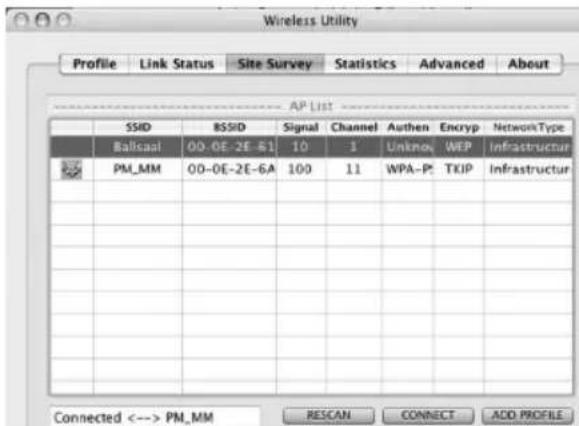
The following window opens:
This screen shows all available wireless networks.
The SSID, which is used to identify WLAN devices in the respective wireless LAN, the router MAC address (BSSID), the signal strength (signal), the channel used (channel), the encryption algorithm (encryption) and the authentication (authentication) and the type of network (network type) are displayed.
The lower section of this window shows the connection status (Connected / Disconnected). Click RESCAN to search for wireless networks again.
7.1 Quick configuration
First, select the required WLAN network by clicking the corresponding line in the list. The network selected is highlighted in blue in the list. Now click the Connect button.
You are connected to the network if the selected network is run without encryption and the signal is strong enough. This is indicated by the green symbol and Connect is shown in the status window.
If you have activated encryption, you are asked for the code. Enter the code in the corresponding fi eld. (See the example below).
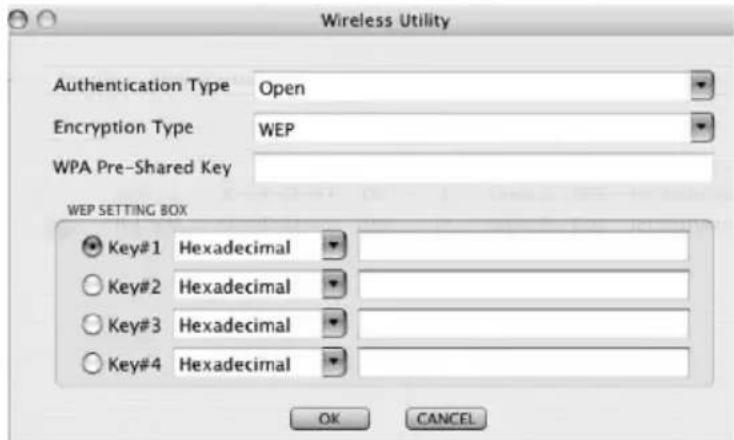
You can enter the data required for encryption here.
The data must be identical to the router or access point settings. The authentication type and encryption are generally already selected in accordance with the target network. Enter the code which must correspond exactly with the code used by the router or access point. Click OK to confirm after you make your entries.
If you do not have this code yourself, please contact the person responsible for config guring the router or access point.
For detailed information on setting encryption, please see Page 14, under the heading:
Setting the wireless LAN encryption.
For further information on the connection made, open the Link status tab. This shows information such as the Link quality and Signal strength.
7.2 Detailed configuration
When configuring your Hama WLAN USB stick, it is useful to create a profile. A profile serves to save various settings for a connection under a certain name. For example, if you want to connect to various wireless networks, you can save the settings for the networks in profi les, which allows you to change the configuration quickly.
7.2.1 Creating a new profile
You need the following information to create a profi le (Profi le):
SSID (network ID): This is the name of the required network.
- Encryption Type: Encryption used in the target network
- (Network Type): (type of network): Infrastructure or ad-hoc
Open the Wireless Utility. Using the Network overview (Site survey) tab, you can select the required network and then open the dialog box using the ADD PROFILE button, or open the Profile tab and start the dialog box by clicking the ADD button.
First enter a name for your profi le (Profi le name). Under SSID, select the network you want to connect to from the list of available networks.
To reduce the energy consumption, you can run the stick in Power saving mode. In this mode, certain functions are deactivated or run at a lower setting if they are not fully used. Select CAM (Constantly Awake Mode), if you want to run the stick at full power all the time.
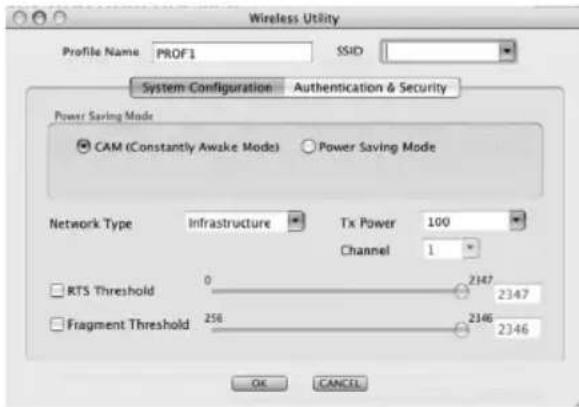
This Hama WLAN USB Stick allows you to set up two different network types. Select Infrastructure under Network type, if you want to connect to a router or access point. The settings for TX Power, RTS Threshold and Fragment Threshold can be left at the default settings.
If you want to connect to another WLAN client device without a router or access point, select 802.11 Ad-hoc.
The settings for TX Power, Channel, RTS Threshold and Fragment Threshold can be left at the default settings.
7.2.2 Setting the wireless LAN encryption
First, it is important to understand a range of terms. The next section will explain the main terms used here:
Authentication: Authentication is a process in which the identity, e.g. of a person is determined based on a certain characteristic. This can be done by fingerprint, password or any other proof of authorisation.
Encryption: Encryption is a process in which a plain text is transformed into a coded text via an encryption process (algorithm). One or more codes can be used for this.
It must also be mentioned that each individual encryption process offers one or more authentication options.
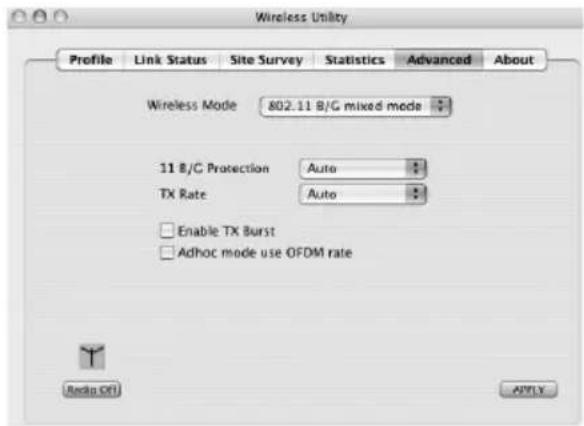
Now switch to the Advanced tab.
Wireless mode allows you to set the standard to be used. This depends on the other devices used in your network. You can choose either 802.11 B only mode (11 Mbps): Then this standard only is used; or 802.11 B/G mixed mode up to 54 Mbps): Both standards are then supported; If you are not sure which of the standards your devices support, you should use the mixed mode (802.11 B/G mixed mode). Make all other settings as shown in the image below.
Click Apply to confirm your entries.
This device can be used with the following encryption types:
64 and 128 bit WEP encryption
WPA Encryption
Note!!! Encryption is deactivated by default. However, for security reasons, we recommend that you always use encryption.
7.2.2.1 WEP encryption
Wired Equivalent Privacy (WEP) is a standard encryption algorithm for WLAN. It both controls the access to the network and guarantees the integrity of the data. This method is considered vulnerable due to a range of weaknesses.
If you want to use WEP encryption, select the following settings:
Two options are available for the Authentication type under WEP.
Select Open if all clients are to be enabled for WLAN. Now there is virtually no other authentication.
Select Shared if you want to use authentication with the challenge response process. A shared code is used for authentication in this method. All WLAN users must know this code.
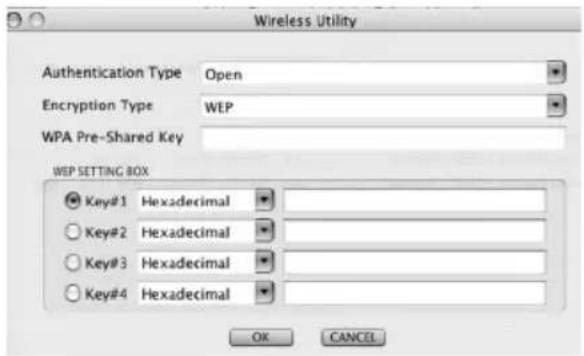
All other selection options under Authentication type are meaningless under WEP.
You can now store four codes in the lower section of the window. The selected code is always used. 64 bit or 128 bit encryption is supported. 128 bit encryption is more secure. First select whether you want to use Hexadecimal (allows characters from 0-9 and a-f to be used) or ASCII (you can use any characters). The setting and the selection of either 64 or 128 bit encryption determines the length of the code to be entered.
WEP 64 bit ASCII requires 5 characters
WEP 64 bit hexadecimal requires 10 characters
WEP 128 bit ASCII requires 13 characters
WEP 128 bit hexadecimal requires 26 characters
Examples: 64 bit hexadecimal (10 characters) = 231074a6ef 64 bit ASCII (5 characters) = j31n.
128 bit hexadecimal (26 characters) = 231074a6b9773ce43f91a5bef3
128 bit ASCII (13 characters) = urlaub2006.+0
7.2.2.2 WPA encryption
Wi-Fi Protected Access (WPA) is an encryption method for WLAN. WPA contains the WEP architecture, but offers additional protection via dynamic codes, which are based on the Temporal Key Integrity Protocol (TKIP), and also offers pre-shared keys (PSK) or extensible authentication protocol (EAP) for user authentication. However, a radius server is required for this.
WPA offers two types of authentication, either pre-shared key or authentication via special authentication protocols, which are generally variations of EAP (Extensible Authentication Protocol). An authentication server (RADIUS server) is used for the latter authentication method, which is rarely used for private applications. Your administrator can give you the information you require to confi gure this authentication method.
The pre-shared key method is more common and offers a high degree of security.
To use WPA encryption, select WPA-PSK under Authentication type and TKIP or AES under Encryption.
Now enter the code used in the WPA preshared key fi eld.

The code entered must be absolutely identical with that used in the network. It must be min. 8 and max. 63 random characters for ASCII. Letters (A-Z), numbers and punctuation marks can be used. 64 characters are required for HEX, whereby only characters from 0-9 and a-f can be used. If you do not have this code, it can be found in your router/access point or you can ask the person responsible for these devices.
Save the settings and click OK.
8. Support and contact information
If products are defective:
Please contact your dealer or Hama Product Consulting if you have any product claims.
Internet / World Wide Web:
Product support, new drivers or product information can be found at www.hama.com
Support Hotline - Hama Product Consulting:
Tel. +49 (0) 9091 / 502-115
Fax +49 (0) 9091 / 502-272
E-mail: Produktberatung@hama.de
Note:
This product may only be used in Germany, Austria, Switzerland, France, England, Belgium, Spain, Holland, Italy, Denmark, Hungary, Poland, Sweden, Portugal, Luxembourg, Ireland, Greece, the Czech Republic, Slovakia and Finland.
See www.hama.com for the declaration of conformity with R&TTE Directive 99/5/EC.
Experiments: 64 bits Hex (10 characters) = 231074a6ef
64 bits ASCII (5 caractères) = j31n!
128 bits Hex (26 caractères) = 231074a6b9773ce43f91a5bef3
128 bits ASCII (13 characters) = conges2006!+0
Experiments: 64 bits hexadecimal (10 characters) = 231074a6ef
64 bits ASCII (5 caractères) = j31n!
128 bits hexadecimal (26 charactères) = 231074a6b9773ce43f91a5bef3
128 bits ASCII (13 caractères) = conges2006!+0
Shift sā til fanebladet Authentication and Security.
See www.hama.com for declaration of conformity according to R&TTE Directive 99/5/EC guidelines