ACM 849/BA - Hob WHIRLPOOL - Free user manual and instructions
Find the device manual for free ACM 849/BA WHIRLPOOL in PDF.
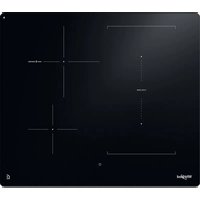
| Product type | Induction hob |
| Brand | WHIRLPOOL |
| Model | ACM 849/BA |
| Power supply | 230-240 V ~ / 400 V 2N ~ / 400 V 3N ~ |
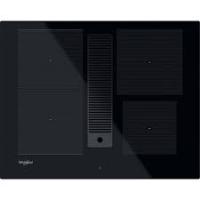
| Number of cooking zones | 4 induction zones |
| Boost power | Available on each zone, max duration 10 minutes |
| Automatic functions | 6th Sense (boiling), Simmering, Melting |
| Flexi Cook zone | Two combinable zones for oval or large pans |
| Timer | Programmable up to 90 minutes with automatic shut-off |
| Pause | Temporary interruption with settings recall |
| Control panel lock | Press and hold for 3 seconds to prevent accidental activation |
| Safety | Residual heat indicator "H", automatic shut-off if no pan detected |
| Surface material | Ceramic glass |
| Cleaning | Soft cloth or specific product, do not use steam cleaner |
| Spare parts | Available for 10 years after purchase |
| Installation | Requires a separation panel under the appliance, except above an oven |
| Certifications | Compliant with Low Voltage Directive 2006/95/EC and EMC Directive 2004/108/EC |
Frequently Asked Questions - ACM 849/BA WHIRLPOOL
User questions about ACM 849/BA WHIRLPOOL
0 question about this device. Answer the ones you know or ask your own.
Ask a new question about this device
Download the instructions for your Hob in PDF format for free! Find your manual ACM 849/BA - WHIRLPOOL and take your electronic device back in hand. On this page are published all the documents necessary for the use of your device. ACM 849/BA by WHIRLPOOL.
USER MANUAL ACM 849/BA WHIRLPOOL
IMPORTANT SAFETY INSTRUCTIONS
YOUR SAFETY AND THAT OF OTHERS IS VERY IMPORTANT
This manual and the appliance itself provide important safety messages, to be read and always observed.

This is the danger symbol, regarding safety, warning of potential risks to users and others.
All safety messages will be preceded by the danger symbol and the following words:

DANGER
Indicates a hazardous situation which, if not avoided, will result in serious injury.

WARNING
Indicates a hazardous situation which, if not avoided, could cause serious injury.
All messages relevant to safety specify the potential risk to which they refer and indicate how to reduce the risk of injury, damage and electric shocks due to incorrect use of the appliance. Make sure to comply with the following:
- The appliance must be disconnected from the power supply before carrying out any installation operation.
- Installation and maintenance must be carried out by a specialised technician, in compliance with the manufacturer's instructions and the local safety regulations in force. Do not repair or replace any part of the appliance unless specifically stated in the user manual.
The appliance must be earthed. - The power cable must be long enough for connecting the appliance, fitted in the cabinet, to the power supply.
- For installation to comply with the current safety regulations, an omnipolar switch with minimum contact gap of 3mm is required.
- Do not use multi-sockets or extension cords.
- Do not pull the appliance's power cable.
- The electrical parts must not be accessible to the user after installation.
- The appliance is designed solely for domestic use for cooking food. No other use is permitted (e.g. heating rooms). The Manufacturer declines any liability for inappropriate use or incorrect setting of the controls.
The appliance and its accessible parts become hot during use. Care should be taken to avoid touching heating elements. Children less than 8 years old shall be kept away unless continuously supervised. - The accessible parts can become very hot during use. Children must be kept away from the appliance and watched over to ensure they do not play with it.
- Do not touch the appliance heating elements during and after use. Do not allow the appliance to come into contact with cloths or other flammable materials until all the components have cooled sufficiently.
- Do not place flammable materials on or near the appliance.
Overheated oils and fats catch fire easily. Pay attention when cooking food products rich in fat and oil. - This appliance can be used by children aged from 8 years and above and persons with reduced physical, sensory or mental capabilities or lack of experience and knowledge if they have been given supervision or instruction concerning use of the appliance in a safe way and understand hazards involved. Children shall not play with the appliance. Cleaning and user maintenance shall not be made by children without supervision.
- A separator panel (not supplied) must be installed in the compartment under the appliance.
- If the surface is cracked, switch off the appliance to avoid the possibility of electric shock.
The appliance is not intended to be operated by means of an external timer or separate remote control system. - Unattended cooking on a hob with fat or oil can be dangerous and may result in fire. NEVER try to extinguish a fire with water, but switch off the appliance and then cover flame e.g. with a lid or a fire blanket.
Danger of fire: do not store items on the cooking surfaces.
- Do not use steam cleaners.
Metallic objects such as knives, forks, spoons and lids should not be placed on the hob surface since they can get hot. - After use, switch off the hob element by its control and do not rely on the pan detector.
Disposal of packaging materials
The packaging material is entirely recyclable and marked with the recycling symbol (C). Do not dispose of the various packaging materials carelessly, but do so responsibly and in full compliance with local authority regulations governing waste disposal.
Scrapping
This appliance is marked in compliance with European Directive 2002/96/EC on Waste Electrical and Electronic Equipment (WEEE).
By ensuring that this appliance is scrapped suitably, you can help prevent potentially damaging consequences for the environment and health.
The symbol on the appliance or accompanying documentation indicates that this product should not be disposed of as unsorted municipal waste but must be taken to a collection point for the treatment of WEEE.
Energy saving
For optimum results, observe the following advice:
Use pots and pans whose bottom diameter is equal to that of the cooking zone.
Only use flat-bottomed pots and pans.
If possible, keep pot lids on when cooking.
Use a pressure cooker to save even more energy and time (do not use in conjunction with the sixth sense function).
Make sure you place the pot or pan in the centre of the cooking zone outlined on the hob.
DECLARATION OF CONFORMITY (C)
This appliance is designed to come into contact with food and complies with Regulation (C E) no. 1935/2004, and has been designed, constructed and marketed in compliance with the safety requirements of "Low Voltage" Directive 2006/95/EC (replacing 73/23/EEC as amended) and protection requirements of "EMC" Directive 2004/108/EC.
BEFORE USE

IMPORTANT: the cooking zones will not switch on if pots and pans are not of the correct dimensions. Only use pots bearing the symbol "INDUCTION SYSTEM" (See figure opposite). Before switching the hob on, position the pot on the desired cooking zone.
EXISTING POTS AND PANS

Use a magnet to check whether pots or pans are suitable for use on the induction hob: pots are unsuitable if they cannot be magnetically detected.
Ensure pots have a smooth bottom, otherwise they may scratch the hob's glass ceramic surface. Check dishes.
- Never place hot pots or pans on the hob's control panel. This could result in damage.
RECOMMENDED DIAMETERS OF POT BOTTOMS
| XL | ∅ 30 cm | 14 cm (Dual Zone) | ∅ 30 cm | XL | ∅ 28 cm | 18 cm 14 cm (Dual zone) | ∅ → 28 cm |
| L | ∅ 24 cm | 17 cm | ∅ 24 cm | L | ∅ 21 cm | 15 cm | ∅ → 21 cm |
| M | ∅ 18 cm | 14 cm | ∅ 18 cm | S | ∅ 14.5 cm | 11 cm | ∅ → 14.5 cm |
IMPORTANT: for the diameter of pot bottoms on zones which can be used with the "sixth sense" function, see paragraph "Sixth Sense Function".

INSTALLATION
After unpacking the hob, check that there has been no damage during transport. If in doubt, contact the dealer or After-sales Service.
PREPARING THE HOUSING UNIT

WARNING
Install a separator panel under the hob.
The lower part of the product must not be accessible after installation.
If there is an oven beneath the hob, do not install the separator panel.

For the distance between the underside of the appliance and the separator panel below, observe the dimensions given in the figure.
In order to ensure the correct operation of the product, do not obstruct the minimum required clearance between the hob and the top of the unit (min. 5 mm).
Cut the worktop to fit before installing the hob and carefully remove any shavings or sawdust.
If an oven is installed beneath the hob, make sure that it is equipped with a cooling system.
In the case of flush-mounted installation, call the After-Sales Service to request assembly of screws kit 4801 211 00112.
To remove the hob from the worktop use a screw driver (not supplied) unlocking the springs from the bottom side of the appliance.
- Do not install the hob above a dishwasher or washing machine, to prevent the electronic circuits from coming into contact with steam or moisture and being damaged as a result.
ELECTRICAL CONNECTION

WARNING
- Disconnect the appliance from the mains power supply.
- The appliance must be installed by a qualified technician who is fully aware of current safety and installation regulations.
The manufacturer declines all liability for injury to persons or animals and for damage to property resulting from failure to observe the regulations provided in this chapter.
- The power supply cable must be long enough to allow the hob to be removed from the worktop.
- Make sure the voltage specified on the appliance rating plate is the same as that of the domestic power supply voltage.
- Do not use extension cables.
Connecting to the terminal board
For electrical connection, use an H05RR-F cable as specified in the table below.
| Conductors | Amount x size |
| 230 V ~ + 1/2 | 3 x 4 mm² |
| 230-240 V ~ + 2/4 | 3 X 4 mm² (Australia only) |
| 230 V 3 ~ + 3/6 | 4 X 1.5 mm² |
| 400 V 3N ~ + 4/8 | 5 X 1.5 mm² |
| 400 V 2N ~ 5/12 | 4 X 1.5 mm² |

400V3N\~
230V
400V2N\~
230 V 3 ~ (Belgium only)
230-240 V ~ (Australia only)
230V UKonly

400 V 2N ~ (NL only)
Connect the yellow/green earth wire to the terminal with the symbol 1全
This wire must be longer than the other wires.
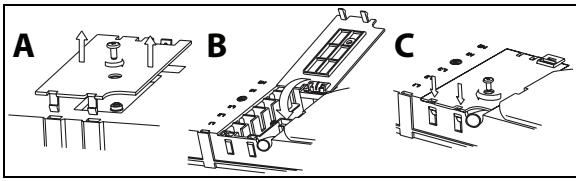
- Remove the terminal block cover (A), undoing the screw and inserting the cover in the terminal block hinge (B).
- Insert the power supply cable into the cable clamp and connect the wires to the terminal board as indicated in the diagram next to the terminal board itself.
- Secure the power cable with the cable clamp.
- Close the cover (C) and screw it on the terminal block with the removed screw - point (1).
Each time the cooktop is connected to the mains it carries out an automatic check which lasts several seconds.
If the hob already has a power cable, follow the instructions given on the label attached to the cable. Connect the appliance to the electricity supply by means of an all-pole disconnect switch with minimum contact gap of 3mm .
Control Panel Description
The control panel is equipped with touch controls: to use them, just press the corresponding symbol (a light touch is sufficient).
To select and activate the cooking zones
First use / after a power failure
After connecting the hob to the electrical power supply, the control panel is locked (the indicator light above the key is ON).
To unlock the control panel, press and hold the key for 3 seconds. The indicator light switches off and the hob can be used normally.
Switching the hob ON/OFF
To switch the hob on, press and hold the ① key for approx. 2 seconds: the indicator light above the key turns on and hyphens appear inside the circles which represent the cooking zones.
To switch off, press the same key until the hob switches off. All the cooking zones are switched off.

The hob automatically switches off if no function is selected within 10 seconds of switching on.
Switching on and adjusting cooking zones

After switching on the hob, position the pot on the chosen cooking zone.
Activate the cooking zone by pressing the relative round key: the round key displays number which corresponds to the intermediate power level.
To change the power level, move your finger horizontally on the slide touchscreen: the number inside the circle will change with just a quick slide of the finger from a minimum of 1 to a maximum of 9. You can activate the booster function by pressing "BOOST" on the slide touchscreen ("P" on the display). The "BOOST" power function can be used for a maximum of 10 minutes, after which the appliance automatically sets the power level at level 9. In models with three cooking zones, three "BOOST" levels can be selected at the same time: in this case the appliance automatically adapts the power distribution between the three zones.

If more than one cooking zone is on, the slide touchscreen allows you to change the power level of the selected zone, indicated by the presence of a luminous dot at the bottom right of the power level indicator. To select a zone, simply press the relative round key.

If you are using a pot that is not suitable, not correctly positioned or not of the correct dimensions for your induction hob, the message "no pot" will appear in the display (see figure on the left). If no pot is detected within 60 seconds, the hob switches off.
Switching off cooking zones
Select the cooking zone to be switched off by pressing the relative round key (a dot lights up at the bottom right of the power level indicator). Press OFF on the slide touchscreen.

The cooking zone switches off and, if the zone is still hot, the letter "H" appears in the circle.
"H" is the residual heat indicator. The hob is fitted with a residual heat indicator for each cooking zone; these indicators alert the user when cooking zones are still hot. When the cooking zone cools down, the display switches off.
Timer selection
The timer can be used to set a max. cooking time of 90 minutes.
Select the cooking zone to be used with the timer (a dot lights up at the bottom right of the power level indicator), then set the required cooking time using the + and - keys of the timer function: the time in minutes is shown next to the cooking zone display.
A few seconds after the key is pressed, the timer begins the countdown (the luminous dot of the selected cooking zone starts flashing).
Once the set time has elapsed, an acoustic signal sounds and the cooking zone switches off automatically.
For use if the timer in conjunction with the sixth sense function, see the description of the function in subsequent pages.
Control panel lock
This function locks the hob controls to prevent accidental switching on (e.g. during cleaning).
Press the key for three seconds: an acoustic signal sounds and an indicator light turns on above the lock symbol to confirm activation. The control panel is locked with the exception of the OFF function. To unlock the controls, repeat the child safety activation procedure. The illuminated dot switches off and the hob is active again.
IMPORTANT: The presence of water, liquid spilled from pots or objects of any nature resting on the key below the symbol can accidentally activate or deactivate the Control panel lock function.
Hold
This function allows you to temporarily hold and then resume cooking processes, maintaining previous settings (except for the sixth sense function and any set timers).
Press the ⑪ key: | | blinks on the display in place of the power levels. To resume cooking, press the ⑪ key again.
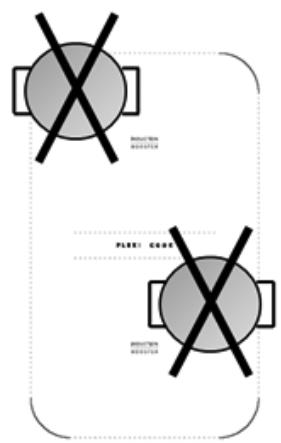
Flexi cook
This function allows you to use the cooking area as two separate cooking zones or as an extra-large single zone.
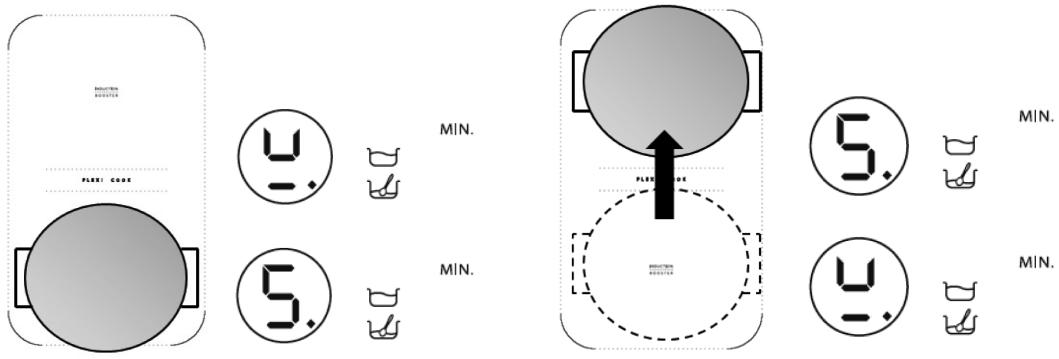
It is perfect for oval, rectangular and elongated pans (with maximum base dimensions of 38 × 18 ~cm ) or more than one standard pan. In order to activate the flexicook function, switch on the hob and press the button : the two cooking zone displays show level "5"; both dots next to the level number are lit, indicating that the Flexi cook is activated.
To change the power level, move your finger along the slide touchscreen: the number inside the circle will change with just a quick slide of the finger from a minimum of 1 to a maximum of 9. To deactivate the flexible zone function, press the key : the cooking zones revert to operating singly again. To switch the cooking zone off, press OFF

The message "no pot" will appear on the display of the zone that is not able to detect any pot (because of missing pot, or misplaced or not suitable for induction). This message remains active for 60 seconds: in this time you can add or slide pots within the flexicook area as you prefer.
After 60 seconds if no pan is placed on the zone, the system stops "searching" pots on that zone, the symbol remains visible on the display to remind that the zone is disabled.
To reactivate the Flexicook function on both heaters, press the button
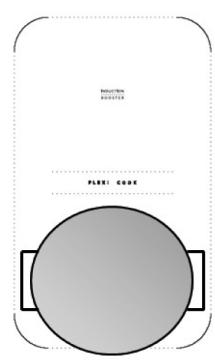
The Flexi cook function is also able to detect when a pot is moved from one zone to the other one within the flexi cook area keeping the same power level of the zone where the pan originally was placed (see the example in the figure below: if the pot is moved from the front heater to the rear heater, the power level will be shown on the display corresponding to the zone where the pot is placed).

MIN.

MIN.


MIN.


MIN.
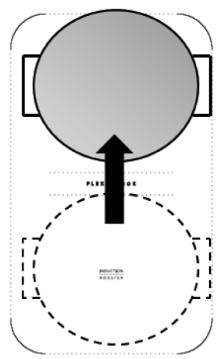
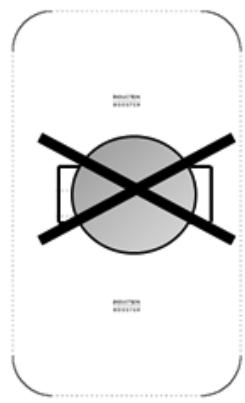
It is also possible to operate the Flexi cook area as two independent cooking zones, using the corresponding button of the single zone. Place the pot in the center of the single zone and adjust the power level with the slide touchscreen.

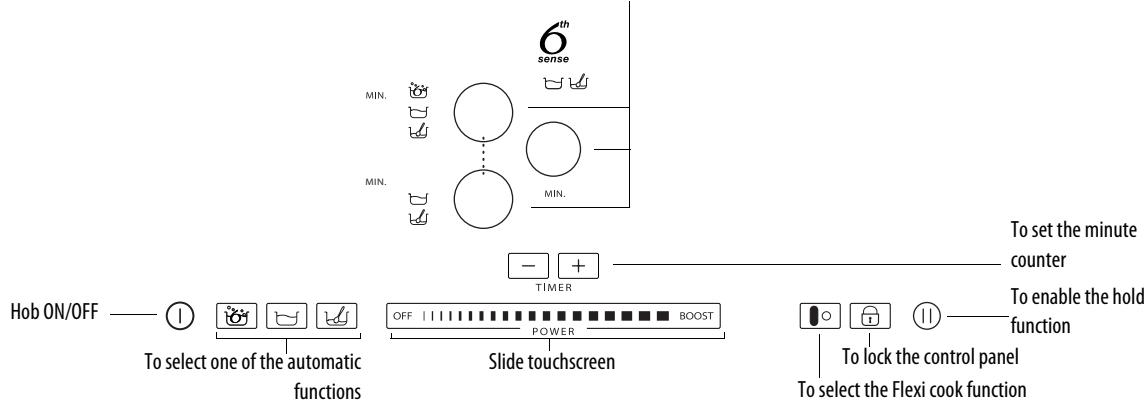
Important: make sure to place the pans centered on the cooking zone in the way to cover the logo INDUCTION placed in the center of the single cooking zone.
In case of big pot, oval, rectangular and elongated pans make sure to place the pans centered on the cooking zone covering both INDUCTION ROOSTER LOGOS
Examples of good pot placement and bad pot placement :


When the flexi cook function is selected, the booster and sixth sense functions cannot be used. If the timer is set, it will be displayed alongside the hotplate display at the top.
Description of automatic functions

The hob features automatic functions for each cooking zone. The symbols of the available functions are shown next to the selection key of each cooking zone. Every time an automatic function is selected, an indicator light turns on next to the symbol and the letter "A" appears in the cooking zone display.
Sixth Sense 6
The Sixth Sense function automatically selects the ideal power setting for bringing water to the boil and signals when boiling point is reached.
After positioning the pot of water, switch on the hob and select the desired cooking zone. Press the key: "A" appears on the display and the indicator light turns on. During heating, an animation is displayed in the space next to the cooking zone.

For correct operation of the sixth sense function, please observe the following recommendations:
- use water only (at room temperature);
- do not add salt, other ingredients or condiments until the water reaches boiling point;
- do not change the power setting of the cooking zone or remove or move the pot;
- fill the pot to at least 1/3 full (min. 1 litre) and never to the brim (see table on the right).
- Do not use a pressure cooker on the zone with the sixth sense function selected;
For optimum results, observe the following advice:
- Do not activate the sixth sense function if the zone is already hot (letter "H" visible on display).
When the water comes to the boil, the hob emits an acoustic signal. This signal is sounded three times at regular intervals. After the second signal, a minute minder is automatically activated to keep track of boiling time. After the third signal, the hob automatically selects a lower power setting to keep the water simmering. From this moment on, you can add any ingredients you like, set the timer and change the power setting. Changing the power setting or selecting the "hold" function overrides the sixth sense function.

The hob features automatic management of the use of the sixth sense function and booster settings, therefore in some cases it may not be possible to select the booster when the sixth sense function is already selected on other cooking zones.
The quality of the pot used may have a bearing on sixth sense function performance.
Simmering
After bringing to the boil, press the key and the hob will automatically set the correct power level to keep the pot simmering. "A" appears on the display: the indicator light lights up. To deactivate the function, simply press OFF on the slide touchscreen.
Melting
This function maintains a permanently low temperature in the cooking zone. After positioning the pot/accessory on the chosen cooking zone, switch on the hob and select the cooking zone. Press the key: "A" appears on the display and the indicator light turns on. To deactivate the function, simply press OFF on the slide touchscreen.
| Cooking zone diameter | Pot base diameter for use of 6th Sense function | Maximum amount of water in the pot |
| 18 cm | 17-19 cm | 5 litres |
| 24 cm | 23-25 cm | 7 litres |
| 28 cm | 24-28 cm | 7 litres |

WARNING
- Never use steam cleaners.
Before cleaning, make sure the cooking zones are switched off and that the residual heat indicator ("H") is not displayed.
IMPORTANT: do not use abrasive sponges or pan scourers. as they could ruin the glass surface.
Clean the hob, when it is cool, after each use in order to remove any food residues.
Sugar and foods with a high sugar content damage the glass ceramic surface and must be immediately removed.
Salt, sugar and sand can scratch the glass surface.
Use a soft cloth, absorbent kitchen wipes or a specific hob cleaner (follow the Manufacturer's instructions).
TROUBLESHOOTING GUIDE
- Read and follow the instructions given in the section "Instructions for use".
- Check that the electricity supply has not been shut off.
Clean the hob and dry it thoroughly.
If, when the hob is switched on, alphanumeric codes appear on the display, consult the following table for instructions.
If you are unable to turn the hob off after using it, disconnect it from the power supply.
| ERROR CODE | DESCRIPTION | POSSIBLE CAUSES | REMEDY |
| The hob switches off and after 10 seconds emits an acoustic signal every 30 seconds. | Continuous pressure on control panel area. | Water or utensils on control panel. | Clean the control panel. |
| C81, C82, C83 | The control panel switches off because of excessively high temperatures. | The internal temperature of electronic parts is too high. | Wait for the hob to cool down before using it again. |
| F42 or F43 | The connection voltage is wrong. | The sensor detects a discrepancy between the appliance voltage and that of the mains supply. | Disconnect the hob from the mains and check the electrical connection. |
| F12, F21, F25, F36, F37, F40, F47, F56, F58, F60, F61, F62, F63, F64 | Call the After-sales Service and specify the error code. | ||
AFTER-SALES SERVICE
Before contacting After-sales Service
- See if you can solve the problem yourself with the help of the suggestions given in the "Troubleshooting guide".
- Switch the appliance off and then on again it to see if the problem has been eliminated.
If after the above checks the fault persists, contact the nearest After-sales Service.
Always specify:
a brief description of the fault;
the type and exact model of the hob;
- the Service number (the number after the word Service on the rating plate) located under the appliance (on the metal plate);
your full address;
- your telephone number and area code.
SERVICE
0000 000 0000

If any repairs are required, please contact an authorised After-Sales Service (to guarantee that original spare parts will be used and repairs carried out correctly). Spare parts are available for 10 years.
POWER LEVEL TABLE
| Power level | Type of cooking | Level use (indicating cooking experience and habits) | |
| Max. power | Boost | Fast heating | Ideal for rapidly increasing the temperature of food to fast boiling in the case of water or rapidly heating cooking liquids |
| 8-9 | Frying - boiling | Ideal for browning, starting to cook, frying deep frozen products, fast boiling | |
| High power | 7-8 | Browning - sautéing - boiling - grilling | Ideal for sautéing, maintaining a lively boil, cooking and grilling (for a short period of time, 5-10 minutes) |
| 6-7 | Browning - cooking - stewing - sautéing - grilling | Ideal for sautéing, maintaining a light boil, cooking and grilling (for a medium period of time, 10-20 minutes), preheating accessories | |
| Medium power | 4-5 | Cooking - stewing - sautéing - grilling | Ideal for stewing, maintaining a gentle boil, cooking (for a long period of time). Creaming pasta |
| 3-4 | Cooking - simmering - thickening - creaming | Ideal for long-cooking recipes (rice, sauces, roasts, fish) with liquids (e.g. water, wines, broth, milk), creaming pasta | |
| 2-3 | Ideal for long-cooking recipes (quantities under 1 litre: rice, sauces, roasts, fish) with liquids (e.g. water, wine, broth, milk) | ||
| Low power | 1-2 | Melting - defrosting - keeping food warm - creaming | Ideal for softening butter, gently melting chocolate, thawing small products and keeping just-cooked food warm (e.g. sauces, soups, minestrone) |
| 1 | Ideal for keeping just-cooked food warm, for creaming risottos and for keeping serving dishes warm (with induction-suitable accessory) | ||
| OFF | Zero power | Support surface | Hob in stand-by or off mode (possible end-of-cooking residual heat, indicated by an “H”) |
| Function | Description of function | ||||
| Simmering | Automatically identifies a power level that is suitable for simmering long-cooking recipes. Suitable for cooking tomato sauce, ragu, soups, minestrone, maintaining a controlled cooking level (ideal for cooking in a bain-marie). Prevents food from boiling over (e.g. spurting) or sticking to the bottom and burning, as often happens with these recipes. Use this function after bringing the pot to the boil. | ||||
| Melting | Automatically identifies a power level that is suitable for slowly melting delicate products without compromising their sensorial quality (chocolate, butter, etc.). | ||||
| 6th Sense Sixth sense bringing water to the boil | Automatically identifies when water reaches boiling point and reduces the power to maintain the boil until the food is added. When the water reaches boiling point an acoustic signal is emitted, and any ingredients can be added (e.g. condiments, pasta, rice, vegetables, meat and fish to be boiled) but also homemade preserves or accessories to be sterilized. | ||||
| Flexi cook | This function combines two cooking zones and allows you to exploit the combined surface area for large rectangular or oval shaped cooking receptacles or grilles. For grilling large quantities or pieces of food (fish, kebabs, vegetables like red chicory, steaks, German sausages). For cooking recipes like rolled roast joints or whole fish, generally accompanied with a sauce or stock, using a casserole dish/fish kettle/pan | ||||
| Food categories | Dishes or type of cooking | Power level and cooking status | |||
| First stage | Power | Second stage | Power | ||
| Pasta, rice | Fresh pasta | Heating the water | Booster - 9 | Cooking the pasta and maintaining the boil | 7-8 |
| Dry pasta | Heating the water | Booster - 9 | Cooking the pasta and maintaining the boil | 7-8 | |
| Boiled rice | Heating the water | Booster - 9 | Cooking the pasta and maintaining the boil | 5-6 | |
| Risotto | Sautéing and roasting | 7-8 | Cooking | 4-5 | |
| Vegetables, pulses | Boiled | Heating the water | Booster - 9 | Boiling | 6-7 |
| Fried | Heating the oil | 9 | Frying | 8-9 | |
| Sautéed | Heating the accessory | 7-8 | Cooking | 6-7 | |
| Stewed | Heating the accessory | 7-8 | Cooking | 3-4 | |
| Light fried | Heating the accessory | 7-8 | Browning the food | 7-8 | |
| Meat | Roast | Browning the meat with oil (if with butter power level 6) | 7-8 | Cooking | 3-4 |
| Grilled | Preheating the pan | 7-8 | Grilling on both sides | 7-8 | |
| Browned | Browning with oil (if with butter power level 6) | 7-8 | Cooking | 4-5 | |
| Stewed | Browning with oil (if with butter power level 6) | 7-8 | Cooking | 3-4 | |
| Fish | Grilled | Preheating the pan | 7-8 | Cooking | 7-8 |
| Stewed | Browning with oil (if with butter power level 6) | 7-8 | Cooking | 3-4 | |
| Fried | Heating the oil or fat | 8-9 | Frying | 7-8 | |
| Eggs | Frittata | Heating the pan with butter or fat | 6 | Cooking | 6-7 |
| Omelettes | Heating the pan with butter or fat | 6 | Cooking | 5-6 | |
| Soft/hard-boiled | Heating the water | Booster - 9 | Cooking | 5-6 | |
| Pancakes | Heating the pan with butter | 6 | Cooking | 5-6 | |
| Sauces | Tomato | Browning with oil (if with butter power level 6) | 6-7 | Cooking | 3-4 |
| Ragu | Browning with oil (if with butter power level 6) | 6-7 | Cooking | 3-4 | |
| Béchamel | Preparing the base (melt butter and flour) | 5-6 | Bring to a light boil | 3-4 | |
| Desserts, creams | Pastry cream | Bring the milk to the boil | 4-5 | Maintain a light boil | 4-5 |
| Puddings | Bring the milk to the boil | 4-5 | Maintain a light boil | 2-3 | |
| Rice in milk | Heat the milk | 5-6 | Cooking | 2-3 | |
CONSIGNES DE SÉCURITÉ IMPORTANTES
VOTRE SECURITE ET CELLE DE VOTRE ENTOURAGE MÉRITENT Toute VOTRE ATTENTION
DECLARATION DE CONFORMITE (C)
GUIDA RICERCA GUASTI
Tia va evepyonoioeTe EaV tN aeitoupyia Flexicook kai otic duo eotie, natntote to koumi
H 104yia Flexi cook mpe i enionc va avxveoet n t metakivon evoc oekouc an to ia eotia otny aan evtoc n cni pavac fxi cook diatnpwrtac to ibio enine do 10xuc, tnc eotiac otnv onoi tootheinke apkka to okeuoc (avatpEte st npapadeiyma otny napakatw ekova: eov to okeuoc metakivnne i an tymuopoovt Eotia otnv niow eotia, to enine do 10xoc empaiveetai otnv oboyn nu attoei eti otny eotia otnv onoi tootheinke te okevoct).
Enionc, mnpoeite va xpnounoiote tvn enipaveia Flexi cook w cdo avexapntec oietc paayepaotoc xpnounoiovtac to avtioiox koujmi nTc meovwveinc eotiac.
ToTOBtItoTe oKevoc 0To KevTPO TcN eHovwEvnc Eotiac Ka pUoMioTe to enine6o loxoc Me tnv oOvnp

ATT FÖRBEREDA INBYGGNADSUTRYMMET

WARNING
DÔLEŽITÉ BEZPEČNOSTNÉ POKYNY
VAŠA BEZPECNOST A BEZPECNOST INYCH OSÔB JE VEŁMI DOLEZITÁ
V toto navode a na samotnom spotrebici su uvedené dolezite spravy tykajuce sa bezpecnosti, ktoré si musite precítat a vždy presne dodržiavat.

NÁDOBY, KTORÉ MÂTE DOMA

BkIIOUeHHe/BbIKIOUeHHe BapOHyo nAnei
YtO6bI BKJIOHTB BApOChyU NaHEnb, HaxMMTe IeepKHe HaxaToi KHOkky 1 OKONO 2 CekyHd: npn EToM 3aTOpTcN HndKaTop HaKD KHOkO, IN BHYTpN KpyKOB, OTHoCIAxxCK 30HAM HarpeBa, NOABTcN 3O6paKeHNI Tpe.
Tb6bI bKIOUHTb naHJIb, HAKMITE n IepXHTe HAKATO T Ty KHOKNy Do Tex nop, noka He noraCHT DCNPIe. PnI tOM npOxCoHIT BbIKIOUHe Nce 3OH HarpeBa.

EcnB TeueHn 10 cekynd nocBe BkIouehn He 6bl BbIbpaH N Odn H3 pexKMOB, BapOHaN naHEn b AToMaTueeCKn BbIKIOaTeC.
BkIIOUeHnE m peryIuPobKa 30H HarpeBa

Iocne BkIoueHn BapOHy nAneHn yCTaHOBtne nocdy Ha Bb6paHHy 3Ony HArpeBa.
BkIouHte 30hy HapReBa hauKaTmem COOTBeCTbUOeJ KpyTIO KhoNk: BHyTpIO KpyKka npi 3OM OTOpBa3NTc UcNIO , 3TO COTBETCTByE TpeDhemy yOBoHMOuHocTN. 3To6bI I3MeHnTB yOboHb MoUHOCTN, IOCTaTOHNO Trop30HTaIBo CMeuaTb NaIE O CEHCOPHO WkaJe: cINpA BHyTpIO KpyKka 6yTeT npi 3OM N3MeHnTaBcBA 3aBcIMOCTN OT pIoNoJHmna Ha WkaJe OT MInHMyma, paBHO r 1, Do MaKcMyma, paBHO r 9. PioJIb3yueCbeCCHOPHO WkaJIO, MoXHO BkIOuHTb peXIM 6bIcTporo paoRpeBa hauKaTmem CencHPOH KhoNk "BOOST" (Ha dncIIee NoBHTc ByKBaP "P"). UpoBeH bMoUHcTn "BOOST" MOxHO nCIOJIb3OBaTb B TeHeNe MaKcIMyM 10 MHyT, PO HcTeeHmN KOtbpX abTomatUeckn YctahAbnBaTaC T yOboHb MoUHocTN 9. B MoDeJX CTpeM 3OHAMn HapReBa MOxHO OndOBpeMeHHo 3aDaBaTb yOboHb MoUHocTN "BOOST" HA BCex 3THx TPEX 30Hax: B 3OM CNyae AbTomatUeckn 6yTe TPOIN3BedeHo pacnPepelene MeUHocTN MExdy 3OHAMN.

EcnB KJIUeHHe No HeckObKo 30n HArpeBa, To C NIOoBbO CeHCOPHO IaIbMoXHO MeHaTb yOpBeH MoUHCTN Bb6paHNo 30Hb HArpeBa, KOtopa OnpeJenTcno HAnuCIO CBTeAueiCToUKN BHN3y Cnpaba OTHaueHnY yOpBn HAUHCTN. IInr Bbl6pa 30Hb HArpeBa DOCTaTOHNO HaxaTb COOTBeTCTByOuY KoTyIyo KhoNky.

B cnyae ecn nocya oka3bBaetcno no kakim-TO npuynnham henoDxpauei dna IcNoIb3OBAHnHa daHHo BapouHoi mHyduKIOHNHO naHEn, Hapnimep, npie ee HnpabInbHO uCTAHOBKe INIIE NOOTBeTCTByoUHX pa3Mepax, To HA DCIIeN BbIOBNTC yKa3aHne Ha "OTCYTCTBNE nocydb" (cm. pnc. c60ky). EcnB teueHne 60 cekynd ciTeMa He 3aΦNKcpiye T haJIue KAKOI-JIN60 nocybl, To npOn3OJeT BbKJIQUHHe BapouHoi naHEn.
BbIKIoueHne 30HbI HarpeBa
Bb6epnte 30ny Hara, KOTpyo Heo6xOIMMo BbKIOHTb, HaxaB COOTBeTCTByIOUkyo KpyrIyIO KHONKY (Ha DnCIIee IOnABITcra ToKa cnpBa NOD 3HaueHmE mypOBH MoIooCTn). HaXMMte Ha OFF Ha ceHcoPno IokaJe.

PnTOM pONCXOINT BbKIIIOUeHHe 30hI bHaPeBa, n eCIN OHa eIe IopraJyA, To BHyTpN Kpyjka OToBpaKaTec8yKBA "H".
BukBa H" yka3bIaet Ha hauHme octatoHoro TeTnla. Tako ropa HndNkAtop npedymotpe nla kaoDto 30hIHarpeBa BapOHOHaENi; OTO6paKeHMe 30I bYkbblrOBOpNT O To,TO onpdeJeHHbe 30hI HarpeBa IMeOT cIMKOM BbICOKy To mTepeATpy. Iocne OCTbBAHN 30hI HarpeBa DmCNIe BbIKIOHTcR.
Hacroika TaMepa
Taimepnpedctabnetae cooBbIKIOUaTeB cuaOBbIM MEXAHN3MOM,IO3BOIAIOUI 3aDabaTB dIINTEbHcTb npiroTOBNEHn IIMuHa BpeMa do 90 MNHT.
Bb6epnte 3OHy hArpeBa, dIg KOTopo ppeIIOAaeTc BkIOUHTb TaMEp (Ha DCINPee CnPABA ND yka3aTeMe MoUHCTN 3aRopaetc TOnKa), 3aTeM YCTAHOBITE
Heo6xOIMoe BpeMa pni NOMOUs KNONOK ^ + fHKNU Taimepa: PdOM cDCIIPEEM 3ObH bHarpeBa 6ydt OTobpaKeHO 3NaHEne BpeMeHH BMINYtax.
Yepe3 HeckoKc SeKHyd nOcne NocJe NocEnHero HauKaTHa Ha Taimepe HauHnaTc ObaTHb OTCtE (TOKA Bbl6op3 3ObH bHarpeBa HauHnAeT MIRatb).
Pi NCTeEHn 3aDaHHOro BpeMeHN PNOAEcra 3ByKOBo CMrHal, IN 3OHa HArpeBa AToMaTHueCKNs BblIOUaETc.
B cnyue NcPONb3OBAHn Taimepa B COUYaCTBO CM. ONINCAHne 3TO rOpeKIMHa Na CNeDuOpSe CTpaniue.
- IcnoIb30BaTbToIbKO BDOy (IMMeIOUyIO TemIpeAtpy OkpykaHOe (cpdebl);
He do6abnlaTb coJIb, liobble nHrpeJeHneTb nI npnpaBb/3anpaBKn Do MOMeHa 3aKnnaHnra
He MeHbTy yOBeHb MoUHOCTn 30HbHaRpeBa, He yBpaTb NocyDy C30HbHaRpeBa, He CDBirTaTb NocyDy;
3aNoJIHbTb NocUy He MeHee Yem Ha 1/3 ee Obema (MnHmym 1), Ho HmKoIHa He 3aNoJIHbTb Do Camoro Kpa (Cm. PnBBeDeHHy pOam TabnIcy);
He noJIb3OBAtBcA CKOpOBapKoH Ha 30HaX HaRpeBa,ДЯ KToTobIx BKIOUeH peXIM "6-e YyBCTB0".
Kpome TOrO,ДЯ NOIpyeHnO ONTUMaJIbHbIX pe3yJIbTaTOB peKoMeHdyeTcA:
He BKNIOuA TbpeXIM "6-e YBCTBO" B To BpeM, KOgda 30Ha HaRpeBa eIe He OCTbJa (Ha DnCIIeepn TOM oTo6paKaetc8yKBA"H").
TABINLA YPOBHEI MOUHOCTN