
DBS 3503 - Iron CLATRONIC - Free user manual and instructions
Find the device manual for free DBS 3503 CLATRONIC in PDF.
| Product type | Steam station iron |
| Brand | Clatronic |
| Model | DBS 3503 |
| Power supply | 220-240 V~, 50/60 Hz |
| Power | 2000-2400 W |
| Net weight | Approx. 3.3 kg |
| Water tank capacity | 1.0 liter |
| Protection class | I |
| Automatic shut-off | Yes, after 20 minutes of inactivity |
| Vertical steam function | Yes, for steaming hanging garments |
| Electronic temperature control | Yes, by SET button with display |
| Transport handle | Yes, retractable with lock |
| Anti-scale filter | Yes, replaceable cartridge (lifespan ~18 L) |
| Steam ironing | Yes, with electronic steam control |
| Dry ironing | Yes |
| Soleplate care | Clean with a slightly damp cloth, without detergent |
| General cleaning | Wipe surfaces with a dry cloth; do not immerse |
| Filter replacement | Turn off and unplug, remove the tank, replace the cartridge |
| Safety | Hot surface (beware of burns), automatic shut-off, unplug before refilling |
| Included accessories | Base with iron rest, removable water tank, anti-scale filter |
| Warranty | According to manufacturer's conditions (see manual) |
Frequently Asked Questions - DBS 3503 CLATRONIC
User questions about DBS 3503 CLATRONIC
0 question about this device. Answer the ones you know or ask your own.
Ask a new question about this device
Download the instructions for your Iron in PDF format for free! Find your manual DBS 3503 - CLATRONIC and take your electronic device back in hand. On this page are published all the documents necessary for the use of your device. DBS 3503 by CLATRONIC.
USER MANUAL DBS 3503 CLATRONIC
natural_image
Black and white photo of a steam iron with orange handle and blue base, no visible text or symbols on the device itself.CE
| DEUTSCH | ENGLISH | |||
| Inhalt | Contents | |||
| Übersicht der Bedienelemente......Seite | 3 | Overview of the Components......Page | 3 | DEUTSCH |
| Bedienungsanleitung......Seite | 4 | Instruction Manual......Page | 37 | |
| Technische Daten......Seite | 9 | Technical Data......Page | 42 | |
| Garantie......Seite | 10 | Disposal......Page | 42 | |
| Entsorgung......Seite | 11 | |||
| NEDERLANDS | JEZYK POLSKI | |||
| Inhoud | Spis treści | |||
| Overzicht van de bedieningselementen......Pagina | 3 | Przegląd elementów obsugi......Strona 3 | ||
| Gebruiksaanwijzing......Pagina | 12 | Instrukcja obsługi......Strona 43 | ||
| Technische gegevens......Pagina | 17 | Dane techniczne......Strona 48 | ||
| Verwijdering......Pagina | 17 | Warunki gwarancji......Strona 49 | ||
| Usuwanie......Strona 49 | ||||
| FRANÇAIS | MAGYARUL | |||
| Sommaire | Tartalom | |||
| Liste des différents éléments de commande......Page | 3 | A kezelőelemek áttekintése......Oldal 3 | ||
| Mode d'emploi......Page | 18 | Használati utasitás......Oldal 50 | ||
| Données techniques......Page | 23 | Műszaki adatok......Oldal 55 | ||
| Elimination......Page | 24 | Hulladékkezelés......Oldal 55 | ||
| ESPAÑOL | YKPAÏHCBKA | |||
| Indice | Зміст | |||
| Indicación de los elementos de manejo......Página | 3 | Огляд елементів управління......сторінка | 3 | JÉZYK POLSKI |
| Instrucciones de servicio......Página | 25 | Інструкція з експлуатації......сторінка | 56 | |
| Datos técnicos......Página | 30 | Технічні параметри......сторінка 61 | ||
| Eliminación......Página | 30 | |||
| ITALIANO | РУССКИЙ | |||
| Indice | Содержание | |||
| Elementi di comando......Pagina | 3 | Обзор деталей прибора......стр. 3 | ||
| Istruzioni per l'uso......Pagina | 31 | Руководство по эксплуатации......стр. 62 | ||
| Dati tecnici......Pagina | 36 | Технические данные......стр. 67 | ||
| Smaltimento......Pagina | 36 | |||
| عربي | ||||
| المحتويات | ||||
| 3 | نظرة عامة على الكويتات | |||
| 72 | دبل التعلیمت | |||
| 68 | البيانات الفنية | |||
natural_image
Line drawings of a shoe with labeled parts A and B, showing front and side views (no text or symbols beyond labels)Thank you for choosing our product. We hope you enjoy using the appliance.
Symbols in these Instructions for Use
Important information for your safety is specially marked. It is essential to comply with these instructions in order to avoid accidents and prevent damage to the machine:

WARNING:
This warns you of dangers to your health and indicates possible injury risks.

CAUTION:
This refers to possible hazards to the machine or other objects.

NOTE:
This highlights tips and information.
General Safety Instructions
Read the operating instructions carefully before putting the appliance into operation and keep the instructions including the warranty, the receipt and, if possible, the box with the internal packing. If you give this device to other people, please also pass on the operating instructions.
- The appliance is designed exclusively for private use and for the envisaged purpose. This appliance is not fit for commercial use.
- Do not use it outdoors. Keep it away from sources of heat, direct sunlight, humidity (never dip it into any liquid) and sharp edges. Do not use the appliance with wet hands. If the appliance is humid or wet, unplug it immediately.
- When cleaning or putting it away, switch off the appliance and always pull out the plug from the socket (pull the plug itself, not the lead) if the appliance is not being used and remove the attached accessories.
- Do not operate the machine without supervision. If you leave the room you should always turn the device off. Remove the plug from the socket.
- The device and the mains lead have to be checked regularly for signs of damage. If damage is found the device must not be used.
- Use only original spare parts.
- In order to ensure your children's safety, please keep all packaging (plastic bags, boxes, polystyrene etc.) out of their reach.

WARNING!
Caution! Do not allow small children to play with the foil as there is a danger of suffocation!
- Pay careful attention to the following "Special Safety Instructions".
Special Safety Instructions
Symbols on the product
You will find the following symbol with warning or informational character on the product:

WARNING: Hot surface! Danger of burns!
During operation the temperature of the exposed surface may be very hot.

WARNING:
- The soleplate of the iron quickly becomes hot and needs time to cool down. Please do not touch it!
- When not in use the iron should be stored in the storage space! Do not place it vertically onto any other surface. There is the risk that the iron will slip.

WARNING:
- Choose a secure surface for the stand! The surface must be level and stable. Check the surface again for stability.
- The iron must be used and rested on a stable, heat-resistant surface.
- Before filling the water tank remove the mains lead.
- The iron must not be left unsupervised while it is connected to the mains.
- Do not use the iron if it was dropped, has visible damages or leaks.
- Do not try to repair the appliance on your own. Always contact an authorized technician. To avoid the exposure to danger, always have a faulty cable be replaced only by the manufacturer, by our customer service or by a qualified person and with a cable of the same type.
- While the iron is switched on and while it cools down, the iron and its connection cable must be outside the reach of children younger than 8 years.
- This appliance can be used by children aged from 8 years and above and persons with reduced physical, sensory or mental capabilities or lack of experience and knowledge if they have been given supervision or instruction concerning use of the appliance in a safe way and understand the hazards involved.
• Children shall not play with the appliance. - Cleaning and user maintenance shall not be made by children without supervision.
- The tank should only be filled up to the maximum mark. Do not overfill! Maximum water filling quantity: 1.0 litres.
- Do not bend the connecting hose (2)!
Intended Use
This appliance is intended for ironing of clothing and textiles.
It is intended for use in households.
Any other use shall be considered as not intended use and can lead to material damage or even personal injury.
Overview of the Components
1 Steam jet button
2 Connecting tube
3 Mains lead
4 Base
5 Iron rest
6 Releasing device for handle "UNLOCK"
7 Water tank with lime filter
8 Handle
9 Lock for continuous steam
10 Steam jet button
11 Selector button SET
12 Control lamp
13 Temperature selection display
14 Lime filter cartridge
not shown
RELEASE button below the water tank. Releasing device of the water tank
Instructions
Unpacking
- Remove any protective foils and stickers from the soleplate.
- Please unwind the lead completely.
Electrical connection
- Make sure that the iron voltage (see name plate) and the line voltage match.
- The mains plug should only be inserted into a correctly installed socket with earthing contact.
Power Requirements
The station has a total maximum wattage of 2400 W. With this connected load a separate supply line protected by a 16 A household circuit breaker is recommended.

CAUTION: Overload!
- If you use extension leads, these should have a cable cross-section of at least 1.5 ~mm^2
- Do not use any multiple sockets, as this device is too powerful.
Turn on and off
Turn on: Connect the mains plug to a properly installed safety socket. The appliance is immediately switched to operating mode. This is indicated by the red control lamp in the display.
Turn off: Press the selector button SET (11) repeatedly until the red control lamp appears in the display. Disconnect the mains plug from the socket. The light in the display goes out.
Automatic shut-off function
The appliance has an automatic shut-off function.
- If the iron station is not in use it will shut off after 20 minutes. The red control lamp in the display flashes.
- Use the selector button SET (11) to reset the desired temperature, if you want to continue ironing.
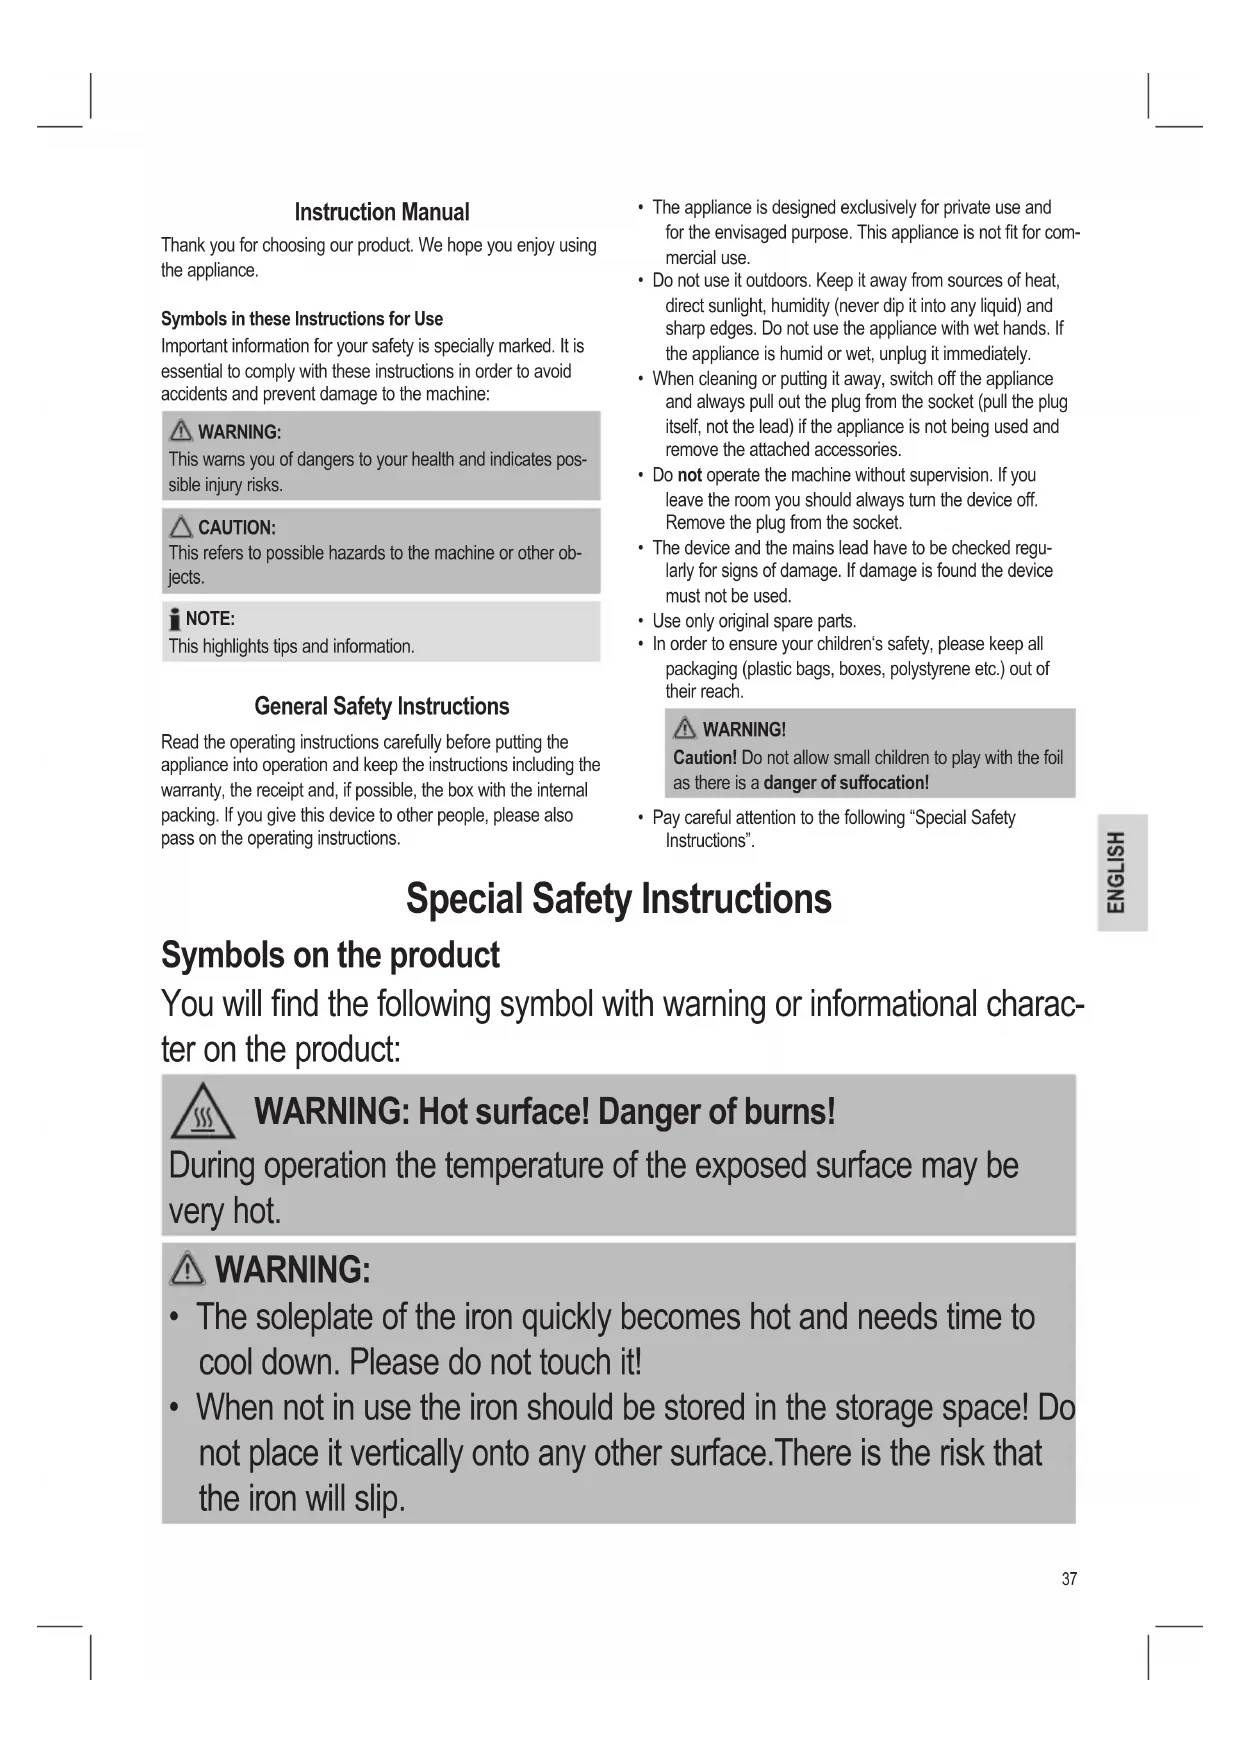
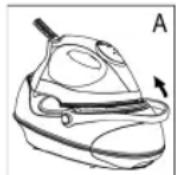
Function of the Handle (8)
The handle attached to the base serves for carrying the appliance when the mains plug has been pulled from the outlet.
- To carry the appliance, raise the handle until it engages (Fig. A). A “click” confirms that the handle has been locked. You can use the handle for transport of the appliance.
- To unlock the handle lock, press both buttons "UNLOCK" (6) at the same time and lower the handle (Fig. B).
Electronic temperature adjustment using the selector button SET (11)
- Observe the ironing instructions on the clothes label.
- Select the temperature setting according to the following table.
- Turn woolen clothes inside out to avoid shiny spots on the fabric due to steam ironing. In addition, lay a thin cotton cloth onto the fabric.
- The instructions in the table only refer to fabrics with no additional surface treatment (gloss, impregnation, wrinkles, etc.). Select a low temperature setting for fabrics with additional surface treatment and iron them inside out.
- Press the selector button SET (11) to set the desired temperature.
| Display |  |  |  |  |
| Fabric Synthetics Silk Nylon Acrylics Acetate | Wool Polyester | Rayon Cotton Linen | Rayon Cotton Linen | |
| Temperature | Low Medium High Highest | |||
| Symbol on clothes label | • | •• | ••• | ••• |
| Ironing instruction | Iron without steam inside out | Steam ironing on the left with a cloth | Iron while the fabric is still damp | Iron with steam |
| Steam selection | — | |||
i NOTE:
The iron heats up faster than it cools down. Start ironing with the lowest temperature setting.
CAUTION:
When changing from a higher to a lower temperature the blue indicator starts flashing fast. This means that the temperature is too high for the setting. Do not sing your laundry! Only continue ironing after the blue indicator stops flashing and an acoustic signal is emitted.
Water Tank (7)
- The water tank has a recessed grip on the bottom so that it can be removed.
- The lock of the water tank is also the lime filter cartridge. Take out the lime filter cartridge to fill with water. With this, proceed as described under "How can I replenish the water during operation?".
• The tank volume is 1.0 litres. - The tank illumination lights once the mains plug has been inserted into the outlet. It indicates readiness for steam ironing when the lime filter cartridge and the water tank have been set correctly.
Water
Use only tap water or distilled water.
Do not fill battery water, water from the clothes dryer and water containing additives (such as starch, perfume, softener or other chemicals) into the water reservoir.
This could damage the iron due to residues forming in the steam chamber. These residues may cause impurities to the fabric when dropping out of the holes in the soleplate.
Operation
Before Initial Use
- Clean the ironing base with a slightly damp cloth.
- In order to remove all residues before initial use, please pass the iron a few times over an old clean cloth.
Ironing without steam
i NOTE:
Sort out the garments according to their ironing temperatures.
- If the handle should still be in the carrying position, unlock the lock as described above under "Function of the Handle".
- Place the iron on the rest (5).
- Only connect the machine to a properly installed safety socket.
- Use the selector button SET (11) to set the temperature. If you have sensitive items to iron, please begin with the lowest temperature.
i NOTE:
- The selected temperature lights up blue and flashes slowly. The iron heats up. The operating temperature is reached as soon as the blue display stops flashing and a beep sounds. Now you can start ironing.
- The iron is electronically held at a constant temperature during use. If the blue indicator in the display flashes slowly, the appliance is in the process of heating up.
- If the blue indicator flashes quickly in the display, the temperature for the set position is still too high. Do not scorch your washing! Only continue to iron if the blue indicator stops flashing and a beep sounds.
After use press the selector button SET (11) repeatedly until the red control lamp flashes in the display. Disconnect the mains plug from the socket.
Steam Ironing
WARNING:
The iron expels a large quantity of hot steam. Danger of burns.
CAUTION:
- When using the steam iron please ensure that the water tank is always filled to the required level.
- The lime filter cartridge always has to be positioned in the water tank, even if you use distilled water.
△ CAUTION: Initial use:
Please proceed as follows:
- The tank should only be filled up to the maximum mark. Do not overfill!
- Close the water tank and place it back in the base.
- Connect the base station to a socket with earthing contact.

CAUTION: Initial use:
- If the handle is still in the carrying position, release the lock as described under "Function of the Handle".
- Use the selector button SET (11) to set the temperature. Refer to the table above.
- Wait until the sole plate has heated up. The operating temperature is reached as soon as the blue indicator stops flashing and a beep sounds.
- Press the steam jet button (1) for at least 12 minute. As an alternative, you can pull back the lock (9) to lock the steam jet button (10). This time is needed for the steam to reach the iron. A slightly louder noise of the pump is normal with this.

NOTE ON STEAM IRONING:
- Setting is not intended for steam ironing (see table).
- The amount of steam is electronically controlled. It is based on the ironing temperature.
- The ironing temperature is electronically controlled during use. The device heats up if the blue indicator on the display starts flashing slowly.
After use, press the selector button SET (11) repeatedly until the red control lamp appears in the display. Disconnect the mains plug from the socket.
Vertical Steam function (Vertical Steam)
This can be used to produce a jet of steam in a vertical direction. This function can be used to remove creases from hanging clothes or from curtains.

WARNING:
Never point the steam jet at other people. Danger of bums.
Hang your laundry on a clothes hanger and move the iron to approximately 5-15 cm away.
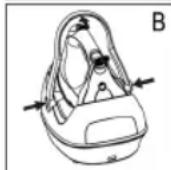
How can I replenish the water during operation?
Refill with water before the tank is completely empty. A loud noise of the pump during operation indicates that the water level is too low.
- Place the iron on the rest (5).
- Press the selector button SET (11) repeatedly until the red control lamp appears in the display.
- Remove the mains plug from the socket.
- In order to remove the tank, press the RELEASE button below the water tank. (Fig. C).
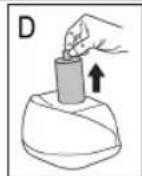
- Remove the lime filter cartridge (Fig. D).
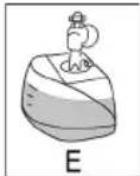
- Fill the tank up to the maximum mark (Fig. E). Do not overfill!
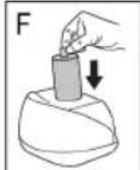
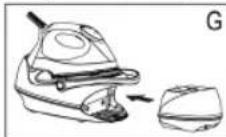
- Reinsert the lime filter cartridge and push the tank back into the base (Fig. F + G). A "click" confirms that the water tank has been set correctly.
- You can now continue ironing.

NOTE:
The tank illumination lights once the mains plug has been inserted into the outlet. If it does not light, the lime filter cartridge or the water tank has not been set correctly. Check both positions.
When you have finished
- Press the selector button SET (11) repeatedly until the red control lamp appears in the display. Remove the mains plug from the socket. The light on the display goes out.
- Allow the device to cool down before you put it away.
Anti-scale filter
Your steam iron station is fitted with an anti-scale filter. The anti-scale filter cartridge becomes spent after filtering approximately 18 litres of water, depending on the hardness of your water. It then loses its effectiveness and must be replaced.
- Turn off the appliance.
- Disconnect the mains plug from the mains.
- Remove the water tank.
- Remove the anti-scale filter cartridge.
- Fill the tank up to the maximum mark. Do not overfill!
- Insert a new anti-scale filter cartridge.
- Before turning on the appliance, wait a few minutes until the new filter cartridge is saturated with water.

NOTE:
If you do not have a new anti-scale filter cartridge, you can still iron with the used cartridge and distilled water.
Cleaning

WARNING:
• Always remove the mains lead before cleaning!
- Wait until the machine has cooled down completely.
• Under no circumstances should you immerse the device in water for cleaning purposes. Otherwise this might result in an electric shock or fire.

CAUTION:
- Do not use a wire brush or any abrasive items.
- Do not use any acidic or abrasive detergents.
• Children shall not perform cleaning without supervision.
- Clean the casing with a slightly damp cloth.
- Clean the sole plate and the rest with a slightly damp cloth.
- Any residual water can remain in the water tank, but should be poured out if it has been in the tank for a prolonged period.
Troubleshooting
| Fault Possible Cause Remedy | ||
| Device does not work | Faulty mains socket | Try another socket. |
| The red control lamp lights up in the display. | Select the desired temperature of the iron. | |
| The device suddenly stops working during operation | Is the electric circuit overloaded? | Check the house fuse |
| The blue indicator on the display is flashing fast | The temperature is too high for the selected position. | Wait until the iron has cooled down (the blue indicator stops flashing). |
| The tank illumination does not light after heating and no steam is generated | The lime filter cartridge is mission or has not been set correctly. | Check the position of the lime filter cartridge. |
| The water tank has not been installed correctly. | A "click" confirms that the water tank has been set correctly. | |
| Loud noises during steam operation | The tank is empty. | Check the tank.Fill tank with water. |
Technical Data
Model: DBS 3503
Power supply: 220-240 V\~, 50/60 Hz
Power consumption:....2000-2400 W
Protection class: I
Maximum filling quantity of the water tank: 1.0 Litre
Net weight:......approx. 3.3 kg
The right to make technical and design modifications in the course of continuous product development remains reserved.
This device has been tested according to all relevant current CE guidelines, such as electromagnetic compatibility and low voltage directives, and has been constructed in accordance with the latest safety regulations.
Disposal
Meaning of the "Dustbin" Symbol
Protect our environment: do not dispose of electrical equipment in the domestic waste.
Please return any electrical equipment that you will no longer use to the collection points provided for their disposal.
This helps avoid the potential effects of incorrect disposal on the environment and human health.
This will contribute to the recycling and other forms of reutilisation of electrical and electronic equipment.
Information concerning where the equipment can be disposed of can be obtained from your local authority.
Instrukcje obsługi
CTC Clatronic Sp. z o.o

- Symbols in these Instructions for Use
- WARNING:
- CAUTION:
- NOTE:
- General Safety Instructions
- WARNING!
- Special Safety Instructions
- Symbols on the product
- WARNING: Hot surface! Danger of burns!
- Intended Use
- Overview of the Components
- not shown
- Instructions
- Unpacking
- Electrical connection
- Power Requirements
- CAUTION: Overload!
- Turn on and off
- Automatic shut-off function
- Function of the Handle (8)
- Electronic temperature adjustment using the selector button SET (11)
- i NOTE:
- Water Tank (7)
- Water
- Operation
- Before Initial Use
- Ironing without steam
- Steam Ironing
- △ CAUTION: Initial use:
- CAUTION: Initial use:
- NOTE ON STEAM IRONING:
- Vertical Steam function (Vertical Steam)
- How can I replenish the water during operation?
- When you have finished
- Anti-scale filter
- Cleaning
- Technical Data
- Meaning of the "Dustbin" Symbol
- Instrukcje obsługi
Brand : CLATRONIC
Model : DBS 3503
Category : Iron