KM 3333 - Food Processor CLATRONIC - Free user manual and instructions
Find the device manual for free KM 3333 CLATRONIC in PDF.

Download the instructions for your Food Processor in PDF format for free! Find your manual KM 3333 - CLATRONIC and take your electronic device back in hand. On this page are published all the documents necessary for the use of your device. KM 3333 by CLATRONIC.
USER MANUAL KM 3333 CLATRONIC
Overview of the Components Page 3
D-47906 Kempen/Germany
General Safety Instructions
Read the operating instructions carefully before putting the
appliance into operation and keep the instructions including the
warranty, the receipt and, if possible, the box with the internal
packing. If you give this device to other people, please also pass
on the operating instructions.
• The appliance is designed exclusively for private use and for
the envisaged purpose. This appliance is not t for commer-
cial use. Do not use it outdoors. Keep it away from sources
of heat, direct sunlight, humidity (never dip it into any liquid)
and sharp edges. Do not use the appliance with wet hands.
If the appliance is humid or wet, unplug it immediately.
• When cleaning or putting it away, switch off the appliance
and always pull out the plug from the socket (pull the plug
itself, not the lead) if the appliance is not being used and
remove the attached accessories.
• Do not operate the machine without supervision. If you
leave the room you should always turn the device off.
Remove the plug from the socket.
• The device and the mains lead have to be checked regularly
for signs of damage. If damage is found the device must not
• Do not try to repair the appliance on your own. Always
contact an authorized technician. To avoid the exposure
to danger, always have a faulty cable be replaced only by
the manufacturer, by our customer service or by a qualied
person and with a cable of the same type.
• Use only original spare parts.
• Pay careful attention to the following “Special Safety Instruc-
Children and Frail Individuals
• In order to ensure your children‘s safety, please keep all
packaging (plastic bags, boxes, polystyrene etc.) out of their
Caution! Do not allow small children to play with the foil
as there is a danger of suffocation!
• This device is not intended to be used by individuals (includ-
ing children) who have restricted physical, sensory or mental
abilities and/or insufcient knowledge and/or experience, un-
less they are supervised by an individual who is responsible
for their safety or have received instructions on how to use
• Children should be supervised at all times in order to ensure
that they do not play with the device.
Symbols in these Instructions for Use
Important information for your safety is specially marked. It is
essential to comply with these instructions in order to avoid ac-
cidents and prevent damage to the machine:
This warns you of dangers to your health and indicates
possible injury risks.
This refers to possible hazards to the machine or other
NOTE: This highlights tips and information.
Special safety instructions for the appliance
The cutting and grating insert, the French fries disc and the
chopping blade are very sharp on the cutting and grating sur-
faces and on the edges! When removing the attachments from
the bowl and container you will come into contact with this
accessory. Handle this accessory with care to avoid injuries.
• Place the appliance on smooth, level and stable work
• Do not insert the appliance plug without installing the neces-
• Before changing the attachments, the appliance must be
disconnected from the mains!
• Do not reach into the mixer vessel as the underlying blade
may cause injuries under certain circumstances!
• Never pour liquids hotter than 60°C into the jug! Danger of
• During operation you must never place your hands or other
objects in the mixer vessels!
• The appliance is equipped with a safety switch. Do not use
the appliance in case of malfunctions or if the safety switch
has been tampered with!
• Do not remove the lid during use.
• The device must only be switched on after you have
inserted the seal/stopper in the hole in the lid.
• In order to prevent injury or other dangers you must only use
the appropriate stopper for pressing the food and not your
ngers, a fork or other objects.
• Do not use the appliance when empty.
• Only food should be processed with this device.
• Do not put hard foods such as ice cubes, nutmeg or large
pieces of chocolate into the container! The blade can be
• Do not carry or lift the appliance during use. Always switch
it off rst and pull out the plug. Carry the appliance always
• Clean the appliance only as described in Cleaning“.
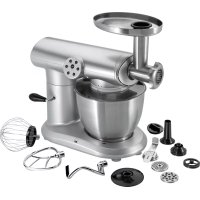
Overview of the Components
2 Mixer vessel lid with lling slot
4 Drive shaft for mixing bowl
6 Kitchen machine, basis appliance
8 Lid of the mixing bowl with feed tube
10 Mixing bowl driveshaft
16 French fries disk
21 Safety cover for mixer drive
22 Whisking and emulsifying disc
The following remark is to be found on the lid (8):
DO NOT OPERATE WITHOUT THIS COVER IN PLACE“
Unpacking the appliance
• Remove the appliance from the box and all the enclosed
• Before the device is used for the rst time the mixing bowl,
processor bowl, various lids and other accessories should
be washed in soapy water to remove any contamination
from their production.
Some parts are extremely sharp! There is the risk of being
injured under certain circumstances!
• Clean each single part one after the other and with great
• Dry well all the parts after washing.
Installation and use
Make sure that the switch (5) is positioned on “0“ and that the
appliance plug is not inserted when changing the attachments.
Only now can the attachments be mounted and used.
The safety cover (21) has to be mounted on the drive shaft of
the mixer drive (4) when you operate the grater bowl in order to
The appliance cannot be used without the safety lid!
Even if you would only like to use the mixer, the mixing bowl
• Short-term operation: If the device is subjected to a full
load (e.g. cutting meat up into slices) it should not be opera-
ted for more than 40 seconds. Please allow it to cool down
for 10 minutes before using it again!
• Pulse operation: Pulse mode is turned on by turning the
switch to the “P” position and releasing it again. The device
should not be used in this mode for more than 1 minute.
Allow it to cool down for 2 minutes before using it again!
Electrical connection
Check whether the electrical voltage that you intend to use is
the same as that of the machine. Details are to be found on the
Assembly of mixing bowl and lid
Position the cover for the mixer drive (21) on the drive shaft
of the mixing vessel (4) such that the
mark on the cover is
arrow on the base of the device. Turn the
cover for the mixer drive in a clockwise direction as far as it will
go (Illustration 1).
1. Place the mixing bowl (9) on the base in such a way that the
marking on the lower edge of the bowl is in line with the
marking on the basis. Then turn the bowl clockwise until
you hear it lock into place (Illustration 2 + 3).
be completely in line with one another.
2. Place the locating pin (20) over the drive shaft of the mixing
bowl (10) (Fig. 4) and select the corresponding tool (see the
section on “Mixing Bowl Operation“).
3. Position the lid (8) in such a way that the arrow
is aligned with the right-hand mark on the grater bowl.
The metal tip of the locating pin (20) has to engage into its
bearing in the lid. If this is not the case, check that the loca-
ting pin is correctly in position. Turn the lid in the direction of
the closed lock until it is heard to lock in place (Fig. 6). To
remove the lid, turn it in an anticlockwise direction.
Positioning the Mixing Bowl and Lid (Illustration 13-15)
1. Hold the mixer vessel (3) in such a way that the handle is on
the left-hand side. Place the mixing bowl on the base of the
device in such a way that the
mark on the bottom edge
of the bowl points to the
arrow on the base of the device.
Turn the mixer vessel in the direction of the arrow until it is
heard to lock in place.
must be completely in line
2. When replacing the lid (2), ensure that the spout opening on
the lid is above the spout of the mixer vessel.
3. Tighten the lid in a clockwise direction until it is heard to
lock in place.To remove the lid, turn it in an anticlockwise
Double Safety System
The motor can only be switched on if the grater bowl with the
cover locks into place correctly and the cover for the mixer drive
(21) is mounted. The mixer can only be used if the grater bowl is
correctly positioned. You should only remove the lid from the gra-
ter bowl or from the mixing vessel when the device is
switched off.ENGLISH
Do not use the mixer and the grater bowl at the same
Unwind the required mains lead from the base.
1. The grater bowl (9) must be mounted as described in the
section “Positioning the Grater Bowl“ (without tool).
2. Chop the food to be mixed into small pieces.
3. Fill the mixer vessel (3) with the food to be mixed (min. 0.2 l -
max. 1.5 l). Do not overll! Do not exceed the maximum
quantity stated on the mixing bowl (MAX mark)! Never ll
with hot food or hard ingredients such as potatoes, ice,
coffee beans, nuts, and so on.
CAUTION: SAFETy SWITCH!
The device only works if the grater bowl (9) with lid is also
4. Put the lid (2) in place and turn it tight.
5. Close the lid with the lock (1), paying attention to the
recesses. Turn the lock until it is tight.
6. Place the mixing bowl (3) in position as described under
“Positioning the Mixing Bowl“.
7. If you wish to ll in more food to be mixed you can remove
the lid and cover. Switch the device off beforehand. Remove
the lid (2) of the mixer vessel and ll with the desired ingre-
Do not reach into the mixer vessel, as the underlying
blade may cause injuries.
8. Place the lid on the mixer vessel again. Do not use the mixer
when empty or without the lid. Ensure that the function
switch is in the “0“ position.
9. Insert the plug in a duly installed 230 V/50 Hz socket.
10. Switch the device on (Level 1 or 2 etc.) or use pulse operati-
11. The mixing bowl must be held rmly in place during mixing.
12. For constant mixing (continuous mode):
When the device is operated on levels 1 to 4 the switch
locks into place in the respective position.
To switch the device off, turn the switch back to the “0“
For pulse mode (mixing at brief intervals) shift the switch to
“0“ position. The appliance is off now. Turn the switch to “P“
according to the desired interval length. When the switch is
released, it returns automatically to the “0“ position.
13. In order to remove the mixer jug turn it counterclockwise.
14. Clean the used parts as described in “Cleaning“.
• The cover of the mixer drive (4) must be mounted as descri-
bed above (Illustration 1).
• Mount the grater bowl as described under “Positioning the
Mixing Bowl“ (Illustration 2 + 3).
• Place the locating pin over the drive shaft (Illustration 4).
The metal point faces upwards.
• Never use more than one utensil at a time.
Dough kneading and beating
1. Please proceed as described under “Mixing Bowl Operati-
2. Use the dough hook (18) for preparing the dough and attach
it to the locating pin. Press the tool down as far as it will go
(Fig. 5). Turn the tool slightly to make insertion easier.
3. Now put in your ingredients. Please note the quantity details
contained in the table below. Do not put in more or less than
the quantities stated (min. 0.2 l – max. 1.5 l).
4. Place the lid in position on the processor bowl. Turn it tight
until it is clearly heard to lock in place (Illustration 6).
5. Close the opening in the lid with the stopper (7) (Illustration
6. Insert the plug into a 230 V / 50 Hz socket installed accor-
ding to existing regulations and with earthing protection.
Switch on the appliance and set a speed between 1 and 4
(See table) with switch (5).
When the device is operated on levels 1 to 4 the switch
locks into place in the respective position.
To switch the device off, turn the switch back to the “0“
For pulse mode (Operating at short intervals) shift the switch
to “0“ position. The appliance is off now. Turn the switch to
“P“ according to the desired interval length. When the switch
is released, it returns automatically to the “0“ position.
With this device it is possible within a very short time:
• up to 1000 g of heavy dough (bread or pastry),
• to stir up to 1 litre of crepe or wafe dough,
• beat up to 1500 g of light dough (e.g. for cookies).
Do not exceed the short operation times stated in the table
when kneading the dough!
7. After kneading/stirring turn the switch (5) back to position
“0“ as soon as a small amount or ball of dough has formed.
Then remove the mains plug.
8. To remove the lid, turn it in an anticlockwise direction.
9. Pull the blade off from the locating pin.
10. Remove the locating pin from the drive shaft.
11. In order to remove the mixing bowl, turn it in an anticlock-
wise direction. You can release the nished dough with the
dough scraper (23) and remove it from the bowl.
12. Clean the used parts as described in “Cleaning“.ENGLISH
Chopping with the Metal Blade
The chopping blade (19) is very sharp! Danger of injury!
1. Please proceed as described under “Mixing Bowl Operati-
2. Insert the chopping blade (19) directly above the locating
pin. Press the tool down as far as it will go (Fig. 5). Inserting
the tool is easier if it is turned slightly.
3. Cut the food up into smaller pieces beforehand. Now ll in
your ingredients. Please note the quantities stated in the
table below. Do not ll in more or less than the quantities
stated (min. 0.2 kg – max. 1.0 kg).
4. Place the lid in position on the processor bowl. Turn it to the
right until it is heard to lock in place (Illustration 6).
5. Close the ller shaft (8) with the stopper (7) (Illustration 10).
6. Insert the plug into a 230 V / 50 Hz socket installed accor-
ding to existing regulations and with earthing protection.
Switch on the appliance and set a speed between 2 and 3
(See table) with switch (5). You will achieve better results if
you use the pulse mode.
7. After chopping, turn the switch (5) back to “0“ and pull out
8. To remove the lid, turn it in an anticlockwise direction.
9. Pull the blade off the locating pin.
10. Remove the locating pin from the drive shaft.
11. In order to remove the mixing bowl, turn it in an anticlock-
wise direction. The contents can now be taken out of the
12. Clean the used parts as described in “Cleaning“.
1. Please proceed as described under “Mixing Bowl Operati-
2. Push to the desired tool (11-15) into the tool holder (17)
(Illustration 7). Attach the tool holder to the locating pin
3. Place the lid in position on the processor bowl. Turn it to the
right until it is heard to lock in place (Illustration 9).
For this you should use the recessed grips of the tool holder.
The grater and rasp surfaces as well as the edges of the
inserts are very sharp! Danger of injury! Handle these
attachments with caution!
4. Insert the plug into a 230 V / 50 Hz socket installed accor-
ding to existing regulations and with earthing protection.
5. Switch the device on (Level 1 or 2 etc.) or use pulse operati-
6. Cut the food up into smaller pieces beforehand. Now ll the
ller shaft (8) with your ingredients. Use the ller (7) to press
the food into the lling slot (Illustration 10). Exert a sufcient
degree of pressure on the ller. The appliance must be swit-
ched on only with the ller (7) mounted into place. Please
note the maximum lling level on the processor bowl.
7. After cutting/grating, turn the switch (5) back to “0“ and pull
8. To remove the lid, turn it in an anticlockwise direction.
Please take off the tool holder from the locating pin.
10. Remove the locating pin from the drive shaft.
11. In order to remove the mixing bowl, turn it in an anticlock-
wise direction. The contents can now be taken out of the
12. Clean the used parts as described in “Cleaning“.
Potatoes can be easily and quickly cut into French fries with the
French fry slicer (16).
1. Please proceed as described under “Mixing Bowl Operati-
2. Attach the French fries disc to the locating pin.
The cutting surfaces and edges of the slicer are extremely
sharp! Danger of injury! Handle these attachments with
3. Follow points 3 to 5 under “Cutting and Grating“.
4. Now ll the ller shaft (8) with your ingredients. Use the ller
(7) to press the food into the lling slot (Illustration 10). Exert
a sufcient degree of pressure on the ller. The appliance
must be switched on only with the ller (7) mounted into
place. Please note the maximum lling level on the proces-
5. After the cutting process is nished, turn the switch (5) back
to the “0“ position and remove the mains plug.
6. To remove the lid, turn it in an anticlockwise direction.
7. Remove the tool carefully from the locating pin.
8. Remove the locating pin from the drive shaft.
9. In order to remove the mixing bowl, turn it in an anticlock-
wise direction. The contents can now be taken out of the
10. Clean the used parts as described in “Cleaning“.
Using the Whisking and Emulsifying Disc
1. Please proceed as described under “Mixing Bowl Operati-
2. Attach the emulsifying disc (22) directly over the locating pin
(Fig. 11). Press the disc down as far as it will go. Insertion is
easier if the disc is turned slightly.
3. Now put in your ingredients (Fig. 12). Please note the quan-
tities contained in the table below. Do not put in any more or
less than the quantities stated (min. 0.1 l – max. 0.5 l).
4. Place the lid in position on the processor bowl. Turn it tight
until it is clearly heard to lock in place (Illustration 6).
5. Close the opening in the lid with the stopper (7) (Illustration
6. Insert the plug into a 230 V / 50 Hz socket installed accor-
ding to existing regulations and with earthing protection.
Switch on the appliance and set a speed between 1 and 4
(See table) with switch (5).
7. After you have nished beating, turn the switch (5) back to
the “0“ position and remove the mains plug.
8. To nish your work, please proceed as described above
under “French fries“, points 6 to 10.ENGLISH
Always choose a utensil and a speed according to the
Heavy dough (e.g. yeast
Cake mixture (Sponge
Cutting into small pieces,
Cutting meat into slices
Grating carrots, radish,
Grating potatoes, hard
Cutting up potatoes Max. 2,5 litre French fries disc
Scrambled egg Min. 2 eggs
• Always remove the plug before cleaning!
• Under no circumstances should you immerse the device
in water for cleaning purposes. Otherwise this might result
in an electric shock or re.
• Do not use a wire brush or any abrasive items.
• Do not use any acidic or abrasive detergents.
• Clean the bowl and the mixing vessel carefully immediately
after each procedure. To do so, remove the bowl in order to
be able to clean off any residues on the drive shaft.
• Use a moist towel to clean the outside of the basis appli-
• In the case of intensely colored foodstuffs (e.g. carrots), the
plastic parts can be stained: clean them with oil.
• Any removable parts which have come into contact with
food (Tool and vessels) can be cleaned in soapy water.
The components are not suitable for cleaning in a dishwasher.
If exposed to heat or caustic cleaners they might become
misshapen or discoloured.
• The tools should be stored in the grater bowl in order to
prevent injuries. First attach the emulsifying disc, the chop-
ping blade, the dough hook and then the tool holder to the
• The mains lead can be wound up under the base. You
should also use the cable compartment to store away the
In order to save space when storing the device, we recom-
mend mounting the mixer vessel with the handle on the
• Device is not working.
Check the mains connection.
Check the position of the rotary switch.
Otherpossiblecauses:
Your device is provided with four safety switches.
These prevent the motor from starting up accidentally.
Check that the following are rmly in place:
• the mixing bowl (9),
• the lid of the mixing bowl (8),
• the mixer vessel (3),
• the lid of the mixer vessel (2) or
• the safety cover (21).
The sound pressure level in the ear of an operator (LpA) was
measured according to DIN EN ISO 3744.
Sound pressure level detected: 87 dB(A) (no limit)ENGLISH
Power consumption: 1000 W Protection class: II Short-term operation : 40 Sec.
This device has been tested according to all relevant current
CE guidelines, such as electromagnetic compatibility and low
voltage directives, and has been constructed in accordance with
the latest safety regulations.
Subject to technical changes without prior notice!
Meaning of the “Dustbin” Symbol
Protect our environment: do not dispose of electrical equipment
in the domestic waste.
Please return any electrical equipment that you will no longer
use to the collection points provided for their disposal.
This helps avoid the potential effects of incorrect disposal on the
environment and human health.
This will contribute to the recycling and other forms of reutilisa-
tion of electrical and electronic equipment.
Information concerning where the equipment can be disposed of
can be obtained from your local authority.41