
BD321 - Radio BLAUPUNKT - Free user manual and instructions
Find the device manual for free BD321 BLAUPUNKT in PDF.
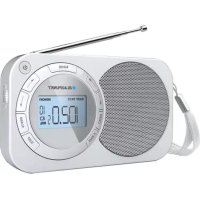


| Product type | AM/FM Radio |
| Brand | Blaupunkt |
| Model | BD321 |
| Power supply | 5 V DC mains adapter (not supplied) or 3 x 1.5 V R6/UM3/AA batteries (not supplied) |
| Frequency bands | FM (frequency modulation) and MW (medium wave) |
| Station presets | 20 presets (10 FM + 10 MW) |
| Functions | Alarm (buzzer or radio), sleep timer, snooze |
| Display | LCD screen |
| Antenna | FM telescopic antenna |
| Headphone jack | 3.5 mm jack (earphones not included) |
| Care and cleaning | Clean with a dry, lint-free cloth |
| Safety | Do not expose to water or humidity; do not block ventilation openings; do not place lit candles on the device; keep at least 5 cm distance around the device |
| Repairability | Contact a qualified technician in case of malfunction; do not open the device yourself |
Frequently Asked Questions - BD321 BLAUPUNKT
User questions about BD321 BLAUPUNKT
0 question about this device. Answer the ones you know or ask your own.
Ask a new question about this device
Download the instructions for your Radio in PDF format for free! Find your manual BD321 - BLAUPUNKT and take your electronic device back in hand. On this page are published all the documents necessary for the use of your device. BD321 by BLAUPUNKT.
USER MANUAL BD321 BLAUPUNKT
Models: BD-320 / BD-321
USER MANUALS
| Page 2 | German |
| Page 6 | English |
| Page 10 | French |
| Page 14 | Italian |
| Page 18 | Spanish |
| Page 22 | Portuguese |
| Page 26 | Dutch |
| Page 30 | Swedish |
| Page 34 | Danish |
| Page 38 | Finnish |
| Page 42 | Norwegian |
| Page 46 | Russian |
| Page 50 | Greek |
| Page 53 | Turkish |
| Page 57 | Polish |
| Page 61 | Bulgarian |
| Page 65 | Romanian |
| Page 69 | Czech |
| Page 73 | Hungarian |
| Page 77 | Japanese |
| Page 81 | Chinese |
| Page 85 | Arabic |
User manual BD-320 / BD-321
Please read the instructions carefully before operating the unit.
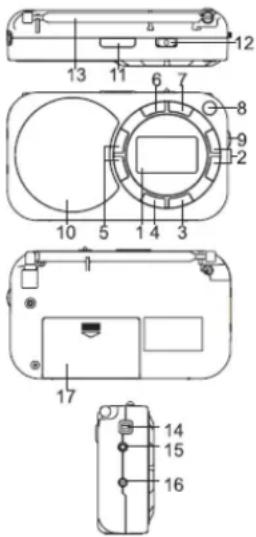
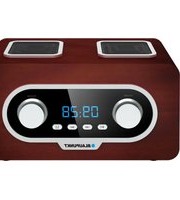
GENERAL CONTROLS
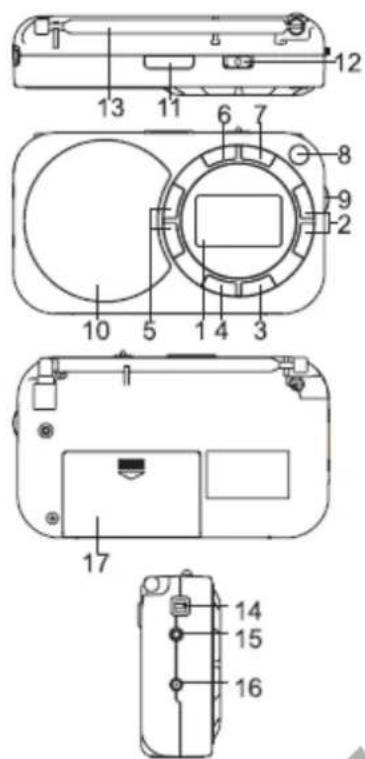
- LCD display 2.TUNING dial
- SLEEP button
- ALARM button
- Preset Tuning
- MEMO button
- BAND button
- ON/OFF button
- VOLUME+/- knob
- Speaker
- SNOOZE button
- Lock switch
- FM telescopic antenna
- Strap pin
- Earphone jack
- DC IN 5V jack
- Battery compartment
POWER SUPPLY
Choose one of the power sources as below.
- AC adapter (not supplied): Output DC 5V - 3 x 1.5V R6/UM3/AA batteries (not supplied)
Connecting power
Connect an AC adapter (not supplied) to the DC IN 5V jack of the unit and to the mains socket.
Caution!
- Check that the voltage marked on the adapter rating plate matches your local supply.
- Never use an AC adaptor that is damaged. Route the power lead in a safe manner and make sure it is not subjected to trapping or pinching. If the power lead is damaged, refer to a qualified service agent.
- The AC adaptor is used as the disconnect device and it shall remain readily operable. To be completely disconnected from the power input, the AC adaptor shall be disconnected from the mains completely. The AC adaptor should not be obstructed and should be easily accessible during intended use.
- Remove the lid of the battery compartment by sliding it outward in the direction of the arrow.
- Insert 3 R6/UM3/AA batteries into the compartment. Make sure to match their polarities (+/-) to the markings inside the compartment.
- Put the lid back in place.
Notes on batteries (not supplied)
- Do not mix different types of batteries or old batteries with new ones.
- Never recharge the batteries, apply heat to them or take them apart.
Batteries should not be exposed to excessive heat such as sunshine, fire or the like.
- Do not throw the batteries in fire!
Attention should be drawn to the environmental aspects of battery disposal.
The batteries need to be replaced when: The volume decreases, or sound is distorted during operation.
The appearance of battery icon " on display indicates that the batteries are low. Replace them with new batteries.
In order to avoid leakage, remove the batteries when the unit will not be used for a long period of time.
- Please respect the environment. Before throwing any batteries away, consult your distributor who may be able to take them back for specific recycling.
CAUTION:
Danger of explosion if batteries are incorrectly replaced. Replace only with the same or equivalent type.
SETTING TIME
After the batteries are installed, the display will show "0:00".
- Press MEMO once to enter the time setting mode. The display will show flashing "24 HR". Then press tuning to select 24H or 12H time format.
- Press MEMO again to confirm and the hour digits flash.
- Press tuning / to set the hour value. Press MEMO to confirm and minute digits flash.
- Press tuning to set the minute value and press MEMO again to confirm.
SETTING THE ALARM
Set alarm time
- In Standby mode, keep the ALARM button pressed until the "ALM" indicator is displayed and the hour digits flash on display.
- Press tuning / to adjust hour value. Then press ALARM to confirm and the minute digits flash.
- Press tuning to adjust minute value and press ALARM to confirm.
Set wake up source
Press ALARM repeatedly to select the wake up source among " ⊙ " and "
- Wake to buzzer sound

displays and buzzer sound will come out when the alarm time is reached.
- Wake to radio
- Follow procedures in "Listen to the radio" to select your desired radio station and adjust the alarm sound level.
- displays and the station selected above will play when the alarm time is reached.
Checking wake time
Keep the ALARM button pressed until you see a flashing wake time.
Silence the alarm temporarily
Press SNOOZE to turn the alarm off temporarily. The alarm will sound again when the snooze period is over.
Note: snooze time is 9 minutes.
Stop the alarm
Press ON/OFF: The alarm will stop, and will sound again 24 hours later.
Cancel wake song
Press ALARM repeatedly until all alarm indicators disappear from the display.
SLEEP TO THE RADIO
In sleep mode, the radio will turn off automatically after a specified time.
In radio ON mode, press SLEEP to select the desired time before turn off among 120-90-60-45-30-15-00.
- Select "00" then the sleep function is OFF, SLEEP indicator will disappear from the display.
When in SLEEP mode, press the SLEEP button to read the remaining sleep time.
USING THE RADIO
Listen to the radio
- Press ON/OFF.
- Select the frequency FM/MW by pressing BAND.
- Select the required radio station with the buttons and
- Adjust the volume with the VOLUME +/- knob.
To enhance radio reception ability:
FM: Extend the telescopic antenna.
MW: Rotate the unit horizontally for optimum reception.
Saving preset stations
- Tune to a station to be saved as a preset station (see "Listen to the radio").
- Press MEMO once and you will see "M" and a flashing "1" on the display.
- Press Preset / to select a preset number.
- Press MEMO to save station as selected preset number.
- Repeat above steps to preset a maximum of 10 stations for MW and FM respectively.
Selecting preset stations
Press preset to select a preset number.
LISTENING WITH EARPHONES
Connect earphones (not included) to the microphone jack on unit.

Continuous use of earphones at high volume can damage the user's hearing.
SAFETY INSTRUCTION
IMPORTANT!
- The ventilation should not be impeded by covering the openings with items such as newspapers, table-cloths, curtains, etc.
- No naked flame sources, such as lighted candles, should be placed on the apparatus.
- Use the apparatus in moderate climates.
- The apparatus should not be exposed to dripping or splashing. Ensure a minimum distance of 5cm around the apparatus for sufficient ventilation.
- Do not place objects filled with liquids, such as vases, on the apparatus.
- The rating plate is located at the back of the unit.
- Excessive sound pressure from earphones and headphones can cause hearing loss. Under the influence of electrical fast transient or/and electrostatic phenomenon, the product may malfunction and require user to power reset.

If at any time in the future you should need to dispose of this product, please note that waste electrical products should not be disposed of with household waste. Please recycle where facilities exist. Check with your Local Authority or retailer for recycling advice. (Waste Electrical and Electronic Equipment Directive)
Note: Design and specification are subject to change without notice.
© 2011 All rights reserved by Blaupunkt. This material may be reproduced, copied or distributed for personal use only.
User manual BD-320 / BD-321
the alarm.
newspapers, tablecloths, curtains, etc.
User Manual
Before starting operation, carefully read the contents of the user manual.
GENERAL SETUP
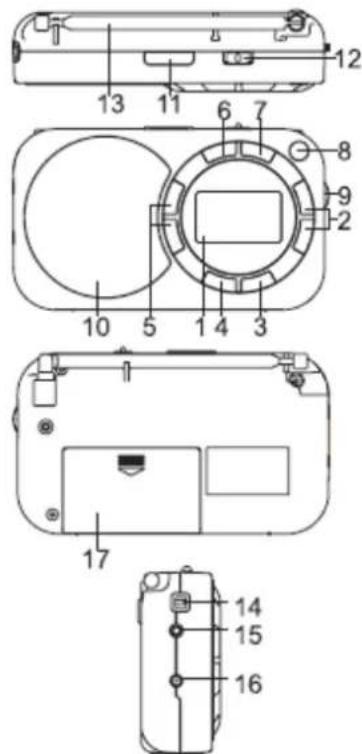
- LCD display
- TUNING buttons
- SLEEP button for setting the sleep time
- ALARM button
- Preset button for presetting stations
- MEMO button
- BAND button for switching bands
- ON/OFF button
- Volume control knob VOLUME+/- 10. Dynamic
- SNOOZE button for repeating the alarm
- Wireless switch
- Telescopic FM antenna
- __SUPPIMER__
- DC 5V power jack
Power supply
Choose one of the power sources below.
- AC adapter (not included):
AC input ~110-240 V 50-60 Hz; DC output 5 V
- Batteries: 3 x 1.5 V R6/AA/UM3 (not included)
Connecting the power supply
Connect the AC adapter (not included) to the DC 5 V jack on the device and to a wall outlet.
Warning!
- Make sure that the voltage indicated on the adapter matches your local voltage.
- Never use a damaged AC adapter. Unplug the power cord, follow safety procedures, and make sure it is not pinched or caught. If the power cord is damaged, contact an official service center.
- The AC adapter is used as a disconnecting device and must remain in working condition. To completely disconnect from the power source, the AC adapter must be fully unplugged from the outlet. Access to the adapter must not be blocked and must be easily accessible during the entire period of use.
Operating with battery power
1. Close the battery compartment cover, pressing it in the direction indicated by the arrow. 2. Insert 2 batteries of type R6/UM3/AA into the compartment. Check that the battery polarity (+/-) matches the markings in the compartment. 3. Put the cover back on.
Instructions for battery use (not included)
Do not mix different types of batteries, do not install old batteries together with new ones. Never disassemble batteries, do not heat or disassemble them. Keep them away from heat sources such as the sun, fire, and similar. Do not throw batteries into fire! After using batteries, dispose of them without harming the environment. Batteries should be replaced when: the volume level decreases, or during use the sound is distorted. The appearance of the battery symbol "_" on the display indicates that the charge level is low. It is necessary to replace the batteries with new ones. If the device will not be used for a long period of time, to avoid leakage, the batteries must be removed. Take care of the environment. Before disposing of batteries, consult your battery distributor; they may accept them for recycling.
WARNING:
In case of incorrect installation, batteries may explode. Replace batteries only with the same or equivalent type.
TIME SETTING
After installing the batteries, "0:00" will appear on the display.
- Press the MEMO button once to enter time setting mode. The display will show "24 HR". Then press the / button to select the time format 24H or 12H.
- Press the MEMO button again to confirm; the hour digits will flash.
- Press the / button to set the hour value. Press the MEMO button to confirm; the minute digits will flash.
- Press the / button to set the minute value and press the MEMO button again to confirm.
ALARM SETTING
Setting the alarm time
- In standby mode, press and hold the ALARM button until the "ALM" indicator appears and the hour digits appear on the display.
- Press the button to set the hour value. Then press the ALARM button to confirm, and the digits indicating the minutes will flash.
- Press the button to set the minute value, then press the ALARM button to confirm.
Setting the alarm source
- Press the ALARM button several times to select the alarm source from the list of sounds or beeps.
A symbol appears after the alarm time is set, and the beeps sound.
- Radio sound
- Follow the instructions in the "Listen to Radio" section to select a radio station and adjust the volume level of the alarm signal.
- Or, after the alarm time is reached, the radio turns on.
Selecting saved stations
- Make sure you are in the save mode.
- Press Preset to select the save number.
USING HEADPHONES
Plug the headphones (not included) into the headphone jack on the device.

Continuous use of headphones at high volume levels may damage your hearing.
IMPORTANT!
- The ventilation openings inside the housing must not be blocked by objects such as newspapers, tablecloths, curtains, etc. Do not place open flames, such as burning candles, on the device.
- The device is intended for use in a temperate climate.
- Avoid getting water into the device.
- Ensure free space of at least 5 cm around the device for adequate ventilation. Do not place objects filled with liquids, such as vases, on the device.
- The rating label of the device is located on the rear cover of the housing.
- Excessive sound levels from headphones can lead to hearing loss. Brief interruptions in power supply and/or electrostatic discharges may cause malfunctions and require the device to be switched off and on again.
If you need to dispose of the device, please note that electrical devices must not be disposed of with regular household waste. Please inquire at your local authorities or at the store where you purchased the device about appropriate recycling centers (directives on the recycling of electronic equipment).
Note: The characteristics of the product may change without prior notice.
© 2011 All rights reserved by Blaupunkt. This material may be reproduced, copied, or distributed only for personal use.


ALVAS FUNCTION (SLEEP)
a 1
.
∴ A( 1,0) .B( -9/4,7/4)
0:00" 1
J 24 HR" a 1000000000000000000000000000000000000000000000000000000000
.12H 24H
.120-90-60-45-30-15-00 8 8 8 8 8 8 8 8 8 8 8 8 8 8 8 8 8 8 8 8 8 8 8 8 8 8 8 8 8 8 8 8 8 8 8 8 8 8 8 8 8
SLEEP OFF 00
SLEEP SLEEP
.ON/OFF

1.
| .العربية الحرفية و صحي的女孩 براير ملاوي بوراير رسمان ملاوي بوراير رسمان ملاوي بوراير رسمان ملاوي بوراير رسمان ملاوي بوراير رسمان ملاوي بوراير رسمان ملاوي بوراير رسمان ملاوي بوراير رسمان ملاوي بوراير رسمان ملا inflamm .العربية الحرفية و صحي的女孩 براير ملاوي بوراير رسمان ملاوي بوراير رسمان ملا inflamm .العربية الحرفية و صحي的女孩 براير ملاوي بوراير رسمان ملا inflamm .العربية الحرفية و صحي的女孩 بRIAير رسمان ملا inflamm .العربية الحرفية و صحي的女孩 بRIAير رسمان ملا inflamm .العربية الحرفية و صحي的女孩 بRIAير رسمان ملا inflamm .العربية الحرفية و صحي的女孩 بRIAير رسمان ملا inflamm .العربية الحرفية و صحي的女孩 بRIAير رسمان ملا inflamm .العربية الحرفية AND IN THE LATERAL AREA OF THE LATERAL AREA OF THE LATERAL AREA OF THE LATERAL AREA OF THE LATERAL AREA OF THE LATERAL AREA OF THE LATERAL AREA OF THE LATERAL AREA OF THE LATERAL AREA OF THE LATERAL AREA OF THE LATERAL AREA OF THE LATERAL AREA OF THE LATERAL AREA OF THE LATERAL AREA OF THE LATERAL AREA OF THE LATERAL AREA OF THE LATERAL AREA OF THE LATERA .العربية الحرفية و صحي的女孩 بRIAير رسمان ملا inflamm .العربية الحرفية و صحي的女孩 بRIAير رسمان ملا inflamm .العربية الح註冊ية و صحي的女孩 بRIAير رسمان ملا inflamm .العربية الح註冊ية و صحي的女孩 بRIAير رسمان ملا inflamm .العربية الح註冊ية AND IN THE LATERAL AREA OF THE LATERAL AREA OF THE LATERAL AREA OF THE LATERAL AREA OF THE LATERAL AREA OF THE LATERAL AREA OF THE LATERAL AREA OF THE LATERAL AREA OF THE LATERAL AREA OF THE LATERAL AREA OF THE LATERAL AREA OF THE LATERAL AREA OF THE LATERAL AREA OF THE LATERAL AREA OF THE LATERAL AREA OF THE LATERAL AREA OFTHE LATERAL AREA OF THE LATERAL AREA OF THE LATERAL AREA OF THE LATERAL AREA OF THE LATERAL AREA OF THE LATERAL AREA OF THE LATERAL AREA OF THE LATERAL AREA OF THE LATERAL AREA OF THE LATERAL AREA OF THE LATERAL AREA OF THE LATERAL AREA OF THE LATERAL AREA OF THE LATERAL AREA OF THE LATERAL AREA OF THE LATERAL AREA OF THE LATERAL .العربية الح註冊ية و صحي的女孩 بRIAير رسمان ملا inflamm .العربية الح註冊ية و صحي的女孩 بRIAير رسمان ملا inflamm .العربية الح註冊ية AND IN THE LATERAL AREA OF THE LATERAL AREA OF THE LATERAL AREA OF THE LATERAL AREA OF THE LATERAL AREA OF THE LATERAL AREA OF THE LATERAL AREA OF THE LATERAL AREA .العربية الح註冊ية و صحي的女孩 بRIAير رسمان ملا inflamm .العربية الح註冊ية AND IN THE LATERAL AREA OF THE LATERAL AREA OF THE LATERAL AREA OF THE LATERAL AREA OF THE LATERAL AREA OF THE LATERAL AREA OF THE LATERAL AREA OF THE LATERAL AREA OF THE LATERAL AREA OF THE LATERAL AREA OF THE LATERAL AREA OF THE LETERAL AREA OF THE LATERAL AREA OF THE LATERAL AREA OF THE LATERAL AREA OF THE LATERAL AREA OF THE LATERAL AREA OF THE LATERAL AREA OF THE LATERAL AREA OF THE LATERAL AREA OF THE LATERAL AREA OF THE LATERAL AREA OF THE LATERAL AREA OF THE LATERAL AREA OF THE LATERAL AREA OF THE LATERAL AREA OF THE LATERAL AREA OF THE LATERAL AREA OFTHE LATERA .العربية الح註冊ية و صحي的女孩 بRIAير رسمان ملا inflamm .العربية الح註冊ية AND IN THE LATERAL AREA OF THE LATERAL AREA OF THE LATERAL AREA OF THE LATERAL AREA OF THE LATERAL AREA OF THE LATERAL AREA OF THE LATERAL AREA OF THE LATERAL AREA OF THE LATERAL AREA OF THE LATERAL AREA OF THE LATERAL AREA OF THE LTERAL AREA OF THE LATERAL AREA OF THE LTERAL AREA OF THE LTERAL AREA OF THE LTERAL AREA OF THE LTERAL AREA OF THE LTERAL AREA OF THE LTERAL AREA OF THE LTERAL AREA OF THE LTERAL AREA OF THE LTERAL AREA OF THE LTERAL AREA OF THE LTERAL AREA OF THE LTERAL AREA OF THE LTERAL AREA OF THE LTERAL AREA OF THE LTERAL AREA OF THE LTERAL AREA OF THE LTERAL AREA OFTHE LTERAL AREA OF THE LTERAL AREA OF THE LTERAL AREA OF THE LTERAL AREA OF THE LTERAL AREA OF THE LTERAL AREA OF THE LTERAL AREA OF THE LTERAL AREA OF THE LTERAL AREA OF THE LTERAL AREA OF THE LTERAL AREA OF THE LTERAL AREA OF THE LTERAL AREA OF THE LTERAL AREA OF THE LTERAL AREA OF THE LTERAL AREA OF THE LTERAL .العربية الح註冊ية و صحي的女孩 بRIAير رسمان ملا inflamm .العربية الح註冊ية AND IN THE LATERAL AREA OF THE LATERAL AREA OF THE LATERAL AREA OF THE LATERAL AREA OF THE LATERAL AREA OF THE LTERAL AREA OF THE LTERAL AREA OF THE LTERAL AREA OF THE LTERAL AREA OF THE LTERAL AREA OF THE LTERAL AREA OF THE LTERAL AREA OF THE LTERAL AREA OF THE LTERAL AREA OF THE LTERAL AREA OF THE LTERAL AREA OF THE LTERAL AREA OF THE LTERAL AREA OF THE LTERAL AREA OF THE LTERAL AREA OFTHE LTERAL AREA OFTHE LTERAL AREA OF THE LTERAL AREA OF THE LTERAL AREA OF THE LTERAL AREA OF THE LTERAL AREA OF THE LTERAL AREA OF THE LTERAL AREA OF THE LTERAL AREA OF THE LTERAL AREA OF THE LTERAL AREA OF THE LTERAL AREA OF THE LTERAL AREA OF THE LTERAL AREA OF THE LTERAL AREA OF THE LTERAL AREA OF THE LTERAL .العربية الح證像 .العربية الح證像 .العربية الح證像 .العربية الح證像 .العربية الح證像 .العربية الح證像 .العربية الح證像 .العربية الح證像 .العربية الح證像 .العربية الح證像 .العربية الح證像 .العربية الح證像 .العربية الح證像 .ال洩 .ال洩 .ال洩 .ال洩 .ال洩 .ال洩 .ال洩 .ال洩 .ال洩 .ال洩 .ال洩 .ال洩 .ال洩 .ال洩 .ال洩 .ال洩 .ال洩 .ال洩 .ال洩 .ال洩 .ال洡 .ال洩 .ال洩 .ال洩 .ال洩 .ال洩 .ال洩 .ال洩 .ال洩 .ال洩 .ال洩 .ال洩 .ال洩 .ال洩 .ال洩 .ال洩 .ال洩 .ال洩 .ال洩 .ال洩 .ال洷 .ال洩 .ال洩 .ال洩 .ال洩 .ال洩 .ال洩 .ال洩 .ال洩 .ال洩 .ال洩 .ال洩 .ال洩 .ال洩 .ال洩 .ال洩 .ال洩 .ال洩 .ال洩 .ال洩 .ال洨 .ال洩 .ال洩 .ال洩 .ال洩 .ال洩 .ال洩 .ال洩 .ال洩 .ال洩 .ال洩 .ال洩 .ال洩 .ال洩 .ال洩 .ال洩 .ال洩 .ال洩 .ال洩 .ال洩 .ال洦 .ال洩 .ال洩 .ال洩 .ال洩 .ال洩 .ال洩 .ال洩 .ال洩 .ال洩 .ال洩 .ال洩 .ال洩 .ال洩 .ال洩 .ال洩 .ال洩 .ال洩 .ال洩 .ال洩 .ال洬 .ال洩 .ال洩 .ال洩 .ال洩 .ال洩 .ال洩 .ال洩 .ال洩 .ال洩 .ال洩 .ال洩 .ال洩 .ال洩 .ال洩 .ال洩 .ال洩 .ال洩 .ال洩 .ال洩 .ال洢 .ال洩 .ال洩 .ال洩 .ال洩 .ال洩 .ال洩 .ال洩 .ال洩 .ال洩 .ال洩 .ال洩 .ال洩 .ال洩 .ال洩 .ال洩 .ال洩 .ال洩 .ال洩 .ال洩 .ال洤 .ال洩 .ال洩 .ال洩 .ال洩 .ال洩 .ال洩 .ال洩 .ال洩 .ال洩 .ال洩 .ال洩 .ال洩 .ال洩 .ال洩 .ال洩 .ال洩 .ال洩 .ال洩 .ال洩 .ال洹 .ال洩 .ال洩 .ال洩 .ال洩 .ال洩 .ال洩 .ال洩 .ال洩 .ال洩 .ال洩 .ال洩 .ال洩 .ال洩 .ال洩 .ال洩 .ال洩 .ال洩 .ال洩 .ال洩 .ال洲 .ال洩 .ال洩 .ال洩 .ال洩 .ال洩 .ال洩 .ال洩 .ال洩 .ال洩 .ال洩 .ال洩 .ال洩 .ال洩 .ال洩 .ال洩 .ال洩 .ال洩 .ال洩 .ال洩 .ال洱 .ال洩 .ال洩 .ال洩 .ال洩 .ال洩 .ال洩 .ال洩 .ال洩 .ال洩 .ال洩 .ال洩 .ال洩 .ال洩 .ال洩 .ال洩 .ال洩 .ال洩 .ال洩 .ال洩 .ال洪 .ال洩 .ال洩 .ال洩 .ال洩 .ال洩 .ال洩 .ال洩 .ال洩 .ال洩 .ال洩 .ال洩 .ال洩 .ال洩 .ال洩 .ال洩 .ال洩 .ال洩 .ال洩 .ال洩 .ال洫 .ال洩 .ال洩 .ال洩 .ال洩 .ال洩 .ال洩 .ال洩 .ال洩 .ال洩 .ال洩 .ال洩 .ال洩 .ال洩 .ال洩 .ال洩 .ال洩 .ال洩 .ال洩 .ال洩 .ال洅 .ال洩 .ال洩 .ال洩 .ال洩 .ال洩 .ال洩 .ال洩 .ال洩 .ال洩 .ال洩 .ال洩 .ال洩 .ال洩 .ال洩 .ال洩 .ال洩 .ال洩 .ال洩 .ال洩 .ال洸 .ال洩 .ال洩 .ال洩 .ال洩 .ال洩 .ال洩 .ال洩 .ال洩 .ال洩 .ال洩 .ال洩 .ال洩 .ال洩 .ال洩 .ال洩 .ال洩 .ال洩 .ال洩 .ال洩 .ال洳 .ال洩 .ال洩 .ال洩 .ال洩 .ال洩 .ال洩 .ال洩 .ال洩 .ال洩 .ال洩 .ال洩 .ال洩 .ال洩 .ال洩 .ال洩 .ال洩 .ال洩 .ال洩 .ال洩 .ال洯 .ال洩 .ال洩 .ال洩 .ال洩 .ال洩 .ال洩 .ال洩 .ال洩 .ال洩 .ال洩 .ال洩 .ال洩 .ال洩 .ال洩 .ال洩 .ال洩 .ال洩 .ال洩 .ال洩 .ال活 .ال洩 .ال洩 .ال洩 .ال洩 .ال洩 .ال洩 .ال洩 .ال洩 .ال洩 .ال洩 .ال洩 .ال洩 .ال洩 .ال洩 .ال洩 .ال洩 .ال洩 .ال洩 .ال洩 .ال洀 .ال洩 .ال洩 .ال洩 .ال洩 .- . . . . . . . . . . . . . . . . . . . . . . . . . . . . . . . . . . . . . . . . . . . . . . . . . . . . . . . . . . . . . . . . . . . . . . . . . . . . . . . . . . . . . . . . . . . . . . . . . . . . - |
- GENERAL CONTROLS
- POWER SUPPLY
- CONNECTING POWER
- CAUTION
- NOTES ON BATTERIES (NOT SUPPLIED)
- SETTING TIME
- SETTING THE ALARM
- SET ALARM TIME
- SET WAKE UP SOURCE
- WAKE TO BUZZER SOUND
- WAKE TO RADIO
- CHECKING WAKE TIME
- SILENCE THE ALARM TEMPORARILY
- STOP THE ALARM
- CANCEL WAKE SONG
- SLEEP TO THE RADIO
- USING THE RADIO
- LISTEN TO THE RADIO
- SAVING PRESET STATIONS
- SELECTING PRESET STATIONS
- LISTENING WITH EARPHONES
- SAFETY INSTRUCTION
- IMPORTANT
- USER MANUAL
- GENERAL SETUP
- WARNING
- OPERATING WITH BATTERY POWER
- INSTRUCTIONS FOR BATTERY USE (NOT INCLUDED)
- TIME SETTING
- ALARM SETTING
- SETTING THE ALARM TIME
- SETTING THE ALARM SOURCE
- SELECTING SAVED STATIONS
- USING HEADPHONES
- ALVAS FUNCTION (SLEEP)
Brand : BLAUPUNKT
Model : BD321
Category : Radio