Babynova 1150 rapid - Washing machine Soba - Free user manual and instructions
Find the device manual for free Babynova 1150 rapid Soba in PDF.


User questions about Babynova 1150 rapid Soba
0 question about this device. Answer the ones you know or ask your own.
Ask a new question about this device
Download the instructions for your Washing machine in PDF format for free! Find your manual Babynova 1150 rapid - Soba and take your electronic device back in hand. On this page are published all the documents necessary for the use of your device. Babynova 1150 rapid by Soba.
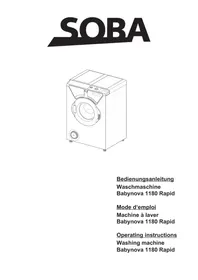
USER MANUAL Babynova 1150 rapid Soba
Operating instructions
Washing machine
Babynova 1150 rapid
Inhaltsverzeichnis
Instructions d-installation
II = lavage principal
III = assouplissant
fermer letiroir
Mise en marche
Operating instructions Washing machine Babynova 1150 rapid
Index
| INSTALLATION | Safety instructions | 50 |
| Manual | 51 | |
| Removal of transport safety bars | 51 | |
| Electrical connection | 52 | |
| Connection and installation | 52 - 53 | |
| Prior to the first wash | 53 | |
| INSTRUCTIONS | Programme selection | 54 - 55 |
| Press buttons | 55 - 58 | |
| Fabric selection | 58 | |
| Selecting a programme | 58 - 59 | |
| The digital display unit | 59 | |
| The programme sequences | 60 | |
| Changing the number of the rinse cycles | 61 | |
| Changing the water level in the rinse cycles | 62 | |
| Adding the correct amount of detergent | 63 | |
| Programme examples | 64 | |
| CLEANING AND MAINTENANCE | Care instructions | 65 |
| Removing lime stone | 65 | |
| Cleaning the water inlet sieve | 65 | |
| SUMMARY | Problem checks | 66 - 68 |
| Opening the door in an emergency | 66 | |
| Emergency draining | 66 | |
| Cleaning the drain pump | 66 | |
| Symbols indicating a fault | 67 | |
| Stain removal | 69 | |
| HLCC labels | 70 | |
| Tips | 71 | |
| Short manual | 72 | |
| Guarantee | 75 |
Safety instructions

Attention
- Removing the transport safety bars (p. 51)!
- Please ensure you read the instructions carefully before using your machine.
- This washing machine is designed solely for the cleaning of laundry and garments equipped with, and in accordance with the necessary HLCC labels, and during use must be protected from interference by unauthorised persons (ie children).
- This washing machine should not be left unattended during use.

Attention
- This product must not be modified in anyway.
- Always switch of the cold water supply after using your machine.

Attention
Every care was taken to respect the environment in the manufacture and packaging of this product. Would you please ensure that the packaging and, when the time comes, the «old» machine are disposed of according to the rules for protection of the environment. Detach the mains lead and remove it together with the plug. Destroy the lock on the door. In this way you can prevent children from shutting themselves in and the risk of suffocation!
Removal of transport safety bars
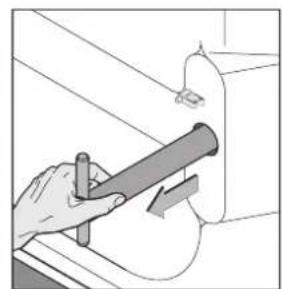
The transport safety bars must be removed before using your machine (see Pic 1 - 3) or your machine could be severley damaged.
- Withdraw both bars from their sockets (Pic 1 - 2).
-
Seal the holes with the plastic plugs provided (Pic 3).
-
In the event of your machine having to be transported, ie moving house it is essential for the transport bars to be put back into the machine.
- Drain any remaining water from the machine (see emergency draining page 66).
- In order to avoid any water leaking from your machine during transport, the machine should always remain upright.
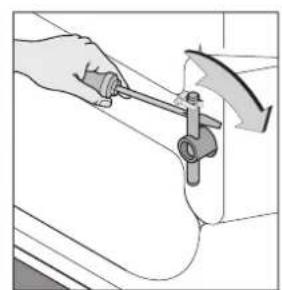
Pic 1
Pic 2
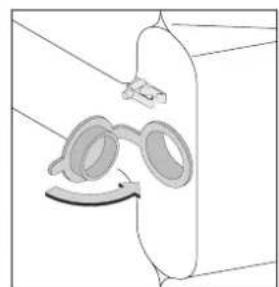
Pic 3
Electrical connection
Plug socket 230V / 50Hz
- Rated effect 2.2kW
- Fuse: min. 10 A
- Kindly note the rating label on the back of the machine.
Connection and installation
Open the loading door to remove both the fi II and drain hoses:
- connect machine to electricity supply
- turn on main switch and switch programme selector to position “ * ”,
- wait until the digital display " 00 " stops flashing
- now switch the programme selector to the "? symbol
Water inlet connection
- It is intended for cold-water connection only
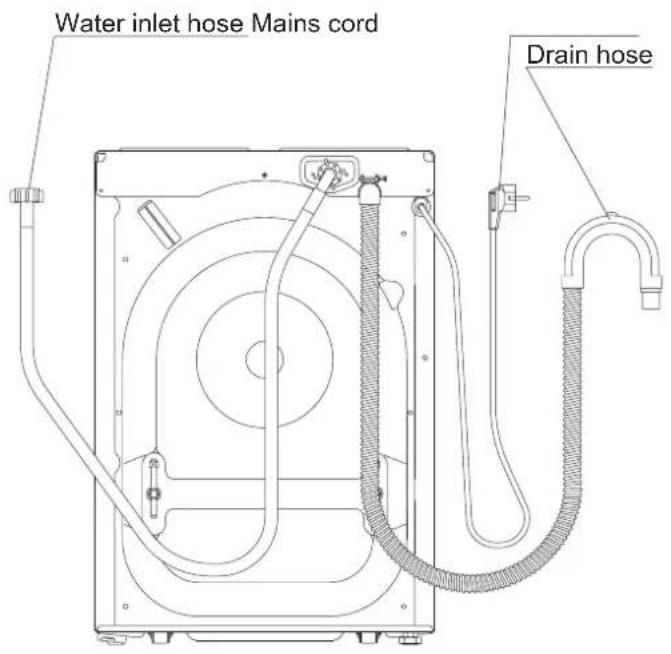
- Screw the intake hose on to the tap.
- The washing machine is intended for a water pressure of 1 to 10 bar. If the pressure exceeds 10 bar, a pressure reducing valve must be installed in the water-line. If the pressure is less than 1 bar, the flowrate regulator behind the strainer (in the water inlet connection of the machine) must be removed.
- Check if all hose connections are leaktight.
Drain connection
- Do not kink the drain hose.
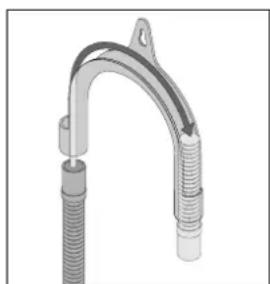
- Hang the drain hose over the edge of thge sink or wash basin. The bend in the hose must not be raised more than 1m above the surface on which your machine stands (so that drainage can function properly).
- Secure the drain hose with the hose holder supplied. Pull the hose holder to the centre of the hose bend onto the drain hose and secure against slipping. If required, use a weight or any other suitable means to ensure that the drain hose cannot slip.
- Tight connection to a non-ventilated drain requires special steps and should be carried out by a plumber only.
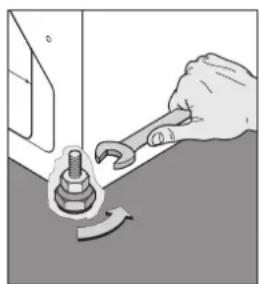
Setting up and starting
- Ensure the unit is on an even, firm surface.
- All four screw-mounting feet must stand firmly on the floor.
- To set up the machine, adjust one or more of the screw-mounting feet by loosening the counter-nuts.
After adjusting the screw-adjustment feet, tighten the relative lock nuts again in the direction of the arrows (with a SW 17 spanner). - Turn on the tap and check the run off hose.

Attention
- Always ensure the drain hose is free of obstructions of any kind, since this will have an adverse effect on the smooth running of your machine.
- Only install your machine in a room protected from frost.
- The company excepts no responsibility for improper use, or maintenance work carried out by unauthorised service personnel resulting in water damage.
Prior to the first wash

Attention:
The washing machine must be properly installed and connected.
The washing machine was tested before leaving the factory. To make sure that any traces of water used in the test are removed, wash for the first time without introducing any dirty linen.
- do not put any dirty linen into the machine
open the water cock - place 1/2 measuring cup of detergent in the chamber foreseen for the main detergent
- start the „easy-care / fine wash" programme at 60^ and let it run its course
The washing machine is now clean and ready for operation.
Programme selection
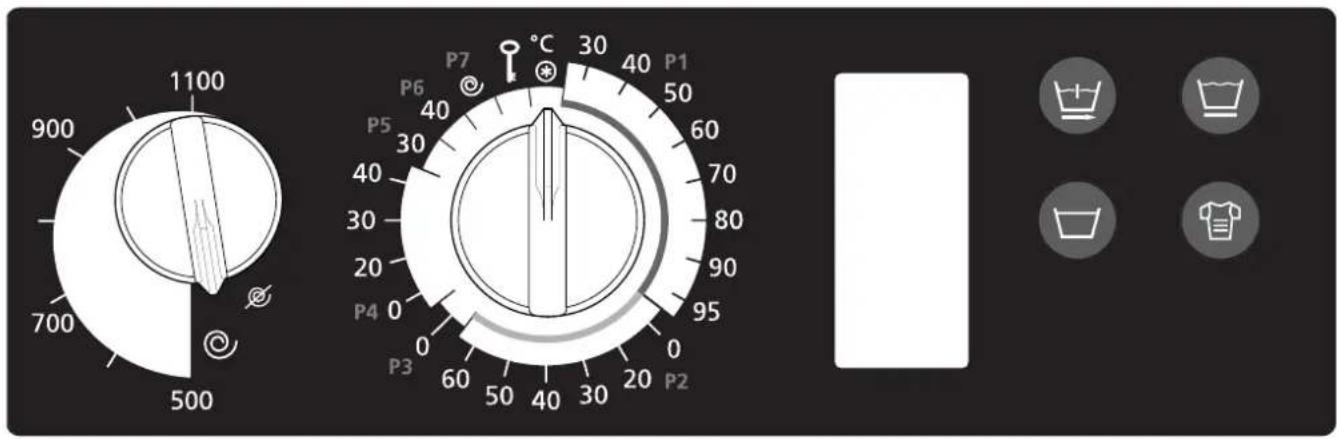
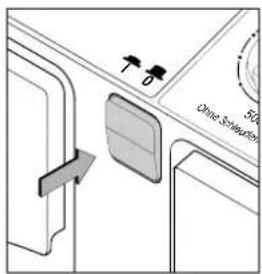
Main switch
Before selecting any programmes, always turn on the main switch.

Attention: After completing a wash cycle, always turn OFF your machine using the main switch.
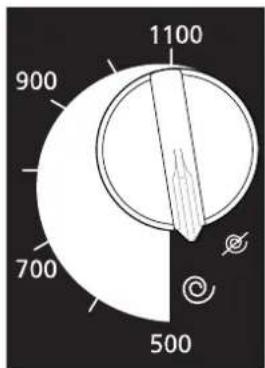
Spin speed switch (variable):
This switch allows you to select the required spin speed at the end of each wash cycle. Should you wish to finish a programme without spinning, select position no spin
Programme selector:

Attention: Before selecting a programme, the loading door must be firmly closed!
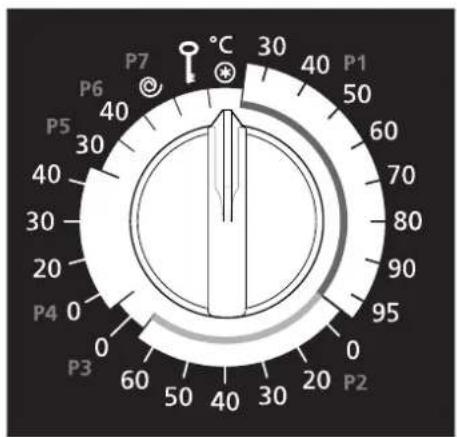
- Turn programme selector to , * " position
- Wait, until " 00 " stops flashing on the digital display unit
- Select the programme of your choice, with the appropriate water temperature.
P1 whites / coloureds 30^ - 95^
P2 easy-care fabrics cold - 60°C
| P3 | hand | wash | cold | (pre-set) |
| P4 | wool | cold | - 40°C | |
| P5 | silk | 30°C | (pre-set) | |
| P6 | quick | wash | 40°C | (pre-set) |
Each of this programme can be combined with the press buttons at random (see p. 56 - 57).
P7 spin dry
Press buttons:
These buttons must be activated, after having selected a programme.
- Once a button has been pressed, it takes 15 sec for it to be activated, this process is shown on the digital display in 5 segments lasting 3 sec each every time a button is pressed, this process is repeated.

Attention:
Once the 15 sec. have passed, and the programme has started it is no longer possible to change the programme by means of the press buttons.
The selected programme and temperature are shown alternatively on the digital display.

Attention:
As soon as a wash cycle is started, the selected temperature is stored in the machines computer. Therefore, if you change the temperature after the wash cycle has started, the machine will not respond.
Should you wish to change the temperature during a wash cycle, please carry out the following procedure.
- Switch the programme selector to position “*”.
-> See programme "override" page 57 - Wait until the digital display showing " 00 " stops flashing
- Select programme with correct temperature, and start again.
Press buttons

With pre-wash
this is only effective within the area P1
Pressing this button adds a pre-wash to the standard or intensive wash programme. This is indicated on the digital display with the "symbol. Press "this button once more, and the pre-wash is erased. This is indicated with the symbol on the display. Pressing this button also enables you to override certain programme sections (see programme times page 57).

Delicates
this is only effective within the area P2
Pressing this button allows you to increase the water level in your machine (for very delicate fabrics ie net curtains) and is indicated on the digital display with the " ^ symbol. Press this button once more, and the water level will return to normal "

Rinse stop
this is effective within the area P1 to P6
Pressing this button, stops the programme in the last rinse cycle, and shows the "□" symbol on the digital display.
If you press this button once again within the 15 sec during programme selection, the rinse stop is cancelled.
This option allows you to minimise the creasing of fabrics.
In order to finish the wash programme press button „Rinse stop“ once more.

Intensive programme
effective within the area P1 and P2
If you wish to activate any of the options described above, in addition to button „Intensive“, you can do so but button „Intensive“ must be activated FIRST.
-
Press this button once, and you have selected the intensive programme (= extended main wash, select the temperature of your choice) The digital display shows the "L" symbol.
-
Press this button twice, and your machine reverts to the standard programme.
Override (stop after your machine has started to wash) This procedure is effective at every stage of the wash cycle
For example reducing the rinse cycles, premature finish of the spin cycle etc. Pressing button enables you to end any given wash programme manually. The digital display provides you with step by step instructions.
Before carrying out the next steps, please ensure your machine has reached the necessary safety levels,
ie should you wish to interrupt the main wash cycle, ensure the water is cooled down and pumped out of the machine.

Fabric selection
Sorting the various types of fabric
- According to garment labels
- Extend of soiling
- Colours
Always fill your machine according to manufacturers instructions, in order to wash economically. Avoid overloading your machine, since this dramatically reduces for cleaning effect.
Selecting a programme
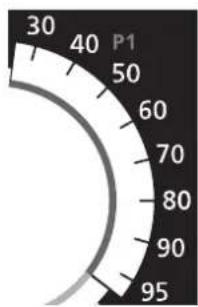



Pre-wash and coloureds programme · P1 · 30 - 95°C
- Switch on main switch, close loading door
- Select spin speed
- Choose temperature (see HLCC care labelling guide) using programme selector in area P1
If desired, select additional functions (see p. 56 - 57)
Attention:
Normal soiled clothes, should never be washed in a pre-wash programme since the standard wash programme will achieve the same results and save water, detergent and energy.
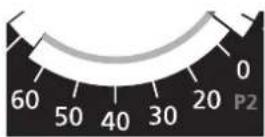
Delicates programme · P2 · up to 60^
- Switch on main switch, close loading door
- Select spin speed
- Choose temperature (see HLCC care labelling guide) using programme selector in area P2
If desired, select additional functions (see p. 56 - 57)
Hand wash programme · P3 · cold (pre-set)
- Switch on main swich, close loading door
- Max spin speed is automatically reduced to 500 rpm, regardless of the spin speed selected.
- Using programme selector in area P3
If desired, select additional functions (see p. 56 - 57)
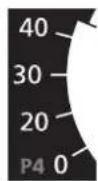
Woollens programme · P4 · up to 40^
- Switch on main switch, close loading door
- Max spin speed is automatically reduced to 500 rpm, regardless of the spin speed selected.
- Choose temperature (see HLCC care labelling guide) using programme selector in area P4
If desired, select additional functions (see p. 56 - 57)
Silk wash programme · P5 · 30^ (pre-set)
- Switch on main swich, close loading door
- Max spin speed is automatically reduced to 500 rpm, regardless of the spin speed selected.
Using programme selector in area P5
If desired, select additional functions (see p. 56 - 57)
Quick wash programme · P6 · 40°C (pre-set)
- Switch on main switch, close loading door
- Select spin speed
Using programme selector in area P6
If desired, select additional functions (see p. 56 - 57)

Additional spin programme P7
- Switch on main switch, close loading door
- Select spin speed
- No additional functions can be selected with this programme
Programme intervention (alterations)
- Return programme selector to position " * "
- Refer to instructions P. 57 "programme override".
The digital display unit
The digital display informs you during programme selection and throughout all the wash programmes about the functions of your machine. While your machine is washing, these functions are displayed using various symboles. The central diagram displays programme sequences and / or programme selection times. The bottom half of the display shows the selected programme and the selected temperature alternatively. Start delay is displayed in the same section.
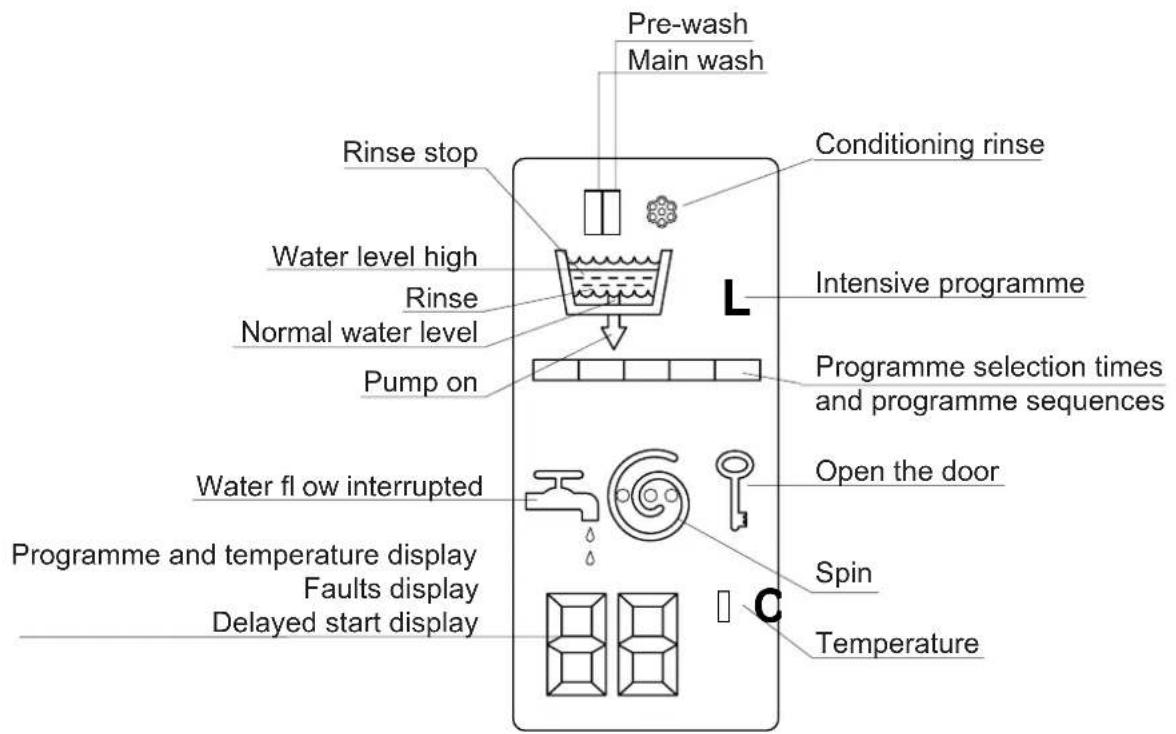
The symbols

Pre-wash · normal water level

Main wash · normal water level

Main wash - water level high
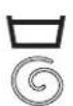
Rinse
Rinse stop
Spin
Programme selection times
and programme sequences
(page 60)
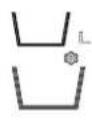
Intensive programme
Conditioning rinse
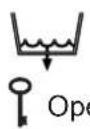
Pump on
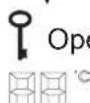
Open the door

Programme & Temperature display
faults display
Delayed start display
The programme sequences
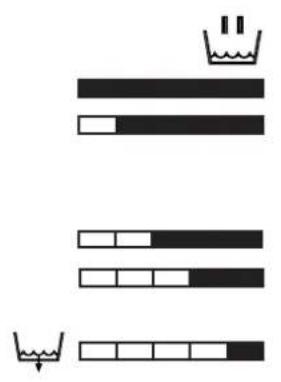
P1, P2, P6 Main wash (standard water level)
Cold fill
Washing and heating up to 40^
(P1 Component programme, P2 Component programme and P2 Economy programme only)
Washing and heating up to selected temperature
extended wash cycle
(this is not available if you have selected P1 standard programme)
Pump on
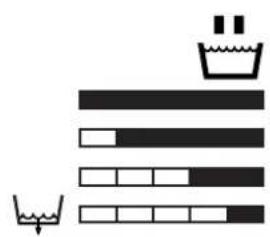
P3, P4, P5 Main wash
Cold fi II
Washing and heating up to selected temperature
Washing
Pump on
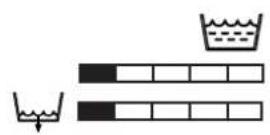
Rinse cycle
Pump on with spin (short)
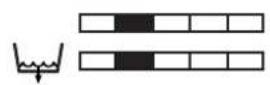
Rinse cycle if selected (s.P.61)
Pump on with spin (short)
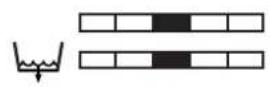
Rinse cycle (automatic)
Pump on with spin (short)
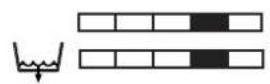
Rinse cycle
Pump on with spin (short)
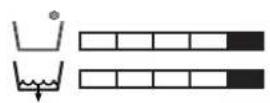
Rinse cycle with cold fill via detergent drawer compartment III (conditioning rinse) Pump on

Spin

Spin cycle, if you have washed in P1, P2 and P6 a spin speed between
500 and 1100 rpm can be selected
Pump on
Spin cycle, if you have washed in P3, P4 and P5 spinning occurs at
500 rpm only, regardless of the selected spin speed
Pump on

Rinse cycles
standard setting: 3 rinse cycles
Whites, coloureds and delicates (P1 / P2):
possible variations: soft water (0 - 10^) 4-5 rinse cycles
normal water (10 - 16^) 3-4 rinse cycles
hard water (16^ and above) 2-3 rinse cycles
Hand wash and woollens programme (P3 / P4):
possible variations: normal water (10 - 16^) 3 rinse cycles
hard water (16^ and above) 2 rinse cycles
In the silk wash programme (P5) are 3 rinse cycles and in the quick wash
programme (P6) are 2 rinse cycles pre-set and cannot be changed.
How to alter the standard (3) rinse cycles
- Main switch on
-
Turn programme selector to “*” position
-
Press button and simultaneously for 3 seconds
--> your digital display will show the " -- " symbol flashing.
- Turn programme selector to P1, P2, P3 or P4
--> your digital display will show the selected programme (see symbols).
- Press button to increase or decrease the number of rinses required
--> This is indicated by the number of flashing bars on your digital display unit.
- Press button for two seconds, this stores the selected number of rinses in your machine
--> The bars stop flashing
- Turn programm selector to “*” position
- Select required programme - see P. 54 - 55
Please note that all manual programme alterations are stored in your machines computer.
These alterations are no longer indicated on the digital display once a standard programme has been re-selected.
To return to standard programm, re-set and save the programm.
Programme intervention
- You can interrupt the selected rinses before they are stored in your machine by returning the programme selector to position “*”.
2 rinse cycles

3 rinse cycles

4 rinse cycles

5 rinse cycles
Changing the water level in the rinse cycles
| Water level | standard | setting: |
| Whites, coloureds and delicates (P1/P2):possible variations:soft water raised water levelnormal or hard water normal water level | ||
| How to alter the „normal“ water level | ||
| ·Main switch on ·Turn programme selector to “*” position | ||
| ·Press buttonandsimultaneously for 3 seconds→The digital display will show the“- - ”symbol flashing. ·Turn programme selector to P1 or P2→The digital display will show the selected programme (see symbols). ·Press buttonto raise or lower the“normal”water level→This is indicated by“flashing waves”on the digital display. ·Press buttonfor two seconds,to store the selected water level→The“waves”stop flashing | ||
| ·Turn programme selector to“*”position ·Select required programme - see P.54-55 | ||
| Please note that all manual programme alterations are stored in your machines computer. These alterations are no longer indicated on the digital display once a standard programme has been re-selected. To return to standard programm,re-set and save the programm. | ||
| Programme intervention ·You can interrupt the selected water level before it is stored in your machine by returning the programme selector to position“*”. | ||
Using the correct amount of detergent, is determined by the following factors:
size and type of your washing machine
- your water supply (hard or soft water)
- degree of soiling of your laundry
- amount of fabric in your drum
- type and brand of detergent used
Before adding detergent please check if
- Your washing machine is loaded to its max capacity -> this saves energy and water
- Your laundry is badly soiled ie greasy, ground in dirt etc
- The amount of detergent to be used tallys with the type of water (ie hard / soft) according to detergent manufacturers instructions
- The detergent is suitable for the selected programme, temperature, and type of fabric to be washed.
Protection of the environment
Your washing machine protects the environment, by saving up to 30% of detergent because:
- Your machine is fitted with an ECO - Valve
(This prevents any unused detergent from being discharged) - The amount of powder needed as indicated by detergent manufacturers on their packaging is designed for 5kg machines
--> Your machine however has a max capacity of 3 kg.
-->Use less for smaller quantities.
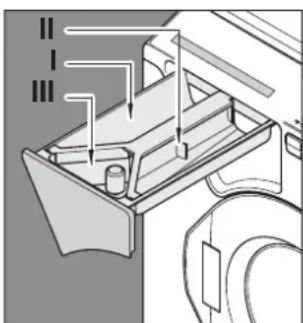
Compartment I
pre-wash, bleach or spotting agents
Compartment II
main-wash
Compartment III
conditioner, softening agents
Advise
The manufacturer recommends for an additional water softening devise to be fitted to your machine, if you live in an area with "normal" water, since this significantly reduces the amount of detergent needed (see soft water).
Programme examples
| programme | temperature press button | capacity max. kg | cumpting rate | ||||
| time min | energy kWh | water litres | |||||
| heavily soiled withes with pre-wash | P 1 95°C | + | 3 150 | 1.20 39 | |||
| heavily soiled withes without pre-wash | P 1 95°C | 3 120 | 0.85 36 | ||||
| normally soiled withes with pre-wash | P 1 95°C | 3 110 | 1.10 39 | ||||
| normally soiled withes without pre-wash | P 1 95°C | 3 80 0.80 36 | |||||
| heavily soiled coloureds P 1 60°C | 3 115 | 0.48 36 | |||||
| normally soiled coloureds P 1 60°C | C 3 70 0.46 | 36 | |||||
| not fast-dyed heavily soiled coloureds | P 1 40°C | 3 105 | 0.35 36 | ||||
| not fast-dyed normally soiled coloureds | P 1 40°C | 3 60 0.33 36 | |||||
| heavily soiled easy-care fabrics | P 2 40°C | 1.5 85 | 0.25 33 | ||||
| normally soiled easy-care fabrics | P 2 40°C | 1.5 60 0.23 33 | |||||
| heavily soiled delicates P2 40°C | + | 1.5 98 | 0.40 38 | ||||
| normally soiled delicates/curtains | P2 40°C | 1.5 73 | 0.38 38 | ||||
| hand wash P3 cold | 1 32 | 0.02 36 | |||||
| woollens | P 4 30°C | 1 50 0.15 40 | |||||
| silk | P 5 | 30°C 1 47 | 0.18 40 | ||||
| quick wash | P 6 | 40° | 1.5 | 38 | 0.21 | 25 | |

Warning: Before starting cleaning, maintenance and removal of faults, pull the mains plug out of the socket and close the water-tap!
Advise:
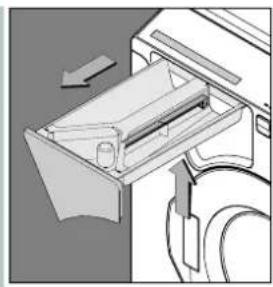
Remove the detergent drawer for cleaning at regular intervals
Pull out the drawer.
- Lift the drawer slightly, and remove completely.
- Clean detergent drawer with warm water.
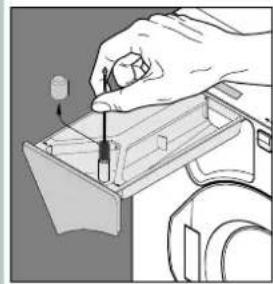
- Remove siphon cover and clean with warm water.
- Clean the filler channel for softener if necessary with a bottle brush and remount siphon cover.
- When drawer removed check if there is any remaining detergent in the shaft of the drawer and clean if necessary.
- Clean housing, control panel and loading door with a soft cloth.
Removing lime stone
If you have used the correct amount of detergent, de-scaling should not be necessary. However, should it be required use corrosion proof de-scaler for washing machines only.
Cleaning the intake fi Iter
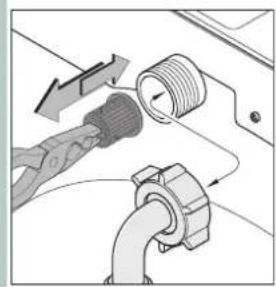
- Turn off the water and unscrew the intake hose from the machine.
- push the split safety ring sideways out of the union nut and lift the union nut off.
- take the coarse filter out and clean it
- replace the filter, mount the union nut and safety ring.
- Screw the intake hose back on to the tap and check that the connection is watertight
Problem checks

Warning: Before starting cleaning, maintenance and removal of faults, pull the mains plug out of the socket and close the water-tap!
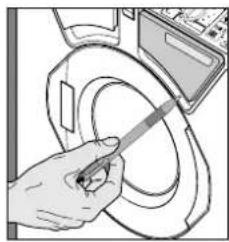
Opening the door in an emergency
- Switch off main switch
- If there is water in the machine (see emergency draining)
--> DANGER: The water could be very hot! - Ensure the drum has stopped rotating
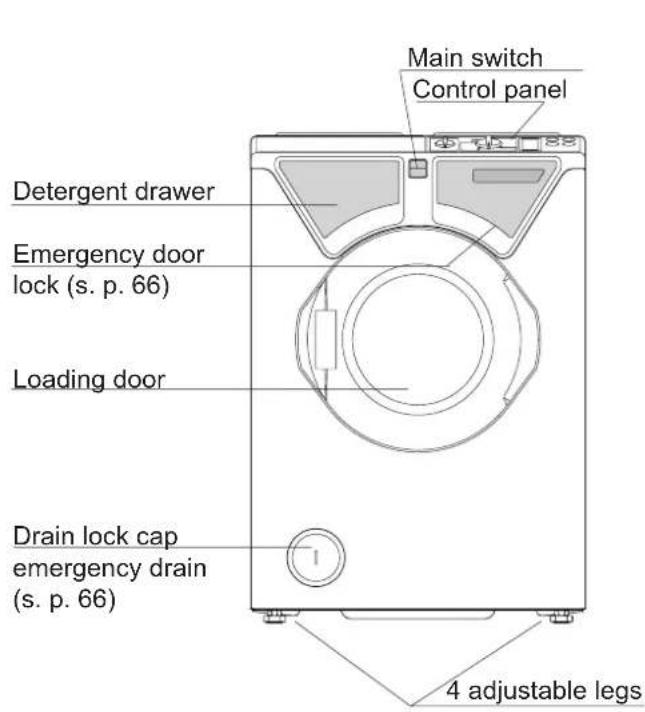
- The emergency door opener (see picture) must be accessible at all times even with built in machines. Pull the switch downwards using a screwdriver or needle to carry out this procedure (see picture).
The door flicks open
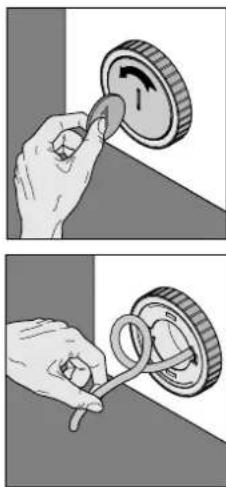
Emergency draining
If the programme is interrupted by a malfunction or in some other way the water remaining in the machine can be removed through a hose.
- Use a coin to remove the cover disc from this drain lock cap.
- Once the hose has been folded out to its full length the water in the machine can be drained out into an appropriate container.
Important: If the failure occurs during the heating phase it is essential that you allow the water to cool before draining to avoid the danger of scalding.
- Replace the hose into the rear of the cap.

Warning
Cleaning of drain pump only necessary in case of faults, if the symboles indicating the fault F2 or F4.
Cleaning the drain pump
The drain pump must only be opened, when the machine is empty.
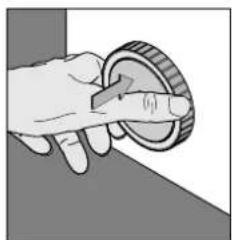
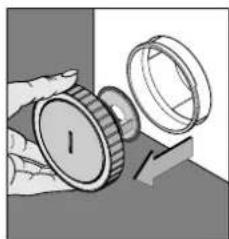
- Press in the outer ring of the locking plug (see Pic 1)
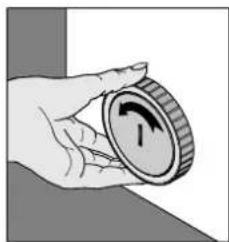
- and turn anticlockwise 1/4 turn (see Pic 2). Press once again and turn another 1/4 turn, to release the plug.
- in order to close, turn drain filter twice to the right (turn - push - turn).
Symbols indicating a fault
- Close the loading door properly
F3 / Check water inlet hose (the machine is not getting enough water, open the tap fully)
- Inlet sieve blocked (cleaning - see P. 65)
- Turn off main switch, wait a few moments and turn back on or turn programme selector to “*” position
F4 The water level is too high, when you switch on the machine
- Wait until the machine has stopped pumping out water, or until the water level has returned to normal (this is announced by a "clicking" noise)
- Turn programme selector to “*” position
- Turn off main switch on the machine
- Check drainage system (see P. 66)
- Turn on main switch
- Turn programme selector to spin programme P7 (water remaining in the machine will be pumped out) or carry out emergency draining - see P. 66
- start the programmm
If the same fault occurs again
--> Turn off cold tap, and remove plug from socket; Contact your customer service, carry out emergency draining (see P. 66), use emergency door opener (see P. 66) to remove washing from machine.
F2 The washing solution is discharged very slowly, or not at all
- Turn off main switch
- Clean drain pump (see P. 66)
- Check drain hose for blockage
- Turn on main switch
- If this procedure has cured fault F2, it is possible that fault F4 may arise due to water level in the machine being too high, this can be eliminated by carrying out procedure as described in F4.
- start the programm
- If fault F2 occurs again
--> Turn off cold tap, and remove plug from socket; Contact your customer service, carry out emergency draining (see P. 66), use emergency door opener (see P. 66) to remove washing from machine.

Attention: When attempting to rectify the following faults, the plug must be removed from mains socket, and the water tap turned off.
Should the display show the following error codes: F1, F5 - F8, F0, F II, FC they can be deleted as mentioned below:
-
Turn on main switch
Programm timer to P2°C -
Press button and simultaneously until the display shows "00" (approx. 3 sec)
You can restart the washing machine now.

Attention: If the display shows one of these error codes again, please contact your customer service, carry out emergency draining and use emergency door opener if necessary to remove washing (see P. 66).
Faults possible causes Solving the problem
| drum stationary | ·no electricity supply ·no programme selected ·loading door open | ·plug in another socket check fuse ·select programm (see P. 54 - 55) ·close loading door |
| no spin | ·no spin selected “∅” ·the washing is unevenly distributed | ·select spin from 500 - 1100 rpm ·if the laundry is unevenly distributed, the machine will automatically return to the wash cycle for a short period, until the spin cycle can commence. If this is not possible the programme will end without spinning. → loosen the washing by hand, and select spin programme P7 once more. |
| machine moves, does not stand properly | ·does not stand correct on the fl oor | ·adjust machine properly - see instruction page 52 - 53 |
| little or no detergent enters the machine | ·detergent drawer blocked ·incorrect programme selection | ·clean drawer (see P. 65) ·see programme selection (P. 54 - 55) |
| conditioner in the machine at programme start | ·to much conditioner in compartment III | ·fill to max. - line only |
| conditioner compartment fl ooded | ·intake valve blocked | ·clean detergent drawer and valve (see P. 65) |
| traces of water on fl oor | ·excess lather dripping from machine ·detergent drawer open ·inlet hose leaking ·drain trap fi tted incorrectly | ·correct detergent dosage ·close drawer ·check connection of inlet hose on machine and cold fi II tap. ·see P. 66 |
| washing not cleaned | ·to much or to little detergent ·incorrect programme selection ·incorrect temperature selection ·certain staines remain | ·correct detergent dosage (see P. 63) ·see P. 54 - 55 ·see P. 54 - 55 ·see P. 69 |
| washing is damaged | ·sharp object in drum ·sharp object in clothing ·faulty fabrics | ·check inside drum ·check pockets ·claim from fabric manufacturer |
| powder residues in washing | ·interrupted water supply ·detergent in conditioning drawer ·water is to soft | ·check water supply ·clean detergent drawer (see P. 65) ·add extra rinse cycles or raise water level during rinse cycles (P. 60 - 62) |
| The water is not pumped off | ·the run off system is blocked or the hose has a kink ·the lye pump is clogged | ·check hose and runoff ·clean lye pump (see page 63) |
If your washing machine fails to operate correctly after having carried out the procedures listed above, please contact your customer service.
Important: Before removing a stain with a solvent or similar product test it on an "invisible" point - at the back of the hem - to be sure neither the fabric nor colour are impaired.
Ballpoint and felt pen: Rub out with alcohol, soak up dissolved dyestuff, wash out remaining marks with gall soap.
Beer: Rinse with lukewarm water, then machine-wash.
Blood: Soak in cold water, rub stains out with gall soap, then machine-wash.
Bright specks: Brush out with vinegar water.
Burn marks: Drip vinegar water on stains, allow to act for several hours, then rinse well with clear water.
Butter: Wash in lukewarm soapsuds, on delicate fabrics remove stain with ammonia solution or gall soap.
Coffee/cocoa: Soak in cold water, then wash out with warm (in case of insensitive fabrics with hot) soapy water.
Dampstains and mould: In case of light-coloured cotton or linen fabrics, spread with a paste consisting of calcium carbonate, soap and water, allow to act, wash out well or rub out with gall soap, rinse and then machine-wash.
Egg white: Rinse in cold water, then machine-wash.
Egg yolk: Soak in lukewarm soapsuds, then wash out.
Fat: Wash out with warm soapsuds or gall soap.
Fruit juice: Sprinkle with salt and wash out with warm water or rub out with gall soap, then machine-wash.
Fruit stains: see "Fruit juice"
Grass: Rub out with gall soap, then machine-wash.
Grease: Rub out with cooking oil or margarine, wash out in soapsuds, remove possibly remaining marks with balsam turpentine or gall soap.
Icecream: Remove with lukewarm water or gall soap.
Ink: Sprinkle thickly with salt, shake out after acting, treat with vinegar or gall soap, rinse well and machine-wash.
Iodine: Moisten, then rub out with the cut surface of a raw potato, rinse with cold water, repeat until the stain disappears, then machine-wash.
Lipstick: Wash out with gall soap.
Milk: Rinse with cold water, then machine-wash.
Nail polish: Dissolve with acetone (Be careful: not to be used for acetate or triacetate!), then machine-wash.
Red wine: Sprinkle with salt, allow to act, shake out, then wash or treat with gall soap.
Rust: Drip lemon juice on light-coloured fabrics until stain disappears, rinse well or put fabric in water containing some glycerine, then wash out with soapy water.
Shoe polish: Dissolve with balsam turpentine, then wash out with soapsuds.
Soot marks: Never wash off! At first, blow off the loose soot, then sprinkle with salt, allow to act, and wash out with soapy water or gall soap.
Spinach: Rub off with the cut surface of a raw potato, then machine-wash.
Sweat: Soak in vinegar water, rinse well and machine-wash.
Tar: Rub out with cooking oil or margarine, wash out in soapsuds, remove possibly remaining greasy marks with ammonia solution or gall soap.
Tea: Wash out with soapsuds or gall soap.
Urine: Wash out with soapsuds or rub out with thinned ammonia solution or gall soap.
Wax: Crease fabric several times in order to loosen the wax and scratch off carefully, then iron out with care using blotting paper or tissue paper until the wax has been soaked up completely. Rub out possible remaining marks with ethyl alcohol, then wash out in soapsuds.
Wine: see "Beer"
Yellowed fabrics: Wash with detergent and a handful of salt (does not work well on synthetics).
Colours run / Fading:
Follow the manufacturer's instructions.
HLCC care labelling guide
Washing
Cotton, linnen, modal, viscose, white or colour fast.
Coured cottons, cotton / modal, polyester / cottons and polyester / modal not colourfast
Silks, modal, viscose and synthetic fabrics s.a. polyacryl, polyester and polyamid

Reine Schurwolle
Machine
washable
woollens

cates wash programme

cates wash programme with reduced agitation

and wash only up to 37^ .

wash, dry cleaning only
Bleaching
Bleaching with chlorine possible

bleaching, do not use stain removers containing bleach. Professional cleaning only
Drying
Can be dryed at max. temperature setting

at low temperature setting only

not machine dry.
Dry cleaning

wash, dry cleaning only.

- The machine should not be used to store worn clothing. Damp, worn clothing is liable to mould and staining.
- Flushing problems (e.g. residues in the detergent chamber) may be possible with highly concentrated powder products. In this case the measuring cups (if available) in the detergent packages should be used.
- With some detergents (liquid or powder) foam may develop even in the final spin cycle. This does not impair the rinsing result.
- White detergent residues may be visible, after completion of a wash cycle particularly on dark textiles. This is due to insufficient rinsing. Generally this is the insoluble water softeners in modern phosphate-free detergents.
Remedy: Shake or brush it off, try another detergent or use a liquid detergent.
- Before putting the laundry in the machine check whether there are any metal parts on or in the laundry that could work loose e.g. metal buttons, bra wiring etc. Such parts could work into the machine and cause a rattling noise.
Repairs of this kind cannot be undertaken free of charge, even during the guarantee period.
Operating Instructions
Adding detergents
- Put detergent in correct compartment ensure you use the correct dosage
I = Prewash II = Mainwash III = Fabric conditioner
- Push in the detergent drawer
Prepare for washing
- Open cold water tap fully; Check the drain hose; Turn on main switch
- Open front loading door (see "end of programme") - Put in your laundry - Close front loading door firmly
- Turn programme selector to “*” position
- Wait, until “ 00 “ stops flashing on the digital display unit; Select the programme of your choice
Programme selection
Whites and colour fast cottons · P1 30 - 95^
- Select spin speed
- Choose temperature (see HLCC care labelling guide) using programme selector in area P1
If desired, select additional functions (see p. 55 - 56)
Non colour fast and delicates · P2 - up to 60^ C
- Select spin speed
- Choose temperature (see HLCC care labelling guide) using programme selector in area P2
- For the delicates programme select press button (higher water level)
If desired, select additional functions (see p. 55 - 56)
Hand wash programme · P3 · cold (pre-set)
Max spin speed is automatically reduced to 500 rpm
- Using programme selector in area P3
If desired, select additional functions (see p. 55 - 56)
Woollens · P4 · up to 40^
Max spin speed is automatically reduced to 500 rpm
- Choose temperature (see HLCC care labelling guide) using programme selector in area P4
If desired, select additional functions (see p. 55 - 56)
Silk wash programme · P5 · 30^ (pre-set)
Max spin speed is automatically reduced to 500 rpm
Using programme selector in area P5
If desired, select additional functions (see p. 55 - 56)
Quick wash programme · P6 · cold (pre-set)
Max spin speed is automatically reduced to 500 rpm
Using programme selector in area P6
- If desired select additional functions (see p. 55 - 56)
Approx. 15 sec. will elapse from selecting a programme until the machine starts to wash. A red light is now visible above the * symbol, and the selected programme and temperature are indicated on the digital display.
End of programme
- Turn programme selector to “*” position
- Wait, until " 00 " stops flashing on the digital display unit
- Turn the programme selector to "?" symbol
- Take out your laundry; Turn off main switch; Close the cold water tap