
142388 - Toaster PRINCESS - Free user manual and instructions
Find the device manual for free 142388 PRINCESS in PDF.
| Product type | 4-slice toaster |
| Brand | Princess |
| Model | 142388 |
| Power | 1350-1500 W |
| Voltage | 220-240 V |
| Capacity | 4 slices of bread or 4 croque-monsieur |
| Material | Chrome steel |
| Functions | Stop, Reheat, Defrost |
| Browning selector | Continuously adjustable (left/right) |
| Auto-centering | Yes |
| Toast lift | Manual |
| Dust cover | Yes |
| Included accessories | 2 croque-monsieur grills, 1 pastry holder, 1 microfiber cloth |
| Crumb tray | Removable, at the back |
| Maintenance | Exterior: dry microfiber cloth; tray and accessories: soapy water |
| Safety | Do not immerse, do not use metal objects, unplug before cleaning |
| Spare parts and repairability | Tray, grills, holder, cloth available; repairs by qualified technician |
Frequently Asked Questions - 142388 PRINCESS
User questions about 142388 PRINCESS
0 question about this device. Answer the ones you know or ask your own.
Ask a new question about this device
Download the instructions for your Toaster in PDF format for free! Find your manual 142388 - PRINCESS and take your electronic device back in hand. On this page are published all the documents necessary for the use of your device. 142388 by PRINCESS.
USER MANUAL 142388 PRINCESS
natural_image
Illustration of a PRINCESS 2 grater with four shades of heat and control knobs (no text or symbols)- Gebruiksaanwijzing • User's instructions • Mode d'emploi - Bedienungsanleitung • Instrucciones de uso • Istruzioni per l'uso
• Bruksanvisning • Brugsanvisning • Bruksanvisning
• Käyttöohje • Instruções de uso • المستخدم دليل
CE
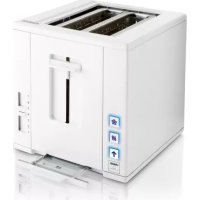
natural_image
Line drawing of a modern toaster with two side grilles and control knobs (no text or symbols)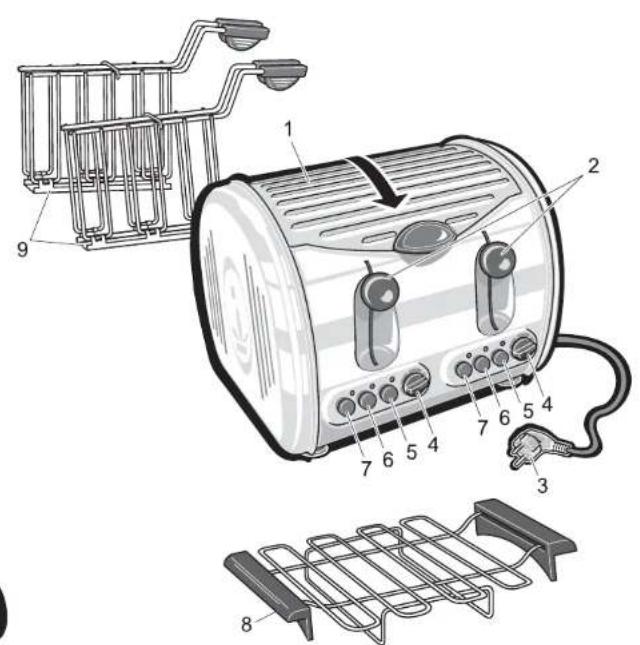

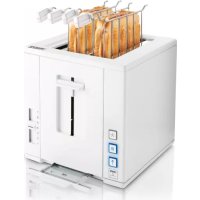
natural_image
Two 3D product diagrams: one of a wire rack with handle, the other of a coiled plate (no text or symbols)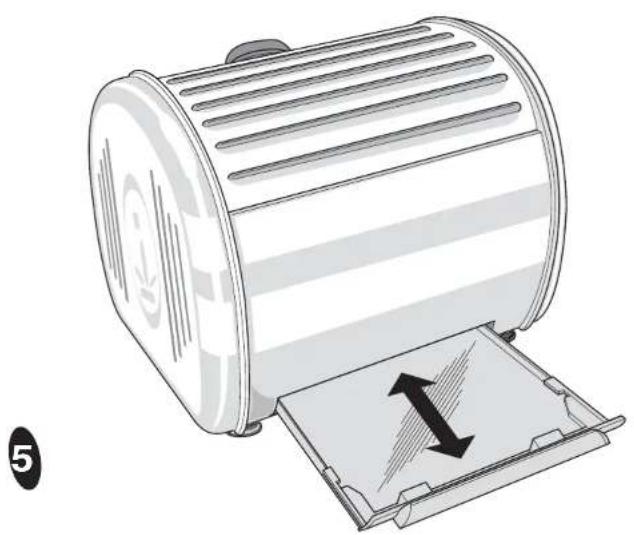
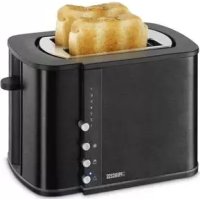
natural_image
Illustration of a mechanical device with a paper feed insert and directional arrow (no text or symbols)1
2

Algemeen
This attractive Princess New Classics 4-slice Toaster is one of the products in our New Classics range, all of which are finished in sturdy chrome-plated steel. The toaster is supplied complete with tosti holders and a rack accessory to toast rolls and French bread.
This sophisticated 1350 -1500 W toaster rapidly toasts slices of bread or tostis for 4 people at the same time, and is very simple to use – making it a boon for the entire family! The rack accessory also enables you to toast rolls or French bread.
In addition, the appliance is equipped with a dustproof cover, stop, reheating and thawing buttons, a browning control, a bread lift, and a centring mechanism. The centring mechanism ensures that slices of bread are always correctly positioned in the slots. Connect the appliance to a 220 - 240 V mains power supply.

Operation and controls
See Figure 1.
The appliance is equipped with the following features:
1 Dustproof cover
2 Bread lift
3 Power cord and plug
4 Browning control (left and right)
5 Thawing button (left and right)
6 Reheating button (left and right)
7 Stop button (left and right)
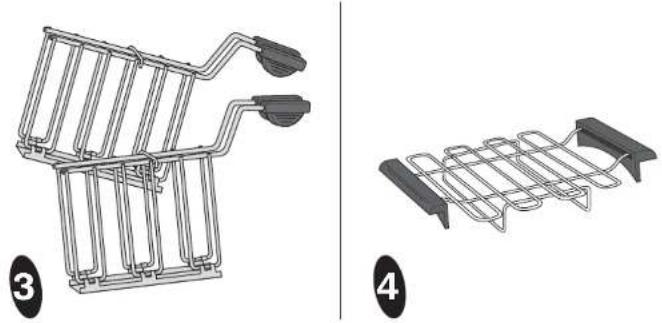
8 Rack accessory for rolls and French bread
9 Tosti holders (2)
A removable crumb tray at the rear of the appliance collects any loose breadcrumbs for easy cleaning.
Before use for the first time
1 Remove all packaging materials before using the appliance for the first time.
2 You can now toast any of the following:
- slices of bread;
- tostis;
- rolls/French bread (using the rack accessory).
Toasting bread
Toast slices of bread by dropping them into the slots and switching on the appliance.

- Do not force the slices into the slots; they could become stuck. Slices of bread that are too high for the appliance should be cut to size before toasting. However, slices that are too small will be difficult to remove from the slots.
- You can break off the toasting cycle by pressing the stop button. The appliance will stop toasting, and the bread lift will rise.
1 Put the plug into an earthed wall socket.
2 Open the dustproof cover.
3 Drop the slices in the toaster's slots.
4 Adjust the browning control to the required degree of browning.
5 Press the lever downwards to lower the bread lift and start the toasting. The appliance ensures that the slices are correctly centred in the slots.
6 The appliance will automatically stop toasting, and the bread lift will automatically rise. Remove the toast from the appliance.
7 When you have finished using the toaster remove the plug from the wall socket and allow the appliance to cool. Close the cover.
Adjusting the degree of browning
See Figure 2.
The degree of browning can be varied with the browning control. Turning the control clockwise will yield browner toast:
- with the control in the left position the toast will be just crisp
- with the control in the mid position the toast will be yellowish-gold
- with the control in the right position the toast will be dark-brown.
8 Try different settings to obtain the required result. Always begin with the control in the lowest setting. Bear in mind that the result will depend on the nature of the bread: dry or older bread will toast more rapidly, fresh or deep-frozen bread will require a little more time.
Reheating toast/thawing bread
See Figure 3.
You can use the appliance to reheat cold toast. You can also use it to thaw slices of bread. Follow the instructions under 'Toasting bread' and after step 5 press the reheating or thawing button.
Toasting tostis
Tostis are usually prepared from bread and cheese. If you so wish, you can also add ingredients such as ham, bacon, onion, salami, pineapple, tomato, smoked salmon, etc.
See Figure 4.
1 Put the plug into an earthed wall socket.
2 Open the dustproof cover.
3 Put the tosti in the tosti holder and clamp the grips together.
4 Fit the tosti holder containing the tosti in one of the toaster's slots.
5 Toast the tosti in the normal manner, in accordance with the 'Toasting bread' instructions from step 4 onwards.
Toasting rolls/French bread with the rack accessory
Rolls and French bread that are too wide for the toaster's slots can be toasted using the rack accessory. Fit the rack accessory to the top of the toaster.
See Figure 5.
1 Put the plug into an earthed wall socket.
2 Open the dustproof cover.
3 Fit the rack accessory to the top of the toaster.
4 Lay the rolls/French bread on the rack.
5 Toast the bread in the normal manner (in accordance with the 'Toasting bread' instructions, from step 4 onwards); if so required, turning the rolls/French bread over whilst the toaster is operating will result in more uniform browning.

Maintenance and cleaning
Always clean the appliance and the accessories after each use. This will prevent food residues from baking onto the appliance.

- Make sure no moisture gets into the appliance.
- Do not immerse the appliance in water, or in other liquids. If this happens do not use the appliance any more; for safety reasons, dispose of the appliance.
- Never use corrosive or scouring cleaning agents.
Removing the crumb tray
See Figure 5.
1 Always remove the plug from the wall socket before removing the crumb tray.
2 Allow the appliance to cool.
3 Pull the crumb tray out of the rear of the appliance, and remove any breadcrumbs.
4 Wash the loose parts (crumb tray, tosti holders and rack accessory) with water containing washing-up liquid. Dry with a dry cloth.
5 Clean the exterior of the toaster with the special microfibre cloth supplied with the appliance. Do not moisten the cloth.
6 Return the crumb tray to the appliance.
7 Close the cover, and store the appliance in a safe place.

Safety
General
- Please read these instructions carefully and retain them for reference.
- Use this appliance only in accordance with the instructions.
- This appliance is intended solely for domestic use.
- Keep the appliance out of the reach of children, and of persons who may not be able to operate it safely.
- Have the appliance repaired only by a qualified electrician. Never try to repair the appliance yourself.
Electricity and heat
- Verify that the mains voltage is the same as that indicated on the type plate on the appliance before use.
- Plug the appliance into an earthed wall socket.
• Always remove the plug from the socket when the appliance is not in use.
- Always remove the plug from the wall socket by pulling on the plug, not the power cord.
- Check the appliance's power cord regularly to make sure it is not damaged. Do not use the appliance if the power cord is damaged. Have a damaged power cord replaced by a qualified electrician.
- Make sure that the appliance and the power cord do not come in contact with sources of heat, such as a hot hob or naked flame.
- Make sure that the appliance, the power cord and plug do not come in contact with water.
- Take care when touching the toaster and the accessories. Allow the appliance to cool down first. The toaster and the accessories will become hot whilst the appliance is in use. The toaster's housing will also become hot, since the housing is an excellent conductor of heat.
- The appliance needs space to allow heat to escape, thereby preventing the risk of fire. Make sure that the appliance has sufficient space around it, and does not come in contact with flammable material. The appliance must not be covered.
During use
- Never use the appliance outdoors.
- Place the appliance on a flat, stable surface where it cannot fall.
- Never allow the power cord to hang over the edge of the draining board, worktop or table.
-
Make sure that your hands are dry before touching the appliance, power cord or plug.
-
Never use the appliance in a humid room.
- Switch off the appliance and remove the plug from the wall socket in the event of a malfunction during use, and before cleaning the appliance, fitting or removing an accessory, or storing the appliance after use.
- Never use the appliance with the cover closed.
- Make sure that the appliance is outside the reach of children. The toaster and the accessories can become hot whilst the appliance is in use.
- Never remove jammed toast with a knife or other sharp object. Always remove the plug from the wall socket before removing jammed toast.
- Do not pick up the appliance if it falls into water. Remove the plug from the wall socket immediately. Do not use the appliance any more.
- Clean the appliance thoroughly after use (see the ‘Cleaning and maintenance’ Section).
U.K. WIRING INSTRUCTIONS
The wires in the mains lead are coloured in accordance with the following code:
As the colours of the wire in the mains lead of this appliance may not correspond with the colour markings identifying the terminals on your plug, proceed as follows:
- The wire which is coloured BLUE must be connected to the terminal which is marked with the letter N or coloured black.
- The wire which is coloured BROWN must be connected to the terminal
which is marked with the letter L or coloured red.
- The wire which is coloured GREEN/YELLOW must be connected to the terminal which is marked with the letter E or (earth symbol) and is coloured GREEN or GREEN/YELLOW
WARNING: THIS APPLIANCE MUST BE EARTHED


The Environment
Dispose of packaging material, such as plastic and boxes, in the appropriate waste containers.

When it reaches the end of its useful life the appliance must be disposed of in a responsible manner. Contact your municipal council or refuse-disposal agency for disposal instructions. You can also hand in the appliance to the retailer.

Généralités

- Algemeen
- Operation and controls
- Before use for the first time
- Toasting bread
- Adjusting the degree of browning
- Reheating toast/thawing bread
- Toasting tostis
- Toasting rolls/French bread with the rack accessory
- Maintenance and cleaning
- Removing the crumb tray
- Safety
- General
- Electricity and heat
- During use
- U.K. WIRING INSTRUCTIONS
- The Environment
- Généralités
Brand : PRINCESS
Model : 142388
Category : Toaster