NetPower 502 AV - Network card / adapter ATLANTIS-LAND - Free user manual and instructions
Find the device manual for free NetPower 502 AV ATLANTIS-LAND in PDF.

| Product Type | HomePlug AV Powerline Adapter |
| Model | NetPower 502 AV (A02-PL502Kit / A02-PL502) |
| Brand | ATLANTIS-LAND |
| Technology | IEEE 1901 / HomePlug AV, up to 500 Mbps |
| Connectivity | 1 x 10/100/1000 Mbps RJ45 Ethernet port |
| Power Supply | Mains plug 96-230 VAC, 50 Hz (directly, no extension cord) |
| LED Indicators | Power (supply), PLC (network link), Ethernet (wired link) |
| Button | SYNC for pairing and reset (10-15s for reset) |
| Security | AES 128-bit encryption, customizable network password |
| Utilities | Configuration software for Windows (2000, XP, Vista) with diagnostic functions |
| Minimum PC Configuration | Pentium III 600 MHz, 256 MB RAM, Ethernet port, CD-ROM drive, .NET Framework |
| Box Content (Kit) | 2 adapters, 2 RJ45 CAT5 cables, quick guide, CD-ROM, warranty leaflet |
| Dimensions (approx.) | Approx. 10 x 6 x 4 cm (not supplied, standard estimate) |
| Weight (approx.) | Approx. 150 g per adapter (estimate) |
| Maintenance and Cleaning | Disconnect before cleaning. Use a dry, lint-free cloth. Do not use solvents. |
| Safety Instructions | Do not open the case (high voltage). Avoid moisture, heat, direct sunlight, magnetic fields. Use directly on wall socket. |
| Spare Parts and Repairability | Not user-serviceable. 2-year warranty. Contact Atlantis support for any defects. |
| Certifications | CE, RoHS, compliance with directives 2004/1008/EC, 2006/95/EC, 2002/95/EC |
| Recycling | Do not dispose of with household waste. Drop off at a recycling center or return to the distributor. |
Frequently Asked Questions - NetPower 502 AV ATLANTIS-LAND
User questions about NetPower 502 AV ATLANTIS-LAND
0 question about this device. Answer the ones you know or ask your own.
Ask a new question about this device
Download the instructions for your Network card / adapter in PDF format for free! Find your manual NetPower 502 AV - ATLANTIS-LAND and take your electronic device back in hand. On this page are published all the documents necessary for the use of your device. NetPower 502 AV by ATLANTIS-LAND.
USER MANUAL NetPower 502 AV ATLANTIS-LAND
PowerLine HD Ethernet Adapter
MultiLanguage Manual
+Power 552P AV & +Power 552P AV Kit
+Power 502 AV &+Power 502 AV Kit
+Power 302 AV & +Power 302 AV Kit
Atlantis
ITALIANO
This product is covered by Atlantis 2 years warranty. For more detailed informations please refer to the web site www.atlantis-land.com.
For more detailed instructions on configuring and using this device, please refer to the online manual.
FRANCAIS
3.1 System Required for Utility 35
- Device Design 36
5.Hardware Installation 38
6.SYNC Button 39
6.1 Application Scenarios 39
- Utility 41
7.1 Opening PKC 500Mbps Utility 42 - APPENDIX A: Frequently Asked Questions 49
- Support 52
FRANCAIS
APPENDIX A: Technical Features 68
A02-PL5(3)O(5)2Kit(v1.0)_MX01 (v1.0 June 2012)
Atlantis
AVVERTENZE
Main
- Diagnostics
- About
Main
Fax: +39.02.78.62.64.39
Website: http://www.atlantis-land.com
Email: info@atlantis-land.com
Atlantis
Copyright Statement
No part of this publication may be reproduced, stored in a retrieval system, or transmitted in any form or by any means, whether electronic, mechanical, photocopying, recording or otherwise without the prior writing of the publisher. Windows™ 98SE/2000/ME/XP/VISTA are trademarks of Microsoft® Corp. Pentium is trademark of Intel. All copyright reserved.
The Atlantis logo is a registered trademark of Atlantis. All other names mentioned may be trademarks or registered trademarks of their respective owners. Subject to change without notice. No liability for technical errors and/or omissions.
CE Mark Warning
In a domestic environment, this product may cause radio interference, in which case the user may be required to take adequate measures.
CE/EMC Restriction of Liability
The product described in this handbook was designed, produced and approved according to the EMC-regulations and is certified to be within EMC limitations. If the product is used in an uncertified PC, the manufacturer undertakes no warranty in respect to the EMC limits. The described product in this handbook was constructed, produced and certified so that the measured values are within EMC limitations. In practice and under special circumstances, it may be possible, that the product may be outside of the given limits if it is used in a PC that is not produced under EMC certification. It is also possible in certain cases and under special circumstances, which the given EMC peak values will become out of tolerance. In these cases, the user himself is responsible for compliance with the EMC limits.
Declaration of Conformity
CE
Hereby we declare that this product is in compliance to all relevant essential requirements of the Electromagnetic Compatibility Directive 2004/1008/CE, Safety (2006/95/CE) and RoHS 2002/95/EC. CE Declaration is available on the web site www.atlantis-land.com.

Important information for the correct recycle/treatment
procedures of this equipment
The crossed-out wheeled bin symbol printed on the unit label or unit packaging indicates that this equipment must not be disposed of as unsorted municipal waste but it should be collected separately.
The waste of electric and electronic equipment must be treated separately, in order to ensure that hazardous materials contained inside the equipment are not buried thereby providing potential future problems for the environment and human health. Moreover, it will be possible to reuse and recycle some parts of the waste of electric and electronic equipment, contributing to reduce the quantities of waste to be disposed of and the depletion of natural resources.
As user of this equipment, you are responsible to return this waste of electronic equipment to an authorised collection facility set up by your Municipality. More detailed information on your nearest collection centre can be obtained from your Municipality or from other competent local entities.
If you are replacing the old equipment with a new equivalent product, the distributor must take-back the old equipment free of charge on a one-to one basis as long as the equipment is of equivalent type and fulfilled the same functions as the supplied equipment.
Your role in participating to the separate collection of waste of electric and electronic equipment is essential to ensure that environmental protection and human health objectives connected to a responsible treatment and recycling activities are achieved.
PS.: The above mentioned information are reported herewith in compliance with Directive 2002/96/CE, which requires a separate collection system and specific treatment and disposal procedures for the waste of electric and electronic equipments (WEEE). For further and more detailed information, we invite you to visit our website at www.atlantis-land.com
Important Safety Instructions
Please read these instructions carefully:
- Unplug the PowerLine HD Ethernet Adapter from the wall outlet before cleaning. Do not use liquid cleaners or aerosol cleaners. Use a damp cloth for cleaning.
- Do not use the PowerLine HD Ethernet Adapter near water.
- The PowerLine HD Ethernet Adapter should never be placed near or over a radiator or heat register, or in a built-in installation unless proper ventilation provided.

Atlantis
- The PowerLine HD Ethernet Adapter should be operated from the type of power indicated on the marking label. If you are not sure of the type of power available, consult your dealer or local power company.
- The PowerLine HD Ethernet Adapter relies on the building's electrical installation for short-circuit (over current) protection. Ensure that a fuse or circuit breaker no larger than 230 VAC is used on the phase conductors (all current-carrying conductors).
- Plug the PowerLine HD Ethernet Adapter directly into a 96-230V AC wall outlet. Do not use an extension cord between the adapter and the AC power source.
- Do not attempt to service the PowerLine HD Ethernet Adapter yourself, as opening or removing covers may expose you to dangerous voltage points or other risks as well as ruin product warranty. Refer all servicing to qualified service personnel.
-
Unplug the PowerLine HD Ethernet Adapter from the wall outlet and refer the product to qualified service personnel for the following conditions:
-
If liquid has been spilled into the product.
- If the product has been exposed to rain or water
- If the product does not operate normally whenthe operating instructions are followed
- If the product exhibits a distinct change in performance

Product warranty does not apply to damage caused lightning, power surges or wrong voltage usage.

Check voltage before connecting to the power supply. Connecting to the wrong voltage will damage the equipment.

High voltage is used in the equipment. Do not open enclosure, service, or change any part of the equipment. Service can only be carried out by qualified technical specialists. Observe safety precautions to avoid electric shock.
Thank You for choosing an Atlantis Product. For more detailed instructions on configuring and using the +Power AV, please refer to this manual.
1. Introduction
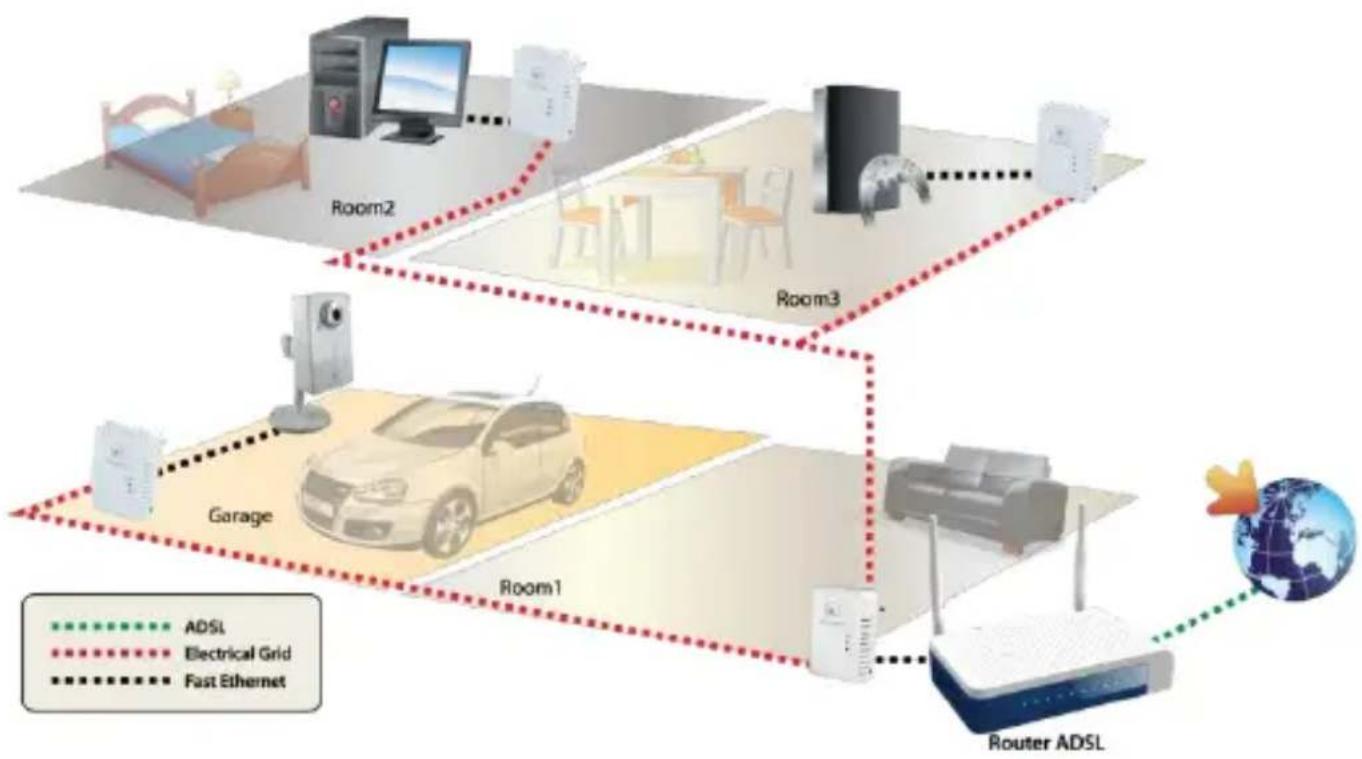
+Power 502 AV utilizes the existing electrical wiring in the house as a path to create a secured network of computers and Ethernet devices. With a maximum data rate of up to 500 Mbps, +Power 502 AV can reliably handle high requirement applications like broadband Internet, high definition video streaming, and Voice over IP.
IEEE1901/HomePlug AV converts digital signals to a complex analog signal that traverses along the electrical wires. When receiving the analog signal, IEEE1901/HomePlug AV converts the analog signal back to digital. To make the signal secured, a 128-bit AES encryption is applied.
A IEEE1901/HomePlug AV device can only communicate with other IEEE1901/HomePlug AV devices that use the same Private Network Name. The Private Network Name can be changed manually using the Utility software on a computer with a Windows operating system. When you use the software, you have to manually type the Private Network Name for the device. Another way to change the Private Network Name is to use the Simple Connect button SYNC (this feature automatically creates an encrypted Private Network Name). It can also be used to reset the Private Network Name or to add a device into an existing IEEE1901/HomePlug AV network.
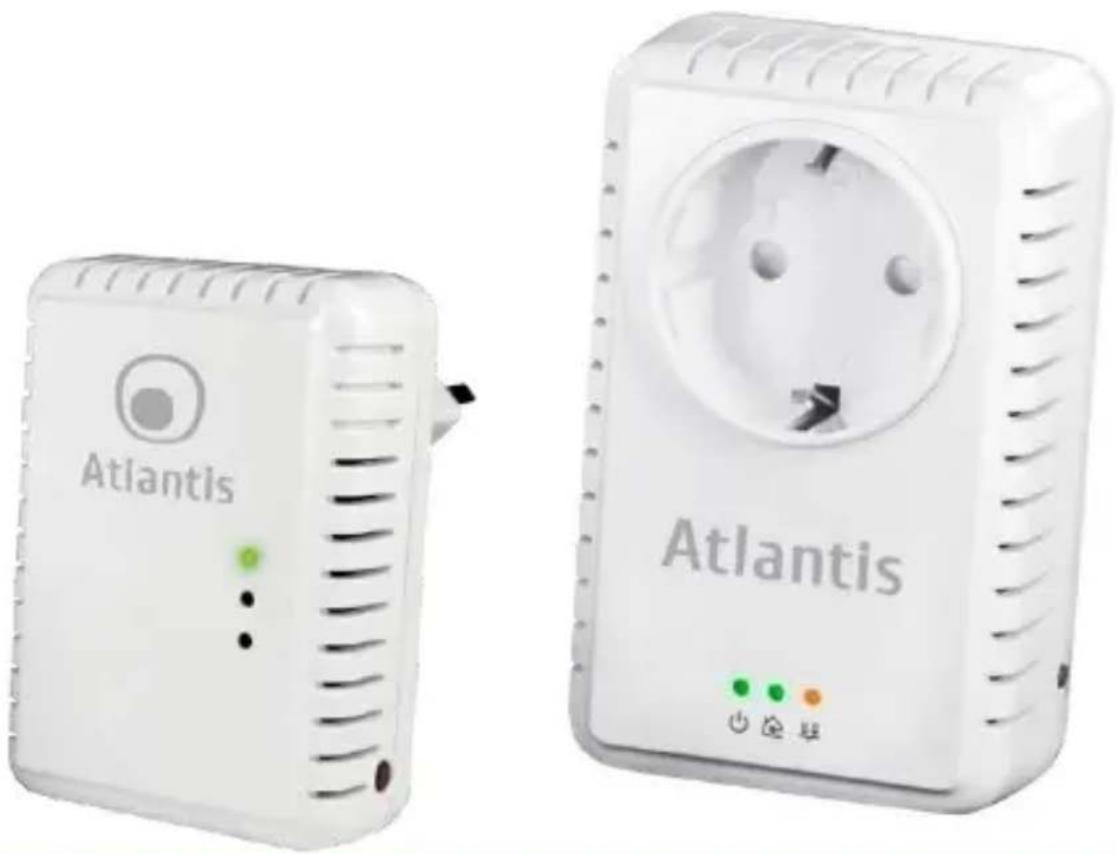
No power outlet goes to waste (due to the integrated electrical socket) and the embedded mains filter ensures the best possible data transmission (+Power 552P AV).
When a IEEE1901/HomePlug AV communicates with another device, the Powerline Activity LED will give you an idea about the status.

+Power 302AV utilizes the existing electrical wiring in the house as a path to create a secured network of computers and Ethernet devices. With a maximum data rate of up to 200 Mbps
2. Package Contents
Open the box of the device and carefully unpack it. The box should contain the following items:
- 2 +Power AV (2 PowerLine HD Ethernet Adapter)
- 2 CAT-5 UTP Straight Ethernet Network cables (RJ45)
1 Quick Start Guide

Atlantis
1 CD-Rom with Utility and Manuals
1 Warranty
If any item is found missing or damaged, please contact your local reseller for replacement.
| The A02-PL502/A02-PLP552 code included just one 500Mbps device and 1 Cat 5E cable. The A02-PL502Kit/A02-PLP552Kit code included two 500Mbps devices and 2 Cat 5E cables. The A02-PL302 code included just one 200Mbps device and 1 Cat 5E cable. The A02-PL302Kit code included two 200Mbps devices and 2 Cat 5E cables. |
3. System Requirements
+Power AV is applicable with all TCP/IP operating systems with Ethernet port. Drivers are not required for this adapter. But the supplied Configuration Utility software to assign the network password operates only with Windows operating systems.
Your computer must meet the following requirements in order to use the PowerLine HD Ethernet Adapter Configuration Utility. Another way to change the Private Network Name is to use the Simple Connect button (SYNC).
3.1 System Required for Utility
Windows 2000, Windows XP or Vista/7 with Ethernet connection
- Pentium III 600 MHz MMX-Compatible PC or greater
- At least 256MB hard disk space and memory
- .NET Framework
| ! | Your computer or the device to which you want to connect the Powerline HD Ethernet Adapter must have an Ethernet port, i.e. a network card or a network adapter. |
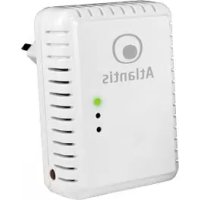
4. Device Design
+Power AV has 3 lights indicator (LEDs), 2 buttons and an Ethernet port:
| LED | MEANING |
| POWER [ ] | Lit when the device is power on. Blinking when the device enters power saving mode. Lit off when power is off. |
| PLC [ ] | Lit when detected and connected with another PowerLine Adapter within the network. • Green: The Powerline connection quality is good • Orange: The Powerline connection quality is fair • Red: The PowerLine connection quality is bad Blinking during data transfer. Lit off when no Powerline Link detected. |
| ETH [ ] | Lit when connected to an Ethernet device. Blinking when data is transmitted or received via Ethernet port. |
| BUTTON | MEANING |
| SYNC | Press for 1-3 seconds to create or join a HomePlug AV network. It also be used to reset the Private Network Name to a random key. Press the Sync Button of device for more 8-10 seconds to make sure that |
| it is detached completely from any possible network group. | |
| RESET | Press this button to for more than 10-15 seconds to reset device to factory default settings. You will see the device's all LEDs are off and restart. The device's setting resets to the "factory defaults". |
| ! | Do not plug the device into a power strip or surge protector because these devices may consist of filter and impair signal. Also avoid plugging the device right next to noisy sources such as cell phone charger, Halogen light, Energy saving bulb, noisy desktop computer vacuum cleaner, etc. Both cases result in poor transmission speed. |
| The “PWR” LED indicator will blink in standby mode. It will automatically get into standby mode, if the Ethernet-link is lost for 60 seconds. If you unplug the Ethernet cable, it will get into standby mode after 60 seconds. Under standby mode, PLC and ETH LEDs will both be off. |
| ! | For a device which already belongs to a network group is to join with a different network group, that device has to be ungrouped from its current attached group first. Press the Sync Button of device A for 8-10 seconds to make sure that it is detached completely from any possible network group. |
| ! | Due to the incompatibility of HomePlug AV 200 with HomePlug 1. devices, the presence of the HomePlug 1.0 devices within the powerline network will thus reduce the performance of your powerline network. |
| ! | No power outlet goes to waste (due to the integrated electrical socket) and the embedded mains filter ensures the best possible data transmission (+Power 552P AV). |
5. Hardware Installation
- Plug the Powerline HD Ethernet Adapter into an AC outlet (Do not plug device into a power strip or surge protector).
- Plug one end of an ETHERNET cable into the Powerline HD Ethernet Adapter and plug the other end to a PC or device.
- Plug the second Powerline HD Ethernet Adapter into an AC outlet (Do not plug device into a power strip or surge protector).
- Option: Now create a secure network by a simply push off the network SYNC button.

IF PLC LED is lit off there is a problem. Please verify the distance, remove strip, and verify the network password.
6. SYNC Button
Sync Button is used to add a HomePlug device to a Powerline network or enable it to join a network by pressing the Sync Button of the device to turn it into Broadcast state or Join state.
There are 3 types of Sync Button trigger states:
- Broadcast State: Enable +Power AV device to provide information for another +Power AV device to join its powerline network group (works even if it is the only device existing within the network group).
- Join State: This allows an ungrouped +Power AV device to join an existing powerline network group.
- Ungroup State: Press the SYNC Button for 8-10 seconds to detach the device from its network group.
6.1 Application Scenarios
Scenario 1: A +Power AV device A wants to form a network group with another +Power AV device B. You can assign whichever device (A or B) to be in the Broadcast State and the other in the Join State.
Example:
- Press the Sync Button of device A for 1 3 seconds to turn it into Broadcast State, you should find the Power LED blinks steadily signifying it is in Broadcast state.
- Press the Sync Button of device B for 1 3 seconds to turn it into Join State, you should find the Power LED blinks steadily signifying it is in Join state.
- Wait for both devices to boot again (all LEDs will turn off and on) and when the PLC LEDs of both devices lit steadily, you will now have these devices being in the same network group.
Scenario 2: A +Power AV device wants to join an existing network group
BC. Device A wants to join a network group "BC" currently consisting of device B and device C. Any devices within the "BC" group can become the "Broadcast State" and device A will be the "Join State".
Example:
- Press the Sync Button of device A for 8-10 seconds to make sure that it is detached completely from any possible network group.
- Press the Sync Button of device B or C of the BC network group for 1 3 seconds to turn it into Broadcast State, you should find the Power LED blinks steadily signifying it is in Broadcast state.
Atlantis
- Press the Sync Button of device A for 1 3 seconds to turn it into Join State, you should find the Power LED blinks steadily signifying it is in Join state.
- Wait for the devices to boot again and when the PLC LEDs of both devices lit steadily, you will now have device A joined with the BC network group.
Scenario 3: A +Power AV device A of network group AD wants to join an existing network group BC. For a device which already belongs to a network group is to join with a different network group, that device has to be ungrouped from its current attached group first.
Example:
- Press the Sync Button of device A for 8-10 seconds to ungroup it from network group AD.
- Then press the Sync Button of device (B or C) of network group BC for 1 3 seconds to turn it to Broadcast State, you should find the Power LED blinks steadily signifying it is in Broadcast state.
- Press the Sync Button of device A again for 1 3 seconds to turn it to Join State, you should find the Power LED blinks steadily signifying it is in Join state.
- Wait for the Sync LED of both devices A and (B or C) lit steadily. Now you will have device A join the network group BC.
7. Utility
Insert the Resource CD that comes with +Power AV into the CD-ROM drive.
Click the Utility button, and then click Run.
In the Run dialog box, type CDRom:\A02-PL502Kit\Utility\ (where D: is your CD-ROM drive), and then click OK.
Follow the instructions on the installation wizard.
Two applications will be installed in your computer: WinPCAP, then PLC 500Mbps Utility will be installed. The installer detects any version of .NET Framework in your computer. If .NET Framework is not installed, a dialog box opens to ask if you would like to install .NET Framework. The .NET Framework will not be installed if the required version is already in your computer.
| Operating System | .NET Framework version to be installed |
| Windows 2000 | .NET Framework 1.1 |
| XP and Vista 32-bit | .NET Framework 2.0 32-bit |
| XP and Vista 64-bit | .NET Framework 2.0 64-bit |
Uninstallation:
- To uninstall the Configuration Utility, go to the Control Panel of your system.
- Open the Add/Remove Programs.
- Select and double click on the PLC 500Mbps Utility in the Add/Remove Programs Properties.
- Follow the on screen instructions to uninstall the Configuration Utility.
Atlantis
7.1 Opening PLC Utility
Two ways to open HomePlug AV Utility:
Right-click the PLC 500Mbps Utility [ ] desktop shortcut and then select Open.
Click the Start button, click Programs, click Atlantis and then click PLC 500Mbps Utility.
The User Interface
The HomePlug AV Utility user interface is divided into tabs. These tabs include:
- Main
- Diagnostics
- About
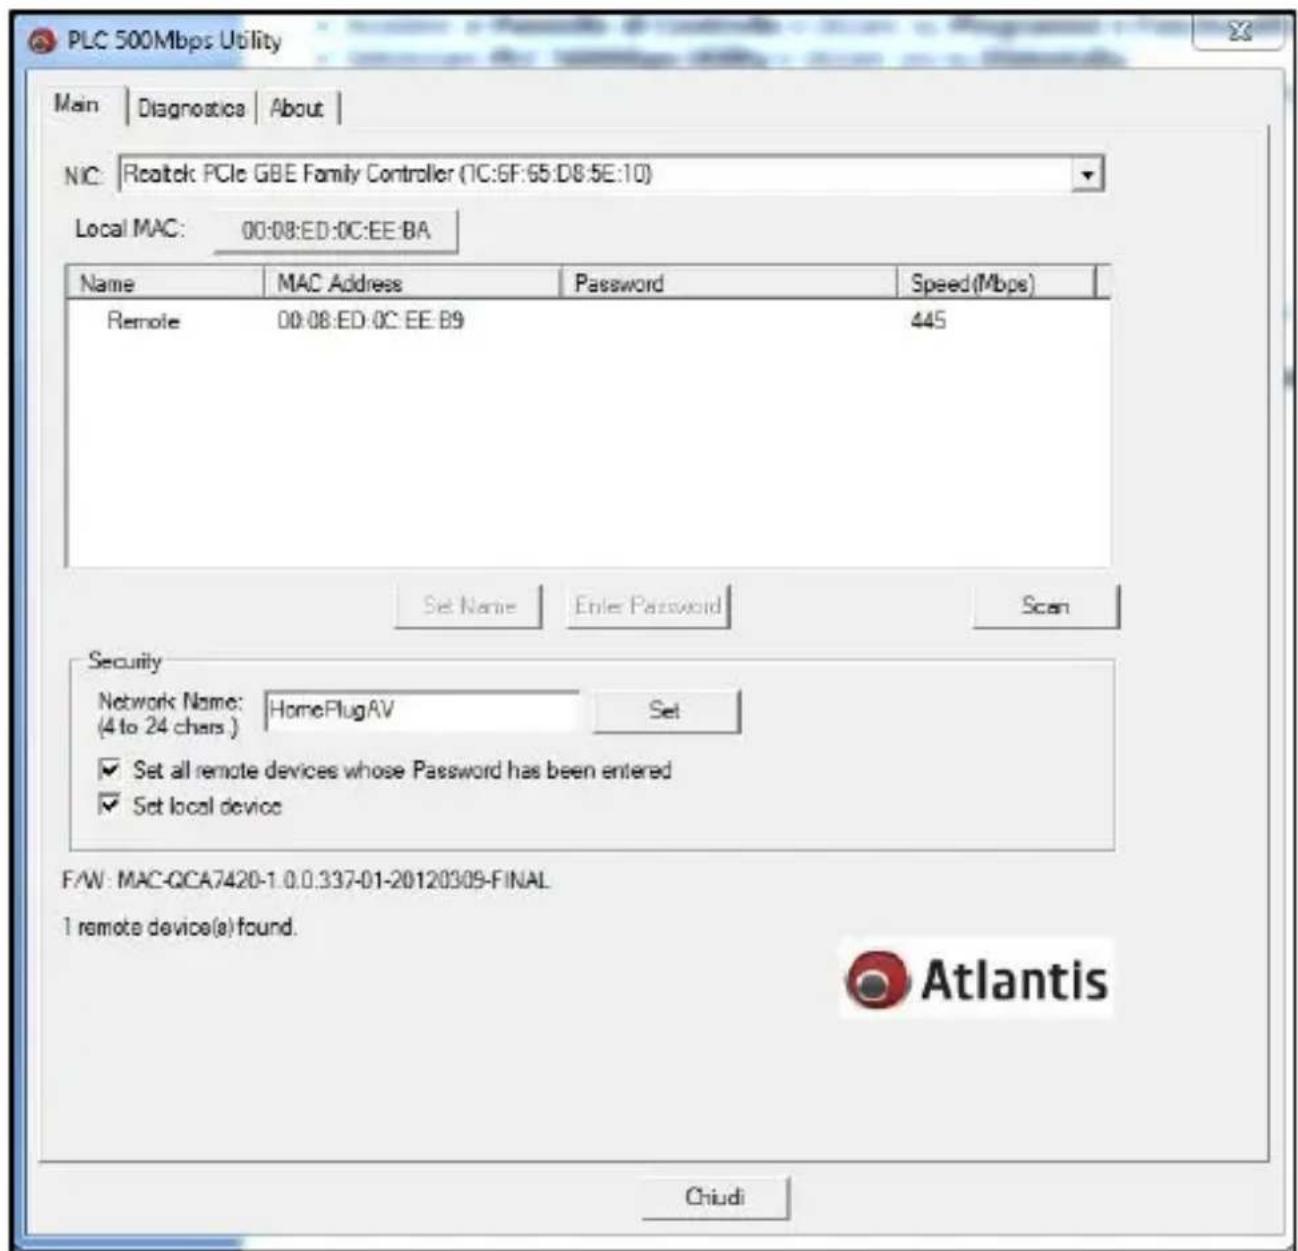
Main
The Main Tab screen lists all the powerline devices that are connected to the host computer when the utility is running.
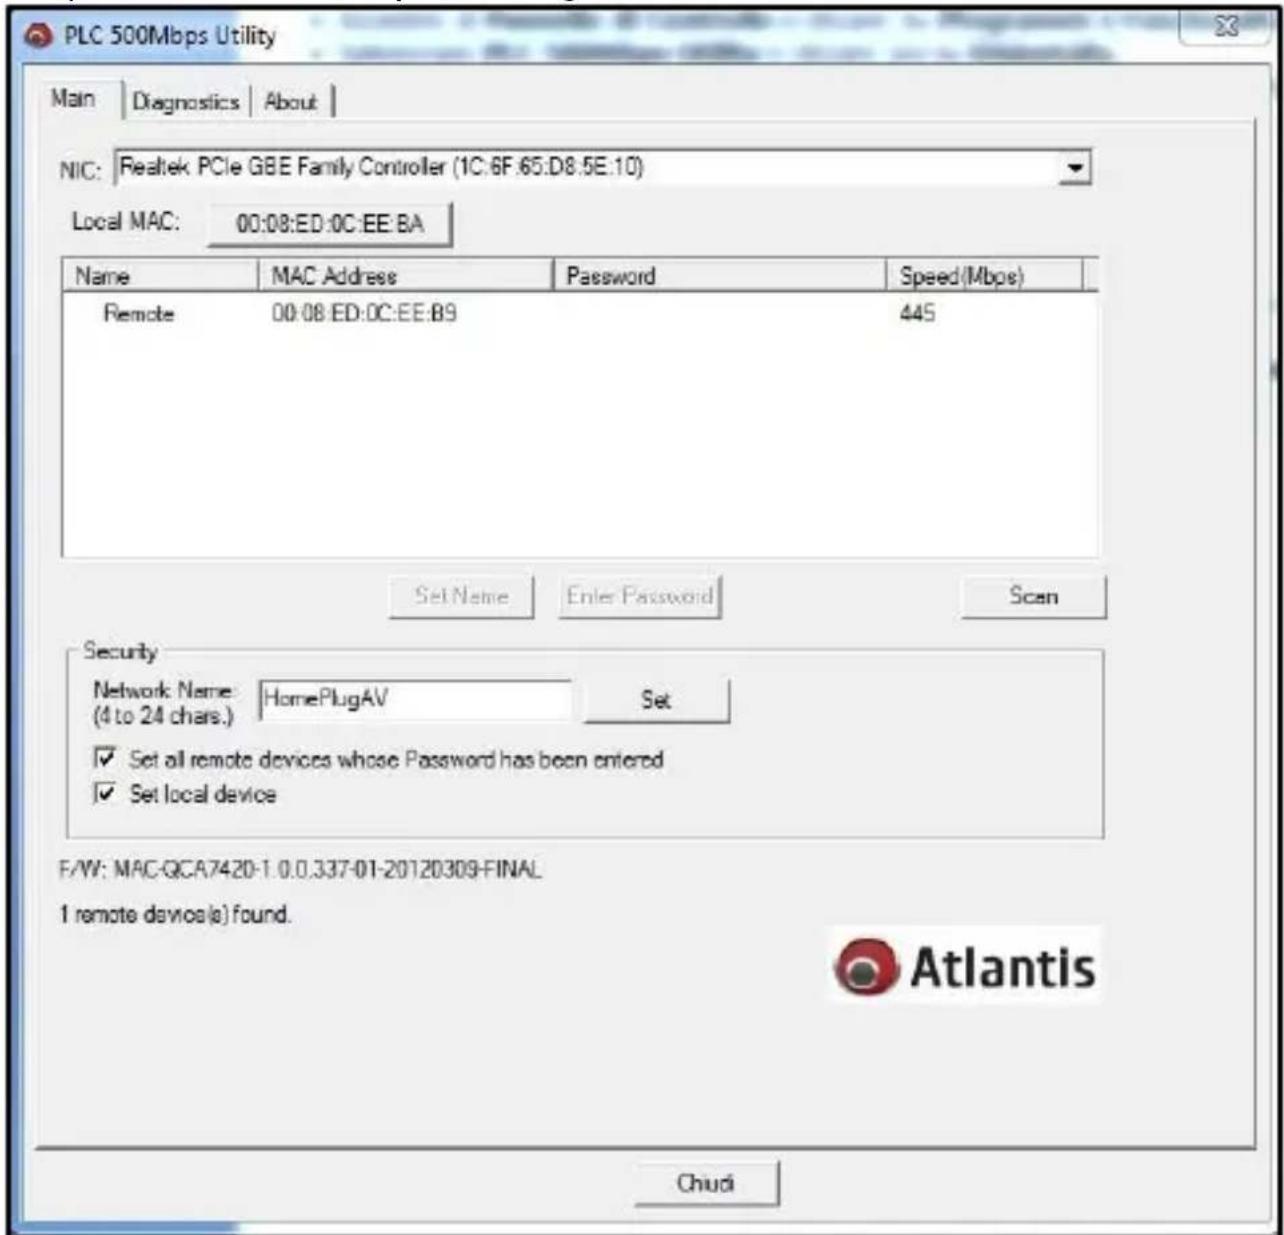
NIC (Network Interface Cards) Selector
First, please select the Network Interface Card (NIC) connected to PLC-Ethernet Bridge device directly.
Local MAC
It shows the local 500Mbps PLC-Ethernet Bridge device directly connected to your computer via Ethernet. The Utility will scan the Powerline network periodically to search for all the 500Mbps PLC-Ethernet Bridge devices, and keep the information updated. You can click this button, and it will show the device's f/w at bottom.
Atlantis
Upper Window
The upper window lists all the remote PLC-Ethernet Bridge devices found in the current logical Powerline networks. This window displays information such as Device Name, MAC Address, Device Password, and Speed (Mbps) for the remote devices. The "Name" column shows the nickname of each remote device inside the Powerline network. The default name is "Remote". You can change it by clicking the item first, and then click the "Set Name" button. It will pop-up "Set Name" dialog box as shown in Figure 2. You can input the new name for the device.
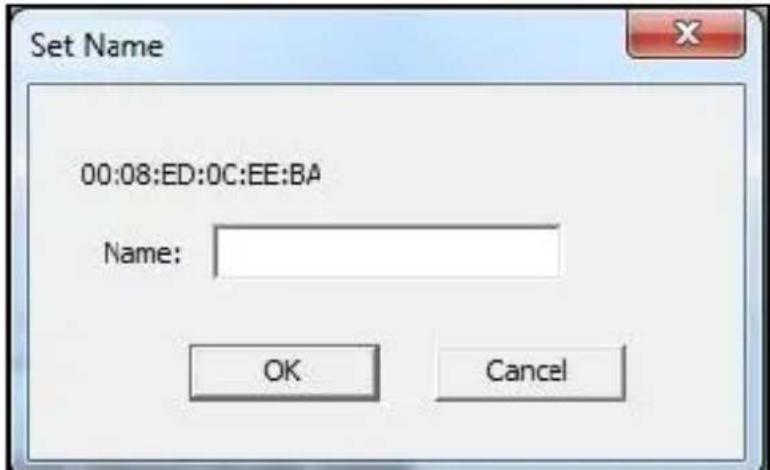
Figure 2: Set Name Dialog
The "MAC Address" column shows remote device's MAC address.
The "Password" column shows remote device's password. You can input the password by clicking the "Enter Password" button.
The "Speed (Mbps)" column shows the remote device's mutual transmit speed with the local device, in Mbps (Million bits per second).
"Enter Password" button
If you want to create a private network, you need to enter the remote device's password first. Please click on the intended device to make it highlighted then click the "Enter Password" button, and the "Enter Password" dialog box will show up (Figure 3). The selected device's MAC address is shown in the dialog box. After entering the password, click "OK" button.

Figure 3: Set Device's Password
| ! | The password of each HomePlug device can be found at the back of the device |
"Scan" button
The "Scan" button is used to search for the 500Mbps PLC-Ethernet Bridge devices connected to your logical network immediately. By default setting, it will automatically scan every 10 seconds and updates the display lists.
"Security"
When rolling out of factory, every 500Mbps PLC-Ethernet Bridge device carries a default logical network name: "HomePlugAV". The "Security" group provides functions to manage this logical network name and create private network.
You can change the local device's network name by check the "Set local device" box. And/Or change the remote device's network name by check the "Set all remote devices whose Password has been entered" box. Please fill in each remote device's password in advance following the instructions in "Enter Password" button.
"Set" button
After input the new "Network Name" and check the options, please click "Set" button to change the network name of selected device. After changed the network name to a new one, all the devices with different network name will no longer be able to communicate or respond to you.
Security
Network Name: (4 to 24 chars.)
prova1

Set all remote devices whose Password has been entered

Set local device

In case you cannot connect into the network after changing the Private Network Name, please power cycle the device. To power cycle, disconnect and then reconnect HomePlug AV from the power outlet.

A Private Network Name is a string of 8 to 24 characters enable HomePlug AV devices to communicate with each other.

When changing the Private Network Name of remote devices, you will need the Device Password that appears on the label pasted on the device. It will be more helpful if you list down the Device ID of your +Power AVs to enable you to remotely change their setting using the Utility software.
Diagnostics
The Diagnostics Tab screen shows System information and a history of all remote devices seen over a period of time.
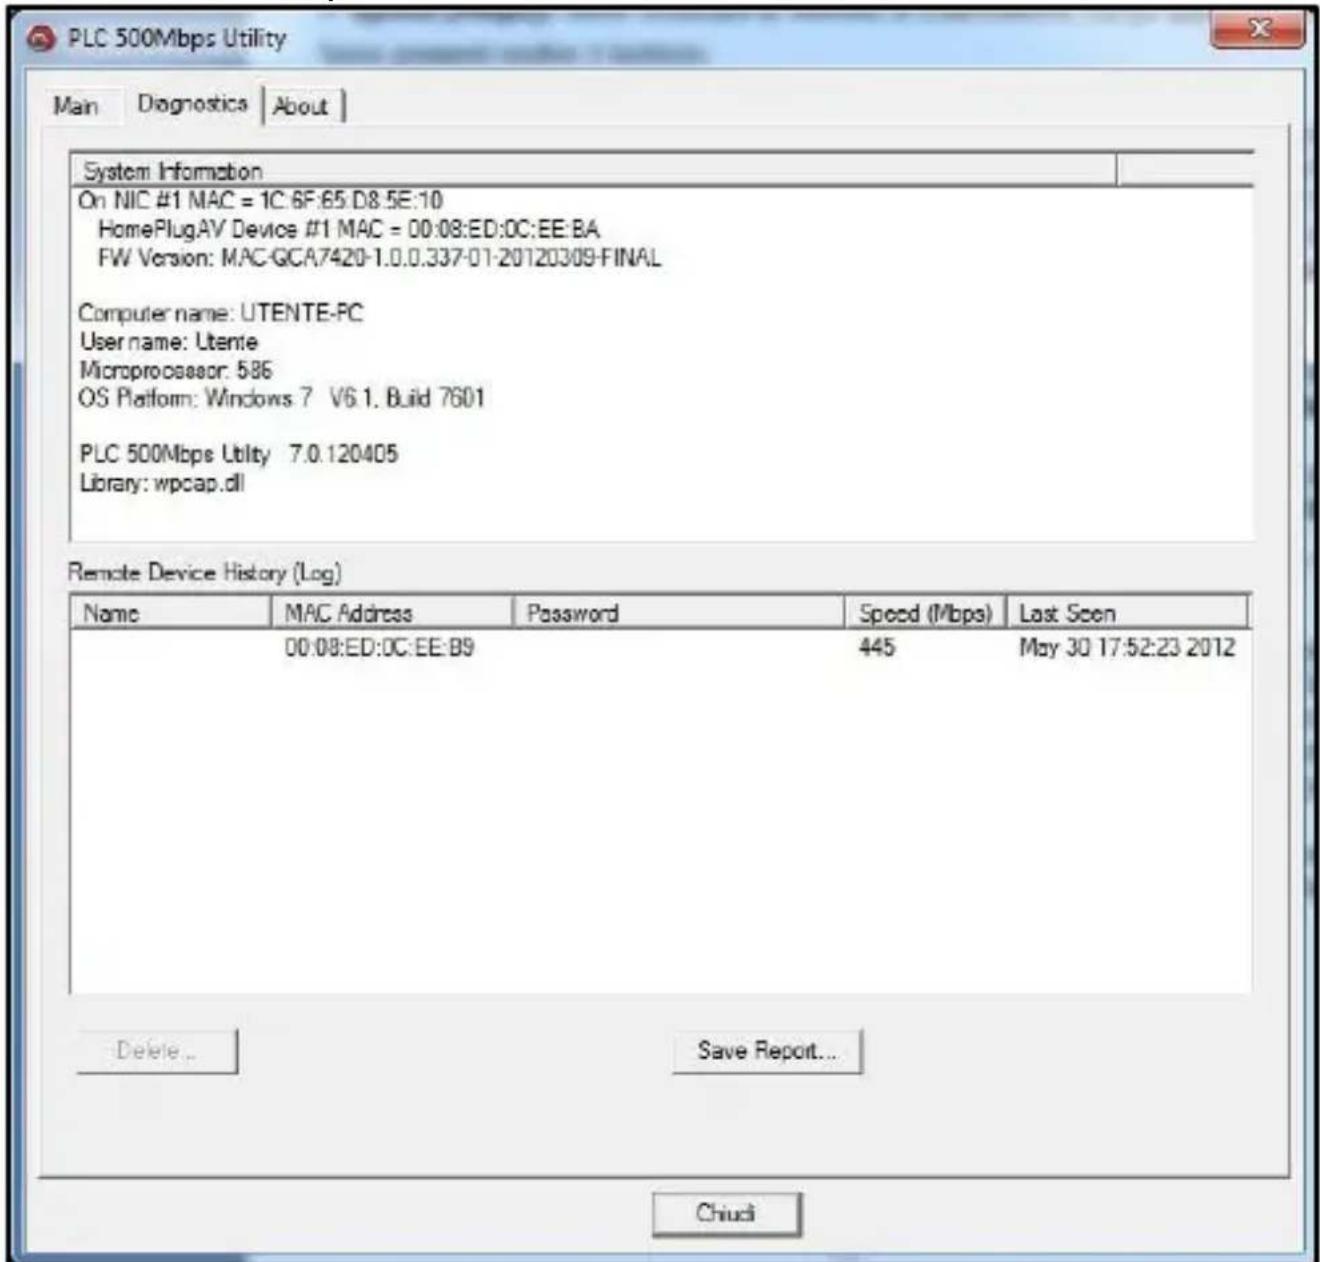
The "Diagnostics" tab shows the system information and the history of all the devices that have been found before (Figure 4).
The upper window of Diagnostics tab shows the host computer's system data and it shows:
- MAC Address of all NICs (network interface card)
- MAC Address and the firmware version of the 500Mbps PLC-Ethernet Bridge device which is connected to each NIC
Computer name - User name
Atlantis
- Processor and operating system information
- Utility program version
- Versions of all the driver DLLs and libraries used
The lower window of Diagnostics tab contains the history of all remote devices which have been found by the computer previously. All the devices will be shown here, regardless of they are currently active or not. The following information is available from the list:
Name
MAC Address
- Password
- Speed(Mbps)
- Last Seen
The diagnostics information displayed on the upper and lower window could be saved to text file or print out by printers. Devices which no longer existed in the network can be deleted using the "Delete..." button.
"Delete..." button
Select the device which is no longer existed in the network by clicking its record first, then click this button to delete the record.
"Save Report..." button
Click this button to save all the device information displayed on the upper and lower window to a text file directly.
About
The About screen shows the software version (1.00f).
8. APPENDIX A: Frequently Asked Questions
Can I use IEEE1901/HomePlug AV with older HomePlug versions?
All IEEE1901/HomePlug AV versions can communicate with each other. HomePlug AV, however, is not backward compatible with HomePlug 1.0 releases. If you will use different versions of HomePlug AV in a single network, you need to use the PLC Utility Utility software to create a Private Network Name for all devices. Unlike the new version of IEEE1901/HomePlug AV, older versions do not feature the Simple Connect button which enables the device to create a common Private Network Name without using the software.
How does HomePlug AV achieve a higher bandwidth than HomePlug Turbo and HomePlug 1.0 devices?
HomePlug AV complies with the HomePlug AV standard. It achieves higher data throughput by using a broader frequency spectrum (2-30 MHz rather than 4-21 MHz), by using a better access method (Time Division Multiple Access rather than Car Sense Multiple Access/Collision Detection), and by using a better processor with greater bitload per Hz. IEEE1901 achieves higher data throughput by using a broader frequency spectrum (2-68 MHz rather than 2-30 MHz used in HomePlug AV).
Can IEEE1901/HomePlug AV be used alongside HomePlug 1.0 devices within the network?
HomePlug 1.0 and HomePlug AV standards can coexist but they will not be able communicate with each other.
Which operating system (OS) is compatible with HomePlug AV?
IEEE1901/HomePlug AV is operating system independent. However, the IEEE1901/HomePlug AV Utility requires a Windows operating system (98SE/ME/2000/XP/Vista/7) with the .NET Framework installed.
How difficult is it to set up a network with IEEE1901/HomePlug AV?
+Power is a plug and play device. Connect it to an Ethernet device, plug it to a wall socket, and it is ready to use. Even the most inexperienced user can set up the network with ease. Installing the PLC Utility software is only needed if you intend to manually change the Private Network Name or view the connection rate.
How many devices do I need to create a HomePlug AV network?
At least two devices are needed to create a HomePlug AV network.
Is HomePlug AV suitable for triple play like the simultaneous use of data, voice, and video applications?
Yes, triple play is supported.
What data transfer rates do I need for high definition TV?
A variety of HDTV resolutions are available. The following are the most common resolutions opposite the required transfer rate:
- 720p,mpeg2: 09-10 Mbps
- 720p,mpeg4: 06-08 Mbps
1080i,mpeg2: 12-15 Mbps
1080i,mpeg4: 08-10 Mbps
Does IEEE1901/HomePlug AV have a security mechanism?
Yes. HomePlug AV uses 128-bit AES encryption.
Are Gigabit Ethernet adapters required for use with IEEE1901/HomePlug AV?
No. Under ideal conditions, IEEE1901/HomePlug AV has a physical gross data rate of up to 500 Mbps. The effective net data rate is somewhat lower. A 100 Mbps Ethernet adapter is therefore adequate in most cases.
Does the technology support multicast video server streams (IP-TV)?
Yes.
Do I need an Automatic Voltage Regulator (AVR) for HomePlug AV?
No. HomePlug AV can operate in an environment using 100-240V.
How many HomePlug AVs can operate in one household?
Up to 8 devices can be used within the household.
What is the maximum range of HomePlug AV?
The maximum range is 300 meters.
If one HomePlug AV is connected to a LAN switch, is it possible for other computers in the switch to communicate with other HomePlug AV devices?
Yes.
Can my neighbors access my HomePlug AV network?
Your electric meter prevents any signal from going outside your household. However, we strongly suggest that you create your own personalized Private Network Name to prevent unauthorized access into your network.
How much is the power consumption of IEEE1901/HomePlug on a 230-volt power supply?
HomePlug AV has a power consumption of 3,96Watts (0.5 W in IDLE mode).
Can I use IEEE1901/HomePlug AV to connect computers located in different floors of the building?
Yes, as long as the electric wires are connected and do not exceed 200/300 meters.
If one IEEE1901/HomePlug AV is connected to a LAN switch, is it possible for other computers in the switch to communicate with other HomePlug AV devices?
Yes.
Can I use IEEE1901/HomePlug AV in an old house with old power supply lines (partly without separated ground wire)?
Yes. However, performance may be affected because of the quality of the wires.
Can I plug IEEE1901/HomePlug AV into a multiple socket switch or do have to plug it directly to the wall socket?
You can plug HomePlug AV into a multiple socket switch. However, we strongly advise to plug it directly to a wall socket to achieve optimal performance.
Do I need electrical grounding for the device?
PLC does not require electrical grounding.
After a blackout, will HomePlug AV switch on automatically?
Yes. If you experience connection issues, unplug the device and plug it back.
9. Support
For technical questions and support, please contact our help-desk by ticket on http://www.atlantis-land.com/ita/supporto.php.
For generic informations, please send an e-mail to info@atlantis-land.com.
For presales informations, please send an e-mail to prevendite@atlantis-land.com.
Atlantis SpA
Via S. Antonio, 8/10
20020 Lainate (MI)
Fax: +39.02.78.62.64.39
Website: http://www.atlantis-land.com
Email: info@atlantis-land.com
Atlantis
Copyright
7.1 Main Tab (Ecran Principal)
APPENDIX A: Technical Features
| Technical Specs | ||
| Model | A02-PL502 | A02-PL552P |
| Standards | IEEE 1901 and HomePlug AV | |
| Chipset | Chipset (PLC): Intellon INT7420® Integrated Single-chip Powerline Network Transceiver | |
| Interface | 1 x Fast Ethernet (LAN) | |
| Pass Through | N/A | YES (Schuko) |
| LED | 3 (Power, PLC, ETH) | |
| SYNC/Reset | Yes(PowerLine)/Yes | |
| Frequency Band | 2Mhz to 68Mhz band (with Mask) | |
| IEEE 1901 and HomePlug AV PHY: | Supports OFDM 4096/1024/256/64/16/8 QAM, QPSK, BPSK and ROBO Modulation Schemes Windowed OFDM with noise mitigation based on patented line synchronization techniques improves data integrity in noisy conditions Dynamic channel adaptation and channel estimation Advanced Turbo Code Forward Error Correction | |
| IEEE 1901 and HomePlug AV MAC: | Priority-based CSMA/CA channel access schemes maximize efficiency and throughput Integrated Quality of Service (QoS) enhancements with programmable packet classification engines and multiple priority queuing Supports IGMP managed multicast sessions | |
| Transmission Rate | PHY Rate: 500Mbps TCP: Up to 90Mbps UDP: Up to 95Mbps | |
| PowerLine Security | Supports "Simple Connect" with Push Button Encryption (128-bit AES Encryption) Rotating NEK (Network Encryption Key) and NMK | |
| QoS | TDMA channel access with Contention-Free and Contention-Based (CSMA/CA) period Channel Adaptation ensures that signal integrity is maintained even under harsh noise environment Four Level prioritized random access method based on contention access and multi-segment | |
| • VLAN/ToS Packet Classifier • Supports IGMP managed multicast session | ||
| Power Outlet | N/A | • Line Voltage: 100 to 240Vac • Line Current: EU 16A • Noise Insertion Filter Loss: up to 35dB at 1Mhz-40Mhz |
| Platform Support | OS Independent with TCP/IP protocol installed | |
| Advanced Features | Simple Connect: Setup network password automatically | |
| Range Coverage | Up to 300meters (PLC) | |
| Nodes | • Up to 8 nodes at home | |
| Certifications | CE (Europe) | |
| Dimensions (mm)/Weight | 68mm x 48mm x 27mm (without Plug) / 71g | 102mm x 64mm x 43mm (without Plug) / 184g |
| Temperature Range | Operation: 0°C ~ 36°C Storage: -10°C ~ 60°C | |
| Humidity | Operating: 30% ~ 75% (non Condensing) Storage: 20% ~ 85% (non Condensing) | |
| Power Consumption | • 4W (full operation) • 0,5W (idle) Support EuP Low Power Directive | |
| Power Supply Specifications | • 100-240Vac, 60/50Hz • Protection: OCP, OVP, SCP | |
| System Requirements | • TCP/IP protocol must be installed on each PC • Web browser, such as Microsoft Internet Explorer 5.0 or later, Netscape Navigator 6.0 or later | |
| Package Contents | • +Power AV (2 PowerLine HD Ethernet Adapter) • 1 CAT-5 UTP Straight Ethernet Network cables (RJ45) • Quick Start Guide (English and Italian) and Warranty • 1 x Warranty Card and 1 x WEEE Card | |
All rights registered
Microsoft and Windows are registered trademarks of Microsoft Corporation
All trade names and marks are registered trademarks of respective companies
Specifications are subjected to change without prior notice. No liability for technical errors and/or omissions
*Performance and Throughput are influenced by many factors (interference, noise, environment
| Technical Specs | |
| Model | A02-PL302 (V1.9) |
| Standards | HomePlug AV |
| Chipset | Chipset (PLC): Intellon INT7420® Integrated Single-chip Powerline Network Transceiver |
| Interface | 1 x Fast Ethernet (LAN) |
| LED | 3 (Power, PLC, ETH) |
| SYNC/Reset | Yes(PowerLine)/Yes |
| Frequency Band | 2Mhz to 30Mhz band (with Mask) |
| IEEE 1901 and HomePlug AV PHY: | Supports OFDM 4096/1024/256/64/16/8 QAM, QPSK, BPSK and ROBO Modulation SchemesWindowed OFDM with noise mitigation based on patented line synchronization techniques improves data integrity in noisy conditionsDynamic channel adaptation and channel estimationAdvanced Turbo Code Forward Error Correction |
| IEEE 1901 and HomePlug AV MAC: | Priority-based CSMA/CA channel access schemes maximize efficiency and throughputIntegrated Quality of Service (QoS) enhancements with programmable packet classification engines and multiple priority queuingSupports IGMP managed multicast sessions |
| Transmission Rate | PHY Rate: 200MbpsTCP: Up to 85MbpsUDP: Up to 85Mbps |
| PowerLine Security | Supports "Simple Connect" with Push Button Encryption (128-bit AES Encryption)Rotating NEK (Network Encryption Key) and NMK |
| QoS | TDMA channel access with Contention-Free and Contention-Based (CSMA/CA) periodChannel Adaptation ensures that signal integrity is maintained even under harsh noise environmentFour Level prioritized random access method based on contention access and multi-segment VLAN/ToS Packet ClassifierSupports IGMP managed multicast session |
| Platform Support | OS Independent with TCP/IP protocol installed |
| Advanced Features | Simple Connect: Setup network password automatically |
| Range Coverage | Up to 300meters (PLC) |
| Nodes | • Up to 8 nodes at home |
| Certifications | CE (Europe) |
| Dimensions (mm)/Weight | 68mm x 48mm x 27mm (without Plug) / 104g |
| Temperature Range | Operation: 0°C ~ 36°C Storage: -10°C ~ 60°C |
| Humidity | Operating: 30% ~ 75% (non Condensing) Storage: 20% ~ 85% (non Condensing) |
| Power Consumption | • 4W (full operation) • 0,5W (idle) Support EuP Low Power Directive |
| Power Supply Specifications | • 100-240Vac, 60/50Hz • Protection: OCP, OVP, SCP |
| System Requirements | • TCP/IP protocol must be installed on each PC • Web browser, such as Microsoft Internet Explorer 5.0 or later, Netscape Navigator 6.0 or later |
| Package Contents | • 2 +Power 302 AV (2 PowerLine HD Ethernet Adapter) • 2 CAT-5 UTP Straight Ethernet Network cables (RJ45) • Quick Start Guide (English and Italian) and Warranty • 1 x Warranty Card and 1 x WEEE Card |

Atlantis
Atlantis SpA
Via S. Antonio, 8/10
20020 Lainate (MI)
info@atlantis-land.com