
BQ 5514 - Barbecue AEG - Free user manual and instructions
Find the device manual for free BQ 5514 AEG in PDF.
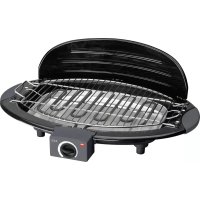


| Product type | Electric barbecue |
| Brand | AEG |
| Model | BQ 5514 |
| Power supply | 230 V ~ 50 Hz |
| Power | 2000 W |
| Net weight | 2.25 kg |
| Cooking surface | Steel grate |
| Water capacity | 2 L (MIN/MAX levels) |
| Thermostat | Yes, with indicator light |
| Safety switch | Yes, prevents operation when not seated in base |
| Wind deflector | Included |
| Reflector | Reflective plate included |
| Dimensions (approx.) | 50 x 30 x 20 cm |
| Protection class | I (with grounding) |
| Use | Moderate outdoor use, do not expose to rain |
| Maintenance | Manual cleaning of parts; do not immerse heating element |
| Warranty | Complies with EC directives |
| Reparability | Contact customer service; no user repair |
Frequently Asked Questions - BQ 5514 AEG
User questions about BQ 5514 AEG
0 question about this device. Answer the ones you know or ask your own.
Ask a new question about this device
Download the instructions for your Barbecue in PDF format for free! Find your manual BQ 5514 - AEG and take your electronic device back in hand. On this page are published all the documents necessary for the use of your device. BQ 5514 by AEG.
USER MANUAL BQ 5514 AEG
Location of Controls.. page 3
User manual. 29
Technical Specifications 31
POLISH
Table of Contents
Beware of Overloads:
General Safety Guidelines
Before using this device, carefully read this user manual and keep it together with the Warranty Certificate, cashier receipt and if possible, the original package inclusive its interior packing. If you hand on the device to any third person, include the user manual as well.
- Use the device for private and its intended purpose only. The device is not intended for commercial use. The device is for limited outdoor use only. Protect it from humidity (do not immerse into liquids under any circumstance) and sharp edges. Do not use the device with wet hands. If the device gets wet, unplug immediately. Always switch off and unplug the device (pull the plug, not the cable) when you do not use the device, or when you attach accessories, during cleaning or malfunctioning.
- Do not leave the device unattended during operation. Always switch off the device when leaving the room. Unplug the device.
- Regularly check the mains cable for signs of damage. Do not continue to operate the device in case the cable is damaged.
- Do not repair the device by yourself. Please contact authorized personnel. In order to avoid hazards, a damaged mains cable must be replaced with an equivalent cable by the manufacturer, our customer service or any other qualified specialist.
- Do only use original parts.
- Please observe the following "Special safety instructions".
Children and disabled persons
- For the safety of your children, keep any packing parts (plastic bags, cardboard, Styrofoam, etc.) out of their reach.

Warning!
Don't let small children play with foils for danger of suffocation!
- This device is not intended for use by persons (including children) with reduced physical, sensory or mental capabilities, or lack of experience and/or knowledge unless they have been given supervision or instructions concerning the use of the device by a person responsible for their safety. Supervise children to ensure they do not play with the device.
Symbols in this user manual
Important notes for your safety are marked distinctively. Pay absolute attention to them to avoid accidents and damage to the device:
Warning:
Warns of dangers for your health and indicates potential risks of injury.
Caution:
Indicates potential dangers for the device or other objects.

Note:
Highlights tips and information for you.
Special security information regarding this device
Danger of burns!
The temperature of touchable surfaces can be very high during operation.
Warning:
Do not use charcoal or similar combustibles with this device.
Caution:
- Keep sufficient safety clearance to flammable objects such as furniture, curtains, etc. Distance to a wall should account for at least 15 cm. Only use the device outdoors if weather conditions are absolutely dry. Never leave the device outdoors after use.
- Do not operate the device with a timer or separate telecontrol system.
- Put the device on a flat, heat resistant surface.
- Allow the device to completely cool down before putting away.
- Do not pour water into hot grease.
Location of Controls
1 Wind deflector 2 Grid 3 Grill base 4 Reflector 5 Heating element with thermostat and temperature control 6 Indicator light 7 Stand support 8 Handle
Unpacking the device
- Unpack the device.
- Remove all packaging materials such as foils, filling material, cable ties and cardboard packaging.
- Check the scope of delivery.
Note:
There might be particles or production remains on the device. We recommend you wipe the enclosure with a damp cloth.
Installation
Please observe the figure.
- Remove the grid (2) and the heating element (5).
- Remove all packaging materials.
- Clean the grid and the reflector (4) with a damp cloth.
- Put the reflector plate into the grill base.
- Pour 2 l of cold water into the grill base, as to cover the plate.
You will find a "MIN" / "MAX" marking inside the grill base on the rear wall.
Caution:
- Fill with water until above the reflector plate. The water bath and the plate will prevent excessive radiated heat near the base of the device. Therefore always barbecue using water and the fitted reflector plate.
- Attach the heating element with the thermostat (5) to the grill base.
Note:
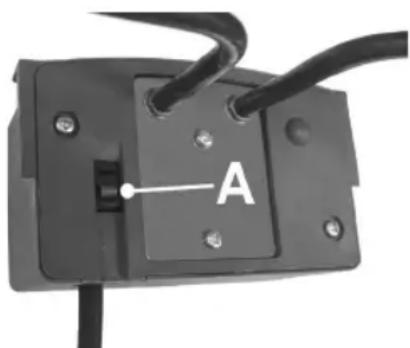
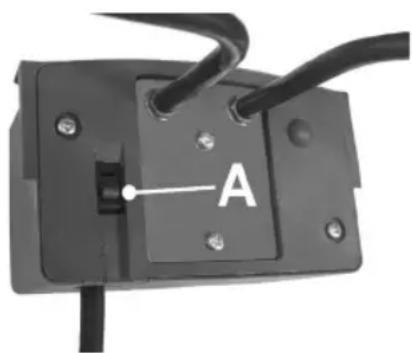
The thermostat is equipped with a safety switch (A). It prevents the operation of the heating element outside of the grill base. Check the correct fitting of the thermostat in the grill base.
Electric installation
- Be sure the voltage of the device (rating plate) is in accordance with the mains voltage.
- Connect the mains plug to a properly installed shockproof socket (230V~50Hz) only.
Connected load
The device is intended for a maximum power intake of 2000 W. This connected load recommends a separate input lead secured with a 16 amp protected switch.
Caution Overload:
When using extension cords, these should have a cable cross-section of at least 1.5 mm². Do not use gang plugs, because the device is too powerful.
The device must be supplied by a residual-current-operated protective device (RCD) with a release current of maximum 30 mA.
Please consult a qualified electrician.
Prior first-time operation
- Operate the device without barbecue for 15 minutes whilst grill base is filled with water.
- Turn the temperature control on the thermostat to the highest position.
- The protective foil on the heating element will be removed.
Note:
Slight formation of smoke is thereby normal. Ensure sufficient ventilation.
Your appliance is now ready for use.
Operating your device
Note:
For efficient heat utilization attach the wind deflector (1).
- Pour 2 l of cold water into the grill base until reaching the "MAX" level.
- Preheat the operable device for about 5 minutes prior use.
- Set the temperature control according to the intended use: Low or middle settings for keeping warm or cooking, highest setting for fast cooking or barbecuing. The indicator light (6) indicates the
operation of the heating.
- Place your grill items directly on the grid. Turn the barbecue from time to time.

Caution:
If the water level falls below the "MIN" marking after long time of barbecuing, please first unplug the device and then add more water, until reaching the "MAX" level.
Do not pour cold water over the hot heating element. It might get damaged.
Switch off:
Turn the temperature control anti-clockwise as far as it will go and unplug the device.
Troubleshooting
The thermostat is equipped with a safety switch (A). It prevents the operation of the heating element outside of the grill base.
If the heating cannot be switched on, please check the mains connection and the correct fitting of the thermostat in the grill base.
Cleaning

Warning:
Always unplug the device and allow the device to cool down before cleaning. Do not under any circumstances immerse the heating element into water for cleaning. Danger of electric shock or fire!

Caution:
Do not use a wire brush or other scratching objects. Do not use acrid or abrasive cleaning agents.
- Remove grid, heating element and reflector from the grill base. Pour out the water from the grill base.
- Clean grid, reflector, wind deflector and grill base manually in a rinsing bath. Use a nylon brush to remove heavy stains.
- Wipe the heating element with a damp cloth.
Attach all parts again.
Technical Specifications
Model: BQ 5514
Voltage supply: 230V, 50Hz
Power input: 2000W
Protection class:
Net weight: 2.25 kg
Specifications are subject to change!
This device complies with all current CE directives, such as electromagnetic compatibility and low voltage directive and is manufactured according to the latest safety regulations.
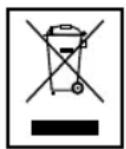
Meaning of the "Wheelie Bin" Symbol
Take care of our environment, do not dispose of electrical appliances via the household waste. Dispose of obsolete or defective electrical appliances via municipal collection points. Please help to avoid potential environmental and health impacts through improper waste disposal. You contribute to recycling and other forms of utilization of old electric and electronic appliances. Your municipality provides you with information about collecting points.
- To avoid damage to the device, let it cool down. Do not use water jets.
Control Panel Description
1 Wind guard 2 Grille 3 Base 4 Reflector plate 5 Heating element with thermostat and temperature regulator 6 Power indicator 7 Stand 8 Handle
Unpacking the Device
- Unpack the device. Remove all packaging material, including the protective film, filling material, and cable ties from the carton.
- Check the device.
Note:
The device may contain parts of the production process. Wipe the device with a damp cloth.
Installation
of the heater.
Remove the grid (2) and the heating element (5). Remove all packaging material. - Clean the grid and the reflector plate (4) with a damp cloth. Insert the reflector plate into the base of the grill. - Pour 2 liters of cold water into the base of the grill up to the level of the surface.
The inside of the grill base has marks "MIN" / "MAX".
Attention:
Pour water above the level of the reflector plate. Water and the plate protect the base of the device from the heat of the heater. Therefore, during operation, always use water and the appropriate reflector plate.
- Attach the heating element with the thermostat (5) to the base of the grill.
Note:
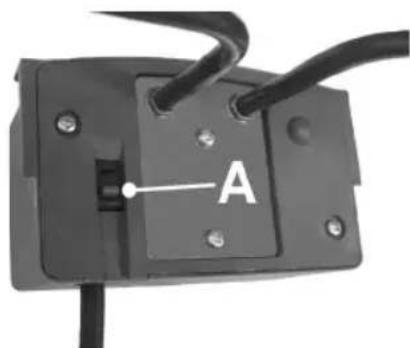
The thermostat is factory set (A). It prevents the heating element from operating without the base of the grill.
Check that the thermostat is correctly installed in the base of the grill.
Installation of electrical connections
- Make sure that the device's power (see table with technical data) matches the mains voltage. - Connect the plug to a suitable socket (230 V, 50 Hz).
Overload protection
Maximum input power of the device is 2000 W. For overload protection, it is recommended to use a separate cable with a cross-section of at least 16 A.
Overload protection:
The main cable must have a cross-section of at least 1.5 mm². Do not use multiple extension cords, as the device is very powerful.
The device must be connected to a socket with a protective earth contact, controlled by a residual current device with a rated current of up to 30 mA.
Contact a qualified electrician for assistance.
Before starting work
- Turn on the device without load for 15 minutes, having previously filled the base with water.
- Turn the thermostat temperature control to the maximum position. The protection against the heating element will be disabled.
44 Ukrainian

Operation:
Normal pressure under the lid. Ensure sufficient ventilation.
The device is ready for use.
Troubleshooting
The thermostat is equipped with a safety switch (A). It prevents the heating element from operating without the base.
If the heating element does not turn on, check the power connection and correct the thermostat connection to the main unit.

Warnings:
Before cleaning, disconnect the device from the mains and let it cool down. Under no circumstances immerse the heating element in water for cleaning. There is a risk of electric shock or fire.

Attention:
Do not use aggressive or abrasive cleaning agents that may damage the device. Do not use sharp or abrasive tools for cleaning.
Remove the grid, heating element, and reflector plate from the main unit. Wash the grid, reflector plate, and main unit in running water. To remove stubborn dirt, use only a soft brush. Wipe the heating element with a damp cloth.
Reassemble all parts.
Technical specifications
Model: BQ 5514 Voltage: 230V, 50Hz Input power: 2000 W Protection class: Net weight: 2.25 kg
Technical specifications are subject to change!
This device has been certified and manufactured in accordance with EU standards, including electromagnetic compatibility and low voltage directives, and is designed in accordance with the latest safety standards.
General safety rules
Before using the device, carefully read this manual.
Keep it, as well as the warranty card, cash receipt, and if possible the original packaging, including its internal elements.
Before using the device, the third person must read this manual.
The device is intended for use only for its intended purpose. The device is not intended for commercial use.
The device may be used only outdoors. Protect it from moisture (do not immerse in liquid) and from splashes. Do not use the device with wet hands. If the device gets wet, unplug it immediately.
- Always turn off the device (pull the plug, not the cord) if the device is not in use, if you are installing additional accessories, as well as during cleaning or in case of malfunction. Do not leave the device unattended during operation. Always turn off the device if you leave the room. Remove the plug from the socket.
- Regularly check the power cord for signs of damage. Stop using the device if the cord is damaged. Do not attempt to repair the device yourself. Contact authorized specialists. To avoid danger, replace damaged cords with equivalent ones from the manufacturer, customer service, or any other qualified specialist.
- Use only original accessories. Follow the additional safety measures described below.
Limited mobility persons
- For child safety, store all packaging elements (plastic bags, cardboard, insulating materials, etc.) out of reach of children.

Attention!
Do not allow small children to play with the film. Danger of suffocation!
This device is not intended for use by persons (including children) with reduced physical, sensory, or mental capabilities, or lack of experience and knowledge, unless they are supervised by a person responsible for their safety or have received instructions on the use of the device. Supervise children to ensure they do not use the device as a toy.
Symbol in this user manual
Important instructions regarding your safety are marked with a symbol. To avoid accidents and damage to the device, pay special attention to them.

Attention:
Warning about danger to health, indicates the possibility of injury.

WARNING:
Danger of injury to persons or damage to property.

Application:
Tips and information.
Additional safety measures for this device

Burn hazard!
The temperature of heated surfaces during operation may be very high.

Caution:
Do not use charcoal or similar combustible materials in this device.

Attention:
It is necessary to maintain a distance from flammable objects such as furniture, curtains, etc.
46 Russian
The distance to the wall must be at least 15 cm.
The device may be used outdoors only in dry weather. Never leave the device outdoors after use.
Do not use the device with a timer switch or with a separate remote control system. - Place the device on a flat, heat-resistant surface. - Before cleaning the device, let it cool down. Do not allow water to get into the switch or the plug.
Arrangement of elements
1 Cover for wind protection 2 Grille 3 Base 4 Reflector 5 Heating element with thermostat and temperature regulator 6 Light indicator 7 Leg 8 Handle
Unpacking the device
- Unpack the device.
- Remove all packaging material: film, padding, cable ties, and cardboard packaging.
- Check completeness.
I Note:
The device may have dust or residues from the production process. It is recommended to wipe the body with a damp cloth.
Installation
Pay attention to the figure.
- Remove the grille (2) and the heating element (5).
- Remove all packaging materials.
- Wipe the grille and reflector (4) with a damp cloth.
- Install the reflector plate into the base. Pour cold water into the base; the water should cover the plate. On the rear wall inside the base there is a marking "MIN" / "MAX".
Note:
Pour water so that it covers the reflector plate. The water and the plate prevent excessive heat dissipation near the base of the device. Therefore, it is absolutely necessary to use water and the installed reflector plate when preparing the grill.
- Install the heating element with thermostat (5) onto the base of the grill.
Principle:
The thermostat is equipped with a safety switch (A). It prevents the heating element from operating when the base of the grill is disconnected.
Check the correct installation of the thermostat on the base of the grill.
Electrical connection
- Make sure that the voltage of the device (nameplate) matches the mains voltage.
- Connect the plug to a properly installed socket with an earthing contact (230 V~50 Hz).
Connected load
The device is designed for a maximum power consumption of 2000 W. For this load, a separate supply line with a safety switch of 16 A is recommended.
Caution: Overload:
If an extension cord is used, it must have a cross-section of at least 1.5 mm². Do not use a multi-outlet plug, as the device has too high a power rating.
The device must be supplied with electricity through a residual current device (RCD) with a tripping current of max. 30 mA.
For a qualified electrician.
Before first use
Let the appliance heat up for 15 minutes without food, with the base covered with water. Set the temperature regulator to the maximum level. This will remove the protective coating from the heating element.
Note:
A small amount of smoke may form. Ensure adequate ventilation.
The appliance is ready for use.
Operation of the appliance
Note:
For more efficient use of the heat, attach the lid to protect from wind (1).
Pour 2 liters of water into the base up to the "MAX" level. Before use, let the appliance heat up for about 5 minutes. Set the temperature regulator according to the desired setting: for surface temperature for cooking dishes, set to low or medium level, for quick cooking or for - maximum level. The light indicator (6) shows the heating process. Place the food for cooking directly on the grill. Turn over from time to time.
Attention:
If after prolonged cooking the water level drops below the "MIN" mark, first disconnect the appliance from the mains, then add water up to the "MAX" level. Do not pour cold water onto the red-hot heating element, as this may damage it.
Switching off:
Turn the temperature regulator counterclockwise to the stop, then disconnect the appliance from the mains.
Troubleshooting
The thermostat is equipped with a safety switch (A). It prevents the heating element from operating when detached from the base.
If the heater does not turn on, check the connection to the mains and the correct installation of the thermostat on the base.
Cleaning
Warning:
Before cleaning, always disconnect the appliance from the power supply. It is forbidden to immerse the heating element in water for cleaning. Danger of electric shock or fire.
Attention:
Do not use wire brushes or sharp objects. Do not use abrasive or corrosive cleaning agents.
- Remove the grill, heating element, and reflector from the base. Pour out the water from the base. Clean the grill, reflector, and windproof cover and the base by hand under running water. Use a soft brush to remove stubborn dirt.
- Wipe the heating element with a slightly damp cloth.
Connect all elements.
48 Russian
Technical specifications
Model: BQ 5514
Power supply: 230V, 50Hz
Power consumption: 2000 W
Class of protection:
Net weight: 2.25 kg
Subject to change without prior notice.
This device complies with all current EU directives, such as electromagnetic compatibility and low voltage; it has been manufactured in accordance with the latest safety regulations.
WARRANTY CARD
Warranty certificate \cdot Warranty card
- POLISH
- TABLE OF CONTENTS
- BEWARE OF OVERLOADS
- GENERAL SAFETY GUIDELINES
- CHILDREN AND DISABLED PERSONS
- WARNING
- SYMBOLS IN THIS USER MANUAL
- CAUTION
- NOTE
- SPECIAL SECURITY INFORMATION REGARDING THIS DEVICE
- DANGER OF BURNS
- LOCATION OF CONTROLS
- UNPACKING THE DEVICE
- INSTALLATION
- ELECTRIC INSTALLATION
- CONNECTED LOAD
- CAUTION OVERLOAD
- PRIOR FIRST-TIME OPERATION
- OPERATING YOUR DEVICE
- TROUBLESHOOTING
- CLEANING
- TECHNICAL SPECIFICATIONS
- MEANING OF THE "WHEELIE BIN" SYMBOL
- CONTROL PANEL DESCRIPTION
- OF THE HEATER
- ATTENTION
- INSTALLATION OF ELECTRICAL CONNECTIONS
- OVERLOAD PROTECTION
- BEFORE STARTING WORK
- UKRAINIAN
- OPERATION
- WARNINGS
- GENERAL SAFETY RULES
- LIMITED MOBILITY PERSONS
- SYMBOL IN THIS USER MANUAL
- APPLICATION
- ADDITIONAL SAFETY MEASURES FOR THIS DEVICE
- BURN HAZARD
- RUSSIAN
- ARRANGEMENT OF ELEMENTS
- I NOTE
- PRINCIPLE
- ELECTRICAL CONNECTION
- CAUTION: OVERLOAD
- BEFORE FIRST USE
- OPERATION OF THE APPLIANCE
- SWITCHING OFF
- WARRANTY CARD
Brand : AEG
Model : BQ 5514
Category : Barbecue