
Personal D250 - USB Drive Ironkey - Free user manual and instructions
Find the device manual for free Personal D250 Ironkey in PDF.
| Product Type | Encrypted USB Drive |
| Brand | Ironkey |
| Model | Personal D250 |
| Power Supply | Via USB port |
| Main Functions | AES-256 hardware encryption, password unlock, virtual keyboard, secure sessions, secure backup |
| Maintenance and Cleaning | Avoid exposure to water and dust. Clean with a dry cloth. |
| Security | AES-256 hardware encryption, automatic lock, brute force attack protection (10 attempts erase), anti-keylogger virtual keyboard |
| Spare Parts and Repairability | Not applicable, sealed product. In case of malfunction, contact support. |
| Compatible Operating Systems | Windows 7/Vista/XP, Mac OS X 10.5+, Linux 2.6+ (x86) |
| Required USB Port | USB 2.0 for high-speed transfer (USB 1.1 compatible) |
Frequently Asked Questions - Personal D250 Ironkey
User questions about Personal D250 Ironkey
0 question about this device. Answer the ones you know or ask your own.
Ask a new question about this device
Download the instructions for your USB Drive in PDF format for free! Find your manual Personal D250 - Ironkey and take your electronic device back in hand. On this page are published all the documents necessary for the use of your device. Personal D250 by Ironkey.
USER MANUAL Personal D250 Ironkey
Imation Personal User Guide

imation
Models: S250, D250
Updated: October 2012

powered by
IRONKEY

Thank you for your interest in Imation Personal - Powered by IronKey™.
Imation's Mobile Security Group is committed to creating and developing the best security technologies and making them simple-to-use and widely available. Years of research and millions of dollars of development have gone into bringing this technology to you.
We are very open to user feedback and would appreciate hearing about your comments, suggestions, and experiences with this product.
Feedback:
securityfeedback@imation.com
User Forum:
https://ik.imationmobilesecurity.com/forum
CONTENTS
Quick Start 4
About my device. 5
How is it different than a regular flash drive? 5
What systems can I use it on? 6
How secure is it? 7
Device Security. 7
Application Security 7
Identity Manager Protection 8
Product specifications. 8
Recommended best practices 9
How do I...? 10
Set up the device. 10
Unlock and lock the device 11
Unlock device 11
Lock device. 12
Type passwords with the Virtual Keyboard 13
Access my device if I forget my password 14
Change my password 14
Access my secure files 15
Encrypt and decrypt files 15
Create a secure backup of my files 15
Restore files to device from backup file 16
Update my device 16
Reformat my device 17
Use my device on Linux 17
Setup up the device 17
Use the Unlocker 17
Find information about my device 19
View device information 19
Determine the storage space available on the device. 20
Use onboard applications 20
Browse the web with onboard Firefox. 20
Open a secure browsing session. 20
Edit the Applications List 21
Restore onboard applications 22
Import digital certificates 22
Use Identity Manager 23
Add accounts and passwords 24
Log into an account automatically 25
Edit and delete accounts and logins 25
Lock down accounts with VeriSign VIP 25
Back up and restore my Identity Manager data. 25
Manage my online account settings 25
Change device nickname 26
Manage account settings 26
Where can I get Help? 28
For more information. 28
To contact support 28
I. Plug the device into your computer's USB port (Windows XP, Vista, 7, or Mac 10.5+)
2. When the Device Setup window appears, follow the onscreen instructions. If this windows does not appear, open it manually: Windows: Start > My Computer > IronKey Unlocker > IronKey.exe Mac: Finder > IronKey Unlocker > IronKey.app
- During Device Setup, you can create an online account to enable password reset. Enter your email address, click Continue, and follow the instructions in the email you receive.
- When Device Setup is complete, you can move your important files to the "Secure Files" drive and they will be automatically encrypted. Some Windows systems prompt to restart after you first plug in your device. You can safely close that prompt without restarting—no new drivers or software are installed.
Linux Setup
- Plug it into your computer's USB port (Linux 2.6+)
- Run the "ironkey" program from the device's linux folder and follow the onscreen instructions.
「大」sの七トアフ
Imation Personal - Powered by IronKey - is designed to be the world's most secure USB flash drive. Now you can safely carry your files and data with you wherever you go.
How is it different than a regular flash drive?
Hardware Encryption
Inside your device is the limation Cryptochip, which protects your data to the same level as highly classified government information. This security technology is always on and cannot be disabled.
Password-Protected
To access your secure data, you unlock the device with a password using the Unlocker software that is carried on the device. Do not share your password with anyone. That way, even if your device is lost or stolen, no one else can access your data.
Self-Destruct Sequence
If the Cryptchip detects physical tampering by a hacker, or if 10 consecutive incorrect password attempts have been entered, it initiates a permanent self-destruct sequence that securely erases all onboard data using flash-trash technology—so remember your password.
Anti-Malware Autorun Protection
Your device helps protect you from many of the latest malware threats targeting USB flash drives by detecting and preventing autorun execution of unapproved programs. It can also be unlocked in Read-Only Mode if you suspect the host computer is infected.
Simple Device Management
Your device includes the limation Control Panel, a central management area for accessing your files, editing your preferences, changing your device password, and safely locking your device.
Secure Local Backup and Data Recovery
Securely back up your secure files using the onboard Secure Backup software (Windows only). It allows you to recover your data to a new limation Personal device in case this one is ever lost or stolen.
Stealth Browsing Technology
Surf the web safely and privately through almost any network, even across unsecured wireless hotspots, with Secure Session browsing. You can open a secure session using the onboard Mozilla Firefox web browser.
This security gives you anti-phishing and anti-pharming protection (for example, we do our own DNS checking), as well as enhanced privacy protection (for example your IP address will not be available to other websites and ISPs). You can verify this using a site such as whatismyip.com or ipchicken.com.
Online account
Your online account allows you use some applications and features, such as resetting a password, browsing the web using secure sessions, updating your device software and creating online backups of Identity Manager data. Your online account includes the Security Vault. If your device is ever lost or stolen, you can easily restore your online passwords from this encrypted online backup.
Self-Learning Password Management
Securely store and back up all your online passwords with the IronKey Identity Manager. It allows you to automatically log into your online accounts to avoid keylogging spyware and phishing attacks.
Waterproof and Tamper-Resistant
Designed to survive the extremes, Imation Personal's rugged metal encasing is injected with an epoxy compound that makes it not only tamper-resistant, but waterproof to military specifications (MIL-STD-810F).
What systems can I use it on?
Windows7
WindowsVista
WindowsXP (SP2+)
MacOSX(10.5+)
Linux (2.6 + )
The computer must have a USB 2.0 port for high-speed data transfer. A USB I.1 port or powered hub will also work, but will be slower.
Some applications are available only for specific operating systems:
»Windows Only
Onboard Firefox
- Secure Backup
Virtual Keyboard
- IronKey Identity Manager
- Secure Sessions
Device Updates
Mac Only—Auto-Launch Assistant
How secure is it?
Imation Personal has been designed from the ground up with security in mind. A combination of advanced security technologies are used to ensure that only you can access your data. Additionally, it has been designed to be physically secure, to prevent hardware-level attacks and tampering, as well as to make the device rugged and long-lasting.
The Imation Cryptchip is hardened against physical attacks such as power attacks and bus sniffing. It is physically impossible to tamper with its protected data or reset the password counter. If the Cryptchip detects a physical attack from a hacker, it destroys the encryption keys, making the stored encrypted files inaccessible.
We strive to be very open about the security architecture and technology that we use in designing and building this product. There is no hocus-pocus or handwaving here. We use established cryptographic algorithms, we develop threat models, and we perform security analyses (internal and third party) of our systems all the way through design, development and deployment.
DEVICE SECURITY
Data Encryption Keys
AES key generated by onboard Random Number Generator
AES key generated at initialization time and encrypted with hash of user password
No backdoors: AES key cannot be decrypted without the user password
AES key never leaves the hardware and is not stored in NAND flash
Data Protection
Secure volume does not mount until password is verified in hardware
Password try-counter implemented in tamper-resistant hardware
Once password try-count is exceeded, all data is erased by hardware
Secure box architecture accessible only to firmware to store sensitive data and settings
APPLICATION SECURITY
Device Password Protection
USB command channel encryption to protect device communications
Password-in-memory protection to protect against cold-boot and other attacks
Virtual Keyboard to protect against keyloggers and screenloggers
The device password is hashed using salted SHA-256 before being transmitted to the device firmware over a secure and unique USB channel. It is stored in an extremely inaccessible location in the protected Cryptochip hardware. The hashed password is validated in hardware (there is no "getPassword" function that can retrieve the hashed password), and only after the password is validated is the AES encryption key decrypted. The password try-counter is also implemented in hardware to prevent memory rewind attacks. Typing your password incorrectly too many times initiates a permanent "flash-trash" self-destruct sequence, which is run in hardware rather than using software, ensuring the ultimate protection for your data.
IDENTITY MANAGER PROTECTION
The Identity Manager and your online account work together, allowing you to back up your online passwords to your Online Security Vault. First, you must unlock your device using two-factor authentication. Your passwords are securely stored in a hidden hardware-encrypted area inside the device (not in the file system), being first locally encrypted with 256-bit AES, using randomly generated keys encrypted with a SHA-256 hash of your device password. All of this data is then doubly encrypted with 128-bit or 256-bit AES hardware encryption. This is the strongest password protection we have ever seen in the industry.
When you back up your passwords online, your device performs a complicated public key cryptography handshake with ldration's services using RSA 2048-bit keys. After successful authentication, your encrypted block of password data is securely transmitted over SSL to your encrypted Online Security Vault within one of our highly-secure data facilities.
Product specifications
For details about your device, see "Device Info" in the Control Panel settings.
| Specification Details | |
| Capacity* Up to 64GB, depending on the model | |
| Dimensions 75mm X 19mm X 9mm | |
| Weight 0.8 oz | |
| Waterproof MIL-STD-810F | |
| Operating Temperature 0C, 70C | |
| Operating Shock 16G rms | |
| Hardware Encryption Data: 256-bit AES (CBC Mode)· Hardware: 256-bit AES· Hashing: 256-bit SHA· PKI: 2048-bit RSA | |
| FIPS Certifications See www.imation.com/en-US/Mobile-Security/Certifications for details. | |
| Hardware USB 2.0 (High-Speed) port recommended, USB 1.1 | |
Specification Details
OS Compatibility · Windows XP (SP2+), Windows Vista, Windows 7
Mac OS 10.5+
- Unlocker for Linux (2.6+, x86)
Accessibility Imation Control Panel is designed to be Section 508 compliant. Users
with disabilities have keyboard navigation and screen reader support.
Designed and Assembled in the U.S.A.
Imation Personal devices do not require any software or drivers to be installed.
- Advertised capacity is approximate and not all of it will be available for storage. Some space is required for onboard software.
Recommended best practices
» Create an online account so that you can:
- reset a forgotten device password
back up your Identity Manager passwords
Lock the device
- when not in use
before unplugging it
before the system enters sleep mode
Never unplug the device when the LED is on
Never share your device password
Perform a computer anti-virus scan before setting up the device
How do I...?
Set up the device
The setup process is the same for Windows and Mac systems. For Linux systems, see "Use my device on Linux" on page 17.
I. Plug the Imation device into your computer's USB port. The "Device Setup" screen appears. The setup software runs automatically from a virtual DVD. This screen may not appear if your computer does not allow devices to autorun. You can start it manually by:
- WINDOWS: Double-clicking the "IronKey Unlocker" drive in "My Computer" and launching "IronKey.exe".
-
MAC: Opening the IronKey Unlocker drive in Finder and opening the IronKey application in the IronKey Unlocker folder.
-
Select a default language preference, agree to the end-user license agreement, and then click the "Continue" button.
By default, limation software will use the same language as your computer's operating system.
- Type a device password and confirm it, then click the "Continue" button.
Your password is case-sensitive and must be at least 4 characters long. - Click the "Enable Password Reset" check box if you want to be able to recover your device if you forget your password.
- Type an email address in the "Email for Online Account" box to bind your device to an online account. You must provide an email address to enable Password Reset. Click the "Continue" button.
- A message prompt will appear indicating that an email has been sent to you. Follow the instructions in the email to set up your online account; this includes creating a "secret question".
Your online account is required for some security features, such as resetting a password, browsing the web using secure sessions, updating your device software and creating online backups of Identity Manager data.
- Once you have set up your online account, click OK in the message prompt to proceed with the device setup.
- The device initializes.
During this process, it generates the AES encryption key, creates the file system for the secure volume, and copies secure applications and files to the secure volume.
- When the initialization is complete, the Imation Control Panel appears. Your device is now
ready to protect your data and can be used on a Windows, Mac or Linux computer.
If you want to add or modify the message that displays on the Unlocker screen, see "Create a message that displays in the Unlocker" on page 12.
Unlock and lock the device
UNLOCK DEVICE
The unlock process is the same for Windows and Mac systems. For Linux systems, see "Use my device on Linux" on page 17.
I. Plug in your device and wait for the Unlocker window to appear.
If the Unlocker window does not appear, you can start it manually by:
- WINDOWS: Double-clicking the "IronKey Unlocker" drive in "My Computer" and launching "IronKey.exe".
-
MAC: Opening the IronKey Unlocker drive in Finder and opening the IronKey application in the IronKey Unlocker folder.
NOTE: On a Mac you can install the Auto-Launch Assistant, which automatically opens the Unlocker when you plug in an Imation Personal device. -
Type your device password and click "Unlock". The Imation Control Panel will appear.
-
Optionally, you can click the "Read-Only Mode" checkbox to unlock the device in Read-Only Mode.
- Entering your password correctly (which is verified in hardware) will mount your secure volume with all your secure applications and files.
- Entering the wrong password 10 consecutive times will permanently destroy the device and all your onboard data.
As a security precaution, you must unplug and reinsert the device after every three failed password attempts.
Unlock the device in Read-Only mode
You can unlock your device in a read-only state so that files cannot be edited on your secure flash drive. For example, say that you want to access a file on your device while using an untrusted or unknown computer; unlocking your device in Read-Only Mode will prevent any malware on that machine from infecting your device or modifying your files.
- Plug in your device and launch the Unlocker
2 Click the "Read-Only Mode" checkbox. - Click the "Unlock" button.
You will see a message in the Control Panel that indicates you are in Read-Only Mode.
When you unlock your device in Read-Only Mode, you will remain in Read-Only Mode until you lock your device.
Some features are not available in Read-Only Mode because they require modifying files on your device. Examples of unavailable features include reformatting, restoring applications,
editing files on the Secure Files drive, editing the Applications List, and running onboard Firefox.
To unlock your device in Read-Only Mode on Linux, enter: ironkey --readonly
Create a message that displays in the Unlocker
This feature allows you to create a message that appears on the limation Unlocker window. For example, you can provide contact information so that if you lose your device someone will know how to return it to you.
I. Unlock your device and click the "Settings" button in the menu bar.
2 Click the "Preferences" button in the left sidebar.
3. Enter text in the "Unlock Message" field.
Your message text must fit the space provided (approximately 7 lines and 200 characters).
Automatically launch the Unlocker on a Mac
Installing the Auto-Launch Assistant will automatically open the Imation Unlocker window when you plug in your device on that computer. This feature is only available on a Mac.
I. Unlock your device and click the "Settings" button in the menu bar.
2 On the "Tools" side bar, click the "Install Auto-Launch Assistant" button.
TIP: To uninstall it, click on the "Uninstall Auto-Launch Assistant" button.
LOCK DEVICE
- Click the "Lock" button in the bottom left of the Control Panel to safely lock your device. You can also use the keyboard shortcut: CTRL + L. If you want the device to automatically lock when not in use, see "Set device to automatically lock" on page 12.
NOTE: If you have applications or files open on the Secure Files drive, you might not be able to lock your device (this prevents potential file corruption). Close any open onboard applications and files and retry locking the device.
CAUTION: Once the device is locked, you can safely unplug it. However, do not unplug the device when it is unlocked.
Set device to automatically lock
You can set a device time-out to automatically lock your device after a specified period of inactivity. This will help prevent others from accessing your secure files.
I. Unlock your device and click the "Settings" button in the menu bar.
2 Click the "Preferences" button in the left sidebar.
3. Click the checkbox for auto-locking the device and set the time-out for either 5, 15, 30, 60, 120, or 180 minutes.
If a secure file has been opened, it may not be safe to lock the device; otherwise, you may lose the file changes or corrupt the file. The device will continue to try to lock in this situation, but
will not force the application to quit. You can configure the setting to force the device to lock; however, you risk losing data in any opened and modified files.
IMPORTANT: Forcing a device to lock can result in data loss. If your files have become corrupt from a forced lock procedure or from unplugging the device before locking, you might be able to recover the files by running CHKDSK and using data recovery software.
To run CHKDSK
I. Unlock the device.
2. Use the following keyboard shortcut to bring up the "Run" prompt: WINDOWS LOGO BUTTON + R.
3. Type "CMD" and press ENTER.
4. From the command prompt, type CHKDSK, the Secure files drive letter, and then 1F / R . For example, if the Secure Files drive letter is G, you would enter: CHKDSK G: F/R
- Use data recovery software if necessary in order to recover your files.
TYPE PASSWORDSWITH THE VIRTUAL KEYBOARD

If you are unlocking your device on an unfamiliar computer and are concerned about keylogging and screenlogging spyware, use the Imation Virtual Keyboard. It helps protect your device password by letting you click out letters and numbers. The underlying techniques in the Virtual Keyboard will bypass many trojans, keyloggers, and screenloggers.
You can start the Virtual Keyboard in a couple of ways:
- Click the Virtual Keyboard icon in a password field on the Imation Unlocker or Control Panel. The Virtual Keyboard appears. Alternatively, when the keyboard focus is in a password field you can press CTRL+ALT+V.
2 Click the keys to type your password. Click "Enter" when you are finished.
- You can use the Virtual Keyboard in conjunction with the actual keyboard, so that you type some characters and click some characters.
- You can also optionally click the "Randomize" button to randomize where the keys are located. This helps protect against screenloggers.
NOTE: This feature is available on Windows only and uses a standard QWERTY keyset.
NOTE: When you click a key in the Virtual Keyboard, all of the keys briefly go blank. This feature prevents screenloggers from capturing what you clicked. If you do not want to use this feature, you can disable it in the options menu beside the "Close" button.
Access my device if I forget my password
The Password Reset option allows you to recover your device if you forget your password. Typically, you enable Password Reset during device setup. However, you can enable it after setup as long as you can unlock your device.
To enable Password Reset
I. Plug in your device and launch the Unlocker
2 Click the "Settings" button on the Control Panel menu bar.
3. Click the "Password" button on the left sidebar and click the "Enable Password Reset..." check box.
You must create an online account (if you don't have one already) before you can proceed.
- If you do not have an online account, click "OK" to create one. On the Account sidebar, type an email address for your account and click the "Create Online Account" button.
- A message prompt will appear indicating that an email has been sent to you. Follow the instructions in the email to set up your online account; this includes creating a "secret question".
- Once you have successfully set up your online account, you will be asked if you want to enable the Password Reset option. Click "Yes".
To reset your password if you forget it
I. Plug in your device and launch the Unlocker
2 Click the "Password Help" button.
3. On the Password Help prompt, click the "Reset Password" button. An email will be sent to the email address provided during account setup with instructions on how to proceed.
4. After you complete the instructions in the email message, click the "Continue" button.
5. Type your new password, or use the Virtual Keyboard, and confirm the password in the fields provided, then click the "Change Password" button.
Change my password
It is also good security practice to regularly change your password. However, be especially careful to remember your device password.
I. Unlock your device and click the "Settings" button in the menu bar.
2 Click the "Password" button in the left sidebar.
3. Enter your current password in the field provided.
4. Enter your new password and confirm it in the fields provided.
5. Click the "Change Password" button.
NOTE: If you created a backup with the Secure Backup application, restoring the backup will require you to enter the device password that was used at the time of the back up.
Access my secure files
After unlocking the device, you can access the files securely stored on the device by:
- Clicking the "Files" button (folder icon) in menu bar of the Imation Control Panel.
- WINDOWS: Opening Windows Explorer to the "Secure Files" drive.
- MAC: Opening Finder to the "Secure Files" drive.
TIP: You can also access your files by right-clicking the IronKey icon on the Windows taskbar and clicking "Secure Files".
Encrypt and decrypt files
Everything you store on your Imentation Personal device is encrypted. Since the device has a built-in Cryptochip, all of the encryption and decryption is done for you "on-the-fly", giving you the convenience of working as you normally would with a regular flash drive, while providing strong and "always-on" security.
- Drag a file onto the Secure Files drive to automatically encrypt it.
- Files opened from the Secure Files drive are automatically decrypted as you open them.
Create a secure backup of my files
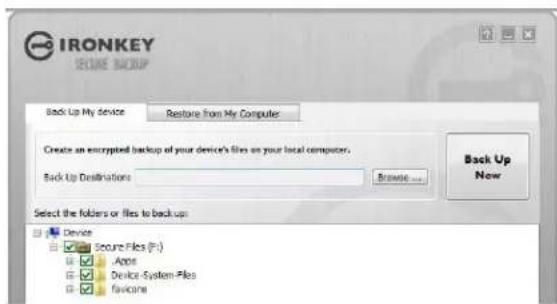
If your device has the Secure Backup application onboard, you can restore an encrypted backup of your data to a new or existing limation Personal device (Windows only, English only).
Secure Backup saves an encrypted backup of some or all of your onboard files to your local computer or network fileshare. You use the same application to restore one or all of your files.
- In the Applications list of the Imentation Control Panel, click the "Secure Backup" button to open the program (Windows only)
The Secure Backup window should appear, displaying the Secure Files drive.
-
Select the files you want to back up.
-
Click the checkboxes next to the files you want to back up.
A green checkmark means all files in this folder and all subFolders will be backed up
A red minus sign means only some of the files in this folder or its sub folders will be backed up
- Type the path to the destination folder for the backed up files or use the Browse button to locate it.
The destination folder can be an existing folder, a new folder, or a separate drive (for example, a network fileshare)
- Click "Backup Now". The files will be encrypted and backed up.
NOTE: While the files are securely encrypted, the filenames are not. To hide the filenames, zip the files you want to back up before you create the backup file.
IMPORTANT: Do not add, alter, or delete the backed up files or you may be prevented from restoring them later.
RESTORE FILES TO DEVICE FROM BACKUP FILE
I. In the Applications list of the Imation Control Panel, click the "Secure Backup" button to open the program (Windows only).
The Secure Backup window should appear, displaying the Secure Files drive.
2 Select the "Restore from My Computer" tab.
3. Select the destination folder you had chosen previously when backing up your data.
-
Make sure to select the folder that contains the backup file, not files or folders within that folder.
-
Select which files/folders to restore and click "Restore Now". Restored files will overwrite existing files of the same name on the Secure Files drive.
NOTE: If the data was backed up from a different limation Personal device, you must use the device password for that device in order to restore the files to another device.
Update my device
You can securely update software and firmware on your device through signed updates that are verified in hardware. Keeping your device up-to-date helps protect you from future malware and online threats.
I. Unlock your device and click the "Settings" button on the menu bar of the limation Control
Panel.
- Click the "Tools" sidebar and in the Updates section, click the "Check for Updates" button.
- If an update is available, click "Download" to install it.
NOTE: You must use a computer running Windows to download software updates.
TIP: You can check for updates automatically each time you unlock your device by clicking the "Automatically check for updates" checkbox.
Reformat my device
Reformatting the Secure Files drive will erase all your secure files and your Application List, but it will not erase your device password and settings.
- Unlock your device and click the "Settings" button in the menu bar.
2 Click the "Reformat Secure Volume" button.
TIP: Back up your data prior to reformatting; otherwise, it will be erased.
Use my device on Linux
You can use your lmatication Personal device on several distributions of Linux (x86 systems only with kernel version 2.6+ ).
SETUP UP THE DEVICE
I. Plug the device into your computer's USB port and run the ironkey program from the device's linux folder.
The device mounts as a virtual DVD.
You must start the Unlocker manually by going to the linux folder and running ironkey.
2 Agree to the license agreement.
Press Q (Quit) to exit or press Y (Yes) to agree to the terms.
- Create a device password.
- Your password is case-sensitive and must be at least 4 characters long.
- The device initializes. During this process, it generates the AES encryption key, and creates the file system for the secure volume.
- When this is complete, your device is ready for use.
USE THE UNLOCKER
Use the Unlocker for Linux to access your files and change your device password on Linux, allowing you to securely transfer files from and between Windows, Mac, and Linux computers.
Depending on your Linux distribution, you might need root privileges to use the program "ironkey" found in the Linux folder of the mounted virtual DVD. If you have only one Imation Personal device attached to the system, run the program from a command shell with no arguments (e.g. ironkey). If you have multiple Imation Personal devices, you must specify which one you want to unlock.
NOTE: ironkey only unlocks the secure volume; it must then be mounted. Many modern Linux distributions do this automatically; if not, run the mount program from the command line, using the device name printed by ironkey.
To change the password of the device named "devicename," enter:
ironkey --changepwd [devicename]
To lock the device named "devicename," enter:
ironkey --lock [devicename]
To unlock the device in Read-Only Mode, enter:
ironkey --readonly
To unlock the device with the password "devicepassword," enter:
ironkey --password [devicepassword]
To lock the device, you must either unmount and physically remove (unplug) it, or else run:
ironkey --lock
Simply unmounting the device does not automatically lock the secure volume.
Please note the following important details for using your device on Linux:
1. Kernel Version must be 2.6 or higher
If you compile your own kernel, you must include the following in it:
DeviceDrivers->SCSIDevicesupport-><*>SCSICDROMSupport
DeviceDrivers-><*> Support for Host-side USB
DeviceDrivers-><*> USB device filesystem
» DeviceDrivers- > < ^ > EHCI HCD (USB 2.0) support
DeviceDrivers->< > UHCI HCD (most Intel and VIA) support
» DeviceDrivers- > < ^ 长 USB Mass Storage Support
The kernels that are included by default in most major distributions already have these features, so if you are using the default kernel that comes with a supported distribution you do not need to take any other action.
Also, on 64-bit linux systems the 32-bit libraries must be installed in order to run the ironkey program. Consult the distribution's help resources for assistance and more information.
2. Mounting problems
Make sure you have permissions to mount external SCSI and USB devices
Some distributions do not mount automatically and require the following command to be run:
mount /dev/
The name of the mounted device varies depending on the distribution. The names of the Imentation Personal devices can be discovered by running:
ironkey --show
3. Permissions
You must have permissions to mount external/usb/flash devices
You must have permissions to run executables off the device's virtual DVD in order to launch the UnlockerYou might need root user permissions
See the Linux folder on the device's virtual DVD for information about how to set up permissions to allow non-root users to access their Imation Personal devices. All of these methods require that the system administrator take (one time) action to enable access; after that, ordinary users can lock, unlock, and change passwords on any Imation Personal devices they plug in.
4. Supported distributions
Not all distributions of Linux are supported. Please visit http://support.imation.com for the latest list of supported distributions.
- The Imation Unlocker for Linux only supports x86 systems at this time.
Find information about my device
VIEW DEVICE INFORMATION
I. Unlock your device and click the "Settings" button in the menu bar.
2 Click the "Device Info" button in the left sidebar.
On this screen you can view details about your device, including:
Model number
Serial number
Software and firmware versions
- Secure files drive letter
- Operating System and system administrative privileges
TIP: You can also click the "Copy" button to copy the device information to the clipboard for pasting in an email, forum posting or support request.
DETERMINE THE STORAGE SPACE AVAILABLE ON THE DEVICE
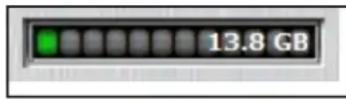
The Capacity Meter at the bottom right of the Control Panel provides current information about how much data storage is available on your device. The green bar graph represents how full
the device is (for example, the meter will be totally green when the device is full), while the white text on the Capacity Meter displays how much free space remains.
Use onboard applications
BROWSE THE WEB WITH ONBOARD FIREFOX
A Firefox web browser is already onboard your device, so none of your cookies, history files, bookmarks, add-ons or online passwords are stored on the local computer. Now you can carry your personalized web experience with you to other computers without worry.
- Click the "Applications" button on the menu bar of the Control Panel, and then click the Mozilla Firefox application.
NOTE: If you have a local version of Firefox running at the same time, you will be prompted to close it.
TIP: You can also open onboard Firefox by right-clicking the IronKey icon in the Windows taskbar and clicking "Secure Browser."
OPEN A SECURE BROWSING SESSION
You must have an online account to open a secure web browsing session. Typically you create an online account during device setup. However, you can also create the account after setup when you enable the Secure Sessions feature.
A secure session creates an encrypted tunnel directly from your device to a secured limation web server, where it is decrypted and sent out to the destination site. You can also view more information about your web traffic and current session.
To enable secure session browsing
I. Plug in your device and launch the Unlocker
2 Click the "Settings" button on the Control Panel menu bar.
3. Click the "Applications" button on the left sidebar and click the "Enable Secure Sessions in onboard Firefox" check box.
You must create an online account (if you don't have one already) before you can proceed.
- If you do not have an online account, click "OK" to create one. On the Account sidebar, type an email address for your account and click the "Create Online Account" button.
- A message prompt will appear indicating that an email has been sent to you. Follow the
instructions in the email to set up your online account; this includes creating a "secret question".
- Once you have successfully set up your online account, you will be asked if you want to enable the Secure Sessions option. Click "Yes".
To open a secure session
I. Start onboard Firefox
- In the bottom right corner of the Firefox window, click the IronKey icon to enable a secure session.
Click the icon again to turn off the secure session.
View network map
The Network Map will show all of your available "circuits" and where in the world your traffic is passing through.
- Right-click the IronKey icon in the Windows taskbar, and click "Secure Sessions", "Network Map".
Monitor bandwidth metrics
The Bandwidth Meter will show your current bandwidth metrics.
- Right-click the IronKey icon in the Windows taskbar, and click "Secure Sessions", "Bandwidth Meter".
Change identities
You can change your apparent online identity to create a new random circuit and change the path of your encrypted web traffic. As you will be coming from a different IP address, it will likely appear to websites that you are a different person.
NOTE: Some sites personalize the content you see based on the geographic location of your IP address. For example, it is common to see sites, such as Google, using different languages during a Secure Session. Changing identities can help.
- Right-click the IronKey icon in the Windows taskbar, and click "Secure Sessions", "Change Identity".
EDIT THE APPLICATIONS LIST
The Applications List is the area where you can quickly launch onboard applications and files. Items in the list are shortcuts to actual files. Managing the items in the list does not alter the actual file.
- Unlock your device. The Control Panel will appear with the Applications List selected by default.
- If the Control Panel is already open, click the "Applications" button in the menu bar to view
the Applications List. Do one of the following:
To add a file or application shortcut—Drag a file from the desktop to the Applications List area to add it to the list.
To add, rename, sort or delete items in the list-right-click anywhere in the Application List and choose the action from the options menu.
To change the way icons appear in the list—right-click anywhere in the Application list and choose, "Large icons", "List", or "Tile".
Some things to know about the Applications List:
You can add any file to the list, including documents, images, and batch files.
For items that are not applications, the operating system opens the item with the default program associated with that file type.
Items that are Windows executables will be hidden from view on the Mac. Similarly, Mac application files will be hidden from view on Windows computers.
RESTORE ONBOARD APPLICATIONS
You can restore your onboard applications if they are ever erased or corrupted (Windows only).
I. Unlock your device, and click the "Settings" button on the menu bar of the Imation Control Panel.
2. Click the "Tools" button in the left sidebar and then, under Device Health, click the "Restore Onboard Apps" button.
Import digital certificates
The Cryptchip includes a limited amount of extremely secure hardware storage space, which you can use to store the private key associated with a digital certificate. This provides you with additional strong authentication capabilities. For example, you could store a self-signed certificate used for internal systems that will allow you to automatically log in when using the onboard Firefox web browser.
The import process uses lmatic's PKCS#I I interface and requires Mozilla Firefox. Note that there is space for five additional private keys in the Cryptochip; these keys will receive the security benefits of the Cryptochip's tamperproof hardware and self-destruct mechanisms.
I. Start onboard Firefox
2 Click the "Firefox" menu, and then click "Options".
3. In the "Options" window, click the "Advanced" icon, and then click the "Encryption" tab.
4. Click the "View Certificates" button to open the Firefox Certificate Manager.
5. IronKey's certificate is available here. To add your own, click the "Import" button.
6. Browse to the PKCS#12-format certificate file and open it.
You will be prompted for the location of the PKCS#12-format certificate file (the file extension is .p12 in UNIX/Linux, .pfx in Windows).
7. A window appears asking you to confirm where to store the certificate. Choose "IronKey PKCS#I I".
8. Enter the password that was used to protect the certificate. If no password was used, simply leave the text field blank.
9. Your certificate is now stored securely in the IronKey Cryptochip and is available for use in the onboard Mozilla Firefox.
NOTE: When deleting certificates, you must restart Firefox for the action to take effect. You cannot delete the IronKey certificate that was pre-packaged with your device.
Use Identity Manager
If Identity Manager is enabled on your device, you can use it to securely store and use important identity credentials, such as login information and one-time passwords to applications and online accounts. You must have an online account to use Identity Manager. Typically, you create the account during device setup. However, you can also create it after setup when you enable the Identity Manager feature.
Identity Manager can automatically launch a specified application, fill in your username and password, and then log you in. It can even generate strong passwords for you, so that you can lock down your important accounts.
Identity Manager also allows you to back up your encrypted Identity Manager data to your Online Security Vault in your online account. The backup synchronizes password data between limation Personal devices and allows you to securely restore all your passwords to a new device if your device is ever lost or stolen. Only you can access and decrypt your passwords.
Identity Manager does not store your passwords in a file on the file system of the flash drive, so malware cannot copy your password database. Also, since your passwords are not typed in this provides added protection from keyloggers and other crimeware.
The Identity Manager works with VeriSign's VIP service to lock down many important online accounts, including eBay, PayPal, AOL, and Geico accounts. This new technology generates a one-time password for each login, locking down your online account so that it can only be used from your device.
See the Help file for detailed information about the benefits of using Identity Manager. To view it, click the Help icon in the top right of the main Identity Manager window.
To enable Identity Manager
I. Plug in your device and launch the Unlocker
2 Click the "Settings" button on the Control Panel menu bar.
3. Click the "Applications" button on the left sidebar and click the "Enable Identity Manager" check box.
You must create an online account (if you don't have one already) before you can proceed.
- If you do not have an online account, click "OK" to create one. On the Account sidebar, type an email address for your account and click the "Create Online Account" button.
- A message prompt will appear indicating that an email has been sent to you. Follow the instructions in the email to set up your online account; this includes creating a "secret question".
- Once you have successfully set up your online account, you will be asked if you want to enable the Identity Manager option. Click "Yes".
To start Identity Manager
- Unlock your device and click the "Applications" button in the menu bar of the Control Panel.
2 Click "Identity Manager".
To modify settings in Identity Manager
- Start Identity Manager and click the "Settings" button in the main Identity Manager window. See the Help file for more information.
ADD ACCOUNTS AND PASSWORDS
You can add accounts to Identity Manager in several ways:
Restore them from your Online Security Vault.
Import them from Firefox, KeePass, RoboForms or Internet Explorer.
» Add them manually using the “Add” button in the main Identity Manager window.
» When on a particular website, select “Add Account” from the Titlebar Menu.
» Use the Identity Manager's built-in self-learning approach to capture your logins by logging into a site as usual. The Identity Manager prompts you to store this password securely on your device.
Generate strong and random passwords
You can create strong random passwords with Identity Manager when you add or edit an account. Once you create the password, Identity Manager can remember them for you.
LOG INTO AN ACCOUNT AUTOMATICALLY
The next time you return to a website or application for which you have stored a password, your login automatically fills in for you. If you have the auto-login option enabled for that account, the Identity Manager also submits the login.
You can also automatically log in by:
Using the IronKey Launcher (Ctrl + Alt + R).
» Using the Titlebar menu in the top right of the application window.
Using the IronKey System Tray Menu.
Clicking the "AUTO" button in the main Identity Manager window.
EDIT AND DELETE ACCOUNTS AND LOGINS
You can manage your Identity Manager accounts from within the main Identity Manager window.
- Unlock your device and Open Identity Manager
2 Double-click the account, or select it and click the "Edit" button.
Your data is automatically saved when you finish making your edits.
LOCK DOWN ACCOUNTSWITH VERISIGN VIP
You can lock down some important online accounts with VeriSign's VIP service so that they can only be accessed using your device. Log into eBay or PayPal, and the Identity Manager will guide you through the rest.
TIP: You can also manually use the VeriSign VIP service for an account by editing the account and selecting VeriSign VIP from the "Additional Authentication" list.
BACK UP AND RESTORE MY IDENTITY MANAGER DATA
You can securely back up your encrypted Identity Manager data to your Online Security Vault. You can synchronize devices (or set up Master-Slave relationships) by restoring backups to your other Imation Personal devices.
To create a backup—Open Identity Manager and click the "Backup" button, then select "Online Backup".
To restore a backup—Open the Identity Manager and click the "Backup" button, then select "Online Restore"
Manage my online account settings
Online accounts are typically created during device setup. You must have an online account to use features, such as resetting a password, browsing the web using secure sessions, updating your device software and creating online backups of Identity Manager data.
Your device supports advanced cryptographic authentication using strong PKI key pairs generated in the Cryptochip. When you log into your online account from your device, it uses these unique keys as your digital identity credentials. This locks down your account so that you must have both your device and your password in order to gain access. In other words, only you can access your online account, even if someone stole your device or password.
To create an online account
- Plug in your device and launch the Unlocker
2 Click the "Settings" button on the Control Panel menu bar. - Click the "Account" button on the left sidebar.
- If you already have an online account with another limation Personal device, type email address used with your account in the box.
- Click the "Create Online Account" check box.
- A message prompt will appear indicating that an email has been sent to you. Follow the instructions in the email to set up your online account; this includes creating a "secret question".
- Once you have finished and have successfully set up your online account, click "OK".
To log on to your online account
I. Unlock your device and click the "Settings" button on the menu bar of the Control Panel.
2. Click the "Account" button in the left sidebar.
3. Click the "Manage Account Settings" button.
CHANGE DEVICE NICKNAME
If you own more than one Imation Personal device, you can create nicknames for each device. Names help you tell the devices apart from each other.
I. Log on to your online account.
2. On the "My IronKeys" tab, click the "Edit" button beside the device whose nickname you want to change.
3. Type a new nickname in the box and click the "Save" button.
MANAGE ACCOUNT SETTINGS
The following table describes some tasks you can perform after you log on to your online account.
Task Description
Review account activity
Click "Account Dashboard" to monitor recent events such as logins, failed password attempts and so on.
| Set up email alerts Click "A" | Account Alerts" to have email alert notices sent to you when specific activities occur, such as an incorrect secret question attempt. You can also sign up to be notified of new limation product announcements. |
| Edit Secret Questions and Answers | Click the "Edit" button to modify your Secret Question responses that you provided during the setup of your online account. You can also edit time zone data. |
| Edit email address Click the | "Edit" button and type the new address in the box. |
Where can I get Help?
For more information
ik.imationmobilesecurity.com/forum Online forum with thousands of users and security experts support.imation.com Support information, knowledgebase and video tutorials securityfeedback@imation.com Product feedback and feature requests www.imation.com/mobilesecurity General information
To contact support
http://support.imation.com
securityts@imation.com
910 E. Hamilton Ave. Suite 410
Campbell, CA 95008 UNITED STATES
Monday - Friday, 6am - 5pm PST
NOTE: lation is not liable for technical or editorial errors and/or omissions contained herein; nor for incidental or consequential damages resulting from the furnishing or use of this material. The information provided herein is subject to change without notice.
The information contained in this document represents the current view of lation on the issue discussed as of the date of publication. lation cannot guarantee the accuracy of any information presented after the date of publication.This document is for information purposes only. lation makes no warranties, expressed or implied, in this document. lation and the lation logo are trademarks of lation Corp.IronKey and the IronKey logo are trademarks of IronKey, Inc. and used under limited license.All other trademarks are the properties of their respective owners.
© 2012 Imation Corp. All rights reserved. IK0989099

はしもに
mount /dev/<name of the device> /media/<mounted device name>
securityfeedback@imation.com
www.imation.com/mobilesecurity
http://support.imation.com
securityts@imation.com
910 E. Hamilton Ave. Suite 410
Campbell, CA 95008 UNITED STATES
太平洋時間 月曜~金曜 6am~5Pm
i
i
Imation 開きの Imation 産売所 SfFteWArN 是 云Rr Aor Ror BnOeD. .
i
Mac 推—Auto-Launch Assistant
Kunstmalmaßnahmen
》図和音也首上头歌有多同人
- 话语的表达方式
ID关利拉吉启
》四歌和音是云,
amho "devicepassword"in Jngi haehao n
ironkey --password [devicepassword]
当将自增之,当将自增之,当将自增之,当将自增之,当将自增之,当将自增之,当将自增之,当将自增之,当将自增之,当将自增之,当将自增之,当将自增之,当将自增之,当将自增之,当将自增之,当将自增之,当将自增之,当将自
ironkey --lock
<|im_start|>assistant <|im_start|>assistant <|im_start|>assistant <|im_start|>assistant <|im_start|>assistant <|im_start|>assistant <|im_start|>assistant <|im_start|>assistant <|im_start|>assistant <|im_start|>assistant <|im_start|>assistant <|im_start|>assistant <|im_start|>assistant <|im_start|>assistant <|im_start|>assistant <|im_start|>assistant <|im_start|>assistant <|im_start|>assistant <|im_start|>assistant <|im_start|>assistant <|im_start|>assistant <|im_start|>assistant <|im_start|>assistant <|im_start|>assistant <|im_start|>assistant <|im_start|>assistant <|im_start|>assistant <|im_start|>assistant <|im_start|>assistant <|im_start|>assistant <|im_start|>assistant <|im_start|>assistant <|im_start|>assistant <|im_start|>assistant
9.지원하나무고자
ik.imationmobilesecurity.com/forum
support.imation.com
securityfeedback@imation.com
www.imation.com/mobilesecurity
http://support.imation.com securityts@imation.com
910 E. Hamilton Ave. Suite 410 Campbell, CA 95008 UNITED STATES 發京日-長京日,六朝6日~六朝5日(PST)
入门
DeviceDrivers-><*> Support for Host-side USB
DeviceDrivers-><*> USB device filesystem
» DeviceDrivers- > < ^ EHCI HCD (USB 2.0) support
DeviceDrivers->< > UHCI HCD (most Intel and VIA) support
DeviceDrivers- > < ^ 长 USB Mass Storage Support
ik.imationmobilesecurity.com/forum
support.imation.com
securityfeedback@imation.com
www.imation.com/mobilesecurity
http://support.imation.com
securityts@imation.com
910 E. Hamilton Ave. Suite 410
Campbell, CA 95008 UNITED STATES
》僅限Mac—Auto-Launch Assistant
建議最佳做法
》請建立一個線上帳號,以方便您:
| ik.imationmobilesecurity.com/forum |
| support.imation.com |
| securityfeedback@imation.com |
| www.imation.com/mobilesecurity |
| http://support.imation.com |
| securityts@imation.com |
| 910 E. Hamilton Ave. Suite 410Campbell, CA 95008 | UNITED STATES |
securityfeedback@imation.com
www.imation.com/mobilesecurity
http://support.imation.com
securityts@imation.com
910 E. Hamilton Ave. Suite 410
Campbell, CA 95008 ESTADOS UNIDOS
De lunes a viernes, de 6:00 a 17:00 (PST)
MISE EN ROUTE
securityfeedback@imation.com
www.imation.com/mobilesecurity
http://support.imation.com
securityts@imation.com
910 E. Hamilton Ave. Suite 410
Campbell, CA 95008 ETATS-UNIS
securityfeedback@imation.com www.imation.com/mobilesecurity
http://support.imation.com
securityts@imation.com
910 E. Hamilton Ave. Suite 410
Campbell, CA 95008 VEREINIGTE STAATEN